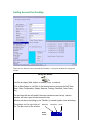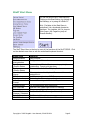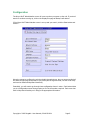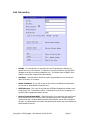
1
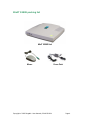
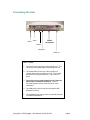
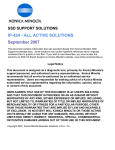
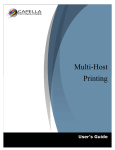
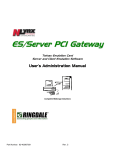
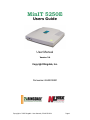
MinIT 5250E Users Guide User Manual Version 2.4 Copyright Ringdale, Inc. Part number: 62-400310001 Copyright 2006 Ringdale User Manual, 62-400310001 Page 1 TABLE OF CONTENTS MinIT 5250E packing list 4 Connecting the Unit 5 Getting Around the Desktop 6 MinIT Start Menu 8 Configuration 9 Unit Information Network Settings Keyboard Settings Configuring 5250 Display Sessions Configuring 5250 Printer Sessions Configure Printer Configure Language Restore Defaults Operation 10 12 13 15 17 19 21 21 22 Using the 122-Key Twinax Style Keyboard PC Style Keyboards Macro Recording and Playback 24 Text Terminal Mode 25 22 23 TO ENABLE TEXT TERMINAL ONLY 26 Display Session Status Print Queue / Session Status Ping Host Linux Command Prompt Process Monitor Set Date/Time Calculator 27 28 29 29 29 30 30 Troubleshooting Guide 31 CHECKLIST MinIT 5250E CONFIGURATION PROBLEMS NETWORK PROBLEMS PROBLEMS AT THE HOST HOST PROBLEMS AT THE HOST PRINTER PROBLEMS Technical Support 31 32 33 35 37 42 43 Copyright 2006 Ringdale User Manual, 62-400310001 Page 2 MinIT 5250E Version 2.0 February 2007 COPYRIGHT Copyright 2007 © Ringdale UK Ltd. All rights reserved. No part of this publication may be reproduced, transmitted, transcribed, stored in a retrieval system, or translated into any language or any computer language, in any form or by any third party, without prior permission of Ringdale UK Limited. DISCLAIMER Ringdale UK Ltd. reserves the right to revise this publication and to make changes from time to time to the contents hereof without obligation to notify any person or organization of such revision or changes. Ringdale UK Ltd. has endeavored to ensure that the information in this publication is correct, but will not accept liability for any error or omission. TRADEMARKS All trademarks are hereby acknowledged. VERSIONS This manual is for MinIT-5250e’s with code version 2.2.17 and higher. Copyright 2006 Ringdale User Manual, 62-400310001 Page 3 MinIT 5250E packing list MinIT 5250E Unit Mouse Copyright 2006 Ringdale User Manual, 62-400310001 Power Pack Page 4 Connecting the Unit Power Video Parallel ( local printer ) Mouse Keyboard Ethernet MinIT Notes: 1. Use only the power supply provided with the unit. The use of any other power supply may damage the unit. 2. The Power Button on the top of the unit will be lit (orange) when there is power to the unit. The unit will not start until you press the button. Then it will turn green. 3. The correct way to power down the unit is from the Start button or the MinIT Root Menu. See the Technical Support section of the manual for more information. 4. The USB ports on the front of the unit support USB Keyboard or Mouse. 5. The headphone jack can be used for powered speakers or amplified headphones. Copyright 2006 Ringdale User Manual, 62-400310001 Page 5 Getting Around the Desktop There are two ways to move around the Desktop – using the keyboard or using the mouse. Using the Mouse Left Click an object (field, button or window) once, to select it. Click on Start Button or Left Click in the desktop area to bring up the MinIT Root Menu (Help, Configuration, Display Sessions, Printing, Calculator, Power Down, etc.) The dark blue title bar will identify the active window across the top. Inactive windows will have a gray title bar across the top. Windows can be moved (drag by the Title Bar) or resized (grab a corner and drag). The buttons on the right side of the Title Bar control the window Minimize Maximize Window Copyright 2006 Ringdale User Manual, 62-400310001 Title Bar Close Page 6 Using the Keyboard Function To get to a particular window To move between fields MinIT Root Menu Keystroke(s) Alt + Tab (hold down the Alt key and hit the tab key until the window you want is highlighted, then release). Tab Alt + Shift +F1 If there is an underlined letter on a button, it is a keyboard shortcut to that button. For example, Hit D when you are Done. Copyright 2006 Ringdale User Manual, 62-400310001 Page 7 MinIT Start Menu You can call up the MinIT Start Menu by Clicking on the Start Button, by clicking on the Desktop, or by using Alt+Shift+F1. Hint: If a letter in the Start Menu is underlined, it is a keyboard shortcut to that item. For instance, hit P to jump to Print Queue. (Hit P again to jump to Process Monitor). The MinIT Start Menu is the key to most of the functions of the MinIT 5250E. Click on the desired menu item or use the underlined keyboard shortcut. Menu Item Getting Started MinIT Administration Print Queue /Session Status Display /Session Status View Keyboard Macros RDP Desktop Ping Host Linux Command Prompt Process Monitor Set Time/Date Calculator Restart Windows Manager / Sessions Reboot Computer POWER Down Function Help overview Configuration of the unit Shows status of Printer Sessions and any print jobs outstanding. Cancel print jobs here. Shows status of all defined Display Sessions. Allows you to see the Keyboard Macros and the number assigned to it. Used for connection to an RDP Server For testing the Ethernet connection to a host For troubleshooting with Technical Support For troubleshooting with Engineering Sets the Clock (lower right corner of Desktop) Brings up a calculator Restarts the MinIT software (partial restart) Full Reboot of the unit Always use this method to turn off the unit. Copyright 2006 Ringdale User Manual, 62-400310001 Page 8 Configuration The NLynx MinIT Administration menu will come up when you power up the unit. If you don’t want it to continue coming up, click on the Display this page at Startup radio button. If the NLynx MinIT Administration menu is not up and you want it, click the Start button and select it. Using the mouse to configure the unit is probably the easiest way, but you can accomplish all the same things using the keyboard if you prefer (tab through the fields, use the cursor keys and use the underlined keyboard shortcuts). Essentially, you will want to go through these configuration items in order. Each button takes you to a configuration screen that prompts you for the information required. Each menu has built-in help that will assist you in filling in the appropriate information. Copyright 2006 Ringdale User Manual, 62-400310001 Page 9 Unit Information Unit No. - The Unit Number is reported to the MinIT Management Software, to identify this unit on the network. It needs to be a unique number for the MinITMan Manager to be able to see and manage the unit. The default value is 99999, which makes it use the last 5 digits of the MAC address. Unit Desc. - Unit Description should be used to help identify the unit, such as the name of the user, or a location. Admin. Password - If you wish to secure this unit from accidental reconfiguration, you can set an Administrative Password here. MinIT.Man port - This is the IP port that the MinITMan Management software uses to talk to the unit. The default is 18901. Change this only if you are changing it on the MinIT.Man management station as well. Boot to Terminal Mode ONLY - Select this option if you want this unit to be forced into a straight text 5250 terminal mode, without access to the x-window desktop. The access to the x-window desktop and the Administration menus will be hidden to the user. An administrator who knows the password can access any of the desktop or administrative functions. Copyright 2006 Ringdale User Manual, 62-400310001 Page 10 Restart MinITMan You will want to hit Restart if you have changed any of the parameters of the unit, so that the new information is reported to the MinITMan manager. Software Update Done Cancel is used to retrieve a Software Update. to exit this menu. to cancel your changes. ? Help button for more information. The help button is used in every menu to provide direct help for the window that you are in. Copyright 2006 Ringdale User Manual, 62-400310001 Page 11 Network Settings The Unit Network Name must be unique in order for DNS servers to be able to identify this unit on the network. Choose Dynamic (DHCP) IP Address if your site uses a DHCP Server to automatically set the unit’s network address, netmask, etc. NOTE: If you use DHCP the unit will obtain the IP Address after a Network Restart. To see the new settings in this window, you must power cycle. Choose Static (Manual) IP Address if you wish to fill in your own network parameters. If you do so, fill in the appropriate information under IP Address, Netmask, Gateway and DNS Server(s). If you made any changes to this page, we recommend that you hit the Network Restart button, in order to make the changes take effect now. Click the Done Click the Cancel Click the ? Help button to exit this window and configure another. button to cancel your changes. button for more information. Copyright 2006 Ringdale User Manual, 62-400310001 Page 12 Keyboard Settings Hit the Select button to choose and / or remap either the • 122-key Twinax Style keyboard (default) • 104-key PC style keyboard The setting should match the type of keyboard that you are connecting to the unit. This is important for correct mapping of the keyboard within the emulation sessions. 104-key PC style keyboard NLynx 122-key Twinax style keyboard If you need to remap any of the keys, the remapping utility will assist you. See Operation for more information about keyboards. Click the Done Click the Cancel Click the ? Help button to exit this window and configure another. button to cancel your changes. button for more information. Copyright 2006 Ringdale User Manual, 62-400310001 Page 13 Setup 5250 Sessions You can configure up to 5 Display sessions and up to 3 printer sessions. If a session has been configured, it will have a name in the field to the right of the button. The next pages will cover the Display Session setup and Printer Session setup. Click the Done Click the Cancel Click the ? Help button when you are finished, in order to save your changes. button to cancel your changes. button for more information. Copyright 2006 Ringdale User Manual, 62-400310001 Page 14 Configuring 5250 Display Sessions Name of the Session - Enter the name of the Session. The name of the session needs to be unique. The AS/400 will not let two sessions have the same name. The name must start with letters and have a maximum of 10 characters. This name will show up on the AS/400. Autostart at Boot – If you want this session to start automatically each time you boot, select this. Run in TEXT mode – In this mode the emulation screen closes out the X-Windows. More on this under the section: Text Terminal Mode. IP Address of Host - Enter the IP address of the AS/400. Port at Host – This is the port used for telnet on the AS/400. Usually 23. Terminal Type – This is usually left at the default IBM-3477-FC, however you can configure your device type to be any of the following: IBM-3477-FC IBM-3179-2 IBM-5292-2 IBM-5291-1 27x132 Color (Default) 24x80 Color 24x80 Color 24x80 Monochrome IBM-3477-FG IBM-3180-2 IBM-3196-A1 IBM-5291-11 27x132 Monochrome 27x132 Monochrome 24x80 Monochrome 24x80 Monochrome Copyright 2006 Ringdale User Manual, 62-400310001 Page 15 Code Page - Specify the graphic character set and code page values that match the attributes of this display device. This will normally be left at code page 37. Codepage 37 is the basic EBCDIC US/Canada codepage. Code page values must be numbers in the range of 1 through 32767. 80 Char. Font - There are six sizes at which to display 80 columns. The options are tiny (5X8) barely readable, small (6x12), the default is medium (7X14), large (9x15), huge (10x20) full screen in 800x600 resolution and full (10x20 centered). You can use the Shift and + and - (on the numpad) to change font setting, but it is not saved. 132 Char. Font - There are six sizes at which to display 80 columns. The options are tiny (5X8) barely readable, small (6x12), the default is medium (7X14), large (9x15), huge (10x20) full screen in 800x600 resolution and full (10x20 centered). You will usually set this to a size smaller than your 80 Char. Font setting. Click the (Re)Start Session Click the Done Click the Cancel Click the ? Help button to start the session now. button to exit this window and configure another. button to cancel your changes. button for more information. Copyright 2006 Ringdale User Manual, 62-400310001 Page 16 Configuring 5250 Printer Sessions Name of session - Enter the name of the printer session (this will be the name that the AS/400 uses for this printer session. Autostart at Boot – If you want this session to start automatically each time you boot, select this. IP Address of Host - Enter the IP address of the AS/400. Port at Host – This is the port used for telnet on the AS/400. Usually 23. Host Print Transform (recommended) to allow the AS/400 to format your print jobs for the specific printer that you have connected. Copyright 2006 Ringdale User Manual, 62-400310001 Page 17 I-Series Printer - If you use Host print transform, you will need to enter the type of printer in the I-Series Printer box. NOTE: you must enter the printer type exactly as the AS/400 lists it. To be certain of what printers your AS/400 supports you can take an F1 on the line “Manufacturer type and model “ that is in the “Change Device Desc (Printer) (CHGDEVPRT)” screen on your AS/400. For example, enter *IBM2380 for an IBM 2380 Personal Printer Series II or enter *HP4 for an HP LaserJet 4 or compatible. See the Help for this screen to scroll through a listing of printers supported on most AS/400s. You can “Cut and Paste” from this list to avoid mistakes. "*IBM3812" is a commonly used generic printer. (Please note, the * is important). Environment Variables – this function is used to pass specific printer variables to the AS/400 in a semicolon separated list. E.g. env.WSCTNAME=MYPRTR;env.WSCSTLIB=*LIB. Next, you will select which “logical” printer to assign to this printer session. If you only have access to one printer from here, leave this at Default. Click the (Re)Start Session Click the Done Click the Cancel Click the ? Help button to start the session now. button to exit this window and configure another. button to cancel your changes. button for more information. Copyright 2006 Ringdale User Manual, 62-400310001 Page 18 Configure Printer You can have up to 3 printers defined to be used as 5250 host printers. For instance, LP1 can be set up to use a parallel printer, and LP2 and LP3 can be network printers that are on your network. Choose your default Printer – usually LP1 – Then click on Configure Printer1 set the printer up. Click the Done in order to button to exit this window and configure another. Click the Cancel button to cancel your changes. Click the ? Help button for more information. Copyright 2006 Ringdale User Manual, 62-400310001 Page 19 Select Network, Parallel Port, or Serial Port. For a printer that is locally attached to this MinIT unit select Parallel Port or Serial Port. IP Address or Port For a Network printer, enter it’s IP address. For a parallel printer use 0. For a serial printer, use 1 and enter the appropriate parameters in the Baud Rate, Parity, Data Bits, Stop Bits, and Flow Control fields. NOTE: To bypass the spooler and print directly to the printer enter LP0. Printer Name (optional) - Some Network Print Servers require a Printer Name. Consult with your Network Administrator. Click the Done Click the Cancel Click the ? Help button to exit this window and configure another. button to cancel your changes. button for more information. Copyright 2006 Ringdale User Manual, 62-400310001 Page 20 Configure Language Click on the Language Click the Done Click the Cancel Click the ? Help button to change to English U.K. button to exit this window and configure another. button to cancel your changes. button for more information. Restore Defaults The Restore Defaults button is used to clear user settings if the unit is to be shipped to a new location. Click the ? Help Click the Exit button for more information. to close the MinIT Administration panel. Copyright 2006 Ringdale User Manual, 62-400310001 Page 21 Operation Using the 122-Key Twinax Style Keyboard The 122-key Twinax Style Keyboard includes many special keys for use in AS/400 applications, such as Function keys 1-24, Help, Roll up, Attn, Sys Req, Field Plus, Record and Play, etc. For the most part the 5250 functions are indicated on the key cap in blue. Attn = Esc Sys Req = Shift+Esc Screen Print = Print Screen key (above the Print key) Erase Input = Clear Dup = Shift+Insert There are also a couple of keyboard shortcuts that might come in handy. Zoom in (bigger font) = Shift+Numpad+ Zoom out (smaller font) = Shift+NumpadEuro Symbol = Alt+e If you are running a session in Text Terminal Mode (see Setup 5250 Sessions), there are three more keyboard shortcuts that you may need to use: Alt+R for Record Macro (start and stop) Alt+P for Play Macro Alt+c to get the cent sign (¢). Should you wish to customize your keyboard mapping, you can use the mapping utility that is built in to the MinIT 5250E. See Keyboard Settings for more information. Copyright 2006 Ringdale User Manual, 62-400310001 Page 22 PC Style Keyboards There are a number of special 5250 keys that are not present on a standard 104-key PC Style Keyboard. If you are using a PC style keyboard you can still use these functions by hitting the following shortcut key combinations: F1 through F12 = F1 through F12 F13 through F24 = Shift + F1 through F12 Enter = Right Control (RCtrl) Field Exit = Enter Error Reset = Left Control (LCtrl) Attn = Esc Sys Req = Shift+Esc End = End Home = Home Dup = Numpad * Field - = Numpad – Field + = Numpad + Roll Up = Page Down Roll Down = Page Up Record = Alt+r Play = Alt+p ¢ = Alt+c Euro symbol = Alt+e Help = Alt+h Zoom in (bigger font) = Shift+Numpad+ Zoom out (smaller font) = Shift+NumpadAgain, if you wish to remap the keyboard to better suit your particular needs, the keyboard mapping utility is to be found under Keyboard within the MinIT Administration Menu. Copyright 2006 Ringdale User Manual, 62-400310001 Page 23 Macro Recording and Playback You can assign keyboard Macros to function keys F1 – F24. Note: the Record and Play keys on the lower left of the 122-key twinax style keyboard are functional in the X-Windows mode only. If you are in a Text mode session use Alt+r and Alt+p for Record and Play. Hit the Record key (or Alt+r), then the selected Function key (F1-F24), and then start entering the keystrokes that you’d like to record. When finished, hit the Record key (Alt+r) again to stop recording. To play a macro, hit the Play key (or Alt+p), then the function key (F1-F24). On a PC (104 key) keyboard, use the Alt+r and Alt+p short cuts to assign Macros to the function keys F1-F12. F(x) refers to the function keys F1-F12 Alt+R+F(x) = Record Macro F(x) Alt+R = Stop recording Alt+P+F(x) = Play Macro F(x) In this example, we are recording a macro to Function key F1. R 0000 F01 While you are in record mode an R will appear on the bottom of the screen, along with a counter and the Function key that the Macro is being recorded to. To see the macros, Click the Start button and select View Keyboard Macros. Copyright 2006 Ringdale User Manual, 62-400310001 Page 24 Text Terminal Mode One of the choices in the Setup 5250 Sessions Menu is the option to force the MinIT 5250E into what we call the “Text Terminal ONLY Mode”. The Text Terminal ONLY Mode makes the MinIT 5250E operate very much like a twinax terminal. There can still be multiple sessions configured, but the user does not see the windows-style desktop. All they would see is a full screen 5250 terminal session. If there are multiple sessions configured and running, you can get to each one by using Alt+F1, Alt+F2, Alt+F3, Alt+F4 and Alt+F5 to jump to each of the 5 display sessions. Alt+F12 will take you to a small menu, with extremely limited options. If you have configured the MinIT 5250e to run in Text Terminal ONLY mode, then this is the path you need to take to get into the Window Manager and the Administrative Menu, should you need to reconfigure the unit for some reason. This option is password protected to prevent curious workers from accidentally reconfiguring the unit. For more on the Administrative password, see the Unit Information section of the manual. Note: In Text Terminal Mode there are a few shortcut keys that you may need to use: Alt+r = Record Macro (start and stop) Alt+p = Play Macro Alt+c = the Cent sign Alt+e = the Euro symbol From a “Text Mode Only” session, the proper way to shut down the MinIT 5250E is to hit Alt+F12 to take you into the menu, then hit p and Enter. This does an “orderly” shutdown, and saves any new macros that may have been recorded since the last time the unit was shut down. Configuring the MinIT 5250E for Text Terminal ONLY Mode In order to get your MinIT working as a terminal you must first configure your network settings and your Display and Printer Sessions. All of this is covered in the Configuration section. We recommend that you leave your MinIT configured as a Graphical Terminal until all of your sessions are working the way you want. You can check out the Text Terminal mode on each session separately in 5250 Sessions for each display session and click the check box for Run in TEXT mode. If TEXT mode works correctly for you, then you can convert it to a Text only terminal. Copyright 2006 Ringdale User Manual, 62-400310001 Page 25 TO ENABLE TEXT TERMINAL ONLY Go into Unit Information and click the box for Boot to Text Terminal ONLY. Click the Done button and reboot the MinIT. At this point, the unit will boot straight into Session 1 in Text mode. No Window Manager will be running and there will be no means for the user to modify settings. The user can toggle between the (up to) five Display Sessions by using Alt-F1 thru Alt-F5. There are a few reasons, mostly to do with networking, which may cause Session 1 to not start or fail to connect. After correcting the problem, you do not have to reboot the MinIT. If you press Alt-F12 you will see a User Menu of options including 'r1' which restarts Session 1. This can save you the time and trouble of a reboot. w brings up the Windows Manager. If it is passworded, you must enter the password, first. p Alt F12 and do a p to power down. If you are running the MinIT 5250E in Text ONLY Mode, it is recommended to use this instead of the power button. This orderly shut down saves any new macros recorded onto the built-in compact flash. More about this User Menu -- there are two 'secret' commands we chose not to expose to users: 'nr' restarts networking. This may be all that is required if your Ethernet cable was loose. 'sq' shows you the contents of the printer Spool Queues. This menu also allows you to start a window manager session if you wish to modify your settings. If you had earlier set an Administrative Password, attempting to start the window manager would prompt you for that password. One more troubleshooting hint: Even though in terminal mode your MinIT does not display the window manager, it is running in the background, you just can't get to it from this unit without the password. You can, however, get to it from a PC running the MinITMan manager. Select the Unit and click Desktop and your Windows desktop computer will show you the MinIT5250 desktop. From there, you can use all of the Administrative configuration functions. See the MinITMan Manager CD for more information. Copyright 2006 Ringdale User Manual, 62-400310001 Page 26 Display Session Status You can start a display session as soon as it is created using the Restart Session button in the Define Display Session. To see if a display session is running in the background, click the Display / Session Status. button and select If a session is active, it will show IS RUNNING. If not, it is indicate IS NOT RUNNING. To start a session that is NOT RUNNING, click on the (Re)Start button. If it is an XWindows terminal session, it will indicate that Alt-Tab is used to bring the session to the front. If it is defined as Run in TEXT mode, it will have GoTo button, and show that the key sequence to start the session is Left Ctrl Alt Fx. Copyright 2006 Ringdale User Manual, 62-400310001 Page 27 Print Queue / Session Status You can start the printer session as soon as it is created using the Restart Session button in the Define Printer Session. To see if the printer session is running, click the Start button and select Print Queue / Session Status. If the printer started successfully, it will show status IS RUNNING. The printer session can start even if you do not have a printer attached. If the printer could not start, it will show status IS NOT RUNNING. This will indicate a problem with the 5250 Printer Session configuration. Check the name to make certain it legal. The name must start with letters, and not exceed ten characters. Check that the I-Series Printer entry is supported on the AS/400. For example older AS/400 do not support the HP5SI selection. Check the IP Address entry. This must be the IP Address of the AS/400. Copyright 2006 Ringdale User Manual, 62-400310001 Page 28 Ping Host The Ping Host utility is an easy way to troubleshoot the network connection to the host. Click the button and select it. Enter the AS/400 IP Address (or another host) and then click on the Ping button. To verify the MinIT 5250E NIC, just ping it’s IP address. Linux Command Prompt This is for Technical Support use. It is passworded. Process Monitor This is for Engineering use only, but feel free to check it out. Copyright 2006 Ringdale User Manual, 62-400310001 Page 29 Set Date/Time The Time is displayed in the lower right of the display. To set the date and time, click the button and select it. Calculator The Calculator utility is simple to use. Click the button and select it. Copyright 2006 Ringdale User Manual, 62-400310001 Page 30 Troubleshooting Guide This section contains solutions to problems that one might encounter when installing MinIT 5250E. To connect to the host, you must know the IP Address of your AS/400 and be on the same network as your AS/400. CHECKLIST The light on the MinIT 5250E is green. You can ping the host. The host can ping the MinIT 5250E The MinIT 5250E IP Address is correct. The MinIT 5250E IP of Destination host is correct. Your MinIT 5250E Setup – Name of Session is not invalid or a duplicate. It is varied on at the AS/400 – WRKCFGSTS *DEV (name of session) The AS/400 Ethernet line is up – WRKLIND The AS/400 TCP/IP is started – NETSTAT The AS/400 Telnet Server is started – NETSTAT The number of virtual devices is sufficient – WRKSYSVAL QAUTOVRT Copyright 2006 Ringdale User Manual, 62-400310001 Page 31 MinIT 5250E CONFIGURATION PROBLEMS These are problems that can occur during the initial configuration. PROBLEM: After restarting the scripts reports Operation Failed and Network is Unreachable. When you come up the sessions do not start. The green light is on solid. CAUSE: You do not have a network connection. SOLUTION: Check the network cables. Try plugging a known good device on to the same network cable. If it works, then you can be certain that the network cable is good and that the MinIT 5250E hardware is likely bad. CAUSE: This could happen if you were using a space or another illegal character in the Device Name. It could also happen if another device has the same name. If that device is inactive, and you wish for this device to take that device’s name, then you must delete the device on the AS/400 using WRKCFGSTS *DEV first. SOLUTION: Do not use spaces, asterisks, question marks, apostrophes, and double quotation marks in the Name of Session. Power off and back on again. At the MinIT 5250E graphic press the <space bar>. Press <space bar> again to go into setup. Select Setup Sessions and press <Enter>. Select the name that is wrong or duplicated. CAUSE: This could happen if your IP address is wrong. ACTION: Verify that the MinIT 5250E’s IP of Destination Host setting is correct and matches the AS/400. To find this on the AS/400, you must sign on with QSECOFR privileges and use CFGTCP, then choose 1. Work with TCP/IP interfaces. If you are on the same physical network, verify that the subnet mask is the same as the AS/400’s. CAUSE: This would happen if you were trying to use a different port socket. You should use Port 23. SOLUTION: Reconfigure the Session’s Port at Destination Host for port 23. PROBLEM: Cannot connect to host. CAUSE: This would happen if the IP address was wrong or non-existent, the physical connection is not good, or if the DHCP Server was down. ACTION: Click NLynx MinIT Administration, and then Network Settings. If the Network Settings window does not show an IP Address, then either DHCP is down, or the MinIT 5250E is set to manual and no IP address has been entered. SOLUTION: Reconfigure the MinIT 5250E’s IP Address or enable DHCP. Copyright 2006 Ringdale User Manual, 62-400310001 Page 32 NETWORK PROBLEMS This category of problems assumes that you have other users already using TN5250E connections to the AS/400. If not, go to the PROBLEMS AT THE HOST section. You are having a problem connecting to the AS/400. The first thing to do is make certain that you can ping the AS/400 and that the AS/400 can ping your device. If you cannot, then you have a network problem that has nothing to do with our software. We cannot help you to troubleshoot all of your network problems, but this guide may help. PROBLEM: Tried to connect the MinIT 5250E and it does not connect. When you try to ping it fails with a message: CAUSE: This means that there were no intelligent responses to the ping at all. ACTION: Verify that the network cable is inserted properly. Try swapping with a known good cable. PROBLEM: Tried to connect the MinIT 5250E and it does not connect to the host. You have verified all addressing, but still when you try to ping it fails. CAUSE: This means that you are not accessing a valid IP address. ACTION: Verify the MinIT 5250E’s Network/ IP address, Netmask, and Gateway. If you are not on the same network, then you must be on the same network as the Gateway to the AS400. If using DHCP, verify that the DHCP server is up. You must power cycle the MinIT-5250E to see the IP Address that you have been provided by the DHCP Server. Copyright 2006 Ringdale User Manual, 62-400310001 Page 33 PROBLEM: Tried to connect the MinIT 5250E and it does not connect. When you try to ping it fails. CAUSE: You may have a problem with your router(s), bridge(s), or hub(s). ACTION: Verify that the IP Address of the AS/400 is on the same subnet as the MinIT 5250E. The Subnet Masks must be the same. Address bits that are not 0, need to be the same. Must be on the same physical network. First, ping the MinIT 5250E from the AS/400: a) Go to any command line, where it says: Selection or command ===> b) Type PING '###.###.###.###' (where ###.###.###.### is the IP address that you are trying to reach, enclosed in single quotes) c) You will get a message: "Verifying connection to host system ###.###.###.###" d) Put your cursor on that message and ROLL UP (which is the Page Down key in some of the better emulation packages). e) If it says: " PING reply 1 from ###.###.###.### took 59 ms. 256 bytes. TTL 128" f) Then roll up again to check the next five. At the end it should say: "Connection verification statistics: 5 of 5 successful (100 %)." If it says "Unknown Host" or "No response from host within 1 seconds for connection verification 1." well obviously you have a network problem to resolve. CAUSE: Different subnet masks, different physical network. You may have a problem with your router(s), bridge(s), or hub(s). SOLUTION: If you can ping one way, but not the other, this is probably a router problem. If a router table believes that a device is not on the network, it may misroute packets. Restart all routers and bridges. If the IP address and subnet masks are logically on the same network, but you still cannot ping, then there may be a physical break in the networks. If the subnet for the AS/400 is not the same as the subnet for the MinIT 5250E Workstation, they are on different supernets and would need a router to connect. Check your hubs. Try pinging other devices to see what devices you can reach, and what the AS/400 can reach, to get a clue where the problem is. Look at the lights. You must be able to ping the AS/400, and the AS/400 must be able to ping the MinIT 5250E. Copyright 2006 Ringdale User Manual, 62-400310001 Page 34 PROBLEMS AT THE HOST The first problems in this category are for when there are other users who have Telnet sessions working. PROBLEM: You do not know the IP Address of the AS/400. SOLUTION: You'll need access to the AS/400's command line. This may imply you have to get your AS/400 System Administrator involved. Ask him or her to provide you with the correct IP address for the AS/400 that you want to connect to. For those that don't know, or would like to know the AS/400 command is as follows: After signing on to the AS/400 with the appropriate privileges, type "CFGTCP" and strike the <Enter> key at any command line. On the next screen, type "1" (Work with TCP/IP Interfaces) and hit the <Enter> key. Locate the interface that you are going to connect to. (If you only see 127.0.0.1 this means TCP/IP has not been properly configured on your AS/400.DO NOT use 127.0.0.1. If you do so you will NEVER get a sign on from the AS/400. If TCP/IP is not configured on your AS/400 we recommend you follow the instructions from IBM. The name of the book is called "Getting Your AS/400 Working for You". Publication number is SC41-5161-00. You'll find helpful information on TCP/IP in Chapter 6.) Write down the IP address and enter that in the MinIT 5250E configuration for this session’s IP of Destination Host. PROBLEM: It was working. The MinIT 5250E no longer connects. When you try to ping (see page 3) it fails with a message: “10 packets transmitted, 10 packets received, 0% packet loss”. POSSIBLE CAUSES: You have lost your IP connection. You could have a cable break, hub, bridge, or router down. This means that you are not accessing a valid IP address, or the Ethernet line is not up or MinIT 5250E or the host configuration was changed. ACTION: Verify physical connection. Viewing lights is the usually the quickest way to do this. See if others users are working, if not check the AS400 configuration. Swap devices if possible to see if the problem follows the device in question. PROBLEM: It was working. The light on the MinIT 6000 is green. Getting the message “Could not start session” initially, after that the MinIT 5250E does not connect to the host. Ping displays: “10 packets transmitted, 10 packets received, 0% packet loss”. CAUSE: Disconnecting the session when you are not at a signon screen could cause this problem. This could also happen if you had a power outage and MinIT 5250E crashed and you had to re-boot. The AS/400 still has your session active, although in a crashed status. Copyright 2006 Ringdale User Manual, 62-400310001 Page 35 SOLUTION(s): Use Alt/Q to quit the session and disconnect from the host. ALT/Q will let SNA server know that the device is disconnected. If the last device using this station address crashed, the station address may be varied off. Ask the System Administrator to vary your device on. This may require varying off, then back on. You can do this from the same MinIT 5250E if you create a new session, using the same IP address, but a different name. To restart the original device: On an AS/400 command line: WRKCFGSTS *DEV oldname WRKCFGSTS *DEV yourdevice <Tab> to oldname Put the cursor on the line to the left of your device and take an option 2 to vary off 1 to vary back on. If security is not a priority, then Work with System Values (WRKSYSVAL) parameter QDEVRCYACN (Device I/O error action) can be changed to allow auto-recovery. The name cannot have any spaces between letters, get rid of the space. Using the same name for the session as someone else uses. If the device that had that name is no longer using it, the AS/400 device must be deleted. Copyright 2006 Ringdale User Manual, 62-400310001 Page 36 HOST PROBLEMS AT THE HOST In this category of problems, none of the TN5250E sessions are connecting. PROBLEM: The MinIT 5250E comes up “Waiting to Connect … “ and “Opening Socket #23” then does not connect to the host. When you try to ping (see page 3) it fails with a message: “10 packets transmitted, 0 packets received, 100% packet loss – child process exited abnormally” POSSIBLE CAUSES: The AS/400 may not have the Ethernet line up. ACTION: CFGTCP, then take an option 1. Select the Ethernet line, and take an option 9 to start it. If it is already started, it will report: “interface not started. ###.###.###.### interface already active” Verify the IP address, if it is correct, then verify that the AS400 Ethernet line is active. WRKLIND The Ethernet line will have a Type *ELAN. Find it, and take an option 8=Work with status, to make certain it is active. PROBLEM: Tried to connect the MinIT 5250E and it does not connect to the host. When you try to ping (see page 3) it fails with a message: “10 packets transmitted, 10 packets received, 0% packet loss”. CAUSE: This means that you are accessing a valid IP address, but it is not a TN5250E host, or else the Telnet Server is not running. Telnet, or the Virtual Device Server may not be running. SOLUTION: On the AS/400 command line, do CFGTCP. Check the Work with TCP/IP Interfaces: Internet Opt Address Subnet Mask 127.0.0.1 192.168.xxx.xxx 255.0.0.0 255.255.255.0 Line Line Description Type *LOOPBACK ENETLINE *NONE *ELAN And 20. Configure TCP/IP applications: then 11. Configure TELNET PROBLEM: You cannot ping the AS/400. POSSIBLE CAUSE: TCP/IP is not started and/or improperly configured on the AS/400. SOLUTION: The AS/400 administrator can check this by typing (on an AS/400's command line) "NETSTAT" and hitting the <Enter> key. If you get an error message stating "Not able to complete request. TCP/IP services are not available." then TCP/IP is not started. Assuming that TCP/IP is already configured on your AS/400 the AS/400 administrator can start TCP/IP by typing "STRTCP" and hitting the <Enter> key. Copyright 2006 Ringdale User Manual, 62-400310001 Page 37 If TCP/IP is not configured on your AS/400 we recommend you follow the instructions from IBM. The name of the book is called "Getting Your AS/400 Working for You". Publication number is SC41-5161-00. You'll find helpful information on TCP/IP in Chapter 6. PROBLEM: Tried to connect the MinIT 5250E and it does not connect to the host. When you try to ping (see page 3) it fails with a message: “10 packets transmitted, 10 packets received, 0% packet loss”. POSSIBLE CAUSE: The Telnet server on the AS/400 is not running. SOLUTION: Make certain that the TELNET server on the AS/400 is running. The AS/400 administrator can check this by typing (on an AS/400's command line) "NETSTAT" followed by hitting the <Enter> key. Next, take option "3" (Work with TCP/IP connection status) and hit the <Enter> key. Under "Local Port" you should see "telnet" with a corresponding "State" of "Listen". If you don't see "telnet" then type "STRTCPTELN" on the AS/400's command line to start the Telnet server on the AS/400. PROBLEM: When you try to ping the AS/400, it responds on 1 of 5, but fails on the rest. The AS/400 cannot ping the MinIT 5250E either. POSSIBLE CAUSE: Your AS/400 may not be at the latest PTF level. SOLUTION: Make certain that the AS/400 is at the latest PTF level. GO LICPGM, option 10, then F11 to see AS/400 version. It will be under Installed Release. You must have security officer privileges to do this. Once you have this information, you must contact your IBM person for assistance. PROBLEM: Tried to connect the MinIT 5250E and it does not connect to the host. When you try to ping (see page 3) it fails with a message: “10 packets transmitted, 10 packets received, 0% packet loss”. Configure Telnet is not an option. CAUSE: Telnet is not started or PTF’s are not installed. ACTION: Make certain that you have all of the PTFs for TN5250E: http://www.nlynx.com/html/tb-tm5250e.htm If Configure TELNET does not exist, then contact Big Blue. Copyright 2006 Ringdale User Manual, 62-400310001 Page 38 PROBLEM: The MinIT 5250E can successfully ping the AS/400 but you're still not getting a session from the AS/400. POSSIBLE CAUSE: The subsystem that runs your virtual devices is inactive. SOLUTION: Assuming you know the name of the subsystem you can easily check this by typing "WRKACTJOB" and hitting the <Enter> key. Look for the subsystem and page down, if necessary. If you don't see it, type "STRSBS ZZZ" (where ZZZ equals the name of your subsystem) and then hit the <Enter> key. Note: To start a subsystem, the user must have job control (*JOBCTL) special authority. PROBLEM: You cannot ping the AS/400. POSSIBLE CAUSE: The route is not up. SOLUTION: Make certain that the route(s) is/are up and running. Typing “CFGTCP” on the command line and striking the <Enter> key can check this. Then, type "1" (Work with TCP/IP interfaces) and strike the <Enter> key. When the next screen appears hit the F11 (Display Interface Status) key. Under the "Interface Status" column the appropriate interface (the one you'll be using) should read "Active". If it's "Inactive" use option "9" to "Start" it. If it reads "Starting" give it about a minute or so and then hit "F5" (Refresh). If anything else other than "Inactive" or "Starting" appears it's time to get the AS/400 administrator involved and if he or she is already involved then it's time to call IBM, or your AS/400 Consultant. PROBLEM: You cannot ping the AS/400. POSSIBLE CAUSE: Ethernet standard is not set to *ALL or the line speed setting is not correct. SOLUTION: If you're connecting the AS/400 via an Ethernet line there is a parameter which may prevent the MinIT 5250E from ‘talking’ to the AS/400. This can be checked by typing "WRKCFGSTS *LIN" and hitting the <Enter> key. Once you locate the line you're trying to connect to type an "8" (Work with Description) next to it and hit the <Enter> key. Then, type a "5" (Display) on the next screen and hit the <Enter> key. Make sure "Ethernet standard" is set to "*ALL " and that the correct "Line speed" is displayed. The line speed can be changed by hitting the F12 (Cancel) key and typing "2" (Change) and then making the change. If you need to change "Ethernet standard" you'll have to type "CRTLINETH" and create a new line description. For help on this, consult IBM, your AS/400 Consultant, or the IBM book. The name of the book is called "Getting Your AS/400 Working for You". Publication number is SC41-5161-00. Related information is in Chapter 6. PROBLEM: When you try to ping the AS/400, it responds on 1 of 5, but fails on the rest. The AS/400 cannot ping the MinIT 5250E either. Your AS/400 is at the latest PTF and CUM level and can ping other devices. Your network administrator made certain the IP addresses are correct. POSSIBLE CAUSE: You have a network problem. This could be a bridge or router problem. It could be a problem with routing tables. SOLUTION: Recreate the Ethernet line. Do not override the MAC address. Check the routers routing tables. Reset the routers. Copyright 2006 Ringdale User Manual, 62-400310001 Page 39 PROBLEM: When you try to ping the AS/400, it responds on 5 of 5. The AS/400 can ping the MinIT 5250E, too. Your AS/400 is at the latest PTF and CUM level and can ping other devices. Your Network Administrator made certain the IP addresses are correct. You recreated the Ethernet line and restarted all routers. But it still will not bring a session up. POSSIBLE CAUSE: Your AS/400 is not set up for enough virtual devices. SOLUTION: WRKSYSVAL QAUTOVRT configured. work with system values (how many virtual devices) make certain that you allow enough virtual devices PROBLEM: The MinIT 5250E can successfully ping the AS/400 but you're still not getting a session from the AS/400. POSSIBLE CAUSE: One of the networked devices or networked nodes is improperly configured. SOLUTION: The next step here is to see if the AS/400 can successfully ping the MinIT 5250E. On an AS/400's command line, type "PING 'x.x.x.x'" where x = IP address of the MinIT 5250E in question. If the PING from the AS/400 to the MinIT 5250E is unsuccessful then try Pinging the network side of the router. If you can PING it but not the Ethernet side of the router then there's probably something wrong with the configuration of the router. If you cannot PING the network side of the router then there's probably something wrong with the TCP/IP configuration on the AS/400. Specifically, the route configuration or the subnet mask on the AS/400 could be wrong but it could be something else. It is recommended that you consult your AS/400 Administrator, your AS/400 Consultant, IBM, or the IBM book. The name of the book is called "Getting Your AS/400 Working for You". Publication number is SC41-5161-00. Related information is in Chapter 6. PROBLEM: You can ping the AS/400 from the MinIT 5250E and the AS/400 can ping the MinIT 5250E, but the session never starts. The light on the MinIT 6000 is green. The does not connect to the host. POSSIBLE CAUSE: The MinIT 5250E supports ‘Enhanced Telnet 5250’ or TN5250E. The main feature that TN5250E provides is Persistent LU naming, which is where the name that you provide when you set each MinIT 5250E session up is the one that the AS/400 sees for your session. Two possible problems that can occur: Certain names are invalid. If another TCP/IP client uses a name it cannot be used. The AS/400 will either have this enabled or not. SOLUTION: You cannot use a name that someone else is using. Blanks are not allowed within the name. You cannot use spaces or dashes or any other character than letters or numbers. Case is ignored. There is a maximum of nine characters. Because most system-supplied objects on this system begin with Q, your names should not start with a Q. Copyright 2006 Ringdale User Manual, 62-400310001 Page 40 PROBLEM: The MinIT 5250E can successfully ping the AS/400 but you're still not getting a session from the AS/400. POSSIBLE CAUSE: Improper configuration of the subsystem used for the virtual devices. SOLUTION: Our product emulates different IBM terminals depending on the color and width selection. For 132 wide configurations, the MinIT 5250E emulates an IBM 3477 terminal. For monochrome 80 wide, it emulates a 5251. For 80 wide color configuration it emulates 3179. This means your subsystem (typically, QINTER) must allow a 3179. You can check this by typing "WRKSBSD *ALL", locate the subsystem you're using for the virtual devices, take option "5" (Display), and hit <Enter>. On the next display, select option "5" (Workstation type entries) and hit the <Enter> key. On the next display, you should see a "Type" of "*all", or a type of "3179". If you do see a "Type" of "*all", or a type of "3179" then take option "5" (Display workstation type details) and hit the <Enter> key. On the next display you should see an appropriate value for the "Maximum active jobs" parameter. You can make changes in one or both cases by typing "CHGWSE" (or "ADDWSE"), hitting the <Enter> key, and making the appropriate changes. Copyright 2006 Ringdale User Manual, 62-400310001 Page 41 PRINTER PROBLEMS When trying to establish a printer session with MinIT 5250E it reports these errors. PROBLEM: Could not establish printer session 8902 CAUSE: The AS/400 closed the connection SOLUTION: PROBLEM: Could not establish printer session 8903 POSSIBLE CAUSE: Had a printer already configured with that name at the AS400. SOLUTION: You must rename the session at the MinIT 5250E or delete the other printer from the AS/400. PROBLEM: Creation of host device 8925. POSSIBLE CAUSE: Using Host Print Transform, the Host Print Transform Name is not valid. SOLUTION: The name must have the splat (asterisk) *, in front of it. PROBLEM: Could not establish printer session 8940 POSSIBLE CAUSE: Using Host Print Transform & not selecting valid printer name. Using *WSCST, but name or library not valid. SOLUTION: Make certain that you put an * in front of the Change the IBMWSCSTNAME to QWPDEFAULT Change the IBMWSCSTLIB to QGPL Copyright 2006 Ringdale User Manual, 62-400310001 Page 42 Technical Support Important Notes: The Power Button on the top of the unit will be lit (white) when there is power to the unit. The unit will not start until you press the button. Then it will turn green and the unit will boot. The correct way to power down the unit is from the Start button or the MinIT Start Menu. Select Power Down from the menu. It will take a few moments to shut itself down and the light will turn white again. If you forget to power the unit down correctly, you may lose any macros that you have recorded since the last proper shutdown. There is extensive on-line help within the MinIT 5250E application. If you are still in need of assistance, the following resources are available: On the Ringdale website: www.ringdale.com click on there is a Knowledge Base. Telephone Support USA: 888-288-9080 or 512-288-9080 Copyright 2006 Ringdale User Manual, 62-400310001 Page 43