1
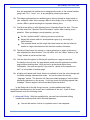
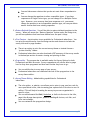
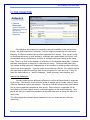
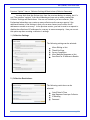
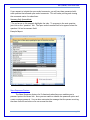
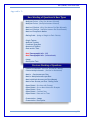
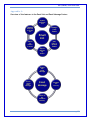
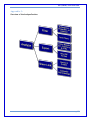
SURVEYMONKEY
CONVERSION GUIDE
5/7/2007
An Introduction and Guide for Utilizing the New Monkey
Copyright ©1999-2007 SurveyMonkey.com. All Rights Reserved. No portion of this guide may be
copied without the express written consent of SurveyMonkey.com.
SurveyMonkey Conversion Guide
Conversion Guide Table of Contents
I. Introduction – The New Face of the Monkey ………………………............... pg. 2
♦ Overview
♦ Chart of Enhancements
II. Account Management …………………………………………………………………………….
pg. 3
♦ Unlimited Survey Responses
♦ Added Options & Control
III. My Surveys / Surveys Design & Capabilities …………………………………………
pg. 4
♦ Added Features, Question Types, etc.
♦ Enhanced Capabilities: editing, printing, etc.
IV. The Collector …………………………………………………………………………………………
Pg. 9
♦ The Definition of Collector
♦ Collector Summary: Settings & Restrictions
V. Email List & Messages …………….…………………………………………………………..…
♦
♦
♦
♦
pg. 13
Overview – Email Invitation Collector
Email List Section
Email Message Section
New Functionality of the Survey Link
VI. Analyzing & Exporting ………………………………………………………………………….
pg. 15
♦ Filtering
♦ Exporting
♦ Share Responses Link
VII. Additional Services ……………………………………………………………………………..
pg. 18
VII. Appendix 1: Visual Reference and Explanation of Buttons …………………
pg. 19
Appendix 2: Overview of Question Types ……….………………………………….. pg. 20
Appendix 3: Table of the My Surveys/Survey Design & Capabilities……. pg. 21
Appendix 4: Overview of the Features in the Email & Messaging……….. pg. 22
Appendix 5: Overview of the Analyze section……………………………......... pg. 23
Page 1
SurveyMonkey Conversion Guide
I. INTRODUCTION: THE NEW MONKEY
The New Face of
the Monkey
• Updated Look: New
Colors with a Fresh
Look & Design
• Same Feel: Similiar
Layout & Navigation
Tabs: Home, Create
Survey, & My Account
• The New Monkey:
The Same Monkey and
Service with
Enhanced Features!
When comparing the new SurveyMonkey to the old, you will see the same product
but now with a fresh look and feel! This guide is your introduction to the new site, and it
is our goal to make this transition a quick and easy process. You will notice that some of
the previous features work differently and offer more capabilities. While these are not
drastic changes, they do carry over the user friendliness of the old site while integrating
upgraded functions of the new site. The overall presentation of the site may appear
dramatically different due to the new color scheme; however, SurveyMonkey is still
organized the same way. You can navigate throughout the account using similar tabs
found in the previous site: Home, Create Survey, My Surveys, and My Account tabs. In
addition, enhancements to the new Monkey will be seen in the following areas (We have
been listening to your suggestions!):
Account Management - Allows more control to you, the account holder.
My Surveys - Enhanced design & editing capabilities with added functions.
The Collector - Allows you to manage the types of responses you collect.
Email List & Messaging – Provides more features and easier management capabilities.
Analyzing Responses - Includes more filtering, exporting, and sharing options.
Additional Services - Includes a survey design service, tutorials, and guides.
Page 2
SurveyMonkey Conversion Guide
Enhancements to the Monkey: The following is a brief overview by sections within an
account. Please refer to pages 19 – 23 for the appendix of features.
Account
Management
• Unlimted Survey
Responses for
Yearly
Subscribers
• More Control of
Account
Management
• Upgrade from
Monthly to Yearly
Survey Design
& Collection
Email Lists &
Messaging
Analyzing &
Exporting
• New Question
Types
• Cancel Message
Option
• Added Filtering
Capabilities
• Survey
Templates
• Ability to
Add/Edit Survey
Responses
• PDF Export &
New Summary
Presentation of
data in Excel
• Added Features
& Capabilities
• The Collector
• New function of
the Survey Link
•Address Book
• Password
Protection for
Share Results
II. ACCOUNT MANAGEMENT:
My Account
• Account Summary:
Account Details, Login
Settings, &
Preferences
• Billing: Billing Profile,
Billing Contact Info,
Payment Info, &
Invoice History
• Transfer Survey
• Event Log
The new Monkey wants you to have more control within your account. This will
make it easier for you, the account holder, to manage simple tasks like email/username
changes or upgrades of monthly subscriptions to yearly. Here is what you will now see in
regards to subscription plans and the new ways you can utilize the My Account section:
Page 3
SurveyMonkey Conversion Guide
1)
The “Unlimited” survey response is a new and exciting feature that we offer to our
Yearly Professional subscribers. If you purchase a Yearly subscription, you will
receive unlimited survey responses on all surveys in the account!
2.) The tool offers more control to you, the account holder, in managing your personal
account information. You can now control the following:
a.
b.
c.
d.
Change login email/username and contact email.
Upgrade from a monthly to annual plan in the Billing section.
Cancel and “un-cancel” the Professional subscription‟s auto-renewal.
The ability to change the time zone in the “Preferences” section or
subscribe/unsubscribe to the newsletter.
3.) The Event Log enables you to track your account‟s activity. You can track
completed logins, auto-cancel renewal requests or stops, password changes, email
changes, etc. If you share an account, this is a good way to track the account‟s
activity.
III. MY SURVEYS / SURVEY DESIGN & CAPABILITIES:
My Surveys
• Edit Survey: Create,
Edit, Spell Check, &
Preview
• Survey Options:
Numbering, Add Logo,
Progress Bar,
Navigation Links,
Answer Required, &
Survey Language
• Print Survey
• Restore Questions
The enhanced SurveyMonkey offers more variety in survey design and capabilities.
We have improved upon question types, added new features, and enhanced the
Page 4
SurveyMonkey Conversion Guide
capabilities in the “My Surveys” tab and “Edit Survey” section. The following list reflects
some of what you will see (Also view Appendix 3 on pg. 20 for table and quick reference):
1.)
To make survey design less time consuming, we now offer survey templates
covering different industries for Professional accounts. These pre-designed
templates are available in the “Create Survey” tab.
2.)
A new “Title Search” function is available on the My Surveys page. No longer
will you have to scroll through your survey list to locate a specific survey. You
can also display your survey list in ascending or descending order according to
the creation date or modified date.
3.)
One new question type has been added in the Design/Edit section (You may also
check pg. 19/Appendix 2):
Open Ended-Contact (U.S. or International) Question
4.)
The Multiple Choice and Matrix of Choice questions types now allow you to select
“how many” out of the list of answers/rows you want respondents to answer.
5.)
The Choice - Single and Multiple (Vertical) types allow 1, 2, or 3 column answer
choice setups. This gives you the ability to break up long lists of answer choices
into columns.
6.)
When creating the Single or Multiple Textbox types for open ended responses,
you can “validate” how the responses are to be entered by the respondents (e.g.
whole numbers, decimal numbers, etc). You can also choose a “Numerical”
textbox and set a “required sum” for the positive, whole numbers.
7.)
The Date and/or Time question offers the following formats:
MM/DD/YYYY
DD/MM/YYYY
8.)
Many of the question types allow you to add a comment field or “other-please
specify” choice as either a separate comment field or as an answer choice with a
comment field. This will be handy for the Single or Multiple choice types. In
addition, the Matrix types now allow an additional comment field.
9.)
The Rating type configuration is one of the more significant changes in the
question types. SurveyMonkey calculates the “response average” based on a
weighted average per column. In the old site, the Analyze section weighted the
columns automatically from 1 to n with the lowest/negative value on the left.
Page 5
SurveyMonkey Conversion Guide
Now the upgraded site enables you to designate the order of the column headers
going from n to 1, from 1 to n, or any weighting scheme you require.
10.) The Image type question now enables you to directly upload an image saved on
your computer rather than creating a URL for that image (You no longer have to
create a URL or upload an image to a separate hosting site).
11.) You have the ability to edit Question Size or Comment/Input box size. This can
be done under the “Question Size & Placement” option when creating a new
question. When you design a survey question, you can:
Set the “question width” either by percent or pixel size.
Adjust the column width for some question types (e.g. according to
label/choices).
The comment boxes and the single line input boxes can also be edited to
smaller or larger sizes based on the character number allowance.
12.) The Move/Copy button for moving or copying questions or pages in the survey
edit mode has now been divided. You can either click the “Move” button or the
“Copy” button to perform either task.
13.) You now have the option of deleting all questions on a page at one time.
Previously in the old site, the page delete would move all questions to another
page without deleting them. Here you had to go back and delete them
individually. Now you can specify if you want to “delete all the questions as
well” or move them to another page.
14.) A highly anticipated spell check feature is available in both the survey design and
the email message customization mode. You can the select the survey
“language” option. The browser will then know what language to look for when
displaying characters on the screen. It will also check the spellings against that
language. We now support Unicode and Multi-Byte characters!
In the Design tab of the My Surveys section, we have added some highly
anticipated improvements to the overall user friendliness of the tool. Some of these
added features cover the following areas:
1.) Advanced Editing – With the upgraded site, you now have advanced editing
capabilities to surveys that have collected responses:
You can add answer choices to a question once it has responses.
Page 6
SurveyMonkey Conversion Guide
You can hide answer choices that you do not want future respondents to
see.
You can change the questions to other compatible types. If you have
responses on a Single Choice type, you can change it to a Multiple Choice
type. However, once a survey does have responses on it, you cannot
change the question to an incompatible question type, nor can you delete
answer choices that have existing responses.
2.) Restore Deleted Questions – You will be able to restore deleted questions to the
survey. When you access the “Restore Question” button under the Design icon,
you will see questions that have been deleted over the past 14 days.
3.) Print Feature – A print option is now available for Professional subscribers. You
can print the actual survey from the Design section and choose to include the
survey title and/or page numbers.
There is an option to print the current survey theme or instead choose a
“printer friendly” theme.
Professional subscribers can also download a PDF summary of the survey results
in the Analyze section for easier viewing and printing of data.
4.) Progress Bar – The progress bar is available under the Survey Options for both
Professional and Basic accounts. Survey respondents will now be able to gauge
how far they have progressed and how much further they have to go:
You can add the bar to every page of your survey.
Professional subscribers can customize the look of the progress bar in the
survey theme editor.
5.) Survey Theme Editing – Added editing capabilities for Professional
subscribers:
The color picker, or palette, now allows you to enter in your own hex code for
more specialized colors, thus increasing your options from 216 colors to over 16
million! This will help in branding the survey to your own organization‟s
specific colors.
You can add elements like Bold, Underline, or Italics to the text in the title,
page titles & page descriptions, question headings & choices, exit link, and
error text message.
You can customize the progress bar design.
Page 7
SurveyMonkey Conversion Guide
Overview of “Theme Preview” when editing or creating a new theme:
Survey Font &
Background
Survey Title
Page Title & Description
Question Heading &
Question Choices /Rows
Progress Bar
Exit Link
Required Asterisk & Error
Text
Page 8
SurveyMonkey Conversion Guide
IV. THE COLLECTOR:
Collectors
• Capture
Responses:
Create Different
Types of Collectors
to Capture
Different Kinds of
Responses
SurveyMonkey has created a concept that was not available in the previous site.
Earlier, the guide mentioned “collectors” and you might be wondering how that works.
Basically, a collector enables you to collect responses for a survey. Once you are ready
to distribute the survey to your audience, collectors are created under the Collect icon.
An individual survey can have one collector or multiple collectors running at the same
time. There is no limit to the number of collectors for Professional subscribers. However,
the Basic subscription is limited to 3 collectors per survey. Collectors each have their
own unique settings and work independently of one another to enable greater collection
control and survey analysis. If you do create more than one collector for a specific survey
you may need to make the settings/restrictions congruent for each one (e.g. if they all
need the same redirect or “jump to webpage,” thank you page, max response, etc).
How to Use Collectors:
You can create and use different collectors to collect different kinds of responses
for a survey. The benefit of the collector is that it enables you to create a survey where
different audiences need to be reached. The use of different collectors will then enable
you to collect separate responses for that survey. Each collector‟s responses will all
come back to the one original survey; combined together in one results summary. Now
you do not have to create three separate surveys and then have us merge the data at a
later point.
The following section presents three examples of how to create and use collectors
effectively.
Page 9
SurveyMonkey Conversion Guide
Example 1: If you are an educator and need to survey “Student Responses,” “Teacher
Responses,” and “Administrator Responses,” then you can essentially create a collector
for each individual audience. Here you could potentially create three different collectors
to send out to each specific group:
Student Collector
Teacher Collector
Administrator Collector
Professional subscribers can then apply filters to specifically look at one specific
collector‟s responses in the Analyze section (e.g. look for the student responses only).
Example 2: Another advantage of the collector is the way in which the collector settings
work. Perhaps you want to have “tracked” vs. “anonymous” responses, or you have
additional responses to enter manually. This example uses three different collectors to
collect three different kinds of responses for one survey: Email List Collector, Anonymous
Collector, & Data Entry Collector.
Email List Collector: Survey a group and be able to track respondents‟ identities by
creating a collector that SurveyMonkey will send out on your behalf.
Anonymous Collector - Survey one group of participants anonymously by creating a
collector to send out the link through your own email client.
Data Entry Collector – Enter responses manually from a paper version by creating a
Data Entry Collector.
Once again, as a Professional subscriber, the Filter feature will enable you to filter by
collector. If you want to only see the anonymous surveys, then you could filter by the
"Anonymous" collector. If you want to see only the tracked responses, you can filter by
the “Email List” Collector.
Example 3: Your organization has offices worldwide and you want to survey each office
separately but still have all the data combined in one results summary. Here you could
create the following three (or however many offices you have) collectors:
Hong Kong Office
San Francisco Office
London Office
You can create the settings and restrictions for each “office” collector and send them out
accordingly. Once you are in the analysis phase, you will still have all the data in one
combined report. You can apply filters by collector to look at each office‟s responses
individually.
Page 10
SurveyMonkey Conversion Guide
Previous “Option” Icon vs. Collector Settings & Restrictions (Collector Summary):
You may think that the Options icon from the previous Monkey is missing, but it‟s
not! The previous “options” from the old Monkey are now set up when creating the
Collector Settings and Restrictions. You are not limited to just one collector, and
Professional subscribers can create as many collectors as the surveys require! One
additional feature of the Settings is that you can now choose to not collect the IP
addresses or emails on a survey. In the previous version, you had to send us a request to
disable the collection of IP addresses for a survey to ensure anonymity. Now you can set
this option up when creating a collector‟s settings.
1.) Collection Settings:
The following settings can be selected:
Allow Editing or Not
Thank You Page
Survey Completion
Allow Multiple Responses or Not
Save Email or IP Address in Results
2.) Collection Restrictions:
The following restrictions can be
selected:
Cutoff Date & Time
Max Response Count per Collector
IP Blocking
Password
Page 11
SurveyMonkey Conversion Guide
V. EMAIL LIST & MESSAGES – EMAIL INVITATION COLLECTOR:
Email List &
Message Center
• Create Recipients:
Add/Remove Emails,
Export Lists, Edit/Add
Resposes, & Track
Respondents
• Address Book
• Cancel Delivery or
Re-Schedule Delivery
The previous SurveyMonkey contained a tab in the menu header named “List
Management.” Some users might wonder what has happened to that tab. The upgraded
site still has all the same List Management capabilities, but the tab is no longer there! It
is now organized through the Email List & Email Message section, which works like the old
List Management. Once you are ready to send your survey out for distribution, you will
create a collector that has SurveyMonkey send the message on your behalf (see page
22/Appendix 4 for chart). Once you create an email list and message you can re-access it
under the collector‟s summary.
1.) Email List Section: The Email List section enables you to do the following:
Create an
email list.
Manage &
track the
emails.
Search for
an email
in a list.
Add, edit,
or remove
emails.
Add/Edit
a survey
response
for an
email.
Export
the
"entire"
list or by
"status."
One new, exciting feature of the Email List section is the ability to add a response
for a respondent on the list. You can click on an email address in a list, and the tool will
prompt you if you want to remove it or add/edit a response. If that specific person has
not responded, you can fill in the entire survey per his or her request. Now with the new
Page 12
SurveyMonkey Conversion Guide
search feature in the email list section, you can search for that specific email in the list.
No longer will you have to scroll through all emails to find the specific one you want to
edit or track.
In our efforts to reduce spamming, the new Monkey has enabled a new opt out for
the messages delivered by SurveyMonkey. In the previous Monkey, if a respondent
selected the “remove link” in the message, it would change the status of the address to
“declined” in the list. Now if a respondent clicks the remove link, he/she will still be in
the list and will be indicated as “opted out.” You cannot send him/her another message.
You, the account holder, will not be able to opt that email address back to the list. The
respondent must choose to be reinstated.
2.) Email Message Section - The email message section enables you to do the following:
Customize
the
invitation
email
message.
Re-use a
previous
message.
Save
messages in
a "draft"
mode.
Schedule the
delivery
immediately
or for a
future date.
Cancel /reschedule a
message for
delivery.
A new feature in the messaging section focuses on creating a new message. When
customizing a new message for a list collector, you can re-use a message from a
previously sent email (or a saved message). While in the creation mode of a message,
there will be a dropdown menu that houses the body texts from previous messages.
When you are composing the body of the new email message, simply click the dropdown
arrow and highlight the message you would like to copy or insert.
A new “cancel” feature will help to make your life easier with our tool! When
using the old site, if you created a message and sent it prematurely through the List
Management there was no way to cancel the scheduled delivery. With the new site you
will notice the “cancel” option under the Email Message‟s sent/schedule delivery status
section. If you set it up to send “immediately,” you have a 5 minute window to cancel
that message and move it into the draft section. Now you can reschedule it for a later
delivery. If you schedule it for a time in the future, you can cancel it at any time before
it goes out on that future date. In addition, the tool enables you to set your account to
your own time zone. This way there will be no confusion as to when your survey will be
mailed according to the scheduled delivery time you setup.
Page 13
SurveyMonkey Conversion Guide
New Function of the Survey Link Sent Through the Email Invitation Collector:
Let‟s address the email link that is now generated by SurveyMonkey in the Email
Invitation collector. In the past, customers have inquired if a person can start the survey
on one computer and then finish the survey later on a different computer. Or if one
person can start a survey and a different person finish the survey (e.g. 360 degree
surveys, surveys filled out by a group, etc). Due to this new Collector concept, you can
now set this up if you use the Email Invitation collector.
When you create a Collector to “have us send the email invite,” the survey
URL contained in that email message is now link related - not cookie related. This means
that a respondent can open their email invitation on one computer and start the survey.
If the respondent needs to exit the survey and walk away or pass it along to someone
else, s/he (or the next person) can now re-access the survey, through the link, later from
a different computer/browser to finish. The survey link in the invitation message will
“remember” where a respondent left off. (Please note: the “anonymous” link is still
cookie related. Only messages sent by the Email Message center will be “link” related.)
V. ANALYZING AND EXPORTING:
Analyze & Export
• View & Browse: View
Summary and Detailed
Responses
• Filter Responses: Filter
by Responses,
Properties, and/or
Collectors
• Export: Download into
spreadsheets, HTML , or
PDF formats
• Share: Create a Link to
Share Data - Ability to
Password Protect
Page 14
SurveyMonkey Conversion Guide
When it is time for you to view your results, you will notice a few changes under
the Analyze section in the areas of filtering, exporting, and sharing responses. Many of
the same functions are available like viewing the entire summary of results versus
browsing individual responses. These new features and upgrades now enable you to
perform enhanced analyzing and exporting (see page 23/Appendix 5 for chart or quick
reference).
Filtering Responses:
As a Professional subscriber you can filter your data to view specific information or
patterns. The previous site only allowed filtering by specific responses. The upgraded
tool now allows you to filter using the following criteria:
Filter by Responses
Filter by Properties (e.g. date, response status, email address, name, IP address,
custom value, etc.)
Filter by Collector
Another added bonus is the ability to „save‟ filters. If you have to filter the results
by many different criteria, you can now set up multiple filters and simply toggle them on
and off. In the previous site, you could only have one filter. This new feature enables you
to create any number of filters (only one of which can be active at any given time) and
then save them for later use.
Exporting Responses:
An additional export option is now available to Professional subscribers. A PDF
export of the summary results can be downloaded to your computer for easier printing or
viewing capabilities. In addition to the new exporting option, you will see a difference in
the actual Excel or spreadsheet file for the results in the Summary version. The
“Summary Only” Spreadsheet will download directly to your computer under the
Download History section. Each survey question will be presented on its own sheet in the
file. If you need to progress to the next survey question to see the data, simply click the
Question Number tab located on the bottom of the spreadsheet page. If you have 5
survey questions, then there will be 5 Question tabs. The Summary spreadsheet will show
the following:
The summary numbers of the responses for each answer
The number of those who answered the question
The percent calculation of the responses
The number of those who skipped the question
Comments (if available as an answer choice or a separate comment field)
Page 15
SurveyMonkey Conversion Guide
If you request to include the open ended comments, you will see them presented with
each question that allowed open ended comments. This will make printing and viewing
the comments easier for subscribers.
Summary Only Spreadsheet:
* The red arrow in this example highlights the tabs. To progress to the next question,
just click on the “question” tab. The open ended comments will also appear below the
question if it had a comment field.
Example Report:
Share Responses Feature:
The Share Responses feature for Professional subscribers now enables you to
password protect the share link. Here you can enable or disable the password option and
create a unique password. You can also customize the message that the person receiving
the share link will see before s/he can access the data.
Page 16
SurveyMonkey Conversion Guide
VI. ADDITIONAL SERVICES:
SurveyMonkey would like to offer additional levels of service regarding survey
design and drafting effective surveys. A survey design how-to section is in the works and
will address guidelines and tips for writing effective surveys. Some of the key concepts
relate to the kinds of survey questions (e.g. leading, double barreled, unbalanced rating
scales, etc.), your survey audience, the survey‟s purpose, response rates, and various
topics.
We are also working on guided tutorials covering survey design, collectors, email
list creation, and analyzing/downloading results. You will be able to view them directly
from our website! We also have a SurveyMonkey User Manual available and Smart Survey
Design manual available in the Help Center of your account. You can download these PDF
file to your own computer.
In addition to the online and written guidelines, we are planning to offer a service
that actually writes survey questions and designs the layout and flow for you at an
additional cost. Once all these new services are available we will be sure to let you know!
Page 17
SurveyMonkey Conversion Guide
Appendix 1:
SurveyMonkey uses icons and buttons in the survey tool to help you identify certain
features of the site. These icons or buttons will take you to a section of the website that
will allow you to set up or perform certain functions.
The following is a visual reference of the commonly used icons/buttons on the website:
Buttons associated with the My Surveys page:
The Design icon enables you to access the survey design/edit mode.
The Collect icon accesses the Collector page.
The Analyze icon accesses the Response Summary page.
Buttons associated with the Survey Designer:
Edit Survey allows you to edit the survey design.
Survey Options accesses the survey design options.
Print Survey allows you to print the survey itself.
Restore re-adds deleted questions from the past 14 days.
Buttons associated with the Analyze section:
View Summary shows the Response Summary page.
Browse Responses allows you to view individual responses.
Filter Responses allows Professional accounts to apply filters.
Download Responses allows Professionals to export the data.
Share Responses allows Professionals to share results.
Page 18
SurveyMonkey Conversion Guide
Buttons associated with the My Account Section:
Account Overview shows the account type, settings, etc.
Billing shows the billing profile, payment info, and invoices.
Transfer Survey transfers/copies surveys between accounts.
Event Log shows the account activity.
Buttons associated with the Email Collector:
View Summary shows a collector’s settings/restrictions.
Edit Email List shows the list manager and addresses.
Edit Message: create, view, & schedule/cancel messages.
Change Settings sets or edits a collector’s settings.
Change Restrictions sets or edits the restrictions.
Once the collector is Open, there will be a Close Collector.
Buttons associated with the Anonymous Collector (Web-link/non-SM email):
Get Survey Link shows the survey links to copy/paste.
Change Settings sets or edits a collector’s settings.
Change Restrictions sets or edits the restrictions.
Manual Data Entry allows manual entry (e.g. hard copies).
Close Collector Now closes the specified collector.
Page 19
SurveyMonkey Conversion Guide
Appendix 2:
New Wording of Questions & New Types
• Multiple Choice - (Only One Answer Allowed)
• Multiple Choice - (Multiple Answers Allowed)
• Matrix of Choices -(Only One Answer Per Row Allowed)
• Matrix of Choices - (Multiple Answers Per Row Allowed)
• Matrix of Drop Down Menus
• Rating Scale - (Assign a Weight to Each Choice)
• Single Texbox
• Multiple Textbox
• Comment Essay Box
• Numerical Textbox
• Date and/or Time
• New! Demographic Info - (US)
• New! Demographic Info - (International)
• Image
• Descriptive Text
Previous Wording of Questions
• Choice One Answer- (Vertical, Horizontal, Menus)
• Choice Multiple Answer - (Vertical or Horizontal)
• Matrix - One Answer per Row
• Matrix Multiple Answers per Row
• Matrix Multiple Answers per Row (Menus)
• Matrix One Answer per Row - Rating Scale
• Open Ended • Open Ended • Open Ended • Open Ended • Open Ended -
One Line with Prompt
One or More Lines with Prompts
Essay
Constant Sum
Date and/or Time
• Presentation - Image
• Presentation -Descriptive
Page 20
SurveyMonkey Conversion Guide
Appendix 3:
Table of the Upgrades for the My Surveys / Survey Design & Capabilities:
Questions &
Features
• 1 New Question Type
• Limit the Number of
Answer Choices for
Multiple Choice &
Matrix of Choices
Questions
• Single Choice /
Multiple Choice allow
1, 2, or 3 Column
Setups
• Date and Time
Configuration
Flexibility
• Matrix Types Now
Allow a Comment
Field
• Matrix Rating
Configuration
Flexibility
Design Options
My Surveys /
Settings
• Adding Images
Directly from your
Computer
• Pre - Designed Survey
Templates for
Specific Industries
• Editing Question Size
and Comment Boxes
• Title Search on My
Surveys Page
• Move/Copy Button
has been Divided
• Sort Titles by
Creation Dates or
Modified Dates
• Option to Delete all
questions on a page
• Progress Bar Feature
• Spell Checker
• Choose to not save IP
addresses or email
addresses in a
specific collector's
settings.
• Advanced Editing
• Advanced Survey
Theme Editing
• Ability to Restore
Deleted Questions
• Print Survey Design
Feature
Page 21
SurveyMonkey Conversion Guide
Appendix 4:
Overview of the features in the Email List and Email Message Center:
Create
an Email
List
Add/Edit
Response
from the
List
Manage/
Track
Emails
Email
List
Search
for
Emails
in a List
Add,
Edit, or
Remove
Emails
Export
the List
by
Status
Create
the
Invite
Message
Access
"Saved
Body"
Messages
Email
Message
Schedule
the
Delivery
Cancel or
ReSchedule
Delivery
Page 22
SurveyMonkey Conversion Guide
Appendix 5:
Overview of the Analyze Section:
Page 23