1
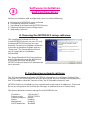
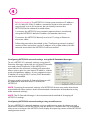
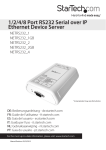
NETRS232
One/Two/Four Port
Quick Installation Guide
Rev. C02
1
Getting Started
Congratulations on your purchase of a StarTech NETRS232. NETRS232s connect serial
devices to Ethernet networks. Any serial device—POS equipment, factory machinery,
monitoring hardware, or security devices, for example—can send its information to the
NETRS232.The NETRS232 places the serial data in a TCP/IP wrapper and sends it out its
Ethernet port. Data moving the other direction, from the Ethernet side of the
NETRS232 to the serial device, undergoes the same process in reverse. StarTech
NETRS232s use industry-standard hardware interfaces and are supported in Windows®
NT4, Windows®2000, Windows® XP, Windows® 2003, Linux, and QNX.
With a NETRS232, you can:
•
•
•
•
•
•
•
Network serial devices
Make devices available to multiple users
Manage multiple serial devices from a single PC
Eliminate long dedicated serial runs
Stop using costly PCs as dedicated serial port servers
Remotely access and control serial devices
Eliminate long-distance phone-modem charges
Included with your package, you should have the following:
•
•
•
•
•
StarTech NETRS232
Power supply
Quad DB-9 cable (NETRS232 Quad version only)
Installation diskette
Quick Installation Guide
Hardware Setup
2
1. Connect the power supply to the NETRS232 and to AC power.
2. The power (red) LED will light to indicate that the unit is receiving power.
3. Connect a network cable to the Ethernet RJ-45 jack of the NETRS232.The other end
of the network cable can be attached to either:
• an Ethernet hub or switch, using a length of standard Ethernet network cable
• a host PC directly, using an Ethernet cross-over cable.
Network status is indicated by two LEDs on the RJ-45 connector.The left (yellow) LED
indicates network activity. It is on by default, turning off when network activity occurs
at the NETRS232.The right (green) LED indicates a network link. It is off by default, but
lights when a network link exists.
Network
Activity and Link
indicators
Network
connector (RJ-45)
Power
indicator
Power
connector
4. Connect a serial device to the NETRS232.
Serial port activity is indicated by two status LEDs per port.The yellow LED lights when
the serial port is transmitting data.The green LED lights when the serial port is
receiving data.
Serial Tx
indicators
Serial Tx
indicator
Serial 2
connector
(DB-9 shown)
Serial connector
(DB-9 shown)
Serial Rx
indicator
Single Port
Serial 1
connector
(DB-9 shown)
Serial Rx
indicators
Dual Port
Software Installation
and Configuration
3
Software installation and configuration consists of the following:
A. Running the NETRS232 setup software
B. Configuring network settings
C. Activating and deactivating NETRS232 ports
D. Optional advanced port configuration
E. Upgrading software
A. Running the NETRS232 setup software
The installation diskette has files to
install NETRS232 drivers on your PC and
to detect NETRS232 devices on your
network.To run the installation software,
insert the installation diskette and run
"Setup.exe".The Setup Wizard will ask
you to supply basic installation
information.
The Setup Wizard will finish by opening
the IP-Extender Manager. By default the
IP-Extender Manager will display
NETRS232 devices that it has detected on
your network.
B. Configuring network settings
The IP-Extender Manager displays NETRS232 information in a Windows Explorer-like
interface. Any NETRS232 devices that are discovered on your network are displayed in
the "IP-Extenders Near Me" branch of the "My IP-Extender Network" tree.
NETRS232 devices installed on your network will need unique IP addresses.These can
be set by using either the IP-Extender Manager, a web browser, or a Telnet client.
The factory default network settings for the NETRS232 are:
IP address:
Subnet mask:
Gateway address:
Name:
Workgroup:
DHCP detection:
192.168.0.35
255.255.255.0
0.0.0.0
[empty]
[empty]
disabled
4
Before Proceeding: The NETRS232 is factory preset with an IP address
of 192.168.0.35. If this IP address cannot be used on the network (it
may already in use, for instance), do not initially connect the
NETRS232 to the network. Instead, either:
1) connect the NETRS232 to a network segment that is not already
using the NETRS232 default IP address for another device or,
2) connect the NETRS232 directly to a host PC using an Ethernet
crossover cable.
Follow the procedure described in the "Configuring network settings"
section of this manual to set the IP address to a usable address for the
network onto which the NETRS232 will be installed.
Configuring NETRS232 network settings using the IP-Extender Manager
To set a NETRS232's network settings using the IPExtender Manager, right-click on it in the IP-Extender
tree and select “Properties”. If the NETRS232 is
accessible on the network, a dialog will open that
allows you to give it a new name, IP address, subnet
mask, and gateway address. If your network assigns
IP addresses using a DHCP server, DHCP detection
can also be enabled.
Changes made using the IP-Extender Manager will
be updated to both the local PC and to the
NETRS232.
NOTE: Changing the network settings of a NETRS232 device may make that device
unavailable to other stations that have activated a connection to that device using
older network settings.
NOTE: The IP-Extender Manager is the recommended method of changing all
NETRS232 settings.
Configuring NETRS232 network settings using a web browser
To set a NETRS232's network settings using a web browser, open the browser and
enter the IP address of the NETRS232 into the browser's location bar.The embedded
web server running on the NETRS232 will display the opening screen of the NETRS232
configuration menu.
5
Choose the setting you wish to change.
In the configuration screen that appears,
enter the network settings you wish for
that NETRS232 device. Once the new
values are entered and accepted, the
NETRS232 will reboot to implement the
new network settings.
Changes made using a web browser will
be updated to the NETRS232 but not to
the local PC.
NOTE: Changing the network settings of
a NETRS232 device may make that device
unavailable to other stations that have
activated a connection to that device using older network settings.
Configuring NETRS232 network settings using a Telnet client
To set a NETRS232's network settings
using a Telnet client, open a Telnet
session to the IP address of the link
whose settings you want to change.
Details on Telnet connection can be
found in the “telnet.pdf” file on the
Installation diskette.
C. Activating & Deactivating NETRS232 ports
NETRS232 ports that have been detected as existing on the network are not initially
activated for your PC.To access a NETRS232 port it must be activated.You may wish to
activate on a given computer some, all, or
none of the NETRS232 ports that are
available on the network.To activate a
particular port, right click on the port
where it is displayed in the right panel of
the IP-Extender Manager, and select
"Activate".To activate all ports on a
particular NETRS232 device, right click on
that device in the left panel of the
Manager and select “Activate All”.
Before activation, NETRS232 ports only appear under the "My IP-Extender Network"
branch of the IP-Extender Desktop. Once they have been activated for a local system,
they will also appear under "My Computer" in the IP-Extender Manager.
To deactivate ports individually, right-click on the port where it is displayed in the right
panel of the IP-Extender Manager, and select "Deactivate".To deactivate all ports on a
6
particular NETRS232 device, right click on that device in the left panel of the Manager
and select “Remove All”.
Icons depict the states of NETRS232 devices and ports as follows:
Device available
on the
network
Device not
available on the
network
Under “My Computer”:
Port available
Under “My Computer”:
Port not available
Under “My Ether Link Network”:
Port activated locally
Under “My Ether Link Network”:
Port not activated locally
Activated ports appear in Windows’ Device Manager under the "Ports (COM & LPT)"
branch as "IP-Extender" ports, with their associated COM numbers.
Activating and deactivating NETRS232 ports on one computer does not affect the
operation of those ports on other systems.
D. Optional advanced port
configuration
NETRS232 ports that have been activated
on your PC can generally be used
immediately without further
configuration. Additional configuration
options can however be accessed
through the IP-Extender Manager.These
configuration options are discussed in
detail in the “advanced.pdf” readme file
on the Installation diskette.
Advanced settings include passwords;
port binding options that can associate a
port with a specified IP address, NetBios
name, or MAC address; port modes for
raw server or client connection, Ethernet
modem operation, RFC 2217
communications, data connect
operation, or RAS server
communications; and a COM port
number reassignment feature.
E. Upgrading software
New versions of NETRS232 software and firmware may be found at www.startech.com.
This device complies with part 15 of the FCC Rules. Operation is subject
to the following conditions: (1) This device may not cause harmful interference,
and (2) this device must accept any interference received, including interference
that may cause undesired operation.