1
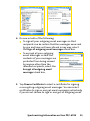
Synchronizing Information on Your Sprint PCS Vision® Smart Device PPC-6700 ©2006 Sprint Nextel. All rights reserved. SPRINT, the "Going Forward" logo, and other trademarks are trademarks of Sprint Nextel. June 7, 2006 Using ActiveSync ActiveSync synchronizes information on your PPC-6700 with information on your PC, such as Outlook content. ActiveSync can also synchronize over a wireless or cellular network with Microsoft Exchange Server, if your company or service provider is running Microsoft Exchange Server with Exchange ActiveSync. When you synchronize, ActiveSync compares the information on your PPC-6700 with the information on your PC and/or Exchange Server and updates all locations with the most recent information. With ActiveSync, you can: Synchronize data, such as Outlook Email, Contacts, Calendar, or Tasks information on your PPC-6700 with your PC, as well as pictures, video, and music. Synchronize Outlook Email, Contacts, Calendar appointments, and Tasks on your PPC-6700 directly with Exchange Server so that you can stay up to date even when your PC is turned off. Exchange files between your PPC-6700 and your PC without synchronizing. Select which types of information are synchronized and specify how much information is synchronized. For example, you can choose how many weeks of past Calendar appointments to synchronize. Before you can synchronize information with a PC, you must first install ActiveSync on your PC and create a synchronization relationship between your PPC-6700 and the PC. You can install ActiveSync from the Getting Started disc that comes with your device. ActiveSync is already installed on your PPC-6700. Once you have installed ActiveSync and set up a synchronization relationship, ActiveSync on the PC recognizes your device when you connect it, and automatically transfers the synchronization settings you specified on your PPC-6700. You may be able to synchronize your device with Exchange Server through your company or wireless service provider. If you plan to do so, obtain the name of the Exchange Server, your user name, password, and domain name from your administrator before starting the Sync Setup Wizard. Synchronizing Information on Your PPC-6700 To install and set up ActiveSync: 1. Install ActiveSync on your PC. After Setup completes, the Sync Setup Wizard automatically starts when you connect your device to the PC. 2. Follow the instructions on the screen to complete the wizard. In the Sync Setup Wizard, do one or both of the following: Create a synchronization relationship between your PC and the device. Configure an Exchange Server connection to synchronize directly with Exchange Server. 3. Choose information types to synchronize. Note: When you finish the wizard, ActiveSync synchronizes your device automatically. Once synchronization completes, you can disconnect your PPC-6700 from your PC. Synchronizing Information When you connect your PPC-6700 to the PC using a USB cable, an infrared connection, or a Bluetooth connection, ActiveSync will immediately synchronize. While the device is connected, ActiveSync synchronizes every time you make a change on either the PC or the device. Synchronize Outlook Information If you have set up a synchronization relationship between your PPC-6700 and the PC, synchronization keeps Outlook information up-to-date in both your device and PC. ActiveSync synchronizes a limited amount of information by default to save storage space on your device. You can change the amount of information synchronized for a given information type in Settings for the information type. Synchronizing Information on Your PPC-6700 You can set up your PPC-6700 to synchronize with more than one PC or with a combination of one or more PCs and Exchange Server. When synchronizing with multiple computers, the items that you synchronize will appear on all of the computers with which they are synchronized. For example, if you have set up synchronization with two PCs (PC1 and PC2), which have different items, and you synchronize Contacts and Calendar on the device with both computers, the result is as follows: Location New state PC1 All Outlook contacts and calendar appointments that were on PC2 are now also on PC1. PC2 All Outlook contacts and calendar appointments that were on PC1 are now also on PC2. Device All Outlook contacts and calendar appointments from both PC1 and PC2 are on the device. Note: Outlook email can be synchronized with only one computer. To start and stop synchronization: To synchronize Outlook information and other local information on the PC, including media files, connect your PPC-6700 to the PC using Bluetooth, infrared (IR), or a cable or cradle. If you are synchronizing directly with Exchange Server, you can use this connection to the PC to “pass through” to the network, or you can synchronize without connecting to the PC over a cellular or Wi-Fi network. In ActiveSync, tap Sync. To end synchronization before it completes, tap Stop. Synchronizing Information on Your PPC-6700 To change which information is synchronized: 1. In ActiveSync on the device, tap Menu > Options. 2. Do one or both of the following: Select the check box for any items you want to synchronize. If you cannot select a check box, you might have to clear the check box for the same information type elsewhere in the list. Clear the check box for any items you want to stop synchronizing. 3. To stop synchronizing with one PC completely, tap the PC, and then tap Delete. Outlook email can be synchronized with only one computer. Notes: To change available synchronization settings, select the type of information and tap Settings. To synchronize directly with Exchange Server: You can set up synchronization with Exchange Server on your PPC-6700, if it is available to you through your company or wireless service provider. However, you should first ask your administrator for the following information and then carry on with the steps: Exchange Server name, your user name, password, and domain name. 1. In ActiveSync on the device, tap Menu > Configure Server. If you have not yet set up synchronization with Exchange Server, this will say Add Server Source. 2. In Server address, enter the name of the server running Exchange Server, and then tap Next. 3. Enter your user name, password, and domain, and then tap Next. To change the rules for resolving synchronization conflicts, tap Advanced. 4. Select the check boxes for the types of information items that you want to synchronize with Exchange Server. Synchronizing Information on Your PPC-6700 5. To change available synchronization settings, select the type of information, and then tap Settings. 6. Tap Finish. Schedule Synchronization With Exchange Server You can schedule information to be synchronized automatically between your device and the Exchange Server, or schedule synchronization at regular time intervals. Choose between these two methods, depending on your email volume and which method you think is more cost-effective. To receive emails and synchronize other information instantly: The Direct Push technology (Push E-Mail feature) enables you to receive new emails on your device as soon as they arrive in your Inbox on the Exchange Server. With this feature, items such as contacts, calendar and tasks are also immediately updated onto your device when these items have been changed or new entries have been added on the Exchange Server. To make Direct Push work, you need to have a 1XRTT or EVDO dial-up connection on your device. For the Direct Push feature to work for your device, your private network (for example, your company’s network) must be using Microsoft Exchange Server Service Pack 2 (SP2) with Exchange ActiveSync, and you must have already completed your first full synchronization with the Exchange Server on your device. Using Comm Manager 1. On the Today screen, tap Start > Programs > Comm Manager. 2. On the Comm Manager screen, tap the Microsoft Direct Push button . The button will turn to ; this indicates that you will receive emails as they arrive. When the button is in the state, you need to manually retrieve your emails. Synchronizing Information on Your PPC-6700 Using ActiveSync 1. In ActiveSync on your device, tap Menu > Schedule. 2. Select As items arrive in the Peak times and Off-peak times boxes. Note: When the dial-up and Wi-Fi connections are turned on at the same time, the Direct Push feature will always go through the dial-up connection, for which you could be charged as per your network operator’s service plan. To schedule synchronization at regular time intervals: You can set how often to synchronize during Peak times (which usually refer to your working hours) when email volume is high, as well as Off-peak times when email volume is low. 1. In ActiveSync on your device, tap Menu > Schedule. 2. Select a shorter time interval in the Peak times box for you to be able to receive emails more frequently. 3. Select a longer interval in the Off-peak times box. Tip: To set the days and hours that make up your peak and off-peak times, tap Adjust peak times to fit your schedule. Synchronizing Information on Your PPC-6700 Synchronizing Via Infrared and Bluetooth You can use local wireless technologies such as infrared (IR) and Bluetooth to establish a connection and synchronize your PPC-6700 with your PC. To synchronize with a PC via infrared: 1. Follow the instructions in ActiveSync Help on the PC for setting up your PC to receive infrared beams. 2. Line up the infrared ports according to the instructions in the manufacturer’s documentation for your PPC-6700, so that they are unobstructed and within close range. 3. On the device, tap Start > Programs > ActiveSync. 4. Tap Menu > Connect via IR. 5. Tap Sync. To synchronize with a PC via Bluetooth: 1. Follow the instructions in ActiveSync Help on the PC for configuring Bluetooth on your PC to support ActiveSync. 2. On the device, tap Start > Programs > ActiveSync. 3. Tap Menu > Connect via Bluetooth. Make sure that Bluetooth is turned on at the device and the PC, and that they are within close range. 4. If this is the first time you have connected to this PC via Bluetooth, you must first complete the Bluetooth wizard on the device and set up a Bluetooth partnership between your PPC-6700 and the PC. For more information about enabling and configuring Bluetooth, see your device's full user guide. Note: You can also use the Sync Setup Wizard to set up the device to synchronize remotely with Exchange Server. This wizard is started when you connect your PPC-6700 to your PC after installing ActiveSync on the PC. Synchronizing Information on Your PPC-6700 Synchronizing Music, Video, and Pictures If you want to carry your music or other digital media along with you while you travel, works with Windows Media Player to synchronize music, video, and pictures with your PPC-6700. Other than selecting the Media information type in ActiveSync to be synchronized, all media synchronization settings must be set in Windows Media Player. Before media can be synchronized, you must do the following: Install Windows Media Player Version 10 on the PC. Connect your PPC-6700 to the PC with a USB cable. If the device is currently connected using Bluetooth or infrared, you must end that connection before media can be synchronized. Insert a miniSD card into your PPC-6700 (32MB or larger is recommended). Set up a sync partnership between the storage card and Windows Media Player. Change Media Synchronization Settings Once you select the Media information type in ActiveSync to be synchronized, any of your favorite music, video, and picture files in Windows Media Player playlists can be synchronized. All you have to do is set up synchronization in Windows Media Player for those media files. To set up a sync relationship with a storage card: 1. Open Windows Media Player. 2. Click the Sync tab. 3. Select the storage card. 4. Click Set up Sync. For information about using Windows Media Player on the device, see the full user guide. Synchronizing Information on Your PPC-6700 Setting Up Email Security Windows Mobile on your device protects your Outlook emails through Secure/Multipurpose Internet Mail Extension (S/MIME), which allows you to digitally sign your messages as well as encrypt them. Using authorization keys and certificates, S/MIME allows you to digitally sign your email messages to prove your identity to the recipients. Authorization keys are also used when encrypting messages to improve privacy and prevent undue tampering or hacking of your messages. You can encrypt a message with or without a certificate. However, to read an encrypted message, you need a valid certificate for decrypting email messages. Note: S/MIME encryption and digital signatures for Windows Mobile-based devices are available only with Exchange Server 2003 Service Pack 2 or a later version that supports S/MIME. If you aren’t using one of these products, or have not yet synchronized, these options are unavailable. Digitally Sign and Encrypt All Messages ActiveSync allows you to set up S/MIME email encryption and signing. You will have to obtain a valid certificate for signing or encrypting email before you will be able to sign or encrypt mail successfully. 1. Tap Start > Programs > ActiveSync. 2. Tap Menu > Options. 3. Select the Email information type, and tap Settings. On the Email Sync Options screen, tap Advanced. 10 Synchronizing Information on Your PPC-6700 4. Do one or both of the following: To sign all your outgoing email messages so that recipients can be certain that the messages were sent by you and have not been altered in any way, select the Sign all outgoing email messages check box. To encrypt all your outgoing email messages so that the contents of your messages are protected from being viewed by anyone other then the intended recipients, select the Encrypt all outgoing email messages check box. 5. Tap Choose Certificate to select a certificate for signing or encrypting outgoing email messages. You can select certificates to sign or encrypt email messages individually if you do not choose to sign or encrypt all outgoing email. Synchronizing Information on Your PPC-6700 11