1
3-227-098-32 (1)
FM/MW/SW
Cassette Car Stereo
Operating Instructions
GB
Manual de instrucciones
ES
CT
For installation and connections, see the supplied installation/connections manual.
Para obtener información sobre la instalación y las conexiones, consulte el manual de
instalación/conexiones suministrado.
XR-CA620X
© 2001 Sony Corporation
Welcome !
Thank you for purchasing this Sony Cassette
Player. You can enjoy its various features even
more with:
• Optional CD/MD units (both changers and
players)*1.
• CD TEXT information (displayed when a CD
TEXT disc*2 is played on a connected optional
CD unit with the CD TEXT function).
• Optional TV/Video units*1
• Supplied controller accessory
Card remote commander RM-X114
• Optional controller accessory
Rotary commander RM-X4S
*1 This unit works with Sony products only.
*2 A CD TEXT disc is an audio CD that includes
information such as the disc name, artist name,
and track names. This information is recorded on
the disc.
2
Table of Contents
Location of controls . . . . . . . . . . . . . . . . . . . 4
Precautions . . . . . . . . . . . . . . . . . . . . . . . . . . 6
Notes on Cassettes . . . . . . . . . . . . . . . . . . . . . 6
Getting Started
Resetting the unit . . . . . . . . . . . . . . . . . . . . . . 7
Detaching the front panel . . . . . . . . . . . . . . . 7
Setting the clock . . . . . . . . . . . . . . . . . . . . . . 8
Cassette Player
Listening to a tape . . . . . . . . . . . . . . . . . . . . . 9
Playing a tape in various modes . . . . . . . . . . 9
Radio
Storing stations automatically
— Best Tuning Memory (BTM). . . . . . . 10
Receiving the stored stations . . . . . . . . . . . . 10
Storing only the desired stations . . . . . . . . . 11
Storing station names
— Station Memo. . . . . . . . . . . . . . . . . . . 11
Tuning in a station through a list
— List-up . . . . . . . . . . . . . . . . . . . . . . . . 12
Other Functions
Using the rotary commander . . . . . . . . . . . . 13
Adjusting the sound characteristics . . . . . . . 14
Quickly attenuating the sound . . . . . . . . . . . 14
Changing the sound and display settings
— Menu . . . . . . . . . . . . . . . . . . . . . . . . . 15
Selecting the sound position
— My Best sound Position (MBP) . . . . . 16
Setting the equalizer . . . . . . . . . . . . . . . . . . 16
CD/MD Unit (optional)
Playing a CD or MD . . . . . . . . . . . . . . . . . .
Display items . . . . . . . . . . . . . . . . . . . . . . .
Playing tracks repeatedly
— Repeat Play . . . . . . . . . . . . . . . . . . . .
Playing tracks in random order
— Shuffle Play. . . . . . . . . . . . . . . . . . . .
Labelling a CD
— Disc Memo . . . . . . . . . . . . . . . . . . . .
Locating a disc by name
— List-up . . . . . . . . . . . . . . . . . . . . . . . .
Selecting specific tracks for playback
— Bank . . . . . . . . . . . . . . . . . . . . . . . . .
17
18
18
18
19
20
20
TV/Video (optional)
Watching the TV. . . . . . . . . . . . . . . . . . . . . 21
Watching a video . . . . . . . . . . . . . . . . . . . . 21
Storing TV channels automatically. . . . . . . 22
Storing only the desired TV channels. . . . . 22
Watching the TV or video while listening to a
tape, CD or MD
— Simultaneous Play . . . . . . . . . . . . . . . 22
Additional Information
Maintenance . . . . . . . . . . . . . . . . . . . . . . . .
Removing the unit. . . . . . . . . . . . . . . . . . . .
Specifications . . . . . . . . . . . . . . . . . . . . . . .
Troubleshooting . . . . . . . . . . . . . . . . . . . . .
Error displays . . . . . . . . . . . . . . . . . . . . . . .
23
24
25
26
27
3
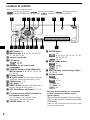
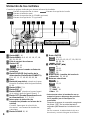
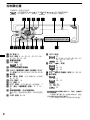
Location of controls
Refer to the pages listed for details.
TAPE : During tape playback RADIO : During radio reception
MENU : During menu mode
CD/MD : During CD/MD playback (optional)
TV : During TV reception (optional)
XR-CA620X
a MBP button 16
b MENU button 8, 9, 10, 11, 12, 15, 16,
17, 19, 20, 21, 22
c Volume control dial
d LIST button
RADIO 11, 12
CD/MD 19, 20
e Receptor for the card remote
commander
f SOURCE (Power on/Tape/Radio/CD/
MD/TV) button 5, 9, 10, 11, 16, 17, 19,
21, 22, 23
g Display window
h Z (eject) button (located on the front side
of the unit, behind the front panel) 9, 23
i OPEN button 7, 9
j EQ7 button 16
k RESET button (located on the front side of
the unit, behind the front panel) 7
l OFF (Stop/Power off) button* 5, 7, 9,
17
m Frequency select switch (located on
the bottom of the unit)
See “Frequency select switch” in the
Installation/Connections manual.
n SOUND button 14, 16
4
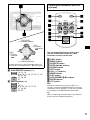
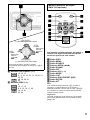
o ENTER button
RADIO 12
MENU 8, 9, 10, 11, 12, 15, 16, 17, 19,
20, 21, 22, 23
CD/MD 19, 20
p MODE (o) button
9
TAPE
RADIO 10, 11
CD/MD 17, 19
21
TV
q DSPL (display mode change) button
12, 18, 19
r Number buttons
TAPE
(1) REP 9
RADIO 10, 11
CD/MD
(1) REP 18
(2) SHUF 18
22
TV
* Warning when installing in a car without
an ACC (accessory) position on the
ignition switch
After turning off the ignition, be sure to press
(OFF) on the unit for 2 seconds to turn off the
clock display.
Otherwise, the clock display does not turn off and
this causes battery drain.
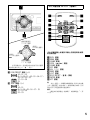
Card remote commander RM-X114
(optional)
DSPL
MODE
PRESET +
MENU
SEEK–
SOUN
D
DISC +
SOURCE
DISC –
LIST
SEEK+
R
ENTE
PRESET –
OFF
+
ATT
VOL
(DISC/PRESET)
(+): to select upwards
–
(SEEK)
(+): to select
rightwards/
>
The corresponding buttons of the card
remote commander control the same
functions as those on this unit.
(SEEK)
(–): to select
leftwards/
.
(DISC/PRESET)
(–): to select downwards
In menu mode, the currently selectable button (s)
of these four are indicated with a “ M” in the display.
s DISC/PRESET buttons (+/–)
RADIO 10, 11, 12
MENU 8, 9, 10, 11, 12, 15, 16, 17, 19,
20, 21, 22
CD/MD 17, 19, 20
21
TV
t SEEK buttons (–/+)
TAPE 9
RADIO 10, 11
MENU 8, 9, 14, 15, 16, 17, 21
CD/MD 17, 19, 20
22, 23
TV
a
b
c
d
e
f
g
h
i
j
k
l
DSPL button
MENU button
SOURCE button
SEEK (</,) buttons
SOUND button
OFF button
VOL (–/+) buttons
MODE button
LIST button
DISC/PRESET(M/m) buttons
ENTER button
ATT button
Note
If the units is turned off by pressing (OFF) for 2
seconds, it cannot be operated with the card remote
commander unless (SOURCE) on the unit is pressed,
or a cassette is inserted to activate the unit first.
Tip
Refer to “Replacing the lithium battery” for details on
how to replace the batteries (page 24).
5
Precautions
Notes on Cassettes
• If your car was parked in direct sunlight, allow
the unit to cool off before operating it.
• If no power is being supplied to the unit, check
the connections first. If everything is in order,
check the fuse.
• If no sound comes from the speakers of a twospeaker system, set the fader control to the
centre position.
• When a tape is played back for a long period,
the cassette may become warm because of the
built-in power amplifier. However, this is not a
sign of malfunction.
Cassette care
If you have any questions or problems
concerning your unit that are not covered in this
manual, please consult your nearest Sony dealer.
• Do not touch the tape surface of a cassette, as
any dirt or dust will contaminate the heads.
• Keep cassettes away from equipment with
built-in magnets such as speakers and
amplifiers, as erasure or distortion on the
recorded tape could occur.
• Do not expose cassettes to direct sunlight,
extremely cold temperatures, or moisture.
• Slack in the tape may cause the tape to be
caught in the machine. Before you insert the
tape, use a pencil or similar object to turn the
reel and take up any slack.
To maintain high quality sound
Be careful not to splash juice or other soft drinks
onto the unit or tapes.
Slack
• Distorted cassettes and loose labels can cause
problems when inserting or ejecting tapes.
Remove or replace loose labels.
• The sound may become distorted while playing
the cassette. The cassette player head should be
cleaned after each 50 hours of use.
The use of cassettes longer than 90 minutes
is not recommended except for long
continuous play
The tape used for these cassettes is very thin and
tends to stretch easily.
Frequent playing and stopping of these tapes
may cause them to become entangled in the
cassette deck mechanism.
6
Getting Started
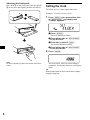
Detaching the front panel
You can detach the front panel of this unit to
protect the unit from being stolen.
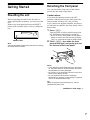
Resetting the unit
Before operating the unit for the first time or
after replacing the car battery, you must reset the
unit.
Remove the front panel and press the RESET
button with a pointed object, such as a ballpoint
pen.
Caution alarm
If you turn the ignition switch to the OFF
position without removing the front panel, the
caution alarm will beep for a few seconds.
If you connect an optional amplifier and do not
use the built-in amplifier, the beep sound will be
deactivated.
1
RESET button
Note
Pressing the RESET button will erase the clock setting
and some stored contents.
Press (OFF)*.
Tape playback or radio reception stops (the
key illumination and display remain on).
* If your car has no ACC position on the ignition
switch, be sure to turn the unit off by pressing
(OFF) for 2 seconds to avoid car battery drain.
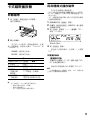
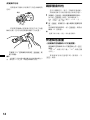
2
Press (OPEN), then slide the front
panel to the right, and gently pull out
the left end of the front panel.
1
2
Notes
• If you detach the panel while the unit is still turned
on, the power will turn off automatically to prevent
the speakers from being damaged.
• Do not drop or put excessive pressure on the front
panel and its display window.
• Do not subject the front panel to heat/high
temperature or moisture. Avoid leaving it in parked
cars or on dashboards/rear trays.
Tip
When carrying the front panel with you, use the
supplied front panel case.
continue to next page t
7
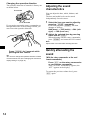
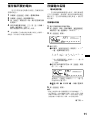
Attaching the front panel
Place hole A of the front panel onto the spindle
B on the unit, then lightly push the left side in.
Setting the clock
The clock uses a 12-hour digital indication.
Example: To set the clock to 10:08
1
Press (MENU), then press either side
of (DISC/PRESET) repeatedly until
“CLOCK” appears.
1 Press (ENTER).
The hour indication flashes.
2 Press either side of (DISC/PRESET)
to set the hour.
x
3 Press the (+) side of (SEEK).
The minute indication flashes.
4 Press either side of (DISC/PRESET)
to set the minute.
2
Note
Do not put anything on the inner surface of the front
panel.
Press (ENTER).
The clock starts. After the clock setting is
completed, the display returns to normal play
mode.
Tip
When D.INFO mode is set to ON, the time is always
displayed (page 15).
8
Cassette Player
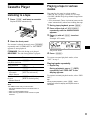
Listening to a tape
1
Press (OPEN) and insert a cassette.
Playback starts automatically.
Playing a tape in various
modes
You can play the tape in various modes:
• METAL lets you play a metal or CrO2 tape.
• BL.SKP (Blank Skip) skips blanks longer than
8 seconds.
• ATA (Automatic Tuner Activation) turns on the
tuner automatically when fast-winding the tape.
1
2
3
2
During tape playback, press (MENU).
Press either side of (DISC/PRESET)
repeatedly until the desired mode
appears.
Press (+) side of (SEEK) to select
“ON.”
Example: ATA mode
Close the front panel.
If a cassette is already inserted, press (SOURCE)
repeatedly until “FORWARD” or “REVERSE”
appears to start playback.
Play mode starts.
FORWARD: The side facing up is played.
REVERSE: The side facing down is played.
4
To
To return to normal playback mode, select
“OFF” in step 3.
Press
Change the tape’s (MODE) (o)
playback direction
Stop playback
(OFF)
Eject the cassette
(OPEN) then Z
Skip tracks
– Automatic
Music Sensor
(SEEK) (./>)
[once for each track]
Fast-forward/
reverse
– Manual Search
(SEEK) (m/M)
[hold to desired point]
Note
The AMS function may not work when:
– the blanks between tracks are shorter than 4
seconds.
– there is noise between tracks.
– there are long sections of low volume or quiet
sections.
Press (ENTER).
Playing tracks repeatedly
— Repeat Play
During playback, press (1) (REP)
repeatedly until “REP-ON” in the
display appears.
To return to normal playback mode, select “REPOFF.”
Tip
During repeat playback, press (MODE). “REP”
disappears from the display and repeat mode is
cancelled.
9
Radio
The unit can store up to 6 stations per band
(FM1, FM2, FM3, MW, SW1, and SW2).
Receiving the stored stations
1
Press (SOURCE) repeatedly to select
the radio.
2
Press (MODE) repeatedly to select the
band.
3
Press the number button ((1) to (6))
on which the desired station is stored.
Caution
When tuning in stations while driving, use Best
Tuning Memory to prevent accidents.
Storing stations
automatically
— Best Tuning Memory (BTM)
The unit selects the stations with the strongest
signals within the selected band, and stores them
in the order of their frequency.
1
Press (SOURCE) repeatedly to select
the radio.
2
Press (MODE) repeatedly to select the
band.
3
Press (MENU), then press either side
of (DISC/PRESET) repeatedly until
“BTM” appears.
4
Press (ENTER).
A beep sounds when the setting is stored.
Notes
• If only a few stations can be received due to weak
signals, some number buttons will retain their former
settings.
• When a number is indicated in the display, the unit
starts storing stations from the one currently
displayed.
Tip
Press either side of (DISC/PRESET) to receive the
stations in the order they are stored in the memory
(Preset Search function).
If preset tuning does not work
Press either side of (SEEK) to search
for the station (automatic tuning).
Scanning stops when the unit receives a
station. Repeat until the desired station is
received.
Tips
• If automatic tuning stops too frequently, turn on the
Local Seek to limit seek to stations with stronger
signals (see “Changing the sound and display
settings” on page 15).
• If you know the frequency of the station you want to
listen to, press and hold either side of (SEEK) to
locate the approximate frequency, then press
(SEEK) repeatedly to fine adjust to the desired
frequency (manual tuning).
If FM stereo reception is poor
Select monaural reception mode.
(see “Changing the sound and display
settings” on page 15). The sound improves,
but becomes monaural (“ST” disappears).
Note
If interference occurs, this unit will automatically
narrow the reception frequency to eliminate noise (IF
AUTO function). In such cases, some FM stereo
broadcasts may become monaural while in the stereo
reception mode.
Tip
To always hear FM stereo broadcasts in stereo, you
can change the IF AUTO setting and widen the
frequency signal reception (see “Changing the sound
and display settings” on page 15). Note that some
interference may occur in this setting.
10
Storing only the desired
stations
You can manually preset the desired stations on
any chosen number button.
1
Press (SOURCE) repeatedly to select
the radio.
2
Press (MODE) repeatedly to select the
band.
3
Press either side of (SEEK) to tune in
the station that you want to store.
4
Press the desired number button ((1)
to (6)) for 2 seconds until “MEM”
appears.
The number button indication appears in the
display.
Storing station names
— Station Memo
You can assign a name to each radio station and
store it in memory. The name of the station
currently tuned in appears in the display. You can
assign a name using up to 8 characters for a
station.
Storing the station names
1
Tune in a station whose name you
want to store.
2
Press (MENU), then press either side
of (DISC/PRESET) repeatedly until
“NAMEEDIT” appears.
3
Press (ENTER).
4
Enter the characters.
Note
If you try to store another station on the same number
button, the previously stored station will be erased.
1 Press the (+)*1 side of
(DISC/PRESET) repeatedly to select
the desired character.
AtBtC…t0t1t2…t+
t–t
… t _*2 t A
*
*1 For reverse order, press the (–) side of
(DISC/PRESET).
*2 (blank space)
2 Press the (+) side of (SEEK) after
locating the desired character.
If you press the (–) side of (SEEK), you
can move back to the left.
3 Repeat steps 1 and 2 to enter the
entire name.
5
Press (ENTER).
Tips
• Simply overwrite or enter “_” to correct or erase a
name.
• There is another way to start storing station names:
Press (LIST) for 2 seconds instead of performing
steps 2 and 3. You can also complete the operation
by pressing (LIST) for 2 seconds instead of step 5.
continue to next page t
11
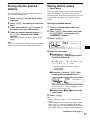
Displaying the station name
Switch the display item to frequency or station
name*.
Tuning in a station through a
list
To
Press
— List-up
Switch display
item
(DSPL) during radio
reception
1
During radio reception, press (LIST)
momentarily.
The frequency or the name assigned to the
station currently tuned in flashes.
2
Press either side of (DISC/PRESET)
repeatedly until you find the desired
station.
If no name is assigned to the selected station,
the frequency appears in the display.
3
Press (ENTER) to tune in the desired
station.
* If the station name is not stored, “NO NAME”
appears in the display for one second.
Erasing the station name
1
2
3
During radio reception, press (MENU),
then press either side of
(DISC/PRESET) repeatedly until “NAME
DEL” appears.
Press (ENTER).
Press either side of (DISC/PRESET)
repeatedly to select the station whose
name you want to erase.
4
Press (ENTER) for 2 seconds.
The name is erased.
Repeat steps 3 to 4 if you want to erase other
names.
5
Press (MENU) twice.
The unit returns to normal radio reception
mode.
Note
If you have already erased all of the station names,
“NO DATA” appears in step 4.
12
Note
If you have a TV tuner connected, the list-up indication
will not appear in the display.
Other Functions
You can also control the unit (and optional CD/
MD/TV units) with a rotary commander
(optional).
*1 Only if the corresponding optional equipment is
connected.
*2 If your car has no ACC (accessory) position on the
ignition key switch, be sure to press (OFF) for 2
seconds to turn off the clock indication after turning
off the ignition.
By rotating the control
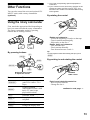
Using the rotary commander
First, attach the appropriate label depending on
how you want to mount the rotary commander.
The rotary commander works by pressing
buttons and/or rotating controls.
SEEK/AMS
control
Rotate and release to:
– Locate the beginning of tracks on the tape.
– Tune in stations automatically.
– Skip tracks on the disc.*1
SOUND
MODE
DSPL
Rotate, hold, and release to:
DSPL
MODE
SOUND
– Fast-wind the tape.
– Find a station manually.
– Fast-forward/reverse a track.*1
By pressing buttons
Tip
To start playback while fast-winding the tape, press
(MODE).
(ATT)
(SOUND)
(MODE)
By pushing in and rotating the control
OFF
(SOURCE)
(DSPL)
(OFF)
Rotate the VOL control
to adjust the volume.
Press
To
(SOURCE)
Change source
(radio/CD*1/MD*1/TV*1/
Tape)
(MODE)
Change operation
(radio band/CD unit*1/MD
unit*1/TV unit*1/tape
playback direction)
(ATT)
Attenuate sound
(OFF)*2
Stop playback or radio
reception
(SOUND)
Adjust the sound menu
(DSPL)
Change the display item
PRESET/
DISC control
Push in and rotate the control to:
– Receive preset stations.
– Change the disc*1.
continue to next page t
13
Changing the operative direction
The operative direction of controls is factory-set
as shown below.
Adjusting the sound
characteristics
To increase
You can adjust the bass, treble, balance, and
fader.
The bass and treble levels can be stored
independently for each source.
To decrease
1
If you need to mount the rotary commander on
the right hand side of the steering column, you
can reverse the operative direction.
Select the item you want to adjust by
pressing (SOUND) repeatedly.
Each time you press (SOUND), the item
changes as follows:
BAS (bass) t TRE (treble) t BAL (leftright) t FAD (front-rear)
2
Adjust the selected item by pressing
either side of (SEEK).
When adjusting with the rotary commander,
press (SOUND) and rotate the VOL control.
Note
Adjust within 3 seconds after selecting the item.
Press (SOUND) for 2 seconds while
pushing the VOL control.
Tip
You can also change the operative direction of these
controls with the unit (see “Changing the sound and
display settings” on page 15).
Quickly attenuating the
sound
(With the rotary commander or the card
remote commander)
Press (ATT) on the rotary commander
or card remote commander.
After “ATT-ON” momentarily appears, the
“ATT” appears in the display.
To restore the previous volume level, press
(ATT) again.
14
Changing the sound and
display settings
— Menu
The following items can be set:
SET (Set Up)
P/M (Play Mode)
• LOCAL-ON/OFF (Local seek mode) (page 10)
– Select “ON” to only tune into stations with
stronger signals.
• MONO-ON/OFF (Monaural mode) (page 10)
– Select “ON” to hear FM stereo broadcast in
monaural. Select “OFF” to return to normal
mode.
• IF AUTO/WIDE (page 10)
• CLOCK (page 8)
• BEEP — to turn the beeps on or off.
• RM (Rotary Commander) — to change the
operative direction of the controls of the rotary
commander.
– Select “NORM” to use the rotary commander
as the factory-set position.
– Select “REV” when you mount the rotary
commander on the right side of the steering
column.
1
Press (MENU).
To set A.SCRL, press (MENU) during CD/
MD Playback.
2
Press either side of (DISC/PRESET)
repeatedly until the desired item
appears.
3
Press the (+) side of (SEEK) to select
the desired setting (Example: ON or
OFF).
DSPL (Display)
4
Press (ENTER).
After the mode setting is completed, the
display returns to normal play mode.
• D.INFO (Dual Information) — to display the
clock and the play mode at the same time (ON).
• M.DSPL (Motion Display) — to select the
Motion Display mode from “1,” “2,” and
“OFF.”
– Select “1” to show decoration lines in the
display and activate Demo display.
– Select “2” to show decoration lines in the
display and deactivate Demo display.
– Select “OFF” to deactivate the Motion
Display.
• A.SCRL (Auto Scroll)*
– Select “ON” to scroll all automatically
displayed names exceeding 8 characters.
– When Auto scroll is set to off and the disc/
track name is changed, the disc/track name
does not scroll.
Note
The displayed item will differ depending on the source.
Tip
You can easily switch among categories (“SET,”
“DSPL,” “SND,” “P/M,” and “EDIT”) by pressing either
side of (DISC/PRESET) for 2 seconds.
* When no CD or MD is playing, this item will not
appear.
SND (Sound)
• LOUD (Loudness) — to enjoy bass and treble
even at low volumes. The bass and treble will
be reinforced.
15
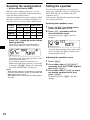
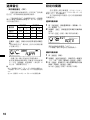
Selecting the sound position
— My Best sound Position (MBP)
When you drive without passengers, you can
enjoy the most comfortable sound environment
with “My Best sound Position.”
“My Best sound Position” has two presets, which
adjust the sound level of balance and fader. You
can select one very easily with the MBP button.
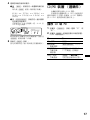
Setting the equalizer
You can select an equalizer curve for seven
music types (XPLOD, VOCAL, CLUB, JAZZ,
NEW AGE, ROCK, CUSTOM, and OFF
(equalizer OFF)).
You can store and adjust the equalizer settings
for frequency and level.
Selecting the equalizer curve
Display
window
Balance Level
Fader Level
Right
Left
Front
Rear
MBP-A
– 4dB
0
0
– 4dB
MBP-B
0
– 4dB
0
– 4dB
MBP-OFF
0
0
0
0
1
Press (SOURCE) to select a source
(radio, CD, MD, tape, or TV).
2
Press (EQ7) repeatedly until the
desired equalizer curve.
Each time you press (EQ7), the item
changes.
Press (MBP) repeatedly for the desired
listening position.
The mode of “My Best sound Position” is
shown in the display in order of the table.
To cancel the equalizing effect, select “OFF.”
After 3 seconds, the display returns to the
normal playback mode.
After one second, the display goes back to the
normal playback mode.
If you want to adjust the sound level of
balance and fader more precisely, you can do
it using the (SOUND) button (see “Adjusting
the sound characteristics” on page 14).
Notes
• When the BAL (balance) or FAD (fader) in “Adjusting
the sound characteristics” (page 14) is adjusted, the
MBP setting returns to OFF.
• When MBP is set to OFF, the BAL and FAD setting is
activated.
16
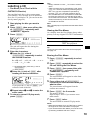
Adjusting the equalizer curve
1
2
3
Press (MENU).
Press either side of (DISC/PRESET)
repeatedly until “EQ7 TUNE” appears,
then press (ENTER).
Press either side of (SEEK) to select
the desired equalizer curve, then
press (ENTER).
Each time you press (SEEK), the item
changes.
4
Select the desired frequency and level.
1 Press either side of (SEEK) to select
the desired frequency.
Each time you press (SEEK), the
frequency changes.
62 (Hz) y 157 (Hz) y 396 (Hz) y
1k (Hz) y 2.5k (Hz) y 6.3k (Hz) y
16k (Hz)
2 Press either side of (DISC/PRESET)
to adjust the desired volume level.
The volume level is adjustable by 1 dB
steps from –10 dB to +10 dB.
CD/MD Unit (optional)
This unit can control external CD/MD units.
If you connect an optional CD unit with the CD
TEXT function and the custom file function, the
CD TEXT information will appear in the display
when you play a CD TEXT disc.
Playing a CD or MD
1
Press (SOURCE) repeatedly to select
“CD” or “MD.”
2
Press (MODE) repeatedly until the
desired unit appears.
CD/MD playback starts.
To
Press
Stop playback
(OFF)
Skip discs
– Disc selection
(DISC/PRESET) (+/–)
Skip tracks
– Automatic
Music Sensor
(SEEK) (./>)
[once for each track]
Fast-forward/
reverse
– Manual Search
(SEEK) (m/M)
[hold to desired point]
To restore the factory-set equalizer curve,
press (ENTER) for 2 seconds.
5
Press (MENU) twice.
When the effect setting is complete, the
normal playback mode appears.
17
Display items
When the disc/track changes, any prerecorded
title*1 of the new disc/track is automatically
displayed (if the Auto Scroll function is set to
“ON,” names exceeding 8 characters will be
scrolled (page 15)).
Displayable items
• Music source
• Clock
• Function
Playing tracks repeatedly
— Repeat Play
You can select:
• REP-1 — to repeat a track.
• REP-2 — to repeat a disc.
During playback, press (1) (REP)
repeatedly until the desired setting
appears in the display.
Repeat Play starts.
To return to normal play mode, select “REPOFF.”
Playing tracks in random
order
Displayable items
• Elapsed playback time
• Disc name*1/artist name*2
• Track title*1
To
Press
Switch display
item
(DSPL)
*1 “NO NAME” indicates there is no Disc Memo (page
19) or prerecorded name to display.
*2 Only for CD TEXT discs with the artist name.
Notes
• Some characters cannot be displayed.
• For some CD TEXT discs with very many
characters, information may not scroll.
• This unit cannot display the artist name for each
track of a CD TEXT disc.
Tip
When Auto scroll is set to OFF and the disc/track
name is changed, the disc/track name does not scroll.
18
— Shuffle Play
You can select:
• SHUF-1 — to play the tracks on the current
disc in random order.
• SHUF-2 — to play the tracks in the current
optional CD (MD) unit in random order.
• SHUF-ALL* — to play all the tracks in all the
connected CD (MD) units in random order.
* Available only when two or more optional CD/MD
units are connected.
During playback, press (2) (SHUF)
repeatedly until the desired setting
appears in the display.
Shuffle Play starts.
To return to normal play mode, select “SHUFOFF.”
Note
“SHUF-ALL” will not shuffle tracks between CD units
and MD units.
Labelling a CD
— Disc Memo (For a CD unit with the
CUSTOM FILE function)
You can label each disc with a custom name
(Disc Memo). You can enter up to 8 characters
for a disc. If you label a CD, you can locate the
disc by name (page 20).
1
Start playing the disc you want to
label.
2
Press (MENU), then press either side
of (DISC/PRESET) repeatedly until
“NAMEEDIT” appears.
3
Press (ENTER).
The unit will repeat the disc during the
labelling procedure.
4
Enter the characters.
1 Press the (+)*1 side of
(DISC/PRESET) repeatedly to select
the desired character.
A t B t C ... t 0 t 1 t 2 ... t + t
– t ... t _*2 t A
*
*1 For reverse order, press the (–) side of
(DISC/PRESET).
*2 (blank space)
2 Press the (+) side of (SEEK) after
locating the desired character.
Tips
• Simply overwrite or enter “_” to correct or erase a
name.
• There is another way to start labelling a CD: Press
(LIST) for 2 seconds instead of performing steps 2
and 3. You can also complete the operation by
pressing (LIST) for 2 seconds instead of step 5.
• You can label CDs on a unit without the CUSTOM
FILE function if that unit is connected along with a
CD unit that has the function. The Disc Memo will be
stored in the memory of the CD unit with the
CUSTOM FILE function.
Note
REP-1/shuffle play is suspended until the Name Edit is
complete.
Viewing the Disc Memo
As a display item, the Disc Memo always takes
priority over any original CD TEXT information.
To
Press
View
(DSPL) during CD/CD
TEXT disc playback
Tip
To find out about other items that can be displayed,
see page 18.
Erasing the Disc Memo
1
Press (SOURCE) repeatedly to select
“CD.”
2
Press (MODE) repeatedly to select the
CD unit storing the Disc Memo.
3
Press (MENU), then press either side
of (DISC/PRESET) repeatedly until
“NAME DEL” appears.
4
Press (ENTER).
The stored names will appear in order from
the earliest entered.
5
Press either side of (DISC/PRESET)
repeatedly to select the disc name you
want to erase.
The stored names will appear from the
earliest ones entered.
6
Press (ENTER) for 2 seconds.
The name is erased.
Repeat steps 5 and 6 if you want to erase
other names.
7
Press (MENU) twice.
The unit returns to normal CD play mode.
If you press the (–) side of (SEEK), you
can move back to the left.
3 Repeat steps 1 and 2 to enter the
entire name.
5
To return to normal CD play mode,
press (ENTER).
Notes
• When the Disc Memo for a CD TEXT disc is erased,
the original CD TEXT information is displayed.
• If you cannot find the Disc Memo you want to erase,
try selecting a different CD unit in step 2.
19
Locating a disc by name
— List-up (For a CD unit with the CD TEXT/
CUSTOM FILE function, or an MD unit)
You can use this function for discs that have been
assigned custom names*1 or for CD TEXT
discs*2.
*1 Locating a disc by its custom name: when you
assign a name for a CD (page 19) or an MD.
*2 Locating discs by the CD TEXT information: when
you play a CD TEXT disc on a CD unit with the CD
TEXT function.
1
2
3
Press (LIST).
The name assigned to the current disc appears
in the display.
Press either side of (DISC/PRESET)
repeatedly until you find the desired
disc.
Selecting specific tracks for
playback
— Bank (For a CD unit with the CUSTOM FILE
function)
If you label the disc, you can set the unit to skip
or play the tracks of your choice.
1
Start playing the disc you want to
label.
2
Press (MENU), then press either side
of (DISC/PRESET) repeatedly until
“BANK SEL” appears.
3
Press (ENTER).
4
Label the tracks.
1 Press either side of (SEEK)
repeatedly to select the track you
want to label.
Press (ENTER) to play the disc.
Notes
• Some letters cannot be displayed (exception: Disc
Memo).
• If the TV tuner XT-40V is connected, the list appears
on the TV monitor instead of the display on the unit.
2 Press (ENTER) repeatedly to select
“PLAY” or “SKIP.”
5
Repeat step 4 to set “PLAY” or “SKIP”
for all the tracks.
6
Press (MENU) twice.
The unit returns to normal CD play mode.
Notes
• You can set “PLAY” and “SKIP” for up to 24 tracks.
• You cannot set “SKIP” for all the tracks on a CD.
20
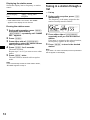
Playing specific tracks only
You can select:
• “BANK-ON” — to play the tracks with the
“PLAY” setting.
• “BANK-INV” (Inverse) — to play the tracks
with the “SKIP” setting.
1
2
3
During playback, press (MENU), then
press either side of (DISC/PRESET)
repeatedly until “BANK-ON,” “BANKINV,” or “BANK-OFF” appears.
Press the (+) side of (SEEK) repeatedly
until the desired setting appears.
Press (ENTER).
Playback starts from the track following the
current one.
To return to normal play mode, select “BANKOFF” in step 2.
TV/Video (optional)
You can connect an optional TV tuner and TV
monitor to this unit.
Watching the TV
1
Press (SOURCE) repeatedly until “TV”
appears.
2
Press either side of (DISC/PRESET)
repeatedly to select the desired TV
band.
Tip
Each time you press (MODE), the item changes as
follows: TV1 t TV2 t AUX
Watching a video
1
Press (SOURCE) repeatedly until “TV”
appears.
2
Press (MODE) repeatedly to select
“AUX.”
Playback the video.
21
Storing TV channels
automatically
Storing only the desired TV
channels
The unit selects the TV channels with the
strongest signals and stores them in the order of
their frequency.
You can store up to 12 channels (6 each for TV1
and 2) on the number buttons in the order of your
choice.
Caution
1
Press (SOURCE) repeatedly until “TV”
appears.
2
Press either side of (SEEK) to tune in
the TV channel you want to store on
each number button.
3
Press the desired number button ((1)
to (6)) until you hear a beep sound.
The number button indication and “MEM”
appear in the display.
When tuning in a station while driving, use Best
Tuning Memory to prevent accidents.
1
Press (SOURCE) repeatedly until “TV”
appears.
2
Press (MENU), then press either side
of (DISC/PRESET) until “AUTO MEM”
appears.
3
Press (ENTER).
The unit stores TV channels in the order of
their frequencies on the number buttons.
A beep sounds when the setting is stored.
Notes
• The unit does not store TV channels with weak
signals. If only a few TV channels can be received,
some number buttons will remain empty.
• When a preset number is indicated in the display,
the unit starts storing TV channels from the one
currently displayed.
Note
If you try to store another channel on the same
number button, the previously stored channel will be
erased.
Watching the TV or video
while listening to a tape, CD
or MD
— Simultaneous Play
The simultaneous play function does not work
while you are listening to the radio.
22
1
Press (MENU), then press either side
of (DISC/PRESET) repeatedly until
“SIMUL-SEL” appears.
2
3
Press (ENTER).
4
Press (SOURCE) repeatedly to select
CD or MD.
Press (–) side of (SEEK).
5
Press (+) side of (SEEK).
Additional Information
6
7
Press (SOURCE) repeatedly to select a
TV or video.
Press (ENTER).
Simultaneous Play starts.
Maintenance
Fuse replacement
When replacing the fuse, be sure to use one
matching the amperage rating stated on the
original fuse. If the fuse blows, check the power
connection and replace the fuse. If the fuse blows
again after replacement, there may be an internal
malfunction. In such a case, consult your nearest
Sony dealer.
If you are already watching the TV or video and
want to listen to a tape, CD or MD as well,
follow the same steps.
Returning to normal mode
Fuse (10 A)
To cancel the CD or MD, select “– – –”
in step 4.
To cancel the TV or video, select
“– – –” in step 6.
Note
If you press Z (EJECT) on this unit or a CD/MD unit
while the unit is in simultaneous play mode,
Simultaneous Play is cancelled.
Warning
Never use a fuse with an amperage rating
exceeding the one supplied with the unit as this
could damage the unit.
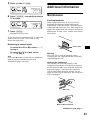
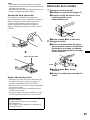
Cleaning the connectors
The unit may not function properly if the
connectors between the unit and the front panel
are not clean. In order to prevent this, detach the
front panel (page 7) and clean the connectors
with a cotton swab dipped in alcohol. Do not
apply too much force. Otherwise, the connectors
may be damaged.
Main unit
Back of the front panel
continue to next page t
23
Notes
• For safety, turn off the ignition before cleaning the
connectors, and remove the key from the ignition
switch.
• Never touch the connectors directly with your fingers
or with any metal device.
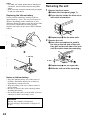
Removing the unit
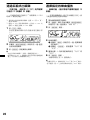
1
Remove the front cover
1 Detach the front panel (page 7).
Replacing the lithium battery
2 Press the clip inside the front cover
with a thin screwdriver.
Under normal conditions, batteries will last
approximately 1 year. (The service life may be
shorter, depending on the conditions of use.)
When the battery becomes weak, the range of the
card remote commander becomes shorter.
Replace the battery with a new CR2025 lithium
battery.
3 Repeat step 2 for the other side.
2
Remove the unit
1 Use a thin screwdriver to push in
the clip on the left side of the unit,
then pull out the left side of the unit
until the catch clears the mounting.
x
+ side up
4 mm
2 Repeat step 1 for the right side.
3 Slide the unit out of its mounting.
Notes on lithium battery
• Keep the lithium battery out of the reach of
children. Should the battery be swallowed,
immediately consult a doctor.
• Wipe the battery with a dry cloth to assure a
good contact.
• Be sure to observe the correct polarity when
installing the battery.
• Do not hold the battery with metallic tweezers,
otherwise a short-circuit may occur.
WARNING
Battery may explode if mistreated.
Do not recharge, disassemble, or dispose of
in fire.
24
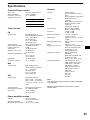
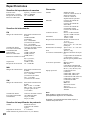
Specifications
Cassette Player section
General
Tape track
Wow and flutter
Frequency response
Signal-to-noise ratio
Outputs
4-track 2-channel stereo
0.08 % (WRMS)
30 – 18,000 Hz
Inputs
Cassette type
TYPE II, IV
61 dB
TYPE I
58 dB
Tuner section
Tone controls
Loudness
FM
Tuning range
FM tuning interval:
50 kHz/200 kHz switchable
87.5 – 108.0 MHz
(at 50 kHz step)
87.5 – 107.9 MHz
(at 200 kHz step)
Aerial terminal
External aerial connector
Intermediate frequency
10.7 MHz/450 kHz
Usable sensitivity
8 dBf
Selectivity
75 dB at 400 kHz
Signal-to-noise ratio
66 dB (stereo),
72 dB (mono)
Harmonic distortion at 1 kHz
0.6 % (stereo),
0.3 % (mono)
Separation
35 dB at 1 kHz
Frequency response
30 – 15,000 Hz
MW
Tuning range
MW tuning interval:
9 kHz/10 kHz switchable
531 – 1,602 kHz
(at 9 kHz step)
530 – 1,710 kHz
(at 10 kHz step)
SW
Tuning range
Aerial terminal
Intermediate frequency
Sensitivity
SW tuning interval:
SW1: 2,940 – 7,735 kHz
SW2: 9,500 – 18,135 kHz
(except for 10,140 – 11,575
kHz)
External aerial connector
10.7 MHz/450 kHz
30 µV (at MW)
40 µV (at SW)
Power requirements
Dimensions
Mounting dimensions
Mass
Supplied accessories
Optional accessories
Optional equipment
Audio outputs
Power aerial relay control
lead
Power amplifier control lead
BUS control input
connector
BUS audio input connector
Remote controller input
connector
Aerial input connector
Bass ±8 dB at 100 Hz
Treble ±8 dB at 10 kHz
100 Hz +8 dB
10 kHz +2 dB
12 V DC car battery
(negative earth)
Approx. 178 × 50 × 181 mm
(w/h/d)
Approx. 182 × 53 × 161 mm
(w/h/d)
Approx. 1.2 kg
Card remote commander (1)
Parts for installation and
connections (1 set)
Front panel case (1)
Rotary commander
RM-X4S
BUS cable (supplied with
an RCA pin cord)
RC-61 (1 m), RC-62 (2 m)
CD changer (10 discs)
CDX-848X, CDX-747X,
CDX-646X, CDX-646
CD changer (6 discs)
CDX-T68X, CDX-T67
MD changer (6 discs)
MDX-65
Source selector
XA-C30
TV tuner
XT-40V
Note
This unit cannot be connected to a digital preamplifier
or an equalizer.
Design and specifications are subject to change
without notice.
Power amplifier section
Outputs
Speaker impedance
Maximum power output
Speaker outputs
(sure seal connectors)
4 – 8 ohms
50 W × 4 (at 4 ohms)
25
Troubleshooting
The following checklist will help you remedy
problems you may encounter with your unit.
Before going through the checklist below, check
the connection and operating procedures.
General
No sound.
• Rotate the volume control dial clockwise to
adjust the volume.
• Cancel the ATT function.
• Set the fader control to the centre position for
a 2-speaker system.
The contents of the memory have been
erased.
• The RESET button has been pressed.
t Store again into the memory.
• The power cord or battery has been
disconnected.
• The power connecting cord is not connected
properly.
No beep sound.
The beep sound is cancelled (page 15).
Indications disappear from/do not appear in
the display.
• The clock display disappears if you press
(OFF) for 2 seconds.
t Press (OFF) again for 2 seconds to
display the clock.
• Remove the front panel and clean the
connectors. See “Cleaning the connectors”
(page 23) for details.
Stored stations and correct time are erased.
The fuse has blown.
Makes noise when the ignition key is in the
ON, ACC, or OFF position.
The leads are not matched correctly with the
car’s accessory power connector.
No power is being supplied to the unit.
• Check the connection. If everything is in
order, check the fuse.
• The car does not have an ACC position.
t Press (SOURCE) (or insert a cassette) to
turn on the unit.
The power is continuously supplied to the
unit.
The car does not have an ACC position.
Tape playback
The sound is distorted.
The tape head is contaminated.
t Clean the head with a commercially
available dry-tape cleaning cassette.
The AMS does not operate correctly.
• There is noise in the space between tracks.
• A blank space is too short (less than 4
seconds).
• A long pause, or a passage of low
frequencies or very low sound level is treated
as a blank space.
Radio reception
Preset tuning is not possible.
• Store the correct frequency in the memory.
• The broadcast signal is too weak.
The stations cannot be received.
The sound is hampered by noises.
• Connect a power aerial control lead (blue) or
accessory power supply lead (red) to the
power supply lead of a car’s aerial booster.
(Only when your car has built-in FM/MW/
SW aerial in the rear/side glass.)
• Check the connection of the car aerial.
• The auto aerial will not go up.
t Check the connection of the power aerial
control lead.
• Check the frequency.
Automatic tuning is not possible.
• The local seek mode is set to “ON.”
t Set the local seek mode to “OFF” (page
15).
• The broadcast signal is too weak.
t Perform manual tuning.
The “ST” indication flashes.
• Tune in the frequency accurately.
• The broadcast signal is too weak.
t Set to the monaural reception mode (page
15).
A programme broadcast in stereo is heard
in monaural.
The unit is in monaural reception mode.
t Cancel monaural reception mode (page
15).
Interference occurs during FM reception.
The wide mode is selected.
t Set the IF mode to “IF AUTO” (page 15).
The power aerial does not extend.
The power aerial does not have a relay box.
CD/MD playback
The sound skips.
Dirty or defective disc.
26
Error displays
(when an optional CD/MD unit is connected)
Error displays
The following indications will flash for about 5
seconds, and an alarm sound will be heard.
NO MAG
The disc magazine is not inserted in the CD/
MD unit.
t Insert the magazine in the CD/MD unit.
NO DISC
No disc is inserted in the CD/MD unit.
t Insert discs in the CD/MD unit.
ERROR*1
• A CD is dirty or inserted upside down.*2
t Clean or insert the CD correctly.
• An MD does not playback because of some
problem.*2
t Insert another MD.
• A CD/MD cannot play because of some
problem.
t Insert another CD/MD.
BLANK*1
No tracks have been recorded on an MD.*2
t Play an MD with recorded tracks on it.
RESET
The CD/MD unit cannot be operated because
of some problem.
t Press the RESET button on the unit.
NOT READ
The lid of the MD unit is open or the MDs are
not inserted properly.
t Close the lid or insert the MDs properly.
HI TEMP
The ambient temperature is more than 50°C.
t Wait until the temperature goes down
below 50°C.
*1 When an error occurs during playback of a CD or
MD, the disc number of the CD or MD does not
appear in the display.
*2 The disc number of the disc causing the error
appears in the display.
If these solutions do not help improve the
situation, consult your nearest Sony dealer.
27
¡Bienvenido!
Gracias por adquirir este reproductor de casetes
Sony. Disfrutará incluso más de sus distintas
funciones con:
• Unidades opcionales de CD/MD (cambiadores
y reproductores)*1.
• Información CD TEXT (mostrada al reproducir
discos CD TEXT*2 en una unidad opcional de
CD conectada con la función CD TEXT).
• Unidades opcionales de TV/Vídeo*1
• Accesorio de controlador suministrado
Mando a distancia de tarjeta RM-X114
• Accesorio de controlador opcional
Mando rotativo RM-X4S
*1 Esta unidad funciona solamente con productos
Sony.
*2 Un disco CD TEXT es un CD de audio que incluye
información, como el nombre del disco, el nombre
del artista y los nombres de las pistas. Esta
información está grabada en el disco.
2
Índice
Ubicación de los controles . . . . . . . . . . . . . . 4
Precauciones . . . . . . . . . . . . . . . . . . . . . . . . . 6
Notas sobre casetes . . . . . . . . . . . . . . . . . . . . 6
Procedimientos iniciales
Restauración de la unidad . . . . . . . . . . . . . . . 7
Extracción del panel frontal. . . . . . . . . . . . . . 7
Ajuste del reloj . . . . . . . . . . . . . . . . . . . . . . . 8
Reproductor de casetes
Audición de cintas . . . . . . . . . . . . . . . . . . . . . 9
Reproducción de cintas en distintos
modos . . . . . . . . . . . . . . . . . . . . . . . . . . . . 9
Radio
Almacenamiento automático de emisoras
— Memoria de la mejor sintonía
(BTM) . . . . . . . . . . . . . . . . . . . . . . . . . . . 10
Recepción de las emisoras almacenadas . . . 10
Almacenamiento de emisoras . . . . . . . . . . . 11
Almacenamiento de nombres de emisoras
— Memorando de emisoras . . . . . . . . . . 12
Sintonización de emisoras mediante lista
— Listado . . . . . . . . . . . . . . . . . . . . . . . . 13
Otras funciones
Uso del mando rotativo . . . . . . . . . . . . . . . . 13
Ajuste de las características de sonido . . . . 15
Atenuación rápida del sonido . . . . . . . . . . . 15
Cambio de los ajustes de sonido y
visualización
— Menú . . . . . . . . . . . . . . . . . . . . . . . . . 15
Selección de la posición del sonido
— My Best sound Position
(Posición óptima de sonido) (MBP) . . . . 16
Ajuste del ecualizador . . . . . . . . . . . . . . . . . 17
Unidad de CD/MD (opcional)
Reproducción de CD o MD . . . . . . . . . . . .
Elementos del visor. . . . . . . . . . . . . . . . . . .
Reproducción repetida de pistas
— Reproducción repetida . . . . . . . . . . .
Reproducción de pistas en orden aleatorio
— Reproducción aleatoria . . . . . . . . . . .
Etiquetado de CD
— Memorando de discos . . . . . . . . . . . .
Localización de discos por nombre
— Listado. . . . . . . . . . . . . . . . . . . . . . . .
Selección de pistas específicas para su
reproducción
— Banco. . . . . . . . . . . . . . . . . . . . . . . . .
18
18
19
19
19
21
21
TV/Vídeo (opcional)
Visualización de la TV . . . . . . . . . . . . . . . . 22
Visualización de vídeos . . . . . . . . . . . . . . . 22
Almacenamiento automático de canales de
TV . . . . . . . . . . . . . . . . . . . . . . . . . . . . . 23
Almacenamiento sólo de los canales de TV
deseados . . . . . . . . . . . . . . . . . . . . . . . . . 23
Visualización de la TV o de vídeos mientras
escucha una cinta, CD o MD
— Reproducción simultánea . . . . . . . . . 23
Información complementaria
Mantenimiento . . . . . . . . . . . . . . . . . . . . . .
Extracción de la unidad. . . . . . . . . . . . . . . .
Especificaciones . . . . . . . . . . . . . . . . . . . . .
Solución de problemas . . . . . . . . . . . . . . . .
Indicaciones de error. . . . . . . . . . . . . . . . . .
24
25
26
27
28
3
Ubicación de los controles
Consulte las páginas indicadas para obtener información detallada.
TAPE : Durante la reproducción de cintas
RADIO : Durante la recepción de la radio
MENU : Durante el modo de menú
CD/MD : Durante la reproducción de CD/MD (opcional)
TV : Durante la recepción de TV (opcional)
XR-CA620X
a Botón MBP 16
b Botón MENU 8, 9, 10, 12, 16, 17, 19,
20, 21, 22, 23
c Dial de control de volumen
d Botón LIST
RADIO 12, 13
CD/MD 20, 21
e Receptor para el mando a distancia
de tarjeta
f Botón SOURCE (Activación de la
alimentación/Cinta/Radio/CD/MD/TV)
5, 9, 10, 11, 17, 18, 20, 22, 23, 24
g Visor
h Botón Z (expulsión) (situado en la parte
frontal de la unidad, detrás del panel frontal)
9, 24
i Botón OPEN 7, 9
j Botón EQ7 17
k Botón RESET (situado en la parte frontal
de la unidad, detrás del panel frontal) 7
l Botón OFF (Parada/Desactivación de
la alimentación)* 5, 7, 9, 18
m Interruptor de selección de
frecuencias (situado en la base de la
unidad)
Consulte “Interruptor de selección de
frecuencias” en el manual de instalación/
conexiones.
n Botón SOUND 15, 16
4
o Botón ENTER
RADIO 12, 13
MENU 8, 9, 10, 12, 16, 17, 19, 20, 21,
22, 23, 24
CD/MD 20, 21
p Botón MODE (o)
9
TAPE
RADIO 10, 11
CD/MD 18, 20
22
TV
q Botón DSPL (cambio del modo de
indicación) 12, 18, 20
r Botones numéricos
TAPE
(1) REP 9
RADIO 10, 11
CD/MD
(1) REP 19
(2) SHUF 19
23
TV
* Advertencia sobre la instalación en un
automóvil que no disponga de posición
ACC (auxiliar) en el interruptor de
encendido
Después de apagar el encendido, asegúrese
de pulsar (OFF) en la unidad durante 2
segundos para desactivar la indicación del
reloj.
En caso contrario, la indicación del reloj no se
desactivará y causará el desgaste de la batería.
Mando a distancia de tarjeta
RM-X114 (opcional)
DSPL
MODE
PRESET +
MENU
SEEK–
SOUN
D
DISC +
SOURCE
DISC –
LIST
SEEK+
R
ENTE
PRESET –
OFF
+
ATT
VOL
(DISC/PRESET)
(+): para seleccionar hacia arriba
(SEEK)
(–): para
seleccionar
hacia la
izquierda/
.
(SEEK)
(+): para
seleccionar
hacia la
derecha/
>
(DISC/PRESET)
(–): para seleccionar hacia abajo
En el modo de menú, el botón o botones
actualmente seleccionables se indican con “ M” en
el visor.
s Botones DISC/PRESET (+/–)
RADIO 10, 12, 13
8, 9, 10, 12, 16, 17, 19, 20, 21,
MENU
22, 23
CD/MD 18, 19, 20, 21
22
TV
t Botones SEEK (–/+)
TAPE 9
RADIO 10, 11, 12
MENU 8, 9, 15, 16, 17, 22
CD/MD 18, 19, 21
23, 24
TV
–
Los botones correspondientes del mando a
distancia de tarjeta controlan las mismas
funciones que los de esta unidad.
a
b
c
d
e
f
g
h
i
j
k
l
Botón DSPL
Botón MENU
Botón SOURCE
Botones SEEK (</,)
Botón SOUND
Botón OFF
Botones VOL (–/+)
Botón MODE
Botón LIST
Botones DISC/PRESET (M/m)
Botón ENTER
Botón ATT
Nota
Si la unidad se apaga pulsando (OFF) durante 2
segundos, no podrá utilizarse con el mando a
distancia de tarjeta, a menos que se pulse (SOURCE)
en la unidad o se inserte un casete para que dicha
unidad se active primero.
Sugerencia
Consulte “Sustitución de la pila de litio” para obtener
información detallada sobre cómo sustituir las pilas
(página 25).
5
Precauciones
Notas sobre casetes
• Si aparca el automóvil bajo la luz solar directa,
permita que la unidad se enfríe antes de
utilizarla.
• Si la unidad no recibe alimentación, compruebe
primero las conexiones. Si todo está en orden,
compruebe el fusible.
• Si no se oye el sonido por los altavoces de un
sistema de dos altavoces, ajuste el control de
equilibrio en la posición central.
• Si la cinta se reproduce durante mucho tiempo,
es posible que el casete se caliente debido al
amplificador de potencia incorporado. No
obstante, no es señal de fallo de
funcionamiento.
Cuidado de los casetes
Si desea realizar alguna consulta o solucionar
algún problema relativo a la unidad que este
manual no trate, consulte con el proveedor Sony
más próximo.
Para mantener una alta calidad de
sonido
Asegúrese de que no se derraman zumos ni
demás bebidas suaves sobre la unidad o las
cintas.
• No toque la superficie de la cinta de los casetes,
ya que la suciedad o el polvo ensuciará los
cabezales.
• Mantenga los casetes alejados de equipos que
contengan imanes incorporados, como
altavoces y amplificadores, ya que la grabación
de la cinta podría borrarse o distorsionarse.
• No exponga los casetes a la luz solar directa, a
temperaturas extremadamente frías ni a la
humedad.
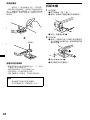
• Si la cinta no está tensa, podría enredarse en el
mecanismo. Antes de insertar la cinta, utilice
un bolígrafo o un objeto similar para girar la
bobina y tensar la cinta.
Holgura
• Los casetes deformados y las etiquetas mal
adheridas pueden causar problemas al insertar
o expulsar las cintas. Retire o cambie las
etiquetas mal adheridas.
• El sonido puede distorsionarse mientras se
reproduce el casete. El cabezal del reproductor
de casetes debe limpiarse tras 50 horas de uso.
No se remienda el uso de casetes de
duración superior a 90 minutos, excepto
para reproducciones largas y continuas
La cinta utilizada en dichos casetes es muy fina y
tiende a estirarse con facilidad.
Las operaciones frecuentes de reproducción y
parada de dichas cintas pueden causar que se
enreden en el mecanismo de la platina de casetes.
6
Procedimientos iniciales
Extracción del panel frontal
Puede extraer el panel frontal de esta unidad para
evitar su robo.
Restauración de la unidad
Alarma de precaución
Antes de utilizar la unidad por primera vez o
después de sustituir la batería del automóvil, es
preciso restaurar dicha unidad.
Extraiga el panel frontal y pulse el botón RESET
con un objeto puntiagudo, como un bolígrafo.
Si gira el interruptor de encendido hasta la
posición OFF sin haber extraído el panel frontal,
la alarma de precaución emitirá pitidos durante
unos segundos.
Si conecta un amplificador opcional de potencia
y no utiliza el incorporado, los pitidos se
desactivarán.
1
Botón RESET
Pulse (OFF)*.
La reproducción de cintas o la recepción de la
radio se detiene (la iluminación de las teclas y
el visor permanecen activados).
* Si el automóvil no dispone de posición ACC en
el interruptor de encendido, asegúrese de
apagar la unidad pulsando (OFF) durante 2
segundos para evitar el desgaste de la batería
del automóvil.
Nota
Al pulsar el botón RESET, se borrará el ajuste del reloj
y algunos contenidos memorizados.
2
Pulse (OPEN), deslice el panel frontal
a la derecha y tire del extremo
izquierdo de dicho panel con
suavidad.
1
2
Notas
• Si extrae el panel con la unidad encendida, la
alimentación se desactivará automáticamente para
evitar que los altavoces se dañen.
• No deje caer ni ejerza excesiva presión sobre el
panel frontal ni sobre su visor.
• No someta el panel frontal al calor ni a altas
temperaturas o humedad. Evite dejarlo en
automóviles aparcados o en salpicaderos o
bandejas traseras.
Sugerencia
Cuando lleve el panel frontal consigo, utilice el
estuche suministrado para el mismo.
continúa en la página siguiente t
7
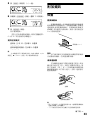
Fijación del panel frontal
Coloque el orificio A del panel frontal sobre el
eje B de la unidad y presione ligeramente sobre
el lado izquierdo para insertarlo.
Ajuste del reloj
El reloj utiliza una indicación digital de 12 horas.
Ejemplo: Para ajustar el reloj a las 10:08
1
Pulse (MENU)y, a continuación,
cualquier lado de (DISC/PRESET)
varias veces hasta que aparezca
“CLOCK”.
1 Pulse (ENTER).
La indicación de hora parpadea.
2 Pulse cualquier lado de
(DISC/PRESET) para ajustar la hora.
x
3 Pulse el lado (+) de (SEEK).
La indicación de minutos parpadea.
4 Pulse cualquier lado de
(DISC/PRESET) para ajustar los
minutos.
2
Nota
No coloque nada sobre la superficie interior del panel
frontal.
Pulse (ENTER).
El reloj se pone en funcionamiento. Al
finalizar el ajuste del reloj, el visor vuelve al
modo de reproducción normal.
Sugerencia
Si el modo D.INFO está ajustado en ON, siempre se
mostrará la hora (página 15).
8
Reproductor de casetes
Audición de cintas
1
2
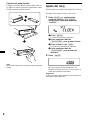
Pulse (OPEN) e inserte un casete.
La reproducción se inicia automáticamente.
Cierre el panel frontal.
Reproducción de cintas en
distintos modos
Puede reproducir la cinta en distintos modos:
• METAL permite reproducir cintas de metal o
de cromo (CrO2).
• BL.SKP (Omisión de espacios en blanco)
omite los espacios en blanco superiores a 8
segundos.
• ATA (Activación automática del sintonizador)
activa el sintonizador de forma automática al
bobinar la cinta rápidamente.
1
Durante la reproducción de la cinta,
pulse (MENU).
2
Pulse cualquier lado de (DISC/PRESET)
varias veces hasta que aparezca el
modo deseado.
3
Pulse el lado (+) de (SEEK) para
seleccionar “ON”.
Ejemplo: Modo ATA
Si ya hay un casete insertado, pulse (SOURCE)
varias veces hasta que aparezca “FORWARD” o
“REVERSE” para iniciar la reproducción.
FORWARD: Se reproduce la cara orientada
hacia arriba.
REVERSE: Se reproduce la cara orientada hacia
abajo.
Para
Pulse
Cambiar el sentido (MODE) (o)
de reproducción de
la cinta
Detener la
reproducción
(OFF)
Expulsar el casete (OPEN) y, a continuación,
Z
(SEEK) (./>)
Omitir pistas
– Sensor de música [una vez por pista]
automático
Avanzar/retroceder (SEEK) (m/M)
[manténgalo pulsado hasta
rápidamente
alcanzar el punto deseado]
– Búsqueda
manual
Se ejecuta el modo de reproducción.
4
Pulse (ENTER).
Para volver al modo de reproducción normal,
seleccione“OFF” en el paso 3.
Reproducción repetida de pistas
— Reproducción repetida
Durante la reproducción, pulse (1)
(REP) varias veces hasta que “REPON” aparezca en el visor.
Para recuperar el modo de reproducción normal,
seleccione“REP-OFF”.
Sugerencia
Durante la reproducción repetida, pulse (MODE).
“REP” desaparece del visor y el modo de repetición se
cancela.
Nota
La función AMS puede no activarse si:
– los espacios en blanco entre las pistas son
inferiores a 4 segundos.
– hay ruido entre las pistas.
– hay largas secciones de volumen bajo o secciones
sin sonido.
9
Radio
Recepción de las emisoras
almacenadas
La unidad puede almacenar hasta 6 emisoras por
banda (FM1, FM2, FM3, MW, SW1 y SW2).
1
Pulse (SOURCE) varias veces para
seleccionar la radio.
2
Pulse (MODE) varias veces para
seleccionar la banda.
3
Pulse el botón numérico ((1) a (6)) en
el que esté almacenada la emisora
deseada.
Precaución
Para sintonizar emisoras mientras conduce,
utilice la función Memoria de la mejor sintonía
para evitar accidentes.
Almacenamiento automático
de emisoras
— Memoria de la mejor sintonía (BTM)
Sugerencia
Pulse cualquier lado de (DISC/PRESET) para recibir
las emisoras en el orden en el que están
almacenadas en la memoria (Función de búsqueda
programada).
La unidad selecciona las emisoras de señal más
intensa dentro de la banda seleccionada y las
almacena por orden de frecuencia.
Si la sintonización programada no
funciona
1
Pulse (SOURCE) varias veces para
seleccionar la radio.
2
Pulse (MODE) varias veces para
seleccionar la banda.
3
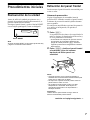
Pulse (MENU)y, a continuación,
cualquier lado de (DISC/PRESET)
varias veces hasta que aparezca
“BTM”.
4
Pulse (ENTER).
La unidad emite un pitido al almacenar el
ajuste.
Notas
• Si se reciben pocas emisoras debido a que las
señales son débiles, algunos botones numéricos
conservarán sus valores anteriores.
• Si el visor muestra un número, la unidad comenzará
a almacenar emisoras a partir del actualmente
mostrado.
Pulse cualquier lado de (SEEK) para
buscar la emisora (sintonización
automática).
La exploración se detiene cuando la unidad
recibe una emisora. Repita la operación hasta
recibir la emisora deseada.
Sugerencias
• Si la sintonización automática se detiene con
demasiada frecuencia, active la búsqueda local para
buscar solamente las emisoras de señal más
intensa (consulte “Cambio de los ajustes de sonido
y visualización” en la página 15).
• Si sabe cuál es la frecuencia de la emisora que
desea escuchar, pulse y mantenga pulsando
cualquier lado de (SEEK) para localizar la
frecuencia aproximada. A continuación, pulse
(SEEK) varias veces para ajustar con precisión la
frecuencia deseada (sintonización manual).
Si la recepción de FM en estéreo es de
mala calidad
Seleccione el modo de recepción
monofónica.
(consulte “Cambio de los ajustes de sonido y
visualización” en la página 15). El sonido
mejorará, aunque será monofónico (“ST”
desaparece).
Nota
Si se producen interferencias, esta unidad reducirá
automáticamente la frecuencia de recepción para
eliminar el ruido (función IF AUTO). En tales casos, es
posible que algunas emisiones de FM en estéreo se
oigan en monofónico mientras se encuentra en el
modo de recepción estéreo.
10
Sugerencia
Para escuchar siempre las emisiones estéreo de FM
en estéreo, puede cambiar el ajuste IF AUTO y
ampliar la recepción de la señal de la frecuencia
(consulte “Cambio de los ajustes de sonido y
visualización” en la página 15). Tenga en cuenta que
pueden producirse ciertas interferencias con este
ajuste.
Almacenamiento de
emisoras
Puede memorizar manualmente las emisoras que
desee en cualquier botón numérico.
1
Pulse (SOURCE) varias veces para
seleccionar la radio.
2
Pulse (MODE) varias veces para
seleccionar la banda.
3
Pulse cualquier lado de (SEEK) para
sintonizar la emisora que desee
almacenar.
4
Pulse el botón numérico que desee
((1) a (6)) durante 2 segundos hasta
que aparezca “MEM”.
La indicación de botón numérico aparece en
el visor.
Nota
Si intenta almacenar otra emisora en el mismo botón
numérico, se borrará la emisora anteriormente
almacenada.
11
Almacenamiento de nombres
de emisoras
— Memorando de emisoras
Es posible asignar un nombre a cada emisora de
radio y almacenarlo en la memoria. El nombre de
la emisora actualmente sintonizada aparece en el
visor. Es posible asignar un nombre con un
máximo de 8 caracteres por emisora.
Almacenamiento de nombres de
emisoras
Sintonice la emisora cuyo nombre
desee almacenar.
2
Pulse (MENU)y, a continuación,
cualquier lado de (DISC/PRESET)
varias veces hasta que aparezca
“NAMEEDIT”.
4
Pulse (ENTER).
Sugerencias
• Para corregir o borrar un nombre, sobrescríbalo o
introduzca “_”.
• Existe otro método para comenzar a almacenar
nombres de emisoras: Pulse (LIST) durante 2
segundos en lugar de realizar los pasos 2 y 3.
También puede completar la operación pulsando
(LIST) durante 2 segundos en lugar de realizar el
paso 5.
Visualización del nombre de la emisora
Cambie el elemento de visualización a la
frecuencia o nombre de emisora*.
Para
1
3
5
Pulse (ENTER).
Introduzca los caracteres.
1 Pulse el lado (+)*1 de (DISC/PRESET)
varias veces para seleccionar el
carácter que desee.
AtBtC…t0t1t2…t+
t–t
… t _*2 t A
* Si el nombre de la emisora no está almacenado,
aparecerá “NO NAME” en el visor durante un
segundo.
Borrado del nombre de emisoras
1
Durante la recepción de la radio, pulse
(MENU)y, a continuación, cualquier
lado de (DISC/PRESET) varias veces
hasta que aparezca “NAME DEL”.
2
3
Pulse (ENTER).
2 Pulse el lado (+) de (SEEK) una vez
localizado el carácter deseado.
Pulse cualquier lado de (DISC/PRESET)
varias veces para seleccionar la
emisora cuyo nombre desee borrar.
4
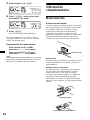
Pulse (ENTER) durante 2 segundos.
El nombre se borra.
Si desea borrar otros nombres, repita los
pasos 3 a 4.
5
Pulse (MENU) dos veces.
La unidad volverá al modo normal de
recepción de radio.
*
*1 Para el orden inverso, pulse el lado (–) de
(DISC/PRESET).
*2 (espacio en blanco)
Pulse
Cambiar el
(DSPL) durante la
elemento del visor recepción de la radio
Nota
Si ya ha borrado todos los nombres de las emisoras,
aparecerá “NO DATA” en el paso 4.
Si pulsa el lado (–) de (SEEK), podrá
desplazarse hacia atrás a la izquierda.
3 Repita los pasos 1 y 2 para
introducir el nombre completo.
12
Sintonización de emisoras
mediante lista
Otras funciones
— Listado
También puede controlar la unidad (y unidades
opcionales de CD/MD/TV) con un mando
rotativo (opcional).
Durante la recepción de la radio, pulse
(LIST) momentáneamente.
Parpadea la frecuencia o el nombre asignado
a la emisora actualmente sintonizada.
2
Pulse cualquier lado de (DISC/PRESET)
varias veces hasta que encuentre la
emisora deseada.
Si la emisora seleccionada no tiene un
nombre asignado, el visor mostrará la
frecuencia correspondiente.
3
Pulse (ENTER) para sintonizar la
emisora deseada.
Nota
Si ha conectado un sintonizador de TV, la indicación
de listado no aparecerá en el visor.
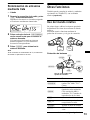
Uso del mando rotativo
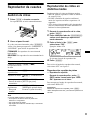
En primer lugar, adhiera la etiqueta apropiada
dependiendo de cómo desee montar el mando
rotativo.
El mando rotativo funciona mediante la
pulsación de botones y/o el giro de controles.
DSPL
MODE
SOUND
SOUND
MODE
DSPL
Pulsación de botones
(ATT)
(SOUND)
(MODE)
(SOURCE)
OFF
1
(DSPL)
(OFF)
Gire el control VOL para
ajustar el volumen.
Pulse
Para
(SOURCE)
Cambiar la fuente
(radio/CD*1/MD*1/TV*1/
Cinta)
(MODE)
Cambiar el funcionamiento
(banda de radio/unidad de
CD*1/unidad de MD*1/
unidad de TV*1/sentido de
reproducción de la cinta)
(ATT)
Atenuar el sonido
(OFF)*2
Detener la reproducción o la
recepción de la radio
(SOUND)
Ajustar el menú de sonido
(DSPL)
Cambiar el elemento del
visor
continúa en la página siguiente t
13
*1 Sólo si el equipo opcional correspondiente está
conectado.
*2 Si el automóvil no dispone de posición ACC
(auxiliar) en el interruptor de la llave de encendido,
asegúrese de pulsar (OFF) durante 2 segundos
para desactivar la indicación del reloj después de
apagar el encendido.
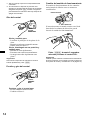
Cambio del sentido de funcionamiento
El sentido de funcionamiento de los controles
está ajustado de fábrica como se muestra a
continuación.
Para aumentar
Giro del control
Para disminuir
Control
SEEK/AMS
Si necesita montar el mando rotativo en el lado
derecho de la columna de dirección, puede
invertir el sentido de funcionamiento.
Gírelo y suéltelo para:
– Localizar el principio de las pistas de la
cinta.
– Sintonizar emisoras automáticamente.
– Omitir pistas del disco.*1
Gírelo, manténgalo en esa posición y
suéltelo para:
– Bobinar la cinta rápidamente.
– Encontrar una emisora manualmente.
– Avanzar/retroceder rápidamente una
pista.*1
Sugerencia
Para iniciar la reproducción mientras la cinta se
bobina rápidamente, pulse (MODE).
Presión y giro del control
Control
PRESET/
DISC
Presione y gire el control para:
– Recibir emisoras memorizadas.
– Cambiar el disco*1.
14
Pulse (SOUND) durante 2 segundos
mientras presiona el control VOL.
Sugerencia
También puede cambiar el sentido de funcionamiento
de estos controles con la unidad (consulte “Cambio de
los ajustes de sonido y visualización” en la página 15).
Ajuste de las características
de sonido
Puede ajustar los graves, los agudos, el balance y
el equilibrio entre los altavoces.
Los niveles de graves y agudos pueden
almacenarse por separado para cada fuente.
1
Seleccione el elemento que desee
ajustar pulsando (SOUND) varias
veces.
Cada vez que pulse (SOUND), el elemento
cambiará de la siguiente forma:
BAS (graves) t TRE (agudos) t BAL
(izquierdo-derecho) t FAD (frontal-
posterior)
2
Ajuste el elemento seleccionado
pulsando cualquier lado de (SEEK).
Al realizar el ajuste con el mando rotativo,
pulse (SOUND) y gire el control VOL.
Nota
Realice el ajuste antes de que transcurran 3
segundos después de seleccionar el elemento.
Atenuación rápida del sonido
(Con el mando rotativo o el mando a
distancia de tarjeta)
Pulse (ATT) en el mando rotativo o en
el mando a distancia de tarjeta.
Después de aparecer “ATT-ON”
momentáneamente, el visor muestra “ATT”.
Para recuperar el nivel anterior de volumen,
pulse (ATT) de nuevo.
Cambio de los ajustes de
sonido y visualización
— Menú
Es posible ajustar los siguientes elementos:
SET (Configuración)
• CLOCK (página 8)
• BEEP — para activar o desactivar los pitidos.
• RM (Mando rotativo) — para cambiar el
sentido de funcionamiento de los controles del
mando rotativo.
– Seleccione “NORM” para utilizar el mando
rotativo en la posición ajustada en fábrica.
– Seleccione “REV” si monta el mando rotativo
en el lado derecho de la columna de
dirección.
DSPL (Indicación)
• D.INFO (Información dual) — para mostrar
simultáneamente el reloj y el modo de
reproducción (ON).
• M.DSPL (Desplazamiento de indicaciones) —
para seleccionar el modo de desplazamiento de
indicaciones entre “1”, “2” y “OFF”.
– Seleccione “1” para visualizar líneas
decorativas en el visor y activar la indicación
de demostración.
– Seleccione “2” para visualizar líneas
decorativas en el visor y desactivar la
indicación de demostración.
– Seleccione“OFF” para desactivar el
desplazamiento de indicaciones.
• A.SCRL (Desplazamiento automático)*
– Seleccione “ON” para que se desplacen
automáticamente todos los nombres
mostrados de más de 8 caracteres.
– Con el desplazamiento automático
desactivado y al cambiar el nombre del disco/
pista, dicho nombre no se desplaza.
* Este elemento no aparece cuando no se reproduce
ningún CD o MD.
SND (Sonido)
• LOUD (Sonoridad) — para disfrutar de graves
y agudos incluso con el volumen bajo. Los
graves y los agudos se potenciarán.
continúa en la página siguiente t
15
P/M (Modo de reproducción)
• LOCAL-ON/OFF (Modo de búsqueda local)
(página 10)
– Seleccione “ON” para que se sintonicen
solamente emisoras de señal más intensa.
• MONO-ON/OFF (Modo monofónico) (página
10)
– Seleccione “ON” para escuchar emisiones
estéreo de FM en monofónico. Seleccione
“OFF” para recuperar el modo normal.
• IF AUTO/WIDE (página 10)
1
Pulse (MENU).
Para ajustar A.SCRL, pulse (MENU) durante
la reproducción de CD/MD.
2
Pulse cualquier lado de (DISC/PRESET)
varias veces hasta que aparezca el
elemento deseado.
3
4
Selección de la posición del
sonido
— My Best sound Position (Posición óptima
de sonido) (MBP)
Cuando conduzca sin pasajeros, podrá disfrutar
del entorno de sonido más cómodo con “Posición
óptima de sonido”.
“Posición óptima de sonido” dispone de dos
valores, que ajustan el nivel de sonido del
balance y el equilibrio entre los altavoces. Puede
seleccionar uno de ellos fácilmente con el botón
MBP.
Nivel de
balance
Pulse el lado (+) de (SEEK) para
seleccionar el ajuste deseado (por
ejemplo: ON u OFF).
Visor
Pulse (ENTER).
Al finalizar el ajuste del modo, el visor
volverá al modo de reproducción normal.
MBP-A
– 4dB
0
MBP-B
0
MBP-OFF
0
Nota
El elemento mostrado varía en función de la fuente.
Sugerencia
Puede cambiar fácilmente entre categorías (“SET”,
“DSPL”, “SND”, “P/M” y “EDIT”) pulsando cualquier
lado de (DISC/PRESET) durante 2 segundos.
Nivel de
equilibrio
entre los
altavoces
Derecho Izquierdo Frontal Posterior
0
– 4dB
– 4dB
0
– 4dB
0
0
0
Pulse (MBP) varias veces para
seleccionar la posición de audición
deseada.
El modo de “Posición óptima de sonido” se
muestra en el visor en el orden de la tabla.
Transcurrido un segundo, el visor vuelve al
modo de reproducción normal.
Si desea ajustar el nivel de sonido del balance
y el equilibrio con mayor precisión, puede
realizarlo con el botón (SOUND) (consulte
“Ajuste de las características de sonido” en la
página 15).
Notas
• Al ajustar BAL (balance) o FAD (equilibrio) de
“Ajuste de las características de sonido” (página
15), el elemento MBP recupera el valor OFF.
• Con MBP ajustado en OFF, el valor de BAL y FAD
se activa.
16
Ajuste del ecualizador
4
1 Pulse cualquier lado de (SEEK) para
seleccionar la frecuencia deseada.
Cada vez que pulse (SEEK), la frecuencia
cambiará.
Puede seleccionar una curva de ecualizador para
siete tipos de música: XPLOD, VOCAL, CLUB,
JAZZ, NEW AGE, ROCK, CUSTOM, OFF
(ecualizador OFF).
Puede almacenar y definir los ajustes del
ecualizador de frecuencia y nivel.
62 (Hz) y 157 (Hz) y 396 (Hz) y
1k (Hz) y 2.5k (Hz) y 6.3k (Hz) y
16k (Hz)
Selección de la curva de ecualizador
1
Pulse (SOURCE) para seleccionar una
fuente (radio, CD, MD, cinta o TV).
2
Pulse (EQ7) varias veces hasta
seleccionar la curva de ecualizador
que desee.
Cada vez que pulse (EQ7), el elemento
cambiará.
Seleccione la frecuencia y nivel que
desee.
2 Pulse cualquier lado de
(DISC/PRESET) para ajustar el nivel
de volumen que desee.
El nivel de volumen puede ajustarse en
intervalos de 1 dB entre –10 dB y +10 dB.
Para restaurar la curva de ecualizador
ajustada en fábrica, pulse (ENTER) durante 2
segundos.
5
Para cancelar el efecto de ecualización,
seleccione “OFF”. Transcurridos 3 segundos,
el visor vuelve al modo de reproducción
normal.
Pulse (MENU) dos veces.
Una vez completado el ajuste de efecto,
aparece el modo de reproducción normal.
Ajuste de la curva de ecualizador
1
2
Pulse (MENU).
3
Pulse cualquier lado de (SEEK) para
seleccionar la curva de ecualizador
que desee y, a continuación, pulse
(ENTER).
Cada vez que pulse (SEEK), el elemento
cambiará.
Pulse cualquier lado de (DISC/PRESET)
varias veces hasta que aparezca“EQ7
TUNE” y, a continuación, pulse
(ENTER).
17
Unidad de CD/MD
(opcional)
Esta unidad puede controlar unidades de CD/MD
externas.
Si conecta una unidad opcional de CD que
disponga de las funciones CD TEXT y de
archivo personalizado, la información CD TEXT
aparecerá en el visor al reproducir discos CD
TEXT.
Elementos del visor
Al cambiar el disco/pista, el título pregrabado*1
del nuevo disco/pista aparece automáticamente
(si la función de desplazamiento automático está
ajustada en “ON”, los nombres con más de 8
caracteres se desplazarán (página 15)).
Elementos visualizables
• Fuente de música
• Reloj
• Función
Reproducción de CD o MD
1
Pulse (SOURCE) varias veces para
seleccionar “CD” o “MD”.
2
Pulse (MODE) varias veces hasta que
aparezca la unidad deseada.
Se inicia la reproducción de CD/MD.
Para
Pulse
Detener la
reproducción
(OFF)
Omitir discos
– Selección de
discos
(DISC/PRESET) (+/–)
Elementos visualizables
• Tiempo de reproducción
transcurrido
• Nombre del disco*1/artista*2
• Título de la pista*1
Para
(SEEK) (./>)
Omitir pistas
– Sensor de música [una vez por pista]
automático
Avanzar/retroceder (SEEK) (m/M)
[manténgalo pulsado hasta
rápidamente
alcanzar el punto deseado]
– Búsqueda
manual
Pulse
Cambiar el
(DSPL)
elemento del visor
*1 “NO NAME” indica que no hay ningún memorando
de discos (página 19) o nombre pregrabado para
mostrarse.
*2 Sólo para discos CD TEXT con nombre del artista.
Notas
• Algunos caracteres no pueden mostrarse.
• Con algunos discos CD TEXT que contengan
muchos caracteres, la información puede no
desplazarse.
• Esta unidad no puede mostrar el nombre del artista
de cada pista de un disco CD TEXT.
Sugerencia
Con el desplazamiento automático ajustado en OFF y
al cambiar el nombre del disco/pista, dicho nombre no
se desplaza.
18
Reproducción repetida de
pistas
— Reproducción repetida
Es posible seleccionar:
• REP-1 — para repetir una pista.
• REP-2 — para repetir un disco.
Durante la reproducción, pulse (1)
(REP) varias veces hasta que el ajuste
deseado aparezca en el visor.
Se inicia la reproducción repetida.
Para recuperar el modo de reproducción normal,
seleccione“REP-OFF”.
Reproducción de pistas en
orden aleatorio
Etiquetado de CD
— Memorando de discos (Para una unidad de
CD con función CUSTOM FILE)
Puede etiquetar los discos con un nombre
personalizado (Memorando de discos). Puede
introducir hasta 8 caracteres por disco. Si asigna
título a un CD, podrá localizar el disco mediante
dicho título (página 21).
1
Inicie la reproducción del disco que
desee etiquetar.
2
Pulse (MENU)y, a continuación,
cualquier lado de (DISC/PRESET)
varias veces hasta que aparezca
“NAMEEDIT”.
3
Pulse (ENTER).
— Reproducción aleatoria
Es posible seleccionar:
• SHUF-1 — para reproducir las pistas del disco
actual en orden aleatorio.
• SHUF-2 — para reproducir las pistas de la
unidad opcional de CD (MD) actual en orden
aleatorio.
• SHUF-ALL* — para reproducir todas las
pistas de todas las unidades de CD (MD)
conectadas en orden aleatorio.
La unidad repetirá el disco durante el
procedimiento de asignación de título.
4
Introduzca los caracteres.
1 Pulse el lado (+)*1 de (DISC/PRESET)
varias veces para seleccionar el
carácter que desee.
A t B t C ... t 0 t 1 t 2 ... t + t
... t _*2 t A
–t
* Disponible solamente cuando hay conectadas dos o
más unidades opcionales de CD/MD.
*
*1 Para el orden inverso, pulse el lado (–) de
(DISC/PRESET).
*2 (espacio en blanco)
Durante la reproducción, pulse (2)
(SHUF) varias veces hasta que el
ajuste deseado aparezca en el visor.
Se inicia la reproducción aleatoria.
2 Pulse el lado (+) de (SEEK) una vez
localizado el carácter deseado.
Para recuperar el modo de reproducción normal,
seleccione“SHUF-OFF”.
Nota
“SHUF-ALL” no establecerá las pistas en orden
aleatorio entre unidades de CD y de MD.
Si pulsa el lado (–) de (SEEK), podrá
desplazarse hacia atrás a la izquierda.
3 Repita los pasos 1 y 2 para
introducir el nombre completo.
5
Para recuperar el modo normal de
reproducción de CD, pulse (ENTER).
continúa en la página siguiente t
19
Sugerencias
• Para corregir o borrar un nombre, sobrescríbalo o
introduzca “_”.
• Existe otro método para comenzar a asignar títulos
al CD: Pulse (LIST) durante 2 segundos en lugar de
realizar los pasos 2 y 3. También puede completar la
operación pulsando (LIST) durante 2 segundos en
lugar de realizar el paso 5.
• Podrá etiquetar discos compactos en una unidad sin
función CUSTOM FILE, si está conectada junto con
una unidad de CD que disponga de dicha función. El
memorando de discos se almacenará en la memoria
de la unidad de CD con la función CUSTOM FILE.
Borrado del memorando de discos
1
Pulse (SOURCE) varias veces para
seleccionar “CD”.
2
Pulse (MODE) varias veces para
seleccionar la unidad de CD que
contenga el memorando.
3
Nota
La reproducción REP-1/aleatoria se suspende hasta
completarse la edición de nombres.
Pulse (MENU)y, a continuación,
cualquier lado de (DISC/PRESET)
varias veces hasta que aparezca
“NAME DEL”.
4
Pulse (ENTER).
Los nombres almacenados se mostrarán por
orden a partir de los primeros introducidos.
Visualización del memorando de
discos
5
Pulse cualquier lado de (DISC/PRESET)
varias veces para seleccionar el
nombre del disco que desee borrar.
Los nombres almacenados se mostrarán a
partir de los primeros introducidos.
6
Pulse (ENTER) durante 2 segundos.
El nombre se borra.
Si desea borrar otros nombres, repita los
pasos 5 y 6.
7
Pulse (MENU) dos veces.
La unidad vuelve al modo de reproducción
normal de CD.
Como elemento de visualización, el memorando
de discos siempre tiene prioridad sobre cualquier
información CD TEXT original.
Para
Pulse
Ver
(DSPL) durante la
reproducción de discos CD/
CD TEXT
Sugerencia
Para conocer otros elementos que pueden
visualizarse, consulte la página 18.
20
Notas
• Cuando se borra el memorando de un disco CD
TEXT, aparece la información CD TEXT original.
• Si no puede encontrar el memorando que desea
borrar, inténtelo seleccionando una unidad diferente
de CD en el paso 2.
Localización de discos por
nombre
— Listado (Para una unidad de CD con la
función CD TEXT/CUSTOM FILE o una unidad
de MD)
Esta función puede utilizarse con discos a los que
se han asignado nombres personalizados*1 o con
discos CD TEXT*2.
*1 Localización de discos por su nombre
personalizado: al asignar un nombre a un CD
(página 19) o MD.
*2 Localización de discos por la información CD
TEXT: si reproduce un disco CD TEXT en una
unidad de CD con la función CD TEXT.
1
Pulse (LIST).
El nombre asignado al disco actual aparece en
el visor.
2
Pulse cualquier lado de (DISC/PRESET)
varias veces hasta que encuentre el
disco deseado.
3
Pulse (ENTER) para reproducir el
disco.
Notas
• No es posible visualizar ciertas letras (excepción:
memorando de discos).
• Si conecta el sintonizador de TV XT-40V, la lista
aparecerá en el monitor de TV y no en el visor de la
unidad.
Selección de pistas
específicas para su
reproducción
— Banco (Para una unidad de CD con función
CUSTOM FILE)
Si asigna nombres a los discos, podrá programar
la unidad para que omita pistas o reproduzca sólo
las que desee.
1
Inicie la reproducción del disco que
desee etiquetar.
2
Pulse (MENU)y, a continuación,
cualquier lado de (DISC/PRESET)
varias veces hasta que aparezca
“BANK SEL”.
3
Pulse (ENTER).
4
Asigne nombre a las pistas.
1 Pulse cualquier lado de (SEEK)
varias veces para seleccionar la
pista a la que desee asignar
nombre.
2 Pulse (ENTER) varias veces para
seleccionar “PLAY” o “SKIP”.
5
Repita el paso 4 para establecer el
modo“PLAY” (reproducción) o“SKIP”
(omisión) en todas las pistas.
6
Pulse (MENU) dos veces.
La unidad vuelve al modo de reproducción
normal de CD.
Notas
• Puede establecer “PLAY” y “SKIP” para un máximo
de 24 pistas.
• No es posible establecer “SKIP” para todas las
pistas de un CD.
continúa en la página siguiente t
21
Reproducción sólo de pistas
específicas
Es posible seleccionar:
• “BANK-ON” — para reproducir las pistas con
el ajuste “PLAY”.
• “BANK-INV” (Inverso) — para reproducir las
pistas con el ajuste “SKIP”.
1
2
Durante la reproducción, pulse
(MENU)y, a continuación, cualquier
lado de (DISC/PRESET) varias veces
hasta que aparezca “BANK-ON”,
“BANK-INV” o “BANK-OFF”.
Pulse el lado (+) de (SEEK) varias
veces hasta que aparezca el ajuste
deseado.
TV/Vídeo (opcional)
Es posible conectar un sintonizador y un monitor
de TV opcionales a esta unidad.
Visualización de la TV
1
Pulse (SOURCE) varias veces hasta
que aparezca “TV”.
2
Pulse cualquier lado de (DISC/PRESET)
varias veces para seleccionar la banda
de TV que desee.
Sugerencia
Cada vez que pulse (MODE), el elemento cambiará
de la siguiente forma: TV1 t TV2 t AUX
3
Pulse (ENTER).
La reproducción se inicia a partir de la pista
siguiente a la actual.
Para volver al modo de reproducción normal,
seleccione“BANK-OFF” en el paso 2.
22
Visualización de vídeos
1
Pulse (SOURCE) varias veces hasta
que aparezca “TV”.
2
Pulse (MODE) varias veces para
seleccionar “AUX”.
Reproduzca el vídeo.
Almacenamiento automático
de canales de TV
Almacenamiento sólo de los
canales de TV deseados
La unidad selecciona los canales de TV de señal
más intensa y los almacena por orden de
frecuencia.
Puede almacenar hasta 12 canales (6 para TV1 y
6 para 2) en los botones numéricos en el orden
que prefiera.
Precaución
1
Pulse (SOURCE) varias veces hasta
que aparezca “TV”.
2
Pulse cualquier lado de (SEEK) para
sintonizar el canal de TV que desee
almacenar en cada botón numérico.
3
Pulse el botón numérico que desee
((1) a (6)) hasta que oiga un pitido.
La indicación de botón numérico y “MEM”
aparecen en el visor.
Para sintonizar emisoras mientras conduce,
utilice la función Memoria de la mejor sintonía
para evitar accidentes.
1
Pulse (SOURCE) varias veces hasta
que aparezca “TV”.
2
Pulse (MENU)y, a continuación,
cualquier lado de (DISC/PRESET) hasta
que aparezca “AUTO MEM”.
3
Pulse (ENTER).
La unidad almacena canales de TV en los
botones numéricos por orden de frecuencia.
La unidad emite un pitido al almacenar el
ajuste.
Notas
• La unidad no almacena canales de TV de señal
débil. Si se reciben pocos canales de TV, algunos
botones numéricos permanecerán vacíos.
• Si el visor muestra un número de memorización, la
unidad comenzará a almacenar canales de TV a
partir del actualmente mostrado.
Nota
Si intenta almacenar otro canal en el mismo botón
numérico, se borrará el canal anteriormente
almacenado.
Visualización de la TV o de
vídeos mientras escucha una
cinta, CD o MD
— Reproducción simultánea
La función de reproducción simultánea no se
activa mientras escucha la radio.
1
Pulse (MENU)y, a continuación,
cualquier lado de (DISC/PRESET)
varias veces hasta que
aparezca “SIMUL-SEL”.
2
3
Pulse (ENTER).
4
Pulse (SOURCE) varias veces para
seleccionar CD o MD.
Pulse el lado (–) de (SEEK).
continúa en la página siguiente t
23
5
Pulse el lado (+) de (SEEK).
Información
complementaria
6
Pulse (SOURCE) varias veces para
seleccionar TV o vídeo.
Mantenimiento
Sustitución del fusible
7
Pulse (ENTER).
Se inicia la reproducción simultánea.
Si ya está viendo la TV o el vídeo y desea
escuchar también una cinta, un CD o un MD,
realice los mismos pasos.
Cuando sustituya el fusible, asegúrese de utilizar
uno cuyo amperaje sea el mismo al especificado
en el fusible original. Si el fusible se funde,
compruebe la conexión de alimentación y
sustitúyalo. Si el fusible se funde de nuevo
después de sustituirlo, es posible que exista algún
fallo de funcionamiento interno. En tal caso,
consulte con el proveedor Sony más próximo.
Recuperación del modo normal
Para cancelar el CD o el MD,
seleccione “– – –” en el paso 4.
Para cancelar la TV o el vídeo,
seleccione “– – –” en el paso 6.
Nota
Si pulsa Z (EJECT) en esta unidad o en una de CD/
MD mientras la unidad se encuentra en el modo de
reproducción simultánea, ésta se cancelará.
Fusible (10 A)
Advertencia
No utilice nunca un fusible cuyo amperaje supere
al del suministrado con la unidad, ya que ésta
podría dañarse.
Limpieza de los conectores
La unidad puede no funcionar correctamente si
los conectores entre dicha unidad y el panel
frontal están sucios. Con el fin de evitarlo,
extraiga el panel frontal (página 7) y limpie los
conectores con un bastoncillo de algodón
humedecido en alcohol. No aplique demasiada
fuerza. En caso contrario, los conectores podrían
dañarse.
Unidad principal
Parte trasera del panel frontal
24
Notas
• Por razones de seguridad, apague el encendido
antes de limpiar los conectores y extraiga la llave del
interruptor de encendido.
• No toque nunca los conectores directamente con los
dedos o con algún dispositivo metálico.
Extracción de la unidad
1
Extraiga la cubierta frontal
1 Extraiga el panel frontal (página 7).
Sustitución de la pila de litio
2 Presione el clip del interior de la
cubierta frontal con un
destornillador fino.
En condiciones normales, las pilas duran
aproximadamente 1 año. (La duración puede ser
menor en función de las condiciones de uso.)
Cuando la pila dispone de poca energía, el
alcance del mando a distancia de tarjeta se
reduce. Sustituya la pila por una nueva de litio
CR2025.
3 Repita el paso 2 en el otro lado.
2
x
Extraiga la unidad
1 Utilice un destornillador fino para
ejercer presión sobre el clip del lado
izquierdo de la unidad, y después
tire de dicho lado hasta que el retén
libere la fijación.
Lado + hacia arriba
4 mm
2 Repita el paso 1 en el lado
derecho.
3 Deslice la unidad para extraerla del
marco.
Notas sobre la pila de litio
• Mantenga la pila de litio fuera del alcance de
los niños. Si la pila se ingiere, póngase en
contacto inmediatamente con un médico.
• Limpie la pila con un paño seco para garantizar
un contacto óptimo.
• Asegúrese de observar la polaridad correcta
cuando instale la pila.
• No agarre la pila con pinzas metálicas, ya que
si lo hace puede producirse un cortocircuito.
ADVERTENCIA
La pila puede explotar si no se emplea
adecuadamente.
No recargue la pila; tampoco la desmonte ni
la arroje al fuego.
25
Especificaciones
Sección del reproductor de casetes
Generales
Pista de cinta
Fluctuación y trémolo
Respuesta de frecuencia
Relación señal-ruido
Salidas
4 pistas y 2 canales estéreo
0,08 % (WRMS)
30 - 18.000 Hz
Tipo de casete
TYPE II, IV
61 dB
TYPE I
58 dB
Sección del sintonizador
FM
Margen de sintonización
Intervalo de sintonización
de FM:
50 kHz/200 kHz
conmutable
87,5 - 108,0 MHz
(en intervalo de 50 kHz)
87,5 - 107,9 MHz
(en intervalo de 200 kHz)
Terminal de antena
Conector de antena externa
Frecuencia intermedia
10,7 MHz/450 kHz
Sensibilidad útil
8 dBf
Selectividad
75 dB a 400 kHz
Relación señal-ruido
66 dB (estéreo),
72 dB (mono)
Distorsión armónica a 1 kHz
0,6 % (estéreo),
0,3 % (mono)
Separación
35 dB a 1 kHz
Respuesta de frecuencia 30 - 15.000 Hz
MW
Margen de sintonización
Intervalo de sintonización
de MW:
9 kHz/10 kHz conmutable
531 - 1.602 kHz
(en intervalo de 9 kHz)
530 - 1.710 kHz
(en intervalo de 10 kHz)
SW
Margen de sintonización
Intervalo de sintonización
de SW:
SW1: 2.940 - 7.735 kHz
SW2: 9.500 - 18.135 kHz
(excepto para 10.140 –
11.575 kHz)
Terminal de antena
Frecuencia intermedia
Sensibilidad
Conector de antena externa
10,7 MHz/450 kHz
30 µV (en MW)
40 µV (en SW)
Sección del amplificador de potencia
Salidas
Salidas de altavoz
(conectores de sellado
seguro)
Impedancia de altavoz
4 – 8 ohmios
Salida máxima de potencia 50 W × 4 (a 4 ohmios)
26
Salidas de audio
Cable de control de relé de
antena motorizada
Cable de control de
amplificador de potencia
Entradas
Conector de entrada de
control BUS
Conector de entrada de
audio BUS
Conector de entrada de
controlador remoto
Conector de entrada de
antena
Controles de tono
Graves ±8 dB a 100 Hz
Agudos ±8 dB a 10 kHz
Sonoridad
100 Hz +8 dB
10 kHz +2 dB
Requisitos de alimentación Batería de automóvil de
12 V CC
(tierra negativa)
Dimensiones
Aprox. 178 × 50 × 181 mm
(an/al/prf)
Dimensiones de montaje Aprox. 182 × 53 × 161 mm
(an/al/prf)
Peso
Aprox. 1,2 kg
Accesorios suministrados Mando a distancia de tarjeta
(1)
Componentes de instalación
y conexiones (1 juego)
Estuche para el panel frontal
(1)
Accesorios opcionales
Mando rotativo
RM-X4S
Cable BUS (suministrado
con un cable de pines RCA)
RC-61 (1 m), RC-62 (2 m)
Equipo opcional
Cambiador de CD
(10 discos)
CDX-848X, CDX-747X,
CDX-646X, CDX-646
Cambiador de CD (6 discos)
CDX-T68X, CDX-T67
Cambiador de MD
(6 discos)
MDX-65
Selector de fuente
XA-C30
Sintonizador de TV
XT-40V
Nota
Esta unidad no puede conectarse a un
preamplificador digital o a un ecualizador.
El diseño y las especificaciones están sujetos a
cambios sin previo aviso.
Solución de problemas
La siguiente lista de comprobaciones le ayudará
a solucionar los problemas que puedan
producirse con la unidad.
Antes de consultar la siguiente lista, compruebe
los procedimientos de conexión y empleo.
Generales
No se oye el sonido.
• Gire el dial de control de volumen en el
sentido de las agujas del reloj para ajustar el
volumen.
• Cancele la función ATT.
• Ajuste el control de equilibrio en la posición
central para un sistema de 2 altavoces.
El contenido de la memoria se ha borrado.
• Ha pulsado el botón RESET.
t Realice el almacenamiento de nuevo en la
memoria.
• Ha desconectado el cable de alimentación o
la batería.
• El cable de conexión de la alimentación no
está correctamente conectado.
No se oyen los pitidos.
El sonido de los pitidos está cancelado (página
15).
Las indicaciones desaparecen del visor o
no aparecen en éste.
• La indicación del reloj desaparecerá si pulsa
(OFF) durante 2 segundos.
t Pulse (OFF) de nuevo durante 2
segundos para visualizar el reloj.
• Extraiga el panel frontal y limpie los
conectores. Consulte “Limpieza de los
conectores” (página 24) para obtener
información detallada.
Las emisoras almacenadas y la hora
correcta se han borrado.
El fusible se ha fundido.
Se oye ruido cuando la llave de encendido
se encuentra en la posición ON, ACC u OFF.
Los cables no coinciden correctamente con el
conector de alimentación auxiliar del
automóvil.
No se suministra alimentación a la unidad.
• Compruebe la conexión. Si todo está en
orden, compruebe el fusible.
• El automóvil no dispone de posición ACC.
t Pulse (SOURCE) (o inserte un casete)
para que se encienda la unidad.
Se suministra alimentación a la unidad de
forma continua.
El automóvil no dispone de posición ACC.
Reproducción de cintas
El sonido se distorsiona.
El cabezal de cintas está sucio.
t Limpie el cabezal con un casete de
limpieza de tipo seco disponible en el
mercado.
La función AMS no funciona correctamente.
• Hay ruido en el espacio entre las pistas.
• El espacio en blanco es demasiado corto
(inferior a 4 segundos).
• Una pausa larga, un pasaje de bajas
frecuencias o uni nivel de sonido muy bajo
se interpretan como espacio en blanco.
Recepción de radio
No es posible utilizar la sintonización
programada.
• Almacene la frecuencia correcta en la
memoria.
• La señal de emisión es demasiado débil.
No es posible recibir las emisoras.
Los ruidos obstaculizan el sonido.
• Conecte un cable de control de antena
motorizada (azul) o un cable de fuente de
alimentación auxiliar (rojo) al cable de
suministro de alimentación del amplificador
de antena del automóvil. (Sólo si el
automóvil dispone de una antena de FM/
MW/SW incorporada en el cristal trasero/
lateral.)
• Compruebe la conexión de la antena del
automóvil.
• La antena automática no se extiende.
t Compruebe la conexión del cable de
control de antena motorizada.
• Compruebe la frecuencia.
No es posible utilizar la sintonización
automática.
• El modo de búsqueda local está ajustado en
“ON”.
t Ajuste el modo de búsqueda local en
“OFF” (página 16).
• La señal de emisión es demasiado débil.
t Utilice la sintonización manual.
La indicación “ST” parpadea.
• Sintonice la frecuencia con precisión.
• La señal de emisión es demasiado débil.
t Realice el ajuste en el modo de recepción
monofónica (página 16).
Un programa emitido en estéreo se oye en
monofónico.
La unidad se encuentra en el modo de
recepción monofónica.
t Cancele el modo de recepción monofónica
(página 16).
La antena motorizada no se extiende.
La antena motorizada no dispone de caja de
relé.
continúa en la página siguiente t
27
Se producen interferencias durante la
recepción de FM.
Está seleccionado el modo de ampliación.
t Ajuste el modo IF en “IF AUTO” (página
16).
Indicaciones de error
(con una unidad opcional de CD/MD conectada)
Indicaciones de error
Reproducción de CD/MD
Se producen saltos de sonido.
Disco sucio o defectuoso.
Las siguientes indicaciones parpadearán durante
unos 5 segundos y se oirá una alarma.
NO MAG
El cargador de discos no está insertado en la
unidad de CD/MD.
t Inserte el cargador en la unidad de CD/
MD.
NO DISC
No hay ningún disco insertado en la unidad de
CD/MD.
t Inserte discos en la unidad de CD/MD.
ERROR*1
• El CD está sucio o insertado al revés.*2
t Límpielo o insértelo correctamente.
• El MD no se reproduce debido a algún
problema.*2
t Inserte otro MD.
• El CD/MD no se reproduce debido a algún
problema.
t Inserte otro CD/MD.
BLANK*1
No hay pistas grabadas en el MD.*2
t Reproduzca un MD que tenga pistas
grabadas.
RESET
La unidad de CD/MD no puede utilizarse
debido a algún problema.
t Pulse el botón RESET de la unidad.
NOT READ
La tapa de la unidad de MD está abierta o los
minidiscos no están insertados correctamente.
t Cierre la tapa o inserte los minidiscos
correctamente.
HI TEMP
La temperatura ambiente es superior a 50°C.
t Espera hasta que la temperatura descienda
por debajo de 50°C.
*1 Cuando se produce algún error durante la
reproducción de un CD o MD, el número de disco
del CD o MD no aparece en el visor.
*2 El visor muestra el número del disco que causa el
error.
Si estas soluciones no ayudan a mejorar la
situación, consulte con el proveedor Sony más
próximo.
28
!"# $
%& '()*(+, -./012
345
%'(67869: -;'(6786</2=>?
@A'(67865 # &'( +,B
CD9:EF4
%& 6G) HI+, 5
JKLMN*O8PPQ
RSLTMN*O8Q
!"#$%&'()
* +,-./-012&345+,6789:;01<
=>0?@AB<=CDEFGHEFIJ
K01L
2
! "
#$ %
&'()* %
+,-./0
123456789 :;<=> ?@
#$A-./0 ?@
B-.CD/0 ??
-./0EF
1/06789 ??
GHIJ4K/0
1IJ89 ?L
MN ?O
4PQRST ?
UVWXRY ?
Z[R\]^_
1`a ?b
cdR
1e23R :=;f> ?
gh ?
)*ijk=j ?
^_l ?"
mn)*op
1qr)*89 ?"
stuv)*op
1tc)*89 ?"
wxij
1yz6789 ?%
GHEF{|yz
1IJ89 L@
cd}op)*
1p~89 L@
! !" #/ L?
# L?
+,-./ LL
B-.CD/ LL
#$ijk=j #/k
1
)* LL
#$%&
LO
L
Lb
L
|^_ L
3
UVWXYZ[\]^
TAPE $ _2 RADIO $ _2`ab MENU $ _2cde
CD/MD $ _2'()*( -&4 TV $ _2`fgH -&4
XR-CA620X
a b c d RADIO CD/MD e !"#$!
f %&'()*+, - ./ - 01 -'2-2345
g 678
h Z (9:4 -h_ijik
l4 5
i %
j ;
k & -h_ijikl4
l %<<(=> - )*?@45
m ABCD+? (EFG1HI4
Z[m+n>?WXop
uv
n %
2J
4
qIr&st
o &
RADIO MENU 5
CD/MD p %2 (o4
TAPE RADIO CD/MD TV q 2 (67KLM4
r NO
TAPE
(1)&
RADIO CD/MD
(1)&
(2)P<
TV 5 (OFF)
MNOPQRSTU&VWXYZ[\]^
DSPL
MODE
PRESET +
MENU
SEEK–
SOUN
D
DISC +
SOURCE
DISC –
LIST
SEEK+
R
ENTE
PRESET –
OFF
+
ATT
VOL
–
(DISC/PRESET)
L
(SEEK)
>
(SEEK)
.
(DISC/PRESET)
KtG_h)
_hKQRL MR
s 2'-& QR-ST
RADIO MENU CD/MD TV t U QS-RT
TAPE RADIO MENU J
CD/MD TV 5
a
b
c
d
e
f
g
h
i
j
k
l
2
%
2
U (<-,4
%
2
%<<
3% (S-R4
%2
2'-& (M-m4
&
V
_`(OFF)*ab]cdefg_
L(SOURCE)_hij&klmnoMN
pq)rstuvwxyuvz{
;|}~]^ }~]^
*
5
%wx yz{2|}~2j
%xAgY>?x
_Y
%xMB MY ¡LTM,B¢h,
%£C¢¤¥¦3,#r
§M¨©ª«¬®¯
xA°±u ²³´µ¶¨W
XoA·¸Y¹º »¼½¾¿
%YÂËÌB Íi¦ÎÏÐÑ
Ò´ÓÔÕÖ×Ø
%ÙÚÛ3ÜÝÒÞ ßàá
M0§MâãÊ=äå 9:æ
ç´èé
%YÂêë|}~ìíî´ïð
ñòB
%óô ¥Õõö÷ø¦ù2
+jYúû´üý þ@
SBRóô CÀ;ÁÂÃÄ´ÅÆÇÈÉ2
´Ê
!
% 0ó ¥2
´]C²³Y´.ó %C¥Õèéª
C Ø
!"#$%&'()*
+,-./0123
«ü=
æ£
«üæI¸{ãÕ
õöy" ø
6
!
Îâãæ1¥2jik
2#$j´.%zg&l'
(h
)jik¬*Ø Ò+á,-û
./N776/0
x32jik4567tuRS8
9::;<=M]>?@ qAAv
á>?& #r§M¨3,
§MÕ]=<
1
(OFF)5
´BCg?`{ã -/0DX0E
FEF4
5 ;¤¥¦§¨©Wª«¬++®¯_`
(OFF)_h°±*a²b]c³[\
¥¦]^
"#$#%
2
(OPEN)
_. .-_hS[eOP@H ¡
¢£
1
2
´µK¶WXO·¸¹]cSº»¼b
½¾¿wÀÁ
ÂÃÄÅiÆ_¸¹QR
ÂÃ(¸¹ÀÇ ÈÉiÀÊ˳S¸¹ÌÍ
KÎϦТÑÒkidÓÔL
µÕÖm¸¹OS6×KØm¸¹Ù
¢Öm
t
7
!"#$%
jik AGHIÊ
KlLLMNO
!"#
J B
C@PPQC>REF
SáTC@ßUÎPTV
1
(MENU)(DISC/PRESET)
!"# $%&'%()
1 (ENTER)
CWFXY
2 (DISC/PRESET) *+,
-.
x
3 (SEEK) -/4
@WFXY
4 (DISC/PRESET) *+,
01
2
8
(ENTER)
C@tZ÷CßUC@[\]lEF4
^__e
ÚÕK¸¹¢Ò¸×Û|ÜÝ
Þ,ßàáâãtãáOOäSTUQR
å
$%
1
2
(OPEN)234567
`tZ
¥hieT
%*76fj e¥klm´'n9 %ojpqr-stuv4e¥ksªwªV?
uvx
%f6f -yzM`{4e¥2|}C
`t{yzM
1
2
67:;<(MENU)
3
(SEEK) A/4BC $'D)
SáTf6fe
4
(ENTER)
(DISC/PRESET) !
=>?5@
89
xa+btZCcd
/(SOURCE)/0|8EF q:9NefN(v´
qN7G7N7v
4567869:gÊ
i
6;<;6=;:g
i
Z[)* (MODE) :o>
)*
(OFF)
|
(OPEN)Z
Hop
+,Ro
(SEEK) :.>>
Hop
U ¡
¢,£¤
(SEEK) :mM>
¥¦§¨©D
&'()*
etZ
b^__e2~ B&s
q9::v
&'()*+
,-.()/0
E:;<(1)-FGH4 !$FGHI
'D)@E"#J9
b^__eC&sqN7rO9::v
Kùúû×_(MODE)_h.üYQR
L[ýùúû×tþ[
Kæçè¬é êëëÚ'{)ì
íABCäîïðaP
íABCä«ñ4
í«&òóô4õö÷iø4ö÷
9
$%1-./0
2xÊ-:*P:*Q:**eeP0
eQ4!¥
g
>?
;2zªBbyzgC
yz#®
1
2
3
(MODE)BCNO
ST=>UVWX&(1)!(6)Y
_(DISC/PRESET)_hÛ&_ j ¡
w] êë
9:;<34=>
+,-./0
(SEEK)*Z[UV A\
]^_`Y
;?`gC4{ãá
ùcd|8?`=b g
,123456/0 78
2&U xÊ&
¬/DÆ Ir
(SOURCE)BCKLM
g
1
2
3
(SOURCE)BCKLM
4
(ENTER)
;ßUæC] qAv
(MODE)BCNO
(MENU)(DISC/PRESET)
!"# $PQR)
;»¼5NWêëÞ
!"K#$] å L
%&4'@QR
´µ()*Õ+]5,_`(SEEK)_h
Û&-S.5,/01Kò23d4
5_(SEEK)_h6789*Õ5, :
¼
?@ABCDEFG
´Cë
]NH
_h¶SÍy
QRLQR&OºYQR
WT ¡]
BCabcKd?5
Z[#P ^Ê q 0E Fß
Uv !¡d¢
-q6vEF£è4
;;<=>S»¼?5m[eñ¿
àâ¬@-ãêëABçCHDKEF¿
tâéEG¿Hûëº&I¿)
J9TUë+EG¿4KâéEG¿Hûµ
%&àâ¬@-ãLM5,
åL %&4'@QRNOK.
ë$<&H=>
10
2-.34/0
¥2ÏÐWU
¦b g
>R/0ʤ¥ß=
-./056
,HI56/0
(MODE)BCNO
¥BCggWU©ª¬
Æ«B;jyg ©ª4]¨2
EF§Ê¥ÎgWU!¬VR
©ª
(SEEK)e]3fg>Sh
UV
JKHILM
i=>WX A(1)!(6)Yjk
lm !"# $RGR)
>R/0WF42EF§Ê]¨
1
2
]3f>ShnoUV
´µPQK ¡«]_hL ¡R&
]N j]Sþ[e
3
(ENTER)
4
s3Xt
1
2
3
4
(SOURCE)BCKLM
(MENU) (DISC/PRESET)
!"# $DpRGGqrQ)
1 (DISC/PRESET) u / v5 1
BC=>Xt
ptPt%…twtxtk…t
ytSt ...tz52tp
*
5P _ (DISC/PRESET) _h S&N
TU4
5Q îV
2 E,{|=>Xt(SEEK)
&/' áÃ/¡(SEEK)/0
^_N¯R
-®4¯
3 }~ 1 2*s3n
o
5
(ENTER)
Õ}Wi[e<=X5YZj[<=i\j]
µ^_R&`q ¡]<=ì_`(LIST)_h
°±* a²abc*@dµe_`(LIST)
_h°±* a²abcåfgIBz{
t
11
NOHILM
5EF"°.Ir´g©ª 5
ª«^_l
¬#$/0 ¥(DSPL)
¥®
789:;</0
,RS/0
1
KdUV<(LIST)
;jyg Ir0´© g©ª2E
F§ÊXY
2
(DISC/PRESET) !
|=>UV
x&s g3WU©ªg IrE
F2EF§Ê
3
(ENTER)]3=>UV
5 ;.]<=h j_áãá¬é.iKQRLQ
R&aP
PQHILM
1
KdUV< (MENU) (DISC/PRESET) ! $DpRG
qG&)@E"#J9
2
3
(ENTER)
4
i(ENTER) k l1
©ª4æ£
xb£Å±g©ª¥²³~ 8~
Q
5
(MENU)
^_8_`?`e
(DISC/PRESET)BC
>
noUV
´µ[ejö]<=NKbcQRáã
,¬-¬
12
´µk]lwNQRLSÚºmnæ
ÒQR
5P «UopO
5Q ;¥¦§¨Wª« ¬++Øqµ¯
K¥¦r¨d_`(OFF)_h°±*a²b
OPQR
µ¥RSLTMABYLT
-´& '()*()6G+,4
TUXYZ
=>
¶·¸ß¦ RSLTMm+¹
ºÊ»¼ RSLTM½ª//00 )
´SLTM
¾¿UÊÀÁ tØ
¾`yg
¾sª</ 5 1Ê ÀÁ
i
¾|Â}
¾¤ÃÄg
¾| ) ÅS¶ÀÁ5
DSPL
MODE
SOUND
SOUND
MODE
DSPL
TUVVW
ÕKlmstWTû×_(MODE)_h
(ATT)
(SOUND)
$##4567$
-./
[\]XYZ
(MODE)
OFF
(SOURCE)
(DSPL)
(OFF)
() *+, -./0123
@AB
(SOURCE)
Z[R¯
:#R ij5=j°<±°
>
(MODE)
Z[²³
:#R´µ ij¶ °
=j¶ °<± ¶ ° )*>
(ATT)
·¸RY
(OFF)°
(SOUND)
)*k#$/0
(DSPL)
Z[^_l
8"#$#%59:$;
-./
3
¾`a¥ß g
¾.</ 5
t
4PQR`a
13
^_`abc
LTMáÆ=F
U
¹¹Ç]ÈCß
;?@ABC
¥yËíìÌìÍÎ0Ï ¡
H¥ÐÅí0ÌgÍ
<=
>?
xÉbRSLTMm+2%z¹¹¤
ÊO¥LTM ¹¹c,
1
(SOUND)BC>]
$/(SOUND)/0"°ÑáT
of -í4Ò 6N7 -Ì4Ò ofj -NÓ
Ê4Ò :f( -j O l4
2
(SEEK)*]BC
RSLTMyËC/(SOUND)/0¬
SG9jLTM
9wCd¯K d a¢xyz
DEFGAH
deXZf
E$'&).i (SOUND)
k l1
µuv)û×%&GHv"wz{`
åL %&4'@QR
14
545 9(ATT)
qf66O9Ôv]¨JÀ]lqf66v]¨2E
F§Ê
bÕ(Ö
(ATT)/0
Ï g Í CY × / $
IJAKLMN
!
,gh
¥ßU"°T
ij8 <k
%'j9'q -#V^4
%o77r ¾Øt´uÙ qAAv=Ú
%N* -RSLTM4¾RSLTMÊ
LTM¹¹
Ó&s qÔ9N*v4/þÈßUh,RS
LTM
Ó;RSLTMm+2%z¹¹¤
ÊOC&s qN7Gv
limn NO
%(pÛÔ:9 -²9:4¾ÜCEFC@0
e t
%*p(rj-ÝEF4¾ÞqPvqQv0q9::v
B&sÝEFe
Ó& qPvEF§]¨+ßCà¬áâãF
EF
Ó& qQvEF§]¨+ßCà¬uÙãF
EF
Ó& q9::vuÙÝEF
%fp'Nj -`ä45
Ó& q9ÔväEF=A£åwª V R
`EF ©ª
Ó;`ä#ßÎuÙæ</© ) Á©
C</© ) Á©ÕäEF
5 hKû× +, i é, OBwSÚmn
mp ()q
%j9'fjO9Ô)9:: -ëìe4-#P^4
Ó& q9Ôvíyî g
%*9Ô9O9Ô)9:: -d¢e4-#P^4
Ó& q9Ôvd¢`a :* ï«b
&s q9::v^__e
%Û:fç69)eÛ(7 -#P^4
1
(MENU)
bßUfp'Nj2'()*(ªB/
(MENU)/0
2
(DISC/PRESET) !
"#=>
3
(SEEK) A/Y*BC=>
+, A¡¢'D'££Y
4
(ENTER)
ßU[C@]lEF4^__e
*QRw{|4cÚuZ«*}~
Õ_(DISC/PRESET)Û&*a6
K D .-, ü á,üé@
.,à-CäxyÂ~
iol %j9ç( -Ì4¾2èíÏCE«é
í0Ìí0Ìæê
15
OPA
!QR
,r12s 7m
ð`z¨BñòC¥óôqõ
hv=k ö¼ ò÷
qõ hvÜøi¥ßU4yË
ÍÎgÍ0yË ¡gÍ*or/0
¥ÏsÅ
CDE
FGHF
IJHF
¹
º
KLMN8
»¼;
@
@
»¼;
KLMNL
@
»¼;
@
»¼;
KLMN544
@
@
@
@
¥ &s üi À üý -8rj9(G9'fj
'jçoþfZZÔ7ef7N9'q'ç69*09::-1
ÎM9::44 1ÎÁC
ΡIr0gÍ Éb¥0yË
1ÎMßU
tuv+w
1
(SOURCE)BCL§ AKLM¨%q¨
Rq¨67QY
2
(EQ7) !f=>©ª«¬
@
$/(EQ7)/0EF"°
(MBP)*|f¤¥Kd{
¦
qõ hveáÊÍ=F E
F2EF§Ê
b£1ÎÃ&s q9::v
?ùlEF§^__e
3xuv+w
?ù]lEF§^__e
á ¦ ú¿ y Ë Í Îg Í0 ¡ g
Í¥(SOUND)/0yË Z[#PQ
^Ê qyËûÝv
Kz¿4z{z
¬
wiâ¬, wOé
üJ
ãââ
é
üJãââO
¬@â¬,¼
16
1
2
3
(MENU)
(DISC/PRESET) e !
$G®Q¯DG)@°(ENTER)
(SEEK)e*BC=>©ª
«¬(ENTER)
$/(SEEK)/0"°]
4
BCf=>±²U³
1 (SEEK) eBC=>±
²
$/(SEEK)/0Ir]
´kuµ¶v y x·®uµ¶v y ¸¹´uµ¶v y
xºuµ¶v y k»·ºuµ¶v y´»¸ºuµ¶vy
x´ºuµ¶v
2 (DISC/PRESET) *]
fg>L¼U³
ÏgÍPoÎÞOPo8
PoyË
á b ( Ö 8 ] È ß U 1 Î Á CY / ö
(ENTER)/0ÙQ?ù
5
(MENU)
;[!ÃßU]l]¨_e
LT
? '()*(+,
x>?& '(6786#0
;# '(+,;'(6786</C
D'(67869:]¨2EF§Ê
)*STUSVSWU
1
(SOURCE) BC $%q)
$Rq)
2
(MODE)
'()*(4tZ
!"#=>½¦
)*
(OFF)
Hyz
yzcd
(DISC/PRESET) :½»>
Hop
+,Ro
(SEEK) :.>>
Hop
U U¡
¢,£¤
(SEEK) :mM>
¥¦§¨©D
17
MN
XY)*Z[
;</ ) ÀÁC</ ) ÀÁ ¥ä
³ 5 14æ`EF -x`äEF#ß
UÎ q9Ôvwª V R ©ªæäE
F -#P^44
,-.()/0
¥&sT
%N7rOP¾cd¶ÀÁ
%N7rOQ¾cd</
¥EF"°
O"PQ
O1
O
E:;<(1)uFGHv !=>
+,@E"#J9
cdtZ
b^__eC&sqN7rO9::v
\]^_)*Z[
,y()/0
¥EF"°
ORS!
OTUVW 5X YZV 5
OP[\] 5
ª«^_l
(DSPL)
¥&sT
%ç:OP¾Ï;j</Ê ÀÁ
%ç:OQ¾Ï;j& '(-*(4+
,B ÀÁ
%ç:Ofjj5¾Ï=Aa>?
'(
-*(4+,B=AÀÁ
5 )iLp +,é, O
E:;<(2) A¾µ¯£Y !=
>+,@E"#J9
Ï&tZ
5Páãá¬é.ÒRp01IipJ
<=QR
5Q )m>< +,01
b__e&s qç:O9::v
«HTpqQR
«HmT +,-./- 01EFpq¼QR
ÚëQR +,-./- 01LAB><
»y¼QRJ ãââ01 AB<
=þ%&ON01 AB<=Ú¼QR
18
@â¬Úº+,û×@é,û×
UCäAB
Õ}Wi[e&<=X5YZj[<=i\j
`aSTU
]
,z{56/0d|d}~/0
l"
`U©ª</-</
#4</!VRx
¡ '(¥½ª©ªÄ]</-#Q^4
1
2
¿:;>ÀÁÂÃ
3
(ENTER)
(MENU)(DISC/PRESET)
!"# $DpRGGqrQ)
2ªBcdD</
4
s3Xt
R«&q +,ì_`(LIST)_h°±
*a²abc*@dµe_`(LIST)_h
*a²abcåfgIBz{
;9m) êë+,NKÚm
) êëx+,xy 01I¢
£S ¡K¡«) êë+,IG
z{56
</3ÎEF"]ÅEFÇ
</BÖA '(67869:
¾
¬)*ijij<¿À< yz
¥(DSPL)¥®
1
1 (DISC/PRESET)A/Y5 BC=>Xt
ptPt%…twtxtk…ty
...tz52tp
tSt
*
5P _ (DISC/PRESET) _h S&N
TU4
5Q îV
2 E,{|=>Xt(SEEK)
u / v áÃ/¡(SEEK)/0
^_N¯R
-®4¯
3 }~12*s3n
o
5
>Ä|ÅÆ%q:;?5Ç(ENTER) K<=¢£hgIO.ü ÛûפT
¥(y¦þQRw§
Qz{56
1
2
(SOURCE)BC $%q)
3
(MENU)(DISC/PRESET)
!"# $DpRGqG&)
4
(ENTER)
= ©ª Þ F
5
(DISC/PRESET)BC
>Ì
ÂÃn
= ©ªÞ tZEF
6
i(ENTER) k l1
D©ª4æ
xbÅÆ©ªY²³~0~
7
(MENU)
4__'(e
(MODE) BCSTÂÃÈÉÊ
Ë%q½¦
t Z $E
+,-./-0101I¢£þ¨edNSQR
©«+,-./-EF
;¤hªµ«Õ¨e01I¢£¬PKb
c*R&+,
19
7856bcde
OPf!Z[)*
,RS/0 d|l8j8p d}~
/0l"fl"
,+/0 d|d}~/0l
"
H»ª`U´©5 1 </´'(6786
</ 5 2ù#
xbH</¥HßU
]sª´&s ÀÁ
5P ^_y»<=®ª01ìx+,
1
2
¿:;>ÀÁÂÃ
3
(ENTER)
4
ÎÏ«ÀÁ
i é, ¯<O
5Q ^_+,-./-EF®ª01ìK¡«+,-./-ê
ë+,Lû×+,-./-01
1
(LIST)
Î ;j </ ´©
Ê
(MENU)(DISC/PRESET)
!"# $PpD(¾G&)
© ª] ¨2 EF §
2
(DISC/PRESET) !
|=>ÂÃ
3
(ENTER):;ÍÂÃ
«H°pqþQR ±ì01I¢£
´«/-²³-³wNæÒmnK]l´l
wLZÚQRKQRL
1 (SEEK)BC>À
ÁÏ«
2 (ENTER) BC $H&pÐ)
$¾(rH)
5
}~ ÑÒ=TÏ«+, $H&pÐ)
$¾(rH)
6
(MENU)
4__'(e
µµJ*¶ABü¬·@ ¸àüt
µÚëx&¹+,L*«AB ¸àüt
20
()k*+
¥&sT
%qofÔqO9Ôv¾AqrjfvßU ÀÁ
%qofÔqOÛÔGv-c¹4¾A qqÛrvß
U ÀÁ
1
E:;< (MENU) (DISC/PRESET) ! " #
$PpD(I'D)$PpD(IrD) $PpD(I'££)
2
(SEEK) u / v !"#
=>+,
! !" ¥&
M>?
gHI¢yzM0gHH
$g/h
1
(SOURCE) E"#J9
2
(DISC/PRESET) BC
=>UÓNO
! $Q)@
3
(ENTER)
Þ;j ÀÁ
º_(MODE) _hw&»;ì-³ ¼
-³*¼¬@/
¶tZ
b^__e2~QB&sqofÔqO
9::v
$ghi
1
(SOURCE) E"#J9
2
(MODE)BC $p¯Ô)
HI
! $Q)@
21
+,-./hij
&
Ir
2-.34/hij
gHI¢¬/DÆ
>?
Îâã
®zC'yz
#yzgHI¢
1
(SOURCE) E"#J9
2
(MENU)(DISC/PRESET)
!"# $p¯Q'RGR)
3
(ENTER)
hgHI¢/ÅIr>R
/ 0 ] B; ß U [ \ C ]
qAv
! $Q)@
Ú ¡]l5)´Bë
õ]l5)N&H_hS°îï
QRRm&OSYQR
'WT ¡]l5)
¥!PQgHI¢ -6GP06GQ
h
4/ &s>R/0]B
1
(SOURCE) E"#J9
2
(SEEK)]3f=>ShE
ÕWX9UÓ±c
3
i=>WX A(1) ! (6)Y !
d|b $Ö)
>R/0WF0 q*7*v]¨2EF§Ê
! $Q)@
´PQSR&5) ¡u&_hLOg
¡5)Sþ¨e
$%kTUS VSWUS "$
g/hVhi
,()
2`agCÜ~#
22
1
(MENU)(DISC/PRESET)
!"# $¾rR¯&I¾G&)
2
3
(ENTER)
4
(SOURCE)BC%qRq
(SEEK) AIY
5
(SEEK) AyY
#$%&
6
(SOURCE)BCQÓ±
lm
7
(ENTER)
Ü~tZ
.C'¿=
Ö m!>Üx"#Y
g>?¬×.x.l$
æ"#¥Ç3%®¯ùCY¹º
»¼½¾¿
xa2`fgH´HIÜC¦a
'(´*(¥/Ü~
q
×Ø%qRqEÑ<BC
$ÙÙÙ)
ÈÉ ²¬
×ØUÓÓ±E´<BC
$ÙÙÙ)
KDubû×tO;_i+,é,
LZ .½.+-_hubû×iþ[
>?
Â&Um!>wª
m!> 'Õ()
x jik]¢ >?M*+
¥_þÎâã«i,Y
)jik -#-^4Kl.A/ú 0
>?MÂ1ª§'>?M¥
Õæ()
@
ABCDE
J9j'K¾¿wCob;¼L
Y§¨WLmÀ©
ÁÂÚÕ):iÛ|ÃÄÅ¡VÆÇw
t
23
H
2,g&3Ù§45 C¢
-6´¥Õ7«8g&
4;g& g19CJKLM
:Û7ùCY. 'NQQ
;g&
1
ÚÛÜ
1 Û
AݮY
2 ÞßXàáâãÜÊäåæç
3 èée}~2
x
2
FGBHL
ÚÛêM
1 ÞßXàáâ23êMeäåæ
çëêMe !äåæçì
íî½{¦
IJJ
2 èe}~1
H
%;g&<2=>˸ ¹?@A
¡g&Yï4ÄB
%*CDEg&Ù?ËFG
%m+g&C'HIÝ_¿
%ÐlmJKLg&'ÕM7
>?
g&è,;ÕMg&NO
ÂHg&
g2P´Q7B
24
3 êMïî½{¦
no
() "#$
£¤¥¦
!
XY
Xk
KLMNOP
¢¤¥¦§§L§W
K FG
¢¤¥¦§
, FG
E
34 4K
%&'(
9:;<
A
/BCDE
IJE
"#$
&NOPL- !6
QRE
K7
%&'(
=7
dqrs
) %&*+
,- !.- !/01
2, !
3,- !4567
2,28 !
3- !4567
=>9:?>@
2 !.,- !
FGH
2,FG 3- !67
KKFG 37L
2FG 3M
7
K 37L
3M
7
,FG 3- !67
, !
%&*+
8- !.- !/01
,K- !
38- !4567
,2- !
3- !4567
%&'(
%&*+
S822,- !
S8,,- !
3T,2,- !U
=7
9:;<
A
CDE
=>9:?>@
2 !.,- !
V W 367
V W 367
/¡)¢ XY
Z@^_
abcXY
%gh
{|
{|
I
I
XY
de9:fdghi:
cjb@ghi:
GlghXk?>@
GlXk?>@
mgXk?>@
9:Xk?>@
no FG3 !67
po FG3- !67
!FG
- !FG
Wtuvwdx
3y>z7
}2 ×,×~~
3p7
} ×,×K~~
3p7
}-
mg@ 37
? > B 3
7
37
0gh@
Gl d 3u
i:7
ut1 ¡ 3 7
utLut22L
utKKLutKK
ut1 ¡ 3K 7
ut¢KLut¢K2
t 1 ¡ 3K 7
tK,
qIJ@
u
d£%&@
¢W
Úë×òwiw
Ê@ËV´«&}ÌÚRy^(
Z@XY
3/[\]?>@7
`
, × 3`67
25
)
pqrs
_"l
\ÍARP8C¥
S ²³2i Í]jY
>?0~Ç'_¿
8K= &v
£¤§E
^_W
Á¥u ÂMNRYÃÄs4PR
YÅ
ÁÆÇÈ<<89Å
ÁÉÊËÌQÍÎÏ·¬ÐÑ
Å
`abcRde
ÁA¥Ò Ó¿Ô¿<¥®Å
ÕÖÉ-K67ÐÅ
Á/¯×k/ØAÙÚÛÅ
Á/¯ÜÝ×ÞÙßàÜÝÅ
^ fggh_
áââãQ89ÙÆÇä :å?bæ>Å
iDjkCDEel X mnopCDE
Áçè饦(OFF)¥®êëLìí
!^_ÉÇîÅ
ÕÖ¥¦(OFF)¥®êëLìíï
!qð^_Å
ÁñòóôÜÝÅõö÷ø
ùúû áóôÜÝã:åLOæ>Å
qrsHtuvwxde
yz{R|}
~5#8
544#
_
ü×ýþ/¯ÜÝÞßàÅ
^H
Á/¯ÜÝŪßù
Å
ÁþÈiiÅ
Õ¥ (SOURCE) ¥®:k¶K>
¶ÛÅ
H
þÈiiÅ
mn
,×Þ¶/Å
äÅ
Õù
óô
ó
Å
Áop Ð!RÅ
Áop "# $ %&ì! 'Å
Á( ")kÉ*+Xk,QR/
-+X./³0Å
HIC
&
ÁÉßà*-.¬67891Å
Á2)./"¸Å
^Ht
" ¡
ÁùÜÝ/,×ü× :34>k56
/¯ü× :74>¨þ×89/
¯ü×Å::éþB¬;<=1
>==?Ô?× Å>
Áþ×ÜÝÅ
Á+,×9=8Å
Õ/,×ü×ÜÝÅ
Á*Å
&¢
Á@£A(¬ áBCãÅ
ÕÉ@£A(¬áB>>ã:å?b
æ>Å
Á2)./"¸Å
Õ
¢,45Å
f=£hiD¤¥
ÁDà@45/0*Å
Á2)./"¸Å
Õ¨aQÝ#(:å?bæ>Å
¦§¨©_ªS«¬®_¯
E¬aQÝ#(Å
ÕÆÇaQÝ#( :å?bæ>Å
¦4KªS°#± ¡
écdäF´µ(Å
ÕÉG>(H áG>ÈI<Bã:å?b
æ>Å
lpl ()
²"
ijJäkij¶mäÅ
26
ctMN
-;>?A'()*(&+,C4
¨©NO
XWFXY?@NÊ]a
=Ú
5K8³
yzKÞ¶Kij=j¶Å
ÕÉyzK¶Kij=j¶Å
59´=
ij=j¶ÐÞ¶KyzÅ
ÕÉyz¶Kij=j¶Å
;6656
ÁijJäkij¶mÅ*
ÕÉijLMNkßà@¶KijÅ
ÁO&PQRS=j9)*Å*
Õ¶KT=jÅ
ÁO&PQRSij=j9)*Å
¶KTij=jÅ
Lµ8¶
=j=UVWopÅ*
Õ)*VWop=jÅ
6;=;£
SPQRSij=j¶9X³Å
Õ¥Ò Ó¿Ô¿< ¥®Å
5£6;89
=j¶YZÙ[Ûk=jÞÙßà@¶
KÅ
Õ\=YZkßà@¶K=jÅ
·´£;KM
]^_`a& b@bÅ
Õcd_`X& b@bÅ
5P K+,ié,û×mnÍÎO+,ié,01
ÚQRKQRL
5Q KQRLQRÏIÍÎ01
áëTPUEBVR,Y¹:
º »¼½W¿
27
Sony Corporation Printed in Thailand