1
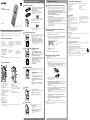
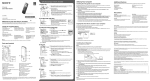
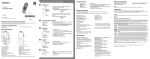
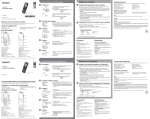
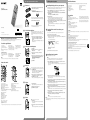
GB FR Let’s try out your new IC recorder 1. Power on. Installing the help guide on your computer Slide and lift the battery compartment lid, then insert a By installing the help guide on your computer from the built-in memory of the IC recorder, you can search for detailed operations and possible solutions when a problem occurs. battery with the correct polarity. Quick Start Guide Turn the power on. Slide the USB DIRECT slide lever on the back of the IC recorder, and insert the USB Slide and hold the HOLD•POWER switch in the direction of “POWER” until the window display appears. Install the help guide. To turn the power off, slide and hold the HOLD•POWER switch in the direction of “POWER” until “Power Off” animation is displayed. In Windows: Double-click [Help_Guide_Installer] (or [Help_Guide_Installer.exe]). In Mac: Double-click [Help_Guide_Installer_for_mac.app]. (v10.5.8 or higher) Follow the instructions that appear on the screen to proceed with installation. To prevent unintentional operations (HOLD) After the installation completes, double-click the [Help_Guide_icdu53_uc.htm] icon in the desktop for Windows (or in Finder for Mac). The help guide is displayed. You can also view the help guide on the following Sony IC Recorder customer support home page: http://rd1.sony.net/help/icd/u53/uc/ ¼¼ To release the IC recorder from the HOLD status, slide the HOLD•POWER switch towards the center. ICD-UX533 Copying files from the IC recorder to your computer 2. Set the date and time. When you insert a battery for the first time, or after the IC recorder has been without a battery for more than 1 minute, the “Set Date&Time” animation appears, and then the year section begins to flash. © 2012 Sony Corporation Printed in China Press or to set the year (the last two digits of This is the Quick Start Guide, which provides you with instructions on the basic operations of the IC recorder. Please read it carefully. We hope you enjoy using your new Sony IC recorder. ˎˎHelp Guide (HTML file stored in the built-in memory so it can easily be copied to your computer.) Optional accessories ˎˎElectret condenser microphone ECM‑CS10, ECM-CZ10, ECM‑CS3, ECM‑TL3 Note Press , press or to select ˎˎRechargeable battery NH‑AAA‑B2EN, NH‑AAA‑B2KN ˎˎUSB AC adaptor AC‑UD20, AC‑U501AD, AC‑U50AG ˎˎCompact charger & 2‑pc AAA Multi‑Use Premium batteries BCG‑34HS2KAN, BCG‑34HW2KAN (play/enter). , and then press Depending on the country or region, some of the models or optional accessories are not available. Your computer Installing Sound Organizer in the display window, and then press (play/enter). Install Sound Organizer on your computer. You can select the following languages: English*, Español (Spanish), Français (French) * Default setting Note Sound Organizer is compatible with the Windows PC only. It is not compatible with Mac. ¼¼ When installing Sound Organizer, log in to an account with administrator privileges. Press STOP. Slide the USB DIRECT slide lever on the back of the IC recorder, and insert the USB Parts and controls connector into the USB port of a running computer. If the IC recorder cannot be connected to a computer directly, use the supplied USB connection support cable. 4. Record. Operation indicator ¼¼ Before you start using the IC recorder, make sure that you slide the HOLD•POWER switch towards the center to release the HOLD status. Press REC/PAUSE. Recording starts and the operation indicator lights in red. Built‑in microphones ¼¼ You can pause recording by pressing REC/PAUSE. Press REC/PAUSE again to restart recording. Place the IC recorder so that the built-in microphones face the direction of the source to be recorded. Make sure the IC recorder has been recognized properly. While the IC recorder is connected to the computer, “Connecting” is displayed in the display window of the IC recorder. Press STOP to stop recording. The “Accessing...” animation appears and the recording stops. Go to the [Start] menu, click [Computer] (or [My Computer]), and then double-click [IC RECORDER] [FOR WINDOWS]. Operation indicator Strap hole (A strap is not supplied.) Built-in microphones (stereo) (L) Speaker Built-in microphones (stereo) (R) USB DIRECT slide lever Display window HOLD•POWER switch REC/PAUSE (record/pause) button microSD card slot (The card slot is in the battery compartment.) STOP button 5. Listen. Double-click [SoundOrganizerInstaller_V140] (or [SoundOrganizerInstaller_V140.exe]). Operation indicator Control button (, , (review/fast backward), Battery compartment Strap hole (A strap is not supplied.) (cue/fast forward)) Follow the instructions that appear on the screen. Press (play/enter). Make sure that you accept the terms of the license agreement, select [I accept the terms Playback starts and the operation indicator lights in green. in the license agreement], and then click [Next]. Adjust the volume by pressing VOL –/+. When the [Setup Type] window appears, select [Standard] or [Custom], and then click Press STOP to stop playback. [Next]. Follow the instructions on the screen and set the installation settings when you select [Custom]. When the [Ready to Install the Program] window appears, click [Install]. (play/enter) button* The installation starts. When the [Sound Organizer has been installed successfully.] window appears, check MENU button [Launch Sound Organizer Now], and then click [Finish]. FOLDER button Note T-MARK (track mark) button (microphone) jack* (headphones) jack You may need to restart your computer after installing Sound Organizer. 6. Erase. Note ERASE button Once a file is erased, you cannot restore it. VOL –/+ (volume –/+) button* Press ERASE. A-B (repeat A-B) button DPC (SPEED CTRL) switch * These buttons and the jack have a tactile dot. Use it as a reference point for operations, or to identify each terminal. “Erase?” is displayed and the file to be erased is played back for confirmation. Select “Execute” using or , and then press (play/ enter). “Erasing…” is displayed while the selected file is being erased. Capacity (User available capacity *1*2) 4 GB (approx. 3.60 GB = 3,865,470,566 Byte) *1 A small amount of the built‑in memory is used for file management and therefore not available for user storage. *2When the built‑in memory is formatted with the IC recorder. Press or to select “Language,” and then press Press or to select the language that you want to use WARNING Risk of explosion if battery is replaced by an incorrect type. Dispose of used batteries according to the instructions. Disconnect the IC recorder from your computer. (play/enter). On handling ˎˎDo not leave the unit in a location near heat sources, or in a place subject to direct sunlight, excessive dust or mechanical shock. CAUTION IC RECORDER or MEMORY CARD Press MENU. If you have any questions or problems concerning your unit, please consult your nearest Sony dealer. Copy files or folders you want to transfer to your computer. Click and hold, drag, and then drop. 3. Select the menu language. On safety Do not operate the unit while driving, cycling or operating any motorized vehicle. ˎˎShould any solid object or liquid fall into the unit, remove the battery and have the unit checked by qualified personnel before operating it any further. Connect the IC recorder to your computer. Check the supplied items. ˎˎQuick Start Guide (1) ˎˎApplication Software, Sound Organizer (Installer file stored in the built-in memory so that you can install it to your computer.) On power Operate the unit only on 1.2 V or 1.5 V DC. Use an NH-AAA rechargeable battery or an LR03 (size AAA) alkaline battery. Do not expose the batteries (battery pack or batteries installed) to excessive heat such as sunshine, fire or the like for a long time. To copy a file or folder (Drag and drop) When you set the minute and press (play/enter), the clock reflects the setting. Precautions You can copy the files and folders from the IC recorder to your computer to store them. Drag and drop the files or folders you want to copy from “IC RECORDER” or “MEMORY CARD” to the local disk on your computer. the year), and then press (play/enter). Repeat this procedure to set month, day, hour, and minute in sequence. Welcome to your new Sony IC recorder! ˎˎVOR (Voice Operated Recording) ˎˎSound Effects ˎˎEasy Search ˎˎDivide ˎˎSound Organizer editing software In Windows: Click [Computer] (or [My Computer]), then double-click [IC RECORDER] [FOR WINDOWS]. In Mac: Double-click [IC RECORDER] on the desktop. 4-438-476-71(1) ˎˎScene Selection ˎˎRecording Filter ˎˎNoise Cut ˎˎT-MARK (Track mark) ˎˎDPC (Digital Pitch Control) ˎˎA‑B Repeat connector into the USB port of a running computer. ˎˎIC Recorder (1) ˎˎStereo headphones (1) ˎˎUSB connection support cable (1) ˎˎNH-AAA (size AAA) rechargeable battery (1) Additional features Details of these additional features for recording, playback, and editing are included in the help guide. IC Recorder Utilizing Your Computer If you format the built-in memory, all data stored there will be erased. (The Help Guide and the Sound Organizer software will also be erased.) RECYCLING NICKEL METAL HYDRIDE BATTERIES Nickel metal hydride batteries are recyclable. You can help preserve our environment by returning your used rechargeable batteries to the collection and recycling location nearest you. For more information regarding recycling of rechargeable batteries, call toll free 1-800-822-8837, or visit http://www.rbrc.org/. Caution: Do not handle damaged or leaking nickel metal hydride batteries. This class B digital apparatus complies with Canadian ICES-003. FR GB Essayez votre nouvel enregistreur IC 1. Mise sous tension. Enregistreur IC Installation du manuel d’aide sur votre ordinateur Faites glisser et soulevez le couvercle du compartiment de la pile, puis insérez une pile rechargeable en respectant la polarité. Guide de démarrage rapide Mettez l’appareil sous tension. Faites glisser et maintenez enfoncé le commutateur HOLD•POWER vers « POWER » jusqu’à ce que la fenêtre d’affichage apparaisse. Utilisation de l’ordinateur En installant le manuel d’aide sur votre ordinateur depuis la mémoire intégrée de l’enregistreur IC, vous pouvez trouver des informations détaillées et d’éventuelles solutions en cas de problème. Faites glisser le levier coulissant USB DIRECT situé à l’arrière de l’enregistreur IC, puis Prévenir les opérations involontaires (HOLD) ICD-UX533 ¼¼Pour sortir l’enregistreur IC de l’état HOLD, faites glisser le commutateur HOLD•POWER vers le centre. Bienvenue sur votre nouvel enregistreur IC Sony ! Ceci est le guide de démarrage rapide qui vous fournit des instructions relatives aux opérations de base de l’enregistreur IC. Veuillez le lire attentivement. Nous espérons que vous apprécierez d’utiliser votre nouvel enregistreur IC Sony. 2. Réglez la date et l’heure. Sous Windows : cliquez sur [Ordinateur] (ou [Poste de travail]), puis double-cliquez sur [IC RECORDER] [FOR WINDOWS]. Sous Mac : double-cliquez sur [IC RECORDER] sur le bureau. Vérifiez les éléments fournis. ˎˎ Enregistreur IC (1) ˎˎ Guide de démarrage rapide (1) ˎˎ Casque stéréo (1) ˎˎ Application, Sound Organizer (le ˎˎ Câble de prise en charge de connexion USB (1) ˎˎ Pile rechargeable NH-AAA (AAA) (1) fichier d’installation est stocké dans la mémoire intégrée afin que vous puissiez l’installer sur votre ordinateur.) électret ECM‑CS10, ECM-CZ10, ECM‑CS3, ECM‑TL3 ˎˎ Pile rechargeable NH-AAAB2EN, NH‑AAA‑B2KN derniers chiffres de l’année), puis appuyez sur (lecture/entrée). Répétez cette opération pour régler dans l’ordre le mois, le jour, l’heure et les minutes. stocké dans la mémoire intégrée afin de pouvoir être facilement copié sur votre ordinateur.) ˎˎ Adaptateur secteur USB AC‑UD20 AC‑U501AD, AC‑U50AG Une fois l’installation terminée, double-cliquez sur l’icône [Help_Guide_icdu53_uc.htm] sur le bureau pour Windows (ou dans le Finder pour Mac). Le manuel d’aide s’affiche. Vous pouvez également afficher le manuel d’aide sur la page d’accueil suivante d’assistance à la clientèle de l’enregistreur IC Sony. http://rd1.sony.net/help/icd/u53/uc/ Copie de fichier depuis l’enregistreur IC vers votre ordinateur Raccordez l’enregistreur IC à votre ordinateur. Copiez les fichiers ou les dossiers que vous souhaitez transférer sur votre ordinateur. Glissez et déposez les fichiers ou dossiers que vous voulez copier depuis « IC RECORDER » ou « MEMORY CARD » vers le disque local de votre ordinateur. Appuyez sur MENU ˎˎ Chargeur compact & 2‑pc piles AAA Premium multi‑usage BCG‑34HS2KAN, BCG-34HW2KAN Appuyez sur , appuyez sur ou pour sélectionner l’onglet entrée). Appuyez sur ou pour sélectionner « Language », puis appuyez sur (lecture/entrée). Remarque , puis appuyez sur (lecture/ Appuyez sur ou pour sélectionner la langue que Selon les pays ou les régions, certains des modèles ou des accessoires optionnels ne sont pas disponibles. vous souhaitez utiliser dans la fenêtre d’affichage, puis appuyez sur (lecture/entrée). Vous pouvez sélectionner les langues suivantes : English* (anglais), Español (espagnol), Français * Réglage par défaut Pièces et commandes Appuyez sur STOP. IC RECORDER ou MEMORY CARD Votre ordinateur Déconnectez l’enregistreur IC de votre ordinateur. Installation de Sound Organizer Installez Sound Organizer sur votre ordinateur. Remarque Sound Organizer n’est compatible qu’avec les ordinateurs Windows. Il n’est pas compatible avec les Mac. ¼¼Lorsque vous installez Sound Organizer, connectez-vous avec un compte ayant des droits d’administrateur. Faites glisser le levier coulissant USB DIRECT situé à l’arrière de l’enregistreur IC, puis insérez le connecteur USB dans le port USB d’un ordinateur en marche. ¼¼Avant de commencer à utiliser l’enregistreur IC, assurez-vous de Indicateur de fonctionnement glisser le commutateur HOLD•POWER vers le centre pour sortir de l’état HOLD. Appuyez sur REC/PAUSE. Microphones intégrés L’enregistrement démarre et l’indicateur de fonctionnement s’allume en rouge. ¼¼Vous pouvez mettre l’enregistrement en pause en appuyant sur REC/PAUSE. Appuyez de nouveau sur REC/PAUSE pour redémarrer l’enregistrement. Tournez l’enregistreur IC de manière à ce que les microphones intégrés soient orientés vers la source à enregistrer. Appuyez sur STOP pour arrêter l’enregistrement. Indicateur de fonctionnement Orifice de dragonne (dragonne non fournie) Microphones intégrés (stéréo) (G) Haut-parleur Microphones intégrés (stéréo) (D) Levier coulissant USB DIRECT Fenêtre d’affichage Commutateur HOLD•POWER Touche REC/PAUSE (lecture/pause) Fente pour carte microSD (La fente pour carte mémoire se trouve dans le compartiment de la pile.) Touche STOP Touche de commande (, , (retour/retour rapide), (avance/avance rapide)) Touche (lecture/entrée)* Compartiment de la pile L’animation « Accessing... » s’affiche et l’enregistrement s’arrête. Touche FOLDER Touche T-MARK (repère de piste) Prise (microphone)* Prise (casque) Touche ERASE Touche A-B (répétition A-B) Accédez au menu [Démarrer] menu, cliquez sur [Ordinateur] (ou [Poste de travail]), et double-cliquez sur [IC RECORDER] [FOR WINDOWS]. Double-cliquez sur [SoundOrganizerInstaller_V140] (ou [SoundOrganizerInstaller_ V140.exe]). terms in the license agreement], puis cliquez sur [Next]. Indicateur de fonctionnement Appuyez sur (lecture/entrée). La lecture démarre et l’indicateur de fonctionnement s’allume en vert. Réglez le volume en appuyant sur VOL –/+. Appuyez sur STOP pour arrêter la lecture. Lorsque la fenêtre [Setup Type] s’affiche, sélectionnez [Standard] ou [Custom], puis cliquez sur [Next]. Suivez les instructions à l’écran et réglez les paramètres d’installation lorsque vous sélectionnez [Custom]. Quand la fenêtre [Ready to Install the Program] apparaît, cliquez sur [Install]. L’installation démarre. Quand la fenêtre [Sound Organizer has been installed successfully.] apparaît, cochez [Launch Sound Organizer Now], puis cliquez sur [Finish]. Remarque Il se peut que vous deviez redémarrer votre ordinateur après l’installation de Sound Organizer. Touche VOL –/+ (volume –/+)* Commutateur DPC(SPEED CTRL) Lorsque l’enregistreur IC est connecté à l’ordinateur, « Connecting » s’affiche dans la fenêtre d’affichage de l’enregistreur IC. Assurez-vous d’accepter les conditions du contrat de licence, sélectionnez [I accept the Orifice de dragonne (dragonne non fournie) Touche MENU Assurez-vous que l’enregistreur IC a bien été reconnu. Suivez les instructions qui s’affichent à l’écran. 5. Écoute. Remarque 6. Effacement. Une fois le fichier effacé, il est impossible de le récupérer. * Ces touches et la prise possèdent un point tactile. Utilisez-le comme référence pour les opérations, ou pour identifier chaque terminal. Appuyez sur ERASE. « Erase? » s’affiche et le fichier à effacer est lu pour confirmation. Sélectionnez « Execute » à l’aide de ou , puis appuyez sur (lecture/entrée). « Erasing... » s’affiche lorsque le fichier est en cours d’effacement. Alimentation Faites uniquement fonctionner l’appareil sous une tension de 1,2 V ou 1,5 V CC. Utilisez une pile rechargeable NH-AAA ou une pile alcaline LR03 (AAA). ˎˎ Si des éléments solides ou liquides venaient à Sécurité Ne faites pas fonctionner l’appareil en conduisant une voiture, une bicyclette ou tout autre véhicule motorisé. Si vous avez des questions ou des problèmes concernant cet appareil, consultez votre revendeur Sony. pénétrer à l’intérieur de l’appareil, retirez la pile et faites-le vérifier par un technicien qualifié avant de le remettre en service. Manipulation ˎˎ Ne laissez pas l’appareil à proximité d’une source de chaleur ou dans un endroit exposé au rayonnement direct du soleil, à une poussière excessive ou à des chocs mécaniques. AVERTISSEMENT Ne pas exposer les piles (pack de piles ou piles installées) à de fortes chaleurs (rayons du soleil, feu, etc.) pendant une période prolongée. ATTENTION Risque d’explosion en cas de remplacement de la pile par un type incorrect. Mettez les piles usagées au rebut conformément aux instructions. Capacité (capacité disponible pour l’utilisateur *1*2) Cliquez et maintenez la touche enfoncée, glissez, puis déposez. S’il n’est pas possible de raccorder directement l’enregistreur IC à l’ordinateur, utilisez le câble de prise en charge de connexion USB fourni. 4. Enregistrement. Précautions Pour copier un fichier ou un dossier (glisser et déposer) Lorsque vous réglez les minutes et appuyez sur (lecture/ entrée), l’horloge affiche le réglage. 3. Sélectionnez le menu de la langue. Accessoires en option ˎˎ Microphone condensateur à Appuyez sur ou pour régler l’année (les deux ˎˎ Manuel d’aide (Fichier HTML Sous Windows : Double-cliquez sur [Help_Guide_Installer] (ou [Help_Guide_Installer.exe]). Sous Mac : double-cliquez sur [Help_Guide_Installer_for_mac.app] (v10.5.8 ou supérieure). Suivez les instructions qui s’affichent à l’écran pour passer à l’installation. Vous pouvez copier des fichiers ou des dossiers depuis l’enregistreur IC vers votre ordinateur pour les stocker. Lorsque vous insérez une pile pour la première fois ou après que l’enregistreur IC est resté sans pile pendant plus d’une minute, l’animation « Set Date&Time » s’affiche et la section de l’année commence à clignoter. Les détails relatifs à ces fonctionnalités complémentaires pour l’enregistrement, la lecture et l’édition se trouvent dans le guide d’assistance. ˎˎ Sélection de scène ˎˎ VOR (Voice Operated Recording) ˎˎ Recording Filter ˎˎ Effets sonores ˎˎ Noise Cut ˎˎ Easy Search ˎˎ T-MARK (repère de piste) ˎˎ Diviser ˎˎ DPC (Digital Pitch Control) ˎˎ Logiciel d’édition Sound Organizer ˎˎ Répétition A-B insérez le connecteur USB dans le port USB d’un ordinateur en marche. Installez le manuel d’aide. Pour mettre l’appareil hors tension, faites glisser et maintenez enfoncé le commutateur HOLD•POWER vers « POWER » jusqu’à ce que l’animation « Power Off » s’affiche. Fonctionnalités complémentaires Si vous formatez la mémoire intégrée, toutes les données qui y sont stockées sont effacées. (Le Manuel d’aide et le logiciel Sound Organizer seront également effacés.) 4 Go (environ 3,60 Go = 3 865 470 566 octets) *1 Une petite quantité de la mémoire interne est utilisée pour la gestion des fichiers et n’est donc pas disponible pour le stockage. *2 Lorsque la mémoire interne est formatée à l’aide l’enregistreur IC. RECYCLAGE DES ACCUMULATEURS À HYDRURE MÉTALLIQUE DE NICKEL Les accumulateurs à hydrure métallique de nickel sont recyclables. Vous pouvez contribuer à préserver l’environnement en rapportant les piles usées dans un point de collection et recyclage le plus proche. Pour plus d’informations sur le recyclage des accumulateurs, téléphonez le numéro gratuit 1-800-822-8837 (Etats-Unis et Canada uniquement), ou visitez http://www.rbrc.org/. Avertissement : Ne pas utilliser des accumulateurs à hidrure métallique de nickel qui sont endommagées ou qui fuient. Cet appareil numérique de la classe B est conforme à la norme NMB-003 du Canada.