1
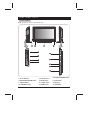
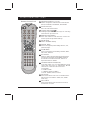
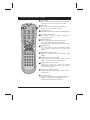
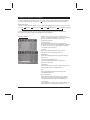
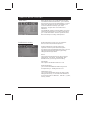
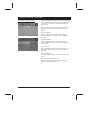
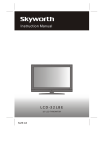
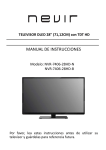
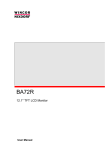
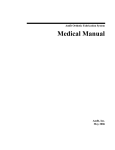
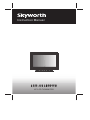
Instruction Manual
LCD-42L8EFHD
42" LCD TV/MONITOR
Thank you very much for your purchase of this product-the most natural Colour
Television Receiver.
To enjoy your set to the full from the very beginning, read this manual carefully and keep
it handy for ready reference.
SETUP
Insert The Batteries
Remove the battery cover by pressing it and sliding it down.
Insert the two 1.5V (AAA size) batteries making sure the polarity (+
or -)of the batteries matches the polarity marks Inside the unit.
3 Replace the battery cover by sliding it in until you hear a click sound.
1
2
Precautions when using batteries
Do not use old and new batteries together.
Do not use different types of batteries (for example, Manganese and
Alkaline batteries) together.
Note that there are chargeable and non-chargeable batteries. Do not
attempt to charge non-chargeable batteries.
Remove the batteries from the remote control unit if you do not intend to use
the unit for a long time. Precautions when using the remote control unit
Do not drop the remote control unit.
Do not subject the remote control unit to physical shocks.
Keep the remote control unit dry. May cause the unit to malfunction.
Replace the batteries with new ones when operation of the unit deteriorates.
TV Installation
-1-
SETUP
Locate the receiver in the room where direct light does not strike the screen.
Total darkness or a reflection on the picture screen can cause eyestrain. Soft and indirect
lighting is recommended for comfortable viewing.
Allow enough space between the receiver and the wall to permit ventilation.
Avoid excessively warm locations to prevent possible damage to the cabinet or premature
component failure.
This TV operates on AC supply directly, connect the AC plug to the socket at the back of the TV.
Insert the mains plug in the socket having a mains voltage of 100-240V AC.
Do not install the receiver in a location near heat sources such as radiator, air ducts, direct
sunlight, or in a place somewhere like close compartment and close area. Do not cover the
ventilation openings when using the set.
Features
In The Box
Up to 200 programme memory.
You should have:
Program Organiser .
Television
Sleep timer.
Remote control
4:3 format , 16:9 format ,14:9 zoom ,
User Guide
16:9 ZOOM1,16:9 ZOOM2 picture modes.
Warranty Card
When no TV signal is dectected, after 15
2 x AAA battery
minutes the TV switches itself automatically
Stand
to stand-bymode.
Wall mount
CYS: PAL / SECAM / NTSC
SYS: BG/DK / I / M
HDMI Input (support up to 1080P)
PC Input (support up to 1080i)
NICAM Stereo / AV Stereo
Panel Features
High resolution (FHD:1920x1080), 42" TFT LCD
display.
Brightness: 500cd/m 2
High-speed response time <8msec.
8-bit color depth, display 16.2M colors.
High contrast ratio (1300:1 Typital)
Viewing angle:178 0(H)/178 0(V)(CR>10).
-2-
FUNCTIONAL PARTS
FRONT PANEL
Note: The graphics are for representation only.
12
1
12
8
10
11
4
PROG
ERAPHONE
9
HDMI3
R -AUDIO- L
3
VOL
3
VIDEO
S-VIDEO
2
MENU
5
TV/AV
6
ON/OFF
7
1. Power Indicator
2. Remote Sensor
3.VOLUME UP/DOWN button
4.PROGRAM UP/DOWN button
5. MENU button
6. TV/AV button
7. ON/OFF button
8. S-VIDEO Input
9. AV3 Input
10. EARPHONE Input
11. HDMI3 Input
12. SPEAKERS
-3-
FUNCTIONAL PARTS
1
HDMI1
1
VGA
2
VGA AUDIO
3
Y
Pb
S/PDIF
Pr
5
4
6
R - AUDIO - L
VIDEO
R - AUDIO - L
VIDEO
AV1
VIDEO
AV OUT
L - AUDIO - R
HDMI2
AV2
BACK PANEL
75 ANT
7
8
1. HDMI1\HDMI2: Connect HDMI input signal from signal source such as DVD.
2. VGA: Connect a PC via a VGA cable.
3. VGA AUDIO: Connect audio signal from PC.
4. Y Pb Pr: Connect RCA cable to connect DVD player or other video device's YPbPr output.
5. AV2: Connect AUDIO and VIDEO input signal from signal source such as DVD.
6. S/PDIF : Connect digital AUDIO output signal.
7. AV OUT : Connect AUDIO and VIDEO output signal.
8. AV1 : Connect AUDIO and VIDEO input signal .
9. ANTENNA IN: Connect a coaxial cable to receive signal from the antenna or cable.
-4-
9
OPERATION INSTRUCTIONS
Remote Control Unit
POWER
MUTE
)
Press this button to turn the TV on/off.
1 POWER (STAND BY) BUTTON (
2 MUTE BUTTON (
)
Press once to mute the sound, press again to
return to preset sound level.
3 PROGRAM SELECTION BUTTONS (0-9)
AV/TV
RECALL
SLEEP
INFO
VOL
MENU
PROG
EXIT
PICTURE SOUND
FAV.
NICAM
PIP ON/OFF PIP SOURCE PIP SOUND PIP SIZE
TEXT
MIX
HOLD
SIZE
INDEX Sub-page REVEAL CANCEL
You could select program you want with 0-9
button. For program up to 100-199, you need
press three digit number quickly, then TV will go
to the program directly. For program between
10-99, you need press two digit number
according program quickly and wait, then TV
will go to the program. For program between 0-9 ,
just press one digit and wait .
4 AV/TV BUTTON
Press this button to display external video signal
Such as TV/AV IN/HDTV/ VGA/HDMI1/HDMI2.
Press up/down arrow key to select item and
press left/right arrow key to enter selected item.
5 QUICK VIEW BUTTON (RECALL)
Press this button to return to the previously
viewed program.
6 SLEEP BUTTON(SLEEP)
Press this button to set the sleep timer. When
the preset length of time has passed, the TV
set Enters standby mode. The time
change(minutes):10,20,30,40,50,60,90,120, off.
7 INFO BUTTON
Press this button to display the settings on the
screen.(e.g. Channel number for TV input,
channel name, colour system).
8 PROGRAM UP/DOWN BUTTONS (PROG.+/-)
Press the PROG.+ button to select the program
Forwards. Press the PROG.- button to select the
program backwards.
9 VOLUME UP/DOWN BUTTONS (VOL.+/-)
Press VOL+/- buttons to adjust sound level. Or
adjust the volume of each item in the menu
status.
-5-
OPERATION INSTRUCTIONS
Remote Control Unit
POWER
10 Left Right arrow/Zoom-/+ (Z- / Z+)
Press to change the screen format: 4:3 format, 16:9
format, 14:9 ZOOM, 16:9 ZOOM1, 16:9 ZOOM2.
MUTE
11 OK BUTTON (OK)
Press to enter selected item.
12 CURSOR button(
/
)
Left/Right/Up/Down direction keys for selecting
menu itemsor signal sources.
AV/TV
RECALL
SLEEP
INFO
VOL
PROG
13 MENU BUTTON (MENU)
Press this button to enter the menu screens for
various Optional adjustable settings.
14 EXIT BUTTON
Press to exit MENU directly.
15 PICTURE Button
Press to change the picture setting :Normal , soft ,
personal, bright .
MENU
EXIT
PICTURE SOUND
FAV.
NICAM
PIP ON/OFF PIP SOURCE PIP SOUND PIP SIZE
TEXT
MIX
HOLD
SIZE
INDEX Sub-page REVEAL CANCEL
16 SOUND Button
Press to change the sound setting :standard, Music,
Film, Voice, Personal .
17 Fav. BUTTON
Press Fav. button to switch favourite channel which
you had set in Favourite channel MENU. If there is
no channel in Favourite channel list, there is no
response for this Fav. Button.
18 SOUND MODE BUTTON(NICAM)
Press this button, you can select different sound
mode when the source is different.The NICAM
selection is common for all TV channels .
TV SOURCE
1. MONO: MONO
2. STEREO: MONO, STEREO
3. DUAL : MONO, DUAL1, DUAL2
19 PIP ON/OFF
Press this button to switch on or off PIP function .
PIP function is available in HDTV, VGA, HDMI
mode only.
20 PIP SOURCE
Press this button to select PIP source from TV,
AV when PIP is active.
-6-
OPERATION INSTRUCTIONS
21 PIP SOUND
Press this button to select current sound output
from main or PIP source when PIP is active .
POWER
MUTE
22 PIP SIZE
Press this button to change PIP picture size ,
Normal or Zoom when PIP is active .
23 TEXT BUTTON
This button is used for entering the teletext MENU.
AV/TV
RECALL
SLEEP
INFO
VOL
MENU
PROG
EXIT
PICTURE SOUND
FAV.
NICAM
PIP ON/OFF PIP SOURCE PIP SOUND PIP SIZE
TEXT
MIX
HOLD
SIZE
INDEX Sub-page REVEAL CANCEL
24 MIX BUTTON(OPTION)
the button is used as closing /opening the
teletext Background.
25 HOLD BUTTON
Press this button to hold the Teletext page
without update to prevent the page from
changing. Press again to release the hold state.
26 SIZE BUTTON
Press this button you can select different image
sizes: Normal, double high top, double high
bottom.
27 INDEX BUTTON (OPTION)
Press this button to enter the Teletext's index
MENU.
28 SUB.PAGE BUTTON (OPTION)
Subcode mode, gives, the possibility to select
certain subcode pages of a teletext page.
29 REVEAL BUTTON (OPTION)
Press this button to reveal the hidden
information for so me Teletext pages press again
to hide the information.
30 CANCEL BUTTON (OPTION)
Press this button to appear the TV signal on the
background.
31 F1-F4 (OPTION)
These four color key are for relative fast teletext
function in the bottom of teletext page and
organizer function relative operation .
-7-
SIZE
SIZE
REVEAL
REVEAL
Text
You could
stop it by press "HOLD" button .
SUB.PAGE
Up arrow key
Down arrow key
SUB.PAGE
INDEX
MIX
MIX
1000
MIX
So TV will display text page you required
quickly .
SIZE
-8-
Up arrow key
Down arrow key
To Cancel TEXT
Press "CANCEL" button to clear the TEXT.
But the page number is still displayed on
the left top of the screen.
NOTICE: However, Teletextis playing all the
same on the background at the time.
Press " CANCEL" button again to resume
the TEXT.
To Freeze TEXT
Press "HOLD" button to hold a Text
Page. This means the page will not change
and refresh.
Press the button again to release the hold
state.
To exit Teletext
Press the " TEXT " or " EXIT" button. The
screen will switch to TV mode.
Note : If there is no teletext signal in
your region , when you press "TEXT"
button , you could entry teletext mode
also , but TV will show top and bottom
line only as graphics below , all teletext
function is not available .
100
P-
P+
110
200
-9-
ANALOG MENU SCREENS
1. Plug in the power cord and switch on power switch . The power indicator will light up.
If TV is in stand by mode. Then Press"¡¡
" Key. The picture will display in few minutes.
MENU BUTTON
1.Press menu button to display menu, and press left/right arrow key to select sub menu.
PICTURE
SOUND
INSTALLATION
TIMER
PREFERENCE
PARENTAL CONTROL
2.After entering an item, you can select the desired adjusting item by the up/down
arrow key and adjust It by the left/right arrow key buttons.
Picture menu
Enter picture menu, you can select Picture
Preset, Contrast, Brightness, Colour, Sharpness,
and Noise Reduction. items by pressing
up/down arrow key.
Picture Preset
Press the left/right arrow key to change the
Picture Preset. Such as SOFT, NORMAL, BRIGHT,
Or Personal. Choose the setting that is best for
your viewing environment.
Contrast
Press the left/right arrow key to increase
/Decrease the contrast of the picture.
Brightness
Press the left/right arrow key to lighten/darken
the picture.
Colour (not available on PC)
Press the left/right arrow key Adjusts the
richness of the color.
Sharpness
Press the button to sharpen or soften the picture.
(Not available on PC and HDMI input .)
Tint
Press the left/right arrow key to adjust tint.
(Available for NTSC .)
Noise reduction
Press the button to select off, low, mid, high to
adjusts the dynamic noise reduction level of
image.(Not available on PC and HDMI input .)
Color Temp
Press left/right arrow key to change picture color
temperature such as neutral, warm and cool .
-10-
ANALOG MENU SCREENS
Sound menu
Enter Sound menu, you can select Sound Mode,
Balance, Treble, Bass, Auto Volume Level. Items
by pressing up/down arrow key.
Sound Mode
Press the left/right arrow key to select the audio
mode. The audio mode are Standard, Music,
Film, Voice, Personal.
Balance
Press the left/right arrow key to adjust to the
left to right sound channel volume.
Treble
Press the left/right arrow key to adjust the high
frequency signal value.
Bass
Press the left/right arrow key to adjust the bass
boost value.
Auto Volume Level
Press left/right arrow key to switch AVL function
on/off. AVL function is not available except TV
mode.
TV Speaker
When select Internal , sound is output from TV
speaker , S/PDIF and audio of AV OUT is mute ;
when select External , TV speaker is mute ,
S/PDIF and audio of AV OUT is active as output
for external speaker . Be noted , output of
earphone is independent from "TV Speaker"
selection .
Installation menu
Enter Installation menu, you can search,
and edit channel or favorite program by pressing
up/down arrow key.
Language
Press the left/right arrow key and MENU buttons
to select the osd Language.
Channel Number
You could change and display channel number
you want.
-11-
ANALOG MENU SCREENS
Installation menu
Channel Name
Display channel name, you could edit it if press
"OK" to enter edit sub menu. use up/down arrow
key to change name of program in the edit sub
menu.
Colour Sys
Press the button to select a new colour standard
value in TV. The choices are AUTO, PAL,NTSC
and SECAM.
Sound Sys
Press the button to select a new sound standard
value in TV. The choices are B/G, D/K, I, M. It's
better to select it before auto installation.
Country
Select country as your location, TV will make
auto-sorting after auto installation, it's better to
select it before auto installation.
Auto Installation
Press right arrow key to start auto program
search. TV will search all band for program.
Manual Installation
Press right arrow key to start Manual program
search . TV will search upward until one
program found. You could input the program
frequency directly to find program also if you
know it.
Fine Tuning
Press left/Right arrow key to decrease/increase
current frequency step by step.
Organiser
Press left arrow or OK key to enter sub menu,
then you could use four color key to Delete,
Copy, Move, Skip program in the list.
Favourite Channel
Press left arrow or OK key to enter sub menu.
There is 8 Favourite program which could be set .
you could use left/right arrow key or digit
number key to select favourite program.
-12-
ANALOG MENU SCREENS
Time menu
Enter Timer menu, you could set time and turn
on/off timer. With Time reference, you could set
channel from which TV get teletext time. Current
Time show the time of your TV remember, you
could set this time manualy if you want.
Otherwise, TV get it from channel for time
reference .
Turn off/Wake up time used for setting of TV turn
off and/or wake up time according current time.
you could select which channel you want when
the TV wake up according wake up time.
Preferences menu
Enter preferences menu you can setup the
Zoom, Film mode, OSD Transparent.
Select preferences menu by press the
up/down arrow key and enter the caption
function by pressing left/right arrow key, you can
adjust the Style function items by pressing
left/right arrow key buttons.
Zoom
The picture display will change as 4:3 format ,
16:9 format , 14:9 zoom, 16:9 ZOOM1,16:9
ZOOM2 when you change Zoom setting.
Film Mode
This option sets the file mode on or off .
OSD Transparent
you could select different OSD background
transparent by it . Setting it from 0 to 7.
Teletext char. Set
you could select teletext character set by press
left/right arrow key . it could be selected from 1
to 5 for character set West Eu. , East Eu. , Cyrillic ,
Turkey , Arabic.
-13-
ANALOG MENU SCREENS
Parental Control menu
Enter Parental Control menu you can set control
of it .Press left/right arrow key to select Parental
Control item, then press up/down arrow key to
entry menu.
Input correct password to entry sub menu when
PIN item is high light . The initial password is
"0000".
Lock Installation
Press left/right arrow key to lock installation
menu or unlock it. This item is only available in
TV mode .
Channel Number
Press left/right arrow key to select channel
which you want lock. This item is only available
in TV mode .
Lock Channel
Press left/right arrow key to active channel lock
function on or off. This item is only available in
TV mode.
Lock Front panel
Press left/right arrow key to lock front key board
or not.
New PIN code/Repeat PIN code
Input and double confirm new PIN code if you
want have one new password.
-14-
ANALOG MENU SCREENS
PC MODE
15 Pin Mini D-Sub Connector
and LCD TV.
PC Input typical display modes. The following
table is an illustration of some of the typical
video display modes.
1
640X480(recommend 60Hz)
2
3
4
800X600(recommend 60Hz)
1024X768(recommend 60Hz)
480p
5
6
7
576p
720p(50/60Hz)
1080i(50/60Hz)
MENU in PC Mode
Geometry menu
Enter menu by pressing the "MENU"
button on the remote control. In PC mode state,
there are 4 geneal menus (Picture, Sound, Time
,parental control)supported all functions are the
same as in TV mode.
when you connect VGA cable to the jacks of PC or
connect HD cable to device such as DVD, and select
the signal source as "VGA" or "YPBPR" the screen
menu will active.
You can use the function to adjust the display setting
automatically or manual.
H-Position
Press left/right arrow key to adjust the H-Position of television the screen appear as .
V-Position
Press left/right arrow key to adjust the V-Position of television the screen appear as.
Phase
Press left/right arrow key to adjust the phase of the picture. This item is only available
in VGA mode .
Colck
Press left/right arrow key to adjust the updating frequency of the picture. This item is
only available in VGA mode .
Auto Adjust
Press left/right arrow key to auto adjust PC size and position. This item is only available
in VGA mode .
PICTURE
-15-
ANALOG MENU SCREENS
Preferences menu
Enter preferences menu you can setup the
Language, Zoom, Film mode, OSD Transparent.
Select preferences menu by press the
up/down arrow key and enter the caption
function by pressing left/right arrow key, you
can adjust the Style function items by pressing
left/right arrow key buttons.
Language
Press the left/right arrow key and MENU buttons
to select the osd Language.
Zoom
The picture display will change as 4:3 format ,
16:9 format , when you change Zoom setting.
OSD Transparent
you could select different OSD background
transparent by it. Setting it from 0 to 7.
Pip menu
Press up/down arrow key to select PIP item and
press left arrow key to entry sub menu . PIP
function is only avaiable in PC, HDTV, HDMI
mode.
PIP
Press left/right arrow key to switch on or off PIP
function .
PIP Source
Press left/right arrow key to select PIP source
such as TV , AV.
Sound
Press left/right arrow key to select TV sound
from main or PIP channel.
PIP Size
Press left/right arrow key to select PIP size such
as 1 or 2 . 1 for small PIP picture, 2 for big PIP
-16-
ANALOG MENU SCREENS
HDMI Input Resolutions
HDMI Input typical display Modes.
The following table is an illustration of some of typical Video
display modes.
1
640X480(recommend 60Hz)
2
3
4
5
6
800X600(recommend 60Hz)
1024X768(recommend 60Hz)
480p
576p
720p(50/60Hz)
7
8
1080i(50/60Hz)
1080p(50/60Hz)
Y Pb Pr Mode(Component input)
The menu of Y Pb Pr mode is exactly same as the menu of HDMI mode.
YPbPr Input typical display modes.
The following table is an illustration of some of the typical video display Modes.
1
2
480i
480p
3
4
5
6
7
576i
576p
720p(50/60Hz)
1080i(50/60Hz)
1080p(50/60Hz)
-17 -
Symptoms
on
Try d if
fe re n t
chann
Check
e l, if O
a e ri a l
K , p ro
conne
b a b ly
Check
c ti o n s
s ta ti o n
a e ri a l
on bac
tr o u b le
fo
r b ro k
k of se
R e -o ri
e
t
n w ir e
ent ae
s
ri a l (i f
P ro b a
in
d o o r ty
b ly lo c
pe)
a l in te
A d ju s t
rf e re n
fi n e tu
ce, su
n in g c
ch as a
A d ju s t
o
n a p p li
n tr o l
b ri g h tn
ance
ess co
A d ju s t
n
tr
o
c o n tr a
l
s
t c o n tr
Check
ol
if s ta ti
o n is b
A d ju s t
ro a d c
c o lo u r
a s ti n g
c
c o lo u r
o n tr o l
Check
if s y s te
m s w it
Check
c h is c
if o n /o
o rr e c t
ff s w it c
Check
h is "o
B a tt e ri
n"
e s in R
e m o te
c o n tr o
l
S o lu ti
SERVICE TIPS
BEFORE CALLING FOR SERVICE, HAVE YOU
CHECKED (
) THE FOLLOWING CHART
ON SYMPTOMS AND SOLUTIONS?
No picture, no sound
Poor sound, picture OK
Poor picture, sound OK
Weak picture
Blurred picture
Double image
Lines in picture
Distorted picture
Weak reception on some channels
Horizontal bars
Picture rolls vertically
Poor colour
No colour
Misoperation of Remote control
No Remote control
On Screen Display Control outside the screen
-18-