1
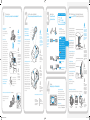
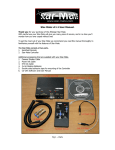
Take your radio out of the box. You should have these. a b MUTE MENU DISP MEMO MENU + BAND MEMO BAND 1 2 3 4 5 6 7 8 9 2 3 4 5 6 7 8 9 DISP 0 0 a. radio b. remote c. dock d. windshield mount e. vent mount f. antenna g. antenna cover/tail h. power adapter i. screws j. alcohol pads k. FM extender antenna (FEA) l. self-adhesive cable guides (3) & suction cups (2) for FEA c e d – 1 sirius.com SIRIUS Satellite Radio Inc. 1221 Avenue of the Americas New York, NY 10020 888.539.SIRIUS(7474) © 2008 SIRIUS Satellite Radio Inc. “SIRIUS” and the SIRIUS dog logo, channel names and logos and related marks are trademarks of SIRIUS Satellite Radio Inc. Radio and subscription required and sold separately. All rights reserved. Be sure to observe the following warnings. Failure to follow these safety instructions and warnings may result in a serious accident and/or personal injury. Installation must be performed according to this installation guide. SIRIUS® is not responsible for issues arising from installations not performed according to the procedures in this guide. f g h l Do not install the FM Extender Antenna or any other component where it will hinder or block your view. In some states it may be illegal to mount it on the windshield of your vehicle. Check applicable law for any restrictions or limitations before installing the extender cable on your windshield. Do not install the FM Extender Antenna or any other component where it may hinder the function of safety devices such as an airbag. Doing so may prevent the airbag from functioning properly in the event of an accident. i j Sit. Stay. Have fun. sirius.com Safety Precautions k Getting Started The installation and use suggestions contained in this guide are subject to any restrictions or limitations that may be imposed by applicable law. The purchaser should check applicable law for any restrictions or limitations before installing the extender cable. Notice to drivers in California and Minnesota: State law prohibits drivers in California and Minnesota from using suction mounts on their windshields while operating motor vehicles. Other dashboard or friction mounting options should be used. SIRIUS does not take any responsibility for any fines, penalties, or damages that may be incurred as a result of disregarding this notice (See California Vehicle Code Section 26708(a); Minnesota Statutes 2005, Section 16971). Installing the Vehicle Kit for your Starmate 5 Satellite Radio Thanks for giving your Starmate 5 a good home. You’re probably anxious to get started. Before you decide to install this kit yourself, we’d like to suggest getting a pro to help. We want you to be 100% satisfied with your satellite radio experience. Just visit your local retailer for installation, or visit sirius.com to learn more. Here’s a simple guide for those who prefer doing this kind of stuff themselves. For more detailed info, check out your User Guide or click the “INSTALL + ACTIVATE“ link on our homepage. Getting Started ST5 (ST5GSG20108) 00.ABCD1.001 SIRIUS9865 ST5_GSG_012808.indd 1 1/28/08 3:00:55 PM 1 The big decision. Pick a spot for your radio. Air vent or windshield? A. Attach the mount to vehicle dock. Using the screws provided, attach the vehicle dock to the vent mount. AIR VENT BE SAFE: Make sure your radio isn’t in a place where it could interfere with driver visibility or safe deployment of the airbags. B. Attach to vent. If the vent louvers in your vehicle are recessed, you may need to use the longer vent hooks with the vent mount. Be sure to match the orientation of the vent hooks as shown. Position the two tension springs against a heating / AC vent louver. Then gently push the vent mount into the vent, far enough so that the hooks drop down and hook the rear of the vent louver. Once the hooks have grasped a vent louver, the tension springs will keep the vent mount hooked to the louver. Use support foot to brace the radio in place. Refer to page 18 in the User Guide if you prefer more detailed instructions. BE SMART: Additional vehicle installation accessories are available at your satellite radio retailer or visit sirius.com/ accessories/vehicle installation for more information. Tension Springs Adjustment Holes Foot Radio mount placement options for windshield Windshield mounting is an alternate method. Refer to the User Guide for details. SIRIUS9865 ST5_GSG_012808.indd 2 BE LEGAL: Some states have laws about suction cups on your windshield. To change the angle of the vehicle dock, move the foot to a different adjustment hole on the vent mount. 2 You’ll be glad you did this right. Place your magnetic antenna and hide those wires. Here are some general guidelines. For more tips and details, check out your User Guide or go to sirius.com/vehicleinstall/ Strain Relief BE CAREFUL: STOP and read the more detailed instructions — or get a pro to help if you don’t understand what to do next. You might accidentally do damage to your ride. Cable A. Placing the antenna outside. Leave at least 3” of metal around the antenna. Use the rubber tail cover to hide and protect the exposed wire. Feed the wire under the rubber molding around the back windshield, into the seal around the trunk. Route the cable along trunk wall and into the interior cabin from there. B. Hiding the antenna wire inside. The best place to hide your antenna wire depends on your vehicle. It’s usually easiest to run the wire from the rear of the vehicle to the front toward the radio by routing the cable along the interior trim where it meets the carpet, by gently pushing it behind the edges of the trim. Then bring the cable out from the trim and route it under the carpet to the dashboard or console. Plug the cable into the radio and coil any extra wires under the carpet or floor mat. BE SMART: Use a tool like a blunt plastic putty knife to help hide wires along the trim. SUV MEMO BAND 1 2 3 4 5 6 7 8 9 0 PICKUP TRUCK Above front windshield, on the roof toward front of cab. Centered between right and left sides. CONVERTIBLE On trunk lid, at least 3” from seam. Centered between right and left sides. Best NOTE: You’ll only need to do this step if you’re using Option A Wireless FM in step 3 to connect to your car radio. B. Cassette Adapter BE SMART: Other options, – like a direct FM connection or rear Auxiliary Input – may give you better audio quality, but may require pro installation. 5VDC AUDIO First, power up. Plug in your A/C power cord. This goes into your cigarette lighter. Now, choose either A, B or C below. Option A Wireless FM Select an FM station on your radio that is not in use — you should only hear static. (Visit sirius.com/ fmchannel to find available stations in your area.) Turn on Starmate and press and hold the FM Preset button for 2 seconds to access the FM Presets list. Then choose FM Preset 1-5 to program and match the same FM station as your car radio. 5VDC The FM Extender Antenna (FEA) brings the FM signal transmitted by your SIRIUS radio closer to your vehicle’s FM antenna to provide a strong FM signal for good reception. aerial type front fender or hood mounted fm antenna A. Positioning FEA inside. The FEA should be mounted vertically on the inside of the windshield at the edge of the glass nearest the antenna. B. Cleaning the suction cup area. Wipe the area where the suction cups will be mounted with the alcohol swab provided. aerial type rear fender or trunk mounted fm antenna AUDIO Option B Cassette Adapter Sold separately. 5VDC BE SMART: A dry car is nice. Avoid damaging or compromising the window and trunk seals. Better C. Auxiliary Input BE SAFE: Not properly placing or installing the antenna can create safety hazards during an accident. SEDAN Good A. Wireless FM Protective Strips Rubber Antenna Cover / Tail Antenna placement options for other vehicles. DISP Audio Quality Adhesive WINDSHIELD MENU 3 Almost there. Connect the audio to your car stereo. AUDIO Option C Input Jack (Aux / Line In) Found in some newer vehicles. C. Attaching the FEA. The wire between the two suction cups should be as straight as possible and shouldn’t obstruct the driver’s view. 4 SIRIUS ID XXX ############ Test your radio and get its ID. Please turn to channel #184 to make sure your radio is getting signal and sound. Now find the 12 digit SIRIUS ID number on the bottom of the box or by selecting: Power > Menu > SIRIUS ID (or) channel #0 Activate your radio. Subscribe online: https://home.sirius.com/ (or) subscribe by phone: 1.888.539.7474 E. Hiding the wires. Hide the wires in the same way as the antenna cable. FM Antenna options for other vehicles. Please refer to your User Guide for detailed instructions for other antenna types. FM Antenna FEA rear roof top Mounted fm antenna BE CAREFUL: Test mount your FEA first using the suction cup mounts provided. Once a good location has been found, permanently adhere the FEA using the adhesive mounts. BE smart: Clean the area where the suction cups will be mounted with the supplied alcohol swab. D. Connecting to the vehicle dock. Plug the FEA into the FM OUT connector of the vehicle dock. Nice job. Now just get your ID and subscribe! BE SMART: Because of the various FM antennas found in vehicles and their numerous locations, SIRIUS suggests professional installation of this item. Consult your User Guide for more info. FM Antenna FM Antenna FEA in glass fm antenna BE SAFE: In some states it may not be legal to put the FEA on the front windshield glass. In these cases, the FEA should be mounted on the A-Pillar adjacent to the FM antenna. FEA Front roof top mounted fm antenna BE smart: Be sure FEA is as close to FM antenna as possible. 1/28/08 3:01:01 PM