1
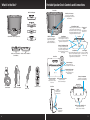
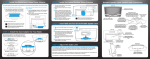
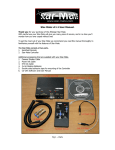
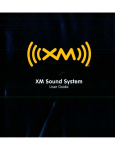
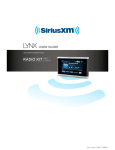
What’s in the Box?
Portable Speaker Dock Controls and Connections
Front View
Radio Dock Adapters
power
volume
aux in
volume
power
Radio Dock Connector
Connector for your Radio.
(Interchangeable for different
model Radios.)
aux in
XM/SXM1 (Pre-installed)
Volume/Mute Control
Sliding a finger in a circular motion
on the volume control increases or
decreases the volume level. Pressing
twice mutes the audio and a circle of
blue lights will flash while muted.
SXM2
XMp3
SiriusXM BB2 Portable Speaker Dock
Power Button
Pressing and holding until the
Power On light is on turns the
power On. Pressing and holding
again turns the power Off.
Radio Dock Adapter
Provides alignment and
support for your Radio.
(Interchangeable for
different model Radios.)
SIRIUS
Top View
power
Radio Connector Module A
(Pre-installed)
Radio Connector Module B
Rear View
Volume Level
Lights
Lights indicate
volume level.
volume
aux in
Power On/Low Battery Light
The light is steady blue when
the Portable Speaker Dock is
powered on; the light blinks
Aux In Button
Aux In Light
when the batteries are nearly
Pressing and holding until the Aux In When on, Portable
discharged.
light is on switches audio output to Speaker Dock is set
Aux In input. Pressing and holding
to Aux In input.
again switches to satellite radio.
Antenna Storage
Storage area for the
Indoor/Outdoor Home Antenna.
mute
select
antenna
band/
fav
memo/
info
menu
display
Indoor/Outdoor
Home Antenna
Home Power Adapter
Power Cord
14V DC
Remote Control
Antenna Connection
Connection for the
Indoor/Outdoor Home
Antenna.
14V DC Power Connection
Connection for the
Home Power Adapter.
Battery Compartment
Requires 8 C size alkaline
batteries (sold separately).
Bottom View
Side View
Aux In
Connection for
audio from an
external device.
aux in
Headphones
Connection for
headphones.
2
Antenna Cable Storage
Storage area for the
Indoor/Outdoor Home
Antenna cable.
Radio Connector Module Lock
Locks and unlocks the
Radio Connector Module.
3
STEP 1: Identify the Radio Dock Adapter and Radio Connector Module Combination for your Radio
There are four Radio Dock Adapters included with your Portable Speaker Dock, which are designed to align
your particular Radio with the Portable Speaker Dock’s connector, and to provide support for your Radio while
it is in the dock. Please note that Radio Dock Adapter XM/SXM1 is pre-installed in the Portable Speaker Dock.
Radio Dock Adapter XMp3i
Top View
There are also two Radio Connector Modules included with your Portable Speaker Dock, which provide the
correct connector for your particular Radio. Please note that Radio Connector Module A is pre-installed in
the Portable Speaker Dock.
XMp3
Both the Radio Dock Adapters and the Radio Connector Modules have a sticker affixed on the bottom which
identifies them. Turn them over to identify them.
Combination 3
The four combinations of the Radio Dock Adapters and Radio Connector Modules are shown with the
Radios each combination supports. Find the correct combination for your Radio, and note the adapter and
module you will use.
Follow steps 2A
and 2C. Skip step 2B.
XMp3
XMp3i
XMP3
+
Bottom View
Radio Connector Module A
Top View
Radio Dock Adapter XM/SXM1
=
(Pre-installed)
(Pre-Installed)
Edge
Top View
XpressR
menu
fm
1
2
3
4
5
6
7
8
9
0
#
jump
Combination 1
XM
SXM1
XM/SXM1
+
Everything is
pre-installed. Skip
ahead to step 3.
Bottom View
Radio Connector Module A
Top View
=
(Pre-installed)
Onyx
Radio Dock Adapter SIRIUS
Xpress
Sportster 5
Top View
lay s ea rc h
disp
men u
menu
FM
mem .
jump
ju mp
1
2
3
4
5
6
7
8
9
0
direct
XpressRCi & XpressRC
1
2
3
4
5
6
7
8
9
r.
pr e. d i
0
Stratus, & Stratus 4, 5, 6
XpressEZ
SIRIUS
Combination 4
SIRIUS
+
Follow steps 2A
and 2C. Skip step 2B.
Bottom View
Radio Connector Module A
Top View
Radio Dock Adapter SXM2
=
sel
menu
jump
Starmate 3, 4, 5
(Pre-installed)
Starmate 8
Top View
menu
FM
jump
1
Combination 2
SXM2
SXM2
+
Follow steps 2A,
2B, and 2C.
Bottom View
Radio Connector Module B
=
2
3
4
5
6
7
8
9
0
direct
Lynx
Top View
4
5
STEP 2: Install the Radio Connector Module and Radio Dock Adapter
In this step, you will install the Radio Connector Module, if necessary, and Radio Dock Adapter, according to the
combination for your Radio that you determined from the previous step.
• Combination 1: Skip this step and go to step 3. The adapter and module are already installed in the
Portable Speaker Dock.
• Combination 2: You will remove the pre-installed adapter, remove the pre-installed module, install Radio
Connector Module B, and install Radio Dock Adapter SXM2.
• Combination 3 & 4: You will remove the pre-installed adapter, and install the Radio Dock Adapter for
your Radio. Follow steps 2A and 2C, and skip step 2B.
power
volume
aux in
d. Insert the Radio Connector
Module B into the dock as shown.
STEP 2A: Removal of the Radio Dock Adapter
The Radio Dock Adapters are constructed
from precision molded plastic. During
removal, extra care must be taken to
not bend, force, or otherwise stress the
adapter.
power
volume
e. Keeping your hand on the module to prevent it from
falling out, turn the dock upside down again.
aux in
Remove the Radio Dock Adapter from the
Portable Speaker Dock by placing a coin,
or your fingernail, into the slot at the back
of the adapter, and pulling it up.
f. Place the coin into the center slot on the lock again,
and turn the lock clockwise to lock the Radio Connector
Module into the dock. Turn the dock upright again.
Coin
STEP 2B: Removal and Installation of
the Radio Connector Module
STEP 2C: Installation of the Radio Dock Adapter
This step applies only to Combination 2. For all other combinations, skip ahead to step 2C.
The Radio Dock Adapters are constructed from precision
molded plastic. During installation, extra care must be taken to
not bend, force, or otherwise stress the adapter.
a. Turn the Portable Speaker Dock upside down, and locate
the Radio Connector Module Lock.
b. While grasping the Portable Speaker Dock as shown, place
a small coin into the center slot on the lock and turn the
lock counterclockwise to unlock the Radio Connector
Module.
Radio Connector
Module Lock
Place the Radio Dock Adapter for your Radio into the dock. Take care to align the tabs on the underside of the
adapter with the corresponding receptacles on the Portable Speaker Dock, so as not to bend or break these
tabs. Gently press the adapter into the dock until it is seated.
c. Turn the Portable Speaker Dock upright. Place a finger
in each of the finger recesses in the Radio Connector
Module, grasp, and gently pull the module straight up and
out of the Portable Speaker Dock.
Coin
Radio Connector
Module Lock
Finger Recess
Finger Recess
power
volume
aux in
Radio Connector Module Top View
6
7
STEP 3: Install the Batteries or Home Power Adapter
STEP 5: Insert Radio and Turn On the Portable Speaker Dock
The Portable Speaker Dock can operate on either batteries or by using the Home Power Adapter if you are near an outlet.
To use your Portable Speaker Dock on-the-go:
1. Open the battery compartment on the bottom
of the Portable Speaker Dock. Insert 8 C-cell
alkaline batteries in the battery compartment.
To use your Portable Speaker Dock with the Home
Power Adapter:
1. Be sure the Portable Speaker Dock is powered
off.
power
2. Align the Radio with the Radio Dock Adapter.
2. Plug the other end of the Home Power Adapter
into a standard wall outlet.
aux in
volume
power
1. Plug the Home Power Adapter into the
connector labeled 14V DC at the rear of the
Portable Speaker Dock.
3. Once aligned, gently press the Radio down so
that it slides down the Radio Dock Adapter
and onto the connector, until it is fully seated
in the Portable Speaker Dock.
menu
FM
jump
4. Press and hold the Power button on the top of
the Portable Speaker Dock until the Power On
light is on.
1
2
3
4
5
6
7
8
9
0
direct
5. If your Radio did not power on, press the
Power button on your Radio.
2. Replace the battery cover.
antenna
14V DC
TIP! When the battery life is getting low the
power light will blink and your Portable
Speaker Dock may not play.
TIP! It is not recommended to keep batteries
in the Portable Speaker Dock for an extended
length of time. Remove the batteries when not
in use.
STEP 4: Install the Indoor/Outdoor Home Antenna
If your Radio has an Audio Level or Line Out Level adjustment feature in the Settings menu when it’s
docked in the Portable Speaker Dock, you should set this level to the maximum volume that does not
cause distorted sound. This will maximize the audio quality. Refer to the User Guide which accompanied
your Radio for instructions on how to set the level.
1. Plug the antenna cable into the antenna
connector at the left rear.
2. Wrap the antenna cable into the storage
area.
Some Radios do not have this adjustment available when docked in the Portable Speaker Dock. These
Radios set their level automatically to optimize the sound quality. No adjustment is necessary.
3. Place the antenna into the storage area
at the rear of the Portable Speaker Dock.
Align the mounting holes on the bottom
of the antenna with the 4 mounting
brackets on the rear of the Portable
Speaker Dock. Push the antenna over
the mounting brackets and then slide
the antenna down slightly to secure it in
place.
4. Open the antenna clamshell so that the
top of the antenna is facing the sky.
8
STEP 6: Adjust the Audio Level
The installation is complete. Sit back and enjoy your favorite programming on SiriusXM Radio!
TIP! If you are using the Portable Speaker Dock indoors,
consult the User Manual beginning on page 30 for
instructions for indoor antenna placement.
9
Sirius XM Radio Inc.
1221 Avenue of the Americas
New York, NY 10020
siriusxm.com
1.866.635.2349
© 2012 Sirius XM Radio Inc. Sirius, XM and all related marks and logos are trademarks of Sirius XM Radio Inc.
SXABB2 Portable Speaker Dock QSG 120104a