1
%HLQVSLUHG
8VHU0DQXDO
and safety precautions
*HQHUDO,QIRUPDWLRQ
*HQHUDO,QIRUPDWLRQ
6DIHW\3UHFDXWLRQV
Please use only Siemens· brand accessories. Any damage caused to the device which is the result of using third-party accessories invalidates any warranty claims. Do not open the device.
If the LCD screen of the device is damaged (the glass is broken for example),
avoid contact between any liquid which might escape and your skin, mucous
membrane (eye, mouth) or foodstuffs and do not breathe in any gas which
might escape. Wash off any affected areas of your body or clothing with copious quantities of soap and water.
Only use the stylus supplied for touching the screen. Other instruments
such as a ballpoint pen for example, can damage the screen.
This unit has a built-in lithium battery which should be used only as instructed
and changed only by Siemens· service personnel.
Use only the supplied AC/DC adapter.
When the adapter is plugged into the power socket it must be free from obstructions. The adapter must not be covered during operation. Do not place
the adapter on any surface which can be damaged by heat.
The SIMpad is disconnected from the power source by unplugging the
AC/DC adapter. Make sure that the AC power socket is freely accessible.
Medical equipment such as pacemakers or hearing aids may be affected by
the radio connection to the base station.
Do not look into the infrared interface when it is activated.
Avoid direct sunlight! The SIMpad is designed to operate at temperatures
between 23 and 131 degrees Fahrenheit (-5 and 55 °C). Switch SIMpad only
on at temperatures between 41 and 104 degrees Fahrenheit (5 and 40 °C).
Do not use the device in damp conditions. Do not subject it to water or rain.
If you wish to operate the device after bringing it in from a cold environment,
condensation can occur. Wait until the device temperature has been equalized and it is absolutely dry before putting it into operation.
If you are in a country where there is a legal obligation for collection and disposal by a specialized dealer, dispose of the device and its battery there.
Even if you are not in such a country, dispose of the device and its battery
separately from other domestic waste.
*HQHUDO,QIRUPDWLRQ
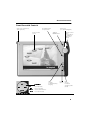
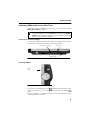
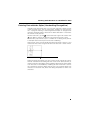
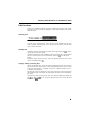
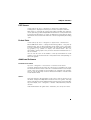
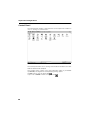
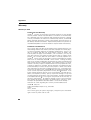
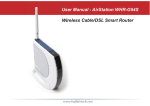
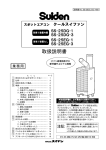
)URQW9LHZZLWK&RQWUROV
At the rear of the device:
Stylus (pull out)
Touch-sensitive
screen
XS
&RQWURONH\
ULJKW
OHIW
GRZQ
Control key
(see detailed diagram)
Show/hide button
for input panel
XS
OHIW
= scroll upwards
= cancel operation
ULJKW
= enter/confirm function
SIMpad
On/Off button
LED
(orange)
to indicate battery
charging
Loudspeaker
Software control
button
(corresponds to
the Windows
right mouse
button)
LED
(green)
to indicate
operating status
(on/off)
GRZQ = scroll downwards
)URQWYLHZZLWKFRQWUROV
*HQHUDO,QIRUPDWLRQ
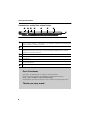
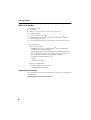
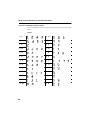
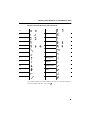
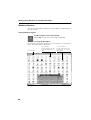
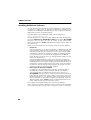
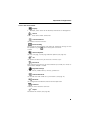
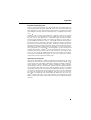
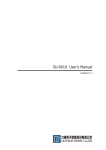
&RQQHWFLRQVDWWKH5HDURIWKH'HYLFH
➐
➊ ➋ ➌ ➍
➎
➏
➑
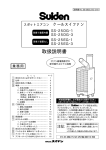
5HDUYLHZRIWKHGHYLFHZLWKLQSXWRXWSXWVRFNHWVDQGVORWV
➊
Serial interface or audio headphones interface (Universal interface for Lumberg
plug, as used in Siemens· cell phones, e.g. S25/S35). Suitable for connecting modems or for direct connection to a PC.
➋
➌
Interface (not supported).
➍
➎
➏
➐
Slot for smartcards.
➑
Stylus storage slot.
IrDA infrared interface. Suitable for connection to a printer or to a modem-capable
telephone for internet connections. Printer or mobile telephone must also be
equipped with an IrDA interface.
PC Card release button.
PC Card slot.
AC/DC adapter connection (12 V). Use the supplied AC/DC adapter to connect the
device to AC power.
'HDU&XVWRPHU
Your views are important to us and we want to hear them!
Please take a few moments to complete our Internet questionnaire:
KWWSZZZVLHPHQVFRPFXVWRPHUVXUYH\
All participants will have the chance to win in one of our regular prize draws.
7KDQN\RXYHU\PXFK
7DEOHRI&RQWHQWV
*HQHUDO,QIRUPDWLRQ Safety Precautions.................................................................................................
Front View with Controls.......................................................................................
Connetcions at the Rear of the Device..................................................................
2
3
4
*HWWLQJ6WDUWHG Your New Generation Device ................................................................................ 7
What is in the Box ................................................................................................. 8
Optional Accessories ............................................................................................. 8
Switching SIMpad on for the First Time................................................................ 9
Basic Settings after SIMpad is switched on for the First Time ........................... 10
6HWWLQJXSWKH,QWHUQHW&RQQHFWLRQ
Inserting the PC Card ..........................................................................................
Selecting the Connection.....................................................................................
Connecting SIMpad to I-Gate ..............................................................................
Connecting SIMpad to HomeRF Gateway ..........................................................
Connecting SIMpad over a PC Card ....................................................................
Connecting SIMpad via Infrared or Serial Interface .............................................
General Notes......................................................................................................
13
13
14
16
18
21
23
&RQQHFWLQJWR\RXUGHVNWRS3& Installing Microsoft ActiveSync ...........................................................................
Connecting by serial port.....................................................................................
Connecting by wireless LAN or Infrared..............................................................
Troubleshooting partnerships ..............................................................................
26
26
28
29
7KH6WDUW&HQWHU Start Center Buttons............................................................................................ 31
Closing Start Center ............................................................................................ 31
:RUNLQJZLWK:LQGRZVIRU+DQGKHOG3& Desktop ...............................................................................................................
Taskbar ................................................................................................................
Starting Programs from the Start Menu ..............................................................
Windows and Dialog Boxes.................................................................................
Entering Data .......................................................................................................
Using the Input Panel to Enter Data ....................................................................
Entering Data with the Stylus (Handwriting Recognition)....................................
Confirm or Cancel with the Control Key ..............................................................
Edit Functions......................................................................................................
Windows Explorer ...............................................................................................
Online Help..........................................................................................................
32
34
35
36
40
40
41
44
45
46
47
$FFHVVLQJWKH:RUOG:LGH:HE Basic Information.................................................................................................
Starting Internet Explorer.....................................................................................
Entering Internet Addresses................................................................................
Navigating Web Pages ........................................................................................
Using the Browser Navigation Aids .....................................................................
Creating and Managing Favorites ........................................................................
Setting the Homepage, Search Page and Various Options .................................
48
49
50
50
51
52
53
7DEOHRI&RQWHQWV
6HQGLQJDQG5HFHLYLQJH0DLOV
Basic Information.................................................................................................
Starting the Inbox ................................................................................................
Archive Folder (e-Mail Account)...........................................................................
Receiving e-Mails ................................................................................................
Displaying e-Mails................................................................................................
Replying to/Forwarding e-Mails ...........................................................................
Sending e-Mails ...................................................................................................
Creating e-Mails...................................................................................................
Attaching Files to e-Mails ....................................................................................
54
55
56
56
56
57
58
58
58
6,0SDG6RIWZDUH
Microsoft Office for Handheld PC 2000 ..............................................................
Microsoft Pocket Outlook for Handheld PC 2000 ...............................................
InkWriter ..............................................................................................................
Microsoft Reader.................................................................................................
PDF Viewer..........................................................................................................
Pocket Paint.........................................................................................................
Additional Software .............................................................................................
Installing Additional Software ..............................................................................
SIMpad Software Updates ..................................................................................
59
62
64
64
65
65
65
66
67
,PSRUWDQW&RQILJXUDWLRQV Connection Settings ............................................................................................
Release Connection.............................................................................................
e-Mail Settings.....................................................................................................
Setting Up Connections.......................................................................................
Control Panel .......................................................................................................
Other settings......................................................................................................
Creating a New e-Mail Account ...........................................................................
68
69
69
70
74
79
81
&RQQHFWLQJZLWKRWKHUGHYLFHV Connecting to your Printer................................................................................... 84
Authenticated Data Connections with Smartcard................................................ 84
6XEVHTXHQW+RPH5)&RQILJXUDWLRQ
Setting the Password for the HomeRF Gateway ................................................
Connecting SIMpad to HomeRF Gateway ..........................................................
Reading out the Network Password....................................................................
Configuring HomeRF Gateway............................................................................
Changing the HomeRF Gateway Network Password .........................................
85
86
87
87
91
$SSHQGL[ Troubleshooting...................................................................................................
Service and Hotline..............................................................................................
Maintenance and Care.........................................................................................
Technical Data .....................................................................................................
Warranty ..............................................................................................................
CE Label .............................................................................................................
92
94
95
95
96
98
*HWWLQJ6WDUWHG
*HWWLQJ6WDUWHG
Congratulations on purchasing a 6,0SDG6/ (simply called 6,0SDG in
this manual), a mobile device powered by the Microsoft· Windows· for
Handheld PC 2000 operating system.
Your SIMpad belongs to a new class of device known as Web pad. The
large screen provides users with a significantly better information display
than that offered by current mobile devices (palmtops, PocketPCs or cell
phones). This makes working easier and turns use into a real experience.
The size and capabilities of the SIMpad let you keep your most important
business and personal information current and close at hand. Your SIMpad
supports the latest version of Microsoft· Pocket Outlook, so you can
check e-Mail and manage your apointments and contacts while on the
road.
If you are familiar with Microsoft· Windows products and notebook PCs,
you will notice that your SIMpad has many of the same characteristics,
making it easy for you to be productive quickly.
<RXU1HZ*HQHUDWLRQ'HYLFH
SIMpad is handy, simple to operate and ideal for mobile Internet access.
With SIMpad you can:
●
Surf the Web, i.e. retrieve information, carry out research, join in discussion forums or order goods
●
Access the network in your work environment via W-LAN. This gives
you access to all your data, wherever you are, whether in your living
room, working at your own or a remote workstation, or anywhere
where you can receive the signal
●
Access your data, surf the Web, send and receive e-Mails and check
deadlines and tasks while you’re on the move
●
Read reports, process texts, create tables and proofread presentations using Pocket Office for Handheld PC 2000
●
Exchange data with other devices, e. g. with PCs or cell phones, or
print data.
*HWWLQJ6WDUWHG
:KDWLVLQWKH%R[
The package contains:
●
A SIMpad
●
Three styli, one of which is in the stylus storage slot
●
An AC/DC adapter
●
A serial PC connection cable
●
A CD-ROM with Microsoft· ActiveSync· and Microsoft· Pocket
Outlook 2000 (*) software
●
A set of documentation with User Manuals and Software Licenses.
(*) PC requirements:
Microsoft ActiveSync:
– 486/66DX processor or higher (Pentium· 90 recommended),
– 16 MB RAM for Windows 95/98,
– Pentium Processor, 32 MB RAM (64 MB recommended) for Windows NT· Workstation 4.0 with Service Pack 3 or higher, or Windows 2000 (Pentium Processor: 166 MHz required),
– 10-50 MB available hard drive space,
– CD drive,
– COM Port (9 or 25 pin).
Microsoft Outlook 2000:
– 153 MB available hard drive space,
– 24 MB RAM recommended.
2SWLRQDO$FFHVVRULHV
You can find the current selection of optional accessories at the following
SIMpad portal:
KWWSZZZP\VLHPHQVFRPVLPSDG
*HWWLQJ6WDUWHG
6ZLWFKLQJ6,0SDGRQIRUWKH)LUVW7LPH
Before operating your SIMpad for the first time, it is vital that you read the
6DIHW\3UHFDXWLRQVon page 2!
%HIRUHVZLWFKLQJWKH6,0SDGRQIRUWKHILUVWWLPH its batteries
must be charged for at least RQHKRXU by connecting the $&'&
DGDSWHU to both SIMpad and power socket. Charging is indicated
by the orange LED on the SIMpad.
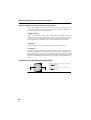
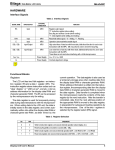
&RQQHFWLRQWRWKH3RZHU6XSSO\
Use the power adapter supplied. The small plug is plugged into the appropriate socket at the back of the device (indicated by arrow).
PC Card release button
PC Card slot
AC/DC adapter
5HDURIWKHGHYLFH
$FWLYDWLQJ6,0SDG
On/off
button:
2QRIIEXWWRQ
To switch on your SIMpad press the
button on the right of the screen
above the control key. If the screen remains dark press the button
again.
After your SIMpad is switched on for the first time a checkerboard screen
is diplayed for a few seconds.
*HWWLQJ6WDUWHG
%DVLF6HWWLQJVDIWHU6,0SDGLVVZLWFKHGRQIRUWKH)LUVW7LPH
A welcome screen is displayed after your SIMpad is first switched on. Follow the instructions on the screen. Subsequently, a number of important
basic settings are requested.
6FUHHQ&DOLEUDWLRQ
After turning the device on, you are asked to calibrate the screen. Calibration is necessary to allow the touch-sensitive screen to react correctly to
the pressure point.
Only use the stylus supplied for touching the screen. Make sure
that you do not touch the screen with anything but the stylus during operation!
More information about using the stylus can be found in Chapter
"Notes on Stylus" on page 25.
Tap with the stylus precisely in the center of the displayed
cross. Hold the stylus in this position for about 1 second. The
cross is moved to another position. Tap in the center of the
cross again. Repeat the process until calibration is completed.
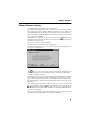
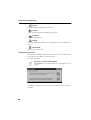
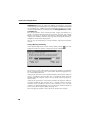
(QWHULQJWKH'DWHDQG7LPH
First a dialog box appears giving the time zone. If you are in a different time
zone than the one displayed, you can select the correct zone from the selection window.
'LDORJER[
World Clock 5HJLVWHU Home City
To end the process, tap the top right of the dialog box
.
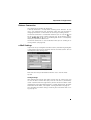
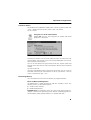
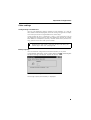
Another dialog box is now displayed, into which you can enter the date
and time.
*HWWLQJ6WDUWHG
'LDORJER[
World Clock 5HJLVWHUDate/Time
Tap with the stylus on the year. Now use the displayed keys and to
select the year. To set the current month, tap the month and choose the
current month from the displayed list. After you have selected the month,
tap the current date.
Tap in the field for the current time on the three areas for hours, minutes
and seconds. When an area is highlighted in blue you can enter a new value. Do this by tapping the number keys of the input panel. Tap
.
*HWWLQJ6WDUWHG
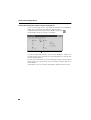
2ZQHU3URSHUWLHV
After you have entered the date and time, a dialog box in which you can
enter your personal data appears.
'LDORJER[
Owner Properties
Enter name, company, address etc. in the fields provided. If you do not
know what to enter in a field, leave this field blank.
To enter data, first tap the desired field. Then tap the required character
on the input panel.
Use
(top right on the input panel) to delete any incorrectly entered
characters (see page 40).
To end the process, tap the top right of the dialog box
.
6DYLQJ\RXU(QWULHV
After you have entered your personal data and the date/time, tap Done.
You are then asked if you wish to save the data. Confirm the query with
OK. The data is saved. A confirmation message informs you that the data
has been saved.
Subsequently, the 6WDUW &HQWHU is displayed on the screen (see page 26
for details). Before you can use SIMpad to surf the Internet, you have to
set up the Internet connection.
6HWWLQJXSWKH,QWHUQHW&RQQHFWLRQ
6HWWLQJXSWKH,QWHUQHW&RQQHFWLRQ
Use the stylus to tap the button Internet in the
6WDUW&HQWHU.
,QVHUWLQJWKH3&&DUG
If you want to access the Internet using SIMpad via a radio PC Card (I-Gate
or HomeRF), slide the card into the designated slot until it clicks into
place. Ensure that the colored side is facing upwards. To remove the card,
press the button next to the PC Card.
If you want to access the Internet using SIMpad via DQRWKHU PC
Card (not I-Gate or HomeRF), please read Chapter "Configuring
the PC Card Driver and Connection", page 18.
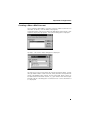
6HOHFWLQJWKH&RQQHFWLRQ
The dialog box Select Connection is displayed.
'LDORJER[
Select Connection
Tap the circle next to the required option. If you tap a Dial-up Connection,
enter the Internet dial-up number for your provider in the field Phone No.
without Area Code. Then tap OK.
6HWWLQJXSWKH,QWHUQHW&RQQHFWLRQ
The subsequent startup depends on the option selected in the dialog box
Select Connection. For further information, see the relevant chapter.
6HOHFWHG&RQQHFWLRQ 6HH
I-Gate 802.11B
Chapter "Connecting SIMpad to I-Gate", page 14
HomeRF
Chapter "Connecting SIMpad to HomeRF Gateway", page 16
PC Card
Chapter "Using a PC Card to Access the Internet", page 18
Infrared or serial
Chapter "Connecting SIMpad via Infrared or Serial Interface", page 21
&RQQHFWLQJ6,0SDGWR,*DWH
3UHUHTXLVLWHV
The I-Gate PC Card has to be plugged into the SIMpad, with the green
LED on the PC Card lit.
&RQQHFWLRQ
The following dialog window appears.
'LDORJER[
Network Settings
Tap OK. You are then asked if you wish to save the data. Confirm the query
with OK. The data is permanently saved. A confirmation message informs
you that the data has been saved. Tap OK.
There are now two options for accessing the Internet using I-Gate.
&RQQHFWLRQWR,6'13ULYDWH&RQQHFWLRQ
The prerequisite is that the AccessPoint is set to the factory default and is
already in operation (connected to ISDN). Otherwise, the Internet provider
account must be configured in the AccessPoint.
If you are using SIMpad for the first time, Internet Explorer (see
page page 49) now starts automatically. If this is a subsequent
configuration, you must now open Internet Explorer by tapping Internet in the 6WDUW &HQWHU.
6HWWLQJXSWKH,QWHUQHW&RQQHFWLRQ
You can now configure the Internet provider account in the AccessPoint
on the SIMpad. To do this, enter the IP address 10.0.0.254 in the “Address” field in Internet Explorer. The HTTP Manager Internet site in which
you have to complete the following connection wizards opens.
– Basic Settings
– Setup Internet Access
– Security Settings
&RQQHFWLRQWR/$1&RPSDQ\1HWZRUN
The prerequisite is that the Access Router is installed and Internet access
is available. Otherwise, the I-Gate LAN AccessPoint has to be connected
to the network.
9LDWKH,FRQLQWKH&RQWURO3DQHO
Double WDS the icon. The dialog box for network configuration
is displayed.
Enter the network user name and password and tap OK. SIMpad is now
connected to the LAN network like a normal desktop PC.
,QWHUQHW&RQQHFWLRQ
The default homepage opens (see page page 49). This sets up the Internet access or the subsequent configuration. For the first startup, we recommend that you first close Internet Explorer and configure your e-Mail
account. To do this tap Setup e-Mail Settings in the 6WDUW &HQWHU and
continue as described in Chapter "e-Mail Settings", page 69.
This concludes the setting up of the Internet Connection. However, please
read the notes starting on page 23.
For detailed information about configuring the AccessPoint, see
the I-Gate User Manual or the SIMpad portal:
KWWSZZZP\VLHPHQVFRPVLPSDG
6HWWLQJXSWKH,QWHUQHW&RQQHFWLRQ
&RQQHFWLQJ6,0SDGWR+RPH5)*DWHZD\
For this, the HomeRF Gateway (optional accessory) must be in operation.
Instructions for this can be found in the HomeRF Gateway System manual. The HomeRF PC Card has to be plugged into the SIMpad.
The following dialog window appears.
'LDORJER[
Network Settings
Tap OK. The SIMpad then tries to set up a connection to the Internet.
Since SIMpad is not yet logged on at the HomeRF Gateway, you will first
be requested to log on.
6HWWLQJWKH3DVVZRUGIRUWKH&RUGOHVV1HWZRUN
If you have not yet determined the password for the cordless network, the
following dialog box appears.
'LDORJER[
HRF Gateway Change Network Password
Set the password for the cordless network in this dialog box. The password identifies all components of your cordless network and prevents unauthorized access to the individual network components. The password
can contain letters and numbers; it must be at least 8 and no more than
20 characters long.
Memorize the password. You will have to re-enter the password
when incorporating further components into the cordless network.
Then tap OK. A confirmation message informs you that the password has
been changed successfully. Tap OK.
6HWWLQJXSWKH,QWHUQHW&RQQHFWLRQ
(QWHULQJ,QWHUQHW$FFHVV'DWD
The following dialog box appears.
'LDORJER[
Set HRF Gateway7DE Internet Access Data
Enter the User Name and Password for Internet access. You should have
received this information from your provider.
Tap OK. The following dialog box appears. Follow the instructions on the
screen.
'LDORJER[
Restart
'LDORJER[
DHCP Server
A confirmation message informs you that the HomeRF Gateway has been
configured successfully. Tap OK.
6HWWLQJXSWKH,QWHUQHW&RQQHFWLRQ
You are then asked if you wish to save the data. Confirm the query with
OK. The data is permanently saved. A confirmation message informs you
that the data has been saved. Tap OK.
For more information on settings (e.g. HomeRF Configuration,
setting up or clearing a connection or network password), see
&KDSWHU6XEVHTXHQW+RPH5)&RQILJXUDWLRQRQSDJH.
If you are using SIMpad for the first time, Internet Explorer starts
automatically. If this is a subsequent configuration, you must
open Internet Explorer by tapping Internet in the 6WDUW &HQWHU.
The default homepage opens (see page page 49). This sets the Internet
access or the subsequent configuration. For the first startup, we recommend that you first close Internet Explorer and configure your e-Mail account. To do this tap Setup e-Mail Settings in the 6WDUW &HQWHU and continue as described in Chapter "e-Mail Settings", page 69.
This concludes the setting up of the Internet Connection. However, please
read the notes starting on page 23.
&RQQHFWLQJ6,0SDGRYHUD3&&DUG
&RQILJXULQJWKH3&&DUG'ULYHUDQG&RQQHFWLRQ
If you want to access the Internet using SIMpad via DQRWKHU PC Card (not
I-Gate or HomeRF), you first have to install the relevant driver for the device. You can download them from the Internet, copy it onto your PC and
install it on SIMpad using the ActiveSync software (see page 26).
Next, you have to configure the relevant connection for this PC Card. To
do this tap Setup Remote Network in the 6WDUW&HQWHU and continue
as described in Chapter "Creating New Connections" on page 70.
8VLQJD3&&DUGWR$FFHVVWKH,QWHUQHW
The PC Card has to be plugged into the SIMpad.
In the 6WDUW&HQWHU, tap Setup Connection Settings.
In the dialog box Connection Selection, tap the circle next to PC Card and
enter the Internet dial-up number for your provider in the field Phone No.
without Area Code. Then tap OK.
The following dialog window appears.
'LDORJER[
Network Settings
6HWWLQJXSWKH,QWHUQHW&RQQHFWLRQ
Tap OK. The dialog box Connection Settings appears with the installed
PC Card.
'LDORJER[
Connection Settings
Tap in the input fields User Name and Password and enter the data which
you received from your Internet service provider. You do not have to fill out
the Domain field. For extra security the field Password only displays asterisks when the password is entered.
Check if the telephone number of your provider in the Dial-up Connection
dialog box is correct. If this is not the case, tap Dialing Properties... The
code of the country you are SUHVHQWO\ in must be specified in the local
country code field (e. g. 49 for Germany or 41 for Switzerland). Tap OK.
If you check the Save Password box, you do not need to specify your password again each time you dial in. However, if you want to prevent other
people from using your SIMpad access, for example, you should leave the
box empty.
Tap OK. You are then asked if you wish to save the settings. Confirm the
query with OK. The settings are saved permanently. A confirmation message informs you that the settings have been saved.
Tap OK.
If you are using SIMpad for the first time, Internet Explorer (see
page page 49) starts automatically. If this is a subsequent configuration, you must open Internet Explorer by tapping Internet in
the 6WDUW &HQWHU.
The dialog box Dial-up Connection appears.
6HWWLQJXSWKH,QWHUQHW&RQQHFWLRQ
'LDORJER[
Dial-up Connection
Tap Connect. The default homepage opens. This sets up the Internet access or the subsequent configuration. For the first startup, we recommend that you first close Internet Explorer and configure your e-Mail account. To do this tap Setup e-Mail Settings in the 6WDUW &HQWHU and
continue as described in Chapter "e-Mail Settings", page 69.
This concludes the setting up of the Internet Connection. However, please
read the notes starting on page 23.
6HWWLQJXSWKH,QWHUQHW&RQQHFWLRQ
&RQQHFWLQJ6,0SDGYLD,QIUDUHGRU6HULDO,QWHUIDFH
1RWHVRQ,QIUDUHG
The connection via the infrared interface only functions if the cell phone’s
infrared interface is switched on. You will find the relevant function in your
cell phone settings. The transmission speed of the connection to the Internet depends on the cell phone’s modem and the connection between
the cell phone and the Internet service provider. The connection to the cell
phone does not support any other type of data exchange typical to cell
phones (e. g. SMS).
Infrared interface (diode)
6HULDODQG,QIUDUHG,QWHUIDFHIRU&RQQHFWLRQWRDFHOOSKRQH
Connection to a cell phone via the infrared interface is possible. The cell
phone must have an integrated modem. This lets you use the cell phone
to set up a connection to an Internet Service Provider.
For the infrared connection, the cell phone must also have an infrared interface. The infrared diodes of SIMpad and the printer must have "line of
sight contact" and may be not more that 0.5 m from each other.
1RWHVRQ6HULDO
Serial interface (RS232)
6HULDO,QWHUIDFHDQG3&&DUG6ORWIRU0RGHP&RQQHFWLRQ
You can set up your Internet connection with SIMpad over a modem
which is directly connected to the telephone socket.
You can use a Hayes-compatible modem (analog or ISDN) with a serial interface. For this you need a crossed (9 pin) V.24 cable for the connection
from the SIMpad to the modem.
Examples of compatible modems are ZyXEL· Omninet 56K Plus and U.S.
Robotics· 56K (the latter for Internet connections only). Suitable ISDN
modems are ZyXEL· omni.net D and U.S. Robotics· COURIER (the latter
for Internet connections only).
6HWWLQJXSWKH,QWHUQHW&RQQHFWLRQ
If you want to use a cell phone with modem over the serial interface, you
must use a null-modem adaptor between the PC connection cable supplied and the corresponding cell phone data cable. The adaptor is available
as an accessory from your specialized dealer.
&RQQHFWLRQ6HWWLQJV
The following dialog window appears.
'LDORJER[
Network Settings
Tap OK. The dialog box Connection Settings appears.
'LDORJER[
Connection Settings
Tap in the input fields User Name and Password and enter the data which
you received from your Internet service provider. You do not have to fill out
the Domain field. For extra security the field Password only displays asterisks when the password is entered.
Check if the telephone number of your provider in the Dial-up Connection
dialog box is correct. If this is not the case, tap Dialing Properties... The
code of the country you are SUHVHQWO\ in must be specified in the local
country code field (e. g. 49 for Germany or 41 for Switzerland). Tap OK.
If you check the Save Password box, you do not need to specify your password again each time you dial in. However, if you want to prevent other
people from using your SIMpad access, for example, you should leave the
box empty.
Tap OK. You are then asked if you wish to save the settings. Confirm the
query with OK. The settings are saved permanently. A confirmation message informs you that the settings have been saved.
6HWWLQJXSWKH,QWHUQHW&RQQHFWLRQ
Tap OK.
If you are using SIMpad for the first time, Internet Explorer (see
page page 49) starts automatically. If this is a subsequent configuration, you must open Internet Explorer by tapping Internet in
the 6WDUW &HQWHU.
The dialog box Dial-up Connection appears.
'LDORJER[
Dial-up Connection
Tap Connect. The default homepage opens. This sets up the Internet access or the subsequent configuration. For the first startup, we recommend that you first close Internet Explorer and configure your e-Mail account. To do this tap Setup e-Mail Settings in the 6WDUW &HQWHU and
continue as described in Chapter "e-Mail Settings", page 69.
This concludes the setting up of the Internet Connection. However, do
take note of the following information.
*HQHUDO1RWHV
1RWHVRQ6ZLWFKLQJ2Q2II
When the screen is dark, press the
button on the right next to the
screen and above the control key. SIMpad is ready for operation immediately after activation. The screen shows the user interface as it was when
you last switched the device off.
To switch off SIMpad, press
.
While on, if SIMpad has not been used for a time, it switches off automatically to save power. If the power supply is ensured (AC power or if the
battery is sufficiently charged) no data is lost when the device switches
off automatically (see “Notes on Battery and Duration of Data Storage”).
To switch back on again, press the button
.
An existing Internet connection is not disconnected if you switch
off SIMpad during a dial-up connection.
6HWWLQJXSWKH,QWHUQHW&RQQHFWLRQ
5HVHW)XQFWLRQ
Should the system “get stuck“ (evident from the fact that input is no longer possible), you can perform a reset. On the underside of the device you
will find a small hole marked RESET. Press the button in this hole using
the stylus. SIMpad is restarted. If a simple reset does not clear the fault,
please refer to “Troubleshooting“
, see page 92.
After a reset you are requested to enter the calibration, date and time
again.
1RWHVRQ%DWWHU\DQG'XUDWLRQRI'DWD6WRUDJH
When the SIMpad is AC-powered, there is no load on the built-in battery.
If it is not at full capacity, it is charged up automatically.
If the battery is fully discharged, FKDUJLQJWDNHVDERXWKRXUV. You
can see that the device is charging when the orange LED on the right side
of the screen is lit. After approximately 1.5 hours about 70% of charge capacity is reached.
As soon as you use SIMpad without a connection to AC power it draws
its power from the battery. When the battery is fully charged you can use
SIMpad IRUXSWRKRXUVZLWKRXWFRQQHFWLQJLWWR$&SRZHU (depending on communication with other devices and on the screen brightness
set). You should therefore minimize the screen brightness as far as possible (see page 80 for adjusting brightness).
When the charge capacity of the battery drops below 20% an appropriate
warning is displayed on the screen. When the charge capacity drops below 10% you should recharge the device.
When SIMpad is switched off and not connected to AC power, your data
is retained for around GD\V with a fully charged battery.
Consider backing up your important data (see page 79) or transferring it to a PC (see page 26) if you are not going to use SIMpad
for an extended period of time and it is not connected to AC power. 2WKHUZLVH\RXUGDWDZLOOEHORVW
6HWWLQJXSWKH,QWHUQHW&RQQHFWLRQ
1RWHVRQ6W\OXV
The screen is touch-sensitive. The stylus supplied in the device is designed to be used to touch the screen.
Storage slot
5HDURI'HYLFHZLWK6ORWIRU6W\OXV
Keep the stylus in the storage slot intended for the purpose at the back of
the device.
Only use the stylus supplied for touching the screen.
&RQQHFWLQJWR\RXUGHVNWRS3&
&RQQHFWLQJWR\RXUGHVNWRS3&
Your SIMpad works as a stand-alone device. However, to get the most out
of your SIMpad, you may want to connect to your desktop PC or notebook.
Microsoft· ActiveSync· is used to exchange data between your PC and
the SIMpad. This program is available on the CD-ROM supplied in the box.
You can use Microsoft ActiveSync to synchronize your Outlook applications (Inbox, Calendar and Contacts) with the PC. Similarly, you can transfer the complete database from SIMpad to a connected PC (backup function) or restore a data backup version from the PC to the SIMpad (Restore
function). You can also use ActiveSync to install additional software on
SIMpad (see page 66).
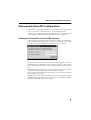
,QVWDOOLQJ0LFURVRIW$FWLYH6\QF
Install ActiveSync on your PC only (it is already installed on SIMpad).
Note: Data transfer is controlled by the PC. No RAS (Remote Access Service) may be active on the PC.
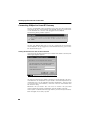
Insert the Microsoft ActiveSync CD into your PC. The Setup Wizard should
start automatically. If it does not start, click Run on the Start menu, and
then type d:<setup, where d ist the letter assigned to your CD-ROM drive.
The Microsoft ActiveSync installation wizard will begin the process, click
Next in the first screen.
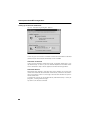
The next screen shows where the installation folders will be saved to. If
the default location is OK click Next. If you would like to change the location, simply click on Change and make your selection, then click Next.
You can connect your SIMpad to a desktop PC using a serial connection
(with the serial PC connection cable supplied), a network connection (with
an optional PC Card) or an infrared connection (using the infrared port).
&RQQHFWLQJE\VHULDOSRUW
To exchange data with a PC you can use the serial interface. To make the
connection you need the PC connection cable (supplied with SIMpad).
Insert the 9-pin end of the serial cable into a serial port on your desktop
PC.
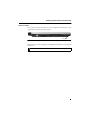
Conventional serial interface (RS232)
6HULDO,QWHUIDFHVIRUFRQQHFWLRQVWRWKH3&
&RQQHFWLQJWR\RXUGHVNWRS3&
Fully insert the flat end of the serial cable, arrow side up, into the serial
port on your SIMpad.
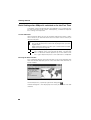
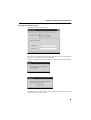
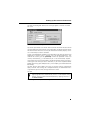
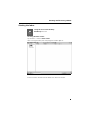
3DUWQHUVKLS:L]DUG
The first time you connect, the New Partnership Wizard on your desktop
PC helps you to establish a partnership and set options for synchronizing
Pocket Outlook data, e-mail messages, and files between your SIMpad
and desktop PC.
Start the ActiveSync program on your PC.
The following dialog window appears.
'LDORJER[
New Partnership - 1
&RQQHFWLQJWR\RXUGHVNWRS3&
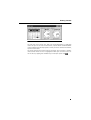
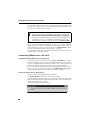
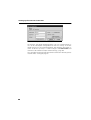
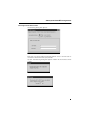
Click Next. A window in which you can select a program for synchronizing
personal information then appears. The following appears if you selected
Microsoft Outlook, for example, and clicked Next.
'LDORJER[
New Partnership - 2
You can now select the required Outlook applications here.
Then click Next.
All e-Mails, appointments and contacts will be transferred to your SIMpad
or synchronized. You can also copy files which you created on the PC (e.g.
Word, Excel, or PowerPoint) to the Explorer on SIMpad.
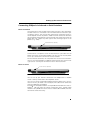
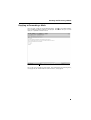
&RQQHFWLQJE\ZLUHOHVV/$1RU,QIUDUHG
After the connection has been set up to the required PC you can synchronize or disconnect ActiveSync directly from your SIMpad. To do this, tap
Start Programs Communication ActiveSync.
In the ActiveSync dialog box now displayed you can choose the desired
connection method from the drop-down list (e.g. serial port, wireless LAN
or infrared).
&RQQHFWLQJWR\RXUGHVNWRS3&
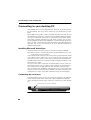
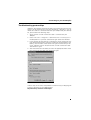
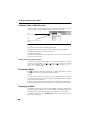
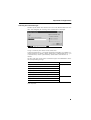
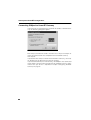
7URXEOHVKRRWLQJSDUWQHUVKLSV
SIMpad is designed to automatically detect the connection type and configure itself to communicate with your desktop PC. However, if you are
unable to establish a connection between your SIMpad and your desktop
PC, please follow the following steps.
1. Verify that the serial PC connection cable is connected to your
SIMpad.
2. Check with Start Programs Communication ActiveSync if in
the drop down list you have selected the right connection method.
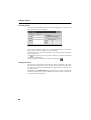
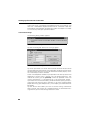
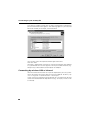
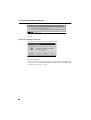
3. If you continue to have difficulty synchronizing, in the Connection Settings dialog of Microsoft ActiveSync window on your desktop PC (see
below), clear the Allow check box for the type of connection you are
using, and then click OK. Disconnect the serial PC connection cable
and connect it again.
4. After the connection is disabled, re-select the appropriate Allow check
box and click OK to enable the connection again.
'LDORJER[
Connection Settings
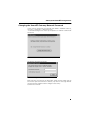
If these steps fail to correct the problem use the ActiveSync Help program
or refer to the FAQs on the SIMpad portal
KWWSZZZP\VLHPHQVFRPVLPSDG
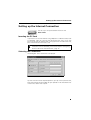
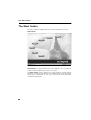
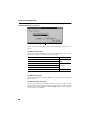
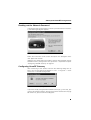
7KH6WDUW&HQWHU
7KH6WDUW&HQWHU
The most important SIMpad functions can be reached easily via the
6WDUW&HQWHU.
7KH6WDUW&HQWHU
6WDUW &HQWHU is started automatically when SIMpad is first switched on
and also when the operating system is restarted.
The 6WDUW &HQWHU contains buttons for various functions. Tap the relevant
button to start a particular function. For a number of functions the Internet
connection is established. In such cases, tap Connect in the dialog box
subsequently displayed.
7KH6WDUW&HQWHU
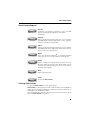
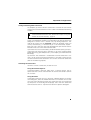
6WDUW&HQWHU%XWWRQV
,QWHUQHW
Establishes the Internet connection, starts the Web
browser (see page 49) and opens your default
Homepage.
2XWORRN
Opens a dialog box through which you can start the Microsoft· Pocket Outlook applications Tasks, Calendar,
Contacts and Inbox (see page 62).
2IILFH
Opens a dialog box through which you can start the Microsoft· Pocket Office applications Word, Excel, PowerPoint and Access (see page 59).
1RWHV
Starts the Microsoft InkWriter·
, an electronic notepad
which you can use to write and draw (see page 64).
6HWXS
Opens a dialog box through which you have access to
the most important settings. Here, for example, you can
configure your e-Mail account or set up a new connection later (see page 68).
+HOS
Opens the online help.
&ORVH
Closes the 6WDUW&HQWHU.
&ORVLQJ6WDUW&HQWHU
To close the 6WDUW&HQWHU, tap the Close button.
6WDUW&HQWHU is a program which runs under Windows for Handheld PC
2000. The next chapter will help you to familiarize yourself with the basics
of Windows for Handheld PC 2000.
On the desktop (see page 32) you will find an icon which allows you to
open the 6WDUW &HQWHU at any point.
:RUNLQJZLWK:LQGRZVIRU+DQGKHOG3&
:RUNLQJZLWK:LQGRZVIRU+DQGKHOG3&
Microsoft· Windows for Handheld PC 2000 is the pre-installed operating
system of SIMpad. The operating system is the basis for all programs
which run on SIMpad.
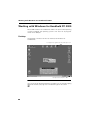
'HVNWRS
The desktop is the basis for the user interface for Windows for
Handheld PC.
Icon properties: right mouse key and tap on icon
Call up desktop anytime
'HVNWRS
You can call up the desktop (minimize all windows) at any time by tapping
on the taskbar (see page 34) at the bottom right of the screen.
:RUNLQJZLWK:LQGRZVIRU+DQGKHOG3&
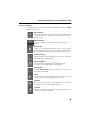
,FRQVRQWKH'HVNWRS
By default the desktop shows the following LFRQV which you can GRXEOH
WDS with the stylus.
0\&RPSXWHU
Shows an overview with folders. You can open various folders
and create new ones. This icon allows you to organize your
fileing system.
0\'RFXPHQWV
Displays the folders intended for storing private data, e. g.
letters.
5HF\FOH%LQ
Shows a list of deleted documents. You can recover documents deleted by mistake. You can empty the entire recycle
bin to permanently delete old files and create more space.
,QWHUQHW([SORUHU
Opens the pre-installed Web browser. This allows you to display Web pages (see page 49).
0LFURVRIW5HDGHU
Opens the pre-installed Microsoft· Reader program.
This allows you to read eBooks (see page 64).
6WDUW&HQWHU
Calls the 6WDUW &HQWHU giving you easy access to the main
functions (see page 26).
,QER[
Opens the pre-installed e-Mail program. This allows you to
send, receive, and manage e-Mails (see page 54).
&DOHQGDU
You can use the Calendar to generate and save information
from your schedule in your SIMpad (page 62).
&RQWDFWV
Business and private information regarding your contacts is
saved using Contacts (page 63).
:RUNLQJZLWK:LQGRZVIRU+DQGKHOG3&
7DVNV
You can use Tasks to manage your activities and responsibilities. (page 63).
0LFURVRIW3RFNHW:RUG
Opens the Microsoft· Pocket Word. This allows you to write
letters, for example (see page 59).
0LFURVRIW3RFNHW([FHO
Opens the spreadsheet program Pocket Excel, (see page 60).
0LFURVRIW3RFNHW$FFHVV
Opens the Pocket Access program. You can use this program
to view and update your databases (see page 61).
0LFURVRIW3RFNHW3RZHU3RLQW
Opens the Pocket PowerPoint. This allows you to access presentations on your SIMpad (see page 61).
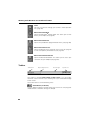
7DVNEDU
Start button
Opened applications
Task manager
System area
7DVNEDU
The taskbar is located DWWKHERWWRPRIWKHVFUHHQ. If it is not visible,
touch the screen with the stylus and drag the stylus to the bottom edge
of the screen.
The taskbar consists of the following areas:
6WDUW%XWWRQRQWKHOHIW
Use this button to display a pop-up menu. You use this to start programs
and documents and other settings on SIMpad.
:RUNLQJZLWK:LQGRZVIRU+DQGKHOG3&
%XWWRQVIRU2SHQHG$SSOLFDWLRQVFHQWHU
A button is shown for each open window at the center area of the taskbar.
If for example you have started the Internet Explorer and Pocket Word a
button is shown for each of these programs. By tapping the relevant button you activate the corresponding window.
7DVN0DQDJHU
To open the task manager, press the button
(right mouse key) and at
the same time tap the taskbar using the stylus.
6\VWHP$UHDRQWKHULJKW
This area displays small icons and the current time of day. The small icons
stand for system programs which are currently running. For example: by
tapping
you can show the input panel and by tapping
you switch to
input using the stylus. 'RXEOH tapping the clock calls up a dialog box
showing a calendar with the current date. You can use this window to set
a new time and date.
6WDUWLQJ3URJUDPVIURPWKH6WDUW0HQX
6WDUWLQJ3URJUDPVIURPWKH6WDUW0HQX
On the taskbar tap Start with the stylus.
If Start is not visible, touch the screen with the stylus and drag the stylus
down to the bottom edge of the screen.
The start menu pops up. Tap Programs. A submenu is displayed. Tap a
program or a program folder. Program folders are identified by
and an
arrow on the right hand side. Tapping a program folder causes a further
submenu to pop up.
6ZLWFKLQJRII6,0SDGYLDWKH6WDUW0HQX
Tap Start Suspend.
To switch back on, press
.
:RUNLQJZLWK:LQGRZVIRU+DQGKHOG3&
:LQGRZVDQG'LDORJ%R[HV
$:LQGRZ:LQGRZV([SORUHUVHHSDJH
'LDORJER[IURP:LQGRZV([SORUHU
Most programs appear on the screen in the form of a window or of a dialog box. A window is a working area, a dialog box is a type of form with
input fields, selection lists etc. Individual commands of a program can in
their turn open dialog boxes. This is how Pocket Word, for example, allows you to find text. A dialog box is opened which then enables you to
enter the search criteria.
:RUNLQJZLWK:LQGRZVIRU+DQGKHOG3&
6ZDSSLQJEHWZHHQ:LQGRZV
It can occur that you have opened a number of windows at the same time.
In this case you can easily swap from one window to the other:
In the middle of the taskbar (see page 34) tap the button of the window
to which you wish to swap to.
0RYLQJ'LDORJ%R[HVZLWK7LWOH%DU
The title bar allows you to
move the dialog box
'LDORJER[,QSXW3DQHOZLWK7LWOH%DU
Dialog boxes which only fill part of the screen have a title bar at the top.
The title bar tells you the function of the dialog box and is also used for
shifting the dialog box: The title bar can also be used to move the dialog
on the screen:
With the stylus drag the dialog box to the desired location.
0HQXEDUVDQG'URSGRZQ6XEPHQXV
0HQXEDUVDQG'URSGRZQ6XEPHQXV
Many programs have a menu at the top left of the window. In English programs they are File and Edit.
On a menubar, tap the desired entry with the stylus, i.e. on the desired
word. If a submenu drops down, tap the relevant entry.
:RUNLQJZLWK:LQGRZVIRU+DQGKHOG3&
7RROEDU
7RROEDULQ3RFNHW:RUG
Many programs have a toolbar at the top of the window. This consists of
icons representing specific functions.
In Pocket Word for example there is the icon
which allows you to write
text in bold letters.
On a tool bar tap the desired icon with the stylus.
&ORVLQJ:LQGRZVDQG'LDORJ%R[HV
Close all windows and dialog boxes by tapping
or
at the top right
of the window or dialog box.
With dialog boxes, tapping
is equivalent to canceling the operation. To
close a dialog box and store the entries, tap in the dialog box on the button
.
Programs which have a menubar (see page 37), normally include the command Close or Exit in the menu File. These commands can also be used
to close a window.
:RUNLQJZLWK:LQGRZVIRU+DQGKHOG3&
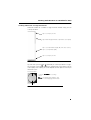
6FUROOLQJZLWKLQ/LVWVRU/RQJHU'RFXPHQWV
When the content of a window is larger than the window itself, you can
scroll up or down.
Tap to scroll up by one line.
Tap and then drag downwards or upwards to scroll rapidly.
Tap to scroll downwards rapidly. Or, if this area is above,
tap to scroll upwards rapidly.
Tap to scroll up by one line.
6FUROO%DUV
Tap with the stylus on
or
repeatedly to scroll up or down in stages.
Tap with the stylus on the scroll bars and drag the stylus down or up to
scroll rapidly. How rapidly you scroll depends on the speed at which you
move the stylus.
Scroll downwards
Using the FRQWURONH\for scrolling.
Press
XS for “one display page upwards“ and
GRZQ for “one display page downwards“.
Scroll upwards
&RQWURO.H\
:RUNLQJZLWK:LQGRZVIRU+DQGKHOG3&
(QWHULQJ'DWD
To enter data use either the input panel or write the characters directly
onto the screen. In both cases you use the stylus.
To try out the data input functions, you can start Microsoft Pocket Word,
for example:
8VLQJWKH,FRQRQWKH'HVNWRS
Double WDS the icon. Pocket Word is opened.
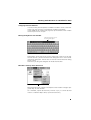
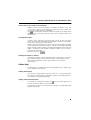
8VLQJWKH,QSXW3DQHOWR(QWHU'DWD
Numerical keypad;
function keys
Special characters
Tap and drag to change the
size of the keyboard
,QSXW3DQHO
If the input panel is not visible, press the
button on the right of SIMpad EHORZ the control key or tap the
icon in the system area of the
taskbar. The input panel is displayed.
To enter data, with the stylus tap at the point or in the input field of a window or a dialog box where you wish to enter something. Then tap the required keys on the input panel.
The input panel is laid out like an normal keyboard.
:RUNLQJZLWK:LQGRZVIRU+DQGKHOG3&
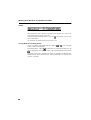
(QWHULQJ'DWDZLWKWKH6W\OXV+DQGZULWLQJ5HFRJQLWLRQ
Instead of the input panel you can also write characters directly on the
screen with the stylus. You can write letters, numbers or special characters. A program working in the background attempts to recognize the
characters entered. When a character has been detected it is inserted at
the current cursor position.
To enter characters, tap the
icon on the lower right in the taskbar. The
icon appears and you are able to write characters on the screen.
To enter data, tap with the stylus in a window or in a dialog at the point or
in the input field in which you wish to enter something.
Then use the stylus to write the desired character on the screen. It is vital
to note the rules which are given on how each character is to be written.
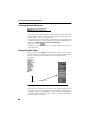
,QSXW$UHDIRU1XPEHUV8SSHUDQG/RZHU&DVH/HWWHUV
When you enter data directly you see an arrow on the right of the screen.
Think of a horizontal line running over the screen at the arrow position, as
shown in the illustration above. Enter numbers above the line. Enter upper
case characters in the middle by straddling the line. Enter lower case letters and special characters below the line. You can also enter upper case
characters in the lower half, these then being interpreted as lower case
characters.
:RUNLQJZLWK:LQGRZVIRU+DQGKHOG3&
2YHUYLHZRI'DWD(QWU\ZLWKWKH6W\OXV
The starting points for writing a character are clearly shown in the tables
below.
/HWWHUV
D $
Q 1
% %
R 2
F &
S 3
G '
T 4
H (
U 5
I )
6 6
J *
W 7
K +
X 8
L ,
Y 9
M -
Z :
N .
[ ;
/ /
\ <
P 0
] =
:RUNLQJZLWK:LQGRZVIRU+DQGKHOG3&
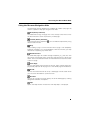
1XPEHUV6SHFLDO&KDUDFWHUVDQG&RPPDQGV
o
m
"
>%DFNVSDFH@
>%ODQN@
>GHOHWHIURP
#
OHIWWRULJKW@
>FXW@
>7DE@
>FRS\@
>QHZOLQH@
>SDVWH@
To continue working with the Windows interface or via the input panel after entering data with the stylus, tap .
:RUNLQJZLWK:LQGRZVIRU+DQGKHOG3&
$GGLWLRQDO$SSOLFDWLRQVIRU(QWHULQJ'DWDZLWKWKH6W\OXV
Tap in the taskbar with the stylus on Start Programs Application
Jot. In the submenu which is now opened, you will find the following applications for data entry with the stylus:
-RW0DFUR(GLWRU
Allows names to be created and managed for text modules and commands. You can assign a longer text to a macro name or commands such
as „Copy“ or “Insert date/time“
. If you enter a macro name with the stylus,
the assigned text is inserted or the assigned command is executed.
-RW7UDLQHU
Allows individual ways of entering particular characters to be set.
-RW7XWRULDO
Learn how to enter characters correctly with the stylus. If you have initial
problems with the input panel and frequently create unwanted characters,
you can use the Jot Tutorial to see how each individual character should
be entered. The program allows you to select one or more characters and
have an animated representation of entry displayed at any speed that you
select.
&RQILUPRU&DQFHOZLWKWKH&RQWURO.H\
Using the control key you can confirm an entry or a selection:
Press ULJKW to do this.
Cancel
&RQWURO.H\
Confirm
You can also cancel an entry or another
situation:
Press OHIW to do this.
:RUNLQJZLWK:LQGRZVIRU+DQGKHOG3&
(GLW)XQFWLRQV
There are a number of editing functions available for text entry. These edit
functions are the same for all programs used under Windows for Handheld PC 2000.
6HOHFWLQJ7H[W
6HOHFWHG7H[W
Use the stylus to position the cursor on the start or end point of the text
to be selected. Then drag the stylus slowly over the screen. The selected
text is shown inversed.
'HOHWLQJ7H[W
To delete the text character-by-character from right to left, tap
(backspace key) on the input panel.
To delete something in the middle of the text, position the cursor beyond
the last character that you wish to delete. Then tap
on the input
panel.
To delete larger sections of text, select the desired section of text. Then
tap on the input panel.
.
&RS\LQJ&XWWLQJRU3DVWLQJ7H[W
Select the desired text. Tap in the menu of the program that you are using
on Edit and in the menu which is then displayed on Copy or on Cut. With
Copy the selected text is retained, with Cut it is deleted. In both cases it
is held on the clipboard.
Position the cursor at the point at wish you want to paste in the text from
the clipboard. Tap in the menu on Edit and in the menu which then opens
on Paste.
Alternatively, after marking a text, you can tap in the toolbar (see page 38)
on
to copy or
to cut. To paste, position the cursor at the desired
point and tap
.
:RUNLQJZLWK:LQGRZVIRU+DQGKHOG3&
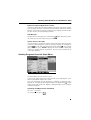
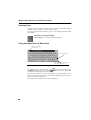
:LQGRZV([SORUHU
You can use the Windows Explorer to manage folders and documents in
your file system.
6WDUWLQJ:LQGRZV([SORUHU
9LD0\&RPSXWHULFRQRQWKH'HVNWRS
Double WDS the icon. The current folder is displayed.
2U8VLQJWKH6WDUW0HQX
Tap with the stylus in the taskbar on Start Programs Windows Explorer. The current folder is displayed.
Current folder
Icon for folder
Icon for document.
Double tapping opens the
folder and displays its contents.
Double tapping opens the
document in the associated program.
:LQGRZV([SORUHUIRU+DQGKHOG3&
:RUNLQJZLWK:LQGRZVIRU+DQGKHOG3&
9LHZV/DUJH,FRQV6PDOO,FRQVDQG'HWDLOV
Folders and files can be displayed in a number of different ways. The
“Large Icons” setting can be impractical, particularly when a folder contains a large number of files or subfolders.
Tap
in the Windows Explorer toolbar (see page 38). A popup menu
opens. Select a view other than the current view (a marker indicates the
current view).
&UHDWLQJ1HZ)ROGHU
It makes sense, particularly to organize the storage of your own documents, to create your own folders and subfolders. The best starting point
to use here is the My Documents folder.
Double tap the My Documents icon on the desktop. Windows Explorer
starts and displays the folder’s contents. Tap File in the Windows Explorer
menu and then tap New Folder in the following pull-down menu. The new
folder is displayed in the Windows Explorer window. You can enter a
name for the new folder.
End your entry with
.
'HOHWLQJ'RFXPHQWVRU)ROGHUV
In Windows Explorer, tap the required folder or document. In the Windows Explorer menu, tap File and then Delete in the pull-down menu.
Deleted files and folders are then to be found in the recycle bin
(see page 33).
2QOLQH+HOS
The SIMpad has an online help function integrated. You can choose general or context-sensitive help.
&DOOLQJ*HQHUDO+HOS
You can access general help at any time. Tap Start Help in the toolbar.
An overview with help topics is displayed. Tap one of the underlined links.
This displays the corresponding topic.
&DOOLQJ&RQWH[W6HQVLWLYH+HOS
If a window or a dialog box includes the
icon at the top right you can
use this to request context-sensitive help.
The elements for which such context-sensitive help is available differ from
program to program.
$FFHVVLQJWKH:RUOG:LGH:HE
$FFHVVLQJWKH:RUOG:LGH:HE
The World Wide Web, also called WWW or just the Web, is the modern,
intuitive interface of the Internet. Even as an inexperienced user you can
quickly find your way around the Web on your own. A program which allows you to surf in the Web is referred to as a Web browser.
0LFURVRIW· ,QWHUQHW ([SORUHUIRU +DQGKHOG 3& is pre-installed as the
Web browser in SIMpad. Please set up your Internet connection first, if
you haven’t done so already (see page 13 and page 68).
The Internet Explorer for Handheld PC is able to display modern, graphically-oriented and dynamic Web pages as well.
%DVLF,QIRUPDWLRQ
The provider of the Web site concerned is responsible for its contents and
design!
Depending on the quality of the connection, the load on the network and
the volume of data on a Web site, you may have to wait a while until the
Web page is loaded.
It can also occur that it is not possible to display a Web page fully. The display window of the Internet Explorer then displays an appropriate message. Such messages are not errors in the device. It may also happen that
Web servers are not reacting or that links that you are following point to a
page that no longer exists. In such cases use the navigation aids of the
browser (see page 51) to reorient yourself.
$FFHVVLQJWKH:RUOG:LGH:HE
6WDUWLQJ,QWHUQHW([SORUHU
Use the stylus to tap the button Internet in the
6WDUW&HQWHU.
2U8VLQJWKH6WDUW0HQX
Tap Start Programs Internet in the toolbar.
,QWHUQHW([SORUHUIRU+DQGKHOG3&
Internet Explorer starts the pre-specified Home page. This sometimes
also involves (automatically) establishing the Internet connection.
$FFHVVLQJWKH:RUOG:LGH:HE
(QWHULQJ,QWHUQHW$GGUHVVHV
'LDORJER[IRUWKH&XUUHQW,QWHUQHW$GGUHVV
At the top of the Internet Explorer window you see a field in which the
current Internet address is displayed. In this field you can also type a new
Internet address that you wish to call next.
Tap in the field for the Internet address. The entire entry is highlighted. You
can overwrite the entry. Using the Input Panel, enter the required Internet
address (e. g. KWWSZZZP\VLHPHQVFRPVLPSDG).
End your entry with
.
The Web site is now searched for. If it is found, it appears on the screen
a short time later.
1DYLJDWLQJ:HE3DJHV
Web sites can contain /LQNV which lead to other pages on the same site
or to other providers. By default, links are shown in blue and underlined in
the text. There are of course Web sites which provide graphical
navigation.
Text Links
Graphical Links
7\SLFDO/LQNVWR:HE3DJHV
To activate a link, with the stylus tap the text or graphical element which
is recognizable as a link. Depending on the technique used, the destination page can replace the old page in the same window or be displayed in
a subarea of the window (with what is known as frames technique) or
open a new browser window.
$FFHVVLQJWKH:RUOG:LGH:HE
8VLQJWKH%URZVHU1DYLJDWLRQ$LGV
The Microsoft Internet Explorer for Handheld PC toolbar (see page 38)
contains symbols to help you navigate in the Web.
%DFN+LVWRU\)XQFWLRQ
The Web browser logs the pages that it has already visited. You can use
the Back function to return to previously visited pages.
)RUZDUG+LVWRU\)XQFWLRQ
If you have previously tapped on
the Forwards function.
, you can undo this operation by using
6WRS
Stops loading a page. Use this function when a page is not completely
loaded or if loading it has caused problems. With this function, you stop
the browser requesting any further data.
5HORDG)XQFWLRQ
On some Web pages the content changes frequently, e. g. the sites with
the current stock market prices or the message overview of a discussion
forum. You use the Reload function to make the browser load the current
status of a page.
+RPH3DJH
You use the Home page function to quit the page currently being displayed and jump back to the page set as the Home page for the browser.
6HDUFK
You use the Search function to call up a Web page with the aid of which
you can search the Web for a particular term.
7H[W6L]H
You use this function to set the display size of the Web page by scrolling
though the individual size options.
+HOS
Opens the Help function. An overview with help topics is displayed.
$FFHVVLQJWKH:RUOG:LGH:HE
&UHDWLQJDQG0DQDJLQJ)DYRULWHV
You can store frequently visited Web sites as favorites (electronic bookmarks). This saves you the effort of having to retype the Internet addresses of such sites each time you need them.
$GGWKH:HE6LWH&XUUHQWO\'LVSOD\HGWRWKH)DYRULWHV
In the Internet Explorer menubar, tap Favorites Add to favorites. A dialog box appears:
'LDORJER[
Add Favorites
The Name field suggests a title for the Web site. You can either accept the
title or overwrite it. In the Type field you can select the file type for the file
to be saved. To store the Web site as a favorite, tap OK.
&DOOLQJXSD:HE6LWH6WRUHGDVD)DYRULWH
Tap Favorites in the Internet Explorer menu and on the desired page title
in the menu which is then displayed. The associated Web site is loaded.
0DQDJLQJ)DYRULWHV
In the Internet Explorer menubar, tap Favorites Organize Favorites.
Windows Explorer opens and you can manage the favorites as normal
files (e.g. delete, rename, copy, etc.).
$FFHVVLQJWKH:RUOG:LGH:HE
6HWWLQJWKH+RPHSDJH6HDUFK3DJHDQG9DULRXV2SWLRQV
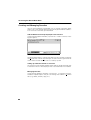
In the Internet Explorer menu, tap View Options. A dialog box with Internet options is displayed.
'LDORJER[
Options
In the field Default Pages you can set the Home Page and the Search
Page.
The Home Page is the Internet address which is loaded immediately
when you start the Web browser or when you tap
. It is recommended
that you set the overview page that you use most frequently as your home
page.
. Here, it is also recommendThe Search Page is loaded when you tap
ed to set a search engine that you prefer for the search page.
6HQGLQJDQG5HFHLYLQJH0DLOV
6HQGLQJDQG5HFHLYLQJH0DLOV
Just like displaying the Web and its http addresses, e-Mail is another important Internet service.
Because Pocket Word, Pocket Excel and Pocket PowerPoint are integrated
in your SIMpad, you are able to view e-Mail attachments just by tapping
them.
0LFURVRIW,QER[is the pre-installed e-Mail application on your SIMpad.
Before you can send and receive e-Mails you must have a connection to
the Internet. Please set up your Internet connection first, if you haven’t
done so already (see page 13 and page 68).
%DVLF,QIRUPDWLRQ
To send and receive e-Mails you need your own e-Mail account as well as
access to the Internet. In general you receive this account when you are
given Internet access by your provider.
An e-Mail account consists of an e-Mail address and various other data.
An e-Mail address is an address in the form of <RXU1DPH#SURYLGHU–the
@ character is generally referred to as “at“.
The e-Mail account also includes an access ID and a password to ensure
that no one else can use your account. In addition the data of an e-Mail
account includes the Internet addresses of the e-Mail servers for incoming and outgoing e-Mails.
H0DLO6HFXULW\
Nowadays many computer viruses are spread with the aid of e-Mails. To
avoid damage, GRQRW RSHQDQ\VXVSLFLRXVH0DLOVfrom people that
you do not know.
'HFODULQJDQG)LQGLQJH0DLO$GGUHVVHV
Your own e-Mail address is just as much part of your personal data as your
address, telephone number or cell phone number. If you have an e-Mail
address, don’t forget to indicate it on business cards, letter heads, promotional material etc.
You frequently find out other people’s e-Mail addresses in this way. In addition however you can search the Web for people and their e-Mail addresses. To do this start your Web browser (see page 49). Typical e-Mail
search services are :
KWWSZZZ\DKRRFRP
KWWSZZZJRRJOHFRP
Note that only people who have let their details be entered on this site will
be found. You can also enter your details so that others can find you.
6HQGLQJDQG5HFHLYLQJH0DLOV
6WDUWLQJWKH,QER[
8VLQJWKH,FRQRQWKH'HVNWRS
'RXEOHWDS the icon.
2U8VLQJWKH6WDUW&HQWHU
Tap Outlook Inbox in 6WDUW&HQWHU.
After starting the Inbox, the main program window appears.
,QER[IRU:LQGRZVIRU+DQGKHOG3&
E-mail accounts and their archive folders are shown on the left.
6HQGLQJDQG5HFHLYLQJH0DLOV
$UFKLYH)ROGHUH0DLO$FFRXQW
Each new e-Mail account created consists of four archive folders. You can
show or hide the archive folders in the list of e-Mail accounts.
Tap
E-mail account folders
Tap
E-mail account folders are
hidden.
2SHQLQJDQG&ORVLQJ$UFKLYH)ROGHUV
The e-Mail archives have the following meaning:
Deleted (local): For e-Mails that you have read and no longer need.
Sent: For e-Mails that you have already sent.
Inbox: For new e-Mails.
Outbox: For e-Mails that you are collecting so that you can send them all
with just one instruction.
6HWWLQJ8S3HUVRQDO$UFKLYH)ROGHUV
In addition to the four archive folders set up automatically, you can set up
your own archive folders. Tap File Folder New Folder in the Inbox
menu. The dialog box New Folder is displayed. Enter a name, e. g. 3UL
YDWH0DLOV. Then tap OK.
5HFHLYLQJH0DLOV
Tap
in the Inbox toolbar (see page 38). A dialog box appears in which
you can enter the password for the e-Mail account.
Tap OK.
Only for Dial-Up Connection: If there is not any connection to the Internet
yet, the dialog window Dial-Up Connection is displayed. Enter the Internet
access data and tap Connect.
e-Mails which are in Outbox archive folder are sent before new e-Mails are
received. New e-Mails received are then to be found in the Inbox folder.
'LVSOD\LQJH0DLOV
In the Inbox list on the left, tap an archive folder. In the right hand part of
the Inbox window e-mails of the selected folder are displayed at the top
of the window. If there are no e-Mails in this folder, the list is empty.
If there are e-Mails in the list, GRXEOHWDS an entry. The text of the selected e-Mail is displayed.
6HQGLQJDQG5HFHLYLQJH0DLOV
5HSO\LQJWR)RUZDUGLQJH0DLOV
You can type a reply to the displayed e-Mail. Tap
in the Inbox toolbar.
The window for editing e-Mails is displayed. The e-Mail that you wish to
reply to is quoted in the text field.
:LQGRZIRU(GLWLQJH0DLOV
Tap in the area for editing the e-Mail. For information on entering data,
see page 40, for information on edit functions, see page 45.
6HQGLQJDQG5HFHLYLQJH0DLOV
6HQGLQJH0DLOV
To prepare a finished mail for sending, in the toolbar, tap
. This stores
the e-Mail in the Outbox. To send all e-Mails in the Outbox at the same
time and receive new e-Mails simultaneously, tap Services Send/Receive Mails.
A dialog box is displayed in which you enter the password for the e-Mail
account. Tap OK. If there is not any connection to the Internet yet, the dialog window Dial-Up Connection is displayed. Enter the Internet access
data and tap Connect.
&UHDWLQJH0DLOV
Tap
in the Inbox toolbar. The window for editing e-Mails is displayed.
The cursor is in the To input field. Enter the e-Mail address of the recipient.
Then tap <...> alongside the field label Subject. Enter a meaningful subject for the e-Mail. After you have entered the e-Mail address and the subject, tap in the window for editing the e-Mail. For information on entering
data, see page 40, for information on edit functions, see page 45.
There is also the Cc field in the e-Mail header data. Here you can specify
the e-Mail addresses of one or more people who are to receive copies of
the e-Mail. If there is no other than the actual recipient to receive the eMail, leave the field empty.
You can also specify a number of recipients in the fields To and Cc. Separate the mail addresses of the individual recipients by a semicolon “;“.
$WWDFKLQJ)LOHVWRH0DLOV
You can attach files stored in SIMpad to e-Mails you are replying or to new
e-Mails that you are creating. Thus e. g. you can attach documents that
you have created with Pocket Word to an e-Mail. The recipient receives
the attached file together with the e-Mail.
To attach a file to a new e-Mail that you are creating or to an e-Mail to
which you are replying, tap
in the toolbar. A dialog box is displayed in
which you can select the file for attachment. To close the dialog box and
attach the selected file, tap
.
&RS\LQJDQ(QWU\IURPDQ$GGUHVV%RRN
When you create a new e-Mail you can use the address book to enter the
address of the recipient or recipients. When the cursor is in one of the
in the toolbar. The address book is opened. Select
fields To or Cc, tap
the desired entry. Tap OK. The address book is closed and the selected
entry is copied into the input field.
6,0SDG6RIWZDUH
6,0SDG6RIWZDUH
Your SIMpad already includes the full suite of software that you need to
function as a mobile manager. You have access to Microsoft Pocket Outlook, Pocket Office and other pre-installed programs to help you calculate
expenses and conduct searches.
0LFURVRIW2IILFHIRU+DQGKHOG3&
Microsoft· Pocket Office is easy to use thanks to the conventional Office
environment which you are used to on your PC. You can open the Pocket
Office program through the 6WDUW &HQWHU by tapping the Office button.
The Office program is described briefly below. More information about
this program can be found in the related Online Help.
3RFNHW:RUG
8VLQJWKH,FRQRQWKH'HVNWRS
'RXEOHWDS the icon.
2U8VLQJWKH6WDUW&HQWHU
Tap Office Word in 6WDUW&HQWHU.
Microsoft· Pocket Word offers many functions which you will recognize
from the desktop version. They have been specially optimized for the mobile user. This includes the spellcheck and full screen mode.
Main functions:
●
Create, read and edit documents (for text input, please also see Chapter "Edit Functions" on page 45).
●
Create joint documents on your SIMpad. Conversion of documents to
Word documents for use on the desktop computer is not possible.
●
Spellcheck, full screen view, and the maximize and minimize
functions.
●
Rich Text Format (RTF).
●
Protect your document with passwords.
6,0SDG6RIWZDUH
3RFNHW([FHO
8VLQJWKH,FRQRQWKH'HVNWRS
'RXEOHWDS the icon.
2U8VLQJWKH6WDUW&HQWHU
Tap Office Excel in 6WDUW&HQWHU.
Microsoft· Pocket Excel offers many functions which are already available
to you in the Microsoft Excel spreadsheet program on your desktop computer. These have been optimized for the mobile user. The newest SW
version of Pocket Excel offers even more useful and familiar functions. For
example, you can now separate and freeze frames, enlarge the view, sort
and filter data, use the new database function and lots more.
Pocket Excel supports more than 100 functions and formulas including the
most frequently used features of the desktop version of Excel.
And you can also format freely in Pocket Excel:
Settings for line height, column width, alignment, frame and shading as
well as font types.
Main functions:
●
Spreadsheets with a lot of basic functions.
●
Split screens and freeze panes.
●
Sort and AutoFilter.
●
Add icons, determine names, configure and use password protection
at file level.
6,0SDG6RIWZDUH
3RFNHW3RZHU3RLQW
8VLQJWKH,FRQRQWKH'HVNWRS
'RXEOHWDS the icon.
2U8VLQJWKH6WDUW&HQWHU
Tap Office PowerPoint in 6WDUW&HQWHU.
With Microsoft· Pocket PowerPoint, you can use you SIMpad to give presentations wherever you are, giving the word "mobility" a whole new
meaning.
You can create a user-defined presentation by making changes to the master slide and the slide sequence and then displaying it on the SIMpad, for
example.
Main functions:
●
Give professional presentations that you have created on your desktop
computer while you’re on the move.
●
Edit presentation notes and create master slides on your SIMpad.
●
Reorganize the slides or hide them.
3RFNHW$FFHVV
8VLQJWKH,FRQRQWKH'HVNWRS
'RXEOHWDS the icon.
2U8VLQJWKH6WDUW&HQWHU
Tap Office Access in 6WDUW&HQWHU.
With Microsoft· Pocket Access (database application) you can transfer
Access 97 or Access 2000 files to your SIMpad using drag and drop. You
can display and update these files later or elsewhere. Modified data can
be synchronized with the company database using a range of connection
possibilities.
6,0SDG6RIWZDUH
0LFURVRIW3RFNHW2XWORRNIRU+DQGKHOG3&
Microsoft· Pocket Outlook comprises the applications
Calendar, Contacts, Tasks and Inbox. The program supports you in managing your daily
information including deadlines, e-Mail and personal data. Pocket Outlook
data can be synchronized automatically with your PC using ActiveSync
technology. Simply set up a connection to your computer (see page 26).
Always synchronize Outlook if you are going to a meeting or if you want
to take your device home.
,QER[
8VLQJWKH,FRQRQWKH'HVNWRS
'RXEOHWDS the icon.
2U8VLQJWKH6WDUW&HQWHU
Tap Outlook Inbox in 6WDUW&HQWHU.
For more information on sending and receiving e-Mails and the Inbox, see
Chapter "Sending and Receiving e-Mails", page 54.
&DOHQGDU
8VLQJWKH,FRQRQWKH'HVNWRS
'RXEOHWDS the icon.
2U8VLQJWKH6WDUW&HQWHU
Tap Outlook Calendar in 6WDUW&HQWHU.
You can use the Calendar to generate and save information from your
schedule in your SIMpad. You no longer need to run two parallel
schedules.
Main functions:
●
Display your schedule in a daily, weekly, monthly or annual overview.
●
Plan group meetings or repeat past meetings.
●
Receive reminders of appointments.
●
Receive meeting requests adjusted to time zones.
●
Alter appointments easily using drag and drop.
6,0SDG6RIWZDUH
&RQWDFWV
8VLQJWKH,FRQRQWKH'HVNWRS
'RXEOHWDS the icon.
2U8VLQJWKH6WDUW&HQWHU
Tap Outlook Contacts in 6WDUW&HQWHU.
Business and private information regarding your contacts is saved using
Contacts. You no longer need to run two parallel lists.
Main functions:
●
You can use Contacts to search for, add or edit information concerning
your contacts.
●
Address an e-Mail to a contact just by tapping the screen once.
●
You can create business cards on the spot.
●
You can use the stylus to write notes, cards or directions on the cards
containing the contact information.
●
You can define the information displayed according to your own requirements.
7DVNV
8VLQJWKH,FRQRQWKH'HVNWRS
'RXEOHWDS the icon.
2U8VLQJWKH6WDUW&HQWHU
Tap Outlook Tasks in 6WDUW&HQWHU.
You can use Tasks to manage your activities and responsibilities. Tasks offers a list of jobs to be done which is always current and reminds you of
pending tasks. It helps you to organize your work without stress.
Main functions:
●
Highlight the priority of tasks, starting with the most important.
●
By setting up a connection, you can ensure automatic and constant
synchronization.
●
Enter handwritten notes and transfer them automatically during synchronization.
●
Copy, cut out and add data.
6,0SDG6RIWZDUH
,QN:ULWHU
8VLQJWKH,FRQRQWKH6WDUW&HQWHU
'RXEOHWDS the icon.
2U8VLQJWKH6WDUW0HQX
Tap Start Programs Accessories InkWriter.
Microsoft InkWriter· is an electronic notebook which you can use to write
and draw as you would on normal paper. You can also format or enlarge
the drawings and text as required. You can enter data via the input panel
or directly using the stylus.
More information about InkWriter can be found in the related Online Help.
0LFURVRIW5HDGHU
8VLQJWKH,FRQRQWKH'HVNWRS
'RXEOHWDS the icon.
2U8VLQJWKH6WDUW0HQX
Tap Start Programs Microsoft Reader.
Microsoft· Reader allows you to enjoy the benefits and user-friendliness
of a mobile library, making reading on the screen more fun. SIMpad enables you to take several books with you, wherever you’re going.
The crisp high-quality display, along with the control key to scroll up and
down, makes reading eBooks truly enjoyable. You can also highlight or underline favorite sections, add notes in the margins and copy your favorite
sections to send to friends. If you cannot find the section which you liked
right away, the Microsoft Reader menu offers you a search function if you
tap and hold down.
You can find additional information about the Microsoft Reader and
eBooks at the address: KWWSZZZPLFURVRIWFRPUHDGHU
Visit your favorite online bookseller to find out about all the great eBooks
already available for download. Once downloaded to your PC, use ActiveSync (see page 26) to transfer the eBooks to your SIMpad (e.g. to the My
Documents folder).
6,0SDG6RIWZDUH
3')9LHZHU
In the taskbar, tap Start Programs Application PDF Viewer.
A dialog box is displayed in which you can select and open a PDF file.
PDF Viewer is a program for viewing the widely-used PDF files. PDF has
an OS (operating system)-independent file format for screen presentation
or printing out documents. It makes no difference which program these
documents were created with. PDF files can be recognized by the ending
".pdf".
3RFNHW3DLQW
In the taskbar, tap Start Programs Applications Pocket Paint.
Microsoft· Pocket Paint is a program for bitmap graphics. Using the appropriate tools, you can draw freehand, create shapes such as rectangles
or circles and place text within the graphic. You can display and edit existing graphics, e. g. photos or clipart, with Pocket Paint. You can,
for example, attach graphics that you have created with Pocket Paint as a
file to an e-Mail.
You can use the icons in the toolbars at the top and bottom to create
graphics. First tap the desired icon. Then perform the corresponding action in the graphic.
$GGLWLRQDO6RIWZDUH
7HUPLQDO6HUYHU&OLHQW
Tap Start Programs Accessories Terminal Server Client.
Using the Terminal Server Client you can log on at a Windows NT server
on which the Terminal Server software is installed and then use all the programs which are available on the Windows NT computer. For example,
you can use the desktop version of Microsoft Windows instead of Microsoft Pocket Word.
*DPHV
Long train journeys, delayed flights, traffic jams in the taxi on the way to
the hotel. Simply turn SIMpad on and relax with a few games. The high
quality color display on the SIMpad makes playing games really enjoyable.
Tap, for example, Start Programs Games BackGammon, Shoot or
Solitaire.
And another benefit for game lovers: the battery lasts for up to 7 hours.
6,0SDG6RIWZDUH
,QVWDOOLQJ$GGLWLRQDO6RIWZDUH
You can add even more functionality to your SIMpad by installing third-party software. A wide variety of commercial software is available for the
Windows for Handheld PC 2000 operating system, ranging from business
applications to games and entertainment.
One Web address for Handheld PC 2000 software programs is :
KWWSGRZQORDGFQHWFRP
The only programs that will run on your SIMpad are those designed specifically for :LQGRZVIRU+DQGKHOG3& and using the 6WURQJ$50
processor. You can verify this data by calling up the control panel,
(see page 74) and there GRXEOH tapping the icon labeled System. Then tap
the System tab.
There are two procedures for installing new software on your SIMpad:
1. 9LDWKH3&
The installation data (e. g. from the Internet) is loaded onto a PC and
extracted there. Self-extracting installation data can be unpacked by
executing the EXE file. For archive data, such as that with the widelyused ZIP file extension for example, you need an unzipping program.
Using ActiveSync you can transfer the unzipped files to SIMpad
(see page 26). Transfer the files e. g. into the Windows folder. Installation occurs automatically.
If the downloaded program includes an installer program (typically
named Setup.exe or Install.exe), double click the installer program on
the desktop PC and installation wizard will guide you trough the installation process. Follow the directions on the screen. Once the software
has been installed on your desktop computer, the installer will automatically transfer the software to your SIMpad.
2. 'LUHFWIURPWKH,QWHUQHWWR6,0SDG
If a program is designed for direct installation, you may be able to
download or install the program from the Web to your SIMpad.
The installation data is loaded in the form of what is known as a
6WURQJ$50· package (CAB file). When transferring data from the Internet you are requested to select a folder in which you wish to save
the installation data, e. g. in Windows. After the installation data has
been transferred, call up Windows Explorer (see page 46). Go to the
Windows folder. There, GRXEOH tap the file downloaded from the Internet. Follow further instructions on the screen.
Exit all applications before loading new software onto SIMpad.
After a software installation SIMpad must be restarted. Do this by tapping
in the taskbar with the stylus on Start Programs Help Soft Reset.
6,0SDG6RIWZDUH
6,0SDG6RIWZDUH8SGDWHV
Your SIMpad operating system can be upgraded.
This replaces the entire operating system as well as installed programs.
All existing data will be deleted! Before executing such an update you
should therefore back up all your important data on a PC (see page 26).
During an update, SIMpad should be connected to AC power or the battery must be fully charged.
Now perform a hardreset. To do this, hold down the
button on the
right above the control key and then press the reset button on the base of
the device using the stylus.
Set up an Internet connection (page 13).
Close the Internet connection and all applications.
Tap Start Programs Tools Software Update. The dialog box Software Update is displayed:
'LDORJER[
Software Update
Tap
in the system area on the taskbar. Then tap the tab Memory and
move the control to the far right (see page 78). Confirm by tapping OK.
To start the update, tap Start.
Follow the instructions on the screen. A progress bar appears. The update
lasts approx. 1 hour with an ISDN dial-up connection, or approx. 10 minutes with an ADSL connection (e.g. with HomeRF Gateway). A dialog window then appears in which you must confirm the start of the Flash writing
procedure.
After the update of your device software, execute a factory reset. To do
this: Simultaneously press
(right button above the control key) and
(button below the control key). Then use the stylus to briefly press
the RESET button on the base of the device. Hold down both buttons for
a further two seconds.
Once this is completed, the SIMpad factory settings are restored. You
must perform the startup operations again (see page 9).
,PSRUWDQW&RQILJXUDWLRQV
,PSRUWDQW&RQILJXUDWLRQV
Use the stylus to tap the button Setup in the
6WDUW&HQWHU.
The following dialog box appears.
'LDORJER[
Setup Selection
You now have access to the most important settings. Here you can configure a new e-Mail account or set up a new connection, for example. Select the necessary option and then see the corresponding chapter.
6HWXS6HOHFWLRQ
6HH
Connection Settings
Chapter "Connection Settings", page 68
Release Connection
Chapter "Release Connection", page 69
e-Mail Settings
Chapter "e-Mail Settings", page 69
Remote Network
Chapter "Setting Up Connections", page 70
Control Panel
Chapter "Control Panel", page 74
&RQQHFWLRQ6HWWLQJV
You can configure the SIMpad later via another connection setting. Proceed as described in the Chapter "Selecting the Connection" on page 13.
If you want to access the Internet using SIMpad via another PC Card (not
I-Gate or HomeRF), you need to install the relevant PC Card driver in advance and the PC Card has to be inserted into the designated slot
(see page 18).
,PSRUWDQW&RQILJXUDWLRQV
5HOHDVH&RQQHFWLRQ
This option closes the dial-up connection.
A dial-up connection is usually billed according to the duration. To save
costs, you should release the connection when you have finished exchanging information via the Internet or retrieving or sending e-Mails.
An Internet connection is established whenever you can see the
icon
on the system area of the taskbar (see page 34). To disconnect from Internet, GRXEOHWDS the
icon. In the dialog box which is subsequently
displayed, tap Release Connection.
An Internet connection is also established when you are sending or receiving e-Mails (see page 54).
H0DLO6HWWLQJV
If you have not yet configured an e-Mail account, the following dialog box
is displayed in which you can enter the data for an e-Mail account. You can
also edityour e-Mail settings later.
'LDORJER[
Mailbox Account (My Mailbox)
Enter the data that you obtained for Internet access into the fields.
Tap OK.
6DYLQJ6HWWLQJV
After entering the data for your e-Mail account you are asked if you wish
to save the data. Confirm the query with OK. The data is permanently
saved. A confirmation message informs you that the data has been saved.
Subsequently, the e-Mail Inbox program is started automatically. For more
information on the Inbox, see Chapter "Starting the Inbox" on page 55.
This concludes the e-Mail settings. However, please read the notes starting on page 23.
,PSRUWDQW&RQILJXUDWLRQV
6HWWLQJ8S&RQQHFWLRQV
Connections to remote computers are managed under Remote Network.
These can be connections to your Internet service provider, to specific online services or remote connections to other PCs. Before you can establish a connection, you must first create and activate it.
Two connections are pre-defined on your SIMpad (I-Gate and HomeRF).
You can readily activate these connections (see page 73). If you want to
define additional connections, follow the instructions in this chapter.
&UHDWLQJ1HZ&RQQHFWLRQV
The Remote Network window opens. You can also call up this window via
Start Programs Communication Remote Network.
5HPRWH1HWZRUN
,PSRUWDQW&RQILJXUDWLRQV
6HOHFWLQJWKH&RQQHFWLRQ7\SH
Double tap the Make New Connection icon in the Remote Network window. The dialog box for creating a new connection is displayed.
'LDORJER[
Make New Connection r3DUW
Assign a name of your choice to the connection.
A dial-up connection is a switched connection (regardless of whether it is
analog, ISDN or via GSM). A direct connection is a dedicated line, e. g. in
a local network, which is permanently connected to the Internet via
routers.
Tap the circle next to the correct connection type. The table below shows
the corresponding settings.
7\SHRI&RQQHFWLRQ'HVLUHG
'HYLFH6HOHFWLRQ
SIMpad PC Card (not I-Gate or HomeRF)
Dial-Up Connection
SIMpad (IrDA) cell phone
SIMpad (serial interface) cell phone
SIMpad (IrDA) GPRS cell phone
SIMpad (serial interface) GPRS cell phone
SIMpad (serial interface) analog or ISDN Modem
SIMpad (serial interface) PC or LAN
LAN Connection
SIMpad I Gate
SIMpad HomeRF
Then tap Next.
,PSRUWDQW&RQILJXUDWLRQV
6HOHFWLQJWKH'HYLFHWREH8VHG
'LDORJER[
Make New Connection r3DUW
In the second part of the dialog box you select the device that you want
to use.
)RU'LDO8S&RQQHFWLRQ
Select the relevant modem from the list. The table below shows which
modem you should use for which connection type.
&RQQHFWLRQ
'HYLFH6HOHFWLRQ
SIMpad (IrDA) cell phone
IrDA and GSM on
COM3:
SIMpad (IrDA) GPRS cell phone
SIMpad (serial interface) cell phone
SIMpad (serial interface) GPRS cell phone
Hayes-compatible
on COM1:
SIMpad (serial interface) analog or ISDN Modem
SIMpad PC Card (not I-Gate or HomeRF)
Installed PC Card
Tap Next.
)RU'LUHFW&RQQHFWLRQ
Select the connection via which SIMpad has access to the existing Internet connection.
)RU'LDO8S&RQQHFWLRQ2QO\
In part 3 of the dialog box specify the country code, area code and telephone number for dialing into the Internet. The Internet Service Provider
provides you with the telephone number. 'RQRW check the Force long distance and Force localboxes.
,PSRUWDQW&RQILJXUDWLRQV
6DYLQJDQG7HVWLQJ1HZ&RQQHFWLRQ
To complete, tap Finish. The new connection is created. An icon with the
name of the created connection is now visible in the Remote Networking
window.
If you are accessing the Internet using SIMpad and the new PC
Card connection for the first time, please see Chapter "Using a PC
Card to Access the Internet", page 18.
To establish the connection, doubleWDS the icon.
Check if the telephone number of your provider in the Dial-up Connection
dialog box is correct. If this is not the case, tap Dialing Properties... The
code of the country you are SUHVHQWO\ in must be specified in the local
country code field (e. g. 49 for Germany or 41 for Switzerland). Tap OK.
Enter the access data that you have obtained from your Internet Service
Provider in the User name and Password fields.
If you check the Save Password box, you do not need to specify your password again each time you dial in. However, if you want to prevent other
people from using your SIMpad access, for example, you should leave the
box empty.
Tap Connect. The connection is established. Once the connection is correctly set up, the Cancel Connection button is activated. Tap Cancel Connection to terminate the connection. You can now activate the connection
(refer to the following chapter).
$FWLYDWLQJWKH&RQQHFWLRQ
You must activate a connection, in order to use it.
8VLQJWKH,QWHUQHW([SORUHU
In Internet Explorer, select the menu View Internet options. The required selection can be selected from the Connections folder. Confirm
this with OK.
8VLQJWKH,QER[
In the Inbox, under the Services, select the submenu Options. In the Options dialog box, select the mailbox from the list of Installed Services that
you want to be allocated with the new connection that you created and
tap Properties. In the dialog box displayed, select the new connection
from the Connection list. Tap Finish and OK in the Options dialog box.
,PSRUWDQW&RQILJXUDWLRQV
&RQWURO3DQHO
The Control Panel window is displayed. You can also open the window via
Start Settings Control Panel.
&RQWURO3DQHO
The control panel allows basic settings to be made for Windows for Handheld PC 2000 and the SIMpad.
The window shows various icons with explanatory labels. If you double
tap DQLFRQ, a dialog box for corresponding settings opens.
To VDYH settings, exit the dialog box .
If you wish to FDQFHO without saving, exit with .
,PSRUWDQW&RQILJXUDWLRQV
,FRQVLQWKH&RQWURO3DQHO
'LVSOD\
For example, select colors for the desktop and title bars of dialog boxes.
2ZQHU
Enter device name and PC connection.
&RPPXQLFDWLRQV
Set the data transfer to the PC.
'HYLFH6HWWLQJ
Device-specific setting options (see page 78). The device settings can also
be opened using the
icon in the system area of the
taskbar.
,QWHUQHW2SWLRQV
Set the start page, search page and other options (see page 53).
-RW
Set options for direct entry of characters with the stylus.
3DVVZRUG
Enter personal password. If you have entered a password, this will be required when SIMpad is started.
5HJLRQDO6HWWLQJV
Set time zone, number format, currency symbols etc.
9ROXPH6RXQGV
Set volume level and sounds for system events (see page 77).
1HWZRUN
Set configuration and identification for network operation.
6RIWZDUH
Automatic uninstallation of software.
6W\OXV
Recalibrate the Screen (see page 76).
,PSRUWDQW&RQILJXUDWLRQV
3RZHU
Check the battery and display the capacity.
6\VWHP
Technical data for hardware and operating system.
.H\ERDUG
Set keyboard properties.
'LDOLQJ
Set general dial-up parameters for connections over the telephone network.
:RUOG&ORFN
Setting up the actual time.
5HFDOLEUDWLQJWKH6FUHHQ
Recalibration is needed if elements of the touch-sensitive screen no longer or only react by tapping at another position.
To start recalibration:
8VLQJWKH,FRQLQWKH&RQWURO3DQHO
Double WDS the icon. The dialog box for stylus properties is displayed.
'LDORJER[
Stylus Properties
Read the text displayed. Then tap Calibration and follow the on-screen instructions.
,PSRUWDQW&RQILJXUDWLRQV
6RXQGVIRU(YHQWV
For Windows for Handheld PC 2000, events can be assigned sounds. The
“Click“ sound when you tap the screen is one such sound.
To set a sound:
8VLQJWKH,FRQLQWKH&RQWURO3DQHO
Double WDS the icon. The dialog box for volume and sound
properties is displayed.
'LDORJER[
Volume & Sounds Properties
The Volume tab allows you to set the important events for which you want
sound support. Tap with the stylus in the corresponding box to activate or
deactivate the relevant option.
You can set the volume using the control on the left. Tap the control and
drag the stylus upwards for increased volume or downwards for reduced
volume.
Tap the Sounds tab.
You select the individual events from the list on the left. You can assign an
individual sound to each selected event. To do so, tap Browse... You can
select a sound file of type *.wav.
3DUWLWLRQLQJ0HPRU\
You can influence the ratio of main memory to program memory.
1RWHVRQ0HPRU\0DQDJHPHQW
All SIMpad data is stored electronically and thus available at once. This
memory consists of the following parts:
●
32 MB FLASH memory
●
64 MB RAM memory
)ODVK0HPRU\ Flash memory retains all its data even when no power is
applied. It contains the operating system and the standard programs (Internet Explorer, Inbox, Pocket Word etc.) in compressed form.
,PSRUWDQW&RQILJXUDWLRQV
5$00HPRU\When you work with SIMpad, the operating system and
standard programs are decompressed and copied into RAM. 64 MB RAM
are available for this, 2 MB of which are required by the operating system.
The remaining 62 MB are shared between the 6WRUDJH0HPRU\ and 3UR
JUDP0HPRU\.
The storage memory stores current data (text, images, parameters etc.)
which is created by the programs being used at the time. The Storage
Memory also works as the file system which will become apparent when
working with Windows Explorer (see page 46). The program memory is
needed for the execution of programs.
You can set the partitioning of storage memory and program memory
yourself.
6HWWLQJ0HPRU\3DUWLWLRQLQJ
In the Opened applications on the taskbar, double tap the
icon. The
dialog box for device settings is displayed. Tap the tab Memory.
'LDORJER[
Device Settings 7DE Memory
You can now use the slider control to set how the memory is partitioned.
Do this by tapping with the stylus on the slider and then dragging the stylus in the required direction.
Sliding to the left means reserving more memory for programs and making less available for your own data. This is sensible for some games of
memory-intensive programs where you will not be processing large volumes of data.
Sliding to the right means restricting the memory for programs and making more available for your own data. This is sensible if there is no longer
sufficient space available for your own data. However, in this case you
could also try deleting documents that you no longer need (see page 47)
or that are in the recycle bin folder (see page 33).
After changing the mamory slider, tap OK to confirm your changes.
,PSRUWDQW&RQILJXUDWLRQV
2WKHUVHWWLQJV
6DYLQJ6HWWLQJVDQG$GGUHVVHV
You can save important settings and data in flash memory, e. g. the address book of the e-Mail program, to ensure lasting storage. This is important when you are not using the device for several days.
In the taskbar, tap Start Programs Help Save Settings to save all
the important current settings. The most important settings are stored:
Mail addresses and options, favorites, Internet connections, network settings, personal user data and system sounds.
Data which you generate using programs such as Pocket Word or
Pocket Excel is not saved. If you want to keep such data, you
should copy it onto a PC (see page 26).
%DWWHU\&DSDFLW\
You can check the charge level of the built-in battery at any time.
In the Opened applications in the taskbar, double tap
. The dialog box
for device settings is displayed. Tap the tab Battery.
'LDORJER[
Device Settings 7DE Main Batteries
The charge capacity of the battery is displayed.
,PSRUWDQW&RQILJXUDWLRQV
6HWWLQJWKH/RXGVSHDNHU9ROXPHDQG6FUHHQ%ULJKWQHVV
Using a setup dialog which is not default for Windows for Handheld PC
2000, check and change the important SIMpad settings.
In Opened Applications in the taskbar, double tap the icon
.
The dialog box for device settings is displayed.
'LDORJER[
Device Settings 7DE Settings
Use the left hand slider control to set the screen brightness. Tap the control and drag the stylus upwards for increased brightness or downwards
for decreased brightness.
Use the right hand control to set the loudspeaker volume. Tap the control
and drag the stylus upwards for increased volume or downwards for reduced volume.
In both boxes you can switch the loudspeaker and/or headset on or off.
,PSRUWDQW&RQILJXUDWLRQV
&UHDWLQJD1HZH0DLO$FFRXQW
To use another e-Mail address you must create an e-Mail account for it in
the Inbox. To do this, start the Inbox (see page 55).
In the Inbox menu, tap Services and in the drop-down menu which is subsequently displayed, tap Options. The Options dialog box is displayed.
'LDORJER[
Options
Tap Add.... The Service Name dialog box is displayed.
'LDORJER[
Service Name
Tap the Service type list and select the type for incoming e-Mails. Usually
the type POP3 e-Mail is used. However, some providers already offer the
newer type IMAP4 e-Mail. Tap the Service Name field. Enter a freely selectable name for the e-Mail account, e. g. your name or the name of your
provider. Tap OK. The dialog box <installed service> Service Definition 1/
3 is displayed.
,PSRUWDQW&RQILJXUDWLRQV
'LDORJER[
Service Definition 1/3
The following data must be supplied:
●
for POP3 Host or IMAP4 Host, the Internet address of the servers for
incoming e-Mails
●
for User ID, the user name for the e-Mail account
●
for Password, the secret access password for the e-Mail account (for
security reasons this is not displayed as it is entered)
●
for SMTP Host, the server Internet address for outgoing
e-Mails
●
for Return address, your own e-Mail address.
This data is provided together with your e-Mail account by your Internet or
service provider.
Tap Next. The dialog box General Preferences 2/3 is displayed.
'LDORJER[
General Preferences 2/3
You can set the options described in the dialog as required. By tapping the
small box before the relevant option you switch the option on or off.
Tap Next. The dialog box Inbox Preferences 3/3 is displayed.
,PSRUWDQW&RQILJXUDWLRQV
'LDORJER[
Inbox Preferences 3/3
You can set the options described in the dialog as required. By tapping the
small box before the relevant option you switch the option on or off.
Tap Finish and OK in the dialog box which is then still displayed.
This creates the e-Mail account. This account is displayed in the Inbox window on the left in the list of e-Mail accounts.
&RQQHFWLQJZLWKRWKHUGHYLFHV
&RQQHFWLQJZLWKRWKHUGHYLFHV
On the back of the device you will find the various interfaces which give
SIMpad its communication capabilities.
Infrared interface (diode)
Slot for smartcard
,QWHUIDFHVIRULQIUDUHGDQG6PDUWFDUGFRQQHFWLRQV
&RQQHFWLQJWR\RXU3ULQWHU
SIMpad has an infrared interface to allow it to communicate with a printer.
The printer used must also have this interface. For printers without an Infrared interface (IrDA) there are commercially available IrDA adapters
which can be connected to the parallel interface of the printer.
An example of a compatible printer with an infrared interface is the
HP Deskjet· 350.
For the infrared connection to be established, SIMpad and the printer
must be switched on. The infrared diodes of SIMpad and the printer must
have “line-of sight contact“ and may be not more that 0.5 m from each
other.
SIMpad supports the SIR (Serial Infrared) standard with a transmission
speed of 115 Kbit/s.
You can print Web pages, e-Mails or documents that you have created
with Pocket Word or InkWriter. To do this, in the menubar for the relevant
program, (Internet Explorer, Inbox, Word etc.), File Print.
$XWKHQWLFDWHG'DWD&RQQHFWLRQVZLWK6PDUWFDUG
Personal data cards (smartcards) are becoming increasingly important,
e.g. for online banking.
The necessary driver software for the PC/SC standard is installed on your
SIMpad.
For this type of authenticated data connections you need an appropriate
smartcard. You also need the relevant software on the SIMpad (application-specific driver). Insert the smartcard into the designated slot when
the data connection asks you to do so. When inserting the card, ensure
that the chip is facing XSZDUGV.
6XEVHTXHQW+RPH5)&RQILJXUDWLRQ
6XEVHTXHQW+RPH5)&RQILJXUDWLRQ
The HomeRF can also be configured at a later date. In the start menu, tap
Start Programs Communication HomeRF Configuration.
If you have already defined the password for the HRF Gateway, proceed
as described in Chapter "Configuring HomeRF Gateway", page 87.
6HWWLQJWKH3DVVZRUGIRUWKH+RPH5)*DWHZD\
If you have not yet configured a password for the cordless HomeRF Gateway, the following dialog box appears. Otherwise, proceed as described
in Chapter "Connecting SIMpad to HomeRF Gateway", page 86.
'LDORJER[
Set HRF Gateway7DE Internet Connection
Set the password for the cordless network in this dialog box. The password identifies all components of your cordless network. It must contain
letters and numbers; it must be at least 8 and no more than 20 characters
long.
Remember this password. You will have to re-enter the password when
incorporating further components into the cordless network.
Then tap OK. A confirmation message informs you that the password has
been changed successfully.
SIMpad is now connected to the cordless network. Now proceed with the
HomeRF Gateway configuration. How you do this is explained in Chapter
"Configuring HomeRF Gateway" on page 87.
6XEVHTXHQW+RPH5)&RQILJXUDWLRQ
&RQQHFWLQJ6,0SDGWR+RPH5)*DWHZD\
If you have not yet configured a password for the cordless HomeRF Gateway, the following dialog box appears.
'LDORJER[
Check Network Connection
Enter the password for the cordless network. This is the password you set
when you connected the first component to the HomeRF Gateway.
Then tap OK.
If you do not know the password or have entered it incorrectly, see Chapter "Reading out the Network Password" on page 87.
If you have entered the password correctly, the SIMpad is now connected
to the cordless network. Now proceed with the HomeRF Gateway configuration. How you do this is explained in Chapter "Configuring HomeRF
Gateway" on page 87.
6XEVHTXHQW+RPH5)&RQILJXUDWLRQ
5HDGLQJRXWWKH1HWZRUN3DVVZRUG
If you do not know the network password or you have entered it incorrectly, the following dialog box appears.
'LDORJER[
Read out Network Password -> Teach
Follow the instructions on the screen and tap OK. This dialog box closes
after approx. 60 seconds.
SIMpad is now connected to the cordless network. Now proceed with the
HomeRF Gateway configuration. How you do this is explained in Chapter
"Configuring HomeRF Gateway" on page 87.
&RQILJXULQJ+RPH5)*DWHZD\
After connecting to the cordless network the following dialog box appears. You can also open this dialog box via Start Programs Communication HomeRF Configuration.
'LDORJER[
HRF Gateway Configuration
If you have already configured the HomeRF Gateway (e.g. with a PC), proceed as described in Chapter "Setting up an Internet Connection" on page
90. Otherwise, please continue reading here.
6XEVHTXHQW+RPH5)&RQILJXUDWLRQ
6HWWLQJXS&RQQHFWLRQDQG5HOHDVH
Tap Set. The following dialog box appears.
'LDORJER[
Set HRF Gateway7DE Internet Connection
In this tab, you can set how an Internet connection should be established
(connected) or released (disconnected) via the HomeRF.
$XWRPDWLF&RQQHFWLRQ
If you activate automatic connection setup, an Internet connection is setup automatically as soon as you start Internet Explorer or the Inbox. Automatic connection setup can be suppressed when retrieving e-Mails.
$XWRPDWLF5HOHDVH
Determine here whether, and after how many minutes of inactivity the
connection should be disconnected automatically. Automatic disconnection is particularly useful if call charges are based on duration for your Internet connection.
A connection can be set up unintentionally and unnoticed by a variety of
programs, creating online charges.
Tap OK to save the data entered.
6XEVHTXHQW+RPH5)&RQILJXUDWLRQ
(QWHULQJ,QWHUQHW$FFHVV'DWD
The following dialog box appears.
'LDORJER[
Set HRF Gateway7DE Internet Access Data
Enter the User Name and Password for Internet access. You will have received this information from your provider.
Tap OK. The following dialog box appears. Follow the instructions on the
screen.
'LDORJER[
Restart.
'LDORJER[
DHCP Server
6XEVHTXHQW+RPH5)&RQILJXUDWLRQ
'LDORJER[
HRF Gateway
Tap OK.
6HWWLQJXSDQ,QWHUQHW&RQQHFWLRQ
The HRF Gateway Configuration dialog box appears.
'LDORJER[
HRF Gateway Configuration
Close the dialog box.
To surf the Internet or exchange e-Mails via the cordless HomeRF Gateway you have to start Internet Explorer. The default homepage opens and
the Internet connection is set up.
6XEVHTXHQW+RPH5)&RQILJXUDWLRQ
&KDQJLQJWKH+RPH5)*DWHZD\1HWZRUN3DVVZRUG
If you want to change the password for the cordless HomeRF Gateway,
tap Start Programs Communication
HomeRF Configuration. Then tap the option Set and the tab Network
Password.
'LDORJER[
Set HRF Gateway7DE Internet Connection
Tap Change Network Password.
'LDORJER[
Change Network Password
Enter the new password in this dialog box. Enter the password again to
ensure that you have entered it correctly. Tap Next. A message informs
you that the password has been changed successfully.
Confirm this with OK.
$SSHQGL[
$SSHQGL[
7URXEOHVKRRWLQJ
You can solve the following faults yourself:
)DXOW
5HPHG\
SIMpad does not
switch on or the
screen flickers.
Connect SIMpad to AC power (empty battery?)
and press the on/off button (see page 9).
Check the AC/DC adapter connections (both ends
plugged in?). Check other electrical equipment on
the same circuit (power failure? blown fuse?).
SIMpad no longer reacts (software is
“stuck“), random
displays on the
screen.
Restart SIMpad by pressing Reset. Check the following reset stages in turn:
(1) In the start menu, tap Start and then Suspend.
(2.) If (1) does not work, do a reset. Press the
small button marked RESET at the bottom of the
device with the stylus.
(3) If the problem cannot be solved with (2), perform a hardreset. To do this, hold down the
button on the right above the control key and then
press the reset button on the bottom of the device with the stylus. Data you have generated
yourself will be lost.
(4) If (3) is also unsuccessful, hold down the
button on the right above the control key and at
the same time, press the
button under the
control key. Then use the stylus to briefly press
the RESET button on the base of the device. Hold
down both buttons for a further two seconds.
This method completely resets the device to its
factory (default) settings. All data that you have
created yourself and all your personal settings are
lost. SIMpad starts again as if it were being started for the first time.
Internet connection Remove the HomeRF card. Wait until the
icon
with HomeRF: the
disappears from the taskbar. Then plug the card
connection is inter- back in and wait approx. 30 seconds.
rupted (irrespective
of distance) or cannot be set up (DHCP
server not found).
$SSHQGL[
Internet connection Ensure that the cell phone you are using has a
via cell phone cannot built-in modem.
be established.
Ensure that the Infrared function is switched on
on the cell phone (can be enabled/disabled in the
cell phone’s settings).
Ensure that a serial cable connection or an infrared connection exists between SIMpad and the
cell phone (see page 21). With infrared connections make sure that SIMpad and the mobile are
not more than 0.5 m from another and that the
two infrared diodes are at a maximum angle of
15°.
Ensure that the cell phone is switched on and that
the battery capacity and network connection are
adequate (no radio gap, prepaid card not expired).
Printing does not
work.
Ensure that the printer has an infrared interface
and that it is switched on (see page 84).
With infrared connection make sure that SIMpad
and the printer are not more than 0.5 m from another and that the two infrared diodes are at a
maximum angle of 15°.
Data backup to the
PC does not work.
Ensure that the data connection to your PC is established (see page 26).
Ensure that the ActiveSync software is installed
and started on the PC.
Error Message:
Low Memory.
Close all open programs. Then reset the memory
partitioning (see page 78). Increase the program
memory by approx 2000-3000 KB (move the slide
to the left). Delete unnecessary files.
Existing e-Mails are In the Inbox, in the menu Services, select the enno longer displayed. try Options.... Tap Properties... and Next in the dialog box which follows. Check whether the option
Only display messages from the last <n> days is
activated. If it is, double tap in the system area of
the taskbar on the time. Check date and time. Set
date and time to current values or deactivate the
Only display messages from the last <n> days option in the dialog box of the Inbox.
$SSHQGL[
Taskbar can no long- The taskbar Auto hide function is activated and
the screen is not properly calibrated. In this case,
er be called up.
switch on the input panel, tap the Ctrl key and
then press the left control key.
Elements on the
The screen must be recalibrated (see page 76).
screen do not react
or only react when
you tap somewhere
else on the screen.
6HUYLFHDQG+RWOLQH
For other faults or if the remedies suggested above are unsuccessful, you
can call up SIMpad Service pages on the Internet or you can call our hotline. The Internet address of SIMpad Service pages is:
KWWSZZZP\VLHPHQVFRPVLPSDG
The hotline numbers are as follows:
&RXQWU\
3KRQH
Austria
05 17 07 50 04
Belgium
078 15 22 21
Denmark
35 25 86 00
Finland
09 22 94 37 00
France
01 56 38 42 00
Germany
01805 333 220
Greece
01 68 64 389
Ireland
18 50 77 72 77
Italy
02 6676 4400
Luxembourg
43 84 33 99
Netherlands
070 33 33 100
Norway
22 70 84 00
Portugal
800 85 32 04
Spain
902 11 50 61
Sweden
087 50 99 11
Switzerland
01 212 00 90
Turkey
0216 57 18989
United Kingdom
09 90 33 44 11
USA
866 473 6723 or 866 4simpad
Contact your dealer regarding questions about device operation. Contact
Siemens· Service regarding device faults. Contact your telephone company regarding questions about your network access!
$SSHQGL[
0DLQWHQDQFHDQG&DUH
In case the built-in battery capacity is already weakening, the battery has
to be changed. Let your dealer do this for you. Do not attempt to open the
device yourself!
8VDJHDQG&OHDQLQJ,QVWUXFWLRQV
Wipe the FDVH with a damp cloth or with an antistatic cloth. Never use a
dry cloth! There is a danger that this will induce a static charge!
Wipe the VFUHHQwith a lint-free soft cloth. To remove finger marks and
contamination from the screen dip the cloth in glass cleaner.
7HFKQLFDO'DWD
Dimensions:
263 x 180 x 28 mm (10.35 x 7.08 x 1.10 Inches)
Weight:
1 Kg
Processor:
,
Intel· StrongARM SA1110·
32-bit RISC processor running at 206 MHz
Screen Type:
8,4 inch LCD TFT SVGA
Screen Resolution:
with SVGA resolution (800 × 600 pixels)
Graphics:
Color depth 16 Bit (65536 color levels),
Photo quality
Memory:
32 MB FLASH memory
64 MB SDRAM
Power Supply:
AC power or battery
Battery Capacity:
2800 mA/h
Battery Life:
up to 7 hours with a fully-charged battery
Battery Charge Time:
up to 2.5 hours to full charge,
approx. 70% charge capacity after 1.5 hours
Supply Voltage:
12 volts
Data Transmission Rate up to115 Kbit/s
with Infrared Link (IrDA):
Transmission Rate
over GSM:
up to 9.6 Kbit/s
Data Transmission Rate
with Serial Link:
up to115 Kbit/s
Range
up to 0.5 m or 20 Inches (classification as per
with Infrared Link (IrDA): IEC60825-1:1993: Laser Class 1)
PC Card prerequisites:
PCMCIA Type II, 3,3 or 5V
Smartcard prerequisites: ISO 7816 (Parts 1 - 3)
$SSHQGL[
:DUUDQW\
:DUUDQW\IRU86$
/LPLWHG2QH<HDU:DUUDQW\
Siemens· warrants to the original consumer purchaser of this product
that the product shall be free from defects in materials or workmanship.
For a period of one (1) year from the date of proof of purchase, a product
with any such defects in materials or workmanship shall be, at Siemens·
option, repaired, replaced or a credit issued without charge for parts or labor directly related to the defect. Replacement products may be new or
reconditioned products or newer models of equal or better functionality.
/LPLWDWLRQVDQG([FOXVLRQV
This warranty does not apply to any product or part thereof which has suffered through normal wear and tear, alteration, improper installation, physical abuse (including exposure to improper temperatures), misuse, neglect or accident and does not cover broken screens or liquids. This
warranty does not apply to consumables, such as batteries, or to any defects that have only an insignificant effect on the value or usability of the
product. This warranty does not cover defects caused by shipment to a
Siemens· service center, or the repair or service of the product by anyone
other than an authorized Siemens· service center. Damage resulting
from an act of God, including but not limited to fire, flood, earthquake and
other natural disasters will be excluded. This limited warranty is in lieu of
all other warranties, express or implied either in fact or by operation of law,
statutory or otherwise, including, but not limited to any implied warranty
of merchantability or fitness for a particular purpose. Some states do not
allow limitations on how long an implied warranty lasts, so the above limitation may not apply to you. Siemens· does not authorize any other person to assume any liability beyond the warranty described herein. In no
event, whether based in contract or tort, shall Siemens· be liable for incidental, consequential, indirect, special, or punitive damages of any kind
resulting from the ownership or use of this product, including interrupted
or incomplete phone calls, or arising out of any breach of this warranty. In
no event shall Siemens· be liable for damage in excess of the purchase
price paid by the original consumer. No other express warranty is given.
The repair or replacement described above is an exclusive remedy.
Questions or claims regarding this warranty shall be addressed to
Siemens· ICM, LLC
11921 North Mopac Expressway, Suite 400
Austin
Texas, 78759
This warranty gives you specific legal rights, and you may also have other
rights which vary from state to state.
$SSHQGL[
'LVFODLPHU5HJDUGLQJ/LQNV
When accessing the Internet, you will be directed to Internet web sites
. These sites may send cookies to
that are beyond the control of Siemens·
your web browser, may solicit personal information, may collect data from
your SIMpad, and may contain information that is inappropriate or offensive.
, and in many cases third party websites, exercise no control
Siemens·
over advertisers or unaffiliated web sites and/or over the use of cookies
by such sites or their advertisers. Siemens· makes no representations
concerning the content of web sites listed in or otherwise accessible using the SIMpad ("Third Party Sites"). Siemens· cannot be held responsible for the accuracy, relevancy, copyright compliance, legality or decency
of material contained in Third Party Sites. When you convey personal information (including, without limitation, credit card and other personal information) using online applications (for example, via email, web forms,
message boards, or chat rooms), the information can be collected and
used by third parties. Siemens· cannot guarantee the security of any information you disclose online and all such disclosures are made at your
own risk. Your use of the SIMpad constitutes an irrevocable waiver of any
claim against Siemens· with respect to such sites, third party content,
and your disclosure of personal information.
,QGHPQLW\IRU3DVVZRUGV
The user of the SIMpad is entirely responsible for maintaining the confidentiality of the user’s passwords and personal information and for all activities online. The user hereby indemnifies, defends and holds Siemens·
and its affiliates, officers, directors, owners, employees, agents, information providers, licensors and licensees (collectively, the "Indemnified Parties") harmless from and against any and all liabilities and costs (including
reasonable attorneys fees) incurred by the Indemnified Parties in connection with any claim arising out of any breach by the user of this obligation
or claims arising from use of the SIMpad. The user shall use his or her
best efforts to cooperate with Siemens· in the defense of any claim. Siemens· reserves the right, at its own expense, to assume the exclusive
defense and control of any matter otherwise subject to indemnification by
the user.
$SSHQGL[
:DUUDQW\IRURWKHUFRXQWULHV
From the date of purchase and within the warranty period Siemens· AG
will rectify free-of-charge any deficiencies which are due to material or
production faults. Siemens· AG will honor the warranty by either repairing
or replacing the defective part or device.
From 01.01.2002 is valid an warranty period of 24 Months for the countries
listed on page 94 (until 31.12.2001, 12 Months).
Excluded from the warranty is damage caused by misuse (e.g. broken
screen, liquids etc.), damage due to normal wear and tear (lettering, battery etc.) or caused by intervention of third parties. The warranty does not
cover consumables (e.g. battery) nor any defects which have only an insignificant effect on the value or the usability of the device.
&(/DEHO
SIMpad is designed for use in the EEA and Switzerland. Specific country
requirements are taken into account.
The CE label confirms that the device complies with the basic requirements of the R&TTE. An undated, unsigned CE declaration is printed in
this manual. For a copy of the dated and signed declaration, contact Siemens· Switzerland Ltd, Albisriederstrasse 245, CH-8047 Zurich, Switzerland.
$SSHQGL[
86$)HGHUDO&RPPXQLFDWLRQV&RPPLVVLRQ)&&
&ODVV%&RPSOLDQFH6WDWHPHQWIRU6,0SDG6/
The following statement applies to the products covered in this manual,
unless otherwise specified herein. The statement for other products will
appear in the accompanying documentation.
127(
This equipment has been tested and found to comply with the limits for a
"Class B" digital device, pursuant to Part 15 of the FCC rules and meets all
requirements of the Canadian Interference-Causing Equipment Regulations. These limits are designed to provide reasonable protection against
harmful interference in a residential installation. This equipment generates, uses and can radiate radio frequency energy and, if not installed and
used in strict accordance with the instructions, may cause harmful interference to radio communications. However, there is no warranty that interference will not occur in a particular installation. If this equipment does
cause harmful interference to radio or television reception, which can be
determined by turning the equipment off and on, the user is encouraged
to try to correct the interference by one or more of the following
measures:
●
Reorient or relocate the receiving antenna.
●
Increase the separation between equipment and the receiver.
●
Connect the equipment into an outlet on a circuit different from that to
which the receiver is connected.
●
Consult the dealer or an experienced radio/TV technician for help.
The manufacturer is not responsible for any radio or television interference
caused by unauthorized modifications of this equipment or the substitution or attachment of connecting cables and equipment other than those
specified by the manufacturer. The correction of interferences caused by
such unauthorized modification, substitution or attachment will be the responsibility of the user.
The use of shielded I/O cables is required when connecting this equipment to any and all optional peripheral or host devices. Failure to do so
may violate FCC rules.
$SSHQGL[
)&&'HFODUDWLRQRI&RQIRUPLW\IRU6,0SDG6/
This device complies with Part 15 of the FCC Rules. Operation is subject
to the following two conditions:
(1) this device may not cause harmful interference, and
(2) this device must accept any interference received, including interference that may cause undesired operation.
Product name
Mobile Personal Computer
Trade name
SIMpad SL4
Model number
S842
Contact person
Oliver Zechlin
Phone no.
(512) 997 0543
Name of responsible party Siemens· ICM, LLC
11921 North Mopac Expressway, Suite 400
Austin
Texas, 78759
We, Siemens· ICM LLC, hereby declare that the equipment bearing the
trade name and model number specified above was tested conforming to
the applicable FCC rules under the most accurate measurement standards possible, and that all the necessary steps have been taken and are
in force to assure that production units of the same equipment will continue to comply with the Commissions requirements.
,QGH[
$
Accessories ........................................... 8
ActiveSync ........................................... 26
Additional Connection Settings............ 68
Approval............................................... 95
Archive Folder (Inbox) .......................... 56
Attaching Files to E-Mails .................... 58
Attaching Files to e-Mails .................... 58
Authenticated Data Connection........... 84
%
Backup function ................................... 26
Battery ................................................. 24
Brightness ........................................... 80
Browser Homepage ............................ 53
Browser Options ................................. 53
&
Care ..................................................... 95
CE Label .............................................. 98
Changing the Password (HomeRF Gateway) ..................................................... 91
Charging .............................................. 24
Cleaning ............................................... 95
Connecting to your PC......................... 26
Control Panel ....................................... 74
Copying, Cutting or Pasting Text ......... 45
Creating e-Mails................................... 58
Cutting Text ......................................... 45
'
Data Link.............................................. 26
Date ..................................................... 10
Deleting Text ....................................... 45
Desktop of Windows CE ..................... 32
Dialing Properties..................... 19, 22, 73
Dialog box of Windows CE .................. 36
Displaying Battery Capacity ................. 79
Displaying E-Mails................................ 56
Displaying e-Mails................................ 56
(
e-Mail
Attaching Files .............................. 58
Configuring an Account................. 69
sending ......................................... 58
e-Mail Account..................................... 56
Entering Data ....................................... 40
About the Inout Panel ................... 40
Freehand....................................... 41
)
Factory Reset ...................................... 92
Faults................................................... 92
FCC Label ............................................ 99
Folders................................................. 47
Forwarding E-Mails.............................. 57
Forwarding e-Mails.............................. 57
*
Games ................................................. 65
Getting Started ...................................... 7
+
Handwriting Recognition ..................... 41
Hardreset............................................. 92
History Function .................................. 51
Hotline ................................................. 94
,
Inbox.............................................. 55, 56
Infrared Interface (IrDA) ....................... 84
InkWriter.............................................. 64
Input Panel........................................... 40
Installing Microsoft ActiveSync ........... 26
Internet Access via
HomeRF ....................................... 16
I-Gate ............................................ 14
Infrared or Serial ........................... 21
PC card ......................................... 18
Internet Addresses .............................. 50
Internet Explorer............................ 33, 49
Jot Macro Editor .................................. 44
Jot Trainer............................................ 44
Jot Tutorial
...................................................... 44
/
Links .................................................... 50
Loudspeaker Volume........................... 80
0
Maintenance........................................ 92
Memory Management......................... 77
Menubars ............................................ 37
Minimizing Windows ........................... 32
,QGH[
MS Reader........................................... 64
My Computer ...................................... 33
My Documents .................................... 33
1
Navigating in Web Pages..................... 50
Navigation Aids .................................... 51
2
Online Help .......................................... 47
Outbox................................................. 56
Outlook mit PC synchronisieren .......... 26
Owner Properties .......................... 12, 75
3
Partitioning Memory ............................ 77
Password (HomeRF Gateway) ...... 16, 85
Pasting Text ......................................... 45
PC (Link to) .......................................... 26
PDF Viewer.......................................... 65
Pocket Office
Access .......................................... 61
Excel ............................................. 60
PowerPoint ................................... 61
Word ............................................. 59
Pocket Outlook
Calendar........................................ 62
Contacts........................................ 63
Inbox ............................................. 62
Tasks............................................. 63
Printer (Connection to)......................... 84
Program Memory................................. 78
5
RAM .................................................... 78
Recalibrating the Screen...................... 76
Recalibration (Screen) .......................... 76
Receiving e-Mails................................. 56
Reload Function................................... 51
Replying to e-Mails Replying to ........... 57
Reset ................................................... 92
6
Save Favorites ..................................... 52
Save Settings....................................... 79
Saving Addresses ................................ 79
Screen Brightness ............................... 80
Screen Calibration................................ 10
Selecting Sounds for Events ............... 77
Selecting Text...................................... 45
Sending (e-Mails) ................................. 58
Service................................................. 94
Settings ............................................... 68
Setup ................................................... 68
SIMpad Software Updates .................. 67
Smart Card .......................................... 84
Software .............................................. 66
Software Updates ............................... 67
Start Button ......................................... 34
Start Center ......................................... 30
Start Menu........................................... 35
Storage Memory.................................. 78
Stylus................................................... 25
Switching On (First Time) ...................... 9
Switching On/Off................................. 23
Synchronizing Outlook with the PC ..... 26
7
Taskbar ................................................ 34
Technical Data ..................................... 95
Terminal Server Client ......................... 65
Time .................................................... 10
Title Bar ............................................... 37
Toolbar................................................. 38
Troubleshooting partnerships .............. 29
8
Usage Instructions............................... 95
:
Warranty .............................................. 96
Web Browser ...................................... 48
Web Pages .......................................... 50
What is in the Box ................................. 8
Window of Windows CE ..................... 36
Windows CE........................................ 32
Windows Explorer ............................... 46
Word Processing Program................... 59
World Wide Web (WWW) ................... 48
(&'HFODUDWLRQRI&RQIRUPLW\
1R6+%
0DQXIDFWXUHU
6LHPHQV6ZLW]HUODQG/WG
$GGUHVV
32%R[&+=XULFK
3URGXFWGHVFULSWLRQ
6,0SDG6/(QJOLVK
0RGHOGHVLJQDWLRQ
6+%EDVHGRQ66HULDO1XPEHU
7KHPRGHOGHVLJQDWLRQ6+%PD\EHIROORZHGE\DGGLWLRQDOOHWWHUV
RUQXPEHUVZKLFKLQGLFDWHVPDOOGLIIHUHQFHVEHWZHHQGHYLFHV
7KHSURGXFWGHVFULEHGDERYHLQWKHIRUPDVGHOLYHUHGLVLQFRQIRUPLW\ZLWKWKHSURYLVLRQVRIWKHIROORZLQJ(XURSHDQ
'LUHFWLYH
(:*
&RXQFLO'LUHFWLYHRIWKHHXURSHDQ3DUOLDPHQWDQGRIWKH&RXQFLOUHODWLQJ5DGLR(TXLSPHQWDQG
7HOHFRPPXQLFDWLRQV7HUPLQDO(TXLSPHQWDQGWKHPXWXDO5HFRJQLWLRQRIWKHLU&RQIRUPLW\
&RQIRUPLW\WRWKH'LUHFWLYHLVDVVXUHGWKURXJKWKHDSSOLFDWLRQRIWKHIROORZLQJVWDQGDUGV
$UWD
6DIHW\
(1(G$$DFFRUGLQJWR(&
$UWD
$FRXVWLF6KRFN
1RWDSSOLFDEOH
$UWE
(0&
(1(1
DFFRUGLQJWR(&
7KHSURGXFWLVODEHOOHGZLWKWKH(XURSHDQ$SSURYDOV0DUNLQJ&(DQGWKHQXPEHUIRUWKHLGHQWLILFDWLRQ
RIWKHLQYROYHGQRWLILHG%RG\
=XULFKUG$XJXVW
6LHPHQV6ZLW]HUODQG/WG
(+|UOHU
6W%UJLQ
,QWHUQDWLRQDO6DOHV0DQDJHU
3URGXFW'HYHORSPHQW0DQDJHU
1DPH
VLJQDWXUH
)XQFWLRQ
1DPH
VLJQDWXUH
)XQFWLRQ
7KLVGHFODUDWLRQFHUWLILHVWKHFRQIRUPLW\WRWKHVSHFLILHGGLUHFWLYHVEXWFRQWDLQVQRDVVXUDQFHRISURSHUWLHV7KHVDIHW\GRFXPHQWDWLRQ
DFFRPSDQ\LQJWKHSURGXFWVKDOOEHFRQVLGHUHGLQGHWDLO
Issued by
Information and Communication mobile
Haidenauplatz 1
D-81667 Munich
© Siemens AG 2001
All rights reserved. Subject to availability.
Right of modification reserved.
Printed in Switzerland (09/2001).
Siemens Aktiengesellschaft
http://www.my-siemens.com/simpad
2UGHU1R$;%