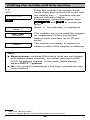
1
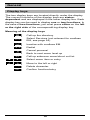
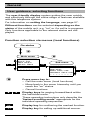
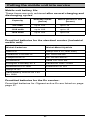
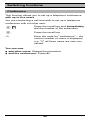
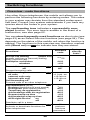
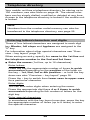
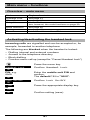
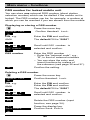
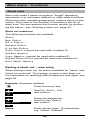
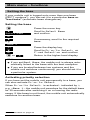
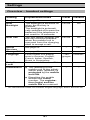
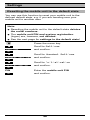
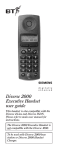
s
Hicom
cordless EM
Gigaset active
Operating
instructions
Warning!
Read the safety notes
on pages 2
and 5 before putting
the equipment
into service.
General
Safety notes
Notes on mobile unit use
●
Research has shown that electronic devices, such as
medical equipment, can be affected by the mobile unit.
Local safety regulations must therefore be
observed!
●
The mobile unit is not suitable for people with hearing
aids since the radio signals interfere with hearing aids,
producing a very unpleasant humming sound if the volume is turned up too high.
Recommendation: Gigaset 2000H headset, see
page 63.
Notes on battery use
●
Only use approved batteries,
see pages 5 and 17.
●
Never use other batteries or normal (non-rechargeable) batteries. These batteries can cause short-circuit
and may be subject to damage (dangerous). Read the
labels in the mobile unit and charging unit battery compartments.
Meaning of symbols:
Warning! please read safety note
in the instructions.
–
+
Use rechargeable batteries only
and observe polarity.
●
Avoid contact with water and fire.
●
Do not use non-Siemens charging devices. This
could damage the batteries.
●
Please also read the notes on page 5 and 8
through 13.
●
The mobile phone, batteries and charging
unit should only be disposed of in accordance with the environmental specifications.
2
General
Operating elements, unit parts
1
10
2
3
11
4
5
6
12
7
8
9
*
1
Receiver inset
2
3
Display (illuminated)
Display keys
4
Menu key
5
6
On-hook key
Talk key
7
Recall key
8
Microphone
9
On/Off key
10 Attachment clip
assembly, see
page 10
11 Ringer loudspeaker
12 Battery compartment/
lid
Figure 1: Operating elements, unit parts
* Shows variant without Ex-protection indication
3
General
Features
Features of the DECT* mobile unit
●
●
●
●
●
●
●
●
●
●
●
●
Illuminated graphical display with battery charge
display
Status-dependent functions
Number redial for the last five numbers dialled
Telephone book in the mobile unit for 100 entries
Enhanced user guidance with displays in German,
English, French, Italian, Spanish, Portuguese or Dutch
For information on setting the language, see page 57
Block dial with correction option
Automatic call acceptance** with removal from charging
unit
Protection against inadvertent key activation
Enhanced convenience through short cuts
Long-life NiCd batteries before recharging:
– batteries last for up to 7 hours when phone is in use
– batteries last for up to 70 hours in standby mode
NiMH batteries can be used for significantly higher operating times***
Each mobile unit can log on to and be used by up to
6 DECT systems
Features of the Hicom cordless EM
●
●
●
●
●
●
●
Internal and external calls in the entire
Hicom cordless EM radio network
Roaming (the user can roam throughout the entire radio
network and still receive all internal and external calls at
one call number)
Automatic call transfer from base station to base station
when moving in the radio network (handover)
Automatic callback for internal calls
Call transfer to internal users
Consultation during a call
Use of all important Hicom functions that do not
require a system-specific telephone
* DECT = Digital Enhanced Cordless Telecommunications
** Activated by default
*** Not in the Ex version
4
General
Additional safety notes for the
standard version
Notes on mobile unit use
●
Do not charge and use the mobile unit in environments where there is danger of explosion.
Notes on battery use
●
Only use approved nickel-cadmium batteries (NiCd
batteries) or nickel-metal-hydride batteries (NiMH),
see page 17.
Additional safety notes for
the Ex version
This device comes with "Intrinsic safety" protection in
accordance with EN 50014 and EN 50020 for operation in
Ex protection zone 1.
As soon as it is suspected that a device is in danger (e.g.
in the case of external damage, incorrect storage or transport damage), the device must be taken out of service and
action must be taken to prevent inadvertent recommissioning.
Authorization for operating in environments where there is
danger of explosion is revoked in the event of mobile unit
manipulation.
Notes on mobile unit use
●
●
Standard safety guidelines must be observed when
using Ex-protected cordless mobile units in order to
prevent malfunctions at the device.
Do not charge or open the mobile unit in environments where there is danger of explosion.
Install the charging station outside the Ex zone.
Only the mobile unit may be used in Ex zones.
Do not use the 2000H headset in Ex zones.
Notes on battery use
●
●
Only use factory-supplied Ex batteries, see page 17.
Never use other batteries. These batteries annul the
Ex protection and are a safety risk.
5
General
Table of contents
General . . . . . . . . . . . . . . . . . . . . . . . . . . . . . . . . . . . . . 2
Operating elements, unit parts . . . . . . . . . . . . . . . . . . . . . 3
Features . . . . . . . . . . . . . . . . . . . . . . . . . . . . . . . . . . . . . . 4
Hicom cordless EM . . . . . . . . . . . . . . . . . . . . . . . . . . . . . 8
Environmental conditions . . . . . . . . . . . . . . . . . . . . . . . . . 8
General operating instructions . . . . . . . . . . . . . . . . . . . . 8
Radio range . . . . . . . . . . . . . . . . . . . . . . . . . . . . . . . . . . . 9
Leaving the radio network . . . . . . . . . . . . . . . . . . . . . . . 10
Fitting the attachment clip . . . . . . . . . . . . . . . . . . . . . . . 10
Cleaning the mobile unit . . . . . . . . . . . . . . . . . . . . . . . . 10
Lending/disposing . . . . . . . . . . . . . . . . . . . . . . . . . . . . . 10
Explanation of the display . . . . . . . . . . . . . . . . . . . . . . . 11
Display keys . . . . . . . . . . . . . . . . . . . . . . . . . . . . . . . . . . 12
User guidance, selecting functions . . . . . . . . . . . . . . . . 13
Putting the mobile unit into service . . . . . . . . . . . . . 15
Inserting batteries in the mobile unit . . . . . . . . . . . . . . .
Charging and using the batteries . . . . . . . . . . . . . . . . . .
Logging mobile units onto a telephone system . . . . . . .
Activating/deactivating mobile units . . . . . . . . . . . . . . . .
Activating/deactivating the keypad lock . . . . . . . . . . . . .
15
16
19
21
21
Telephone functions . . . . . . . . . . . . . . . . . . . . . . . . . .
Internal dialling . . . . . . . . . . . . . . . . . . . . . . . . . . . . . . . .
External dialling . . . . . . . . . . . . . . . . . . . . . . . . . . . . . . .
Answering calls . . . . . . . . . . . . . . . . . . . . . . . . . . . . . . .
Block dialling for internal/external dialling . . . . . . . . . . .
Number redial – last five numbers . . . . . . . . . . . . . . . . .
22
22
23
23
24
25
Switching functions . . . . . . . . . . . . . . . . . . . . . . . . . . 26
Automatic callback . . . . . . . . . . . . . . . . . . . . . . . . . . . . .
Forwarding calls . . . . . . . . . . . . . . . . . . . . . . . . . . . . . .
Consultation during a call . . . . . . . . . . . . . . . . . . . . . . . .
Shuttle – switching between two users . . . . . . . . . . . . .
Conference . . . . . . . . . . . . . . . . . . . . . . . . . . . . . . . . . . .
Overview - code functions . . . . . . . . . . . . . . . . . . . . . . .
6
27
27
28
28
29
30
General
Telephone directory . . . . . . . . . . . . . . . . . . . . . . . . . . 34
Entering letters/characters and digits . . . . . . . . . . . . . . .
Overview – directory submenu . . . . . . . . . . . . . . . . . . . .
Storing numbers . . . . . . . . . . . . . . . . . . . . . . . . . . . . . . .
Dialling a number from the telephone directory . . . . . . .
Editing/deleting/displaying an entry . . . . . . . . . . . . . . . .
Deleting the telephone directory . . . . . . . . . . . . . . . . . .
Available memory . . . . . . . . . . . . . . . . . . . . . . . . . . . . . .
34
36
36
38
39
40
40
Main menu – functions . . . . . . . . . . . . . . . . . . . . . . . .
Overview – main menu . . . . . . . . . . . . . . . . . . . . . . . . .
Activating/deactivating the handset lock . . . . . . . . . . . .
Short cuts . . . . . . . . . . . . . . . . . . . . . . . . . . . . . . . . . . . .
Setting the base . . . . . . . . . . . . . . . . . . . . . . . . . . . . . . .
41
41
41
43
45
Settings . . . . . . . . . . . . . . . . . . . . . . . . . . . . . . . . . . . . 47
Overview – settings . . . . . . . . . . . . . . . . . . . . . . . . . . . .
Settings – handset, ringer... . . . . . . . . . . . . . . . . . . . . . .
Base settings . . . . . . . . . . . . . . . . . . . . . . . . . . . . . . . . .
Overview – handset settings . . . . . . . . . . . . . . . . . . . . .
Overview – beeps . . . . . . . . . . . . . . . . . . . . . . . . . . . . .
Beeps – keys, battery, range... . . . . . . . . . . . . . . . . . . .
Select services . . . . . . . . . . . . . . . . . . . . . . . . . . . . . . . .
Changing the mobile unit PIN . . . . . . . . . . . . . . . . . . . .
Setting the language . . . . . . . . . . . . . . . . . . . . . . . . . . .
Resetting the mobile unit to the default state . . . . . . . . .
47
48
49
51
52
53
54
56
57
58
Appendix . . . . . . . . . . . . . . . . . . . . . . . . . . . . . . . . . . .
Troubleshooting . . . . . . . . . . . . . . . . . . . . . . . . . . . . . . .
Approval . . . . . . . . . . . . . . . . . . . . . . . . . . . . . . . . . . . . .
Technical data . . . . . . . . . . . . . . . . . . . . . . . . . . . . . . . .
Acoustic signals . . . . . . . . . . . . . . . . . . . . . . . . . . . . . . .
Accessories . . . . . . . . . . . . . . . . . . . . . . . . . . . . . . . . . .
60
60
61
61
62
63
Index . . . . . . . . . . . . . . . . . . . . . . . . . . . . . . . . . . . . . . . 64
Permitted batteries: Gigaset active Ex . . . . . . . . . . . 67
Additional standards: Gigaset active Ex . . . . . . . . . . 67
7
General
Hicom cordless EM
The Hicom® cordless EM DECT* telephone system comprises
●
●
●
●
the radio exchange for the Hicom 150 E system,
up to 16 base stations (transmitter/receiver),
up to 64 2000C mobile units (cordless telephone),
and the Gigaset 2000L charging shell.
Environmental conditions
●
●
●
●
●
●
●
Please read the safety notes on pages 2 and 5.
Make sure that the mobile unit is at least one meter away
from medical equipment, fire alarm equipment and other
radio equipment, e.g. radio telephones or radio pagers, as
otherwise its performance may be impaired, e.g. by interference.
The mobile unit and charging shell should not be placed
near electronic devices, such as other telephones, HiFi,
office or microwave devices, as this may adversely affect
the operation of your telephone and/or the electronic
equipment.
Do not expose the mobile unit or charging shell to direct
sunlight or other sources of heat.
Use the Gigaset active at temperatures between -10°C
and +40°C.
Do not expose the mobile unit or charging shell to damp
environments.
Avoid using the mobile unit and charging shell in rooms
where there is a lot of dust.
General operating instructions
●
●
The devices offer a high level of privacy. No protection
can be guaranteed against illegal bugging using other
radio receivers.
When operating the mobile unit, a basic distinction is
made between
– telephone/switching functions, e.g. when a call is in
progress, and
– local functions, display when mobile unit is on.
8
General
●
●
●
●
●
Local functions can also be performed in the charging
shell.
Before saving, local functions can be cancelled with the
menu key or the on-hook keyA.
Your telephone directory entries, all settings and your PIN
are not lost, even if you remove the batteries.
Call charges are displayed on the mobile unit in the
same way as call charges are displayed on optiset E telephones.
A Gigaset base station is operated in accordance with the
Gigaset operating instructions.
Radio range
●
●
●
●
●
*
Depending on the environment, the range in the open is
up to 300 m.
In buildings, the range extends up to 50 m (depending
on the room and building layout and construction).
If you leave the radio range of one of the base stations
in the system during a call, the range warning tone* is
signalled and the range warning symbol
is displayed. The quality of the voice connection drops, especially if you move. For a better voice connection, move
back into the base station range!
The radio connection is lost if you exceed the range. This
is identified by the flashing of -!, for example.
Please consult your system administrator in the case of
on-going range problems!
Deactivated by default; To activate/deactivate see page 53
9
General
Leaving the radio network
●
●
Integrated power saving function: If you leave the base
station radio range when the mobile unit is switched on,
the interval between synchronisation attempts gradually
increases – this increases the battery life in standby
mode.
To ensure that the mobile unit can be used as soon as you
return to the radio network, you should immediately register it again:
Press the On/Off key until the display is blank, press
the On/Off key again until the mobile unit is on.
If you intend to leave the radio network and take your
mobile unit with you, we recommend that you turn the
mobile unit off in order to save the batteries.
Fitting the attachment clip
An attachment clip is supplied with your mobile unit and can
be attached to facilitate portability.
To use this clip, remove the plug on the rear of the mobile
unit by inserting a coin and turning it clockwise through 90°.
Insert the pivot supplied into the opening left by the plug and
screw it clockwise through 90° until it locks into place.
The mobile unit can now be attached via this pivot to the belt
clip.
Cleaning the mobile unit
To clean the mobile unit and the charging shell, simply wipe
them with a damp or antistatic cloth. Never use a dry cloth
(since this can generate electrostatic charges and discharges) and never use abrasive cleaning agents.
Lending/disposing
●
●
If you lend your mobile unit to someone else, please make
sure that you include the operating instructions with it.
Please dispose of defective batteries, mobile units and
charging shells in accordance with legal requirements.
10
General
Explanation of the display
The mobile unit features a 4-line display with 16 characters
per line. Depending on the situation, the display shows:
● digits, e.g. dialled numbers,
● text, e.g. the current base (system),
● symbols, e.g. ringing or battery symbol,
● and in the last line the current functions of the two display keys.
Display when the mobile unit is on (example)
-!
D ?B
7
7;@ Z
Battery symbol
Display of current base
Current function of right display
key: INT key or Redial
Current function of left display
key: Telephone directory or
Select Services
Right display key
Menu key
Left display key
Display when call is in progress (example)
G
4>
;?A:@
Internal call number of
user
Name of user
Function of the right* display
key: Initiate "consult." function.
Function of the left display
key: Scroll to the next function.
*
System-dependent arrangement!
11
General
Display keys
The two display keys are located directly under the display.
The current functions of the display keys are statusdependent and are displayed in the lower display line. Each
display key can be used to display one or two functions. In
the case of two functions, you must press either on the left
or the right side of the correspondLing display key.
Meaning of the display keys
D
Call up the directory
?R?
Select Services (not relevant for cordless
EM, see page 54)
7;@
Inactive with cordless EM
Z
Redial
[
Cancel process/
Back to next menu level up
9
Call up submenu menu/short cut list
; <
Select menu item or entry
Move to the left or right
:
9
Delete character
Confirm function/entry
12
General
User guidance, selecting functions
The user-friendly display system guides the user quickly
and effectively through the entire range of features available
with this telephone system.
For information on setting the language, see page 57.
Different functions can be selected depending on the
status of the mobile unit, e.g. "on" or if a call is in progress.
Only functions applicable to the relevant status are displayed.
Function selection via menus (local functions)
On status
Main menu
;<
6) -!:*&
?$*,.
2',(
9
?!'!-!
?!)#?!,/!
RRRRRRRR
Sub-menu
-6)
- - - -!B*'.(!
--->)#!,*)>!#-!,
-!?!)#6) -!?!)#RRRRRRRR
;<
Press menu key to:
– Call the main menu (local functions)
– Move back in the menu hierarchy until you
reach the "on" status
– Cancel functions
; <
Display keys for paging forward/back within
the individual menu.
These operating instructions only describe the
"fastest scrolling mode" appropriate for the
individual operating sequences.
9
Display key for confirming the marked function.
9
Display key for calling up additional menus.
13
General
[
A
Display key for cancelling functions/
returning to the next menu level up.
On-hook key for ending calls or for cancelling
functions and returning to the "on" status
immediately.
The currently selected (highlighted) function is displayed
on a dark background.
A dotted line indicates the end of the menu. If you scroll
further, the first function in the menu is selected again. When
the "line" is selected, press the 59 display key to
jump back to the higher-level menu or to the "on" status display.
Function selection via codes
(switching functions)
Most switching functions, for example, the callback or shuttle functions, can be executed using codes.
You will find an overview of all executable functions on
page 30.
14
Putting the mobile unit into service
.
Inserting batteries in the mobile unit
Note:
●
●
●
●
●
●
●
Read the safety notes on page 2 and 5 first!
Only use supplied or permitted batteries, do not use
normal batteries (non-rechargeable) – see page 17.
Only open the battery compartment in dust-free environments.
Hold the mobile unit with the dialling keypad facing
downwards (see Figure 2). A battery compartment for
2 batteries is located in the lower part of the mobile unit.
To open the battery compartment, undo the screw on the
lid and remove the lid (see Figure 2).
Insert the two batteries supplied in the battery compartment as shown in Figure 2.
Ensure that the batteries are inserted correctly (polarity
illustrated on the label in the battery compartment).
The battery compartment cannot be closed if batteries
are inserted incorrectly.
Screw the lid securely back into place. Ensure that the
lower end of the lid is locked into place.
Fig. 2: Rear of mobile unit, battery compartment open
Fig. 3: Ex version battery
15
Putting the mobile unit into service
Charging and using the batteries
The batteries supplied (NiCd) are not charged.
To charge the batteries, insert the mobile unit in the Gigaset
2000L charging shell. The mobile unit can be inserted with
the display facing upwards or downwards.
The LED
on the charging shell lights up while the batteries are charging. In addition, the battery symbol in the
mobile unit display indicates the charging status:
Batteries empty.
E Batteries charged 33%.
8 Batteries charged 66%.
7 Batteries charged 100%.
Note:
●
●
●
●
New batteries should be initially charged for a minimum
period of 16 hours without interruption – irrespective
of the battery symbol displayed.
In order to maintain max. battery storage capacity
for as long as possible, the mobile unit should only
ever be inserted in the charging shell when the batteries are almost empty E.
The batteries warm up during charging.
Old, defective batteries must be disposed of in accordance with legal requirements, not in the normal waste
disposal system.
Battery charging times:
Capacity
Charging time in
mobile unit
(hours)
Charging time in
reserve battery
compartment
(hours)
600 mAh
4 to 5
24
1100 mAh
8 to 9
40
16
Putting the mobile unit into service
Mobile unit battery life:
These times are only achieved after several charging and
discharging cycles.
Capacity
Standby mode
(hours)
When phone in use
(hours)
700 mAh
up to 100
up to 10
1100 mAh
up to 160
up to 15
1500 mAh
up to 220
up to 20
Permitted batteries for the standard version (industrial
mobile unit):
Nickel-Cadmium
Nickel-Metal-Hydride
Saft RC6
Sanyo HR-3 U (1300 mAh)
Panasonic P-60 AA/1P
GP GP60 AA HC
Philips R6 NC-P
GP GP120 AA HC
UCAR RC6
Varta VH 1101 AA
Energizer Eveready XC 6
Panasonic HHR-110AA
DAIMON ACCU 1000
Emmerich CE R 6
Sanyo N-3U
Varta battery Plus Ni-Cd 1.2V
No. 5006
Permitted batteries for the Ex version:
Permitted batteries for Gigaset active Ex are listed on page
page 67.
17
Putting the mobile unit into service
Note on using NiMH batteries:
After you have inserted the NiMH batteries, we recommend that the mobile unit be fully charged and then discharged until the battery warning beep is heard, i.e.
without replacing the batteries in the charging shell. This
ensures that the charge status display7 of the
mobile unit is adapted to the increased operating life of
the NiMH batteries.
Thereafter, you can place your mobile unit in the charging
shell each time it is used. Charging is electronically controlled, so that the batteries are charged optimally.
18
Putting the mobile unit into service
.
Logging mobile units onto a telephone system
For information on setting the language, see page 57.
Your system administrator supplies you with mobile units
that have already been logged on when you are installing
the system for the first time. You must log on any new mobile
units as described below if you extend the system.
●
●
Please call Siemens Service if you purchased the mobile
unit directly from Siemens. Please call your retailer if
you did not purchase your mobile unit directly from Siemens. Please ask Siemens Service or your retailer to provide you with the call number and the system code (eightdigit) of every mobile unit and to open the "logon window"
(e.g. 10 minutes).
Logging a mobile unit onto Hicom 150 E:
H
Switch the mobile unit on with the On/
Off key - >!#-!, appears in the
display with the first logon procedure.
-!*, for example, flashes with the
second logon procedure.
Press the menu key – the main menu
is displayed.
;
?!)#9
Scroll with the left display key until
?!)#- is selected (in the top display line) and confirm the selection
with the right display key.
<
>!#-!,
9
Scroll with the left display key until
>!#-!, is selected and confirm.
-!
9
<
Confirm -!*, for example, to log
on as system 1.
If necessary, select another base/
system with the display key.
)!,-!
* !
*
)!,-!* !
is displayed.
See note "Base/system" on page 20
19
Putting the mobile unit into service
e.g.
H...
OOOOOOOO
9
-!
Enter the mobile unit system code
(eight-digit) and confirm the entry with
the display key – * symbols are displayed instead of digits.
if necessary, press the display keys
and : to correct an
entry.
-!*, for example, is displayed.
The mobile unit is successfully logged
on (registered) if the ring symbol
flashes (this can take up to 30 seconds).
-!
The mobile unit ready to receive or
transmit calls if this display is retained.
Note:
●
●
Base/system: cordless EM mobile units are not logged
onto bases (base stations), but rather onto the Hicom
150 E telephone system. In this case, -! always
means DECT** system.
No ring symbol is displayed if the logon procedure was
unsuccessful.
* See note "Base/system"
** DECT = Digital Enhanced Cordless Telecommunications
20
Putting the mobile unit into service
Activating/deactivating mobile units
●
●
Off status: display clear – calls are not received!
On status: e.g. -! is displayed – prerequisite for
all telephone functions, normal operating status!
Activating the mobile unit:
H
Press the On/Off key – you hear the
confirmation beep.
Display when telephone is in the "on"
status, see page 11.
Deactivating the mobile unit:
H
Press the On/Off key until the display
is clear – you hear the confirmation
beep.
Activating/deactivating the keypad lock
This allows you to protect your mobile unit against inadvertent key activation, e.g. when carrying it in your bag.
Calls are signalled even if the keypad is locked and can be
answered in the same way as when the telephone is on.
Prerequisite: Mobile unit is activated!
Activating the keypad lock:
H
Press the On/Off key for less than
1 second.
9!2
'*&!
Display when keypad is locked.
Deactivating the keypad lock:
H
Press the On-Off key briefly.
Display when telephone is "on", see
page 11.
Note:
The mobile unit switches off completely if you press the
On/Off key for too long.
21
Telephone functions
-!
D ?R?
7
7;@ Z
This display when the mobile is
on is a prerequisite and initial status
for all telephone functions (see also
”Radio range” page 9). -! H, , ,
, or an other name may be displayed (see page 49) depending on
the current base (system).
Note:
●
●
●
You can use the menu keyor the display key 9
to call up the short cut list and start your short cuts
when a connection is set up (while a call is in
progress).
All functions concluded with the on-hook keyA
can also be concluded by inserting the mobile unit
into the charging shell.
All functions can be cancelled with the on-hook
key A.
Internal dialling
C
Press the talk key - the user’s own
mobile phone number appears in the
display.
O
Enter the internal number when the
you hear the dial tone – the entered
digits are displayed.
See also Note!
Call
Conduct the call – the name or the
number of the user is displayed.
Ending a call
A
Press the on-hook key or place the
mobile unit into the charging shelf.
Note:
The dialled number is automatically stored for number
redial, see page 25.
22
Telephone functions
External dialling
C
Press the talk key - the user’s own
mobile unit number appears in the display.
External code
e.g. G
Enter the external code, e.g. "0",
when you hear the dial tone.
O
Call
Dial the external number - the entered
digits are displayed.
See also Note!
Conduct the call.
Ending a call
A
Press the on-hook key or place the
mobile unit in the charging shell.
Note:
The dialled number is automatically stored for number
redial.
Answering calls
The mobile unit’s ringing tone is audible. The caller’s
name is displayed if the caller is an internal user. The
number or the name is displayed if the caller is an external
user (as for optiset telephones)!
●
The mobile unit is in the charging shell:
K
Simply remove the mobile unit from
the charging shell*.
or
●
The mobile unit is not in the charging shell:
C
Press the talk key.
Ending a call
A
*
Press the on-hook key or place the
mobile unit in the charging shell.
Only if Auto Talk is activated – see also page 51!
23
Telephone functions
Block dialling for internal/external dialling
Block dialling means that you enter the number first (up to
32 digits), if necessary correct it and then press the talk key
to dial.
O
C
Enter the internal number or "external
code", e.g. "0" and the external
number.
If necessary, use the and
: display keys to correct the
entries.
Press the talk key (within 30 seconds)
– the entered number is dialled.
Ending a call
A
Press the on-hook key or place the
mobile unit in the charging shell.
Note:
Refer also to the notes under "Internal/External dialling",
see page 22 and 23.
24
Telephone functions
.
Number redial – last five numbers
You have dialled a number, but the other party is busy or
does not answer: press the on-hook key. The last five
numbers dialled (up to 32 digits) are always stored automatically.
Dialling a stored number
Z
Press the display key - the first
three stored numbers are displayed.
<
If necessary, press the display keys
to scroll to the required number.
C
Press the talk key – the selected
number is dialled.
Copying a number to the telephone directory
Z
Press the display key.
Scroll to the desired number.
<
9
<
*2;.(!,
9
Names
9
?/!),2
9
),2
-*,!
Press the display key.
Scroll until *2;.(!,is displayed
and confirm.
Enter names (max. 16 characters).
(see page 34).
Press the display key.
Confirm ?/!),2.
),2-*,!
is displayed for approx. two seconds.
25
Switching functions
Editing a number
Z
<
9
<
;.(!,
9
:
9
?/!),2
9
Press the display key.
Scroll to the desired number.
Press the display key.
Scroll to ;.(!,
and confirm.
Edit number.
Press the display key.
Confirm?/!),2 –
),2(* "! is displayed
for approx. two seconds.
Deleting a number
Z
<
9
<
!'!!;.(!,
9
Press the display key.
Scroll to the desired number.
Press the display key.
Scroll to !'!!;.(!, and
confirm – ),2$-!!) !'!!
is displayed for approx. two seconds.
Displaying a number
All the digits of a number (to a max. of 32) are displayed.
Z
<
9
;
-'2;.(!,
9
Press the display key.
Scroll to the desired number.
Press the display key.
Scroll to -'2;.(!,
and confirm.
Press the display key 59 to
return to the redial function.
26
Switching functions
Prerequisite: The required function is set up!
Automatic callback
If a dialled internal user is busy or if your call is not
answered, you can program an automatic callback request.
Storing a callback request:
4
Press the recall key.
O
Enter the code.
Deleting stored callback requests:
~
Enter the code.
Note:
● The system calls you back when the user
– becomes free or
– makes another call
● Up to 5 callback requests can be stored.
No further callback requests can be stored if five
callback requests have already been stored for the
called party.
Forwarding calls
You answered an external call and would like to forward it to
another user:
4O
Press the recall key and immediately
dial the number of the user.
A
Wait until the user answers the call or
press the on-hook key immediately
Return forwarded call:
4
Press the recall key.
Note:
If the forwarded call was not answered, the system performs an automatic "recall".
27
Switching functions
Consultation during a call
You are conducting an internal or external call and would like
to obtain some information from an internal or external user:
4O
Press the recall key, immediately dial
the number of the subscriber and conduct the consultation call.
Ending a consultation:
4
Press the recall key.
Shuttle – switching between two users
You can shuttle between the two users during a consultation
call:
OH
Enter the code.
You can shuttle between the users as
often as you like by entering the code
OH again.
Note:
●
●
The shuttle function cannot be performed with a voice
mail system info box.
Pressing the on-hook key cancels the shuttle function.
The system performs an automatic recall if a user is
still waiting on the line.
28
Switching functions
Conference
This function allows you to set up a telephone conference
with up to five users.
You are conducting a call and wish to set up a telephone
conference with a further user:
4O
Press the recall key and immediately
dial the number of the subscriber.
4
Press the recall key.
O
Enter the code for "conference" – the
current number of users is displayed,
e.g. "3"; all three users are now connected.
You can now
●
●
add other users: Repeat the procedure.
end the conference: Press ~.
29
Switching functions
Overview - code functions
Like other Hicom telephones, the mobile unit allows you to
perform the following functions by entering codes. The codes
in your system may deviate from the standard codes specified here. Consult your system administrator if you have any
queries about the codes in your system.
The confirmation tone indicates a successfully completed function. The error tone is audible in the event of a
malfunction, see also page 62.
You can store frequently used functions as short cuts (see
page 43) or as Select Service functions (see page 54). This
depends on the status of the mobile unit when the function is
started. The functions in this overview are, therefore, marked
with (Short cut) or ?R? to indicate how they are stored.
Standard
code
Functions*
Accept call waiting
(Short cut)
Answer call from a (second) waiting
party (second call).
Anklopfen verhindern
Anklopfen erlauben
Do not disturb on
off
Prevent incoming calls.
?R?
4*
55
#490
*490
*97
#97
?R?
Call forwarding on
all calls
external calls only
internal calls only
Call forwarding off
Forward calls to an other telephone.
*11+ph. no.
*12+ph.no.
*13+ph.no.
?R?
Call distribution (ACD)
Register (beginning of work period)
De-register (end of work period)
Temporary de-registration
Acknowledge after de-registration
Request wrap-up time
Acknowledge wrap-up time
ACD night service
on
off
Distribute call in a team.
*401
#401
*402
#402
*403
#403
*404
#404
?R?
Associated service
Activate or deactivate functions for
other telephones.
30
#1
*83+
partner+
services
procedure...
Systemspecific
code**
Switching functions
Standard
code
Functions*
Associated dialling
Set up connections for other
telephones.
?R?
Override
(Short cut)
Override and speak in a busy
connection.
*67+
Partner+
ph. no.
4*
62
?R?
Baby alarm,
Room monitoring (system)
For the acoustic monitoring of a specific
room.
*88
?R?
#0
Reset services for own
base
Reset activated functions.
?R?
Voice calling
Communication with telephone partner
via partner’s loudspeaker in the telephone.
?R?
Call trace
Identify an external caller via the network provider. The feature must be
requested separately from Telecom.
Message text
send
*80+ph.no.
*84
@R
*68+ph. no.
delete (sent/received message texts)
delete (sent message texts)
delete (received message texts)
call sender
Send predefined texts (only to
optiset E with display).
Conference (up to 6 users) (Short cut)
start
end
Add further telephone partner to
conversation.
+text no.
#680
#681
#682
#683
4*
3
#3
?R?
Speed dialling
Dial centrally stored speed dialling
destinations
*7+speed
?R?
Release line
Release busy external lines (active calls
on this line are disconnected).
*43
Shuttle
(Short cut)
Switch between two connections.
*2
31
dial. no.
Systemspecific
code**
Switching functions
Standard
code
Functions*
DTMF dialling (tone dialling)(Short cut)
Transmit DTMF signals.
Night service
?R?
*44+*
or ph. no.
#44
(Short cut)
*56+park
on
off
Diversion of all calls to a fixed
destination.
Park
*53
pos.
#56+park
pos.
Unpark
Hold call and resume at different
telephones.
?R?
Page
Answer
Locating person using assigned pocket
receivers.
*45+ph.no.
#45+ph.no.
?R?
Project code
Assign toll connections to certain
projects.
*60+
PCODE[+#]
Callback store
(Short cut)
delete
Storing an automatic callback request,
see also page 27.
?R?
on
off
Your number/name is not displayed on
called party’s phone.
Suppress phone number
?R?
Assign phone number
Assign other numbers to your own
phone. These numbers then appear in
the display of the called party’s
telephone.
?R?
on
off
Signal calls from other telephones and
answer calls on these telephones.
Answer group
?R?
Hunt group/group call
activate
deactivate
Hunt group calls/group call are no
longer signalled to the user who has left
the hunt group.
Hunt group (the telephones ring in
succession).
Group call (the telephones ring
simultaneously).
32
4*
58
#58
*86
#86
*41+
ph. no.
*81+ph. no.
#81
*85
#85
Systemspecific
code**
Switching functions
Standard
code
Functions*
Switch
?R?
actuation, on
off
To switch on/off certain devices (e.g.
relay).
*90
#90
Recall to network (flash)
?R?
To allows features to be used in analogue lines, a signal must be transmitted
through the line before the number is
dialled.
*51
?R?
*66
#66
*93
?R?
Telephone data service
Control with the telephone computer.
*42
?R?
enter
delete
Enter a unique date for the next 24
hours via the telephone.
*46
#46
lock (system)
unlock
Define lock code
Protect the telephone against
unauthorized use.
Phone
Date
Door opener via DTMF enable
Systemspecific
code**
?R? *89+ph, no.+
lock
Enable the door opener feature to be
activated by means of a code.
Door opener via adapter box(Short
cut)
Activate the door opener feature from
the telephone.
code
#89+ph. no.+
code
*61+ph. no.
?R?
Call pickup, directed
Answer calls for an other phone on your
own phone.
*59+ph. no.
?R?
Call pickup, group
Answer calls for telephones within a call
pickup group on your own phone.
*57
?R?
Retrieve an external
call from common hold
Transfer a call on hold to the assigned
line.
*63+line
code
* If activated (consult your system administrator if necessary).
** You can enter the codes that are valid for your system in this column.
33
Telephone directory
Your mobile unit has a telephone directory for storing up to
100 numbers, see also Note on page 44. The stored numbers can be simply dialled, modified or deleted at any time.
Access to the telephone directory is locked if the mobile unit
is locked.
Note:
Numbers from the number redial memory can also be
transferred to the telephone directory, see page 25.
Entering letters/characters and digits
Three of four letters/characters are assigned to each digit
key. Blanks, full stops and hyphens are assigned to the
"0" key.
For information about other special characters see ”Overview – key layout” page 35.
When saving an entry, specify the name in the 1st line and
the telephone number in the 2nd and 3rd lines.
●
Enter the names (1st line, up to 16 characters)
Enter letters
Press the key the appropriate number of times in quick
succession depending on the position of the letter on
the key – 1st, 2nd, 3rd or 4th position – or hold the key
down see also ”Overview – key layout” page 35.
Press the * key to switch from lower case to upper case
for a particular character.
Enter digits
You can also enter digits when entering the name.
Press the appropriate digit keys 4 or 5 times in quick
succession depending on the number of letters on the
digit key.
Enter special characters
In accordance with the key layout overview, press the key
the appropriate number of times (up to 8 times) to enter
the special character.
34
Telephone directory
2nd keystroke
3rd keystroke
4th keystroke
5th keystroke
6th keystroke
ä
ö
ü
ß
1
,
a
b
c
2
ä
à
â
ç
d
e
f
3
ë
é
è
ê
u
g
h
i
4
ï
î
j
k
l
5
w
m
n
o
6
ö
ñ
ó
ô
x
p
q
r
s
7
ß
y
t
u
v
8
ü
ú
ù
û
w
x
y
z
9
.
–
0
+
:
?
!
*
/
(
)
=
&
@

"
S *)
a]A
}
#
8th keystroke
1st keystroke
s
7th keystroke
Key
Overview – key layout
*) Blank is inserted
Note:
Telephone directory entries are automatically sorted in
alphabetical order. "Names" that begin with "*" or "#" precede entries starting with "A".
●
Enter the telephone number (2nd and 3rd line)
●
When you have entered the name, press the display key
and enter the telephone number (up to 32 digits)
using the digit keys.
●
Correcting/deleting entries (1st, 2nd and 3rd line)
The cursor is moved from character to character in wraparound mode using the display keys
and .
A character is always inserted to the left of the cursor.
The character to the left of the cursor is deleted when you
press the display key : .
35
Telephone directory
Overview – directory submenu
Submenu
Explanation/note
Dial Number
see page 38
New Entry
– Save Entry
– Insert Function
– Show Function
– Check Duplicate
– Cancel
see page 36
see page 39
see page 37
see page 37
see page 37
to cancel a function.
Edit Entry
see page 39
Delete Entry
see page 39
Display Entry
see page 39
Send entry
not relevant for cordless EM.
Delete directory
see page 40
Copy directory
not relevant for cordless EM.
Available Memory
see page 40
Storing numbers
D
Press the display key – the directory is
displayed.
9
Press the display key.
Press the display keys to scroll to
;!0),2and confirm.
<
;!0!),2
9
Name
Enter the name (1st line only,
max. 16 characters).
Enter letters/digits and correct if
necessary, see page 34 and 35.
Switch to number entry.
Telephone number Enter the associated telephone
number (2nd and 3rd lines,
max. 32 digits)
– Enter the "external code", e.g. "0"
before external numbers.
– Check the entry, see page 37.
9
Press the display key.
?/!),2
Confirm ?/!),2.
9
or
[
Return to the higher-level display.
36
Telephone directory
Inserting a function:
You can enter a pause, e.g. following an international prefix,
when you are entering the telephone numbers.
9
<
7)-!,.)*)
9
<.-!
9
Press the display key.
Scroll until 7)-!,.)*)is
selected and confirm the selection.
Press <.-!– a "P" is inserted into
the phone number.
Displaying a function:
You can display the meaning of the selected character when
you are entering or editing telephone numbers.
9
<
?$*0.)*)
9
Press the display key.
Scroll until ?$*0.)*)is
selected and confirm the selection –
the explanatory text
#s<s<.-!
is displayed
Checking an entry:
To avoid duplicate entries of a telephone number in the
directory, you can execute the Check Duplicate function
before an entry is saved.
Prerequisite: The new entry is listed in the directory.
9
<
$!&.'!
9
Press the display key.
Scroll until $!&.'!is
selected and confirm the selection –
the check is initiated.
e.g.
;* !)'
!),2"*.)
;* !)'!),2"*.) or the
&
Press the display key – the checked
entry is displayed again.
Edit or save the entry as described
on page 36.
name of an identical number is displayed.
37
Telephone directory
Dialling a number from the telephone directory
Prerequisite: Number is stored and mobile unit is "on" –
no connection is set up (idle).
D
Press the display key – the first names
(alphabetical order) in the telephone
directory are displayed, the name in
the first line is selected (dimmed).
<
or
e.g. Scroll to the desired name or
enter the initial letters, see page 34.
C
Press the talk key – the relevant
number is displayed and dialled.
Note:
You can also call up the "Directory" function and dial a
number using the submenu 9 "Dial Number".
38
Telephone directory
Editing/deleting/displaying an entry
The stored entries – numbers and/or names – can be edited,
deleted or displayed.
D
Press the display key – the first names
are displayed.
<
Scroll to the desired entry.
●
Editing an entry:
9
<
),2
9
e.g.
Press the display key.
Scroll to ),2
and confirm.
4>
Name flashes.
:
Change the name, for example.
Switch to number and edit.
9
?/!),2
9
●
Press the display key.
Confirm?/!),2.
Deleting an entry:
9
<
!'!!),2
9
Press the display key.
Scroll to !'!!),2
and confirm.
Displaying an entry:
Press the display key.
Scroll to -'2),2
<
-'2),2
and confirm.
9
●
9
Press 59 to jump to the higherlevel menu.
39
Telephone directory
Deleting the telephone directory
You can also delete all of the entries in the entire telephone
directory in one go, e.g. if you are lending the mobile unit to
another user. This function is also protected by the mobile
unit PIN.
D
Press the display key.
9
Press the display key.
Scroll to !'!!,!*,2
and confirm.
;
!'!!,!*,2
9
PIN
9
Enter the mobile unit PIN and
confirm.
!'!!''
!),!-
E?
or
To cancel:
Press display key
; .
Press the display key –
''!),!- !'!! is
displayed for approx. 2 seconds.
[
Return to the higher-level display.
Available memory
The amount of available memory space can be displayed as
a percentage.
D
Press the display key.
9
Press the display key.
Scroll to /''!4!(*,2
and confirm.
;
/''!4!(*,2
9
e.g.
4!(*,2
w/''!
or
[
E.g.4!(*,2
w/''!
is displayed for approx. 2 seconds.
Return to the higher-level display.
40
Main menu – functions
Overview – main menu
Main menu
Handset Lock
Short Cut
Baby Alarm
Base Selection
Settings
Service
Explanation/notes
see page 41
see page 43
Not available,
see, however, the code functions on page 30
see page 45
see page 47
not relevant for cordless EM
Activating/deactivating the handset lock
Incoming calls are signalled and can be accepted or, for
example, forwarded to another telephone.
The following are blocked when the handset is locked:
– Dialling internal and external numbers
– Access to the telephone directory
– Block dialling
– Function menu call up (except for "Cancel Handset Lock")
6) -!:*&
9
PIN, e.g.
GGGG
9
:*&)S""
9
;
or
9
Press the menu key.
Confirm6) -!:*&.
Enter the mobile unit PIN and
confirm.
The default PIN is "0000".
Confirm:*&)S"".
Press the appropriate display key.
Confirm setting (save).
41
Main menu – functions
DSS number for locked mobile unit
You can store one external DSS number (direct station
selection number) which can be dialled if the mobile unit is
locked. The DSS number can be, for example, a number at
which you can be reached if you are absent from the mobile.
Displaying or storing a DSS number
6) -!:*&
9
PIN, e.g.
GGGG
9
; or <
??).(!,
9
DSS number
9
Press the menu key.
Confirm 6) -!:*&.
Enter the PIN and confirm.
The default PIN is "0000"!
Scroll until ??).(!,is
selected and confirm.
Enter the DSS number
– Enter the "external code", e.g.,
"0", in front of external numbers
– You can store the entry and
insert functions by means of
the submenu (see page 36 and 37).
Confirm the setting.
Deleting a DSS number
6) -!:*&
9
PIN, e.g.
GGGG
9
Press the menu key.
Confirm 6) -!:*&.
Enter the PIN and confirm.
Enter the PIN and confirm.
The default PIN is "0000"!
; or <
??).(!,
9
Scroll until ??).(!,is
selected and confirm.
:
Delete the DSS number (input
function, see page 34).
9
?/!),2
9
Press the display key.
Confirm ?/!),2.
42
Main menu – functions
Short cuts
Short cuts make it easier to perform "longer" operating
sequences, e.g. automatic callback or other code functions.
Store a function (operating sequence) under a name of your
choice. The name of the function is included in the list of
short cuts. You can execute the function quickly by confirming the name – see ”Starting a short cut” page 44.
Short cut submenu
The following functions are available:
?,
;!0),2
),2
!'!!),2
-'2),2
*2),2(cannot be used with cordless E)
!'!!4!(*,2
*24!(*,2(cannot be used with cordless E)
!".'?$*,.- (cannot be used with cordless E)
/''!4!(*,2
Saving a short cut – new entry
When saving a short cut, an area is available for "name" and
"short cut contents". First assign a name to this short cut.
For information on entering letters/characters and digits, see
page 34.
Example: Automatic callback
Press the menu key.
<
4&,*
9
Scroll to ?$*,.
and confirm.
9
<
;!0),2
9
Name
Press the display key.
Scroll to ;!0),2
and confirm.
Enter names (max. 16 characters),
e.g. "Autom. Callback".
43
Main menu – functions
4
Switch to entering the short cut
contents.
Press the recall key.
O
Enter the code "*58".
9
?/!),2
9
Press the display key.
Confirm ?/!),2.
Starting a short cut
The start procedure is specific to the mobile unit status:
Starting from the "on" status
Press the menu key.
<
?$*,.
9
Scroll until ?$*,. is selected
and confirm – the first names (in
alphabetical order) in the short cut list
are displayed.
<
Scroll to the desired name.
9
Press the display key.
Confirm ?, – the active status is
indicated in the display until the short
cut has been completed.
?,
9
Starting during connection set-up or during a call
Call up the short cut list with the 9 display key. Continue
as described for the "on" status of the mobile unit.
Note:
●
●
●
The other short cut functions "Delete Entry", "Edit
Entry", "Display Entry", "Delete Memory" (deletes all
short cuts) and "Available Memory" are all executed in
the same way as described for the telephone directory,
see page 39.
A shared memory with up to 100 entries is available
for telephone directory entries, short cut entries
and select services, see also ”Deleting default select
services” page 54.
The 7)-!,.)*)short cut cannot be used with
cordless EM.
44
Main menu – functions
Setting the base
If your mobile unit is logged onto more than one base
(DECT systems*), you can set it to a particular base or
"best base" (automatic base changeover).
Setting the base
Press the menu key.
<
?!'!-!
9
Scroll to ?!'!-!
and confirm.
<
e.g.
-!
If necessary, scroll to the required
base.
9
Press the display key.
Scroll to <,*,2?!'!Nor
1! ?!'!*)and confirm.
<
9
or
[
Return to the higher-level display.
Note:
●
●
If you set !--!, the mobile unit is always automatically linked to the base with the best reception.
If you are located between two systems and the
mobile unit switches continuously, you should set it to
a particular system.
Activating priority selection
If you have set the mobile unit permanently to a base, you
can also activate <,*,2?!'!.
When <,*,2?!'!Nis activated - indicated by O,
e.g. O-! – the mobile unit searches for the default base
for 30 seconds after switching it on or leaving the radio
range. If this base is not found, the mobile unit automatically
searches for another base.
*
see also Note on page 20
45
Main menu – functions
Prerequisite:
You have selected a specific base as described above and
have called up the submenu 9 . The display shows:
<,*,2?!'!N
1! ?!'!*)
RRRRRRRRRRRRRRRR
;
<
[
9
To activate, press the display
key 9 .
46
Settings
Overview – settings
Setting
Explanation/notes
Handset
Volume
Call volume;
Level 1 is not shown in the
display!
Ringer
Options
Volume and tone
(call signal, bell)
Low to high or
ringer off
Set tone frequency
– volume
– tone
Register
see page 19
Base
Settings
see page 49
Handset
Settings
see page 51
Level
Default
3
1
6
0
10
6
–
–
–
–
–
–
2
Note:
●
●
Before it is saved, each setting can be cancelled
using or [ and you can return to the higherlevel display.
On-hook key A for terminating/cancelling functions
and returning to the "on" status immediately.
47
Settings
Settings – handset, ringer...
Press the menu key.
;
?!)#9
Scroll to ?!)#and confirm.
For an explanation of the individual
settings, see the section entitled
"Overview – settings", page 47.
6) -!B*'.(!
>)#!,*)>!#-!,
-!?!)#6) -!?!)#RRRRRRRRRRRRRRRR
Example: Setting the ringer volume
Press the menu key.
;
?!)#9
Scroll to ?!)#and confirm.
<
>)#!,*)9
Scroll to >)#!,*)and confirm.
6) -!B*'.(!
9
Confirm the ringer volume – the ringer
volume audible is specific to the current setting (default: level 6), see the
display.
Symbol for ringer
>)#!,B*'.(!
[
9
Dark bars indicate the current
setting – level 3 in this case
Confirm current setting
(save)
Change the setting
9
Press the display keys to set the
required volume and confirm.
Note:
●
●
See page 62 for information about acoustic signals!
Calls received at ringer volume settings 5 and 6 are
also signalled by a vibration alarm.
48
Settings
Base settings
You can rename the preset base names "Base 1" through
"Base 6". Within a company, for example, base 1 could be
changed to "Plant 1" and base 2 changed to "Plant 2".
Changing the base name
Press the menu key.
;
?!)#9
Scroll to ?!)#and confirm.
<
-!?!)#9
Scroll to -!?!)#and confirm.
<
e.g.
-!
Scroll to the desired base.
9
$)#!-!;(!
9
;(!*"-!
-!
Name
9
?/!),2
9
Press the display key.
Confirm$)#!-!;(!.
-! flashes.
Enter a new name for base 1
(max. 16 characters).
Enter letters/characters and correct if
necessary, see page 34 and 35.
Press the display key.
Confirm?/!),2.
49
Settings
ISDN configuration
Not relevant for cordless EM.
De-registering a base
The mobile unit should not be de-registered!
Attention!
If the mobile unit is de-registered, it must be reregistered again as when putting it into service,
before it can be used again (see page 19)!
50
Settings
Overview – handset settings
Setting
Explanation/notes
Beeps
see page 52
Auto
Backlight
The backlight is switched on
when the first key is
pressed.
The backlight is automatically switched off to save the
batteries if the telephone is
not used for 15 seconds.
You can define whether the
talk key must be pressed
when the mobile unit is
removed from the charging
shell to accept a call.
Auto Talk
Select
Services
see page 54
Change PIN
see page 56
Language
Local mobile unit display
texts in German, English,
French, Italian, Spanish,
Dutch or Portuguese
BabyAlarmLevel
Not relevant for cordless EM.
Initialization
●
●
The resetting of the
Level
Default
–
–
On/Off
On
On/Off
On
–
On*
–
–
7 languages
German*
–
–
–
–
mobile unit to the initialization state (defaults) is
protected by the mobile
unit PIN.
Resetting the mobile
deletes the redial
number. The registration (login) and the
mobile PIN are retained!
*
for international mobile unit variants: English language; Select Services off
51
Settings
Overview – beeps
Beep type
Explanation, note
Key Beeps
Audible each time a key is
pressed.
Default
On
Batt. Low Beep
Audible approx. 5 minutes before
the battery runs out.
On
Range Warning
Audible when you leave the radio
range.
Off
Confirm Beep
Audible if a local function/setting was successfully performed.
On
Error Beep
Audible if a function/setting was
not successfully performed.
Also in the case of erroreous/
unauthorised entries.
On
In Range Beep
The in range beep is audible if the
mobile unit is reconnected to a
base station (resynchronised with
base).
Off
See page 62 for information about acoustic signals!
52
Settings
Beeps – keys, battery, range...
Press the menu key.
;
?!)#9
Scroll to ?!)#and confirm.
;
6) -!?!)#9
Scroll to 6) -!?!)#and confirm.
!!9
Confirm!!-.
9!2!!N:*0!!
>)#!C,))#
*)",(!!
,,*,!!
7)>)#!!!
RRRRRRRRRRRRRRRR
For an explanation of the individual
beeps, see "Overview – Beeps", page
52.
Example: Activating/deactivating the range warning
Scroll to >)#!C,))#
and confirm.
<
>)#!C,))#
9
>)#!C,))#
Type of beep
Range warning symbol
;
Confirm current setting.
[
OK
; or is displayed
depending on the current setting
;
or
9
Press the relevant display key.
Confirm the setting (save).
53
Settings
Select services
The stored default select services – operating sequences
for Telecom services – cannot be used with cordless EM.
Saving functions under ?R?
Frequently used functions (operating sequences) that are
started when the mobile is in the "on" status can be stored
"under" the ?R? display key. This will simplify operations.
Example: Call forwarding to a specific user, in accordance
with ”Overview - code functions” on page 30.
?R?
Press the display key.
9
Press the display key.
The remaining operating steps are performed in a similar
way to those described under ”Saving a short cut – new
entry”, see page 43.
Starting saved functions
?R?
Press the display key.
<
Scroll to the desired function.
9
Press the display key.
Confirm?,.
?,
9
Deleting default select services
The default select services are already loaded when the unit
is delivered*.
In order to make more space (approx. 10%) for the telephone directory / short cuts, you can delete the default
select services.
?R?
9
;
!'!!4!(*,2
9
*
Press the display key.
Press the display key.
Scroll to !'!!4!(*,2
and confirm.
Not loaded with international mobile unit variants!
54
Settings
PIN
9
Enter the mobile unit PIN and
confirm.
!'!!''
!),!-
E?
or
Press the display key –
''!),!- !'!! is
displayed for approx. 2 seconds.
[
Return to the higher-level display.
Note:
You can also save the default select services again as
required using , 9 and :* ?!'!?!,/.
Deactivating the ?R? display
If you have not saved any other operating sequences under
?R? , it is advisable to deactivate the select services –
the display key ?R? is then no longer displayed:
Press the menu key.
;
?!)#9
Scroll to ?!)#and confirm.
;
6) -!?!)#9
Scroll to 6) -!?!)#and confirm.
<
?!'!?!,/!9
Scroll to ?!'!?!,/!and confirm.
Press the display key.
9
Confirm the setting.
Note:
You can use this function to switch on Select Services
again at any time.
55
Settings
Changing the mobile unit PIN
You can use this function to change your personal mobile
unit PIN. The default PIN is "0000".
The mobile unit PIN is required for the following functions:
– changing the mobile unit PIN
– deleting the telephone directory
– resetting the mobile unit to the default state
Important:
●
●
●
If you forget your mobile unit PIN, a service engineer will have to access the device. Forgetting a PIN
is just as serious as losing a key. In this case, please
consult your system administrator!
7)*,,!<7; is displayed if an incorrect mobile
unit PIN is entered.
The functions can be cancelled/terminated with the
menu key before settings are saved/deleted.
Press the menu key.
;
?!)#9
Scroll to ?!)#and confirm.
;
6) -!?!)#9
Scroll to 6) -!?!)#and confirm.
<
$)#!<7;
9
Scroll to $)#!<7;
and confirm.
PIN, e.g.
GGGG
9
Enter the "old" PIN and confirm.
The default PIN is "0000"!
New PIN, e.g.
H
9
Enter the "new" PIN (max. 8 digits)
and confirm.
New PIN
Enter the "new" PIN again carefully
and confirm – ;!0<7;-*,! u is
displayed for approx. 2 seconds.
H
9
56
Settings
Setting the language
Prerequisite:
The mobile unit is on (German default
state*!)
Press the menu key.
;
?!)#9
Scroll to ?!)#and confirm.
;
6) -!?!)#9
Scroll to 6) -!?!)#and confirm.
;
:)#.#!
9
Scroll to :)#.#!
and confirm.
<
e.g.
)#'-$
9
Scroll to desired language
and confirm.
The following overview will help you to set the desired language as described above when the unit is delivered or if the
language is changed inadvertently:
Displays for language settings
Deutsch
Einstellungen
Lokale Einst.
Sprache
English
Settings
Handset Settings
Language
Français
Réglages
Réglages combiné Langue
Italiano
Impostazioni
Impostaz.Telef.
Lingua
Español
Ajustes
Ajuste local
Idioma
Português
Programações Program. local
Língua
Nederlands
Instellingen
Taal
Lokale instell.
Note:
The language you set only applies to the mobile unit
display texts stored in the mobile unit.
*
For international mobile unit variants: English – see table for display texts
57
Settings
Resetting the mobile unit to the default state
You can use this function to reset your mobile unit to the
defined default state, e.g. if you are handing over your
mobile unit to another user.
Note:
●
●
●
Resetting the mobile unit to the default state deletes
the redial numbers.
The mobile unit PIN and system registration
(logon) are, however, not deleted.
See the next page for settings in the default state!
Press the menu key.
;
?!)#9
Scroll to ?!)#and confirm.
;
6) -!?!)#9
Scroll to 6) -!?!)#and confirm.
;
7)'3*)
9
Scroll to 7)'3*)
and confirm.
PIN
9
Enter the mobile unit PIN
and confirm.
58
Settings
Settings after the mobile unit has been reset:
Telephone directory:
Retained
Short cuts:
Retained
Redial:
Deleted
Mobile unit PIN:
System registration:
As per last save
Retained
Language:
German*
Automatic call acceptance:
Automatic backlight:
On
On
Select Services menu:
Active*
Ringer tone:
Ringer volume:
1
6
Handset volume:
1
Different beeps:
See overview page 52
*
For international mobile unit variant: English language; S-S menu inactive
59
Appendix
Troubleshooting
Before contacting the Service department, you should
attempt to rectify any errors yourself:
Caution:
The battery compartment must not be opened under
any circumstances in an Ex zone.
Error
Possible cause
Remedy
No display.
Mobile unit not
switched on.
Battery empty.
Press the On/Off
key.
Recharge the battery
or replace it with a
spare battery.
*))!N>!'!-! cordless EM is fully
is displayed as soon
as you press the talk
key.
No dial tone; no calls
can be made.
Try again later.
utilised by other
users.
No radio connection The mobile unit is
possible to base sta- outside the radio
tion, -!flashes. range of the base
stations; radio signal
too weak.
The mobile unit is not
registered.
Excessive delay
between synchronisation attempts.
Move into radio
range, change location.
-! is displayed,
for example, but no
incoming or outgoing
calls are possible.
Activation/deactivation not possible.
Remove the battery
compartment lid,
remove and then
reinsert the batteries,
close the battery
compartment lid.
The mobile unit is
blocked.
60
Register mobile unit.
Switch off mobile unit
and switch it back on
again.
Appendix
Approval
The mobile units have been approved by the German Federal Office of Telecommunication Approval (BZT). They
comply with the conditions of approval passed by the Federal Ministry for Post and Telecommunications (BMPT) for
connection to the Hicom cordless EM telephone system.
They can also be registered and operated on the 10xx and
20xx Gigaset base stations.
Technical data
Standards
No. of channels
Frequencies
Duplex operation
Channel configuration
Bit rate
Modulation
Voice encoding
Transmit power
Range
DECT in accordance with
ETSI, CTR 6, CTR 10, GAP
Ex protection in accordance with
EN 50014 and EN 50020
120 duplex channels
1.88 GHz to 1.90 GHz
Time duplex with
10 ms frame length each
1728 kHz
1152 kbit / s
GFSK
32 kBit/s (ADPCM)
10 mW medium power;
250 mW peak power
outdoors
approx.300 m
indoors
approx.50 m
Convenience mobile unit
Battery life
Permitted environmental conditions for
operation*
Weight incl. batteries
Dimensions
(L x B x H)
*
see ”Charging and using the batteries”
page 16
-10 °C to +40 °C
100% relative air humidity
as well as water splashes and jets
(IP 65)
approx. 165 g
approx. 160 x 55 x 25 mm
In non-protected environments
61
Appendix
Acoustic signals
Internal dial tone
0.2 s/0.3 s beep/pause, sequence repeated after 0.5-s pause
External dial tone
Steady tone
Ring tone
Pause
Beep
0.8 s
2s
Pause
Beep
Beep
...
Busy tone
0.5 s beep/pause ...
Confirmation tone
Beep
0,8 s
Error beep/range warning
4 x 0.1 s beep/pause
Call waiting tone
Pause
0.1 s
10 s
0.1 s
62
Appendix
Accessories
●
●
Gigaset 2000H headset
Comprising an adapter and headset.
Note: high-performance nickel-metal-hydride batteries are
recommended for use in conjunction with the headset.
Gigaset 2000L charging unit
For charging the mobile unit batteries and
2 spare batteries.
Caution:
The charging unit and headset must not be operated
in environments where there is danger of explosion.
Further information available on request.
Please contact your nearest Siemens Sales office.
63
Index
A
Call waiting ........................... 30
Call waiting tone ................... 62
Callback ................................ 32
Callback, automatic .............. 27
Calling up, short cut .............. 44
Cancelling functions........ 13, 14
Character set ........................ 35
Charging shell....................... 63
Charging the batteries .......... 16
Charging times...................... 17
Cleaning
loading shell ..................... 10
mobile unit ........................ 10
Code functions................ 26, 30
Conference ..................... 29, 31
Confirm beep ........................ 52
Confirmation tone ................. 62
Consultation during a call ..... 28
Correcting entries ................. 24
Correction key................. 24, 35
Accessories........................... 63
Acoustic signals .................... 62
Activating/deactivating
the mobile unit .................. 21
Actuate switch ....................... 33
Answer .................................. 32
Answer group ........................ 32
Answering a call .................... 23
Approval ................................ 61
Assign phone number ........... 32
Associated dialling ................ 31
Associated services .............. 30
Attachment clip...................... 10
Automatic
base changeover .............. 45
callback ............................. 27
Automatic backlight ............... 51
Automatic talk........................ 51
B
D
Baby alarm ............................ 31
Backlight, automatic .............. 51
Base changeover .................. 45
Base display.......................... 20
Base settings......................... 49
Batteries
battery low beep ............... 52
charging ............................ 16
inserting in the mobile unit 15
types ................................. 17
using ......................... 2, 5, 16
Battery life, mobile unit.......... 61
Beeps
overview............................ 52
representation................... 62
setting ............................... 53
Block dialling ......................... 24
Busy tone .............................. 62
Date ...................................... 33
Deactivating S-S display ....... 55
Deactivating/activating
the mobile unit .................. 21
Default state.......................... 58
Deleting
entry ................................. 39
Select Services................. 54
the telephone directory ..... 40
Dial tone................................ 62
Dialling
block dial .......................... 24
external............................. 23
internal.............................. 22
number from
telephone directory ...... 38
redialling ........................... 25
Dialling in block ..................... 24
Digits..................................... 34
Display
backlight ........................... 51
keys .................................. 12
Displaying
entry ................................. 39
Displaying a function............. 37
Disposing/lending ................. 10
Do not disturb ....................... 30
Door opener.......................... 33
C
Call
ending ............................... 22
forwarding ......................... 27
Call charge display..................9
Call charges ............................9
Call distribution...................... 30
Call forwarding ...................... 30
Call pickup
directed ............................. 33
group................................. 33
Call trace ............................... 31
64
Index
Hicom functions .............. 26, 30
Hunt group ............................ 32
DSS number
deleting ............................. 42
displaying.......................... 42
storing ............................... 42
DTMF dialling ........................ 32
Duplicate entry ...................... 37
I
In range beep........................ 52
Initialization ........................... 51
Input function
character set..................... 35
digits ................................. 34
special characters ............ 34
Insering a function ................ 37
Inserting the batteries ........... 15
Intrinsic safety ......................... 5
E
Editing
entry.................................. 39
Editing an entry ..................... 39
Ending a call.......................... 22
Entering names ..................... 36
Entry
check ................................ 37
deleting ............................. 39
displaying.......................... 39
editing ............................... 39
Environmental conditions ........8
Error beep ............................. 52
Error correction ..................... 60
Error tone .............................. 62
Ex protection ..................... 5, 17
External code ........................ 23
K
Key beep............................... 52
Keypad lock .......................... 21
Keys .................................. 3, 11
L
Lending ................................. 10
Lending/disposing ................. 10
Letters/characters
entering ............................ 34
Lock code ............................. 33
Locking the keypad............... 21
Logging
mobile unit onto
telephone system ......... 19
F
Fault correction ..................... 60
Features
Hicom cordless E................4
mobile unit ..........................4
Fitting the attachment clip ..... 10
Forwarding calls .................... 27
Function selection
telephone/switching
functions ....................... 14
via menus ......................... 13
Functions, cancelling.......13, 14
M
Main menu
overview ........................... 41
Menus ................................... 13
Mobile unit
activating/deactivating ...... 21
cleaning ............................ 10
logging onto telephone
system.......................... 19
storing/changing PIN ........ 56
G
General operating instructions 8
Group call.............................. 32
N
H
Night service ......................... 32
Number
copying
number redial ............... 25
dialling from directory ....... 38
editing/deleting/displaying 39
storing............................... 36
Number redial ....................... 25
Handset lock ......................... 41
Handset settings
default state ...................... 58
overview............................ 51
Select Services ................. 54
Handset volume .................... 47
Headset................................. 63
Hearing aids ............................2
65
Index
O
Quality of the connection.........9
Setting the base .................... 45
Setting the language ............. 57
Settings
base.................................. 49
beeps................................ 53
handset, ringer ................. 48
language........................... 57
overview ........................... 47
Short cut
new entry .......................... 43
starting.............................. 44
Short cuts
menu ................................ 43
Shuttle............................. 28, 31
Signals .................................. 62
Spare batteries ..................... 17
Special characters ................ 34
Speed dialling ....................... 31
Standards ex-version ............ 67
Starting, short cut.................. 44
Storing numbers ................... 34
Submenu, telephone directory
overview ........................... 36
Suppress phone number ...... 32
Switching between two users 28
Switching functions ......... 26, 30
Symbols in the battery
compartment ...................... 2
System code ......................... 20
R
T
Radio network
leaving .............................. 10
power saving function ....... 10
Range................................ 9, 61
Range warning ................52, 53
Range warning tone ................9
Recall to network................... 33
Release line .......................... 31
Reset services....................... 31
Retrieve
external call....................... 33
Ring tone............................... 62
Ringer..............................47, 48
Room monitoring................... 31
Talk, automatic ..................... 51
Technical data ...................... 61
Telephone conference .......... 29
Telephone data service ........ 33
Telephone directory
duplicate entry .................. 37
Telephone functions ....... 20, 21
Telephone lock/unlock .......... 33
Transmit power ..................... 61
Troubleshooting .................... 60
On status.........................11, 22
Operating elements.................3
Operating status.................... 21
Override ................................ 31
Overview
beeps ................................ 52
handset settings................ 51
main menu ........................ 41
settings ............................. 47
submenu
telephone directory ....... 36
P
Page...................................... 32
Park....................................... 32
Pause display........................ 37
PIN ........................................ 56
Power saving function ........... 10
Priority selection
on/off................................. 45
Privacy ....................................8
Project code .......................... 32
Putting mobile unit into
service .............................. 16
Q
U
Unit parts ................................ 3
Using the batteries ................ 16
S
V
Safety notes ........................2, 5
Saving operating sequences. 54
Select Services ..................... 54
Selecting the base................. 45
Send/delete message text..... 31
Service .................................. 41
Vibration alarm...................... 48
Voice calling.......................... 31
Volume
handset............................. 47
ringer ................................ 48
66
Permitted batteries: Gigaset active Ex
Only the original battery packs C39165-A7019-B110 and
C39165-A7019-B112 may be used with Gigaset active Ex.
Capacity
Standby mode
(hours)
When the phone is
in use (hours)
600 mAh
up to 70
up to 7
If other batteries are used, operation in environments where
there is danger of explosion is no longer permitted.
Additional standards: Gigaset active Ex
Gigaset active Ex also complies with the requirements of the
following european standards:
EN 50014
EN 50020
67
3$0%
1P A31003-M1522-B799-2-7619
When passing on the device
enter the following telephone numbers:
In the event of an error:
For sales queries:
Printed on recycled paper –
doing more for the environment!
This device complies with the requirements of the EU guidelines:
89/336/EEC
73/23/EEC
“Electromagnetic Compatibility”
“Electric Operating Resources for Use within
Specific Voltage Parameters”.
and thus bears the CE mark.
Ex version:
In addition to the above, this device complies with the requirements
of the European standards
EN 50014
EN 50020
Published by the
Private Communication Systems Group
Hofmannstraße 51, D-81359 Munich
Siemens Aktiengesellschaft
© Siemens AG 2001
All rights reserved.
Delivery subject to availability;
right of technical modifications
reserved.
Order no.:
A31003-M1522-B799-2-7619
Printed in Germany.
BA299 0.5