1
CDC-5506 (G)_ENG_110817:CDC-5506(E)_ENG 2011-08-17 오
5:36 페이지 2
Introduction
ENGLISH
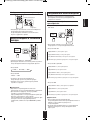
READ THIS BEFORE OPERATING YOUR UNIT
This symbol is intended to alert the user to the presence of
uninsulated "dangerous voltage" within the product's
enclosure that may be of sufficient magnitude to constitute
a risk of electric shock to persons.
CAUTION
: TO REDUCE THE RISK OF ELECTRIC
SHOCK, DO NOT REMOVE COVER (OR
BACK). NO USER-SERVICEABLE PARTS
INSIDE. REFER SERVICING TO
QUALIFIED SERVICE PERSONNEL.
This symbol is intended to alert the user to the presence of
important operating and maintenance (servicing)
instructions in the literature accompanying the appliance.
WARNING : TO REDUCE THE RISK OF FIRE OR ELECTRIC SHOCK, DO NOT EXPOSE THIS APPLIANCE TO RAIN OR MOISTURE.
CLASS 1
LASER PRODUCT
CAUTION
Invisible laser radiation when the unit is open.
Do not stare into beam.
CAUTION : USE OF ANY CONTROLS, ADJUSTMENTS, OR PROCEDURES OTHER THAN THOSE SPECIFIED
HEREIN MAY RESULT IN HAZARDOUS RADIATION EXPOSURE.
FOR YOUR SAFETY
EUROPE
AUSTRALIA
220 V
240 V
Units shipped to Australia are designed for operation on 230 V AC only.
To ensure safe operation, the three-pin plug supplied must be inserted only into a standard threepin power point which is effectively earthed through the normal household wiring. Extension cords
used with the equipment must be three-core and be correctly wired to provide connection to earth.
Improper extension cords are a major cause of fatalities. The fact that the equipment
operates satisfactorily does not imply that the power point is earthed and that the installation
is completely safe. For your safety, if in any doubt about the effective earthing of the power
point, consult a qualified electrician.
PAN-EUROPEAN UNIFIED VOLTAGE
All units are suitable for use on supplies 220-240 V AC.
2
CDC-5506 (G)_ENG_110817:CDC-5506(E)_ENG 2011-08-17 오
5:36 페이지 3
CAUTION
Information for Users on Collection and Disposal of
Old Equipment and used Batteries
These symbols on the products, packaging, and/or
accompanying documents mean that used electrical and
electronic products and batteries should not be mixed
with general household waste. For proper treatment,
recovery and recycling of old products and used
batteries, please take them to applicable collection
points, in accordance with your national legislation.
By disposing of these products and batteries correctly,
you will help to save valuable resources and prevent any
potential negative effects on human health and the
environment which could otherwise arise from
inappropriate waste handling.
For more information about collection and recycling of
old products and batteries, please contact your local
municipality, your waste disposal service or the point of
sale where you purchased the items.
[Information on Disposal in other Countries outside the
European Union]
These symbols are only valid in the European Union. If
you wish to discard these items, please contact your
local authorities or dealer and ask for the correct method
of disposal.
Note for the battery symbol (bottom two symbol
examples):
The sign Pb below the symbol for batteries indicates that
this batteries contains lead.
PRECAUTIONS
■Moisture condensation
Moisture may form on the lens in the following conditions.
• Immediately after a heater has been turned on.
• In a steamy or very humid room.
• When this unit is moved from a cold place to a warm one.
If moisture forms inside this unit, it may not operate properly.
In this case, turn on the power and wait about one hour for the moisture to evaporate.
■If there is noise interference on the TV while a broadcast is being received.
Depending on the reception condition of the TV, interference may appear on the TV screen while you are watching a TV
broadcast and this unit is left on. This is not a malfunction of this unit or the TV. To watch a TV broadcast, turn off this unit.
■Do not transport this unit with discs left in it.
■Do not place on the component such as amplifier or receiver that generates heat.
If so, the temperature inside this unit rises and malfunction may occur.
3
ENGLISH
• Leave a space around the unit for sufficient ventilation.
• Avoid installation in extremely hot or cold locations, or in an area
that is exposed to direct sunlight or heating equipment.
• Keep the unit free from moisture, water, and dust.
• Do not let foreign objects in the unit.
• The ventilation should not be impeded by covering the ventilation
openings with items, such as newspapers, table-cloths, curtains,
etc.
• No naked flame sources, such as lighted candles, should be
placed on the unit.
• Please be care the environmental aspects of battery disposal.
• The unit shall not be exposed to dripping or splashing for use.
• No objects filled with liquids, such as vases, shall be placed on
the unit.
• Do not let insecticides, benzene, and thinner come in contact
with the set.
• Never disassemble or modify the unit in any way.
■Notes on the AC power cord and the wall outlet.
• The unit is not disconnected from the AC power source(mains)
as long as it is connected to the wall outlet, even if the unit has
been turned off.
• To completely disconnect this product from the mains,
disconnect the plug from the wall socket outlet.
• When setting up this product, make sure that the AC outlet you
are using is easily accessible.
• Disconnect the plug from the wall outlet when not using the unit
for long periods of time.
CDC-5506 (G)_ENG_110817:CDC-5506(E)_ENG 2011-08-17 오
5:36 페이지 4
ENGLISH
CONTENTS
Introduction
• READ THIS BEFORE OPERATING YOUR UNIT
Rear Panel Connections
I
I
2
5
Front Panel & Remote Controls
I
6
• REMOTE CONTROL OPERATION RANGE
• LOADING BATTERIES
I
9
Preliminary Knowledge About Discs & Files
• PLAYABLE DISCS
I
10
• USB MEMORY DEVICES
I
10
• PLAYABLE AUDIO FILE FORMATS
I
• CARE AND HANDLING OF DISCS
I
I
9
10
10
Operations
• PLAYING TRACKS/FILES
I
11
• PLAYING IN RANDOM ORDER
I
13
• REPEAT PLAY
I
13
• PLAYING THE FIRST 10 SECONDS OF EACH TRACK/FILE
I
• PLAYING IN DESIRED ORDER
I
14
• SELECTING A TIME DISPLAY (Audio CD only)
I
16
• ADJUSTING THE BRIGHTNESS OF THE FLUORESCENT DISPLAY
• LISTENING WITH HEADPHONES
I
16
Troubleshooting Guide
Specifications
I
I
17
18
4
14
I
16
CDC-5506 (G)_ENG_110817:CDC-5506(E)_ENG 2011-08-17 오
5:36 페이지 5
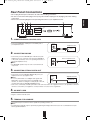
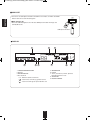
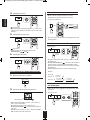
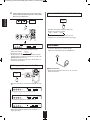
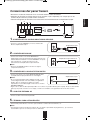
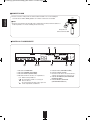
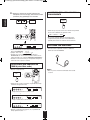
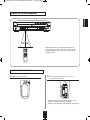
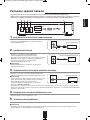
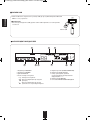
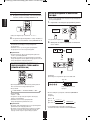
Rear Panel Connections
4
5
CDC-5506
N18041
5DISC CD CHANGER
DIGITAL
OPT
DIGI LINK
ANALOG
POWER SOURCE
230V
POWER CONSUMPTION
50Hz
23 W
CLASS 1 LASER PRODUCT
KLASSE 1 LASER PRODUKT
LUOKAN 1 LASER LAITE
KLASS 1 LASER APPARAT
DESIGNED IN USA
ASSEMBLED IN CHINA
L
AVIS : RISQUE DE CHOC ELECTRIQUE-NE PAS OUVRIR.
WARNING : SHOCK HAZARD-DO NOT OPEN.
R
SN.
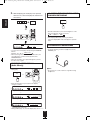
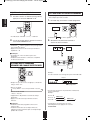
1. CONNECTING ANALOG AUDIO OUTS
• Connect the ANALOG L and R jacks to the CD IN jacks of
your amplifier/receiver.
ANALOG
Amplifier/receiver
L
CD IN
R
2. CONNECTING DIGILINK
• Connect this jack to the DIGILINK jack of Sherwood system
amplifier/receiver to control this unit remotely by DIGILINK II
or III system. (For details, refer to the operating instructions of
Sherwood amplifier/receiver.)
■Note :
• The DIGILINK operation may not work on some Sherwood
components.
DIGI LINK
Sherwood amplifier/receiver
DIGILINK
3. CONNECTING OPTICAL DIGITAL OUT
• Connect this jack to the OPTICAL DIGITAL IN jack of your
DIGITAL
amplifier/receiver to enjoy digital sound.
Amplifier/receiver
OPT
■Notes :
• It is not recommended to record digital audio signals with
OPTICAL IN
digital audio connection between this unit and MD or CD
recorder, etc.. When recording the sounds played on this unit,
record them through the ANALOG AUDIO OUT jacks.
• Some of the commercially available optical fiber cords cannot be used for the equipment. If there is an optical fiber cord which
cannot be connected to your equipment, consult your dealer or nearest service organization.
4. AC INPUT CORD
• Plug the cord into a wall AC outlet.
5. TERMINAL FOR UPGRADE
• This terminal may be used in the future to update the operating software, etc.
■Note :
• Programming for upgrade requires specialized programming knowledge and for that reason we recommend that it only be
done by qualified installers.
5
ENGLISH
• Do not plug the AC input cord into the AC outlet when making connections.
• Be sure to connect the white plugs to the L(Left) jacks and the red plugs to the R (Right) jacks when making
connections.
• Refer to the connecting diagram in the operating instructions of your amplifier/receiver
CDC-5506 (G)_ENG_110817:CDC-5506(E)_ENG 2011-08-17 오
5:36 페이지 6
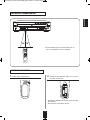
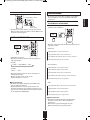
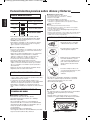
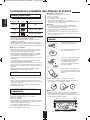
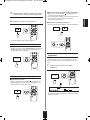
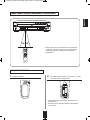
Front Panel & Remote Controls
ENGLISH
Front panel controls
1
23
2
24
5
3
1
5 DISC CD CHANGER
CDC-5506
2
4
7
3
4
5
DISC SKIP
OPEN / CLOSE
DISC SELECTOR
5 DISC AUTOMATIC LOADING SYSTEM
PHONES
POWER
PROGRAM
INTRO
RANDOM
TIME
DIMMER
REPEAT
USB
ON/ STANDBY
CD/ USB
ON
5V
500mA
OFF
20 16 18 19 17
13 14 10 11 12
Remote controls
2
6
21
13
17
d
a
f
b
c
e
10
16
20
14
15
22
18
6
9
25
8
CDC-5506 (G)_ENG_110817:CDC-5506(E)_ENG 2011-08-17 오
5:36 페이지 7
1. POWER SWITCH
16. PROGRAM BUTTON
Push this switch to enter the standby mode.
To switch the power off, push this switch again.
Press this button to program your favorite tracks/files or
to review the programmed tracks/files.
17. INTROSCAN BUTTON
In the standby mode, press this button to turn the power
on and to enter the operating mode.
In the operating mode, press this button again to turn
the power off and to enter the standby mode.
Press this button to play the first 10 seconds of each
track/file.
18. TIME BUTTON
Press this button to display the different time
information on the Audio CD.
3. DISC TRAY
Load a disc on the disc tray.
19. DIMMER BUTTON
4. OPEN/CLOSE (
) BUTTON
Press this button to select the brightness of the
fluorescent display as desired.
Press this button to open or close the disc tray.
5. DISC SELECTOR BUTTONS
20. CD/USB SELECTOR BUTTON
Use these buttons to select the disc to be played.
Press this button to select the disc or the USB memory
device as playback source.
6. DISC BUTTON
21. NUMERIC(0~9) BUTTONS
When selecting a disc with this button, press this first
and then the desired disc number(1~5) on the numeric
buttons within 2 seconds.
Press the corresponding buttons to select a track/file
for play or programming.
7. DISC SKIP BUTTON
22. FOLDER UP/DOWN (+/-) BUTTONS
For loading or unloading discs, press this button to
rotate clockwise to the next disc position.
Press these buttons to select the desired folder.
23. REMOTE SENSOR
8. HEADPHONE JACK
This receives the signals from the remote control unit.
Stereo headphones can be plugged into this jack for
private listening.
9. PLAY/PAUSE (
24. FLUORESCENT DISPLAY
For details, see next page.
) BUTTON
ⓐPress this button to start play in the stop or pause
mode.
ⓑPress this button to interrupt play temporarily.
10. STOP (
25. USB CONNECTOR
For details, see next page.
■DIGILINK SYSTEM REMOTE CONTROL
) button
This unit can be remotely conrolled with Sherwood
DIGILINK III amplifier or receiver.
Press this button to stop play or clear the programmed
tracks/files.
11. BACKWARD SKIP/SEARCH(
/
• For avaliable functions, refer to the compatible
unit’s operating instructions.
• To listen to a CD by DIGILINK system, first
make DIGILINK connection between this unit
and the Sherwood compatible amplifier or
receiver.
) BUTTON
ⓒPress this button to replay from the beginning of the
current track/file or return to a previous track/file.
ⓓPress and hold down this button to search for a
specific passage in fast backward.
12. FORWARD SKIP/SEARCH(
/
) BUTTON
ⓔPress this button to play from the beginning of a
next track/file.
ⓕPress and hold down this button to search for a
specific passage in fast forward.
13. RANDOM PLAY BUTTON
Press this button to play tracks/files in random order.
14. REPEAT (1/F/ALL) BUTTON
Press this button to play a track/file, a folder, or all
tracks/ files repeatedly.
15. REPEAT A↔B BUTTON
Press this button to play a specific passage repeatedly.
7
ENGLISH
2. POWER ON/STANDBY button
CDC-5506 (G)_ENG_110817:CDC-5506(E)_ENG 2011-08-17 오
5:36 페이지 8
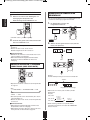
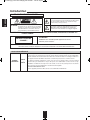
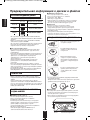
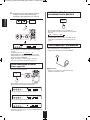
■USB CONNECTOR
ENGLISH
• An USB memory device can be connected to th USB connector to listen to MP3 or WMA
files stored on it through this unit.
■ Note :
• After USB playback, remove the USB memory device in the stop mode or in the standby
mode.
USB memory device
■FLUORESCENT DISPLAY
1
2
PROG
3
RANDOM REPEAT ALL 1 DISCS
A< >B
INTRO
SCENE TRACK
1
2
3
4
5
4
5
6
7
1. PROGRAM indicator
2. RANDOM indicator
3. REPEAT display
4. Disc tray number display
: Light(s) up when disc(s) is(are) loaded.
•
: Lights up to show the disc being played
8
5. PLAY indicator
6. PAUSE indicator
7. Track/file number, playing time,
operating information, etc.
8. INTROSCAN indicator
9. MUSIC CALENDAR display
• 1~5 : Disc tray Numbers
•
1 2
4 5
7 8
10 11
13 14
currently.
8
9
3
6
9
12
CDC-5506 (G)_ENG_110817:CDC-5506(E)_ENG 2011-08-17 오
5:36 페이지 9
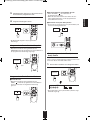
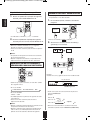
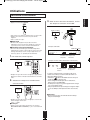
REMOTE CONTROL OPERATION RANGE
CDC-5506
2
3
4
5
DISC SKIP
ENGLISH
1
5 DISC CD CHANGER
OPEN / CLOSE
DISC SELECTOR
5 DISC AUTOMATIC LOADING SYSTEM
PHONES
POWER
PROGRAM
INTRO
RANDOM
TIME
DIMMER
REPEAT
USB
ON/ STANDBY
CD/ USB
ON
5V
500mA
OFF
• Use the remote control unit within a range of about
7 meters (23 feet) and angles of up to 30 degrees
aiming at the remote sensor.
LOADING BATTERIES
1. Remove the cover.
2. Load two batteries (“AAA” size, 2 x 1.5V)
matching the polarity.
• Remove the batteries when they are not used for a
long time.
• Do not use the rechargeable batteries (Ni-Cd type).
9
CDC-5506 (G)_ENG_110817:CDC-5506(E)_ENG 2011-08-17 오
5:36 페이지 10
Preliminary Knowledge About Discs & Files
■WMA(Windows Media Audio)
• Sampling frequency : 32, 44.1, 48 kHz
• Bit rate : 32 ~ 320 kbps
• Extension : .wma, .WMA
• WMA Tag is not available
• Windows Media and the Windows logo are trademarks or
registered trademarks of Microsoft Corporation in the United States
and/or other countries.
■Notes :
• Folders can be up to ten levels deep.
• For some files, it may not be possible to use certain functions
during playback.
• Files protected by DRM(Digital Rights Management) cannot be
played.
• When the data of file and folder names is larger than the unit’s
memory capacity, some files, etc. cannot be recognized and
played.
ENGLISH
PLAYABLE DISCS
This unit supports the following discs.
Disc
Logo
Format or file type
PCM
Audio CD, MP3, WMA
Audio CD, MP3, WMA
CARE AND HANDLING OF DISCS
• This unit supports CD-R and CD-RW discs recorded in
Audio CD(CD-DA) format, MP3 or WMA format.
• Only CD-R and CD-RW discs recorded with ISO9660
format can be played back.
• This unit supports multi-session discs. Some multi-session
discs may take a long time to load and some may not be
loaded at all.
• In handling a disc, hold it carefully
with edges.
• Do not stick paper or write
anything on the printed surface.
■Unplayable discs
• Since this unit cannot support disc types, formats and file
types not listed above, do not play such discs.
• Some CD-R and CD-RW discs cannot be played due to
incomplete disc finalization, recording quality or physical
condition of the disc, characteristics of recording device or
authoring software, etc.
See the operating instructions supplied with your recording
device for more information.
• Some Audio CDs use copy protection that doesn’t
conform to the official CD standard. Since these are
nonstandard discs, this unit cannot play them properly.
• When an Audio CD recorded in DTS-ES or Dolby Digital
EX is played, noise may be heard.
• Finger marks and dust on the
recorded surface should be
carefully wiped off with a soft cloth.
Wipe straight from the inside to the
outside of the disc.
• Always keep the discs in their
cases after use to protect them
from dust and scratches.
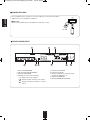
USB MEMORY DEVICES
• An USB memory device can be connected to the USB
connector on the front panel to play MP3 or WMA files
stored on it.
• Only USB memory devices conforming to mass storage
class and MTP(Media Transfer Protocol) standards can be
played on this unit.
• Thin unit supports FAT16 or FAT32 file format system for
USB memory divece.
• Do not use a cracked, deformed, or repaired disc.
These discs are easily broken and may cause serious
personal injury and apparatus malfunction.
■Notes:
• Do not expose discs to direct sunlight, high humidity or
high temperature for a long time.
• When loading or unloading a disc in the disc tray, always
place it with the printed side up.
PLAYABLE AUDIO FILE FORMATS
■MP3(MPEG-1 Audio Layer-3)
• Sampling frequency : 32, 44.1, 48 kHz
• Bit rate : 32 ~ 320 kbps
• Extension : .mp3, .MP3
• Fixed bit-rate files are recommended. Variable bit-rate
(VBR) fiels are playable, but playing time may be
displayed incorrectly.
• ID3 Tag is not avaliable.
• MPEG Layer-3 audio coding technology licensed from
Fraunhofer IIS and Thomson.
1
5 DISC CD CHANGER
CDC-5506
2
3
4
5
DISC SKIP
OPEN / CLOSE
DISC SELECTOR
5 DISC AUTOMATIC LOADING SYSTEM
PHONES
POWER
PROGRAM
INTRO
RANDOM
TIME
DIMMER
REPEAT
USB
ON/ STANDBY
CD/ USB
ON
10
OFF
Tray
Printed side
5V
500mA
CDC-5506 (G)_ENG_110817:CDC-5506(E)_ENG 2011-08-17 오
5:36 페이지 11
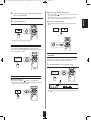
Operations
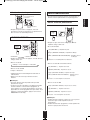
PLAYING TRACKS/FILES
ENGLISH
Before operation
3. Depending on the selected playback source,
• Push the POWER switch.
load the disc(s) or connect the USB memory
device.
OPEN / CLOSE
or
• Then this switch is kept depressed, it enters the standby
mode.
• To switch the power off, push this switch again.
• Then the power is cut off.
■Standby mode
• In the standby mode, this unit is not disconnected from
the AC mains and a small amount of current is retained
to support the operation readiness.
Example : Audio CD
■Auto Power Save
Music calendar
• The auto power save is a function that automatically
turns the power off to enter the standby mode. When it
is in the stop mode, in the pause mode, etc. for more
than 30 minutes, the auto power save will function.
SCENE TRACK
STEP
1
2
3
4
5
Total tracks
1. In the standby mode, turn the power on.
1 2
4 5
7 8
10 11
13 14
3
6
9
12
Total playing time
Example : Music files (923 files and 15 folders)
or
SCENE
9
ON/ STANDBY
1
2
3
4
5
+
Total files
• When the number of files is more than 99 (i.e. a three-digit
number), the third-digit number is displayed on the music
calendar.
• “ ” indicator lights up on the music calendar when the
number of tracks is more than 14.
• For loading discs on other trays each, press the DISC SKIP
button.
• 8 cm (3 inch) discs can be loaded on the inside circle of the
tray, too.
• It may take a long time to read a disc or an USB memory
device that contains many files and folders, etc.
• Each time this button is pressed, this unit is turned on to
enter the operating mode or off to enter the standby
mode.
2. Select the disc or the USB memory device as a
playback source.
CD/ USB
Total folders
or
■Note :
• Do not open or close the tray by force.
Doing so may damage it.
• Each time this button is pressed, the playback source
changes as follows :
“Cd” ↔ “USb”
■Note :
• Depending on the selected playback source, the DISC
SELECTOR buttons or the FOLDER UP/DOWN(+/-)
buttons, etc. will not function.
11
CDC-5506 (G)_ENG_110817:CDC-5506(E)_ENG 2011-08-17 오
4.
5:36 페이지 12
Selecting a disc
Start play.
• Press the corresponding button to start play from the
desired disc.
ENGLISH
or
Example : When selecting the disc 4
4
within
2 sec.
or
•“
” indicator lights up.
• The unit plays from the first track/file (on the current disc
to the last on the 5th disc.
5.
To interrupt play temporarily.
• The first track/file of the selected disc will be played.
or
Selecting a track/file during play
To skip back
•“
” indicator lights up.
• To resume play, press the PLAY(“
6.
” or “
”) button.
or
To skip
ahead
To stop play.
• Each time the button is pressed, a track/file is skipped.
• When the BACKWARD SKIP(
) button is pressed
once midway through a track/file, play returns to the
beginning of that. When it is pressed again, a track/file is
skipped.
• When using the NUMERIC buttons on the remote control.
or
Changing discs during play
1.
Example :
For “3” : 3
Open the disc tray.
For “15” : 1 within 2 sec.
within 2 sec.
For “123” : 1
OPEN / CLOSE
5
2
within 2 sec.
3
To advance or reverse fast during play
2.
• Press and hold down the button until the desired passage
is reached.
Change the desired discs.
To reverse fast
or
To advance
fast
• During playing the disc ①, the disc ③ and ④ can be
changed.
• After changing the discs, press the OPEN/CLOSE(
)
butto to close the disc tray.
• When changing the disc ② or ⑤, press the DISC SKIP
button and rotate the disc tray.
12
CDC-5506 (G)_ENG_110817:CDC-5506(E)_ENG 2011-08-17 오
5:36 페이지 13
REPEAT PLAY
Selecting a folder during play
• You can play a track/file, a folder, all tracks/files or a
specific passage repeatedly.
To select previous
• During play of the desired track/file or folder,
To select next
• Each time the button is pressed, the previous or the next
folder is selected and the first file in that folder is
automatically played.
or
PLAYING IN RANDOM ORDER
• Each time this button is pressed, the repeat mode
changes as follows.
or
• In case of Audio CD
→ ONE(“REPEAT 1”) : Track repeat
↓
dISC(“REPEAT 1DISC”) : Disc repeat
↓
ALL(“REPEAT ALL DISCS”) : All disc repeat
↓
OFF : Repeat mode off
• “ RANDOM ” indicator lights up.
• Each time the button is pressed, the random mode
changes as follows :
• In case of CD
→1 DISC → ALL DISC → OFF
• In case of CD with files
→ ONE(“REPEAT 1”) : File repeat
↓
FOL(“REPEAT”) : Folder repeat
↓
dISC(“REPEAT 1 DISC”) : Disc repeat
↓
ALL(“REPEAT ALL DISC”) : All disc repeat
↓
OFF : Repeat mode off
• In case of USB
1 DISC ↔ OFF
• The unit automatically selects and plays tracks in random
order.
• Press this button again to cancel the random play.
■Notes :
• The random play skip the track/folder which has 100
tracks/files more.
• When the NUMERIC buttons are pressed during random
play or program play, the random play or the program
play is canceled. (However, the programmed contents
are not cleared. To recall the programmed contents,
press the PROGRAM button in the stop mode.)
• In case of USB
→ dISC(“REPEAT 1DISC”) : All file repeat
↓
ONE(“REPEAT 1”) : File repeat
↓
FOL(“REPEAT ”) : Folder repeat
↓
OFF : Repeat mode off
■Notes :
• During random play or introscan play, you can select the
all track/file repeat mode only.
• During program play, the folder repeat mode cannot be
selected.
13
ENGLISH
Repeating a track/file, a folder, all
tracks/files
CDC-5506 (G)_ENG_110817:CDC-5506(E)_ENG 2011-08-17 오
5:36 페이지 14
PLAYING IN DESIRED ORDER
Repeating a specific passage
ENGLISH
1.
• Up to 32 tracks/files can be programmed to be played in
any desired order.
During play at the beginning of the desired
passage, press the REPEAT A↔B button.
1.
In the stop mode, enter the program mode.
PROGRAM
• “ REPEAT ” and “ A< >” indicators light up.
or
• Then “ PROG ” indicator flickers.
2. Select the desired track/file and store it in the
2. At the end of the desired passage, press the
memory.
REPEAT A↔B button again.
• Then “ B ” indicator lights up as well and the desired
passage is played repeatedly.
• Press this button again to cancel the repeat A↔B play.
PROGRAM
■Notes :
• Repeat A↔B play works only within a track/file.
• During random play or introscan play, repeat A↔B play
will not work.
or
PLAYING THE FIRST 10 SECONDS OF
EACH TRACK/FILE
Example :
When selecting and storing track 4 on an Audio CD
Track No.
PROG
TRACK
1
2
3
4
5
• Each time this button is pressed, the intro mode changes
as follows :
Programmed order
• In case of CD
→1 DISC INTRO → ALL DISC INTRO → OFF
• You can select a track/file with pressing the NUMERIC
buttons.
Example :
• In case of USB
1 DISC ↔ OFF
For “3” : 3
For “15” : 1
• The unit plays the first 10 seconds of each track/file.
• Press this button again to cancel the introscan play.
For “123” : 1
■Notes :
• During program play, introscan play will not work.
• During all disc introscan play, the unit plays only the first
track on each disc for 10 seconds.
within 2 sec.
within 2 sec.
5
2
within 2 sec.
3
• Then the selected track/file is stored automatically without
pressing the PROGRAM button.
14
CDC-5506 (G)_ENG_110817:CDC-5506(E)_ENG 2011-08-17 오
Repeat the above step 2 until the desired tracks
/files are programmed.
4.
Start program play.
■To clear all programmed tracks/files
• Press the STOP(
) button for more than 4 seconds in
the program mode.
• Opening the disc tray or selecting the other playback
source clears all programmed tracks/files, too.
■To clear a specific track/file
• Find the desired track/file and clear it in the program
mode.
PROGRAM
or
or
• Play starts in the programmed order.
Checking the programmed tracks/files
• Each time the PROGRAM button is pressed in the
program mode, the programmed tracks/files are displayed
in the programmed order.
Rectifying any wrong programmed
track/file
Example :
When track 5, 9 and 7 are programmed and you want to
replace track 9 with track 10 on an Audio CD.
PROGRAM
or
1.
Find track(/file) 9 in the program mode.
PROGRAM
or
Clearing the programmed tracks/files
■To clear on by one
• Each time the STOP(
) button is pressed in the
program mode, the programmed tracks/files are cleared
one by one in the opposite order.
PROG
TRACK
STEP
1
2
3
4
5
• Then the programmed track(/file) is displayed for several
seconds.
or
15
ENGLISH
3.
5:36 페이지 15
CDC-5506 (G)_ENG_110817:CDC-5506(E)_ENG 2011-08-17 오
5:36 페이지 16
ADJUSTING THE BRIGHTNESS OF THE
FLUORESCENT DISPLAY
2. While displaying the track(/file) to be replaced
ENGLISH
with new one, select track(/file) 10 and store it in
the memory.
DIMMER
PROGRAM
or
• Each time this button is pressed, the brightness of the
fluorescent display changes as follows.
→ ON → dimmer → OFF
• In the display OFF mode, pressing any buttons
cancel the display OFF mode to display the operation
status.
LISTENING WITH HEADPHONES
PROG
TRACK
STEP
1
2
3
4
5
• For private listening, insert the headphones into the
PHONES jack.
• You can select a track(/file) with pressing the NUMERIC
buttons.
within 2 sec.
Example : For “10” : 1
0
• When selecting a track with the NUMERIC buttons, the
selected track is stored automatically without the
PROGRAM button.
• When the track/file to be replaced disappears, perform
the above step 1 again.
PHONES
SELECTING A TIME DISPLAY
(Audio CD only)
■Note :
• Be careful not to set the volume too high when using
headphones.
• During play,
TIME
or
• Each time this button is pressed, the time display
changes as follows.
TRACK
INDEX
→
1
2
3
4
5
7 8 9
10 11 12
Elapsed time of the current track
↓
TRACK
INDEX STEP
1
2
3
4
5
7 8 9
10 11 12
Remaining time of the current track
↓
1
2
3
4
5
7 8 9
10 11 12
Remaining time of the disc
• During random play, etc., the time display may show “--:--”.
16
CDC-5506 (G)_ENG_110817:CDC-5506(E)_ENG 2011-08-17 오
5:36 페이지 17
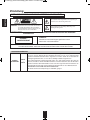
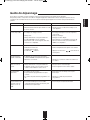
Troubleshooting Guide
No power
PROBLEM
• The AC input cord is disconnected.
• Poor connection at AC wall outlet or the outlet
is dead or off.
POSSIBLE CAUSE
REMEDY
• Connect the cord securely.
• Check the outlet using a lamp or another
appliance.
No play
• The disc is loaded upside down.
• Dirty disc.
• Defective or deeply scratched disc.
• The CD-R/CD-RW disc is nonstandard.
• Music files in non-compatible format are
recorded.
• Reload the disc with the printed side up.
• Clean the disc.
• Load another disc.
• See “Unplayable discs” on page 10.
• Only music files in MP3 and WMA formats can
be played.
No sound
• Incorrect connections.
• Incorrect operation of the amplifier/receiver.
• The “ ” indicator lights up.
• Make connections correctly.
• Operate the amplifier/receiver correctly.
• Press the “
” button to cancel the pause
mode.
Poor or distorted
sound
• The unit is connected to the PHONO input
jacks of the amplifier/receiver.
• Poor connections.
• Make connections correctly.
• Check the connections and connect all cords
securely.
Sound skips
• Defective or deeply scratched disc.
• The unit is placed on a surface that is subject
to vibration or physical shock.
• Play another disc.
• Place this unit on a stable surface.
Programming is not
performed
• The disc is dirty or badly scratched.
• The programming procedure is not correct.
• The number of the programmed tracks/files is
32.
• Try again with a scratch-free disc.
• Try again.
• Check the number of the programmed
tracks/files.
It takes a long time to
read a disc or an
USB memory device.
• It may take a longer time to read a disc or an USB
memory device that contains many files and
folders, etc.
• This is not mulfuntion.
17
ENGLISH
If a fault occurs, run through the table below before taking your unit for repair.
If the fault persists, attempt to solve it by switching the unit off and on again. If this fails to resolve the situation, consult your
dealer. Under no circumstances should you attempt to repair the unit yourself. This could void the warranty.
CDC-5506 (G)_ENG_110817:CDC-5506(E)_ENG 2011-08-17 오
5:36 페이지 18
ENGLISH
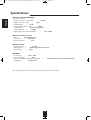
Specifications
■ TYPICAL AUDIO PERFORMANCES
• Number of channels
I
2
• Frequency response, 20~20,000 Hz
I
±0.8 dB
• Signal to noise ratio, A Wtd.
I
94 dB
• Dynamic Range
I
86 dB
• Total harmonic distortion, 1 kHz
I
0.009 %
• Wow and flutter
I
Quartz crystal precision
• Audio output level
I
2 V RMS
• Digital output, optical, wavelength 660 nm
I
-20 ~ -15 dBm
■ OPTICAL READOUT SYSTEM
• Laser
I
Semiconductor laser
• Wavelength
I
760~800 nm
• Numerical aperture
I
0.45
■ SIGNAL FORMAT
• Sampling Frequency
• D/A Conversion
I
• Oversampling
I
I
44.1 kHz
Multibit (Sigma-delta conversion)
8 times
■ GENERAL
• Power supply
I
230 V ~ 50 Hz
• Power consumption
I
23 W
• Dimensions (WxHxD, including protruding parts)
• Weight (Net)
I
5.6 kg (12.4 lbs)
I
440x112x397 mm (17-5/16x4-7/16x15-4/6 inches)
Note: Design and specifications are subject to change without notice for improvements.
18
CDC-5506 (G)_ENG_110817:CDC-5506(E)_ENG 2011-08-17 오
5:36 페이지 19
MEMO
19
CDC-5506 (G)_German:CDC-5506(E)_ENG 9/9/2011 5:39 PM Page 2
Einleitung
DEUTSCH
BITTE LESEN SIE DIESE HINWEISE VOR INBETRIEBNAHME DES GERÄTS
Dieses Symbol weist auf gefährliche Hochspannung im
Gerät hin, die zu Stromschlag führen kann.
VERMEIDUNG VON STROMSCHLAG
VORSICHT: ZUR
GERÄTEGEHÄUSE NICHT ÖFFNEN. ES BEFINDEN
Dieses Symbol weist auf wichtige Bedienungs- und
Wartungsanleitungen hin.
SICH KEINE VOM VERBRAUCHER WARTBAREN
TEILE IM INNERN DES GERÄTS. REPARATUR UND
WARTUNG NUR DURCH FACHPERSONAL.
WARNHINWEIS:
ZUR VERMEIDUNG VON FEUER UND STROMSCHLAG SETZEN SIE DAS GERÄT NICHT REGEN ODER
FEUCHTIGKEIT AUS.
KLASSE 1
LASERPRODUKT
VORSICHT
Unsichtbare Laserstrahlung bei geöffnetem Gerät.
Nicht in den Laserstrahl blicken.
VORSICHT: DIE BENUTZUNG DER BEDIENELEMENTE, EINSTELLUNGEN ODER VORGEHENSWEISEN ANDERS
ALS HIER BESCHRIEBEN, KANN ZUR FREISETZUNG GEFÄHRLICHER STRAHLUNG FÜHREN.
SICHERHEITSHINWEISE
EUROPA
AUSTRALIEN
220 V
240 V
Geräte für den australischen Markt sind für eine Netzspannung von 230V~ konzipiert.
Für einen sicheren Betrieb darf der dreistiftige Netzstecker nur an einer ordnungsgemäß
geerdeten Standard Haushaltssteckdose angeschlossen werden. Sollten Sie für das Gerät ein
Verlängerungskabel benutzen, so muss dieses dreiadrig verkabelt und geerdet sein.
Nicht ordnungsgemäße Verlängerungskabel stellen eine große Gefahrenquelle dar. Allein die
Tatsache, dass dieses Gerät einwandfrei funktioniert, weist nicht darauf hin, dass die Steckdose
geerdet ist und dass die Elektroinstallation sicher ist. Zu Ihrer eigenen Sicherheit wenden Sie sich
im Zweifelsfall in Bezug auf die korrekte Erdung der Steckdose bitte an einen Elektrofachmann.
VEREINHEITLICHTE EUROPÄISCHE NETZSPANNUNG.
Alle Geräte sind für eine Netzspannung von 220-240V~ geeignet.
2
CDC-5506 (G)_German:CDC-5506(E)_ENG 9/9/2011 5:39 PM Page 3
VORSICHT
Verbraucherinformationen zur Sammlung und
Entsorgung von Altgeräten und erschöpften Batterien
Diese Symbole auf Produkt, Verpackung und/oder
beigefügten Dokumenten bedeuten, dass gebrauchte
elektrische und elektronische Geräte sowie Batterien nicht
mit dem Hausmüll entsorgt werden dürfen. Für
ordnungsgemäße Behandlung, Wiedergewinnung und
Recycling von Altgeräten und erschöpften Batterien geben
Sie diese bitte bei einer entsprechenden Sammelstelle
gemäß örtlicher Richtlinien ab.
Durch die ordnungsgemäße Entsorgung dieser Geräte und
Batterien helfen Sie bei der Einsparung wertvoller
Ressourcen mit und vermeiden Sie mögliche negative
Folgen für Umwelt und Gesundheit, welche anderenfalls
aufgrund unsachgemäßer Abfallentsorgung entstehen
könnten.
Für weitere Informationen zu Sammelstellen und zum
Recycling von Altgeräten und Batterien setzen Sie sich
bitte mit Ihrer Kommunalverwaltung, dem
Entsorgungsunternehmen oder mit der Verkaufsstelle, in
welcher Sie die Produkte gekauft haben, in Verbindung.
• Dieses Gerät ist nicht vom Stromnetz getrennt, solange der
Netzstecker in der Steckdose steckt, selbst wenn das Gerät
ausgeschaltet ist.
• Beim Ziehen des Netzsteckers fassen Sie bitte stets am Stecker
an, nicht am Kabel ziehen.
• Bei längerer Nichtbenutzung ziehen Sie bitte den Netzstecker.
• Die Steckdose sollte sich in unmittelbarer Nähe des Geräts
befinden und muss jederzeit frei zugänglich sein.
[Informationen zur Entsorgung in Ländern außerhalb der
Europäischen Union]
Diese Symbole gelten nur innerhalb der Europäischen
Union. Zur Entsorgung dieser Produkte setzen Sie sich
bitte mit den örtlichen Behörden oder Ihrem Fachhändler
in Verbindung.
Hinweise für das Batteriesymbol (untere beide
Symbolbeispiele):
Die Bezeichnung Pb unterhalb des Batteriesymbols
bedeutet, dass diese Batterie Blei enthält.
SICHERHEITSHINWEISE
■Kondensation
Auf der Tonabnehmerlinse kann sich unter folgenden Bedingungen Feuchtigkeit bilden.
• Nach dem Einschalten der Heizung.
• In einem feuchten Raum.
• Wenn das Gerät von einer kalten in eine warme Umgebung umgesetzt wird.
Das Gerät kann Fehlfunktionen zeigen, wenn sich im Innern Feuchtigkeit gebildet hat.
In diesem Fall schalten Sie das Gerät für eine Stunde aus und warten Sie ab, bis es vollständig ausgetrocknet ist.
■Störungen des Fernsehempfangs
Abhängig von den Empfangsbedingungen des Fernsehers kann es zu Fernsehstörungen kommen, wenn Sie dieses Gerät
eingeschaltet lassen. Das ist keine Fehlfunktion dieses Geräts oder des Fernsehers. Schalten Sie dieses Gerät aus, wenn
Sie fernsehen.
■Setzen Sie das Gerät nicht mit eingelegten Discs um.
■Stellen Sie das Gerät nicht auf einer Komponente ab, die Wärme erzeugt, wie beispielsweise Verstärker oder
Receiver.
Hierdurch kann es zu Übertemperatur und Fehlfunktionen des Geräts kommen.
3
DEUTSCH
• Lassen Sie rings um das Gerät genügend Raum für
ausreichende Lüftung.
• Installieren Sie das Gerät nicht in besonders heißen oder kalten
Umgebungen, in direkter Sonneneinstrahlung oder in
unmittelbarer Nähe von Heizgeräten.
• Schützen Sie das Gerät vor Feuchtigkeit, Wasser und Staub.
• Führen Sie keine Fremdkörper in das Gerät ein.
• Blockieren Sie keinesfalls die Lüftungsschlitze mit Zeitungen,
Tischtüchern, Gardinen oder ähnlichem.
• Stellen Sie keine offenen Flammen (wie brennende Kerzen) auf
dem Gerät ab.
• Bitte entsorgen Sie Batterien umweltgerecht.
• Setzen Sie das Gerät weder Tropfwasser noch Spritzwasser aus.
• Stellen Sie keine wassergefüllten Gegenstände (wie Vasen) auf
dem Gerät ab.
• Lassen Sie das Gerät nicht mit Insektenvernichtungsmitteln,
Waschbenzin oder Verdünner in Berührung kommen.
• Demontieren oder modifizieren Sie das Gerät nicht.
■Hinweise zum Netzkabel und zur Steckdose
CDC-5506 (G)_German:CDC-5506(E)_ENG 9/9/2011 5:39 PM Page 4
DEUTSCH
INHALT
Einleitung
• BITTE LESEN SIE DIESE HINWEISE VOR INBETRIEBNAHME DES GERÄTS
Anschlüsse auf der Rückseite
I
Frontblende und Fernbedienung
• REICHWEITE FERNBEDIENUNG
• BATTERIEN EINSETZEN
I
I
5
I
I
9
6
9
Hintergrundinformationen zu Discs und Dateien
• ABSPIELBARE DISCS
I
10
• USB-SPEICHERMEDIEN
I
10
• ABSPIELBARE AUDIODATEIFORMATE
I
• PFLEGE UND BEHANDLUNG VON DISCS
I
10
10
Bedienungshinweise
• TRACKS/DATEIEN WIEDERGEBEN
I
11
• ZUFALLSWIEDERGABE
I
13
• WIEDERHOLUNG
I
13
• ANSPIELEN DER ERSTEN 10 SEKUNDEN JEDES TRACKS (ODER JEDER DATEI)
• WIEDERGABE IN GEWÜNSCHTER REIHENFOLGE
I
14
• ZEITDISPLAY WÄHLEN (nur Audio-CD)
I
16
• HELLIGKEIT DES DISPLAYS EINSTELLEN
I
16
• KOPFHÖRER
I
16
Störungserkennung
Spezifikationen
I
I
2
17
18
4
I
14
CDC-5506 (G)_German:CDC-5506(E)_ENG 9/9/2011 5:39 PM Page 5
Anschlüsse auf der Rückseite
• Ziehen Sie den Netzstecker, während Sie Anschlüsse vornehmen.
• Schließen Sie die weißen Stecker an den Buchsen L (links) und die roten Stecker an den Buchsen R (rechts) an.
• Siehe Anschlussdiagramm in der Betriebsanleitung Ihres Verstärkers/Receivers.
DEUTSCH
4
5
CDC-5506
N18041
5DISC CD CHANGER
DIGITAL
OPT
DIGI LINK
ANALOG
POWER SOURCE
230V
POWER CONSUMPTION
50Hz
23 W
CLASS 1 LASER PRODUCT
KLASSE 1 LASER PRODUKT
LUOKAN 1 LASER LAITE
KLASS 1 LASER APPARAT
DESIGNED IN USA
ASSEMBLED IN CHINA
L
AVIS : RISQUE DE CHOC ELECTRIQUE-NE PAS OUVRIR.
WARNING : SHOCK HAZARD-DO NOT OPEN.
R
SN.
1. ANALOG-AUDIOAUSGÄNGE ANSCHLIEßEN
• Verbinden Sie die Buchsen ANALOG L und R mit den
Buchsen CD IN Ihres Verstärkers/Receivers.
ANALOG
Verstärker/Receiver
Amplifier/receiver
L
CD IN
R
2. DIGILINK ANSCHLIEßEN
• Verbinden Sie diese Buchse mit der DIGILINK-Buchse des
Sherwood System-Verstärkers/Receivers, um dieses Gerät
mit dem DIGILINK II oder III System fernbedienen zu können
(Einzelheiten siehe Betriebsanleitung des Sherwood
Verstärkers/Receivers).
■Bitte beachten Sie:
• Der DIGILINK-Betrieb steht Ihnen möglicherweise nicht für
alle Sherwood Komponenten zur Verfügung.
DIGI LINK
Sherwood
Verstärker/Receiver
Sherwood amplifier/receiver
DIGILINK
3. OPTISCHEN DIGITALAUSGANG ANSCHLIEßEN
• Verbinden Sie diese Buchse für Digitalsound mit der Buchse
DIGITAL
OPTICAL DIGITAL IN Ihres Verstärkers/Receivers.
Verstärker/Receiver
Amplifier/receiver
OPT
■Bitte beachten Sie:
• Es wird nicht empfohlen, digitale Audiosignale mit DigitalOPTICAL IN
Audioanschluss zwischen diesem Gerät und MD- oder CDRekorder o.ä. aufzunehmen. Nehmen Sie auf diesem Gerät
wiedergegebenes Audio über die Buchsen ANALOG AUDIO
OUT auf.
• Nicht alle optischen Glasfaserkabel können für dieses Gerät benutzt werden. Setzen Sie sich in diesem Fall mit Ihrem
Fachhändler oder dem Kundendienst in Verbindung.
4. NETZKABEL
• Stecken Sie den Netzstecker in die Steckdose.
5. ANSCHLUSS FÜR AKTUALISIERUNGEN
• Diesen Anschluss können Sie für zukünftige Aktualisierungen der Software benutzen.
■Bitte beachten Sie:
• Für die Programmierung zur Aktualisierung benötigen Sie spezielle Programmierkenntnisse, daher sollten Aktualisierungen
von Ihrem Fachhändler durchgeführt werden.
5
CDC-5506 (G)_German:CDC-5506(E)_ENG 9/9/2011 5:39 PM Page 6
Frontblende und Fernbedienung
DEUTSCH
Bedienelemente auf der Frontblende
1
23
2
24
3
5
1
5 DISC CD CHANGER
CDC-5506
2
4
7
3
4
5
DISC SKIP
OPEN / CLOSE
DISC SELECTOR
5 DISC AUTOMATIC LOADING SYSTEM
PHONES
POWER
PROGRAM
INTRO
RANDOM
TIME
DIMMER
REPEAT
USB
ON/ STANDBY
CD/ USB
ON
5V
500mA
OFF
20 16 18 19 17
13 14 10 11 12
Fernbedienung
2
6
21
13
17
d
a
f
b
c
e
10
16
20
14
15
22
18
6
9
25
8
CDC-5506 (G)_German:CDC-5506(E)_ENG 9/9/2011 5:39 PM Page 7
14. WIEDERHOLUNG (1/F/ALL)
1. HAUPTSCHALTER
Drücken Sie die Taste zum Einschalten des Geräts in
den Standby-Modus.
Zum Ausschalten drücken Sie die Taste erneut.
Drücken Sie diese Taste, um einen Track (oder eine
Datei), einen Ordner oder alle Tracks/Dateien zu
wiederholen.
15. WIEDERHOLUNG A↔B
Im Standby-Modus drücken Sie diese Taste, um das
Gerät einzuschalten.
Während des Betriebs drücken Sie diese Taste erneut,
um das Gerät wieder in den Standby-Modus zu
versetzen.
Drücken Sie diese Taste, um einen bestimmten
Abschnitt zu wiederholen.
16. PROGRAMM
Drücken Sie diese Taste, um Tracks/Dateien in einer
bestimmten Reihenfolge zu programmieren oder die
programmierten Tracks/Dateien anzuzeigen.
3. DISC-LAUFWERK
Laden Sie eine Disc in das Disc-Laufwerk.
4. ÖFFNEN/SCHLIEßEN (
17. ANSPIELEN
)
Drücken Sie diese Taste, um die ersten 10 Sekunden
jedes Tracks (oder jeder Datei) anzuspielen.
Drücken Sie diese Taste, um das Disc-Laufwerk zu
öffnen und zu schließen.
18. ZEIT
5. DISC-AUSWAHLTASTEN
Drücken Sie diese Taste, um die verschiedenen
Zeitinformationen auf der Audio-CD anzuzeigen.
Mit diesen Tasten wählen Sie die abzuspielende Disc.
6. DISC
19. DIMMER
Zum Wechseln einer Disc drücken Sie zunächst diese
Taste und dann innerhalb von 2 Sekunden die
gewünschte Nummer der Disc (1~5) mit den
Zifferntasten.
Drücken Sie diese Taste zur Auswahl der Helligkeit des
Displays.
20. CD/USB-AUSWAHLTASTE
Drücken Sie diese Taste zum Umschalten zwischen
Disc- und USB-Wiedergabe.
7. DISC ÜBERSPRINGEN
Drücken Sie diese Taste, um zur nächsten Disc zu
springen.
21. ZIFFERNTASTEN (0~9)
Drücken Sie die entsprechenden Tasten zur Auswahl
eines Tracks (oder einer Datei) zur Wiedergabe oder
Programmierung.
8. KOPFHÖRERBUCHSE
Schließen Sie an dieser Buchse Stereo-Kopfhörer für
privaten Musikgenuss an.
9. WIEDERGABE/PAUSE (
22. ORDNER AUFWÄRTS/ABWÄRTS (FOLDER +/-)
)
Mit diesen Tasten wählen Sie den gewünschten Ordner.
ⓐDrücken Sie diese Taste, um im Stopp- oder
Pausemodus die Wiedergabe zu starten.
ⓑDrücken Sie diese Taste, um die Wiedergabe zu
unterbrechen (Pause).
10. STOPP (
23. SENSOR FERNBEDIENUNG
Hier werden die Signale von der Fernbedienung
empfangen.
)
24. DISPLAY
Drücken Sie diese Taste, um die Wiedergabe zu
beenden oder das Wiedergabeprogramm zu löschen.
11. SPRUNG/SUCHE RÜCKWÄRTS (
/
Einzelheiten finden Sie auf der nächsten Seite.
25. USB-PORT
)
Einzelheiten finden Sie auf der nächsten Seite.
ⓒDrücken Sie diese Taste, um zum Anfang des
aktuellen Tracks (oder der Datei) oder zum
vorherigen Track (oder der Datei)
zurückzuspringen.
ⓓHalten Sie diese Taste gedrückt, um im schnellen
Rücklauf nach einer bestimmten Stelle zu suchen.
12. SPRUNG/SUCHE VORWÄRTS (
/
■DIGILINK-SYSTEM FERNBEDIENUNG
Dieses Gerät kann mit einem Sherwood DIGILINK III
Verstärker oder Receiver fernbedient werden.
• Die verfügbaren Funktionen finden Sie in der
Betriebsanleitung des kompatiblen Geräts.
• Zur Wiedergabe einer CD über das DIGILINKSystem stellen Sie zunächst die DIGILINKVerbindung zwischen diesem Gerät und dem
Sherwood kompatiblen Verstärker oder Receiver
her.
)
ⓔDrücken Sie diese Taste, um zum Anfang des
nächsten Tracks (oder der Datei) zu springen.
ⓕHalten Sie diese Taste gedrückt, um im schnellen
Vorlauf nach einer bestimmten Stelle zu suchen.
13. ZUFALLSWIEDERGABE
Drücken Sie diese Taste, um Tracks/Dateien in
zufälliger Reihenfolge wiederzugeben.
7
DEUTSCH
2. EIN/STANDBY
CDC-5506 (G)_German:CDC-5506(E)_ENG 9/9/2011 5:39 PM Page 8
DEUTSCH
■USB-PORT
• Sie können ein USB-Speichermedium am USB-Port anschließen, um MP3- oder WMADateien über dieses Gerät wiederzugeben.
■ Bitte beachten Sie:
• Nach der USB-Wiedergabe trennen Sie das USB-Speichermedium im Stopp- oder
Standby-Modus ab.
USB-Speichermedium
■DISPLAY
1
2
PROG
3
RANDOM REPEAT ALL 1 DISCS
A< >B
INTRO
SCENE TRACK
1
2
3
4
5
4
5
6
7
1. PROGRAMMWIEDERGABE
2. ZUFALL
3. WIEDERHOLUNG
4. Disc-Laufwerk
8
1 2
4 5
7 8
10 11
13 14
3
6
9
12
9
5. WIEDERGABE
6. PAUSE
7. Track- (oder Datei-) nummer, Spielzeit,
Betriebsinformationen usw.
8. ANSPIELEN
9. MUSIKKALENDER
• 1~5 : Nummern der Disc-Laufwerke
•
: Leuchtet auf, wenn Disc(s) geladen ist/sind.
•
: Leuchtet zur Anzeige der spielenden Disc auf.
8
CDC-5506 (G)_German:CDC-5506(E)_ENG 9/9/2011 5:39 PM Page 9
REICHWEITE FERNBEDIENUNG
CDC-5506
2
3
4
5
DISC SKIP
DEUTSCH
1
5 DISC CD CHANGER
OPEN / CLOSE
DISC SELECTOR
5 DISC AUTOMATIC LOADING SYSTEM
PHONES
POWER
PROGRAM
INTRO
RANDOM
TIME
DIMMER
REPEAT
USB
ON/ STANDBY
CD/ USB
ON
5V
500mA
OFF
• Die Fernbedienung hat eine Reichweite von ca.
7 m in einem Winkel von bis zu 30 Grad.
BATTERIEN EINSETZEN
1. Öffnen Sie das Batteriefach.
2. Setzen Sie zwei Batterien (AAA, 2 x 1,5 V) mit
korrekter Polarität ein.
• Bei längerer Nichtbenutzung entnehmen Sie bitte
die Batterien.
• Benutzen Sie keine Akkus (Ni-Cd).
9
CDC-5506 (G)_German:CDC-5506(E)_ENG 9/9/2011 5:39 PM Page 10
Hintergrundinformationen zu Discs und Dateien
■WMA(Windows Media Audio)
• Abtastfrequenz: 32, 44.1, 48 kHz
• Bitrate: 32 ~ 320 kbit/s
• Dateiendung: .wma, .WMA
• WMA-Tag nicht zur Verfügung.
• Windows Media und das Windows-Logo sind Marken oder
eingetragene Marken der Microsoft Corporation in den Vereinigten
Staaten bzw. anderen Ländern.
DEUTSCH
ABSPIELBARE DISCS
Dieses Gerät kann folgende Discs wiedergeben.
Disc
Logo
Logo
Format
Dateityp
Formatoder
or file
type
Audio CD
PCM
PCM
CD-R
Audio
CD,
MP3,
WMA
Audio
CD,
MP3,
WMA
CD-RW
AudioCD,
CD,
MP3,
WMA
Audio
MP3,
WMA
■Bitte beachten Sie:
• Ordner können bis zu zehn Ebenen haben.
• Für einige Dateien, stehen während der Wiedergabe
möglicherweise nicht alle Funktionen zur Verfügung.
• DRM-geschützte Dateien (Digital Rights Management) können nicht
wiedergegeben werden.
• Sind Datei- oder Ordnernamen zu lang, können sie vom Gerät
möglicherweise nicht erkannt und wiedergegeben werden.
• Dieses Gerät unterstützt CD-R und CD-RW, die in AudioCD (CD-DA) Format, MP3- oder WMA-Format
aufgenommen sind.
• Nur CD-R und CD-RW, die im Format ISO9660
aufgenommen wurden, können wiedergegeben werden.
• Dieses Gerät unterstützt Multi-Session-Discs. Einige MultiSession-Discs benötigen längere Zeit zum Laden oder
können nicht geladen werden.
PFLEGE UND BEHANDLUNG VON DISCS
■Nicht abspielbare Discs
• Da dieses Gerät keine Disctypen, Formate und Dateitypen
unterstützt, die nicht oben aufgeführt sind, spielen Sie
solche Discs bitte nicht ab.
• Einige CD-R und CD-RW können aufgrund
unvollständiger Finalisierung, Aufnahmequalität oder
physikalischen Bedingungen der Disc, Eigenschaften des
Aufnahmegeräts oder der Bearbeitungssoftware nicht
wiedergegeben werden.
Siehe Betriebsanleitung des Aufnahmegeräts für weitere
Informationen.
• Einige Audio-CDs benutzen Kopierschutz, der nicht der
offiziellen CD-Norm entspricht. Diese können vom Gerät
möglicherweise nicht korrekt wiedergegeben werden.
• Bei der Wiedergabe einer Audio-CD, die in DTS-ES oder
Dolby Digital EX aufgezeichnet wurde, können
möglicherweise Nebengeräusche gehört werden.
• Bringen Sie auf der Abspielseite
keine Aufkleber an.
• Halten Sie Discs vorsichtig an der
Kante.
• Fingerabdrücke und Staub auf der
Abspielseite wischen Sie mit einem
weichen Tuch vorsichtig ab. Wischen
Sie von innen nach außen.
• Bewahren Sie Discs stets im Cover
auf, um Staub und Kratzer zu
vermeiden.
USB-SPEICHERMEDIEN
• Benutzen Sie keine gebrochenen, verformten oder reparierten
Discs.
Diese Discs können zerbrechen und zu Verletzungen sowie
Schäden am Gerät führen.
• Ein USB-Speichermedium kann am USB-Port auf der
Frontblende zur Wiedergabe von MP3- oder WMADateien angeschlossen werden.
• Nur USB-Speichermedien entsprechend
Massenspeicherklasse und MTP (Media Transfer
Protocol) Normen können auf diesem Gerät
wiedergegeben werden.
• Dieses Gerät unterstützt FAT16 oder FAT32
Dateiformatsystem für USB-Speichermedien.
■Bitte beachten Sie:
• Setzen Sie Discs nicht direkter Sonneneinstrahlung,
Feuchtigkeit oder hohen Temperaturen aus.
• Beim Laden und Herausnehmen einer Disc aus dem DiscLaufwerk muss die bedruckte Seite stets nach oben zeigen.
ABSPIELBARE AUDIODATEIFORMATE
■MP3(MPEG-1 Audio Layer-3)
• Abtastfrequenz: 32, 44.1, 48 kHz
• Bitrate: 32 ~ 320 kbit/s
• Dateiendung: .mp3, .MP3
• Dateien mit feststehender Bitrate werden empfohlen.
Dateien mit variabler Bitrate (VBR) können
wiedergegeben werden, jedoch wird die Spielzeit
möglicherweise nicht korrekt angezeigt.
• ID3-Tag steht nicht zur Verfügung.
• MPEG Layer-3 Audio-Codiertechnologie lizenziert durch
Fraunhofer IIS und Thomson.
1
5 DISC CD CHANGER
CDC-5506
2
3
4
5
DISC SKIP
OPEN / CLOSE
DISC SELECTOR
5 DISC AUTOMATIC LOADING SYSTEM
PHONES
POWER
PROGRAM
INTRO
RANDOM
TIME
DIMMER
REPEAT
USB
ON/ STANDBY
CD/ USB
ON
10
OFF
Laufwerkschublade
Tray
Printed Seite
side
Bedruckte
5V
500mA
CDC-5506 (G)_German:CDC-5506(E)_ENG 9/9/2011 5:39 PM Page 11
Bedienungshinweise
TRACKS/DATEIEN WIEDERGEBEN
DEUTSCH
Vor der Wiedergabe
3. Abhängig von der gewählten Wiedergabequelle
• Drücken Sie den Hauptschalter.
laden Sie die Disc(s) oder schließen Sie das
USB-Speichermedium an.
OPEN / CLOSE
oder
• Bei gedrückter Taste wird der Standby-Modus
aufgerufen.
• Zum Ausschalten drücken Sie die Taste erneut.
• Die Stromversorgung wird unterbrochen.
■Standby-Modus
• Im Standby-Modus ist das Gerät nicht vom Stromnetz
getrennt und verbraucht etwas Energie zur
Unterstützung der Betriebsbereitschaft.
■Automatische Energieeinsparung
Beispiel: Audio-CD
Musikkalender
• Die automatische Energieeinsparung ist eine Funktion,
die automatisch den Standby-Modus aufruft. Ist das
Gerät für mehr als 30 Minuten im Stopp- oder
Pausemodus, dann wird die automatische
Energieeinsparung aktiv.
SCENE TRACK
STEP
1
2
3
4
5
Gesamtzahl Tracks
1 2
4 5
7 8
10 11
13 14
3
6
9
12
Gesamtspielzeit
1. Im Standby-Modus schalten Sie das Gerät aus.
Beispiel: Musikdateien (923 Dateien und 15 Ordner)
oder
SCENE
9
ON/ STANDBY
1
2
3
4
5
+
Gesamtzahl Dateien
• Ist die Anzahl der Dateien größer als 99 (also dreistellig), wird
die dritte Ziffer im Musikkalender angezeigt.
•
leuchtet im Musikkalender auf, wenn die Anzahl der Tracks
größer als 14 ist.
• Um Discs an anderer Stelle im Laufwerk zu laden, drücken Sie
DISC SKIP.
• 8 cm (3 Zoll) Discs können in der inneren Vertiefung der
Schublade geladen werden.
• Der Ladevorgang einer Disc oder eines USBSpeichermediums mit einer Vielzahl von Dateien und Ordnern
dauert etwas länger.
• Mit Tastendruck wird das Gerät ein- oder ausgeschaltet
(Standby-Modus).
2. Wählen Sie Disc oder USB-Speichermedium
als Wiedergabequelle.
CD/ USB
Gesamtzahl Ordner
oder
■Bitte beachten Sie:
• Öffnen und schließen Sie das Laufwerk nicht gewaltsam.
Das kann zu Schäden führen.
• Mit jedem Tastendruck wird die Wiedergabequelle wie
folgt umgeschaltet:
„Cd“ ↔ „USb“
■Bitte beachten Sie:
• Abhängig von der gewählten Wiedergabequelle haben die
Disc-Auswahltasten oder FOLDER (+/-) keine Funktion.
11
CDC-5506 (G)_German:CDC-5506(E)_ENG 9/9/2011 5:39 PM Page 12
4.
Disc wählen
Wiedergabe starten.
• Drücken Sie die entsprechende Taste, um die
Wiedergabe der gewünschten Disc zu starten.
DEUTSCH
oder
Beispiel: Auswahl Disc 4
4
innerhalb von
2 Sekunden.
oder
•
leuchtet auf.
• Das Gerät beginnt mit der Wiedergabe von ersten Track
(oder der ersten Datei) der aktuellen oder der letzten der
fünf Discs.
5.
Wiedergabe unterbrechen.
• Der erste Track (oder die Datei) der gewählten Disc wird
wiedergegeben.
oder
Track/Datei während der Wiedergabe wählen
Zurückspringen
•
leuchtet auf.
• Zur Fortsetzung der Wiedergabe drücken Sie
WIEDERGABE (
oder
).
6.
oder
Vorwärts
springen
Wiedergabe beenden.
• Mit jedem Tastendruck wird ein Track (oder eine Datei)
übersprungen.
• Mit ZURÜCKSPRINGEN (
) im Track (oder der Datei)
kehrt der Player an den Anfang des Musiktitels zurück.
Mit erneutem Tastendruck wir ein Track (oder eine Datei)
übersprungen.
• Benutzung der Zifferntasten auf der Fernbedienung.
oder
Beispiel:
Discs während der Wiedergabe wechseln
1.
Für „3“: 3
innerhalb von
Öffnen Sie das Disc-Laufwerk.
Für „15“: 1
Für „123“: 1
OPEN / CLOSE
2 Sekunden.
within
2 sec.
innerhalb von
2 Sekunden.
within
2 sec.
5
innerhalb von
2
2 Sekunden.
within
2 sec.
3
Schneller Vorlauf oder Rücklauf während
der Wiedergabe
2.
• Halten Sie die Taste gedrückt, bis die gewünschte Stelle
erreicht ist.
Wechseln Sie die gewünschten Discs.
Schneller Rücklauf
oder
Schneller
Vorlauf
Disc-Laufwerk
• Während der Wiedergabe von Disc ① können Disc ③
und ④ gewechselt werden.
• Nach dem Wechseln der Discs drücken Sie
ÖFFNEN/SCHLIEßEN (
), um das Disc-Laufwerk zu
schließen.
• Beim Wechseln von Disc ② oder ⑤drücken Sie DISC
SKIP zu Drehen des Disc-Laufwerks.
12
CDC-5506 (G)_German:CDC-5506(E)_ENG 9/9/2011 5:39 PM Page 13
WIEDERHOLUNG
Ordnerwahl während der Wiedergabe
Track (oder Datei), Ordner, alle
Tracks/Dateien wiederholen
• Während der Wiedergabe des gewünschten Tracks (oder
der Datei) oder des Ordners.
Nächsten
Ordner wählen
• Mit jedem Tastendruck wird der vorherige oder nächste
Ordner gewählt und die erste Datei in diesem Ordner wird
automatisch wiedergegeben.
ZUFALLSWIEDERGABE
oder
• Mit jedem Tastendruck wird der Wiederholungsmodus wie
folgt umgeschaltet.
oder
• Audio-CDs
→ONE („REPEAT 1“): Track wird wiederholt
↓
dISC („REPEAT 1DISC“): Disc wird wiederholt
↓
ALL („REPEAT ALL DISCS“): Alle Discs werden wiederholt
↓
OFF: Wiederholungsmodus ausgeschaltet
• RANDOM leuchtet auf.
• Mit jedem Tastendruck wird die Zufallswiedergabe wie
folgt umgeschaltet:
• Für CDs
→1 DISC → ALLE DISCS → AUS
• CDs mit Dateien
→ONE („REPEAT 1“): Datei wird wiederholt
↓
FOL (”REPEAT”): Ordner wird wiederholt
↓
dISC („REPEAT 1 DISC“): Disc wird wiederholt
↓
ALL („REPEAT ALL DISC“): Alle Discs werden wiederholt
↓
OFF: Wiederholungsmodus ausgeschaltet
• Für USB
1 DISC ↔ AUS
• Das Gerät wählt und spielt die Tracks automatisch in
zufälliger Reihenfolge.
• Drücken Sie diese Taste erneut, um die
Zufallswiedergabe zu verlassen.
■Bitte beachten Sie:
• Die Zufallswiedergabe überspringt Tracks/Ordner mit
mehr als 100 Tracks/Dateien.
• Mit den Zifferntasten verlassen Sie die Zufalls- oder
Programmwiedergabe (das Programm wird jedoch nicht
gelöscht; zum erneuten Aufrufen des Programms drücken
Sie im Stoppmodus PROGRAM).
• USB
→dISC („REPEAT 1DISC“): Alle Dateien werden wiederholt
↓
ONE („REPEAT 1“): Datei wird wiederholt
↓
FOL („REPEAT“): Ordner wird wiederholt
↓
OFF: Wiederholungsmodus ausgeschaltet
■Bitte beachten Sie:
• Während der Zufallswiedergabe und während des
Anspielens können Sie nur alle Tracks/Dateien
wiederholen.
• Während der Programmwiedergabe kann die
Ordnerwiederholung nicht gewählt werden.
13
DEUTSCH
• Sie können einen Track (oder eine Datei), einen Ordner,
alle Tracks/Dateien oder einen bestimmten Abschnitt
wiederholen.
Vorherigen Ordner wählen
CDC-5506 (G)_German:CDC-5506(E)_ENG 9/9/2011 5:39 PM Page 14
WIEDERGABE IN GEWÜNSCHTER
REIHENFOLGE
Bestimmten Abschnitt wiederholen
DEUTSCH
1.
Drücken Sie während der Wiedergabe zur
Festlegung des Startpunktes der
Wiederholungsschleife REPEAT A↔B.
• Bis zu 32 Tracks/Dateien können zur Wiedergabe in einer
bestimmten Reihenfolge programmiert werden.
1.
Im Stoppmodus rufen Sie den
Programmiermodus auf.
PROGRAM
oder
• REPEAT und A< > werden angezeigt.
• PROG blinkt.
2. Am Ende des gewünschten Abschnitt drücken
2. Wählen Sie den gewünschten Track (oder die
Sie erneut REPEAT A↔B.
Datei) zum Speichern.
• B leuchtet auf und der gewählte Abschnitt wird
wiederholt.
• Drücken Sie diese Taste erneut um den
Wiederholungsmodus A↔B zu verlassen.
PROGRAM
■Bitte beachten Sie:
• REPEAT A↔B steht Ihnen nur innerhalb eines Tracks
(oder einer Datei) zur Verfügung.
• Während der Zufallswiedergabe und während des
Anspielens steht Ihnen REPEAT A↔B nicht zur
Verfügung.
oder
ANSPIELEN DER ERSTEN 10 SEKUNDEN
JEDES TRACKS (ODER JEDER DATEI)
Beispiel:
Auswahl und Speicherung Track 4 auf einer Audio-CD
Tracknr.
PROG
TRACK
• Mit jedem Tastendruck schalten Sie den Anspielmodus
wie folgt um:
1
2
3
4
5
Programmierte Reihenfolge
• CDs
→1 DISC INTRO → ALLE DISC INTRO → AUS
• USB
1 DISC
• Wählen Sie einen Track (oder eine Datei) mit den
Zifferntasten.
Beispiel:
↔ AUS
Für „3“: 3
• Das Gerät spielt die ersten 10 Sekunden jedes Tracks
(oder jeder Datei) an.
• Drücken Sie diese Taste erneut, um den Anspielmodus
zu verlassen.
Für „15“: 1
innerhalb von
2 Sekunden.
within
2 sec.
innerhalb von
Für „123“: 1
■Bitte beachten Sie:
• Während der Programmwiedergabe steht Ihnen die
Anspielfunktion nicht zur Verfügung.
• Während des Anspielens aller Discs wird nur der erste
Track jeder Disc für 10 Sekunden angespielt.
within
2 sec.
2 Sekunden.
5
2
innerhalb von
2 Sekunden.
within
2 sec.
3
• Damit wird der gewählte Track (oder die Datei)
automatisch gespeichert, ohne dass Sie PROGRAM
drücken müssen.
14
CDC-5506 (G)_German:CDC-5506(E)_ENG 9/9/2011 5:39 PM Page 15
Wiederholen Sie Schritt 2, bis alle gewünschten
Tracks/Dateien programmiert sind.
4.
Programmwiedergabe starten.
■Alle programmierten Tracks/Dateien löschen
• Halten Sie STOP (
) für 4 Sekunden im
Programmmodus gedrückt.
• Öffnen Sie das Disc-Laufwerk oder wählen Sie eine
andere Wiedergabequelle, um alle programmierten
Tracks/Dateien zu löschen.
■Bestimmten Track (oder Datei) löschen
• Suchen Sie den gewünschten Track (oder die Datei) und
löschen Sie im Programmmodus.
PROGRAM
oder
oder
• Die Wiedergabe beginnt in der programmierten
Reihenfolge.
Programmierte Tracks/Dateien überprüfen
• Mit jedem Tastendruck im Programmmodus auf
PROGRAM werden die programmierten Tracks/Dateien in
der programmierten Reihenfolge angezeigt.
Falsch programmierten Track (oder
Datei) ändern
Beispiel:
Track 5, 9 und 7 sind programmiert und Sie möchten Track
9 mit Track 10 auf einer Audio-CD ersetzen.
PROGRAM
1.
oder
Suchen Sie Track/Datei 9 im Programmmodus.
PROGRAM
oder
Programmierte Tracks/Dateien löschen
■Einzeln löschen
• Mit jedem Tastendruck im Programmmodus auf
STOP (
) werden die programmierten Tracks/Dateien
einzeln nacheinander in umgekehrter Reihenfolge
gelöscht.
PROG
TRACK
STEP
1
2
3
4
5
• Der programmierte Track (oder die Datei) wird für einige
Sekunden angezeigt.
oder
15
DEUTSCH
3.
CDC-5506 (G)_German:CDC-5506(E)_ENG 9/9/2011 5:40 PM Page 16
2.
HELLIGKEIT DES DISPLAYS EINSTELLEN
DEUTSCH
Während der Anzeige des auszutauschenden
Tracks (oder der Datei) wählen Sie Track (oder
Datei) 10 zum Speichern.
DIMMER
PROGRAM
oder
• Mit jedem Tastendruck wird die Helligkeit des
Displays wie folgt umgeschaltet.
→ EIN → dunkler → AUS
• Bei ausgeschaltetem Display drücken Sie eine
beliebige Taste, um den Betriebsstatus anzuzeigen.
KOPFHÖRER
PROG
TRACK
STEP
1
2
3
4
5
• Für privaten Musikgenuss schließen Sie die
Kopfhörer an der Kopfhörerbuchse PHONES an.
• Sie können einen Track (oder eine Datei) mit den
Zifferntasten wählen. innerhalb von
2 Sekunden.
2 sec. 0
Beispiel: Für „10“: 1 within
• Bei Auswahl eine Tracks mit den Zifferntasten wird der
gewählte Track automatisch gespeichert, ohne dass Sie
PROGRAM drücken müssen.
• Erlischt der auszutauschende Track (oder die Datei), so
wiederholen Sie Schritt 1.
PHONES
Zeitdisplay wählen (nur Audio-CD)
■Bitte beachten Sie:
• Stellen Sie die Lautstärke nicht zu hoch ein, wenn Sie
Kopfhörer benutzen.
• Während der Wiedergabe
TIME
oder
• Mit jedem Tastendruck schaltet das Zeitdisplay wie folgt
um.
TRACK
INDEX
→
1
2
3
4
5
7 8 9
10 11 12
Vergangene Spielzeit des aktuellen Tracks
↓
TRACK
INDEX STEP
1
2
3
4
5
7 8 9
10 11 12
Verbleibende Spielzeit des aktuellen Tracks
↓
1
2
3
4
5
7 8 9
10 11 12
Verbleibende Spielzeit der Disc
• Während der Zufallswiedergabe kann die Zeit als „--:--“
angezeigt werden.
16
CDC-5506 (G)_German:CDC-5506(E)_ENG 9/9/2011 5:40 PM Page 17
Störungserkennung
PROBLEM
MÖGLICHE URSACHE
LÖSUNGSVORSCHLAG
Kein Strom.
• Netzstecker nicht in der Steckdose.
• Schlechter Kontakt in der Steckdose oder
Steckdose beschädigt.
• Stecken Sie den Stecker fest in die Steckdose.
• Überprüfen Sie die Steckdose mit einem
anderen Gerät.
Keine Wiedergabe.
• Die Disc ist verkehrt herum geladen.
• Die Disc ist verschmutzt.
• Die Disc ist beschädigt oder stark verkratzt.
• CD-R/CD-RW nicht Standard.
• Die Musikdateien wurden nicht in einem
kompatiblen Format aufgenommen.
• Laden Sie die Disc mit dem Aufdruck nach oben.
• Reinigen Sie die Disc.
• Laden Sie eine andere Disc.
• Siehe „Nicht abspielbare Discs“ auf Seite 10.
• Nur Musikdateien in den Formaten MP3 und
WMA können wiedergegeben werden.
Kein Ton.
• Anschlüsse vertauscht.
• Falsche Einstellung Verstärker/Receiver.
• leuchtet auf.
• Überprüfen Sie die Anschlüsse.
• Bedienen Sie den Verstärker/Receiver korrekt.
• Drücken Sie
, um den Pausemodus zu
verlassen.
Schlechter oder
verzerrter Klang.
• Das Gerät ist an den Eingängen PHONO des
Verstärkers/Receivers angeschlossen.
• Schlechter Kontakt.
• Überprüfen Sie die Anschlüsse.
• Überprüfen Sie die Anschlüsse.
Tonsprünge.
• Die Disc ist beschädigt oder stark verkratzt.
• Das Gerät ist nicht vibrations- und stoßfest
aufgestellt.
• Benutzen Sie eine andere Disc.
• Stellen Sie das Gerät auf einer stabilen Fläche
auf.
Programmierung
kann nicht
durchgeführt werden.
• Die Disc ist verschmutzt oder stark verkratzt.
• Die Programmierung wurde nicht korrekt
vorgenommen.
• Die Höchstzahl programmierter Tracks/Dateien
ist 32.
• Legen Sie eine unzerkratzte Disc ein.
• Versuchen Sie es noch einmal.
Das Lesen einer Disc
oder eines USBSpeichermediums
dauert lange.
• Das Lesen einer Disc oder eines USBSpeichermediums mit vielen Dateien und
Ordnern kann etwas länger dauern.
17
• Überprüfen Sie die Anzahl der programmierten
Tracks/Dateien.
• Dies ist keine Fehlfunktion.
DEUTSCH
Bei einer Störung sehen Sie sich zunächst die nachstehende Tabelle an, bevor Sie sich an den Kundendienst wenden.
Können Sie die Störung nicht beheben, schalten Sie das Gerät aus und wieder ein. Führt dies auch nicht ans Ziel, so wenden Sie
sich bitte an Ihren Fachhändler. Unter keinen Umständen reparieren Sie das Gerät selbst. Damit verlieren Sie Ihre
Garantieansprüche.
CDC-5506 (G)_German:CDC-5506(E)_ENG 9/9/2011 5:40 PM Page 18
DEUTSCH
Spezifikationen
■ TYPISCHE AUDIOLEISTUNGEN
• Anzahl Kanäle
I
2
• Frequenzgang, 20~20.000 Hz
I
±0,8 dB
• Rauschabstand, A-gewichtet
I
94 dB
• Dynamikbereich
I
86 dB
• Klirrfaktor, 1 kHz
I
0,009 %
• Tonhöhenschwankung
I
Quarzkristallpräzision
• Audioausgangspegel
I
2 V RMS
• Digitalausgang, optisch, Wellenlänge 660 nm
I
-20 ~ -15 dBm
■ OPTISCHES LESESYSTEM
• Laser
I
Halbleiterlaser
• Wellenlänge
I
760~800 nm
• Numerische Apertur
I
0,45
■ SIGNALFORMAT
• Abtastfrequenz
• D/A-Konversion
• Überabtastung
I
I
I
44,1 kHz
Multibit (Sigma-Delta-Konversion)
8 Mal
■ ALLGEMEIN
• Netzspannung
I
230 V ~ 50 Hz
• Leistungsaufnahme
I
23 W
• Abmessungen (BxHxT, einschließlich überstehender Bauteile)
• Gewicht (Netto)
I
5,6 kg (12.4 lbs)
I
Bitte beachten Sie: Änderung von Design und Spezifikationen vorbehalten.
18
440x112x397 mm (17-5/16x4-7/16x15-4/6 Zoll)
CDC-5506 (G)_German:CDC-5506(E)_ENG 9/9/2011 5:40 PM Page 19
NOTIZEN
19
CDC-5506 (G)_Spanish:CDC-5506(E)_ENG 9/9/2011 3:30 PM Page 2
Introducción
ESPAÑOL
LEA ESTO ANTES DE UTILIZAR SU UNIDAD
Este símbolo tiene como propósito alertar al usuario de la
presencia de "voltaje peligroso" no aislado dentro del
compartimiento del producto, que puede ser de suficiente
magnitud para constituir un riesgo de choque eléctrico
para las personas.
PRECAUCIÓN
AVISO:
: PARA REDUCIR EL RIESGO DE CHOQUE
ELÉCTRICO, NO QUITE LA TAPA (NI LA PARTE
TRASERA): EN EL INTERIOR NO HAY PARTES
QUE REQUIEREN SERVICIO. EL SERVICIO DEBE
SER REALIZADO POR PERSONAL DE SERVICIO
CUALIFICADO.
Este símbolo tiene como propósito alertar al usuario de la
presencia de instrucciones importantes de mantenimiento
(servicio) y de funcionamiento en la literatura que
acompaña a este aparato.
PARA REDUCIR EL RIESGO DE FUEGO O CHOQUE ELÉCTRICO, NO EXPONGA ESTE APARATO A LA LLUVIA O LA HUMEDAD.
PRODUCTO LÁSER
DE CLASE 1
PRECAUCIÓN
Radiación láser invisible cuando la unidad está abierta.
No mire el haz.
PRECAUCIÓN: EL USO DE CUALQUIER MANDO, AJUSTE O PROCEDIMIENTO DISTINTOS A LOS AQUÍ
ESPECIFICADOS PUEDE PROVOCAR EXPOSICIÓN A RADIACIÓN NOCIVA.
PARA SU SEGURIDAD
EUROPA
AUSTRALIA
220 V
240 V
Las unidades enviadas a Australia están diseñadas sólo para su funcionamiento con 230 V CA.
Para asegurar la operación segura, la clavija incluida de tres pines debe insertarse solamente en
un punto estándar de corriente para el mismo número de pines, que ha sido adecuadamente
puesto a tierra a través de un cable doméstico normal. Los cables de extensión utilizados en el
equipo deben ser de tres núcleos y estar correctamente cableados para ofrecer conexión a tierra.
Los cables de extensión inadecuados son una causa importante de fallecimientos. El hecho de
que el equipo funcione satisfactoriamente no implica que el punto de corriente esté conectado a
tierra ni que la instalación esté completamente segura. Para su seguridad, si existe duda acerca
del punto efectivo de conexión a tierra, consulte con cualquier electricista cualificado.
VOLTAJE UNIFICADO PANEUROPEO
Todas las unidades son adecuadas para los suministros de 220-240 V CA.
2
CDC-5506 (G)_Spanish:CDC-5506(E)_ENG 9/9/2011 3:30 PM Page 3
PRECAUCIÓN
Información para los usuarios acerca de la recogida
y la eliminación de equipos viejos y pilas usadas.
Los símbolos sobre estos productos, el embalaje y/o los
documentos que lo acompañan significan que los
productos eléctricos y electrónicos usados y las pilas no
deben incluirse en los desechos domésticos normales.
Para el tratamiento, la recuperación y el reciclaje
apropiados de los productos viejos y las pilas usadas,
llévelos a los puntos de recogida utilizados según su
legislación nacional.
Al eliminar correctamente ayudará a ahorrar valiosos
recursos y a prevenir cualquier efecto potencial negativo
sobre la salud humana y el medio ambiente que, de otra
forma, surgen por un manejo inadecuado de residuos.
Para mayor información sobre la recogida y el reciclaje
de productos y pilas usadas póngase en contacto con su
municipio local, su servicio de eliminación de residuos o
el punto de venta donde compró el producto.
[Información sobre eliminación en otros países fuera de la
Unión Europea]
Estos símbolos son válidos sólo en la Unión Europea. Si
desea eliminar estos artículos, pónganse en contacto
con sus autoridades locales o su vendedor e infórmese
sobre el método correcto de eliminación.
Nota para el símbolo de pila (parte baja, ejemplos de dos
símbolos):
El símbolo Pb debajo del símbolo para las pilas indica
que las mismas contienen plomo.
PRECAUCIONES
■Condensación de humedad
Puede formarse humedad sobre los lentes bajo las siguientes condiciones.
• Inmediatamente después de que un calefactor ha sido encendido.
• En un cuarto con vapor o muy húmedo.
• Cuando la unidad ha sido desplazada de un lugar frío a uno caliente.
Si se forma humedad dentro de la unidad, esta última podría no funcionar correctamente.
En este caso, desconecte el suministro de corriente y esperé alrededor de una hora para que se evapore la humedad.
■Si hay interferencia de ruido en el TV mientras se recibe una transmisión.
Dependiendo del estado de la recepción del TV, podría presentarse interferencia en la pantalla del TV mientras ve un
programa de televisión y la unidad se ha dejado encendida. Esto no es un fallo de la unidad o del TV. Para ver un
programa de TV, apague esta unidad.
■No transporte esta unidad con discos dentro de la misma.
■No coloque encima de componentes tales como un amplificador o un receptor que generen calor.
Si lo hace, la temperatura en el interior de la unidad aumenta y puede presentarse un fallo.
3
ESPAÑOL
• Deje un espacio alrededor de la unidad para suficiente ventilación.
• Evite la instalación en sitios extremadamente calientes o fríos, o en
una zona expuesta a la luz solar directa o al calentamiento del equipo.
• Mantenga la unidad libre de humedad, agua y polvo.
• No deje objetos extraños en la unidad.
• No debe obstruirse la ventilación cubriendo los orificios para la misma
con artículos, tales como, periódicos, paños de mesa, cortinas, etc.
• No deben colocarse fuentes de flama descubierta, tales como velas
encendidas, sobre la unidad.
• Respete los aspectos medioambientales de la eliminación de pilas.
• Para el uso, la unidad no debe exponerse a escurrimientos de agua ni
a salpicaduras.
• No deben colocarse objetos llenos con líquidos, tales como vasos,
sobre la unidad.
• No permita que los insecticidas, el benceno y los disolventes entren
en contacto con la unidad.
• No desarme ni modifique la unidad de modo alguno.
■Nota sobre el cable de corriente CA y la toma de pared.
• La unidad no está desconectada de la fuente de corriente CA
(suministro) mientras esté conectada a la toma de pared, aun cuando
la unidad haya sido apagada.
• Para desconectar completamente este producto del suministro,
desconecte la clavija de la toma de pared.
• Cuando realice ajustes en este producto, compruebe que la toma de
corriente CA que utiliza sea fácilmente accesible.
• Desconecte la clavija de la toma de pared cuando no se utiliza la
unidad por períodos de tiempo prolongados.
CDC-5506 (G)_Spanish:CDC-5506(E)_ENG 9/9/2011 3:30 PM Page 4
ESPAÑOL
CONTENIDO
Introducción
• LEA ESTO ANTES DE UTILIZAR SU UNIDAD
Conexiones del panel trasero
I
I
2
5
Mando del panel frontal y mando a distancia I
6
• ALCANCE DE FUNCIONAMIENTO DEL MANDO A DISTANCIA I 9
• CARGA DE LA PILAS
I
9
Conocimientos previos sobre discos y ficheros
• DISCOS REPRODUCIBLES I
10
• DISPOSITIVOS DE MEMORIA USB I
10
• FORMATOS REPRODUCIBLES DE FICHEROS DE AUDIO I
• CUIDADO Y MANEJO DE LOS DISCOS
I
10
10
Funciones
• REPRODUCCIÓN DE CANCIONES/FICHEROS I 11
• REPRODUCCIÓN EN ORDEN ALEATORIO I
13
• REPETIR REPRODUCCIÓN I
13
• REPRODUCIR LOS PRIMEROS 10 SEGUNDOS DE CADA CANCIÓN/FICHERO
• REPRODUCCIÓN EN ORDEN DESEADO I
14
• SELECCIÓN DE UNA PANTALLA DE TIEMPO (sólo CD de audio) I
16
• AJUSTE DEL BRILLO DE LA PANTALLA FLUORESCENTE
I
16
• ESCUCHAR CON AUDÍFONOS
I
16
Guía de localización y eliminación de fallos I 17
Especificaciones
I
18
4
I
14
CDC-5506 (G)_Spanish:CDC-5506(E)_ENG 9/9/2011 3:30 PM Page 5
Conexiones del panel trasero
4
5
CDC-5506
N18041
5DISC CD CHANGER
DIGITAL
OPT
DIGI LINK
ANALOG
POWER SOURCE
230V
POWER CONSUMPTION
50Hz
23 W
CLASS 1 LASER PRODUCT
KLASSE 1 LASER PRODUKT
LUOKAN 1 LASER LAITE
KLASS 1 LASER APPARAT
DESIGNED IN USA
ASSEMBLED IN CHINA
L
AVIS : RISQUE DE CHOC ELECTRIQUE-NE PAS OUVRIR.
WARNING : SHOCK HAZARD-DO NOT OPEN.
R
SN.
1. CONEXIÓN DE LAS SALIDAS ANALÓGICAS DE AUDIO
• Conecte los enchufes ANALOG L y R en los enchufes CD
IN de su amplificador/receptor.
ANALOG
Amplificador/receptor
Amplifier/receiver
L
CD IN
R
2. CONEXIÓN DE DIGILINK
• Conecté este enchufe en el enchufe DIGILINK del
amplificador/receptor del sistema Sherwood para manejar esta
unidad a distancia mediante el sistema DIGILINK II o III. (Para
mayor información, consulte las instrucciones de
funcionamiento del amplificador/receptor Sherwood.
DIGI LINK
Amplificador/receptor
Sherwood
Sherwood amplifier/receiver
DIGILINK
■Nota:
• El manejo de DIGILINK podría no funcionar en algunos
componentes Sherwood.
3. CONEXIÓN DE LA SALIDA ÓPTICA DIGITAL
• Conecte esta clavija en el enchufe OPTICAL DIGITAL IN de
su amplificador/receptor para disfrutar el sonido digital.
DIGITAL
Amplificador/receptor
Amplifier/receiver
OPT
■Notas:
• No se recomienda grabar señales digitales de audio con una
OPTICAL IN
conexión digital de audio entre esta unidad y una grabadora
de MD o CD, etc. Cuando desee grabar los sonidos
reproducidos en esta unidad, hágalo a través de los enchufes
ANALOG AUDIO OUT.
• Algunos de los cables de fibra óptica disponibles en el comercio no pueden utilizarse para el equipo. Si hay un cable de fibra
óptica que no puede conectarse con su equipo, consulte a su vendedor o a la organización de servicio más cercana.
4. CABLE DE ENTRADA AC
• Conecte el cable en una toma de pared AC.
5. TERMINAL PARA ACTUALIZACIÓN
• Esta terminal podría utilizarse en el futuro para actualizar el software de funcionamiento, etc.
■Nota:
• La programación para la actualización requiere de conocimiento especializado de programación y, por esta razón,
recomendamos que sólo se realice por técnicos cualificados.
5
ESPAÑOL
• No conecte el cable de entrada de CA en el enchufe mientras realiza conexiones.
• Asegúrese de conectar las clavijas blancas en los enchufes L (de la izquierda) y las clavijas rojas en los
enchufes R (de la derecha) cuando realiza conexiones.
• Consulte el diagrama de conexión en las instrucciones de funcionamiento de su amplificador/receptor
CDC-5506 (G)_Spanish:CDC-5506(E)_ENG 9/9/2011 3:30 PM Page 6
Mando del panel frontal y mando a distancia
ESPAÑOL
Mandos del panel frontal
1
23
2
24
3
5
1
5 DISC CD CHANGER
CDC-5506
2
4
7
3
4
5
DISC SKIP
OPEN / CLOSE
DISC SELECTOR
5 DISC AUTOMATIC LOADING SYSTEM
PHONES
POWER
PROGRAM
INTRO
RANDOM
TIME
DIMMER
REPEAT
USB
ON/ STANDBY
CD/ USB
ON
5V
500mA
OFF
20 16 18 19 17
13 14 10 11 12
Mandos a distancia
2
6
21
13
17
d
a
f
b
c
e
10
16
20
14
15
22
18
6
9
25
8
CDC-5506 (G)_Spanish:CDC-5506(E)_ENG 9/9/2011 3:30 PM Page 7
1. BOTÓN DE ENCENDIDO
13. BOTÓN RANDOM PLAY (REPRODUCCIÓN
ALEATORIA)
Pulse este botón para entrar al modo standby (modo de
reserva).
Para apagar, pulse de nuevo este botón.
Pulse este botón para reproducir canciones/ficheros en
orden aleatorio.
14. BOTÓN DE REPETICIÓN (1/F/ALL)
Pulse este botón para reproducir una canción/fichero,
una carpeta o todas las canciones/los ficheros, en
forma repetida.
En el modo standby (modo de reserva), pulse este
botón para encender y para entrar en el modo de
funcionamiento.
En el modo de funcionamiento, pulse este botón una
vez más para apagar y para entrar en el modo standby
(modo de reserva).
15. BOTÓN DE REPETICIÓN A↔B
Pulse este botón para reproducir un segmento
específico en forma repetida.
3. PORTADISCOS
16. BOTÓN PROGRAM (PROGRAMA)
Carga de un disco en el portadiscos.
4. BOTÓN OPEN/CLOSE (ABRIR/CERRAR) (
Pulse este botón para programar sus
canciones/ficheros favoritas(os) o revisar las
canciones/los ficheros programadas(os).
)
Pulse este botón para abrir o cerrar el portadiscos.
17. BOTÓN INTROSCAN (EXPLORACIÓN
INTRODUCTORIA)
5. BOTONES DE DISC SELECTOR (SELECTOR
DE DISCOS)
Pulse este botón para reproducir los primeros 10
segundos de cada canción/fichero.
Utilice estos botones para seleccionar el disco por
reproducir.
18. BOTÓN TIME (TIEMPO)
6. BOTÓN DISC (DISCO)
Pulse este botón para mostrar diversas informaciones
sobre el tiempo en el CD de audio.
Cuando selecciona un disco con este botón, pulse este
último primero y después el número de disco deseado
(1~5) en los botones numéricos dentro de 2 segundos.
19. BOTÓN DIMMER (INTENSIDAD LUMINOSA)
Pulse este botón para seleccionar el brillo deseado de
la pantalla fluorescente.
7. BOTÓN DISC SKIP (SALTAR DISCO)
Para cargar o descargar discos, pulse este botón para
girar en el sentido de las agujas del reloj hacia la
siguiente posición de disco.
20. BOTÓN SELECTOR CD/USB
Pulse este botón para seleccionar el disco o el
dispositivo de almacenamiento USB como fuente de
reproducción.
8. ENCHUFE PARA AUDÍFONOS
Puede conectar audífonos estéreo en este enchufe para
escuchar en privado.
21. BOTONES NUMÉRICOS (0~9)
Pulse los siguientes botones para seleccionar una
canción/fichero para reproducir o programar.
9. BOTÓN PLAY/PAUSE (REPRODUCIR/PAUSA)
(
)
22. BOTONES FOLDER UP/DOWN (CARPETA
ARRIBA/ABAJO) (+/-)
ⓐ Pulse este botón para iniciar la reproducción en el
modo de parada o pausa
Pulse estos botones para seleccionar la carpeta
deseada.
ⓑ Pulse este botón para interrumpir la reproducción en
forma temporal.
10. Botón STOP (PARADA) (
23. SENSOR A DISTANCIA
)
Esta señal recibe las señales desde la unidad de
mando a distancia.
Pulse este botón para detener la reproducción o borrar
las canciones/los ficheros programadas(os).
11. BOTÓN BACKWARD SKIP/SEARCH
(AVANZAR/BUSCAR HACIA ATRÁS) (
24. PANTALLA FLUORESCENTE
/
Para mayor información, ver página siguiente.
)
25. CONECTOR USB
ⓒ Pulse este botón para reproducir nuevamente
desde el principio de la canción/el fichero actual o
para regresar a la canción/el fichero anterior.
Para mayor información, ver página siguiente.
■MANDO DISTANCIA DEL SISTEMA DIGILINK
ⓓ Pulse y mantenga pulsado este botón para buscar
un segmento específico volviendo rápidamente
hacia atrás.
12. BOTÓN FORWARD SKIP/SEARCH
(AVANZAR/BUSCAR HACIA ADELANTE) (
/
Esta unidad puede ser manejada a distancia con el
amplificador o receptor DIGILINK III de Sherwood.
• Para las funciones disponibles, consulte las
instrucciones del funcionamiento de la unidad
compatible.
• Para escuchar un CD con el sistema DIGILINK,
compruebe primero la conexión a DIGILINK entre esta
unidad y el amplificador o el receptor compatibles con
Sherwood.
)
ⓔ Pulse este botón para reproducir a partir del inicio
de la siguiente canción/del siguiente fichero.
ⓕ Pulse y mantenga pulsado este botón para buscar
un segmento específico avanzando rápidamente.
7
ESPAÑOL
2. Botón POWER ON/STANDBY
(ENCENDIDO/STANDBY)
CDC-5506 (G)_Spanish:CDC-5506(E)_ENG 9/9/2011 3:30 PM Page 8
ESPAÑOL
■CONECTOR USB
• Puede conectarse un dispositivo de almacenamiento USB en el conector USB para
escuchar ficheros MP3 o WMA grabados en la misma a través de esta unidad.
■ Nota:
• Después de la reproducción del USB, retire el dispositivo de almacenamiento USB en el
modo de parada o en el modo standby (modo de reserva).
Dispositivo de
almacenamiento USB
■PANTALLA FLUORESCENTE
1
2
PROG
3
RANDOM REPEAT ALL 1 DISCS
A< >B
INTRO
SCENE TRACK
1
2
3
4
4
5
5
6
7
1. Indicador de PROGRAMA
2. Indicador RANDOM (ALEATORIO)
3. Indicador REPEAT (REPETICIÓN)
4. Indicador del número de disco en el portadiscos
• 1~5 : Números del portadiscos
•
•
: Se enciende(n) cuando se coloca(n) el
disco/los discos.
: Se enciende para mostrar el disco que está
siendo reproducido actualmente.
8
8
1 2
4 5
7 8
10 11
13 14
3
6
9
12
9
5. Indicador PLAY (REPRODUCCIÓN)
6. Indicador PAUSE (PAUSA)
7. Información del número de canción/fichero,
el tiempo de reproducción, la función, etc.
8. indicador INTROSCAN (EXPLORACIÓN
INTRODUCTORIA)
9. Indicador MUSIC CALENDAR
(CALENDARIO MÚSICAL)
CDC-5506 (G)_Spanish:CDC-5506(E)_ENG 9/9/2011 3:30 PM Page 9
ALCANCE DEL FUNCIONAMIENTO DEL MANDO A DISTANCIA
CDC-5506
2
3
4
5
DISC SKIP
ESPAÑOL
1
5 DISC CD CHANGER
OPEN / CLOSE
DISC SELECTOR
5 DISC AUTOMATIC LOADING SYSTEM
PHONES
POWER
PROGRAM
INTRO
RANDOM
TIME
DIMMER
REPEAT
USB
ON/ STANDBY
CD/ USB
ON
5V
500mA
OFF
• Use la unidad de mando a distancia dentro de un
rango de aprox. 7 m (23 pies) y ángulos de hasta
30 grados dirigidos hacia el sensor a distancia.
CARGA DE LAS PILAS
1. Retire la tapa.
2. Coloque dos pilas (tamaño “AAA”, 2 pilas de
1,5V) haciendo coincidir la polaridad.
• Retire las pilas cuando no se utilicen por un tiempo
prolongado.
• No utilice pilas recargables (tipo Ni-Cd).
9
CDC-5506 (G)_Spanish:CDC-5506(E)_ENG 9/9/2011 3:30 PM Page 10
Conocimientos previos sobre discos y ficheros
■WMA(Windows Media Audio)
• Frecuencia de barrido: 32, 44,1, 48 kHz
• Velocidad de transferencia de bits: 32 ~ 320 kbps
• Extensión: .wma, .WMA
• El identificador WMA no está disponible
• Los logotipos de Windows Media y Windows son marcas
comerciales o registradas de Microsoft Corporation en Estados
Unidos y/o en otros países.
■Notas:
• Las carpetas pueden incluir hasta diez niveles.
• Para algunos ficheros, podría no ser posible el uso de algunas
funciones durante la reproducción.
• Los ficheros protegidos por DRM(Digital Rights Management) no
podrán ser reproducidos.
• Cuando los datos del fichero con los nombres de la carpeta superan
la capacidad de memoria de la unidad, algunos ficheros, etc., no
podrán ser reconocidos ni reproducidos.
ESPAÑOL
DISCOS REPRODUCIBLES
Esta unidad es compatible con los siguientes discos.
Disc
Logotipo
Logo
Formato or
filedetype
Formato
tipo
fichero
CD de audio
PCM
PCM
CD-R
Audio
CD,
MP3,
WMA
Audio
CD,
MP3,
WMA
CD-RW
AudioCD,
CD,
MP3,
WMA
Audio
MP3,
WMA
CUIDADO Y MANEJO DE LOS DISCOS
• Esta unidad es compatible con discos CD-R y CD-RW
grabados en formato de audio CD (CD-DA), MP3 o WMA.
• Sólo los discos CD-R y CD-RW grabados con el formato
ISO9660 podrán reproducirse.
• Esta unidad es compatible con discos multisesión. Algunos
discos multisesión pueden tomar un tiempo encargarse y
algunos podrían no ser reproducidos.
• Al manejar un disco, sosténgalo
cuidadosamente por las orillas.
■Discos no reproducibles
• Puesto que esta unidad no es compatible con tipos de discos,
formatos y tipos de ficheros no mencionados anteriormente,
no reproduzca tales discos.
• Algunos discos CD-R y CD-RW podrían no ser reproducidos
debido a finalización incompleta del disco, calidad de
grabación o estado físico del disco, características del
dispositivo de grabación o software de autor, etc.
Ver instrucciones de funcionamiento incluidas en su
dispositivo de grabación para mayor información.
• Algunos CD de audio utilizan protección para copia aquí no
cumple con la norma oficial de CD. Puesto que se trata de
discos no estándares, esta unidad no puede reproducirlos
adecuadamente.
• Cuando se reproduce un CD grabado en DTS-ES o Dolby
Digital EX, puede escucharse ruido externo.
• No pegue papel ni escriba nada
sobre la superficie impresa.
• Deben removerse cuidadosamente
las huellas dactilares y el polvo
sobre la superficie grabada con un
paño suave. Limpie directamente
desde el interior hacia el interior
del disco.
• Conserve siempre los discos en
sus estuches después del uso para
protegerlos del polvo y los
arañazos.
DISPOSITIVOS DE MEMORIA USB
• Puede conectarse un dispositivo de almacenamiento USB en el
conector USB en el panel frontal para reproducir ficheros MP3
o WMA almacenados en el mismo.
• Los dispositivos de memoria USB que cumplen con los
estándares de clase de almacenamiento masivo y MTP (Media
Transfer Protocol) pueden reproducirse en esta unidad.
• Esta unidad es compatible con el sistema de formato de
ficheros FAT16 o FAT32 para el dispositivo de almacenamiento
USB.
• No utilice discos fracturados, deformados o reparados.
Estos discos podrían romperse fácilmente y ocasionar
graves lesiones personales, así como el mal
funcionamiento del aparato.
FORMATOS REPRODUCIBLES DE
FICHEROS DE AUDIO
■MP3(MPEG-1 audio Layer-3)
• Frecuencia de muestreo: 32, 44,1, 48 kHz
• Velocidad de transferencia de bits: 32 ~ 320 kbps
• Extensión: .mp3, .MP3
• Se recomiendan los ficheros con velocidad fija de
transferencia de bits. Los ficheros de velocidad variable
de transferencia bits (VVTB) son reproducibles, pero el
tiempo de reproducción podría mostrarse
incorrectamente.
• El identificador ID3 no está disponible.
• Tecnología de codificación de audio MPEG Layer-3 audio
bajo licencia de Fraunhofer IIS y Thomson.
■Notas:
• No exponga los discos a la luz directa del sol, la humedad
elevada o las altas temperaturas por un tiempo
prolongado.
• Cuando cargue o descargue un disco en el o desde el
portadiscos, coloque siempre el lado impreso hacia arriba.
1
5 DISC CD CHANGER
CDC-5506
2
3
4
5
DISC SKIP
OPEN / CLOSE
DISC SELECTOR
5 DISC AUTOMATIC LOADING SYSTEM
PHONES
POWER
PROGRAM
INTRO
RANDOM
TIME
DIMMER
REPEAT
USB
ON/ STANDBY
CD/ USB
ON
10
OFF
Plataforma
Tray
Printed
side
Lado
impreso
5V
500mA
CDC-5506 (G)_Spanish:CDC-5506(E)_ENG 9/9/2011 3:30 PM Page 11
Funciones
REPRODUCCIÓN DE CANCIONES/FICHEROS
ESPAÑOL
Antes del funcionamiento
3. Dependiendo de la fuente de reproducción
• Pulse el botón POWER.
seleccionada, cargue el disco o los discos, o
conecte el dispositivo de almacenamiento USB.
OPEN / CLOSE
o
• Si este botón se mantiene pulsado, entrará en el modo
standby (modo de reserva).
• Para apagar, pulse de nuevo este botón
• Entonces se suprime el suministro de energía.
■Modo standby (modo de reserva)
• En el modo standby (modo de reserva), la unidad no se
desconecta del suministro de CA y se retiene una pequeña
cantidad de corriente para respaldar la facilidad de
operación.
■Auto Power Save (ahorro de energía
automático)
Ejemplo: CD de audio
Calendario de música
• El ahorro de energía automático es una función que apaga,
en forma automática, el suministro de energía para entrar en
el modo standby (modo de reserva). Cuando está en el modo
de reserva, el modo de pausa, etc., por más de 30 minutos,
el modo ahorrador de energía se pondrá en funcionamiento.
SCENE TRACK
STEP
1
2
3
4
1. En el modo standby (modo de reserva), encienda
5
Total de canciones
el aparato.
1 2
4 5
7 8
10 11
13 14
3
6
9
12
Tiempo de
reproducción total
Ejemplo: ficheros de música (923 ficheros y 15 carpetas)
ON/ STANDBY
o
SCENE
9
1
2
3
4
5
+
Ficheros totales
• Cuando el número de ficheros es superior a 99 (es decir,
es un número de tres dígitos), el número del tercer dígito
se mostrará en el calendario de música.
• El indicador “
” se enciende en el calendario de música
cuando el número de canciones supera 14.
• Para cargar discos en otras plataformas, pulse el botón
DISC SKIP (SALTAR DISCO).
• Los discos de 8 cm (3 pulgadas) puede cargarse también
sobre el círculo interior de la plataforma.
• Puede tomar un tiempo para leer un disco o un
dispositivo de almacenamiento USB que contiene
muchos ficheros y carpetas, etc.
• Cada vez que se pulsa un botón, esta unidad se
enciende para entrar en el modo de funcionamiento o se
apaga para entrar en el modo de reserva.
2. Seleccione el disco o el dispositivo de
almacenamiento USB como fuente de reproducción.
CD/ USB
Carpetas totales
o
■Nota:
• No abra ni cierre la plataforma por la fuerza.
Al hacerlo podría dañarla.
• Cada vez que se pulsa este botón, la fuente de
reproducción cambia de la siguiente forma:
“Cd” ↔ “USb”
■Nota:
• Dependiendo de la fuente de reproducción seleccionada,
los botones del FOLDER UP/DOWN (SELECTOR DE
DISCOS) o los botones FOLDER UP/DOWN (CARPETA
ARRIBA/ABAJO) (+/-), etc., quedarán sin funcionar.
11
CDC-5506 (G)_Spanish:CDC-5506(E)_ENG 9/9/2011 3:30 PM Page 12
4.
Seleccione un disco
Comienzo de la reproducción.
• Pulse el botón correspondiente producción a partir el
disco deseado.
ESPAÑOL
o
Ejemplo: cuando seleccione el disco 4
4
dentro de 2
segundos
o
• El indicador “
” se enciende.
• La unidad reproduce desde la primer canción/el primer
fichero (sobre el disco actual hasta la última canción/el
último fichero en el quinto disco).
5.
Para interrumpir la reproducción en forma temporal.
• Se reproducirá la primera canción/el primer fichero del
disco seleccionado.
o
Selección de una canción/un fichero
durante la reproducción
Para saltar hacia atrás
• El indicador “
” se enciende.
• Para continuar la reproducción, pulse el botón PLAY
(REPRODUCCIÓN) (“
” o “ ”).
6.
o
Para saltar
hacia
adelante
Para detener la reproducción.
• Cada vez que se pulsa el botón, se salta una canción/un
fichero.
• Cuando se pulsa el botón BACKWARD SKIP (SALTAR
HACIA ATRÁS) (
) una vez a la mitad de la canción/del
fichero, la reproducción vuelve al inicio de la misma/del
mismo. Cuando se pulsa de nuevo, se salta una canción/un
fichero.
• Cuando se utilizan los botones NUMÉRICOS sobre el
mando a distancia.
o
Cambio de discos durante la reproducción
1.
Ejemplo:
Abra el portadiscos.
Para “3”: 3
dentro de
2 segundos
within
2 sec.
Para “15”: 1
OPEN / CLOSE
dentro de
Para “123”: 1
2.
within
2 sec.
2 segundos
5
2
dentro de
2 segundos
within
2 sec.
3
Para avanzar o retroceder rápidamente
durante la reproducción
Cambie los discos deseados.
• Pulse y mantenga pulsado el botón hasta que se alcance
el segmento deseado.
Para regresar rápidamente
o
Portadiscos
• Durante la reproducción puede cambiar el disco ①, el
disco ③ y el ④.
• Después de cambiar los discos, pulse el botón
OPEN/CLOSE (ABRIR/CERRAR) (
) para cerrar el
portadiscos.
• Cuando cambie el disco ② o el ⑤, pulse el botón DISC
SKIP (SALTAR DISCO) para girar el portadiscos.
Para avanzar
rápidamente
12
CDC-5506 (G)_Spanish:CDC-5506(E)_ENG 9/9/2011 3:30 PM Page 13
REPETIR REPRODUCCIÓN
Selección de una carpeta durante la
reproducción
Para seleccionar anterior
Repetición de una canción/un fichero,
una carpeta, todas las canciones/todos
los ficheros
• Durante la reproducción de la canción/del fichero
deseada(o),
Para seleccionar siguiente
• Cada vez que se pulse el botón, se selecciona la carpeta
anterior o siguiente y se reproduce, en forma automática,
el primer fichero en tal carpeta.
REPRODUCCIÓN EN ORDEN ALEATORIO
o
• Cada vez que se pulsa este botón, el modo de
reproducción cambia de la siguiente forma:
o
• En el caso del CD de audio
→ ONE(“REPETIR 1”): repetir canción
↓
dISC(“REPETIR 1DISCO”): repetir disco
↓
ALL(“REPETIR TODOS LOS DISCOS”): repetir todos los discos
• El indicador “ RANDOM ” se enciende.
• Cada vez que se pulsa este botón, la fuente de
reproducción cambia de la siguiente forma:
↓
OFF: modo de repetición apagado
• En el caso del CD
• En el caso de CD con ficheros
→ 1 DISC → ALL DISC → OFF
→ ONE(“REPETIR 1”): repetir fichero
↓
FOL(“REPETIR”): repetir carpeta
• En el caso del USB
1 DISC ↔ OFF
↓
dISC(“REPETIR 1DISCO”): repetir disco
• La unidad selecciona y reproduce automáticamente las
canciones en orden aleatorio.
• Pulse una vez más este botón para cancelar la
reproducción aleatoria.
↓
ALL(“REPETIR TODOS LOS DISCOS”): repetir todos los discos
↓
OFF: modo de repetición apagado
■Notas:
• La reproducción aleatoria avanza sobre la canción/la
carpeta que tiene más de 100 canciones/ficheros.
• Cuando los botones NUMÉRICOS se pulsan durante la
reproducción aleatoria o la reproducción de un programa,
la reproducción aleatoria o del programa se cancela. (Sin
embargo, los contenidos programados no se borran. Para
llamar de nuevo los contenidos programados, pulse el
botón PROGRAM (PROGRAMA) en el modo de parada.)
• En el caso del USB
→ dISC(“REPETIR 1DISCO”): repetir todos los ficheros
↓
ONE(“REPETIR 1”): repetir fichero
↓
FOL(“REPETIR”): repetir carpeta
↓
OFF: modo de repetición apagado
■Notas:
• Durante la reproducción aleatoria o la reproducción
introductoria, puedes seleccionar sólo el modo de
repetición de todas las canciones/todos los ficheros.
• Durante la reproducción del programa, no podrá
seleccionarse el modo de repetición de carpeta.
13
ESPAÑOL
• Puede reproducir, en forma repetida, una canción/fichero,
una carpeta, todas las canciones/todos los ficheros o un
segmento específico.
CDC-5506 (G)_Spanish:CDC-5506(E)_ENG 9/9/2011 3:30 PM Page 14
REPRODUCCIÓN EN EL ORDEN DESEADO
Repetición de un segmento específico
ESPAÑOL
1.
• Pueden programarse hasta 32 canciones/ficheros para
ser reproducidos en el orden deseado.
Durante la reproducción al principio del segmento
deseado, pulse el botón REPEAT A↔B.
1.
En el modo de parada, introduzca el modo de
programa.
PROGRAM
o
• Los indicadores “ REPEAT ” y “ A< > ” se iluminan.
2. Durante la reproducción al principio del segmento
• Entonces el indicador “ PROG ” parpadea.
deseado, pulse una vez más el botón REPEAT A↔B.
2. Seleccione la canción/el fichero deseada(o) y
guárdela(o) en la memoria.
• Entonces se ilumina el indicador “ B ” y el segmento
deseado se reproduce en forma repetida.
• Pulse una vez más este botón para cancelar la repetición
PROGRAM
A↔B.
■Notas:
• La reproducción de repetición A↔B funciona sólo dentro
de una canción/un fichero.
• Durante la reproducción aleatoria o la reproducción de
exploración interior, la repetición A↔B no funcionará.
o
REPRODUCCIÓN DE LOS PRIMEROS 10
SEGUNDOS DE CADA CANCIÓN/FICHERO
Ejemplo:
Cuando seleccione y grabe la canción 4 en un CD de audio.
N.° de canción
PROG
TRACK
• Cada vez que se pulsa este botón, el modo intro cambia
de la siguiente forma:
1
2
3
4
5
Orden programado
• En el caso del CD
→ 1 DISC INTRO → ALL DISC INTRO → OFF
• Puede seleccionar una canción/un fichero al pulsar los
botones NUMÉRICOS.
Ejemplo:
• En el caso del USB
1 DISC ↔ OFF
• La unidad reproduce los primeros 10 segundos de cada
canción/fichero.
• Pulse una vez más este botón para cancelar la
exploración introductoria.
■Notas:
• Durante la reproducción del programa, la reproducción de
la exploración introductoria no funcionará.
• Durante la reproducción de exploración introductoria de
todos los discos, la unidad reproducirá únicamente la
primera canción de cada disco durante 10 segundos.
Para “3”: 3
dentro de
2 segundos
Para “15”: 1 within 2 sec.
5
dentro de
Para “123”: 1
2 segundos
within
2 sec.
2
dentro de
2 segundos
within
2 sec.
3
• Entonces la canción/el fichero se almacena de modo
automático al pulsar el botón PROGRAM (PROGRAMA).
14
CDC-5506 (G)_Spanish:CDC-5506(E)_ENG 9/9/2011 3:30 PM Page 15
3. Repita el paso 2 anterior hasta que se programen
■Para borrar las canciones/los ficheros
programadas(os)
las canciones/los ficheros deseadas(os).
Inicio de la reproducción del programa.
■Para borrar una canción/un fichero específica(o)
• Encuentre la canción/el fichero deseada(o) para borrarla
en el modo de programa.
o
PROGRAM
o
• La reproducción comienza en el orden programado.
Comprobación de las canciones/los
ficheros programadas(os)
• Cada vez que se pulsa el botón PROGRAM
(PROGRAMA) en el modo de programa, las
canciones/los ficheros programadas(os) se muestran en
el orden programado.
Rectificación de una canción/un fichero
programada(o) en forma incorrecta.
PROGRAM
Ejemplo:
Cuando se programan las canciones 5, 9 y 7, y desea
reemplazar la canción 9 por la canción 10 en un CD de audio.
o
1.
Encuentre la canción (/el fichero) 9 en el modo
de programa.
Borrado de las canciones/los ficheros
programadas(os)
PROGRAM
■Para borrar de uno en uno
• Cada vez que se pulsa STOP (PARADA) ( ) en el
modo de programa, las canciones/los ficheros
programadas(os) se borran de uno en uno en el orden
opuesto.
o
PROG
TRACK
STEP
1
2
3
4
5
o
• Entonces la canción (/el fichero) programado se muestra
por varios segundos.
15
ESPAÑOL
4.
• Pulse el botón STOP( ) durante más de 4 segundos en
el modo de programa.
• La apertura del portadiscos o la selección de otra fuente
de reproducción borra también todas las canciones/los
ficheros.
CDC-5506 (G)_Spanish:CDC-5506(E)_ENG 9/9/2011 3:30 PM Page 16
AJUSTE DEL BRILLO DE LA PANTALLA
FLUORESCENTE
2. Mientras se muestra la canción(/el fichero) por
ESPAÑOL
reemplazar con una nueva(o), seleccione la canción
(/el fichero) 10 y guárdela(o) en la memoria.
DIMMER
PROGRAM
o
• Cada vez que se pulsa este botón, el brillo de la pantalla
fluorescente cambia de la siguiente forma:
→ ON → dimmer → OFF
• En el modo apagado (OFF) de la pantalla, pulse
cualquier botón para cancelar el modo OFF de la
pantalla para mostrar el estado de funcionamiento.
ESCUCHAR CON AUDÍFONOS
PROG
TRACK
STEP
1
2
3
4
5
• Para escuchar en privado, inserte los audífonos
dentro del enchufe PHONES.
• Puede seleccionar una canción(/un fichero) al pulsar los
botones NUMÉRICOS. dentro de
2 segundos
2 sec. 0
Ejemplo: Para “10”: 1 within
• Cuando seleccione una canción con los botones
NUMÉRICOS, la canción seleccionada se almacena en
forma automática sin el botón PROGRAM (PROGRAMA).
• Cuando la canción/el fichero por reemplazar desaparece,
realice de nuevo el paso 1 anterior.
PHONES
SELECCIÓN DE UNA PANTALLA DE
TIEMPO (sólo CD de audio)
■Nota:
• Evite no poner el volumen demasiado alto cuando
escucha.
• Durante la reproducción,
TIME
o
• Cada vez que se pulsa este botón, la pantalla de tiempo
cambia de la siguiente forma:
TRACK
→
INDEX
1
2
3
4
5
7 8 9
10 11 12
Tiempo transcurrido de la canción actual
↓
TRACK
INDEX STEP
1
2
3
4
5
7 8 9
10 11 12
Tiempo restante de la canción actual
↓
1
2
3
4
5
7 8 9
10 11 12
Tiempo restante del disco
• Durante la reproducción aleatoria, etc., la pantalla del
tiempo podría mostrar “--:--”.
16
CDC-5506 (G)_Spanish:CDC-5506(E)_ENG 9/9/2011 3:30 PM Page 17
Guía de localización y resolución de fallos
PROBLEMA
POSIBLE CAUSA
SOLUCIÓN
No hay corriente
• El cable de entrada AC está desconectado.
• Conexión deficiente en la toma de pared de CA
o la toma de pared está muerta o apagada.
• Conecte el cable en forma segura.
• Compruebe la toma utilizando una lámpara u
otro dispositivo.
No reproduce
• El disco ha sido cargado en forma invertida.
• Cargue nuevamente el disco con el lado
impreso hacia arriba.
• Limpie el disco.
• Cargue otro disco.
• Ver “Discos no reproducibles” en la página 10.
• Sólo pueden reproducirse ficheros de música
en formatos MP3 y WMA.
• Disco sucio.
• Disco defectuoso o muy arañado.
• El disco CD-R/CD-RW no es estándar.
• Los ficheros de música han sido grabados en
un formato incompatible.
No hay sonido
• Realice las conexiones correctamente.
• Maneje el amplificador/receptor correctamente.
• Correcciones incorrectas.
• Funcionamiento incorrecto del
amplificador/receptor.
• El indicador “
” se enciende.
• Pulse el botón “
de pausa.
” para cancelar el modo
• Realice las conexiones correctamente.
El sonido es
deficiente o
distorsionado
• La unidad está conectada en los enchufes de
entrada PHONO del amplificador/receptor.
• Conexiones deficientes.
El sonido salta
• Disco defectuoso o muy arañado.
• La unidad está colocada sobre una superficie
que está sujeta a vibración o choque físico.
• Reproduzca otro disco.
• Coloque esta unidad sobre una superficie
estable.
No se realiza la
programación
• El disco está sucio o demasiado arañado.
• El procedimiento de programación no es
correcto.
• El número de canciones/ficheros programados
es 32.
• Intente de nuevo con un disco sin arañazos.
• Intente de nuevo.
Le toma mucho
tiempo leer un disco
o un dispositivo de
almacenamiento
USB.
• Puede tomar un tiempo más prolongado para
leer un disco o un dispositivo de
almacenamiento USB que contiene muchos
ficheros y carpetas, etc.
17
• Compruebe las conexiones y conecte todos los
cables en forma segura.
• Compruebe el número de canciones/ficheros
programados.
• Esto no es un fallo.
ESPAÑOL
Se ocurre una avería, consulte la tabla siguiente antes de enviar su unidad reparación.
Si la avería persiste, intente resolverla apagando y encendiendo de nuevo la unidad. Si esto no soluciona la situación, consulte a
su vendedor. Bajo ninguna circunstancia intente reparar la unidad usted mismo. Esto podría anular la garantía.
CDC-5506 (G)_Spanish:CDC-5506(E)_ENG 9/9/2011 3:30 PM Page 18
ESPAÑOL
Especificaciones
■ FUNCIONES DE AUDIO TÍPICAS
• Número de canales
I
2
• Frecuencia de respuesta, 20~20,000 Hz
I
±0,8 dB
• Relación señal-ruido, ponderado A
I
94 dB
• Rango dinámico
I
86 dB
• Distorsión armónica total, 1 kHz
I
0,009 %
• Lloriqueo y centelleo
I
Precisión de cristal de cuarzo
• Nivel de salida de audio
I
2 V RMS
• Salida digital, óptica, longitud de onda 660 nm
I
-20 ~ -15 dBm
■ SISTEMA ÓPTICO DE LECTURA
• Láser
I
láser semiconductor
• Longitud de onda
I
760~800 nm
• Apertura numérica
I
0,45
■ FORMATO DE SEÑAL
• Frecuencia de muestreo
• Conversión D/A
I
• Supermuestreo
I
I
44,1 kHz
Multibit (conversión sigma-delta)
8 veces
■ GENERAL
• Suministro de corriente I
230 V ~ 50 Hz
• Consumo de corriente
I
23 W
• Dimensiones (An.xAl.xD, incluidas partes salientes)
• Peso (neto)
I
5,6 kg (12,4 lbs)
I
440x112x397 mm (17-5/16x4-7/16x15-4/6 pulgadas)
Notas: diseño y especificaciones sujetos a cambios sin previo aviso.
18
CDC-5506 (G)_Spanish:CDC-5506(E)_ENG 9/9/2011 3:30 PM Page 19
MEMO
19
CDC-5506 (G)_French:CDC-5506(E)_ENG 9/9/2011 7:04 PM Page 2
Introduction
FRANÇAIS
A LIRE AVANT D'UTILISER L'APPAREIL
Ce symbole est destiné à alerter l'utilisateur de la présence
de "tension dangereuse" dans le boîtier du produit pouvant
être d'une ampleur suffisante pour constituer un risque
d'électrocution pour les personnes.
ATTENTION :
POUR RÉDUIRE LE RISQUE DE CHOC ÉLECTRIQUE,
NE RETIREZ PAS LE COUVERCLE (OU LE PANNEAU
ARRIERE). AUCUNE PIÈCE À L'INTÉRIEUR NE PEUT
ÊTRE RÉPARÉE PAR L'UTILISATEUR. VEUILLEZ
VOUS ADRESSER A UN PERSONNEL QUALIFIE.
Ce symbole est destiné à alerter l'utilisateur de la présence
d'importantes instructions d'utilisation et de maintenance
(entretien) dans la documentation accompagnant l'appareil.
AVERTISSEMENT : POUR RÉDUIRE LE RISQUE D'INCENDIE OU DE CHOC ÉLECTRIQUE, N'EXPOSEZ PAS CET APPAREIL À LA
PLUIE OU L'HUMIDITÉ.
PRODUIT LASER DE
CLASSE 1
ATTENTION
Radiation laser invisible quand l'appareil est ouvert.
Ne fixez pas le faisceau.
ATTENTION : L’UTILISATION DE COMMANDES OU DE REGLAGES, OU L'EXECUTION DE PROCEDURES AUTRES QUE CELLES
SPECIFIEES DANS CE MANUEL RISQUE DE CAUSER UNE EXPOSITION A DES RADIATIONS DANGEREUSES.
POUR VOTRE SÉCURITÉ
Les unités expédiées en Australie sont destinées pour fonctionner sur 230 V CA uniquement.
Pour des raisons de sécurité, la fiche trois broches doit être branchée uniquement dans une prise d'alimentation
tripolaire standard connectée directement au circuit de mise à la terre de la maison. Les rallonges à utiliser avec
EUROPE
AUSTRALIE
220 V
240 V
cet équipement doivent être trifilaires et branchées correctement pour assurer une connexion à la terre.
Les rallonges électriques inappropriées sont la cause de tous les accidents mortels. Le fait que l'appareil
fonctionne de façon satisfaisante ne veut pas dire que la source d'alimentation est mise à la terre ou que
l'installation est totalement sans risque. Pour votre sécurité, si vous avez un quelconque doute concernant la
mise à la terre de la source d'alimentation, consultez un électricien qualifié.
VOLTAGE PANEUROPEEN UNIFIE
Tous les appareils peuvent être utilisés sur des sources d'alimentation 220-240 V CA.
2
CDC-5506 (G)_French:CDC-5506(E)_ENG 9/9/2011 7:04 PM Page 3
ATTENTION
Information pour les utilisateurs sur la collecte et
l'élimination des appareils et des piles usagés
Ces symboles apposés sur les produit, l'emballage, ou
figurant dans la documentation qui les accompagne,
indiquent que les piles et appareils électriques et
électroniques usagés doivent être séparés des ordures
ménagères. Pour le traitement, la récupération et le
recyclage des piles et des appareils usagés, veuillez les
porter à l'un des points de collecte, conformément à la
législation nationale en vigueur.
En éliminant les piles et les appareils usagés
correctement, vous contribuez à prévenir le gaspillage
de ressources naturelles précieuses ainsi qu'à protéger
la santé humaine et l'environnement contre les effets
potentiellement nocifs d'une manipulation inappropriée
des déchets.
Pour de plus amples information sur la collecte et le
recyclage des piles et des appareils usagés, contactez
votre municipalité, le service d'élimination des déchets
ou le point de vente où vous avez acheté les produits.
[Information sur l'élimination dans les pays en dehors de
l'Union européenne]
Ces symboles ne sont valables que dans l'Union
européenne. Pour éliminer ces produits, contactez les
autorités locales ou votre revendeur pour connaître la
méthode de mise au rebut appropriée.
Remarque relative aux symboles sur les piles (voir les deux
exemples ci-contre) :
Le symbole Pb ci-dessous indique que cette pile contient
du plomb.
PRÉCAUTIONS
■Condensation d'humidité
L'humidité peut se former sur la lentille dans les conditions suivantes.
• Immédiatement après l'allumage d'un chauffage.
• Dans une pièce embuée ou très humide.
• Lorsque l'appareil est déplacé d'un endroit froid à un endroit chaud.
Si l'humidité se forme à l'intérieur de cet appareil, celui-ci peut ne pas fonctionner correctement.
Dans ce cas, allumez l'appareil et patientez environ une heure pour que l'humidité s'évapore.
■S'il y a des interférences sonores au niveau du téléviseur pendant une émission.
Selon les conditions de réception du téléviseur, des interférences peuvent apparaître sur l'écran du téléviseur pendant que
vous regardez une émission télé et que cet appareil est allumé. Ce n'est ni un dysfonctionnement de cet appareil ni du
téléviseur. Pour regarder une émission télé, éteignez l'appareil.
■Ne transportez pas cet appareil alors qu'il contient des disques.
■Ne placez pas dessus des appareils tels qu'amplificateur ou récepteur qui génèrent de la chaleur.
Si vous le faites, la température interne de l'appareil s'élève et un dysfonctionnement peut se produire.
3
FRANÇAIS
• Laissez un espace autour de l'appareil pour assurer une aération
suffisante.
• Evitez l'installation dans des endroits extrêmement chauds ou froids, ou
dans un endroit qui est exposé directement au soleil ou à des appareils de
chauffage.
• Eloignez l'appareil de toute humidité, eau et poussière.
• Ne laissez pas d'objets étrangers pénétrer dans l'appareil.
• La ventilation ne doit pas être entravée en couvrant les fentes de
ventilation avec des objets tels que journaux, nappes, rideaux, etc.
• Aucune source de flamme nue, telle que des bougies allumées, ne doit
être placée au dessus de l'appareil.
• Pensez à la protection de l'environnement lors de l'élimination des piles.
• L'appareil ne doit pas être exposé au ruissellement ni à la projection d'eau.
• Aucun objet rempli de liquides, tels que des vases ne doit être placé au
dessus de l'appareil.
• Ne laissez pas les insecticides, benzène, et diluant entrer en contact avec
l'appareil.
• Ne jamais démonter/apporter des modifications à l'appareil d'une manière
ou d'une autre.
■Remarques concernant le cordon d'alimentation et la prise murale.
• L'appareil n'est pas déconnecté de la source d'alimentation CA (secteur)
tant qu'il est raccordé à la prise murale, même si l'appareil a été éteint.
• Pour déconnecter totalement cet appareil du secteur, débranchez la fiche
de la prise de courant murale.
• Lorsque vous installez ce produit, assurez-vous que la prise secteur que
vous utilisez est facilement accessible.
• Débranchez la fiche de la prise murale lorsque vous n'utilisez pas
l'appareil pendant de longues périodes.
CDC-5506 (G)_French:CDC-5506(E)_ENG 9/9/2011 7:04 PM Page 4
FRANÇAIS
Sommaire
Introduction
• A LIRE AVANT D'UTILISER L'APPAREIL
I
Connecteurs du panneau arrière
I
5
Panneau avant et télécommande
• PORTEE DE LA TELECOMMANDE
• INSALLATION DES PILES
I
I
2
6
I
9
9
Connaissances préalables des disques et Fichiers
• DISQUES COMPATIBLES
I
10
• DISPOSITIFS DE MEMOIRE USB
I
10
• FORMATS DE FICHIERS AUDIO COMPATIBLES
• ENTRETIEN ET MANIPULATION DES DISQUES
I
I
10
10
Utilisation
• LECTURE DE PISTES/FICHIERS
I
11
• LECTURE ALÉATOIRE
I
13
• REPETITION DE LECTURE
I
13
• LECTURE DES 10 PREMIERES SECONDES DE CHAQUE PISTE/FICHIER
• LECTURE DANS UN ORDRE DONNE
I
14
• CHOIX D'UN AFFICHAGE DES TEMPS (CD audio uniquement)
I
16
• REGLAGE DE LUMINOSITE DE L'ECRAN FLUORESCENT
I
16
• ECOUTE AVEC CASQUE
I
16
Guide de dépannage
Spécifications
I
I
17
18
4
I
14
CDC-5506 (G)_French:CDC-5506(E)_ENG 9/9/2011 7:04 PM Page 5
Connecteurs du panneau arrière
4
5
CDC-5506
N18041
5DISC CD CHANGER
DIGITAL
OPT
DIGI LINK
ANALOG
POWER SOURCE
230V
POWER CONSUMPTION
50Hz
23 W
CLASS 1 LASER PRODUCT
KLASSE 1 LASER PRODUKT
LUOKAN 1 LASER LAITE
KLASS 1 LASER APPARAT
DESIGNED IN USA
ASSEMBLED IN CHINA
L
AVIS : RISQUE DE CHOC ELECTRIQUE-NE PAS OUVRIR.
WARNING : SHOCK HAZARD-DO NOT OPEN.
R
SN.
1. CONNEXION DES SORTIES AUDIO ANALOGIQUES
• Branchez les connecteurs ANALOG L et R aux
connecteurs CD IN de votre amplificateur/récepteur.
ANALOG
Amplificateur/récepteur
Amplifier/receiver
L
CD IN
R
2. CONNEXION DIGILINK
• Raccordez ce connecteur au connecteur DIGILINK du
système amplificateur/récepteur Sherwood afin de pouvoir
contrôler cet appareil à distance par le système DIGILINK II
ou III. (Pour plus de détails, reportez-vous au mode
d'utilisation de l'amplificateur/récepteur Sherwood).
■Remarque :
• L'opération DIGILINK peut ne pas fonctionner sur certains
produits Sherwood.
DIGI LINK
Amplificateur/récepteur
Sherwood
Sherwood amplifier/receiver
DIGILINK
3. CONNEXION DE SORTIE OPTIQUE NUMÉRIQUE
• Raccordez ce connecteur au connecteur OPTICAL DIGITAL
IN de votre amplificateur/récepteur pour bénéficier d'un son
DIGITAL
Amplificateur/récepteur
Amplifier/receiver
numérique.
OPT
■Remarque :
OPTICAL IN
• Il n'est pas recommandé d'enregistrer les signaux audio
numériques avec une connexion audio numérique avec cet
appareil et un enregistreur MD ou CD, etc. Lors
d'enregistrement de sons lus sur cet appareil, utilisez les
connecteurs de sortie audio analogiques ANALOG AUDIO OUT.
• Certains câbles de fibre optique disponibles dans le commerce ne peuvent pas être utilisés avec et appareil. Si un câble de
fibre optique ne peut pas être connecté à votre équipement, consultez le revendeur le plus proche ou un centre de service.
4. Cordon d'alimentation secteur
• Branchez le cordon dans une prise secteur murale.
5. CONNECTEUR DE MISE A JOUR
• Ce connecteur peut être utilisé pour mettre à jour le logiciel d'exploitation, etc.
■Remarque :
• La mise à jour nécessite des connaissances en programmation et c'est pour cette raison que nous recommandons qu'elle ne
soit faite que par des installateurs qualifiés.
5
FRANÇAIS
• Ne branchez pas la prise d'alimentation secteur lors des connexions.
• Veillez à brancher les fiches blanches au connecteur L (gauche) et les fiches rouge au connecteur R (droite)
lors des connexions.
• Consultez le diagramme des raccordements du guide d'utilisation de votre amplificateur/récepteur
CDC-5506 (G)_French:CDC-5506(E)_ENG 9/9/2011 7:04 PM Page 6
Panneau avant et télécommande
FRANÇAIS
Commandes du panneau avant
1
23
2
24
3
5
1
5 DISC CD CHANGER
CDC-5506
2
4
7
3
4
5
DISC SKIP
OPEN / CLOSE
DISC SELECTOR
5 DISC AUTOMATIC LOADING SYSTEM
PHONES
POWER
PROGRAM
INTRO
RANDOM
TIME
DIMMER
REPEAT
USB
ON/ STANDBY
CD/ USB
ON
5V
500mA
OFF
20 16 18 19 17
13 14 10 11 12
Télécommande
2
6
21
13
17
d
a
f
b
c
e
10
16
20
14
15
22
18
6
9
25
8
CDC-5506 (G)_French:CDC-5506(E)_ENG 9/9/2011 7:04 PM Page 7
13. TOUCHE LECTURE ALEATOIRE
1. TOUCHE D'ALIMENTATION
Appuyez sur cette touche pour passer en mode veille.
Appuyez de nouveau sur cette touche pour éteindre
l'appareil.
Appuyez sur cette touche pour lire les pistes/fichiers
dans un ordre aléatoire.
Appuyez sur cette touche pour lire une piste/fichier, un
dossier, ou toutes les pistes/fichiers de façon répétitive.
En mode veille, appuyez sur cette touche pour allumer
l'appareil et entrer en mode fonctionnement.
Dans le mode fonctionnement, appuyez à nouveau sur
cette touche pour éteindre l'appareil et entrer dans le
mode veille.
15. TOUCHE REPETER A↔B
Appuyez sur cette touche pour lire un passage précis
de façon répétitive.
3. TIROIR A DISQUE
16. Touche PROGRAM
Pour charger un disque dans le tiroir à disque.
4. Touche OPEN/CLOSE (
Appuyez sur cette touche pour programmer vos
pistes/fichiers préférés ou pour revoir les pistes/fichiers
programmés.
) (Ouvrir/Fermer)
Appuyez sur cette touche pour ouvrir ou fermer le tiroir à
disque.
17. TOUCHE INTROSCAN
Appuyez sur cette touche pour lire les 10 premières
secondes de chaque piste/fichier.
5. TOUCHES SELECTEUR DE DISQUE
Utilisez ces touches pour sélectionner le disque à lire.
18. Touche TIME
6. Touche DISC
Appuyez sur cette touche pour afficher les différentes
informations de temps d'un CD audio.
Lorsque vous sélectionnez un disque avec cette touche,
appuyez sur celle-ci d'abord puis entrez le numéro de
disque (1 ~ 5) à l'aide des touches numériques dans les
2 secondes.
19. TOUCHE RETROECLAIRAGE
Appuyez sur cette touche pour sélectionner la
luminosité de l'écran fluorescent.
7. Touche DISC SKIP
Pour charger ou décharger des disques, appuyez sur
cette touche pour passer au disque suivant dans le sens
horaire.
20. TOUCHE SELECTEUR CD/USB
Appuyez sur cette touche pour sélectionner le disque
ou la clé USB comme source de lecture.
8. PRISE CASQUE
21. TOUCHES NUMERIQUES (0 ~ 9)
Un casque stéréo peut être connecté dans cette prise
pour une écoute en privé.
9. TOUCHE PLAY/PAUSE (
Appuyez sur les touches correspondantes pour
sélectionner une piste/fichier pour lecture ou
programmation.
)
ⓐAppuyez sur cette touche pour démarrer la lecture en
mode stop ou pause.
ⓑAppuyez sur cette touche pour interrompre
temporairement la lecture.
10. Touche STOP (
22. TOUCHES FOLDER (+/-)
Appuyez sur ces touches pour sélectionner le dossier
souhaité.
23. CAPTEUR À DISTANCE
)
Ceci reçoit les signaux de la télécommande.
Appuyez sur cette touche pour arrêter la lecture ou
effacer les pistes/fichiers programmés.
24. ECRAN FLUORESCENT
Pour plus de détails, reportez-vous à la page suivante.
11. TOUCHE RETOUR RAPIDE/RECHERCHER
(
/ )
25. CONNECTEUR USB
ⓒAppuyez sur cette touche pour relire à partir du
début de la piste/fichier ou retourner à une
piste/fichier précédent.
ⓓMaintenez appuyée cette touche pour rechercher
un passage spécifique en retour rapide.
Pour plus de détails, reportez-vous à la page suivante.
■SYSTEME DE TELECOMMANDE DIGILINK
Cet appareil peut être contrôlé à distance au moyen
d'un amplificateur ou récepteur Sherwood DIGILINK III.
• Pour connaître les fonctions disponibles,
reportez-vous au mode d'emploi de l'appareil
compatible.
• Pour écouter un CD via le système DIGILINK,
établissez d'abord une connexion DIGILINK
entre cet appareil et l'amplificateur ou le
récepteur compatible Sherwood.
12. TOUCHE AVANCE RAPIDE/RECHERCHER
(
/
)
ⓔAppuyez sur cette touche pour démarrer la lecture
à partir du début de la piste/fichier suivant.
ⓕMaintenez appuyée cette touche pour rechercher
un passage précis en avance rapide.
7
FRANÇAIS
14. TOUCHE REPEAT (1/F/ALL) (1/F/Tout)
2. Touche POWER ON/STANDBY (allumer/veille)
CDC-5506 (G)_French:CDC-5506(E)_ENG 9/9/2011 7:04 PM Page 8
FRANÇAIS
■CONNECTEUR USB
• Une clé USB peut être raccordée au connecteur USB pour écouter des fichiers MP3 ou
WMA stockés sur la clé USB via cet appareil.
■ Remarque :
• Après la lecture USB, retirez la clé USB dans le mode stop ou veille.
Clé USB
■ECRAN FLUORESCENT
1
2
PROG
3
RANDOM REPEAT ALL 1 DISCS
A< >B
INTRO
SCENE TRACK
1
2
3
4
4
5
5
6
7
1. Indicateur PROGRAMME
2. Indicateur LECTURE ALEATOIRE
3. Affichage REPETITION
4. Affichage du numéro de tiroir à disque
8
1 2
4 5
7 8
10 11
13 14
3
6
9
12
9
5. Indicateur de LECTURE
6. Indicateur de PAUSE
7. Numéro de Piste/fichier, temps de lecture,
informations d'utilisation, etc.
8. Indicateur INTROSCAN
9. Affichage ORDRE DE LECTURE
• 1~5 : Numéros des tiroirs à disque
•
: S'allume lorsque les disques sont chargés.
•
: S'allume pour afficher le disque en cours de
lecture.
8
CDC-5506 (G)_French:CDC-5506(E)_ENG 9/9/2011 7:04 PM Page 9
PORTEE DE LA TELECOMMANDE
CDC-5506
2
3
4
5
DISC SKIP
FRANÇAIS
1
5 DISC CD CHANGER
OPEN / CLOSE
DISC SELECTOR
5 DISC AUTOMATIC LOADING SYSTEM
PHONES
POWER
PROGRAM
INTRO
RANDOM
TIME
DIMMER
REPEAT
USB
ON/ STANDBY
CD/ USB
ON
5V
500mA
OFF
• Vous pouvez utiliser la télécommande dans un
rayon d'environ 7 mètres (23 pieds) et des angles
jusqu'à 30 degrés tout en visant le capteur de la
télécommande.
INSTALLATION DES PILES
1. Démontez le couvercle.
2. Insérez deux piles ("AAA", 2 x 1,5 V) en
respectant les polarités.
• Retirez les piles quand vous n'allez pas utiliser
l'appareil pendant une longue période.
• N'utilisez pas des piles rechargeables (type Ni-Cd).
9
CDC-5506 (G)_French:CDC-5506(E)_ENG 9/9/2011 7:04 PM Page 10
Connaissance préalable des disques et fichiers
■WMA(Windows Media Audio)
• Fréquence d'échantillonnage : 32, 44,1, 48 kHz
• Débit : 32 ~ 320 kbps
• Extension :.wma,.WMA
• Les Tag WMA ne sont pas disponibles
• Windows Media et le logo Windows sont des marques
commerciales ou des marques déposées de Microsoft Corporation
aux Etats-Unis et/ou dans d'autres pays.
■Remarque :
• Les dossiers peuvent être jusqu'à dix niveaux d'imbrication.
• Pour certains fichiers, il est possible que certaines fonctions ne
soient pas disponibles pendant la lecture.
• Les fichiers protégés par DRM (Digital Rights Management) ne
peuvent pas être lus.
• Lorsque les données d'un fichier/dossier est plus grande que la
capacité de mémoire de l'appareil, certains fichiers, etc. peuvent ne
pas être reconnus et lus.
FRANÇAIS
DISQUES COMPATIBLES
Cet appareil supporte les disques suivants.
Disque
Disc
Logo
Logo
Format
ou or
type
fichier
Format
filede
type
Audio CD
PCM
PCM
CD-R
CD audio,
MP3,
WMA
Audio
CD, MP3,
WMA
CD-RW
CD audio,
MP3,WMA
WMA
Audio
CD, MP3,
ENTRETIEN ET MANIPULATION DES
DISQUES
• Cet appareil supporte les disques CD-R et CD-RW enregistrés
au format CD audio (CD-DA) MP3 ou WMA.
• Seuls les disques CD-R et CD-RW enregistré au format
ISO9660 sont compatibles.
• Cet appareil supporte les disques multisessions. Certains
disques multisessions peuvent prendre un certain temps pour
être chargés et certains ne peuvent pas être chargés du tout.
• Pour manipuler un disque, tenez-le
soigneusement par les bords.
■ Disques non compatibles
• Etant donné que cet appareil ne supporte pas les types de
disques, formats et types de fichiers non listés ci-dessus, il
convient de ne pas lire de tels disques/fichiers.
• Certains disques CD-R et CD-RW ne sont pas compatibles
car la finalisation des disques est incomplète, la qualité de
l'enregistrement ou l'état physique du disque, les
caractéristiques de l'appareil d'enregistrement ou du logiciel
de gravure, etc.
Pour plus d'informations, reportez-vous au mode d'emploi
fourni avec votre appareil d'enregistrement.
• Certains CD audio utilisent des protections contre la copie qui
n'est pas conforme à la norme CD officielle. Cet appareil ne
peut pas les lire correctement car ils ne sont pas des disques
standards.
• Quand un CD audio est enregistré en DTS-ES ou Dolby
Digital EX est lu, du bruit peut être entendu.
• Ne collez pas de papier et n'inscrivez
rien sur la surface imprimée.
• Les traces de doigts et la poussière
sur la surface enregistrée doivent
être soigneusement essuyées avec
un chiffon doux. Essuyez de
l'intérieur vers l'extérieur du disque
selon une ligne droite.
• Gardez toujours les disques dans
leurs pochettes après utilisation afin
de les protéger de la poussière et des
rayures.
CLE USB
• Une clé USB peut être raccordée au connecteur USB du
panneau avant pour lire les fichiers MP3 ou WMA stockés sur
cette clé.
• Seuls les clés USB conformes à la classe de stockage de
masse et aux normes MTP (Media Transfer Protocol) peuvent
être lus sur cet appareil.
• Cet appareil supporte les systèmes de fichiers FAT16 ou
FAT32 pour les clés USB.
• N'utilisez pas un disque fissuré, déformé ou réparé.
Ces disques se brisent facilement et peuvent provoquer des
blessures graves ou endommager l'appareil.
FORMATS DE FICHIERS AUDIO
COMPATIBLES
■Remarque :
• N'exposez pas les disques directement au soleil, l'humidité ou
à une température élevée pendant une longue période.
• Posez toujours les disques avec la face imprimée vers le haut
lors du chargement du tiroir à disque.
■MP3(MPEG-1 Audio Layer-3)
• Fréquence d'échantillonnage : 32, 44,1, 48 kHz
• Débit : 32 ~ 320 kbps
• Extension :.mp3,.MP3
• Il est recommandé d'utiliser un débit fixe. Des fichiers à débit
variable (VBR) sont compatibles, mais le temps de lecture
peut ne pas être affiché correctement.
• Les Tag ID3 ne sont pas disponibles.
• Le codage audio MPEG Layer-3 est une technologie sous
licence de Fraunhofer IIS et Thomson.
1
5 DISC CD CHANGER
CDC-5506
2
3
4
5
DISC SKIP
OPEN / CLOSE
DISC SELECTOR
5 DISC AUTOMATIC LOADING SYSTEM
PHONES
POWER
PROGRAM
INTRO
RANDOM
TIME
DIMMER
REPEAT
USB
ON/ STANDBY
CD/ USB
ON
10
OFF
TiroirTray
à disque
FacePrinted
imprimée
side
5V
500mA
CDC-5506 (G)_French:CDC-5506(E)_ENG 9/9/2011 7:04 PM Page 11
Utilisations
LECTURE DE PISTES/FICHIERS
3. Selon la source de lecture sélectionnée, insérez
• Appuyez sur la touche POWER.
des disques ou connectez une clé USB.
OPEN / CLOSE
ou
• Cette touche reste appuyée, l'appareil passe en mode veille.
• Appuyez de nouveau sur cette touche pour éteindre
l'appareil.
• Puis le courant est coupé.
■Mode veille
• En mode veille, l'appareil n'est pas déconnecté de
l'alimentation secteur et une petite quantité de courant est
conservée pour une remise en marche immédiatement.
Exemple : CD Audio
■Économie d'énergie automatique
Ordre de lecture
• La fonction Économie d'énergie éteint automatiquement
l'appareil pour le mettre en mode veille. la fonction économie
d'énergie automatique s'active, lorsque l'appareil reste en
mode stop, pause, etc. pendant plus de 30 minutes.
SCENE TRACK
STEP
1
2
3
4
5
1 2
4 5
7 8
10 11
13 14
3
6
9
12
Nombre total Temps total
de lecture
de pistes
1. En mode veille, allume l'appareil.
Exemple : Fichiers audio (923 fichiers et 15 dossiers)
ou
SCENE
9
ON/ STANDBY
1
2
3
4
5
+
Nombre total de
fichiers
• Lorsque le nombre de fichiers est supérieur à 99 (soit un
nombre à trois chiffres), le troisième chiffre du nombre est
affiché dans l'Ordre de lecture.
• L'indicateur "
" s'allume dans l'Ordre de lecture lorsque le
nombre de pistes est supérieur à 14.
• Pour le chargement des disques dans les autres tiroirs,
appuyez sur la touche DISC SKIP.
• Les disques 8 cm (3 pouces) peuvent également être chargés
sur le cercle intérieur du tiroir.
• Cela peut prendre beaucoup de temps pour charger un disque
ou une clé USB qui contient plusieurs fichiers et/ou dossiers,
etc.
• Chaque fois que cette touche est appuyée, l'appareil est
allumé pour entrer en mode fonctionnement ou en mode
veille.
2. Sélectionne le disque ou la clé USB comme
source de lecture.
CD/ USB
Nombre total
de dossiers
ou
■ Remarque :
• Ne forcez pas l'ouverture et la fermeture du tiroir à disque.
Cela peut l'endommager.
• Chaque fois que cette touche est appuyée, la source de
lecture change comme suit :
“CD” ↔ “USB”
■Remarque :
• Selon la source de lecture sélectionnée, les touches
DISC SELECTOR ou FOLDER (+/-), etc. ne fonctionnent
pas.
11
FRANÇAIS
Avant utilisation
CDC-5506 (G)_French:CDC-5506(E)_ENG 9/9/2011 7:04 PM Page 12
4.
Sélection d'un disque
Démarrer la lecture.
• Appuyez sur la touche correspondante pour lancer la
lecture du disque souhaité.
FRANÇAIS
ou
Exemple : En sélectionnant le disque 4
4
dans les
2 sec.
ou
• L'indicateur “
” s'allume.
• L'appareil lit la première piste/fichier, à partir du disque
actuel à la dernière sur le 5ème disque.
5.
Pour interrompre temporairement la lecture.
• La première piste/fichier du disque sélectionné sera lu.
ou
Sélection d'une piste/fichier en cours de lecture
Pour revenir en arrière
• L'indicateur “
” s'allume.
• Pour reprendre le lecture, appuyez sur la touche
LECTURE (“
” ou “ ”).
6.
ou
Pour
avancer
Pour arrêter la lecture.
• Chaque fois que la touche est appuyée, une piste/fichier
est ignorée.
• Lorsque la touche RETOUR RAPIDE (
) est appuyée
une fois à mi-chemin sur une piste/fichier, la lecture
revient au début. Quand elle est à nouveau appuyée, une
piste/fichier est ignorée.
• Lorsque vous utilisez les touches numériques de la
télécommande.
ou
Changement de disques pendant la lecture
1.
Exemple :
Ouvrez le tiroir à disque.
Pour “3” : 3
les 2
2 sec.
within
sec.
Pour “15” : 1 dans
OPEN / CLOSE
les 2
2 sec.
within
sec.
Pour “123” : 1 dans
5
2
dans les22 sec.
sec.
within
3
Pour une lecture rapide vers l'avant ou l'arrière
2.
• Maintenez appuyée la touche jusqu'à ce que le passage
désiré soit atteint.
Placez les disques souhaités.
Pour un retour rapide
ou
Pour une
avance
rapide
Tiroir à disque
• Pendant la lecture, disque ①, ③ et ④ peuvent être
changés.
• Après avoir changé les disques, appuyez sur la touche
(OUVRIR/FERMER (
)) pour fermer le tiroir à disque.
• Lors du changement du disque ② ou ⑤, appuyez sur la
touche DISC SKIP et fermez le tiroir à disque.
12
CDC-5506 (G)_French:CDC-5506(E)_ENG 9/9/2011 7:04 PM Page 13
REPETITION DE LECTURE
Sélection d'un dossier pendant la lecture
Pour sélectionner le
précédent
• Vous pouvez lire à plusieurs reprises une piste/fichier, un
dossier, toutes les pistes/fichiers ou un passage précis.
• Pendant la lecture d'une piste/fichier ou dossier,
Pour sélectionner le
suivant
• Chaque fois que la touche est appuyée, le dossier
précédent ou suivant est sélectionné et le premier fichier
dans ce dossier est automatiquement lu.
ou
LECTURE ALÉATOIRE
• Chaque fois que cette touche est appuyée, le mode
répétition change comme suit.
ou
• En cas de CD audio
→UN ("REPETER 1") : Répétition de piste
↓
Disque ("REPETER 1 DISQUE") : Répétition de Disque
↓
TOUT ("REPETER TOUS LES DISQUES") : Répétition de tous
les disques
↓
Désactivé : Le mode Répétition est désactivé
• L'indicateur “ RANDOM ” s'allume.
• Chaque fois que la touche est appuyée, le mode aléatoire
change comme suit :
• Dans le cas de CD
→ 1 Disque → Tous les disques → Désactivé
• Dans le cas d'un CD contenant des fichiers
→UN ("REPETER 1 ") : Répétition d'un fichier
↓
DOSSIER ("REPETER") : Répétition de dossier
↓
Disque ("REPETER 1 DISQUE") : Répétition de disque
↓
TOUT ("REPETER TOUS LES DISQUES") : Répétition de tous
les disques
↓
Désactivé : Le mode Répétition est désactivé
• Dans le cas de clé USB
1 Disque ↔ Désactivé
• L'appareil sélectionne automatiquement et lit dans un
ordre aléatoire.
• Appuyez sur cette touche pour annuler la lecture
aléatoire.
■Remarque :
• La lecture aléatoire saute la piste/dossier qui a 100
pistes/fichiers ou plus.
• Lorsque les touches numériques sont appuyées pendant
la lecture aléatoire ou la lecture d'un programme, la
lecture aléatoire ou la lecture du programme est annulée.
(Cependant, le contenu programmé n'est pas effacé. Pour
rappeler le contenu programmé, appuyez sur la touche
PROGRAM en mode stop.)
• Dans le cas de clé USB
→Disque ("REPETER 1 DISQUE") : Répéter tous les fichiers
↓
UN ("REPETER 1 ") : Répétition d'un fichier
↓
DOSSIER ("REPETER") : Répétition de dossier
↓
Désactivé : Le mode Répétition est désactivé
■Remarque :
• Pendant la lecture aléatoire ou Introscan, vous ne pouvez
sélectionner que le mode répétition toutes les
pistes/fichiers.
• Pendant la lecture d'un programme, le mode répétition de
dossier ne peut pas être sélectionné.
13
FRANÇAIS
Répétition d'une piste/fichier, un
dossier, toutes les pistes/fichiers
CDC-5506 (G)_French:CDC-5506(E)_ENG 9/9/2011 7:04 PM Page 14
LECTURE DANS UN ORDRE PROGRAMME
Répétition d'un passage précis
FRANÇAIS
1.
• On peut programmer jusqu'à 32 pistes/fichiers pour lire
dans n'importe quel ordre souhaité.
Pendant la lecture au début du passage désiré,
appuyez sur la touche REPEAT A↔B.
1.
En mode stop, entrez dans le mode programme.
PROGRAM
• Les indicateurs “ REPEAT ” et “ A< > ” s'allument.
ou
• L'indicateur “ PROG ” se met à clignoter.
2. A la fin du passage désiré, appuyez à nouveau
2. Sélectionnez la piste/fichier souhaité et
sur la touche REPEAT A↔B.
stockez-le dans la mémoire.
• L'indicateur “ B ” s'allume également et le passage désiré
est lu à plusieurs reprises.
• Appuyez à nouveau sur cette touche pour annuler la
répétition A ↔ B.
PROGRAM
■Remarque :
• La répétition A ↔ B ne fonctionne qu'avec une
piste/fichier.
• Pendant la lecture aléatoire ou Introscan, la répétition
A↔B ne fonctionne pas.
ou
LECTURE DES 10 PREMIERES
SECONDES DE CHAQUE PISTE/FICHIER
Exemple :
Lors de la sélection et le stockage de la piste 4 d'un CD audio
Piste n°
PROG
TRACK
1
2
3
4
5
• Chaque fois que cette touche est appuyée, le mode intro
change comme suit :
Ordre programmé
• Dans le cas de CD
→ 1 Disque INTRO → Tous les Disques INTRO → Désactivé
• Vous pouvez sélectionner une piste/fichier en utilisant les
touches numériques.
Exemple :
• Dans le cas de clé USB
1 Disque ↔ Désactivé
Pour “3” : 3
• L'appareil lit les 10 premières secondes de chaque
piste/fichier.
• Appuyez sur cette touche pour annuler la lecture
Introscan.
■Remarque :
• Pendant la lecture d'un programme, Introscan ne
fonctionne pas.
• Pendant la lecture de tous les disques Introscan,
l'appareil ne lit que la première piste sur chaque disque
pendant 10 secondes.
Pour “15” : 1
Pour “123” : 1
dans les22 sec.
within
sec.
dans
les 2
2 sec.
within
sec.
5
2
dans
les 2
within
2 sec.
sec.
• La piste/fichier sera sélectionné est stocké
automatiquement sans appuyer sur la touche
PROGRAMME.
14
3
CDC-5506 (G)_French:CDC-5506(E)_ENG 9/9/2011 7:04 PM Page 15
Répétez l'étape 2 ci-dessus jusqu'à ce que toutes
les pistes/fichiers souhaités soient programmés.
4.
Démarrez la lecture d'un programme.
■Pour effacer toutes les pistes/fichiers programmés
• Appuyez sur la touche STOP ( ) pendant plus de 4
secondes en mode programme.
• L'ouverture du tiroir à disque ou la sélection d'une autre
source de lecture, efface également toutes les
pistes/fichiers programmés.
■Pour effacer une piste/fichier précis
• Trouvez la piste/fichier et l'effacer en mode programme..
PROGRAM
ou
ou
• La lecture démarre dans l'ordre programmé.
Vérification des pistes/fichiers programmés
• Chaque fois que la touche PROGRAMME est appuyée en
mode programme, les pistes/fichiers programmés sont
affichés dans l'ordre programmé.
Remplacer toute piste/fichier
programmé
Exemple :
Lorsque les pistes 5, 9 et 7 sont programmées et vous
voulez remplacer la piste 9 avec la piste 10 sur un CD
audio.
PROGRAM
ou
1.
localisez la piste (/fichier) 9 en mode
programme.
PROGRAM
Effacer les pistes/fichiers programmés
ou
■Pour effacer un par un
• Chaque fois que la touche STOP ( ) est appuyée en
mode programme, les pistes/fichiers programmés sont
effacés un par un dans l'ordre inverse.
PROG
TRACK
STEP
1
2
3
4
5
ou
• Puis la piste (/fichier) programmée est affichée pendant
quelques secondes.
15
FRANÇAIS
3.
CDC-5506 (G)_French:CDC-5506(E)_ENG 9/9/2011 7:04 PM Page 16
REGLAGE DE LA LUMINOSITE DE
L'ECRAN FLUORESCENT
2. Tout en affichant la piste (/fichier) à remplacer
FRANÇAIS
par une nouvelle piste, sélectionnez la piste
(/fichier) 10 et stockez-la en mémoire.
DIMMER
PROGRAM
ou
• Chaque fois que cette touche est appuyée, la
luminosité de l'écran fluorescent change comme suit.
→ Activé → Rétroéclairage → Désactivé
• En mode affichage Désactivé, appuyez sur une
touche quelconque pour annuler l'affichage Désactivé
et afficher l'état de fonctionnement.
PROG
ECOUTE AVEC CASQUE
TRACK
STEP
1
2
3
4
5
• Vous pouvez sélectionner une piste (/fichier) à l'aide des
touches numériques.
dans les22 sec.
sec. 0
Exemple : Pour "10" : 1 within
• Lorsque vous sélectionnez une piste avec les touches
numériques, la piste sélectionnée est stockée
automatiquement sans la touche PROGRAM.
• Lorsque la piste/fichier à remplacer disparaît, effectuez à
nouveau l'étape 1 ci-dessus.
• Pour une écoute privée, insérez la prise casque dans
le connecteur PHONES.
PHONES
SÉLECTION DU TEMPS A AFFICHER
(CD audio uniquement)
• Pendant la lecture,
■Remarque :
• Veillez à ce que le volume ne soit pas trop fort
lorsque vous utilisez un casque.
TIME
ou
• Chaque fois que cette touche est appuyée, l'affichage de
temps change comme suit.
TRACK
INDEX
→
1
2
3
4
5
7 8 9
10 11 12
Temps écoulé de la piste actuelle
↓
TRACK
INDEX STEP
1
2
3
4
5
7 8 9
10 11 12
Temps restant de la piste actuelle
↓
1
2
3
4
5
7 8 9
10 11 12
Temps restant du disque
• Pendant la lecture aléatoire, etc., l'affichage du temps peut
être “--:--”.
16
CDC-5506 (G)_French:CDC-5506(E)_ENG 9/9/2011 7:04 PM Page 17
Guide de dépannage
PROBLEME
CAUSE POSSIBLE
REMEDE
Ne s'allume pas
• Le cordon d'entrée secteur est débranché.
• Mauvais branchement de prise murale ou celleci est hors tension.
• Bien brancher le cordon secteur.
• Vérifiez la prise en utilisant une lampe ou un
autre appareil.
Lecture impossible
• Le disque est chargé à l'envers.
• Rechargez le disque avec la face imprimée
vers le haut.
• Nettoyez le disque.
• Chargez un autre disque.
• Voir "Disques non compatibles" à la page 10.
• Seuls les fichiers audio aux formats MP3 et
WMA sont compatibles.
• Disque sale.
• Disque défectueux ou rayé profondément.
• Le CD-R/CD-RW n'est pas standard.
• Des fichiers audio sont enregistrés dans des
formats non compatibles.
Pas de son
Son de mauvaise
qualité ou déformé
• Faites les connexions correctement.
• Utilisez l'amplificateur/récepteur correctement.
• Connexions incorrectes.
• Utilisation incorrecte de
l'amplificateur/récepteur.
• L'indicateur " "s'allume.
• Appuyez sur la touche "
mode pause.
• L'appareil est connecté aux connecteurs
d'entrée PHONO de l'amplificateur/récepteur.
• Mauvaises connexions.
" pour annuler le
• Faites les connexions correctement.
• Vérifiez les connexions et bien raccordez tous
les câbles.
Saut en cours de
lecture
• Disque défectueux ou rayé profondément.
• L'appareil est placé sur une surface qui est
soumise à des vibrations ou des chocs.
• Essayez de lire un autre disque.
• Placez l'appareil sur une surface stable.
Programmation
impossible
• Le disque est sale ou rayé.
• La procédure de programmation n'est pas
correcte.
• Le nombre de pistes/fichiers programmés est
32.
• Réessayez avec un disque sans rayures.
• Réessayez.
Ça prend beaucoup
de temps à lire un
disque ou une clé
USB.
• La lecture d'un disque ou une clé USB
contenant plusieurs fichiers et dossiers, peut
prendre beaucoup de temps.
17
• Vérifiez le nombre de pistes/fichiers
programmés.
• Ceci n'est pas un dysfonctionnement.
FRANÇAIS
Si une panne se produit, consultez le tableau ci-dessous avant d'emmener votre appareil pour réparation.
Si la panne persiste, essayez de le résoudre en éteignant l'appareil et l'allumant de nouveau. Si la panne persiste encore,
consultez votre revendeur. En aucun cas vous ne devez tenter de réparer l'appareil vous-même. Cela pourrait annuler la
garantie.
CDC-5506 (G)_French:CDC-5506(E)_ENG 9/9/2011 7:04 PM Page 18
FRANÇAIS
Spécifications
■PERFORMANCES AUDIO TYPIQUES
• Nombre de canaux
I
2
• Réponse en fréquence, 20~20,000 Hz
I
±0,8 dB
• Rapport signal sur bruit, pondéré A
I
94 dB
• Gamme dynamique
I
86 dB
• Distorsion Harmonique totale, 1 kHz
I
0,009 %
• Pleurage et scintillement
I
Précision de cristal de quartz
• Niveau de sortie audio
I
2 V RMS
• Sortie numérique, optique, longueur d'onde 660 nm
I
-20 ~ -15 dBm
■ SYSTEME DE LECTURE OPTIQUE
• Laser
I
Laser semi-conducteur
• Longueur d'onde
I
760~800 nm
• Ouverture numérique
I
0,45
■ FORMAT DU SIGNAL
• Fréquence d'échantillonnage
I
44,1 kHz
• Conversion Numérique/Analogique
I
Multibit (Sigma-delta conversion)
• Suréchantillonnage
I
8 fois
■ GENERAL
• Alimentation
I
230 V ~ 50 Hz
• Consommation d'énergie
I
23 W
• Dimensions (L×H×P, parties saillantes incluses)
• Poids net :
I
5,6 kg (12.4 lbs)
I
440x112x397 mm (17-5/16x4-7/16x15-4/6 pouces)
Remarque : À cause des améliorations continues, la conception et les caractéristiques peuvent être modifiées sans préavis.
18
CDC-5506 (G)_French:CDC-5506(E)_ENG 9/9/2011 7:04 PM Page 19
MEMO
19
CDC-5506 (G)_Russian:CDC-5506(E)_ENG 9/9/2011 5:03 PM Page 2
Введение
РУССКИЙ
ПРОЧТИТЕ ДО ИСПОЛЬЗОВАНИЯ УСТРОЙСТВА
Этот символ предупреждает потребителя о наличии
не изолированных компонентов с опасным
напряжением в корпусе продукта, могущих привести к
поражению электрическим током.
ВНИМАНИЕ:
ДЛЯ СНИЖЕНИЯ ОПАСНОСТИ ПОРАЖЕНИЯ
ЭЛЕКТРИЧЕСКИМ ТОКОМ НЕ ОТКРЫВАЙТЕ КРЫШКУ
(ИЛИ ЗАДНЮЮ ПАНЕЛЬ) ВНУТРИ НЕТ ЧАСТЕЙ
ОБСЛУЖИВАЕМЫХ ПОТРЕБИТЕЛЕМ ДЛЯ СЕРВИСА
ОБРАТИТЕСЬ К КВАЛИФИЦИРОВАННОМУ
СПЕЦИАЛИСТУ
ПРЕДУПРЕЖДЕНИЕ:
Этот символ предназначен для предупреждения
потребителя о наличии важных инструкций по
эксплуатации и техническому обслуживанию (ремонту)
в руководствах, включенных в комплект устройства.
ЧТОБЫ УМЕНЬшИТЬ РИСК ПОЖАРА ИЛИ ПОРАЖЕНИЯ эЛЕКТРИЧЕСКИМ ТОКОМ, НЕ ПОДВЕРгАЙТЕ ДАННОЕ
УСТРОЙСТВО ВОЗДЕЙСТВИю ДОЖДЯ ИЛИ ВЛАгИ.
КЛАСС 1
ЛАЗЕРНЫЙ ПРОДУКТ
ВНИМАНИЕ!
Невидимая лазерная радиация, когда устройство открыто.
Не смотрите на луч.
ВНИМАНИЕ! ИСПОЛЬЗОВАНИЕ ЛЮБЫХ ЭЛЕМЕНТОВ УПРАВЛЕНИЯ, НАСТРОЕК ИЛИ ПРОЦЕДУР, ОТЛИЧНЫХ ОТ
ОПИСАННЫХ ЗДЕСЬ, МОЖЕТ ПРИВЕСТИ К ОПАСНОМУ ВОЗДЕЙСТВИЮ РАДИАЦИОННОГО ОБЛУЧЕНИЯ.
МЕРЫ БЕЗОПАСНОСТИ
Устройства, поставляемые в Австралию разработаны только для работы под напряжением 230 В.
Для безопасной работы трехконтактный штепсель из комплекта следует включать только в
стандартный заземленный трехконтактный разъем питания домашней электросети. Удлинители,
ЕВРОПА
АВСТРАЛИЯ
220 В
240 В
использованные с оборудованием, должны быть трехпроводными и быть правильно заземленными.
Неподходящие удлинители являются основной причиной летальных исходов. Удовлетворительная
работа оборудования не означает, что разъем питания заземлен и что установка полностью
безопасна. Для обеспечения безопасности, при малейшем сомнении в правильном заземлении
разъема питания обратитесь к квалифицированному электрику.
ОБЩЕЕВРОПЕЙСКОЕ ЕДИННОЕ НАПРЯЖЕНИЕ
Все устройства подходят для использования под напряжением 220-240 В переменного тока.
2
CDC-5506 (G)_Russian:CDC-5506(E)_ENG 9/9/2011 5:03 PM Page 3
ВНИМАНИЕ!
Информация потребителям по сбору и
утилизации старого оборудования и
использованных батарей
Эти символы на продуктах, упаковке и/или
сопроводительной документации означают, что
использованные электрические и электронные
продукты и батареи не следует смешивать с
обычными бытовыми отходами. Для надлежащей
обработки, утилизации и переработки старого
оборудования и батарей, пожалуйста, сдайте их в
специальные пункты сбора в соответствии с
национальным законодательством.
Сдав эти продукты и батареи надлежащим образом,
вы поможете сохранить ценные ресурсы и
предотвратить возможные отрицательные
последствия для здоровья человека и окружающей
среды, которые могут возникнуть из-за
неправильного обращения с отходами.
Для получения дополнительной информации о сборе
и переработке старого оборудования и батарей,
пожалуйста, обратитесь в местный муниципалитет,
службу утилизации отходов или организацию
продаж, где вы приобрели оборудование.
[Информация по обращению с отходами для стран, не
входящих в Европейский союз]
Эти символы являются действительными только в
Европейском союзе. Если вы хотите избавиться от
этих товаров, пожалуйста, обратитесь в местный
орган власти или к поставщику товара, как следует
поступать с отходами.
Примечание к символу батареи (Значение двух
символов внизу):
Знак Pb под символом батареи указывает, что она
содержит свинец.
МЕРЫ ПРЕДОСТОРОЖНОСТИ
■Конденсация влаги
На линзах может образоваться влага при следующих условиях:
• Сразу же после включения нагревателя.
• В запаренном или очень влажном помещении.
• При перемещении устройства из холодного места в теплое.
Образование влаги внутри устройства может привести к его неправильному функционированию.
В этом случае выключите питание и подождите примерно час для испарения влаги.
■Если на телевизоре есть шумовые помехи при приеме передачи.
В зависимости от состояния приема телевизора при просмотре передач на экране могут возникнуть помехи, если
устройство оставлено включенным. Это не является неисправностью устройства или телевизора. При просмотре
телепередач выключайте устройство.
■Не перевозите устройство с оставленными внутри дисками.
■Не ставьте устройство на компоненты как усилитель или приемник, которые генерируют тепло.
В этом случае повышается температура внутри устройства и могут возникнуть неисправности.
3
РУССКИЙ
• Обеспечьте достаточно пространства около устройства для
нормальной вентиляции.
• Избегайте установки в чрезмерно горячих или холодных местах, или в
местах, которые подвергаются воздействию прямых солнечных лучей
и нагревательных приборов.
• Берегите устройство от влаги, воды и пыли.
• Не оставляйте посторонних предметов на устройстве.
• Не следует затруднять вентиляцию закрывая вентиляционные
отверстия газетами, полотенцами, занавесками и т. п.
• Не ставьте на устройство источников открытого пламени, напр.
зажженных свечей и т. п.
• Пожалуйста, не забывайте об экологических последствиях
утилизации батарей.
• При пользовании не следует подвергать устройство воздействию
брызг или капель.
• Не следует ставить на устройство никаких сосудов с жидкостью,
напр. ваз.
• Не допускайте контакт устройства с инсектицидами, бензином и
разбавителями.
• Запрещается разбирать или переделывать устройство каким-либо
образом.
■Примечания к шнуру питания и розетке переменного тока.
• Даже если устройство выключено, оно не отключается от источника
питания переменного тока (сети), пока оно включено в розетку.
• Для полного отключения устройства от источника питания выньте
штепсель из розетки.
• При установке продукта убедитесь, что разъем питания переменного
тока находится в легко доступном месте.
• Вынимайте штепсель из розетки, если прибор не используется в
течение длительного периода времени.
CDC-5506 (G)_Russian:CDC-5506(E)_ENG 9/9/2011 5:03 PM Page 4
РУССКИЙ
СОДЕРЖАНИЕ
Введение
• ПРОЧТИТЕ ДО ИСПОЛЬЗОВАНИЯ УСТРОЙСТВА
Разъемы задней панели
I
I
2
5
Передняя панель и пульт дистанционного управления
• РАДИУС ДЕЙСТВИЯ ДИСТАНЦИОННОГО УПРАВЛЕНИЯ
• УСТАНОВКА ЭЛЕМЕНТОВ ПИТАНИЯ
I
9
Предварительная информация о дисках и файлах
• ВОСПРОИЗВОДИМЫЕ ДИСКИ
I
10
• ПАМЯТЬ USB
I
10
• ВОСПРОИЗВОДИМЫЕ ФОРМАТЫ АУДИО ФАЙЛОВ
• УХОД И ОБРАЩЕНИЕ С ДИСКАМИ
I
10
I
I
I
6
9
10
Функции управления
• ВОСПРОИЗВЕДЕНИЕ ТРЕКОВ/ФАЙЛОВ
I
11
• ВОСПРОИЗВЕДЕНИЕ В СЛУЧАЙНОМ ПОРЯДКА
I
13
• НЕОДНОКРАТНОЕ ВОСПРОИЗВЕДЕНИЕ
I
13
• ВОСПРОИЗВЕДЕНИЕ ПЕРВЫХ 10 СЕКУНД КАЖДОГО ТРЕКА/ФАЙЛА
• ВОСПРОИЗВЕДЕНИЕ В ЖЕЛАЕМОМ ПОРЯДКЕ
I
14
• ВЫБОР ИНДИКАЦИИ ВРЕМЕНИ (Только аудио CD)
I
16
• НАСТРОЙКА ЯРКОСТИ ФЛУОРЕСЦЕНТНОГО ДИСПЛЕЯ
I
16
• ПРОСЛУШИВАНИЕ С НАУШНИКАМИ
I
16
Руководство по устранению неисправностей
Технические характеристики
I
I
18
4
17
I
14
CDC-5506 (G)_Russian:CDC-5506(E)_ENG 9/9/2011 5:03 PM Page 5
Разъемы задней панели
• Не включайте шнур питания переменного тока в розетку при выполнении соединений.
• Обязательно подключите белый штекер к разъему L (левому) и красный штекер к разъему R (правому).
• Обратитесь к схеме соединений и руководству по эксплуатации вашего усилителя/приемника.
РУССКИЙ
4
5
CDC-5506
N18041
5DISC CD CHANGER
DIGITAL
OPT
DIGI LINK
ANALOG
POWER SOURCE
230V
POWER CONSUMPTION
50Hz
23 W
CLASS 1 LASER PRODUCT
KLASSE 1 LASER PRODUKT
LUOKAN 1 LASER LAITE
KLASS 1 LASER APPARAT
DESIGNED IN USA
ASSEMBLED IN CHINA
L
AVIS : RISQUE DE CHOC ELECTRIQUE-NE PAS OUVRIR.
WARNING : SHOCK HAZARD-DO NOT OPEN.
R
SN.
1. ПОДКЛюЧЕНИЕ АНАЛОгОВЫХ АУДИО ВЫХОДОВ
• Свяжите разъемы ANALOG L и R с разъемами CD IN
усилителя/приемника.
ANALOG
Усилитель/приемник
Amplifier/receiver
L
CD IN
R
2. ПОКЛюЧЕНИЕ DIGILINK
• Свяжите этот разъем с разъемом DIGILINK
усилителя/приемника системы Sherwood для
дистанционного управления этим устройством системами
DIGILINK II или III. (Для дополнительной информации
обратитесь к руководству по эксплуатации
усилителя/приемника Sherwood.)
■Примечание:
• Функции DIGILINK могут не работать на некоторых
компонентах Sherwood.
DIGI LINK
Усилитель/приемник
Sherwood
Sherwood amplifier/receiver
DIGILINK
3. ПОДКЛюЧЕНИЕ ОПТИЧЕСКОгО ЦИФРОВОгО ВЫХОДА
• Свяжите этот разъем с разъемом OPTICAL DIGITAL IN
DIGITAL
усилителя/приемника для наслаждения цифровым звуком.
Усилитель/приемник
Amplifier/receiver
OPT
■Примечания:
• Не рекомендуется запись цифровых аудио сигналов через
OPTICAL IN
аудио связь между этим устройством и устройствами
записи MD или CD и др. Для записи звуков,
воспроизводимых на этом устройстве, пользуйтесь
разъемами ANALOG AUDIO OUT.
• Некоторые из коммерчески доступных оптических шнуров не могут быть использованы для данного оборудования.
Если оптический шнур не может подключиться к вашему оборудованию, обратитесь к поставщику или в ближайшую
сервисную организацию.
4. ВХОДНОЙ шНУР ПИТАНИЯ ПЕРЕМЕННОгО ТОКА
• Включите шнур в розетку переменного тока.
5. ТЕРМИНАЛ ДЛЯ ОБНОВЛЕНИЯ
• Можете воспользоваться этим терминалом в будущем для обновления программного обеспечения и т.д.
■Примечание:
• Программы для обновления требуют специальных знаний программирования. Поэтому мы рекомендуем в этом
случае обратиться к квалифицированному специалисту.
5
CDC-5506 (G)_Russian:CDC-5506(E)_ENG 9/9/2011 5:03 PM Page 6
Передняя панель и пульт дистанционного управления
РУССКИЙ
Функции управления на передней панели
1
23
2
24
3
5
1
5 DISC CD CHANGER
CDC-5506
2
4
7
3
4
5
DISC SKIP
OPEN / CLOSE
DISC SELECTOR
5 DISC AUTOMATIC LOADING SYSTEM
PHONES
POWER
PROGRAM
INTRO
RANDOM
TIME
DIMMER
REPEAT
USB
ON/ STANDBY
CD/ USB
ON
5V
500mA
OFF
20 16 18 19 17
13 14 10 11 12
Дистанционное управление
2
6
21
13
17
d
a
f
b
c
e
10
16
20
14
15
22
18
6
9
25
8
CDC-5506 (G)_Russian:CDC-5506(E)_ENG 9/9/2011 5:03 PM Page 7
1. ВЫКЛюЧАТЕЛЬ ПИТАНИЯ POWER
14. КНОПКА REPEAT (1/F/ALL)
Нажмите эту кнопку для входа в режим готовности.
Для выключения питания снова нажмите эту
кнопку.
Нажмите эту кнопку для неоднократного
воспроизведения трека/файла, папки или всех
треков/файлов.
15. КНОПКА REPEAT A↔B
В режиме готовности нажмите эту кнопку для
включения и входа в рабочий режим.
В рабочем режиме нажмите эту кнопку для
выключения и входа в режим готовности.
Нажмите эту кнопку для неоднократного
воспроизведения конкретного пассажа.
16. КНОПКА PROGRAM
Нажмите эту кнопку для программирования
любимых треков/файлов или просмотра
запрограммированных треков/файлов.
3. ЛОТОК ДИСКОВ
Установите диск в лоток.
4. КНОПКА OPEN/CLOSE (
)
17. КНОПКА INTROSCAN
Нажмите эту кнопку для открытия и закрытия
лотка дисков.
Нажмите эту кнопку для воспроизведения первых
10 секунд каждого трека/файла.
5. КНОПКИ DISC SELECTOR
18. КНОПКА TIME
Используйте эти кнопки для выбора
воспроизводимого диска.
Нажмите эту кнопку для показа разной временной
информации на Audio CD.
6. КНОПКА DISK
19. КНОПКА DIMMER
При выборе диска сначала нажмите эту кнопку, а
затем желаемый номер диска (1-5) на цифровых
кнопках в течение 2 секунд.
Нажмите эту кнопку для выбора желаемой
яркости флуоресцентного дисплея.
20. КНОПКА ВЫБОРА CD/USB
7. КНОПКА DISC SKIP
Нажмите эту кнопку для выбора диска или памяти
USB как источника воспроизведения.
Используйте эту кнопку для перехода от одного
диска к другому по часовой стрелке.
21. ЦИФРОВЫЕ КЛАВИшИ (0~9)
8. РАЗЪЕМ НАУшНИКОВ
Нажмите соответствующую кнопку, чтобы выбрать
файл для воспроизведения или
программирования.
Стерео наушники могут быть подключены к этому
разъему для индивидуального прослушивания.
9. КНОПКА ВОСПРОИЗВЕНИЕ/ПАУЗА (
)
22. КНОПКИ FOLDER (+/-)
ⓐНажмите эту кнопку для начала
воспроизведения в режиме стоп или паузы.
ⓑНажмите эту кнопку для временного
прекращения воспроизведения.
10. КОПКА (
Нажмите эти кнопки для выбора желаемой папки.
23. ДИСТАНЦИОННЫЙ СЕНСОР
Принимает сигналы от пульта дистанционного
управления.
) STOP
Нажмите эту кнопку для остановки
воспроизведения или удаления
запрограммированных треков/файлов.
24. ФЛюОРЕСЦЕНТНЫЙ ДИСПЛЕЙ
Для дополнительной информации, см. следующую
страницу.
11. КНОПКА ПЕРЕМОТКИ НАЗАД/ПОИСКА
(
/
)
25. РАЗЪЕМ USB
Для дополнительной информации, см. следующую
страницу.
ⓒНажмите эту кнопку для воспроизведения с
начала текущего трека/файла или возврата к
предыдущему треку/файлу.
ⓓНажмите и удерживайте эту кнопку при поиске
конкретного пассажа при быстрой перемотке
назад.
■СИСТЕМА ДИСТАНЦИОННОгО
УПРАВЛЕНИЯ DIGILINK
Это устройство можно управлять дистанционно с
усилителя или приемника Sherwood DIGILINK III.
• Для доступных функций обратитесь к
руководству по эксплуатации
соответствующего устройства.
• Для прослушивания CD на системе DIGILINK
сначала осуществите связь DIGILINK между
этим устройством и совместимым
усилителем или приемником Sherwood.
12. КНОПКА ПЕРЕМОТКИ ВПЕРЕД/ПОИСКА
(
/ )
ⓔНажмите эту кнопку для воспроизведения с
начала следующего трека/файла.
ⓕНажмите и удерживайте эту кнопку при поиске
конкретного пассажа при быстрой перемотке
назад.
13. КНОПКА RANDOM
Нажмите эту кнопку для воспроизведения
треков/файлов в случайном порядке.
7
РУССКИЙ
2. Кнопка POWER ON/STANDBY
CDC-5506 (G)_Russian:CDC-5506(E)_ENG 9/9/2011 5:03 PM Page 8
РУССКИЙ
■РАЗЪЕМ USB
• Память USB можно подключить к разъему USB для прослушивания файлов MP3 или
WMA от этого устройства.
■ Примечание:
• После воспроизведения с USB удалите память USB в режиме стоп или в режиме
готовности.
Память USB
■ФЛУОРЕСЦЕНТНЫЙ ДИСПЛЕЙ
1
2
PROG
3
RANDOM REPEAT ALL 1 DISCS
A< >B
INTRO
SCENE TRACK
1
2
3
4
5
4
5
6
7
• 1~5 : Номера лотков дисков
: Световая индикация при загрузке
диска(ов)
•
: Световая индикация при начале
правильного воспроизведения диска
3
6
9
12
9
5. Индикатор PLAY (ПРОСЛУШИВАНИЕ)
6. Индикатор PAUSE (ПАУЗА)
7. Номер трека/файла, времени
воспроизведения, функциональная
информация и т. п.
8. Индикатор INTROSCAN
9. Показ МУЗЫКАЛЬНОГО КАЛЕНДАРЯ
1. Индикатор PROGRAM
2. Индикатор RANDOM
3. Дисплей REPEAT
4. Показ номера лотка диска
•
8
1 2
4 5
7 8
10 11
13 14
8
CDC-5506 (G)_Russian:CDC-5506(E)_ENG 9/9/2011 5:03 PM Page 9
РАДИУС ДЕЙСТВИЯ ДИСТАНЦИОННОГО УПРАВЛЕНИЯ
CDC-5506
2
3
4
5
DISC SKIP
РУССКИЙ
1
5 DISC CD CHANGER
OPEN / CLOSE
DISC SELECTOR
5 DISC AUTOMATIC LOADING SYSTEM
PHONES
POWER
PROGRAM
INTRO
RANDOM
TIME
DIMMER
REPEAT
USB
ON/ STANDBY
CD/ USB
ON
5V
500mA
OFF
• Используйте пульт дистанционного управления
в радиусе 7 метров (23 футов) и с отклонением
углом 30 градусов к сенсору дистанционного
управления.
УСТАНОВКА БАТАРЕЙ
1. Снимите крышку
2. Установите две батареи (типа “AAA”, 2 x 1.5 В),
в соответствии с полярностью
• Удалите батареи, если долго не пользуетесь
устройством.
• Не пользуйтесь аккумуляторными батареями
(типа Ni-Cd).
9
CDC-5506 (G)_Russian:CDC-5506(E)_ENG 9/9/2011 5:03 PM Page 10
Предварительная информация о дисках и файлах
■WMA(Windows Media Audio)
• Частота дискретизации: 32, 44.1, 48 кГц
• Скорость передачи данных: 32 ~ 320 кбит/с
• Расширение: .wma, .WMA
• WMA Tag не поддерживается.
• Windows Media и логотип Windows, являются товарными
знаками или зарегистрированными товарными знаками
Microsoft Corporation в США и/или других странах.
■Примечания:
• Папки могут иметь до 10 уровней в глубину.
• Для некоторых файлов невозможно использование
определенных функций во время воспроизведения.
• Невозможно воспроизводить файлы, защищенные DRM(Digital
Rights Management).
• Когда данные об имени файла или папки длиннее
возможностей памяти устройства, некоторые файлы и т. п. не
могут быть опознаны и воспроизведены.
РУССКИЙ
ВОСПРОИЗВОДИМЫЕ ДИСКИ
Это устройство поддерживает следующие типы дисков:
Диск
Disc
Logo
Логотип
Formatили
or file
Формат
типtype
файла
Audio CD
PCM
PCM
CD-R
Audio
CD,
MP3,
WMA
Audio
CD,
MP3,
WMA
CD-RW
AudioCD,
CD,
MP3,
WMA
Audio
MP3,
WMA
УХОД И ОБРАЩЕНИЕ С ДИСКАМИ I 10
• Это устройство поддерживает диски CD-R и CD-RW,
записанные в Audio CD(CD-DA) формате, MP3 или WMA
формате.
• Можно воспроизводить только диски CD-R и CD-RW,
записанные в формате ISO9660.
• Это устройство поддерживает мультисессионные диски.
Некоторые мультисессионные диски загружаются
медленно или могут вообще не загрузиться.
• При переноске диска держите его
осторожно за края.
■Невоспроизводимые диски
• Не пользуйтесь дисками типов, форматов или типов
файлов, не перечисленных выше - устройство их не
поддерживает.
• Некоторые диски CD-R и CD-RW не воспроизводятся изза неполного завершения записи, качества записи или
физического состояния диска, характеристик
записывающего устройства или программного
обеспечения и т. п.
Для дополнительной информации ознакомьтесь с
руководством по эксплуатации записывающего
устройства.
• Некоторые Audio CD используют защиту от записи,
несоответствующую официальным стандартам компактдисков. Устройство не может воспроизводить правильно
нестандартные диски.
• Воспроизведение Audio CD, записанного в DTS-ES или
Dolby Digital EX может сопровождаться шумом.
• Не приклеивайте бумагу и не
пишите что-либо на печатной
поверхности.
• Отпечатки пальцев и пыль
следует осторожно вытирать
мягкой тряпочкой. Вытирайте с
внутреннего к наружному краю
диска.
• После воспроизведения всегда
храните диски в их упаковке,
чтобы защитить их от пыли и
царапин.
ПАМЯТЬ USB
• Можно подключить память USB к разъему USB на
передней панели для воспроизведения MP3 или WMA
файлов.
• Только памяти USB, отвечающие классу объема
хранения и отвечающие стандартам MTP(Media Transfer
Protocol), могут быть воспроизведены на этом устройстве.
• Устройство поддерживает форматы файлов FAT16 или
FAT32 для памятей USB.
• Не пользуйтесь треснувшими, деформированными или
склеенными дисками.
Эти диски легко ломаются и могут привести к серьезным
травмам и выводу аппаратуры из строя.
ВОСПРОИЗВОДИМЫЕ ФОРМАТЫ
АУДИО ФАЙЛОВ
■Примечания:
• Не подвергайте диски воздействию прямых солнечных
лучей, высокой влажности или высокой температуре в
течение длительного времени.
• При установке и снятии диска из лотка всегда держите
его печатной поверхностью вверх.
■MP3(MPEG-1 Audio Layer-3)
• Частота дискретизации: 32, 44.1, 48 кГц
• Скорость передачи данных 32 ~ 320 кбит/с
• Расширение: .mp3, .MP3
• Рекомендуется установленная скорость передачи
данных. Файлы с переменной скоростью передачи
данных (VBR) воспроизводимы, но время
воспроизведения может показываться неправильно.
• ID3 Tag не поддерживается.
• Технология аудио кодировки MPEG Layer-3
запатентована Fraunhofer IIS и Thomson.
1
5 DISC CD CHANGER
CDC-5506
2
3
4
5
DISC SKIP
OPEN / CLOSE
DISC SELECTOR
5 DISC AUTOMATIC LOADING SYSTEM
PHONES
POWER
PROGRAM
INTRO
RANDOM
TIME
DIMMER
REPEAT
USB
ON/ STANDBY
CD/ USB
ON
10
5V
500mA
OFF
Лоток
Tray
Printed
side
Печатная
поверхность
CDC-5506 (G)_Russian:CDC-5506(E)_ENG 9/9/2011 5:03 PM Page 11
Функции управления
ВОСПРОИЗВЕДЕНИЕ ТРЕКОВ/ФАЙЛОВ
РУССКИЙ
До использования
3. В зависимости от выбранного источника
• Нажмите кнопку POWER.
воспроизведения, установите диск(и) или
подключите память USB.
OPEN / CLOSE
или
• Когда кнопка нажата, устройство в режиме готовности.
• Для выключения питания снова нажмите эту кнопку.
• Тогда питание выключено.
■Режим готовности
• В режиме готовности устройство не отключается от
сети переменного тока и потребляет небольшое
количество энергии для поддержки готовности.
■Автоматическое выключение питания
Например: Audio CD
• Автоматическое выключение питания - функция,
автоматически выключающая питание и включающая
режим готовности. Она срабатывает при нахождении
устройства режиме стоп, режиме паузы т. п. более 30
минут.
Музыкальный календарь
SCENE TRACK
STEP
1
2
3
4
5
Итого треков
1. В режиме готовности, включите питание.
1 2
4 5
7 8
10 11
13 14
3
6
9
12
Итого время
воспроизведения
Например: Файлы с музыкой (923 файла и 15 папок)
или
SCENE
9
ON/ STANDBY
1
2
3
4
5
+
Итого файлов
• Когда количество файлов превысит 99 (т.е. трехзначное
число), третья цифра показывается в музыкальном
календаре.
• “ ” Индикатор зажигается на музыкальном календаре,
когда количество треков превышает 14.
• Для установки дисков в других лотках, нажмите кнопку
DISC SKIP.
• Во внутренний круг лотка можете установить и 8 см
(3-дюймовые) диски.
• Чтение диска или памяти USB может отнять немало
времени, если в них содержится много файлов, папок и т. п.
• При каждом нажатии этой кнопки, устройство входит
в рабочий режим или выключается и входит в режим
готовности.
2. Выберите диск или память USB как
источника воспроизведения.
CD/ USB
Итого папок
или
■Примечание:
• Не открывайте или закрывайте лоток с применением силы.
Так можете вывести его из строя.
• При каждом нажатии этой кнопки, источники
воспроизведения меняются:
“Cd” ↔ “USb”
■Примечание:
• В зависимости от выбранного источника
воспроизведения кнопка выбора диска или кнопка
FOLDER (+/-) и т. п. не будут работать.
11
CDC-5506 (G)_Russian:CDC-5506(E)_ENG 9/9/2011 5:03 PM Page 12
4.
Выбор диска
Начало воспроизведения
• Нажмите соответствующую кнопку для начала
воспроизведения диска.
РУССКИЙ
или
Например: При выборе диска 4
4
в течение
2 сек.
или
• Загорается индикатор “
”.
• Устройство воспроизводит, начиная с первого трека/
файла на активном диске к последнему на 5 диске.
5.
Временно прекратить воспроизведение.
• Начнется воспроизведение первого трека/файла
выбранного диска.
или
Выбор трека/файла во время воспроизведения
Для перехода назад
• Загорается индикатор “
”.
• Чтобы восстановить воспроизведения, нажмите
кнопку PLAY(“
” или “
”).
6.
или
Для
перехода
вперед
Чтобы остановить воспроизведение.
• Каждый раз при нажатии кнопки трек/файл
пропускаются.
• Когда нажата кнопка BACKWARD SKIP(
) один
раз посреди воспроизведения трека/файла,
воспроизведение начинается с его начала. При
повторном нажатии трек/файл пропускается.
• При пользовании цифровых кнопок дистанционного
управления.
или
Замена дисков во время воспроизведения
1.
Например:
Для “3” : 3
в течение 2 сек.
Для “15” : 1 within 2 sec.
Откройте лоток дисков.
OPEN / CLOSE
Для “123” :1
в within
течение22 sec.
сек.
5
2
вwithin
течение
сек.
2 2sec.
3
Для продвижения вперед или
возвращения во время воспроизведения
2.
• Нажмите и удерживайте кнопку до нахождения
желаемого пассажа.
Замените желаемый диск.
Для быстрого возврата
или
Для
быстрого
продвижения
вперед
Лоток дисков
• Во время воспроизведения диска ① можно заменить
диски ③ и ④.
• После замены дисков, нажмите кнопку
OPEN/CLOSE(
), чтобы закрыть лоток дисков.
• При замене дисков ② или ⑤, нажмите кнопку DISC
SKIP и меняйте лоток дисков.
12
CDC-5506 (G)_Russian:CDC-5506(E)_ENG 9/9/2011 5:03 PM Page 13
НЕОДНОКРАТНОЕ ВОСПРОИЗВЕДЕНИЕ
Выбор папки во время воспроизведения
Повторение трека/файла, папки, всех
треков/файлов.
• Во время воспроизведения желаемого трека/файла
или папки,
Выбор
следующего
• Каждый раз при нажатии этой кнопки выбирается
предыдущая или следующая папка и
воспроизведение начинается автоматически с
первого содержимого файла.
ВОСПРОИЗВЕДЕНИЕ В СЛУЧАЙНОМ
ПОРЯДКА
или
• При каждом нажатии этой кнопки, режим
неоднократного воспроизведения меняется:
• В случае Audio CD
или
→ONE(“REPEAT 1”): Повторение трека
↓
dISC(“REPEAT 1DISC”): Повторение диска
↓
ALL(“REPEAT ALL DISCS”): Повторение всех дисков
↓
OFF: Выход из режима неоднократного воспроизведения
• Загорается индикатор “ RANDOM ”.
• При каждом нажатии этой кнопки, режим случайного
воспроизведения меняется следующим образом:
• В случае CD с файлами
→ONE(“REPEAT 1”): Повторение файла
• В случае CD
→1 DISC → ALL DISC → OFF
↓
FOL(“REPEAT”): Повторение папки
↓
dISC(“REPEAT 1 DISC”): Повторение диска
↓
ALL(“REPEAT ALL DISC”): Повторение всех дисков
↓
OFF : Выход из режима неоднократного воспроизведения
• В случае USB
1 DISC ↔ OFF
• Устройство автоматически выбирает и
воспроизводит треки в случайном порядке.
• Нажмите снова кнопку для выхода из режима
случайного порядка.
• В случае USB
→dISC(“REPEAT 1 DISC”): Повторение всех файлов
■Примечания:
• Случайное воспроизведение не включает
треки/папки с более чем 100 единицами содержания..
• При нажатии на цифровую кнопку в режиме
случайного воспроизведения или
запрограммированного воспроизведения происходит
выход из этих режимов. (Тем не менее
запрограммированное содержание не стирается. Для
повторного вызова запрограммированного
содержания, нажмите кнопку PROGRAM в режиме
стоп.)
↓
ONE(“REPEAT 1”): Повторение файла
↓
FOL(“REPEAT”): Повторение папки
↓
OFF: Выход из режима неоднократного воспроизведения
■Примечания:
• При случайном воспроизведении или
воспроизведении начала всех треков/файлов можете
выбрать только режим неоднократного
воспроизведения.
• Во время запрограммированного воспроизведения
режим неоднократного воспроизведения папки
недоступен.
13
РУССКИЙ
• Возможно неоднократное воспроизведение
трека/файла, папки, всех треков/файлов или
конкретного пассажа.
Выбор предыдущего
CDC-5506 (G)_Russian:CDC-5506(E)_ENG 9/9/2011 5:03 PM Page 14
ВОСПРОИЗВЕДЕНИЕ В ЖЕЛАННОМ
ПОРЯДКЕ
Повторение конкретного пассажа
Во время воспроизведения, в начале желаемого
пассажа, нажмите клавишу REPEAT A↔B.
• Можно запрограммировать порядок воспроизведения
до 32 треков/файлов.
РУССКИЙ
1.
1.
В режиме стоп введите программный режим.
PROGRAM
или
• Зажгутся индикаторы “ REPEAT ” и “ A< > ”.
2. Во время воспроизведения, в конце желаемого
• Когда мигает индикатор “ PROG ” .
пассажа, снова нажмите кнопку REPEAT A↔B
2. Выберите желаемый трек/файл и поместите
• Примечания: Тогда зажжется и индикатор “ B ” и
желаемый пассаж будет воспроизводиться
неоднократно.
• Нажмите снова эту кнопку для прекращения
неоднократного A↔B воспроизведения.
его в память.
PROGRAM
■Примечания:
• Неоднократное A↔B воспроизведение работает
только с треками/файлами.
• Во время случайного воспроизведения и в режиме
воспроизведения начала файла неоднократное A↔B
воспроизведение не будет работать.
или
ВОСПРОИЗВЕДЕНИЕ ПЕРВЫХ 10
СЕКУНД КАЖДОГО ТРЕКА/ФАЙЛА
(РЕЖИМ INTROSCAN)
Например:
При выборе и сохранении трека 4 из Audio CD.
Трек No.
PROG
TRACK
1
2
3
• При каждом нажатии этой кнопки, режим работы
introscan меняется следующим образом:
5
Запрограммированный
порядок
• В случае CD
→1 DISC INTRO → ALL DISC INTRO → OFF
• Можете выбрать трек/файл, нажимая ЦИФРОВЫЕ
кнопки.
Например:
• В случае USB
1 DISC ↔ OFF
• Устройство воспроизводит первые 10 секунд
каждого трека/файла.
• Нажмите снова кнопку прекращения
воспроизведения в режиме introscan.
■Примечания:
• Во время запрограммированного воспроизведения
режим introscan не будет работать.
• Во время воспроизведения всех дисков в режиме
introscan устройство воспроизводит первые 10
секунд только первого трека каждого диска.
4
Для “3” : 3
в течение 2 сек.
Для “15” : 1 within 2 sec.
в течение 2 сек.
within
2 sec.
Для “123” : 1
5
2
в течение 2 сек.
within
2 sec.
3
• Тогда выбранный трек/файл сохраняется
автоматически без нажатия кнопки PROGRAM.
14
CDC-5506 (G)_Russian:CDC-5506(E)_ENG 9/9/2011 5:03 PM Page 15
Повторяйте шаг 2 до завершения
программирования всех желаемых
треков/файлов.
4.
Начало воспроизведения.
■Удаление всех треков/файлов
• Нажмите кнопку STOP (
) на более чем 4 секунды
в программном режиме.
• Открытие лотка диска или выбор другого источника
воспроизведения стирает также все
запрограммированные треки/файлы.
■Удаление конкретного трека/файла
• Найдите желаемый трек/файл и удалите его в
программном режиме.
PROGRAM
или
или
• Воспроизведение начинается в
запрограммированном порядке.
Проверка запрограммированных
треков/файлов.
• Каждый раз, при нажатии кнопки PROGRAM в
программном режиме, запрограммированный
трек/файл показывается в запрограммированном
порядке.
Устранение любых неправильно
запрограммированных треков/файлов
Например:
Когда треки 5, 9 и 7 запрограммированы и вы желаете
заменить трек 9 треком 10 на Audio CD.
PROGRAM
1.
Найдите трек(файл) в программном режиме.
или
PROGRAM
или
Удаление запрограммированных
треков/файлов.
■Удаление по одному
• Каждый раз, при нажатии кнопки STOP (
)в
программном режиме, запрограммированные
треки/файлы удаляются в обратном порядке.
PROG
TRACK
STEP
1
2
3
4
5
• Тогда запрограммированный трек/файл
изображается на несколько секунд.
или
15
РУССКИЙ
3.
CDC-5506 (G)_Russian:CDC-5506(E)_ENG 9/9/2011 5:03 PM Page 16
НАСТРОЙКА ЯРКОСТИ
ФЛУОРЕСЦЕНТНОГО ДИСПЛЕЯ
2. Во время показа трека/файла, который
РУССКИЙ
следует заменить новым, выберите
трек/файл 10 и сохраните его в памяти.
DIMMER
PROGRAM
или
• При каждом нажатии этой кнопки яркость
флуоресцентного дисплея меняется следующим
образом:
→ ON → dimmer → OFF
• В режиме OFF дисплея нажатие любой кнопки
прекращает режим OFF и показывает рабочий
статус.
ПРОСЛУШИВАНИЕ С НАУШНИКАМИ
PROG
TRACK
STEP
1
2
3
4
5
• Для индивидуального прослушивания
подключите наушники к разъему PHONES.
• Можете выбрать трек/файл, нажимая ЦИФРОВЫЕ
кнопки.
в течение 2 сек.
Например: Для “10” : 1 within 2 sec. 0
• Когда выбираете трек ЦИФРОВЫМИ кнопками,
выбранный трек сохраняется автоматически без
нажатия кнопки PROGRAM.
• Когда трек/файл, который следует заменить,
исчезает, исполните описанный выше шаг 1.
PHONES
ВЫБОР ИНДИКАЦИИ ВРЕМЕНИ
(Только аудио CD)
■Примечание:
• Будьте осторожны и не настраивайте звук
наушников слишком громко.
• Во время воспроизведения
TIME
или
• При каждом нажатии этой кнопки, индикация
времени меняется следующим образом::
TRACK
INDEX
→
1
2
3
4
5
7 8 9
10 11 12
Воспроизведенное время текущего трека.
↓
TRACK
INDEX STEP
1
2
3
4
5
7 8 9
10 11 12
Остающееся время текущего трека.
↓
1
2
3
4
5
7 8 9
10 11 12
Остающееся время диска.
• Во времени произвольного воспроизведения дисплей
может показывать “--:--”.
16
CDC-5506 (G)_Russian:CDC-5506(E)_ENG 9/9/2011 5:03 PM Page 17
Руководство по устранению неисправностей
ПРОБЛЕМА
ВОЗМОЖНАЯ ПРИЧИНА
РЕшЕНИЕ
Нет питания
• Шнур питания отключен
• Плохой контакт с розеткой; розетка не
работает или выключена.
• Подключите шнур надежно.
• Проверьте розетку с помощь лампы или
другого устройства.
Нет
воспроизведения
• Диск поставлен наоборот
• Загрязненный диск
• Поврежденный или исцарапанный диск
• CD-R/CD-RW диск нестандартен.
• Музыкальные файлы несовместимого
формата
• Установите диск печатной стороной вверх.
• Почистите диск.
• Установите другой диск.
• См. “Невоспроизводимые диски” на стр. 10.
• Можно воспроизводить только файлы MP3
и WMA форматов.
• Неправильные соединения
• Неправильная функция
усилителя/приемника
• Зажжен индикатор “ ”.
• Правильно осуществите соединения.
• Обращайтесь правильно с
усилителем/приемником.
• Нажмите кнопку “
” для прекращения
режима паузы.
• Устройство подключено к входному
разъему PHONO усилителя/приемника.
• Плохо подключенная связь
• Правильно осуществите соединения.
Звук прерывается.
• Поврежденный или исцарапанный диск
• Устройство находится на поверхности,
подверженной вибрации и ударам.
• Воспроизведите другой диск.
• Расположите устройство на надежной
поверхности.
Программирование
не работает.
• Диск загрязнен или покрыт царапинами.
• Неправильная программная процедура
• Число запрограммированных
треков/файлов 32.
• Попробуйте снова с диском без царапин.
• Попробуйте снова.
• Проверьте число запрограммированных
треков/файлов.
Диск или USB
память
прочитываются
слишком долго.
• Чтение диска или памяти USB может
отнять немало времени, если в них
содержится много файлов, папок и т. п.
• Это не неисправность.
Нет звука
Слабый или
искаженный звук
17
• Проверьте подключения и подключите все
шнуры правильно.
РУССКИЙ
В случае неисправности справьтесь с нижней таблицей, перед тем как отдать устройство в починку.
Если неисправность не устранена, попытайтесь решить проблему, переключая устройство. Если и таким образом не
справитесь с ситуацией, посоветуйтесь с вашим поставщиком. Ни при каких обстоятельствах не следует пробовать
чинить устройство самому. Это может привести к аннулированию гарантии.
CDC-5506 (G)_Russian:CDC-5506(E)_ENG 9/9/2011 5:03 PM Page 18
РУССКИЙ
Технические характеристики
■ ТИПИЧНЫЕ ХАРАКТЕРИСТИКИ АУДИО
• Число каналов
I
2
• Частотный ответ, 20~20,000 Гц
I
±0.8 дБ
• Соотношение сигнала к шуму, A Wtd.
I
94 дБ
• Динамический диапазон
I
86 дБ
• Суммарные гармонические искажения, 1 кГц
I
0.009 %
• Коэффициент детонации
I
Точность кварцевого кристалла
• Уровень звукового выхода
I
2 V RMS
• Цифровой выход, оптический, длинна волны 660 нм
I
-20 ~ -15 дБм
■ ОПТИЧЕСКАЯ ЧИТАюЩАЯ СИСТЕМА
• Лазер
I
Полупроводниковый лазер
• Длинна волны
I
760~800 нм
• Цифровая апретура
I
0.45
■ ФОРМАТ СИгНАЛА
• Частота дискретизации
• D/A преобразование
• Передискретизация
I
I
I
44.1 кгц
Multibit (Сигма-дельта преобразование)
8 раз
■ ОСНОВЫЕ ХАРАКТЕРИСТИКИ
• Питание
I
230 В ~ 50 гц
• Потребляемая мощност
I
23 Вт
• Размеры (Ш x В х Г, включая выступающие части)
• Вес (нетто)
I
5.6 кг (12.4 фунта)
I
440x112x397 мм (17-5/16x4-7/16x15-4/6 дюймов)
Примечание: Дизайн и технические харатеристики могут быть изменены без предварительного сообщения об
улучшениях.
18
CDC-5506 (G)_Russian:CDC-5506(E)_ENG 9/9/2011 5:03 PM Page 19
MEMO
19