1
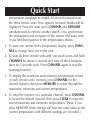
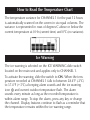
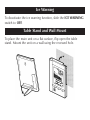
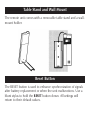
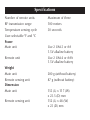
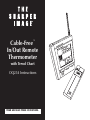
Cable-Free™
In/Out Remote
Thermometer
with Trend Chart
OQ234 Instructions
Read and save these instructions.
Dear Sharper Image Customer,
Thank you for your purchase of a Sharper Image product. We appreciate
your business very much.
Please accept my personal assurance of your complete satisfaction with
this product’s quality and performance. We offer generous return
privileges and excellent warranties on all our products.
For more than 25 years, The Sharper Image has shared the fun of
discovering innovative products that make life easier and more enjoyable. We’ve been in business a long time because we are an exciting
place to shop and — just as importantly — we strive to deliver great
customer service that exceeds your expectations.
Enjoy your purchase!
Respectfully,
Richard Thalheimer
Founder, Chairman and Chief Executive Officer
Call 1-800-344-4444 for 24-7 ordering and customer service,
or go to
, our complete online store.
Warnings
•Do not immerse the unit in water.
•Do not clean the unit with abrasive or corrosive material.
•Do not subject the unit to excessive force, shock, dust, temperature or humidity.
•Do not tamper with the unit’s internal components. Doing so
will invalidate the warranty on the unit and may cause unnecessary damage.
•Only use fresh batteries as specified in the instructions. Do not
mix new and old batteries as the old ones may leak.
•Always read the instructions thoroughly before operating the unit.
Quick Start
Battery Installation
Remote Units:
•Unscrew battery compartment cover for remote units first.
•Designate a channel number (1, 2, 3) for each remote on the
Channel Slide Switch; choose ˚F or ˚C temperature display
unit on the ˚F/˚C Switch.
•Insert two AAA (UM-4) batteries (included) into each battery
compartment as specified. Ensure proper polarities are maintained; replace cover.
Main Unit:
1. Slide open battery compartment door.
2. Insert two AA (UM-3) batteries (included). Ensure proper
polarities are maintained; replace door.
Checking Temperatures:
1. Using either the table stand or wall mount feature, set the
main and remote units within an effective range of 110
yards. Although the remote units are weatherproof, they
should be located away from direct sunlight, rain or snow.
2. Once batteries are installed, the main unit will start receiving
Quick Start
3.
4.
5.
6.
temperature samplings at roughly 30-second intervals from
the three remote units. If no signal is received, blanks will be
displayed. Press the main unit’s CHANNEL and MEMORY
simultaneously to enforce another search, or to synchronize
the transmission and reception of the remote and main units
if you find discrepancies in the temperatures shown.
To view one remote unit’s temperature display, press CHANNEL to change from one to the next.
To scan all three remote units with one touch, press and hold
CHANNEL for about 2 seconds and view all three temperatures for 5 seconds each. Press CHANNEL again to stop the
scanning function.
To display the maximum and minimum temperatures stored
in each remote unit’s memory, press CHANNEL for the
desired channel, then press MEMORY to rotate through the
maximum, minimum and current temperatures.
To clear the memory of a particular channel, press CHANNEL
to locate the desired channel, then press CLEAR to erase the
stored maximum and minimum temperatures. (Now, if you
press MEMORY, these settings will have the same value as the
current temperature until different readings are recorded.)
INSTRUCTIONS FOR USE
Main Features
N
A
D
B
L
C
K
E
M
F
G
H
J
I
A. OUTDOOR TEMPERATURE - Displays current temperature,
remote sensor unit.
B. TEMPERATURE TREND CHART - Outdoor CHANNEL 1 temperature variance display, last 12 hours.
Main Features
C. INDOOR TEMPERATURE - Shows the temperature collected
indoors.
D. ICE WARNING ICON - Lights up when the ice warning function is active.
E. CHANNEL BUTTON - Sets the remote sensor channel.
F. MEMORY BUTTON - Toggles between current, maximum
and minimum temperatures.
G. CLEAR BUTTON - Erases memory data.
H. RESET BUTTON - Returns all settings to default values.
I. ICE WARNING SLIDE SWITCH [AL ON/OFF] - Turns the ice
warning function on or off.
J. °F/°C SLIDE SWITCH - Selects between degrees Fahrenheit
(°F) and Centigrade (°C).
K. BATTERY COMPARTMENT - Accommodates two UM-3 or
AA-size batteries.
L. ANTENNA - Receives radio signal from remote unit.
M. TABLE STAND - For standing the main unit on a flat surface.
N. WALL-MOUNT RECESSED HOLE - For mounting the main
unit on a wall.
Main Features: Remote Unit
H
A
B
C
E
D
F
G
A. LCD - Displays the current temperature monitored by the
remote unit.
B. LED INDICATOR - Flashes when the remote unit transmits
a reading.
C. °F/°C SLIDE SWITCH - Selects between degrees Fahrenheit
(°F) and Centigrade (°C).
Main Features: Remote Unit
D. CHANNEL SLIDE SWITCH - Designates the remote unit
Channel 1, Channel 2 or Channel 3.
E. RESET BUTTON - Returns all settings to default values.
F. BATTERY COMPARTMENT - Accommodates two UM-4
or AAA-size batteries.
G. WALL-MOUNT HOLDER - Supports the remote unit when
wall-mounted.
H. REMOVABLE TABLE STAND - For standing the remote unit
on a flat surface.
Battery and Channel Installation: Remote Unit
1.
2.
3.
4.
5.
Remove the screws on the battery compartment.
Select the channel number on the CHANNEL slide switch.
Select the temperature display unit on the °F/°C slide switch.
Insert two UM-4 or AAA-size batteries.
Replace the battery compartment door and secure the
screws.
Replace the batteries when the low-battery indicator of the particular channel lights up on the main unit.
Battery and Channel Installation: Remote Unit
Note: Once a channel is assigned to a unit, you can change it only
by removing the batteries and repeating the above procedure.
Battery Installation: Main Unit
1. Slide the battery compartment door open.
2. Insert two UM-3 or AA-size batteries.
3. Replace the battery compartment door.
Battery Installation: Main Unit
4. Flip the table stand open and press the RESET button with
a blunt stylus. This ensures easier synchronization between
the transmission and reception of signals.
Replace the batteries when the indicator
of the indoor temperature lights up.
Getting Started
Once batteries are in place for the remote units, they will start
transmitting samplings at roughly 30-second intervals.
The main unit will also start receiving once batteries are
installed. The temperature of the selected channel will be displayed on the top line and the indoor temperature on the bottom line. The main unit will automatically update its readings
at 30-second intervals. The temperature variance for the last
12 hours is automatically scanned on the trend chart.
Getting Started
If no signals are received, blanks are displayed. Press CHANNEL
and MEMORY simultaneously to enforce another search. This is
useful in synchronizing the transmission and reception of the
remote and main units.
Repeat this step whenever you find discrepancies between the
reading shown on the main unit and the reading shown on the
respective remote unit.
Note: The remote temperature display on the main unit is determined by the selection made (°F or °C) on the main unit’s slide
switch. The remote sensors will automatically convert to the
selection made on the main unit.
Checking Remote and Indoor Temperatures
The indoor temperature is shown on the bottom line of the display. Temperature readings, received from a remote sensor, are
displayed on the top line of the unit.
Press CHANNEL to change from one channel to the next.
If more than one remote sensor is being used, the unit can automatically scan all three of the outdoor channels.
To use the automatic outdoor channel scanner function, press
and hold CHANNEL for about two seconds. The unit begins a
cycle of continuously rotating through the three channels.
Temperature readings from each site are displayed for approximately five seconds.
To stop the automatic scanning function, press CHANNEL again.
The scanning cycles will stop.
Checking Remote and Indoor Temperatures
The kinetic wave display on the channel icon indicates the status
of reception.
The unit is in searching mode
Temperature readings are
securely registered
No signals
If no readings are received from one particular channel for more
than two minutes, blanks are displayed until further readings are
successfully searched. To enforce an immediate search, press
CHANNEL and MEMORY simultaneously. Of course, no reading
will be shown if no remote unit is assigned to that channel.
The Cable Free™ Indoor/Outdoor Thermometer is capable of
measuring temperatures within the -58°F (-50°C) and +158°F
(+70°C) range. If the temperature goes above or below these
temperatures, the display will show “HHH” or “LLL.”
Maximum and Minimum Temperatures
The maximum and minimum recorded indoor temperatures and
those of each channel are automatically stored in memory. To
display them:
1. Press CHANNEL to locate the desired channel.
2. Press MEMORY to rotate through the maximum (MAX), minimum (MIN) and current temperatures. Indoor temperature
readings are displayed.
To clear the memory of a particular channel, press CHANNEL to
locate the desired channel. Press CLEAR. The MAX and MIN
memory for that channel will be erased. Note: It will also erase
the memory for the indoor temperatures.
Disconnected Signals
If, for no obvious reason, a particular channel display goes blank,
press CHANNEL and MEMORY to enforce an immediate search.
If that fails, ensure the remote unit for that channel remains in
place, ensure the transmission is within range and the path is
clear of obstacles and interference.
How to Read the Temperature Chart
The temperature variance for CHANNEL 1 for the past 12 hours
is automatically scanned on the screen in six equal columns. The
variance is represented in rows of degrees C above or below the
current temperature at 0 Hr (current time) and 0°C (no variance).
Ice Warning
The ice warning is selected on the ICE WARNING slide switch
located on the main unit and applies only to CHANNEL 1.
To activate the warning, slide the switch to ON. When the temperature recorded at CHANNEL 1 falls to between 28.4°F (-2°C)
to 37.4°F (+3°C) a beeping alarm sounds and the ice warning
icon ❄ and current outdoor temperature flash. The alarm
sounds every minute as long as the recorded temperature is
within alarm range. To stop the alarm, press any key or change
the channel. Display features continue to flash as a reminder that
the temperature remains within the ice warning range.
Ice Warning
To deactivate the ice warning function, slide the ICE WARNING
switch to OFF.
Table Stand and Wall Mount
To place the main unit on a flat surface, flip open the table
stand. Mount the unit on a wall using the recessed hole.
Table Stand and Wall Mount
The remote unit comes with a removable table stand and a wallmount holder.
Reset Button
The RESET button is used to enhance synchronization of signals
after battery replacement or when the unit malfunctions. Use a
blunt stylus to hold the RESET button down. All settings will
return to their default values.
Specifications
Temperature Measurement
Main Unit
Indoor Temperature Measurement
Displayed IN temperature range 14.0°F to 158.0°F
(-9.9°C to +70.0°C)
Proposed operating range
23.0°F to 122.0°F
(-5.0°C to +50.0°C)
Temperature resolution
0.2°F (0.1°C)
Temperature scale
<-7°C to >7°C
Ice Warning Function
-2°C to +3°C
Channel 1 remote sensor
28.4°F to 37.4°F
Remote Sensor Unit
Displayed Range
Proposed operating range
Temperature resolution
RF transmission frequency
-58.0°F to +158.0°F
(-50.0°C to + 70.0°C)
-4.0°F to +140.0°F
(-20.0°C to +60.0°C)
0.2°F (0.1°C)
433 MHz
Specifications
Number of remote units
RF transmission range
Temperature sensing cycle
User-selectable °F and °C
Power
Main unit
Remote unit
Weight
Main unit
Remote sensing unit
Dimension
Main unit
Remote sensing unit
Maximum of three
100 meters
30 seconds
Use 2 UM-3 or AA
1.5V alkaline battery
Use 2 UM-4 or AAA
1.5V alkaline battery
200 g (without battery)
87 g (without battery)
153 (L) x 117 (W)
x 23.5 (D) mm
152 (L) x 48 (W)
x 23 (D) mm
WARRANTY
What Is Covered
This warranty covers any defects in materials or workmanship, with the exceptions stated below.
How Long Coverage Lasts
This warranty runs for 90 days from the date of original purchase.
What Is Not Covered
This warranty does not cover damage caused by misuse or use other than as intended and described in the
product instruction manual, or loss or damage to batteries or removable parts.
What The Sharper Image Will Do
The Sharper Image will repair any defects in materials or workmanship. In the event repair is not possible,
The Sharper Image will either replace this product with one of similar features and price, or refund the full
purchase price of the product, whichever you prefer.
How to Obtain Service
Return the product and receipt, along with a brief explanation of the problem, to:
T.S.I. - Returns Department
2901-A West 60th Street
Little Rock, AR 72209
If you have questions please feel free to contact our customer service representatives at 1-800-344-5555 or
by email at [email protected].
This warranty gives you specific legal rights, and you may have other legal rights that vary from state to state.
Sharper Image Corporation
650 Davis St., San Francisco, CA 94111
(415) 445-6000
Shop online:
Due to continuing improvements, actual product may differ slightly from the product described herein.
V1 08/02