1
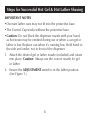
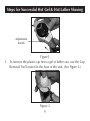
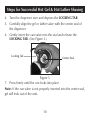
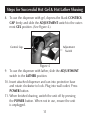
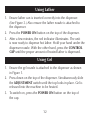
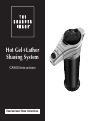
Hot Gel+Lather
Shaving System
CA900 Instructions
Read and save these instructions.
Table of Contents
Important Safety Instructions...................................................................3
General Instructions....................................................................6
Variable Temperature Control..................................................6
Parts Diagram..........................................................................7
Steps for Successful Hot Gel & Hot Lather Shaving..................8
Using Lather..........................................................................12
Using Gel..............................................................................12
Removing the Shaving Can....................................................13
Troubleshooting Guide..........................................................14
Warning....................................................................................15
Keep Away From Water.........................................................15
IMPORTANT SAFETY INSTRUCTIONS
When using an electrical appliance, basic precautions should
always be observed, including the following:
READ ALL INSTRUCTIONS BEFORE USING.
DANGER — To reduce the risk of electric shock:
•Do not reach for the Hot Gel+Lather Shaving System if it has
fallen into the water. Unplug it immediately.
•Do not use while bathing or in the shower.
•Do not place or store the appliance where it can fall or be
pulled into a tub or sink. Do not place in or drop into water
or any other liquid.
•Always unplug the unit from electrical outlet immediately after
using it.
•Before cleaning, unplug the appliance.
IMPORTANT SAFETY INSTRUCTIONS
WARNING
•To reduce the risk of electric shock, this appliance has a polarized plug (one blade is wider than the other). This plug will fit
in a polarized outlet only one way. If the plug does not fit fully
in the outlet, reverse the plug. If it still does not fit, contact a
qualified electrician to install the proper outlet. Do not change
the plug in any way. Do not attempt to defeat this safety feature.
An authorized service representative should perform servicing.
The appliance has no user-serviceable parts.
•The Hot Gel+Lather Shaving System should never be left
unattended when the plug is in and the power is on.
•This appliance should not be used by, on or near children or the
physically challenged.
•Use the appliance only for its intended purpose as described in
this instruction manual.
•Do not use attachments not recommended by the manufacturer.
•Do not pull or twist cord, or wrap cord around appliance.
IMPORTANT SAFETY INSTRUCTIONS
•Never operate the appliance if it has a damaged plug or cord,
if it is not working properly, if it has been dropped or damaged,
or dropped into water. Return appliance to a service center for
examination and repair.
•Never drop or insert objects into openings.
•Do not use outdoors. Do not operate where aerosol (spray)
products are being used or where oxygen is being administered.
•Use only on a level surface.
•Before attaching to shaving cream/gel cans, unplug the appliance.
•Keep cord away from heated surfaces.
•Never use a tool to remove anything from the dispenser.
•To disconnect, turn all controls to OFF, then remove plug
from outlet.
•For household use only.
•Ensure gel nozzle is used for gel and lather nozzle is used
for lather.
SAVE THESE INSTRUCTIONS
General Instructions
Variable Temperature Control
This unit is equipped with a variable temperature-control dial.
Adjust it until the gel or lather is heated to a comfortable
temperature.
Note: At the same temperature control position, the gel temperature will be higher than the lather temperature.
Parts Diagram
Power
OFF button
Control Cap
Variable
Temperature Control
Ready
Indicator Light
Power
ON Button
Adjustment Switch
120V
Power Cord
Jack
Gel Release Button
Locking Tab
Cap Removal Tool
(Located Underneath the unit)
Protective
Cylinder
Gel Nozzle
Lather Nozzle
Steps for Successful Hot Gel & Hot Lather Shaving
IMPORTANT NOTES
•Oversize lather cans may not fit into the protective base.
•The Control Cap works without the protective base.
•Caution: Do not block the dispenser nozzle with your hand,
as hot steam may be emitted during use or when a can gel or
lather is low. Replace can when it’s running low. Hold hand to
the side and under, not in front of the dispenser.
1.Attach the desired gel or lather nozzle (included) and rotate
into place. Caution: Always use the correct nozzle for gel
or lather.
2.Ensure the ADJUSTMENT switch is in the lather position.
(See Figure 1.)
Steps for Successful Hot Gel & Hot Lather Shaving
Adjustment
Switch
Figure1
3.To remove the plastic cap from a gel or lather can, use the Cap
Removal Tool located in the base of the unit. (See Figure 2.)
Figure 2
Steps for Successful Hot Gel & Hot Lather Shaving
4.Turn the dispenser over and depress the LOCKING TAB.
5.Carefully align the gel or lather valve with the center seal of
the dispenser.
6.Gently insert the can valve into the seal and release the
LOCKING TAB. (See Figure 3.)
Locking Tab
Center Seal
Figure 3
7.Press firmly until the can locks into place.
Note: If the can valve is not properly inserted into the center seal,
gel will leak out of the unit.
10
Steps for Successful Hot Gel & Hot Lather Shaving
8.To use the dispenser with gel, depress the black CONTROL
CAP firmly and slide the ADJUSTMENT switch to the outermost GEL position. (See Figure 4.)
Control Cap
Adjustment
Switch
Figure 4
9.To use the dispenser with lather, slide the ADJUSTMENT
switch to the LATHER position.
10.Insert attached dispenser and can into protective base
and rotate clockwise to lock. Plug into wall outlet. Press
POWER button.
11.When finished shaving, switch the unit off by pressing
the POWER button. When not in use, ensure the unit
is unplugged.
11
Using Lather
1.Ensure lather can is inserted correctly into the dispenser.
(See Figure 3.) Also ensure the lather nozzle is attached to
the dispenser.
2.Press the POWER ON button on the top of the dispenser.
3.After a few minutes, the red indicator illuminates. The unit
is now ready to dispense hot lather. Hold your hand under the
dispenser nozzle. With the other hand, press the CONTROL
CAP until the proper amount of heated lather is dispensed.
Using Gel
1.Ensure the gel nozzle is attached to the dispenser as shown
in Figure 1.
2.Press down on the top of the dispenser. Simultaneously slide
the ADJUSTMENT switch until the top locks in place. Gel is
released into the machine to be heated.
3.To switch on, press the POWER ON button on the top of
the cap.
12
Using Gel
4.After a few minutes, the red indicator illuminates.
5.To release heated gel into the palm of your hand, press the
GEL RELEASE button located on the dispenser nozzle.
Removing the Shaving Can
When a gel or lather can is empty, or when traveling, it is necessary to remove the Hot Gel+Lather Shaving System from the can.
1.Ensure the unit is unplugged from the outlet.
2.Holding the can with one hand, turn the CAP on the unit
counterclockwise. Press the LOCKING TAB with the other
hand and disconnect the dispenser from the top of the can.
3.Clean the unit with a damp cloth.
DO NOT IMMERSE THE UNIT IN WATER!
13
Troubleshooting Guide
Problem: Gel is too runny.
Solution: Adjust temperature control dial to a
lower setting.
Problem: Unit fails to heat.
Solution: Ensure the unit is plugged in and turned on. Top red
light illuminates and blinks. After one to 3 minutes, the red light
stops blinking and the unit is ready to dispense hot gel/lather.
Problem: Unit does not dispense gel.
Solution: Unit is not properly mounted to the gel can. Remove
unit from the can and reattach, ensuring a secure fit on top of
the can. Or ensure the lather can is using the lather nozzle and
perfectly locked.
Problem: The gel/lather is too hot or too much steam is emitted.
Solution: Adjust temperature control dial to lower
setting, or replace can if it has a low amount of gel/lather.
14
WARNING
KEEP AWAY FROM WATER
IF YOU THINK THE POWER IS OFF WHEN THE SWITCH IS
OFF, YOU'RE WRONG.
Everyone knows that electricity and water are a dangerous
combination. But did you know that an electric appliance is still
electrically live even if the switch is off?
If the plug is in, the power is on. So when you are not using your
appliances, keep them unplugged.
ALWAYS UNPLUG SMALL APPLIANCES.
A Public Service Ad from the Association of Home Appliance Manufacturers and
Underwriters Laboratories, Inc.
15
Warranty
What Is Covered
This warranty covers any defects in materials or workmanship, with the exceptions stated below.
How Long Coverage Lasts
This warranty runs for 90 days from the date of original purchase.
What Is Not Covered
This warranty does not cover damage caused by misuse or use other than as intended and described
in the product instruction manual, or loss or damage to batteries or removable parts.
What The Sharper Image Will Do
The Sharper Image warrants this product against defects in materials and workmanship. When repair is
not practical, The Sharper Image will have the option to replace the defective product with one that is
the same or has similar functionality.
How to Obtain Service
Return the product and receipt, along with a brief explanation of the problem, to:
T.S.I. - Returns Department
2901-A West 60th Street
Little Rock, AR 72209
If you have questions please feel free to contact our customer service representatives at 1-800-344-5555
or by email at [email protected].
This warranty gives you specific legal rights, and you may have other legal rights that vary from state to state.
© 2006, 2007 Sharper Image Corporation
Sharper Image Corporation
350 The Embarcadero, Sixth Floor
San Francisco, CA 94105-1218
Shop online:
Actual product may differ slightly from the product described herein.
V3 03/07
IB-7341