1
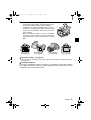
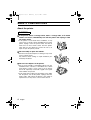
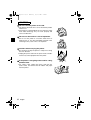
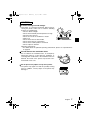
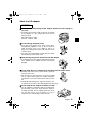
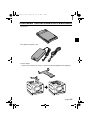
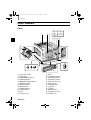
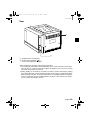
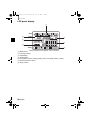
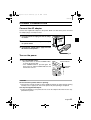
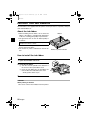
ol_DVP-P1_E_Cover1.fm Page 1
Wednesday, July 23, 2003
4:09 PM
NOTE: This manual explains how to safely operate the DVP-P1EX and DVP-P1U.
Any information regarding only one of these products will be labeled as such.
Please read these instructions carefully before using the printer. Make sure to read and understand the section “SAFETY PRECAUTIONS” on pages 4 to 11. Keep this manual in a safe
place for later reference.
DVP-P1_E.book Page i Wednesday, July 23, 2003
3:20 PM
Warning
TO PREVENT THE RISK OF FIRE OR ELECTRIC SHOCK, DO NOT EXPOSE THIS
APPLIANCE TO RAIN OR MOISTURE
FOR AMERICAN USERS
i This equipment has been tested and found to comply with the limits for a Class B digital device, pursuant to Part 15 of the FCC Rules. These limits are designed to provide reasonable protection against harmful interference in a residential installation.
This equipment generates, uses and can radiate radio frequency energy and, if not
installed and used in accordance with the instructions, may cause harmful interference to radio communications. However, there is no guarantee that interference will
not occur in a particular installation. If this equipment does cause harmful interference to radio or television reception, which can be determined by turning the equipment off and on, the user is encouraged to try to correct the interference by one or
more of the following measures:
h Reorient or relocate the receiving antenna.
h Increase the separation between the equipment and receiver.
h Connect the equipment to an outlet on a circuit different from that to which the
receiver is connected.
h Consult the dealer or an experienced radio/TV technician for help.
i Changes or modifications not expressly approved by the party responsible for compliance could void the user’s authority to operate the equipment.
Tested To Comply With FCC Standards
FOR HOME OR OFFICE USE
Declaration of Conformity
Model Number : DVP-P1U
Trade Name : SANYO
Responsible party : SANYO FISHER COMPANY
Address : 21605 Plummer Street, Chatsworth, California 91311
Telephone No. : (818) 998-7322
This device complies with Part 15 of the FCC Rules. Operation is subject to the following two conditions:
(1) this device may not cause harmful interference, and
(2) this device must accept any interference received, including interference that
may cause undesired operation.
i
English
DVP-P1_E.book Page ii
Wednesday, July 23, 2003
3:20 PM
FOR CANADIAN USERS
i This Class B digital apparatus complies with Canadian ICES-003.
English
ii
DVP-P1_E.book Page iii
Wednesday, July 23, 2003
3:20 PM
BEFORE READING THE MANUAL
Design © 2003 SANYO Electric Co., Ltd.
Program © 2003 SANYO Electric Co., Ltd.
Documentation © 2003 SANYO Electric Co., Ltd.
Copyright 2003 SANYO Electric Co., Ltd. All rights reserved.
All other company and product names are registered trademarks or trademarks of their
respective owners.
Caution
i It is forbidden to copy this manual, whole or in part, without prior written permission.
i All images and illustrations given in this manual are for explanation purposes and
may differ slightly from that of the actual product. Also, actual specifications are subject to change without prior notice and therefore may differ from the contents of this
manual.
i Sanyo Electric shall not be held responsible for any problems resulting from the use
of this printer.
i Sanyo Electric declines all responsibility for damages due to improper use of the
printer, failure to adhere to the instructions given in this manual, or repairs or changes
done by those other than a technician authorized by the manufacturer.
i Sanyo Electric shall not be held responsible for any damage caused by optional
devices or consumable items used with the printer other than those supplied with the
printer or those specified by Sanyo Electric.
i Sanyo Electric shall not be held responsible for any losses or loss of revenue resulting from the loss of data caused by the malfunction, or the repairing of a malfunction,
of the printer.
Symbols used in this manual
NOTE
Points giving some extended instructions or special points to pay attention to.
HINT
Points that may prove useful when using the DVP-P1.
HELP
In case a problem occurs, this may help in certain situations.
CAUTION
Points that require special attention.
see page xx Refer to the page indicated in brackets for detailed information.
i The numbers in the illustrations (2-1, 2-2 etc.) correspond to the numbered steps in
the procedures.
DVP-P1_ETOC.fm
Page 1
Wednesday, July 23, 2003
5:17 PM
CONTENTS
BASIC OPERATION................................................................................................. 2
SAFETY PRECAUTIONS......................................................................................... 4
FOR CORRECT USE OF YOUR PRINTER........................................................... 12
CHECKING THE INCLUDED ACCESSORIES ...................................................... 15
SEPARATELY SOLD ACCESSORIES .................................................................. 16
OUTLINE
SPECIAL FEATURES OF THE PRINTER ............................................................. 17
PART NAMES ........................................................................................................ 18
SETUP
POWER CONNECTION .........................................................................................
INSTALL THE INK RIBBON ...................................................................................
LOADING THE PAPER ..........................................................................................
INSERT THE CARD ...............................................................................................
21
22
24
27
PRINTING
SETTING THE PRINT MODE ................................................................................
INDEX PRINTS.......................................................................................................
INDEX SELECT PRINTS........................................................................................
ID-SIZE PRINTS.....................................................................................................
PRINT ONE IMAGE................................................................................................
PRINT ALL IMAGES...............................................................................................
DPOF PRINTING....................................................................................................
OTHER PRINT SETTINGS ....................................................................................
PRINTING FROM YOUR DIGITAL CAMERA (PictBridge printing)........................
29
30
32
34
36
38
40
42
44
TROUBLESHOOTING
TROUBLESHOOTING............................................................................................ 45
APPENDIX
SPECIFICATIONS.................................................................................................. 48
English
1
DVP-P1_E.book Page 2 Wednesday, July 23, 2003
3:20 PM
BASIC OPERATION
Basic printing procedure
1
2
3
4
5
2
Install the ink ribbon (see page 22).
h The ink ribbon and paper are not supplied with this
printer. Please purchase them separately (see page
16).
Load the paper (see page 24).
Connect the AC adapter, and turn on the power
(see page 21).
Insert the card (see page 27).
Make an index print (see page 30).
h Each sheet of an index print contains up to 20
images.
h Once you are familiarized with the operation, you
can select the image to print by specifying its image
number (see page 36).
English
DVP-P1_E.book Page 3 Wednesday, July 23, 2003
20
20
03
05
02
2003
05
01
ID-size prints
(see page 34)
03
05
03
Index select printing (see page 32).
h Confirm the image number on the index print, specify the image number with the printer, and print.
h In addition, you can make ID-size prints, or you can
make prints according to the DPOF settings. And of
course you can print all the data in the card, or print
just one image.
h When not using the printer, remove the ink ribbon
and paper, and store them in the box in which they
were purchased in a place protected from heat and
light.
04
2003 05
6
3:20 PM
DPOF printing
(see page 40)
Print all images
(see page 38)
Print one image
(see page 36)
k Other print settings (see page 42).
i You can specify borderless prints, date imprint and sharpness printing (except for
Index prints).
k PictBridge compliant
This printer is PictBridge compliant. PictBridge is a standard that enables direct printing
from a digital still camera to the printer. With PictBridge printing, the print functions are
controlled by your camera’s print settings.
English
3
DVP-P1_E.book Page 4 Wednesday, July 23, 2003
3:20 PM
SAFETY PRECAUTIONS
About the printer
CAUTION
k If the printer makes a strange noise, emits a strange odor, or if smoke
comes out from it, immediately turn off the power and unplug it from
the power outlet.
i If the printer is used under these conditions, it may
cause a fire or electric shock. Immediately turn off the
printer, unplug it from the power outlet, and wait to
make sure no more smoke comes from the printer.
Then take it to the dealer for service. Do not try to
repair or open the printer yourself.
k Do not modify or open the cabinet.
i Do not touch any internal parts, as doing so may cause
a fire or electric shock.
Any internal check, setting, or repair should be performed by the dealer.
k Do not insert objects in the printer.
i Do not insert metallic or flammable objects into the
ventilation holes, card slots, or ink ribbon slot, or allow
such objects to fall in. It may cause a fire or electric
shock. Be especially careful with regard to this point
when children are present.
i In the event that an object was inserted in or has fallen
into the printer, turn off the printer, unplug it from the
power outlet, and contact the dealer. If the printer is
operated as is, it may cause a fire or electric shock.
4
English
DVP-P1_E.book Page 5 Wednesday, July 23, 2003
3:20 PM
k Do not place flower vases or other containers holding liquids on top of
the printer.
i In the event that water or other liquid has gotten inside
the printer, immediately turn off the printer, unplug it
from the power outlet, and contact the dealer. If the
printer is operated as is, it may cause a fire or electric
shock.
k Do not get the printer wet.
i Take care not to let the printer get wet or allow water to
get inside, as this may case a fire or electric shock.
k Do not use during a storm.
i To avoid the risk of electric shock, quickly turn off the
printer and unplug the power cord from the power outlet.
k Do not place on an unstable surface.
i The printer may fall, resulting in damage to the printer
or injury.
i If the printer has fallen and its body is damaged, turn it
off, unplug the power cord from the power outlet, and
take it to the dealer for repair. Using the printer after its
body has been damaged may cause a fire or electric
shock.
English
5
DVP-P1_E.book Page 6 Wednesday, July 23, 2003
3:20 PM
CAUTION
k Do not stand the printer on its side.
i The printer should be in its correct horizontal position
when in use.
i If the printer is operated while set on its side, the paper
feed and/or discharge may not work properly and
cause a malfunction.
k Do not use where there is risk of explosion.
i Do not use the printer in a location where there is
explosive gas or any other flammable material in the
air. Doing so may cause a fire or an explosion.
k Cautions when carrying the printer.
i Be careful not to drop the printer or subject it to strong
shock or vibration.
i Unplug the power cord from the power outlet, and disconnect any other equipment from the printer.
k If the printer is not going to be used for a long
period of time.
i For safety’s sake, unplug the power cord from the
power outlet, and remove the ink ribbon and paper
from the printer.
6
English
DVP-P1_E.book Page 7 Wednesday, July 23, 2003
3:20 PM
CAUTION
k Cautions during use and storage.
i This printer is a precision instrument. When using or
storing the printer, make sure to avoid the following
locations to avoid damage.
h Places in direct sunlight
h Places where humidity and temperature are high
h Places that may get wet
h Places close to an air conditioner or heater
h Inside a car
h Places where there is dust and dirt
h Places where there is a fire burning
h Places where volatile products are stored
h Places subject to vibration
Operating environment:
h For details about the optimum operating environment, please see “Specifications”
on page 48.
k Do not obstruct the ventilation holes.
i Do not obstruct the ventilation holes, for example by
placing the printer in a spot with poor ventilation, or
covering it with a table cloth. If the ventilation holes are
blocked, the inside of the printer may become overheated and cause a fire.
k Do not place heavy objects on top of the printer.
i The printer may topple over and fall, possibly causing
injury. In addition, a heavy object on the printer may
damage it.
English
7
DVP-P1_E.book Page 8 Wednesday, July 23, 2003
3:20 PM
CAUTION
k Do not remove the paper tray during printing.
i During printing, the paper is moving back and forth
within the printer. If you attempt to touch the paper, it
may result in injury. Do not touch the paper tray until
printing is finished.
Do not remove the paper tray and put your fingers or
hands in the paper tray slot.
k Do not insert your fingers in the printer.
i Your fingers may be pinched or burned. Be especially
careful with regard to this point when children are
present.
8
English
DVP-P1_E.book Page 9 Wednesday, July 23, 2003
3:20 PM
About the AC adapter
CAUTION
k Make sure the rated voltage of AC adapter matches the line voltage in
your area.
i Fire and/or electrocution could result from connecting
the AC adapter to a line voltage other than that for
which it is rated.
DVP-P1EX: 220V to 240V
DVP-P1U: 100V to 120V
V~120V
1000V~240V
0
22
k Do not damage the power cord.
i Do not put heavy objects on the power cord or place
heat-producing appliances near it. Do not bend or
modify the power cord, or use staples to affix it, as
doing so may damage the power cord and cause a fire
or electric shock.
i If the power cord is damaged, consult with your dealer
about obtaining a replacement cord.
k When moving the printer, disconnect the AC adapter.
i If you attempt to move the printer without disconnecting
the AC adapter, the AC adapter or power cord may be
damaged.
k Do not allow dust etc. to build up on the power cord or power outlet.
i A build up of dust may cause a short circuit or generate
heat and cause a fire.
i Take special care when the printer is used in a humid
room, in a place where vapors are readily condensed,
in the kitchen, or in a place where dust easily accumulates.
i Periodically unplug the power cord from the power outlet, and remove any dust or dirt adhering between the prongs.
k Do not wrap the AC adapter in cloth or the like.
i If the AC adapter is wrapped in cloth, the resulting heat
generated may cause a fire. Even when the printer is
not being operated, the AC adapter generates some
heat. For this reason, once the printer is set up, it
should never be covered with a cloth or the like.
English
9
DVP-P1_E.book Page 10
Wednesday, July 23, 2003
3:20 PM
CAUTION
k Caution when connecting the AC adapter.
i Securely plug the power cord all the way into the power
outlet. If the power cord is not fully plugged in, heat
may be generated and cause a fire.
i Do not use a bundled power cord, as the heat generated may cause a fire.
i When using an extension cord, make sure that the total
wattage of the connected devices does not exceed the rated value of the extension
cord. If the power load exceeds the rated value, it may cause a fire. Before using an
extension cord with the printer, make sure to read all its accompanying instructions.
i Do not leave the supplied AC adapter’s power cord plugged into the power outlet
while the other end is not plugged into the printer’s power socket. The loose end can
cause electrocution if touched with wet hands or if handled by children.
i Use only the supplied power cord. If a different power cord is used, it may be rated for
a different current load, and that may cause a fire.
i The supplied AC adapter is for exclusive use with this printer. Do not use it with other
devices, as doing so may cause a fire or electric shock.
CAUTION
k When unplugging the power cord, be sure to hold the power plug and
slowly pull it out of the power outlet.
i Pulling the cord portion may damage the power cord
and cause a fire or electric shock.
k Do not touch the power cord plug with wet hands, or you risk receiving
an electric shock.
10
English
DVP-P1_E.book Page 11
Wednesday, July 23, 2003
3:20 PM
CAUTION
Other items
k Caution concerning the card.
i The card may be warm immediately after use. Before
removing the card, turn off the power to the printer and
wait for it to cool down.
i Keep out of the reach of children. If the card is inserted
incorrectly, it may cause an accident to occur.
English
11
DVP-P1_E.book Page 12
Wednesday, July 23, 2003
3:20 PM
FOR CORRECT USE OF YOUR PRINTER
k Maintenance
i Cleaning
1 Turn off the power, and remove the power plug from the power outlet.
2 Use a soft cloth to gently wipe the printer clean.
To remove stains
3 Moisten a cloth with a solution of water and a mild detergent. Wring the cloth out
well before using it to wipe the printer. Follow by polishing with a soft, dry cloth.
4 Remove any dust from the ventilation holes on the front panel
h Dust entering the printer from the ventilation holes will adhere to the prints and
diminish their quality.
i Caution
h Never use benzine or thinner to clean the printer, as doing so may cause deformation or paint peeling. Also, before using a chemically treated dustcloth to clean the
printer, make sure to read all accompanying instructions.
h Do not allow pesticides or flammable substances to come into contact with the
printer or paper tray. Also, do not allow rubber or vinyl objects to contact the printer
for a long period. They may cause deformation, discoloration, or paint peeling.
k When not using the printer for a long period
h Remove the power cord.
However, when the power is interrupted for a long time, the printer functions may
begin to not work properly. Periodically turn on the printer and use it to maintain
the functions.
k Caution concerning condensation
h Using the printer or card with condensation inside it may damage it.
i If condensation seems likely to form
h Place the printer in a plastic bag and seal it, and then wait until the printer has
reached the ambient temperature.
i Be careful of condensation under the following conditions
h When moving the printer suddenly from a cold place to a warm place.
h When the ambient temperature changes drastically, such as when a heater is
turned on to quickly heat the room.
h When the printer is placed in the path of cool air from an air conditioner.
h When the printer is placed in a location of high humidity.
12
English
DVP-P1_E.book Page 13
Wednesday, July 23, 2003
3:20 PM
k Caution concerning undesired interference
h The printer may create undesired interference if used close to a television or radio.
To avoid this type of interference, make sure the cores on the supplied power cord
and AC adapter are not removed.
Core
Power cord
Core
AC adapter
k About the ink ribbon
h Use only the specified ink ribbon.
h If the ribbon in the ink ribbon is slack, turn the spindle in the direction indicated by
the arrow to make it taut before using.
h Keep unused ink ribbon in the package. Do not subject it to direct sunlight or high
temperatures or humidity.
h Do not touch or pull the ribbon. Doing so may cause the print quality to deteriorate.
k About the paper
h Use only paper specified for the printer.
h Hold the paper by the edges, and avoid touching the print surface. If the print surface is scratched or smudged, the print quality may deteriorate.
h Once a paper is printed, do not reinsert it in the printer, as doing so may result in
damage.
h Do not use paper with bent edges, or wrinkled paper. If there is a curl to the paper,
take measures to flatten it before using it in the printer.
h Keep unused paper in the package. Do not subject it to direct sunlight or high temperatures or humidity. Keep it flat to prevent folds or wrinkles.
k About the printing surface
h Water-based inks (paint stick, ink jet printing) will not adhere to the printing surface. Please use a ball point pen or permanent marker.
English
13
DVP-P1_E.book Page 14
Wednesday, July 23, 2003
3:20 PM
k About prints
h Keep prints in a place that is not subject to direct sunlight or high temperatures or
humidity.
h It is best to keep prints in an album or card case, or other air-tight place.
h If keeping prints in an album, choose nylon photo covers. Polypropylene or cellophane can also be used. Photo covers other than these may cause discoloration or
color transfer.
h Do not let cellophane tape or plastic erasers etc. contact the print surface for a
long period. They may cause discoloration.
k About thermal head replacement
h When the thermal head is worn out, the print quality deteriorates. The thermal
head is a consumable item. When the print quality deteriorates, replace the thermal head.
h For replacement of the thermal head, please consult with the store where you purchased the printer. It is recommended that you request a checkup of the printerís
precision parts at the same time.
k Caution concerning copyrights
h The images you print are for your own private use; any other use may violate the
rights of copyrights owners.
14
English
DVP-P1_E.book Page 15
Wednesday, July 23, 2003
3:20 PM
CHECKING THE INCLUDED ACCESSORIES
i Paper tray
i AC adapter and power cord
i Paper stopper
If necessary, attach this accessory to prevent the discharged prints from dropping.
English
15
DVP-P1_E.book Page 16
Wednesday, July 23, 2003
3:20 PM
SEPARATELY SOLD ACCESSORIES
Postcard paper and ink ribbon (sets)
i Postcard paper and ink ribbon set (50 sheets)
h A set of 50 postcards and one ink ribbon
product number:
DVP-P1EX: DVP-IPK50
DVP-P1U: DVP-IPK50U
i Postcard paper and ink ribbon set (100 sheets)
h A set of 100 postcards and one ink ribbon
product number:
DVP-P1EX: DVP-IPK100
DVP-P1U: DVP-IPK100U
NOTE
About the ink ribbon life
i The ink ribbon that comes in a set can be used only for the number of sheets that
comes in the set. It cannot be used to print more than the specified number.
16
English
DVP-P1_E.book Page 17
Wednesday, July 23, 2003
3:20 PM
OUTLINE
SPECIAL FEATURES OF THE PRINTER
This printer is designed to print pictures taken with a digital camera, combining beautiful
print results with easy-to-use operation. It also incorporates various useful functions for
printing images on postcards and L size paper.
Beautiful and durable prints
i The dye sublimation printer uses an exclusive ink ribbon to produce beautiful prints
that are highly resistant to UV light. The fade resistance is equal to that of standard
lab-processed photo prints.
i The exclusive print paper is water-resistant. Keep your prints clean by immediately
and gently blotting any drops of water with a soft cloth, and they will not be damaged.
i Postcards made exclusively for this printer are sold separately. In addition to standard
options such as date imprinting and borderless printing, with this printer you can
specify extra-sharp images.
* The preservation of prints which have been saturated in water cannot be guaranteed.
DPOF compliant
i You can have your prints produced following the printing specifications (number of
prints, date imprinting, index print) set within your digital camera.
Print from various types of memory cards
i Prints can be made directly from many of the various types of digital camera memory
cards simply by inserting the card into the printer.
i This printer is compatible with the following cards:
h SD Memory Card
h MultiMedia Card
h CompactFlash
h Microdrive
h SmartMedia (3.3V)
h Memory Stick (An adapter is required to use Memory Stick Duo.)
Direct prints from your digital camera (PictBridge)
i Any digital camera that supports PictBridge can be connected to the printer for direct
printing without a PC. Using this function, the print functions are controlled by your
camera’s print settings.
English
17
DVP-P1_E.book Page 18
Wednesday, July 23, 2003
3:20 PM
OUTLINE
PART NAMES
Front
3
1
4
5
2
INK RIBBON PAPER MEMORY CARD
6 78 90
A
B
N
C
M
D
E
I
MENU
L
K
H
COPIES
J
F
G
1
2
3
4
5
6
7
8
9
0
A
B
18
Paper eject section
LCD monitor
[INK RIBBON] indicator
[PAPER] indicator
[MEMORY CARD] indicator
[CANCEL] button
[PRINT] indicator
[PRINT] button
POWER indicator
POWER button
Slot A
Card slot cover
English
C
D
E
F
G
H
I
J
K
L
M
N
Slot B
[PictBridge] terminal
[COPIES] [+] button
[COPIES] [–] button
Paper tray slot cover
Paper tray slot
Ventilation holes
[+] button
[–] button
[MENU] button
Ink ribbon slot cover
Ink ribbon slot
DVP-P1_E.book Page 19
Wednesday, July 23, 2003
3:20 PM
OUTLINE
Rear
1
2
1 Ventilation holes (cooling fan*)
2 DC IN terminal (DC24V+)
Connect the supplied AC adapter.
*About temperature elevation and cooling fan operation
i The cooling fan in the printer will automatically start to operate when the internal temperature rises to a certain temperature. When this happens, the noise of the cooling
fan can be heard, but this is normal.
i During printing, if the inside of the printer exceeds a specific temperature, printing
may stop temporarily. Printing will automatically resume after the temperature drops.
When printing stops due to elevated temperature, the [HEAT] indication will appear
on the LCD monitor and the PRINT indicator will flash. If this should occur, please
wait for a while for printing to resume.
English
19
DVP-P1_E.book Page 20
Wednesday, July 23, 2003
3:20 PM
OUTLINE
LCD panel display
1
Mode
7
Image
Number
2
6
3
5
Setting
1
2
3
4
5
6
7
20
4
* All the indications never appear at the same time.
[Mode] menu
Print page number
Index display
[Setting] menu
Total number of prints (during printing, shows remaining number of prints)
Specified number of prints
Image number
English
DVP-P1_E.book Page 21
Wednesday, July 23, 2003
3:20 PM
SETUP
POWER CONNECTION
Connect the AC adapter
Connect the supplied AC adapter to the printer. Make sure that all the power cord and
AC adapter plugs are firmly inserted.
1
2
3
Insert the power cord plug into the AC adapter socket.
Connect the other end of the power cord plug
to a power outlet.
Insert the AC adapter plug (L type) in the DC
IN terminal of the printer.
3
1
2
Turn on the power
1
Press the POWER button.
h The printer turns on, and the POWER indicator and LCD monitor light.
h If the POWER button is pressed again, the
power turns off, and the POWER indicator and
LCD monitor turn off.
Power indicator
POWER
button
LCD monitor
CAUTION
Do not turn off the printer while it is printing.
i If the printer is turned off while it is in the middle of printing, the paper will stop moving
and may cause a paper jam. Turn off the printer only after printing is completed.
Use only the supplied AC adapter
i To prevent damage to your printer, do not use an AC adapter other than the one supplied with the printer.
English
21
DVP-P1_E.book Page 22
Wednesday, July 23, 2003
3:20 PM
SETUP
INSTALL THE INK RIBBON
The ink ribbon is not supplied with this printer. Please purchase a separately sold postcard and ink ribbon set.
About the ink ribbon
i When installing the ink ribbon, do not touch the
ribbon. If the ribbon is smudged with fingerprints
or dirt, the resulting print quality may be inferior.
i The guarantee term for the ink ribbon quality is
as follows:
Unopened ink ribbon stored in a dark place:
Temperature 40ºC or lower.
i The ink ribbon can print only the number of
sheets that comes with it.
i The number of prints is indicated on the ink ribbon.
Ribbon
Number of prints indication
How to install the ink ribbon
1
2
3
Open the ink ribbon slot cover.
2-1
Install the ink ribbon.
1 Turn the cassette spindle in the direction of
the arrow to take up the ribbon slack.
2 Insert the ink ribbon into the ink ribbon slot
from the direction indicated by the arrow.
2-2
h Firmly push it all the way in.
1·3
Close the ink ribbon slot cover.
CAUTION
When printing is finished
i Be sure to remove the ink ribbon from the printer.
22
English
DVP-P1_E.book Page 23
Wednesday, July 23, 2003
3:20 PM
SETUP
How to remove the ink ribbon
1
2
Open the ink ribbon slot cover.
2-1
Remove the ink ribbon.
1 Lift the lock lever.
2 Lift out the ink ribbon.
2-2
1
CAUTION
Cautions when replacing the ink ribbon
i Do not insert fingers into the ink ribbon slot. Immediately after printing, the inside of
the printer is very hot. If fingers etc. are inserted into the ink ribbon slot, they may get
burned.
i When removing the ink ribbon, take care not damage the ribbon by touching it.
Do not rewind the ink ribbon
i Once used, the ink ribbon cannot be used again even if it is rewound.
English
23
DVP-P1_E.book Page 24
Wednesday, July 23, 2003
3:20 PM
SETUP
LOADING THE PAPER
The paper and ink ribbon are not supplied with this printer. Please purchase the separately sold postcard paper and ink ribbon set.
About the paper
i This printer can print only the exclusive postcard
paper. Using paper other than that specified may
cause paper jams. Also, you will not be able to
obtain the best prints.
i The ink ribbon can print only the number of
sheets that comes with it. When loading the
paper, take care to load it correctly oriented and
with the print surface facing down.
i Once a paper is printed, do not reinsert it in the
printer, as doing so may result in damage.
i If the paper is not to be used for a while, remove
it from the paper tray.
i Only one side of the paper is suitable for printing.
i Load the paper with the print side facing down.
i A maximum of 50 sheets can be loaded in the
paper tray.
How to load the paper
1
2
24
Open the cover of the paper tray.
Confirm the print side.
h The print side of the paper is shiny, and the non-print side indicates a place for
writing the address.
English
DVP-P1_E.book Page 25
Wednesday, July 23, 2003
3:20 PM
SETUP
3
Insert the paper in the paper tray.
h Insert the paper with the print side facing down, and with the top edge near the
pull-handle side of the paper tray.
NOTE
i Images captured with the camera held vertically are rotated 90 degrees and printed.
Image captured with
the camera held
vertically
Image captured with
the camera held
horizontally
English
25
DVP-P1_E.book Page 26
Wednesday, July 23, 2003
3:20 PM
SETUP
Installing the paper tray
1
2
3
Open the paper tray slot cover.
Slowly insert the paper tray into the paper
tray slot.
h Slowly insert it all the way in.
Close the paper tray slot cover.
1
2
k To remove the paper tray
h Open the paper tray slot cover, grasp the
paper tray pull-handle, and pull out the paper
tray.
Pull handle
CAUTION
When printing is finished
i Be sure to remove the paper from the paper tray.
26
English
DVP-P1_E.book Page 27
Wednesday, July 23, 2003
3:20 PM
SETUP
INSERT THE CARD
Cards that can be used with this printer
i The cards listed below can be used with this printer:
i Only one card can be inserted at a time.
h SD Memory Card/MultiMedia Card
h CompactFlash/Microdrive
h SmartMedia (except for SmartMedia cards that operate at 5V)
h Memory Stick (An adapter is required to use Memory Stick Duo.)
Note that only card data which was recorded in the DCF compliant format can be
printed. Image data which was saved on a computer cannot be printed.
How to insert the card
1
Turn on the power (see page 21).
2
Open the card slot cover.
Card slot cover
English
27
DVP-P1_E.book Page 28
Wednesday, July 23, 2003
3:20 PM
SETUP
3
Insert the card.
MEMORY CARD indicator
h Choose the correct slot for your type of card.
Slot A
h Take care that the card is oriented correctly,
and firmly push it all the way in.
Slot A: SmartMedia, SD Memory Card,
MultiMedia Card, Memory Stick
Slot B: CompactFlash, Microdrive
h When a card is inserted, the MEMORY CARD
indicator will light.
Slot B
4
Close the card slot cover.
How to remove the card
1
2
3
Open the card slot cover.
Pull out the card.
h The MEMORY CARD indicator will go out.
Close the card slot cover.
CAUTION
i Do not remove the card while the MEMORY CARD indicator is flashing or in the middle of printing.
28
English
DVP-P1_E.book Page 29
Wednesday, July 23, 2003
3:20 PM
PRINTING
SETTING THE PRINT MODE
This section explains how to set the print mode.
1
2
3
Turn ON the power and insert a card into the
correct card slot (see pages 21, 28).
Press the MENU button to move the menu
pointer [g] to the [Mode] menu.
Press the [+] or [–] button.
h Keep the [+] or [–] button depressed until the
desired print mode appears in the [Mode]
menu on the LCD monitor.
2
1 a (index print):
3
h Prints 20 small images on each sheet.
1
2
3
2 b (index select):
h Prints only the image(s) selected on the Mode
index display on LCD monitor.
Image
Number
3 d (ID size):
4
5
6
h Prints 6 ID-size images on each sheet.
Menu pointer
4 c (single image):
h Prints only the selected image.
S tti
5 f (all images):
h Prints all images.
6 e (DPOF):
h Prints images as specified by the DPOF settings (index print, date imprint,
number of prints).
English
29
DVP-P1_E.book Page 30
Wednesday, July 23, 2003
3:20 PM
PRINTING
INDEX PRINTS
A print that shows thumbnail versions of the images-up to 20 per sheet-is called an
“index print”. When a memory card contains a lot of image data, this print mode can be
very useful for cataloguing the many images.
1
Set the printer to the Index print mode (see page 29).
h The print page and index images are shown on the LCD monitor.
Mode
Image
Number
Print page
Index images
Setting
30
English
DVP-P1_E.book Page 31
Wednesday, July 23, 2003
3:20 PM
PRINTING
2
3
Select the page to be printed.
h You can select whether to print the
images on the selected page or print the
images on all pages.
1 Press the MENU button to move the
menu pointer [g] to the [Image Number].
2 Press the [+] or [–] button to select the
page to be printed.
h Each time the [+] or [–] button is
pressed, the page changes.
h To print the images on all pages,
select [t].
h The total number of pages to be
printed is indicated by “Total” on the
LCD monitor.
3
2-1
2-1
2-2
Mode
Image
Number
Press the PRINT button.
h The PRINT lamp lights and printing
starts.
h During printing, the remaining number of
pages is indicated by “Remains”.
Setting
2-2
3
2-2
h For index prints, the following information can be confirmed.
Date that lower right image
was photographed
Date that upper left image
was photographed
2003. 06. 03 2003. 06. 03
XXX-XXXX
File
number*
Folder number*
* In PictBridge printing, these are not
printed.
Page
01
100- 0001
1 0 0 -0 0 0 2
1 0 0 -0 0 0 3
1 0 0 -0 0 0 4
1 0 0 -0 0 0 5
100- 0006
1 0 0 -0 0 0 7
1 0 0 -0 0 0 8
1 0 0 -0 0 0 9
1 0 0 -0 0 1 0
100- 0011
1 0 0 -0 0 1 2
1 0 0 -0 0 1 3
1 0 0 -0 0 1 4
1 0 0 -0 0 1 5
100- 0016
1 0 0 -0 0 1 7
1 0 0 -0 0 1 8
Page
number
NOTE
Damaged or incompatible data
i If the data for an image is damaged, or if the image format is not supported by this
printer, a “s” mark is printed instead of the image.
English
31
DVP-P1_E.book Page 32
Wednesday, July 23, 2003
3:20 PM
PRINTING
INDEX SELECT PRINTS
Select the desired image data from the index images on the LCD monitor and print
them.
You can select several images and specify the number of prints for each image.
1
Set the printer to the Index Select print mode (see page 29).
h The print page as well as the index image and folder number are shown on the
LCD monitor.
Mode
Image
Number
Image
Number
Print page
Index images
Setting
HINT
How to use the index prints
i The printed images on the index print (see page 30) correspond to the index images.
Having the index print to refer to makes it easier to select the images you want to
print.
32
English
DVP-P1_E.book Page 33
Wednesday, July 23, 2003
3:20 PM
PRINTING
2
Specify the image to print and the number of prints.
1 Press the MENU button and move the
menu pointer [g] to [Image Number].
2 Press the [+] or [–] button to select the
image to print.
h When [+] or [–] is pressed, the Index
Navi
moves. Use the Index
Navi to specify the image you wish to
print.
h If you press the [+] and [–] COPIES
buttons at the same time for about 2
seconds, the number of prints specified in step (3) is applied to all the
images.
3 Press the [+] or [–] COPIES button to
specify the number of prints.
h The number of prints for the currently
selected image (Quantity) and the
total number of prints (Total) are
shown on the LCD monitor.
h A maximum of 19 prints can be specified.
h You can press the CANCEL button to
cancel the settings.
3
2-3
2-2
2-1
2-2
2-1
Mode
Image
Number
Setting
2-2
Index Navi
2-3
Number of prints
2-3
3
Total number of prints
Press the PRINT button.
h The PRINT indicator lights, and printing
begins.
h During printing, the remaining number of prints (Remains) is shown.
NOTE
If the total number of prints indication does not show more than [99]...
i The indication for the total number of prints cannot show more than 99. However, you
can specify more 100 or more prints.
i When the specified total number of prints is 100 or more, the total number of prints
indication appears as [w]. During printing the remaining number of prints indication
also appears as [w]; when the remaining number of prints becomes 99, the correct
number is shown on the display.
You can specify borderless prints, date imprint, and sharpness printing (see page
42).
English
33
DVP-P1_E.book Page 34
Wednesday, July 23, 2003
3:20 PM
PRINTING
ID-SIZE PRINTS
ID-size images can be printed on one sheet of paper.
A set of three 30mm × 24mm images and three 45mm × 35mm images is printed on one
sheet of paper.
1
Set the printer to the ID Size print mode (see page 29).
h The image number and number of prints is shown on the LCD monitor.
Mode
Image
Number
Image
Number
Number of
prints
Setting
34
English
DVP-P1_E.book Page 35
Wednesday, July 23, 2003
3:20 PM
PRINTING
2
3
Specify the image you wish to print and
the number of prints.
1 Press the MENU button, and move the
menu pointer [g] to [Image Number].
2 Press the [+] or [–] button to display the
number of the image you wish to print.
3 Press the [+] or [–] COPIES button to
specify the number of prints.
h The total number of prints (Total) is
shown on the LCD monitor.
h A maximum of 19 prints can be specified.
Press the PRINT button.
h The PRINT indicator lights, and printing
begins.
h During printing, the remaining number of
prints (Remains) is shown.
3
2-3
2-2
2-1
2-2
2-1
Mode
Image
Number
Setting
2-3
2-3
Number of prints
Total number of prints
NOTE
You can specify sharpness printing (see page 42).
English
35
DVP-P1_E.book Page 36
Wednesday, July 23, 2003
3:20 PM
PRINTING
PRINT ONE IMAGE
The data for one image can be printed on one sheet, or you can make multiple prints.
1
Set the printer to the One Image print mode (see page 29).
h The image number is shown on the LCD monitor.
Mode
Image
Number
Image
Number
Setting
36
English
DVP-P1_E.book Page 37
Wednesday, July 23, 2003
3:20 PM
PRINTING
2
3
Specify the image to print and the number of prints.
1 Press the MENU button to move the
menu pointer [g] to [Image Number].
2 Press the [+] or [–] button to select the
image to print.
3 Press the [+] or [–] COPIES button to
specify the number of prints.
h The total number of prints (Total) is
shown on the LCD monitor.
h A maximum of 19 prints can be specified.
3
2-3
2-1
Press the PRINT button.
h The PRINT indicator lights, and printing
begins.
h During printing, the remaining number of
prints (Remains) is shown.
2-1
2-2
2-2
Mode
Image
Number
Setting
3
2-3
NOTE
You can specify borderless prints, date imprint, and sharpness printing (see page
42).
English
37
DVP-P1_E.book Page 38
Wednesday, July 23, 2003
3:20 PM
PRINTING
PRINT ALL IMAGES
You can print all the images on the card.
1
Set the printer to the All Image print mode (see page 29).
h The image number and total number of images (Total) is shown on the LCD monitor.
Mode
Image
Number
Image
Number
Total number
of images
Setting
38
English
DVP-P1_E.book Page 39
Wednesday, July 23, 2003
3:20 PM
PRINTING
2
Press the PRINT button.
h The PRINT indicator lights, and printing begins.
h During printing, the remaining number of prints (Remains) is shown.
Mode
Image
Number
Remaining
number of
prints
Setting
NOTE
If the total number of prints indication appears as [w]...
i The indication for the total number of prints cannot show more than 99. However,
when the remaining number of prints becomes 99, the correct number is shown on
the display. You can customize the setting.
You can specify borderless prints, date imprint, and sharpness printing (see page
42).
English
39
DVP-P1_E.book Page 40
Wednesday, July 23, 2003
3:20 PM
PRINTING
DPOF PRINTING
04
2003 05
20
03
05
02
20
2003
05 0
1
1
03
05
03
You can print the images according to the DPOF settings set with your camera, for
example.
DPOF-standard printing --index prints and printer-controlled settings, for example-- is
possible. (DPOF trimming is not available.)
Set the printer to the DPOF print mode (see page 29).
h The DPOF settings are shown on the LCD monitor.
Mode
Number of
index prints
Image
Number
Total number
of prints
Setting
40
English
DVP-P1_E.book Page 41
Wednesday, July 23, 2003
3:20 PM
PRINTING
2
Press the PRINT button.
h The PRINT indicator lights, and printing
begins.
h During printing, the remaining number of
prints (Remains) is shown.
2
Mode
Image
Number
Setting
2
2
NOTE
If the total number of prints indication does not show more than [99]...
i The indication for the total number of prints cannot show more than 99. However, you
can specify 100 or more prints.
i When the specified total number of prints is 100 or more, the total number of prints
indication appears as [w]. During printing the remaining number of prints indication
also appears as [w]; when the remaining number of prints becomes 99, the correct
number is shown on the display.
If printing does not begin...
i It is not possible to print if there are 1980 or more DPOF specified prints. Decrease
the number of specified prints and repeat the procedure.
You can specify borderless prints and sharpness printing (see page 42).
English
41
DVP-P1_E.book Page 42
Wednesday, July 23, 2003
3:20 PM
PRINTING
OTHER PRINT SETTINGS
The following printing functions are available:
Borderless prints [Borderless*]: The image is printed with no white border around the
picture.
Date imprint [Date]: The date the image was captured is imprinted in the corner.
Sharpness printing [Sharpness]: The images are printed with extra-sharp outlines.
* Due to the difference in the respective horizontal-to-vertical ratios of the digital image
and the paper, the upper and lower portions of the image may be cropped in borderless prints.
1
2
3
4
Set the printer to the desired print mode (see page 29).
h The settings that can be customized differ depending on the selected print mode.
Index print mode:
Not available.
Index Select, All Image, and One Image print modes:
Borderless prints, date imprint, and sharpness printing can be specified.
ID Size print mode:
Sharpness printing can be specified.
DPOF print mode:
Borderless prints and sharpness printing can be specified.
Specify the image and the number of prints.
Index Select print mode:→ (see page 32)
ID Size print mode:→ (see page 34)
Print one Image mode:→ (see page 36)
All Image print mode:→ (see page 38)
DPOF print mode:→ (see page 40)
Specify printing functions.
1 Press the MENU button to move the menu
pointer [g] to the [Setting] menu.
2 Press the [+] or [–] button.
h Press the [+] or [–] button to check the
checkbox for the desired print functions.
4
Press the PRINT button.
h The PRINT lamp lights and printing starts.
Mode
3-1
3-2
Image
Number
Setting
42
English
DVP-P1_E.book Page 43
Wednesday, July 23, 2003
3:20 PM
PRINTING
k About date imprinting
i You can select the format of the imprinted date.
1 Select the [Mode] menu.
2 Press the [+] and [–] COPIES buttons at the same time for about 2 seconds.
h The screen to select the date format appears.
3 Press the [+] or [–] COPIES button.
h Each time the button is pressed, the date format changes. Specify the desired
format.
Mode
Image
Number
JP: Year/Month/Day
US: Month/Day/Year
EU: Day/Month/Year
Setting
4 Press the MENU button.
h This completes the date format setting.
h You can press the CANCEL button any time to exit the setting procedure.
NOTE
If the date is not printed correctly
i This printer imprints the date that was recorded when the image was photographed
with the digital camera. If an image is subsequently altered using editing software, or
if the data format is changed before saving, the date information may be lost. In some
cases you may not be able to print such images, or the date may be imprinted as
“00.00.0000”.
English
43
DVP-P1_E.book Page 44
Wednesday, July 23, 2003
3:20 PM
PRINTING
PRINTING FROM YOUR DIGITAL CAMERA
(PictBridge printing)
PictBridge printing allows you to print directly from your digital camera to the printer
using just an USB interface cable. The print settings are controlled with the digital camera. Note that PictBridge printing is possible only with digital cameras that are PictBridge
compliant. Even if a non-PictBridge-compliant camera is connected to the printer, printing is not possible.
1
Connect the digital camera to the printer’s USB terminal.
h Use the USB interface cable that was supplied with your digital camera.
To [PictBridge]
terminal
2
To USB terminal
Turn on the power to both the printer and the digital camera.
h [x] flashes on the LCD monitor.
h Wait until the [x] indication lights steady before proceeding to step 3.
Image
Number
3
Use the digital camera to control the printing operations.
h For detailed information about controlling the printer operations and settings from your
camera, please refer to the Instruction Manual that came with your digital camera.
<Button operation during PictBridge printing>
i The operation buttons function as follows during PictBridge printing.
Pressing the CANCEL button during printing will cancel the printing operation.
i If the camera is set so that it is operating following the printer settings, you can select
the [One Image], [ID Size] or [Index] print mode.
NOTE
Do not turn off the power to the printer while it is connected.
i If the power to the printer is turned off while it is connected, the camera may not operate correctly. If the camera does not operated correctly, disconnect the dedicated
USB interface cable, turn off the camera, and then reconnect the cable.
44
English
DVP-P1_E.book Page 45
Wednesday, July 23, 2003
3:20 PM
TROUBLESHOOTING
TROUBLESHOOTING
If malfunction occurs, first check the troubleshooting procedures given below.
Problem or
indication
Cause
Solution
[u] is shown on
the LCD monitor,
and the PAPER
indicator is lit or
flashing.
The paper tray is empty: The
PAPER indicator is lit.
[u] is shown on
the LCD monitor,
and the INK RIBBON indicator is lit.
The ink ribbon is depleted.
1 Remove the ink ribbon.
2 Install a new ink ribbon.
h When the PRINT button
is pressed, printing
resumes.
[u] is shown on
the LCD monitor,
the PAPER indicator is lit or flashing
and the INK RIBBON indicator is lit.
The paper tray is empty or
there is a paper jam in the
printer, and the ink ribbon is
depleted.
Refer to the paragraphs above
on “[u] is shown on the
LCD monitor, and the PAPER
indicator is lit or flashing” and
“[u] is shown on the LCD
monitor, and the INK RIBBON
indicator is lit,” and follow the
indicated procedures to
resolve the problems.
The card image(s)
can’t be read and
the MEMORY
CARD indicator is lit
red or orange.
More than one card is inserted
in the printer: The MEMORY
CARD indicator is lit orange.
If two cards are inserted
1 Remove one of the cards
from the printer.
If the inserted card is defective
1 Replace the card.
If the SmartMedia is inserted
incorrectly
1 Remove the card and reinsert it correctly oriented.
Paper jam in the printer: The
PAPER indicator flashes.
The inserted card is defective:
The MEMORY CARD indicator
is lit red.
The SmartMedia is inserted
incorrectly: The MEMORY
CARD indication is lit red.
When the paper tray is
empty
1 Remove the paper tray and
load the paper.
2 Reinsert the loaded paper
tray in the printer.
h When the PRINT button
is pressed, printing
resumes.
English
45
DVP-P1_E.book Page 46
Wednesday, July 23, 2003
3:20 PM
TROUBLESHOOTING
Problem or
indication
Printing is not possible, although the
card is correctly
inserted and the
procedure was correctly followed.
Cause
Solution
The inserted card has defecNot a malfunction. Use a card
tive or has unreadable image
that works properly, take the
data. In this case, the printer
photos again, and print them.
will operate differently depending on the selected print mode.
All Image print mode
i When defective image data
is read, [v] is
shown on the LCD monitor.
i The defective image is
skipped, and the next
image is read.
i Defective image data is not
printed.
Index print mode
i The defective image is
skipped, and the next
image is read.
i Defective image data is
printed as a “s” mark.
i Images are printed except
for defective image data.
DPOF print mode
i When defective image data
is read, [v] is
shown on the LCD monitor.
i The defective image is
skipped, and the next
image is read.
i Images are printed except
for defective image data.
[w] is shown
instead of the number of prints indication on the LCD
monitor.
The card inserted has 1981 or
more images recorded.
There is no recorded image
data on the card.
The card was recorded using a
camera that does not conform
to the DCF standard.
46
English
i Do not record more than
1980 images on one card.
i Insert a card in which image
data has been recorded.
i Insert a card that was
recorded using a camera
that conforms to the DCF
standard.
DVP-P1_E.book Page 47
Wednesday, July 23, 2003
3:20 PM
TROUBLESHOOTING
Problem or
indication
Cause
Solution
A TIFF image cannot be printed.
i The image is a 16-bit TIFF
image that was saved using
a computer’s image processing application.
* This printer cannot recognize TIFF images that do
not conform to the DCF
standard.
i When saving a TIFF image
on your computer, specify
an 8-bit TIFF file.
The printing speed
is slow.
i The amount of image data
is large.
* The higher the resolution
and the lower the compression ratio, the more beautiful the prints that can be
produced. However, when
the amount of image data is
large, it takes more time to
read, and the start of printing is delayed.
i Make the image resolution
lower or the compression
ratio higher.
The print is blurred
or smudged.
i The paper used is not the
specified paper.
* There is a paper jam.
i Use the specified paper.
i In very rare cases you may
not be able to print an
image even though it conforms to the DCF standard,
or the printing may be distorted.
i Change the conditions
when photographing.
i Select borderless printing
(see page 42).
The images in the
index print are not
in order by date.
The images were edited on a
computer.
Not a malfunction. The dates
of images that were edited on
a computer are not recognized.
The printed image
is small.
The image printed has a resolution is 320 × 240 pixels or
less.
Not a malfunction. Images
having a resolution of 320 ×
240 pixels or less are printed
without being enlarged. In
addition, they cannot be
printed as borderless prints.
The paper supply
The ink ribbon is depleted.
was depleted and
more paper was
inserted in the
paper tray, but printing does not
resume.
Install a new ink ribbon, and
press the PRINT button to
resume printing.
English
47
DVP-P1_E_06.fm
Page 48
Monday, September 8, 2003
4:02 PM
APPENDIX
SPECIFICATIONS
Printer
Printing system
Resolutions
Paper size
Dye-sublimation printer
310 dpi
100 mm × 148 mm (about 4" × 6")
True borderless
Paper feed
Automatic feeding from paper cassette
Paper cassette
Maximum 50 sheets
Printing time
About 40 seconds/page (for borderless prints, excluding
image processing time)
(except for index prints and ID-size prints)
Ink Ribbon cartridge
Print up to 100 sheets (when using DVP-IPK100/U)
Gradations
8-bit/color
LED indications
Power, MEMORY CARD, INK RIBBON, PRINT
Card slot
CF type I/II, SmartMedia (3.3V), SD Card, Memory Stick
Image format
JPEG/TIFF format (DCF, DPOF, Exif 1.0 - 2.2 compliant)
Note:
Designed mainly by the Japan Electronics and Information Technology Industries Association (JEITA), DCF
(Design rules for camera file system) is standard for digital still camera image files to provide interoperability
between digital photography devices for the images
stored on removable memory cards. However, rt is not
guaranteed that all devices will support the DCF standard.
Image size
Maximum 12,000,000 pixels
(Maximum 10,000,000 pixels for TIFF)
Print mode
Index, Index select, One, All, DPOF, PictBridge,
ID photo
Print option
Borderless on/off, Date on/off, sharpness on/off
Paper feed
Automatic paper feed (maximum 50 sheets)
Ambient
Temperature 10 to 35ºC (operating)
environment
–10 to 55ºC (storage)
(recomHumidity
35 to 80% (operating, no condensation)
mended)
10 to 90% (storage, no condensation)
Power supply (AC adapter) AC100-120V (DVP-P1U), AC220-240V (DVP-P1EX)
DC in
DC 24V
Power consumption
82 W
Weight
2.2 Kg
Dimensions (W × H × D)
189 × 192 × 162 mm
* Even if an image format complies with the DCF standard, complete compatibility is
not guaranteed.
48
English
DVP-P1_E.book Page 49
Wednesday, July 23, 2003
3:20 PM
APPENDIX
AC adapter specifications
Power supply
DVP-P1EX (VAR-P1EX): AC220V – 240V, 50/60Hz, 0.45A
DVP-P1U (VAR-P1): AC100V – 120V, 50/60Hz, 0.85A
Rated power
DC24V, 3A
Operating environment
0ºC – 40ºC
Storage environment
–20ºC – 85ºC
Dimensions and Weight 72 × 36 × 150 mm (excluding protrusions)
(W × H × D)
450g (excluding power cord)
Power cord specifications
Rated
DVP-P1EX (VAR-P1EX): AC250V, 2.5A
DVP-P1U (VAR-P1): AC125V, 10A
i When using the AC adapter abroad, the power cord may need to be replaced in accordance with local requirements.
Paper tray specifications
Size
Capacity
100 mm × 148 mm (about 4" × 6") (Postcard size)
50 sheets max.
Postcard paper and ink ribbon specifications
DVP-IPK50/U
DVP-IPK100/U
Storage conditions
(DVP-IPK50/U,
DVP-IPK100/U)
Paper
Ink ribbon
Paper
Ink ribbon
Temperature
50 postcards
For printing 50 postcards
100 postcards
For printing 100 postcards
Less than 40ºC
English
49
DVP-P1_E.book Page 50
Wednesday, July 23, 2003
3:20 PM
DVP-P1_Es.book
Page 51
MEMO
Wednesday, July 23, 2003
3:30 PM
ol_DVP-P1_E_Cover4.fm Page 1
Wednesday, July 23, 2003
4:08 PM