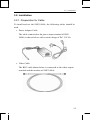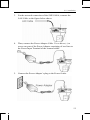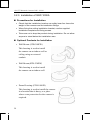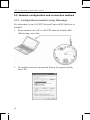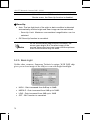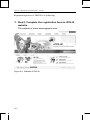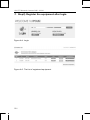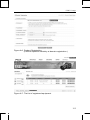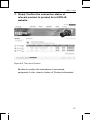
1
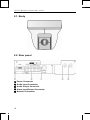
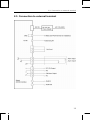
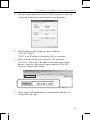
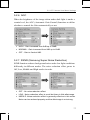
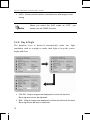
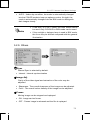
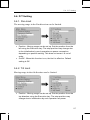
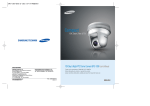
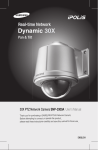
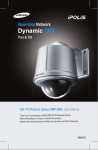
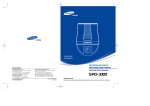
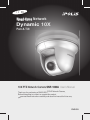
Real-time Network Dynamic 10X Pan & Tilt 10X PTZ Network Camera SNP-1000A User’s Manual Thank you for purchasing a SAMSUNG iPOLiS Network Camera. Before attempting to connect or operate this product, please read these instructions carefully and save this manual for future use. ENGLISH Preface A brand that is integrated into Samsung's network products, stands for a convenient world (Polis) made safe (Police) through Samsung's superior network performance(Internet protocol). With products' clear digital images transmitted over the internet, real-time monitoring is possible anywhere with an internet connection. Easy remote control functions and the use of existing networks minimize installation costs. With , experience a world of convenience connected anytime, anywhere. Preface Thanks for purchasing of 10X PTZ Network Camera SNP-1000A. This is a user instruction manual for a 10X PTZ Network Camera SNP-1000A that employs Samsung Techwin’s WINNER Ⅲ DSP system with superior low light capability. The user who installs and operates the product shall be aware of this manual and other manuals referenced by this manual before the installation and operation and use properly. This manual and the software and hardware explained here are protected by copyright law. So the copy, reprint and translation to other languages of a part of or all contents of this user manual without permission of SamsungTechwin Co., LTD are not allowed except for the copy for general use within the scope of copyright law. i Contents Contents Preface .............................................................................. i Contents ...........................................................................1 Note to User .....................................................................5 Product Warranty and Limitations ....................................8 Warning Symbols .............................................................9 Danger..............................................................................9 Caution ........................................................................... 11 Ch1. Overview .......................................................................13 1.1. 10X PTZ Network Camera SNP-1000A Introduction .......14 1.2. Features ..................................................................14 Ch2. Section names and functions .....................................17 2.1. Body ........................................................................18 2.2. Rear panel ...............................................................18 2.3. Connection to external terminal...............................19 Ch3. Installation and Network Setup...................................21 3.1. Components and Accessories.................................22 3.2. Installation ...............................................................23 3.2.1. Preparation for Cable ............................................. 23 3.2.2. Cable Connection................................................... 24 3.2.3. Installation of SNP-1000A ...................................... 26 3.2.4. Installing the SNP-1000A on a Ceiling.................... 27 3.2.5. Installing the SNP-1000A Wall Mount ..................... 29 3.2.6. Installing the Dome Housing (STH-1000PI)............ 31 1 10X PTZ Network Camera SNP-1000A 3.3. Network configuration and connection method .......32 3.3.1. Configuration/connection using Web page ............. 32 Ch4. How to Use Web Viewer...............................................37 4.1. How to Use Web Viewer..........................................38 4.1.1. Login ...................................................................... 38 4.1.2. Web Viewer screen ................................................ 39 4.1.3. Area Zoom guide.................................................... 45 4.2. Using Administration page.......................................49 4.2.1. Initialization Screen after Connecting ..................... 49 4.2.2. Live ........................................................................ 50 4.2.3. Basic ...................................................................... 51 4.2.4. Network.................................................................. 53 4.2.5. User ....................................................................... 54 4.2.6. Pan/Tilt/Zoom......................................................... 57 4.2.7. Motion Detection .................................................... 59 4.2.8. Alarm/Sensor ......................................................... 60 4.2.9. Time ....................................................................... 63 4.2.10. LOG ..................................................................... 64 4.2.11. Upgrade ............................................................... 65 4.2.12. System Reboot..................................................... 66 Ch5. How to Operate Camera...............................................67 5.1. OSD Menu Organization .........................................68 5.2. PTZ Camera User Menu Settings ...........................71 5.2.1. Camera Setting ...................................................... 71 5.2.2. FOCUS .................................................................. 71 5.2.3. White Balance ........................................................ 73 2 Contents 5.2.4. Exposure................................................................ 75 5.2.5. Back Light .............................................................. 76 5.2.6. AGC ....................................................................... 77 5.2.7. SSNR (Samsung Super Noise Reduction) ............. 77 5.2.8. Day & Night............................................................ 78 5.2.9. Others .................................................................... 79 5.3. Sequence Setting ....................................................80 5.3.1 Preset ..................................................................... 80 5.3.2. Swing SEQ............................................................. 82 5.3.3. Group SEQ ............................................................ 83 5.3.4. Tour SEQ ............................................................... 83 5.3.5. PTZ Trace .............................................................. 84 5.3.6. Auto Run ................................................................ 85 5.3.7. Power On Resume................................................. 86 5.4. P/T Setting...............................................................87 5.4.1. Pan Limit ................................................................ 87 5.4.2. Tilt Limit.................................................................. 87 5.4.3. Area Setting ........................................................... 88 5.4.4. Area Masking ......................................................... 89 5.4.5. Prop. P/T................................................................ 89 5.4.6. Digital Flip .............................................................. 90 5.4.7. Jog Speed .............................................................. 90 5.5. OSD Setting ............................................................91 5.5.1. Camera Name........................................................ 91 5.5.2. Preset Number ....................................................... 92 5.5.3. Preset Name .......................................................... 92 5.5.4. Sequence Status .................................................... 93 3 10X PTZ Network Camera SNP-1000A 5.5.5. Area Name ............................................................. 93 5.5.6. PTZ Position .......................................................... 94 5.5.7. Language ............................................................... 94 5.6. Initialization Setting .................................................95 5.7. Status.......................................................................96 Ch6. Troubleshooting ...........................................................97 Appendix A. DDNS Usage...................................................101 Specifications ...............................................................109 Dimension .................................................................... 112 If you refer to the enclosed Quick guide and the Note Manual in the CD, you can learn how to use Network Manager Standard. 4 Note to User Note to User This machine’s electromagnetic waves have been registered as suitable for business purposes; the retailer and consumer should be aware of this registration. If in the case of wrongful purchases, please exchange the product for a home use product. Correct Disposal of This Product (Waste Electrical & Electronic Equipment) (Applicable in the European Union and other European countries with separate collection systems) This marking shown on the product or its literature, indicates that it should not be disposed with other household wastes at the end of its working life. To prevent possible harm to the environment or human health from uncontrolled waste disposal, please separate this from other types of wastes and recycle it responsibly to promote the sustainable reuse of material resources. Household users should contact either the retailer where they purchased this product, or their local government office, for details of where and how they can take this item for environmentally safe recycling. Business users should contact their supplier and check the terms and conditions of the purchase contract. This product should not be mixed with other commercial wastes for disposal. 5 10X PTZ Network Camera SNP-1000A Samsung Techwin cares for the environment at all product manufacturing stages to preserve the environment, and is taking a number of steps to provide customers with more environment-friendly products.The Eco mark represents Samsung Techwin s will to create environment-friendly products, and indicates that the product satisfies the EU RoHS Directive. 6 Note to User Correct disposal of batteries in this product (Applicable in the European Union and other European countries with separate battery return systems.) This marking on the battery, manual or packaging indicates that the batteries in this product should not be disposed of with other household waste at the end of their working life. Where marked, the chemical symbols Hg, Cd or Pb indicate that the battery contains mercury, cadmium or lead above the reference levels in EC Directive 2006/66. If batteries are not properly disposed of, these substances can cause harm to human health or the environment. To protect natural resources and to promote material reuse, please separate batteries from other types of waste and recycle them through your local, free battery return system 7 10X PTZ Network Camera SNP-1000A Product Warranty and Limitations The manufacturers of this product do not take any responsibility for this product; therefore, the manufacturer does not authorize the third-party, but allows that retailer is responsible. The product warranty does not extend to cover accidents, negligence, abuse, or wrongful use for the whole or any part of the product. Additionally, the manufacturer does not provide warranty for any additional parts or affiliations. The warranty is for one year from the purchase date. During the period, warranty does not extend to malfunction in these areas. y Malfunction due to user’s negligence y Dismantlement or replacement by the user y Connection to alternate power source y Malfunction due to natural disasters (fire, flood, tsunami, etc.) y Replacement due to wear and tear y Instability of network 8 Warning Symbols Warning Symbols Before attempting to connect or operate this product, please read these instructions carefully and save this manual for future use. Danger : Misuse or wrongful operation of the product may result in death, injury or bring about other fatal results. It indicates absolute caution when operating. Caution : Misuse or wrongful operation of the product may result in slight injury or damage to the product. It indicates caution when operating. Note : Indication that the user needs to be aware of certain matters, or will find matters helpful in operating the product. Danger Before Setup y Please set up the proper voltage before connecting to power source. y Please be sure the power is turned off before setup. 9 10X PTZ Network Camera SNP-1000A y There is risk of shock or fire; be sure to avoid setup in places with high humidity. y To prevent shocks, please connect the ground wire. y Do not install the camera on a surface that can not support it. y Unless the surface is suitable, it could cause falling or other hazards. During Use y When opening the product cover, there is a risk of electric shock. Only a professional should open the cover. y Please use only in an environment with standard temperature and humidity. y Please do not plug in multiple products to a power source; it is often the cause of fires. y Please do not place water or heavy objects on the product; it is often a cause of malfunction. y Please do not use in a location with propane gas, gasoline or other flammable substances to avoid risk of explosion or fire. y Please do not touch the power plug with wet hands to avoid electric shock. y Do not pull on the power plug with too much force; a damaged plug may cause electric shock or fires. y Don’t connect the RJ-45 cable to a terminal by constraint. y Stop using your camera when you find a malfunction. If you use your camera around smoke or unusual heat for a long time, Fire may be caused. 10 Caution y Random replacement of built-in battery by other types of batteries may cause explosion. The battery shall be replaced by the same battery. The lithium battery incorporated in this product is not user replaceable. Replacement of the lithium battery will be done by a trained technician. For information on its replacement, please contact your service provider. y The used batteries shall be disposed carefully because they can cause environment pollutions. Disassembly and Cleaning y There is a risk of malfunction, shock or other dangers. Please do not disassemble or attempt to fix the product. y To prevent malfunction or shock, please do not use a wet cloth or oil-based cleaning product to clean the product exterior. Clean the exterior of the product with a dry cloth. Caution y Do not install under extreme temperature conditions Use only under temperature conditions between -0°C and +40°C. Provide good ventilation when using in high temperature conditions. 11 10X PTZ Network Camera SNP-1000A y Do not install under unstable lighting conditions. Severe lighting changes or flickering may hinder normal camera operation. y Do not drop the camera or subject it to physical shock. May cause a product malfunction. y Never keep the camera face to strong light directly. May damage the CCD. y Avoid touching the camera lens. The lens is the most important component of the camera. Be careful not to smear it with fingerprints. y Do not expose the camera to rain or other types of liquids Wipe dry any liquids. Liquids may contain minerals that are corrosive to Electronic components. y Do not expose the camera to radioactivity. Radioactivity exposure may damage the CCD. y Do not disassemble the camera. If you disassemble the product as you please, a Repair Center doesn’t repair it for free. y Please check the created network place first, before trying to connect to a network. y Please use only the power adapter that is provided with the product. y Please check national laws to be sure that using the product for monitoring purposes is not illegal. 12 C h 1. O v e r v ie w 10X PTZ Network Camera SNP-1000A 1.1. 10X PTZ Network Camera SNP-1000A Introduction The SNP-1000A is a high-tech network camera that uses MPEG-4 codec technology to allow high compression rates and clear picture quality by allowing for high frame rates to be transmitted through the network. By using the network, remote connection, monitoring, and control is possible from any location for simple use; additionally, set-up requires only a network. The 10X PTZ Network Camera SNP-1000A utilizes embedded software solutions (Embedded Web Server, Embedded Streaming Server, Network Protocol) developed by SamsungTechwin, and guarantees performance and safety while offering various solutions through Internet integration. 1.2. Features 10X Zoom Lens with Auto-Focus Function The 10X zoom lens having Auto-focus function magnifies the image up to 100 times when used with the digital 10X zoom function. Variable Auto Surveillances • Individual Preset Saving Modes 12 camera adjustment functions can be saved independently in each Preset menu to provide optimum images. • PTZ Trace 4 patterns which are set up by users can be saved and replayed. 14 1.2. Features • Auto Swing Pan or Tilt is operated in sequence between 2designated positions. • Group Search • Tour Search Maximum 128 Preset positions are toured in order. Maximum 6 Group Search functions are toured in order. Proportional P/T Even when the Zoom-In function is On for the Pan and Tilt speed correction function linked to the zoom position, fine manual operation is possible.functions are toured in order. Day & Night Day & Night function of ICR (IR Cut-Filter Removal) and Sens-Up function can achieve optimum images during day and night. ※ Sens-Up function improves the CCD sensitivity by lengthening the exposure time using electricity. ※ Day&Night function enables users to select and adjust the colour and black and white images according to the light level.ions are toured in order. OSD (On Screen Display) Items such as Camera ID, Camera Name, Preset Number, Preset Name, Area Name and Camera Status are displayed on the monitor. Camera functions can be set up on the OSD menu screen. 15 10X PTZ Network Camera SNP-1000A 128 Preset Position A maximum of 128 Preset positions can be set up. This function enables users to set up the monitoring place any time. Digital Flip When you want to monitor the moving object below the camera, you can execute the Digital Flip. The moving object can be monitored without screen reverse. Area Masking For privacy protection, a maximum of 4 areas can be masked among the surveillance areas preventing them to be displayed on the screen. High Data Compression Ratio Its data transfer speed is very fast with high data compression ratio based on MPEG-4 and it transfers relatively high frame number at the same network bandwidth. Area Zoom This zooming function supports image expansion of square area by mouse dragging. Function execution is easy only with mouse operation. Just one time clicking completes PTZ position adjustment at Area Zoom mode. 16 C h 2. S e c t io n n a m e s a n d f u n c t io n s 10X PTZ Network Camera SNP-1000A 2.1. Body 2.2. Rear panel ① ② ③ ④ ⑤ 18 Power Connector Audio Input Connector Audio Output Connector Alarm Input/Output Connector Network Connector 2.3. Connection to external terminal 2.3. Connection to external terminal 19 10X PTZ Network Camera SNP-1000A Alarm Connection Terminal 20 PIN NO. NAME #1 #2 #3 #4 #5 #6 #7 #8 #9 #10 S1 S2 G +V NO NC CM Purpose Not Used. Not Used. Not Used. Alarm Input 1 Alarm Input 2 GND DC 12V Alarm Output(NO) Alarm Output(NC) Alarm Output(COM) C h 3. Installation and Network Setup 10X PTZ Network Camera SNP-1000A 3.1. Components and Accessories Accessories Products Sold Separately The following products are provided separately. y Accessory Housing - Wall Type Mount : STB-280PW - Wall Type Mount : STB-230PW - Dome Housing : STH-1000PI Note 22 See pages 26 for product images. 3.2. Installation 3.2. Installation 3.2.1. Preparation for Cable To install and use the SNP-1000A, the following cables should be used. y Power Adapter Cable The cable connected to the power input terminal of SNP1000A is shown below with a rated voltage of DC 12V 4A. y Video Cable The BNC cable shown below is connected to the video output terminal and the monitor of SNP-1000A. 23 10X PTZ Network Camera SNP-1000A y Lan Network Cable The cable connected to the network device of SNP-1000A for Network communication is shown below. Note Video cable and LAN network cable are not provided in this product’s package. BNC connection terminal can optionally be used to connect when the Analog output is necessary. 3.2.2. Cable Connection 1. First, connect one end of the BNC video cable connector to the Video Output Terminal. 2. Next, connect the other end of the connector to the Video Input Terminal of the monitor. 24 3.2. Installation 3. For the network connection of the SNP-1000A, connect the LAN Cable as the figure below shows. 4. Then, connect the Power Adapter Cable. Use a driver (-) to screw one part of the Power Adapter consisting of two lines to the Power Input Terminal of the camera holder. 5. Connect the Power Adapter’s plug to the Power Outlet. 25 10X PTZ Network Camera SNP-1000A 3.2.3. Installation of SNP-1000A Precautions for Installation Check that the installation location can safely bear four times the weight of the camera and its installation fittings. When fixing the ceiling installation bracket, use the supplied installation template and fixing screws. Take care not to drop the product during installation. Do not allow anyone to stand below the installation area. Optional Products for Installation y Wall Mount (STB-280PW) This housing is used to install the camera on an indoor wall or ceiling using an external conduit. y Wall Mount(STB-230PW) This housing is used to install the camera on an indoor wall. y Dome Housing (STH-1000PI) This housing is used to install the camera in a location that is dusty, or a place where extra protection for the camera is required. 26 3.2. Installation 3.2.4. Installing the SNP-1000A on a Ceiling 1. Prepare the accessories in the camera box (power adapter, installation template, audio extension cable, 1 loose-proof screw, 3 installation bracket fixing screws, 2 installation brackets, installation cover, installation CD) and a tool for making a hole in the ceiling. 2. Attach the installation template to the ceiling where you want to install the camera, make a hole of at least 65mm in diameter, and 3 holes for fixing screws according to the marks on the template, and pull the external incoming cables out of the hole. Precautions before Attaching the Installation Template Caution Installation Location: Check that the function and performance of the camera installed on the ceiling will not be adversely affected by the external environment, and that the ceiling can adequately support the weight of the camera. Installation Direction: Determine the main direction of the camera in advance and attach 27 10X PTZ Network Camera SNP-1000A the template so that the front of the template is in line with the camera direction. Caution: Since there is a danger of the product falling during installation, take care not to allow anyone to stand below the installation area. 3. Align the arrow on the ceiling attachment installation bracket with the front of the template, fix the bracket by fastening the 3 screws through the holes, and connect the external incoming cables (video cable, network cable and power cord) to the camera. 4. Assemble the camera, which should already have been attached to the product installation bracket, to the ceiling attachment installation bracket, facing forwards, and fix the camera with the supplied fixing screw. 5. To complete installation, rotate the installation cover along the groove of the ceiling attachment bracket, and fix it. 28 3.2. Installation 3.2.5. Installing the SNP-1000A Wall Mount 1. Prepare the accessories in the camera box (power adapter, audio extension cable, 2 installation brackets, 1 loose-proof screw, installation CD, installation cover) and the wall mount(STB280PW or STB-230PW) and 3 installation bracket fixing screws in the mount packaging box. 2. Fix the wall mount (STB-280PW) with 3 screws to the wall where the camera is to be installed, as shown in the figure on the right. Precautions before Attaching the Installation Template Caution Precautions before Attaching the Installation Template Installation Place: Check that the function and performance of the camera installed on the wall will not be adversely affected by the external environment, and that the ceiling can adequately support the weight of the camera. Installation Direction: Determine the main direction of the camera in advance and attach 29 10X PTZ Network Camera SNP-1000A the template so that the front of the template is in line with the camera direction. Caution: Since there is a danger of the product falling during installation, take care not to allow anyone to stand below the installation area. 3. Fix the wall bracket and the wall surface attachment installation bracket onto the wall mount (STB-280PW) with the screws supplied, as shown in the figure on the right, and connect the external incoming cables (video cable, network cable and power cord) to the camera. 4. Assemble the camera, which should already have been attached to the product installation bracket, to the wall attachment installation bracket, facing forwards, and fix the camera with the supplied fixing screw. 30 3.2. Installation 5. To complete installation, rotate the installation cover along the groove of the ceiling attachment bracket, and fix it. 3.2.6. Installing the Dome Housing (STH-1000PI) To install the Dome Housing (STH-1000PI), fix it instead of installing the cover in the last step “3.2.4. Installing the SNP-1000A on a Ceiling” on page 27 and “3.2.5. Installing the SNP-1000A Wall Mount” on page 29. When the Dome Housing is installed on the ceiling When the Dome Housing is installed on the wall 31 10X PTZ Network Camera SNP-1000A 3.3. Network configuration and connection method 3.3.1. Configuration/connection using Web page Use when there is one 10X PTZ Network Camera SNP-1000A to be installed. 1. Please connect user’s PC to 10X PTZ Network Camera SNP1000A using cross cable. 2. To configure network, the internal IP must be registered in the user’s PC. 32 3.3. Network configuration and connection method 3. After pressing internet protocol (TCP/IP) properties, press the ‘advanced’ button to go into advanced configurations. 4. The IP address of IP setting tap can be added as "192.168.1.XXX" "XXX" is an IP address voluntarily set by a customer. 5. Please launch a Web browser on user’s PC and enter [192.168.1.100] in the URL address field and push <Enter> button. Connect to Webviewer login window of 10X PTZ Network Camera SNP-1000A. 6. Please login with administrator’s authorization and move to ‘Setup-Network’ page. 33 10X PTZ Network Camera SNP-1000A Note 7. 34 Default value is ID : admin, PW : 11111111 Please configure according to the network environment where 10X PTZ Network Camera SNP-1000A will be installed and push <Save> button to save the configuration. 3.3. Network configuration and connection method ① LAN / xDSL/ DHCP Configuration Item LAN Use xDSL Video Quality Description When network product is connected to normal local LAN or when connected to static IP, the network data to be allotted to the IP is configured. When using xDSL dynamic IP, enter the ID and PW. When automatically receiving IP through DHCP server, the DHCP functions are activated. ‘DHCP’ is used in the LAN environment where the DHCP is activated. Generally, for mid/large scale, DHCP servers are operated through LAN and for small-scales, IP sharers use DHCP functions. ② Port Configuration Item Port Setting Description The connection port and http, ftp port configurations can be set here and the DDNS use can be checked. 35 10X PTZ Network Camera SNP-1000A Note 36 Use SWR changes its IP address every time the user attempts to connect to the ISP and when the product is connected to a cable modem or xDSL modem. In this case, the user cannot know the changed IP address. When a product that uses dynamic IP is registered on the DDNS server, when wishing to connect to the product, the changed IP address can be easily recognized. In order to register the IP address to the DDNS server, set Use SWR as Enabled. C h 4. How to Use Web Viewer 10X PTZ Network Camera SNP-1000A 4.1. How to Use Web Viewer 4.1.1. Login To connect to the login page, click the ‘move to Webpage’ button on Network Manager or enter network camera IP address on the internet web browser and press the enter key. Enter user ID and password and push <Login> button, it then moves to the appropriate Web page. Note Default value is ID: admin, PW: 11111111 If you click <Guest> button, it moves to WebViewer page under the Guest authenticated status. However, administrator has to permit guest access for this. Note 38 If you logged in first in administrator mode, please change the password of administrator. It can prevent other users from connecting to the administration page. 4.1. How to Use Web Viewer 4.1.2. Web Viewer screen Web Viewer screen is composed of menu area for camera/video configuration and screen area for displaying input video from camera. Controls Flip Image Vertical reversal of channel screen 39 10X PTZ Network Camera SNP-1000A Stretch Image When selecting resolution with Half D1 and CIF, stretches channel screen to resolution D1 size. Save Image Saves channel screen to ‘JPEG file’. Quad Converts to 4 split screens (applied only to 4 channel server). Compression Video compression mode (the mode of compressing video) - MPEG, JPEG Resolution Video resolution (the size of video screen transmitted) - NTSC : D1(704x480), Half D1(704x240), CIF(352x240) - PAL : D1(704x576), Half D1(704x288), CIF(352x288) Frame Rate The number of maximum video frame transmitted for each second. - 1, 5, 10, 15, 20, 25, 30 Quality Quality Configures video quality - Very High, High, Normal, Low, Very Low 40 4.1. How to Use Web Viewer Pause Stops video for a while. OSD Displays related information. Displays the title Removes the title 41 10X PTZ Network Camera SNP-1000A Deinterlace On/off function of Deinterlace. Screen where Deinterlace is not applied Screen where Deinterlace is not applied Deinterlace is a function to adjust the video quality Note softly by eliminating the border line which was made by an interlace function. The interlace function draws an even line and an odd line of the Image one after the other. 42 4.1. How to Use Web Viewer Camera Setup Displays OSD control button of camera. Camera OSD control button is displayed Camera OSD is displayed Day&Night Day&Night configuration function (Color, B/W configuration) PTZ Control PTZ control function Screen where camera PTZ control window is displayed 43 10X PTZ Network Camera SNP-1000A Note The left/right slide bar can control focus (left slide bar) / zoom (right slide bar) The “+” displayed in the middle can be pressed using the mouse as the base point of the Pan / Tilt and it will Pan /Tilt according to that point. Instruction for Camera OSD control button <↑>, <↓> button Moves selection displaying arrows up and down on camera OSD menu. <←>, <→> button Changes configuration of selected field on camera OSD menu. <Set> button Displays camera OSD or moves to upper/lower menu of selected field. <Exit> button Terminates camera OSD. ※ For configuring the function and detail operating method of 10X PTZ Network Camera SNP-1000A, refer ‘Ch5. How to Operate Camera’. 44 4.1. How to Use Web Viewer 4.1.3. Area Zoom guide Area Zoom function supports easy and fast PTZ (Pan/Tilt/Zoom) control for the selected image area on the monitor. Screen image of menu popped up by clicking mouse right button Clicking mouse right button delivers menu of Area Zoom function. Screen image of Area Zoom pointer appeared by Area Zoom selection Clicking Area Zoom menu delivers Area Zoom mode showing yellow colored Area Zoom pointer at the center of monitor. 45 10X PTZ Network Camera SNP-1000A Screen image of new PTZ position moved by one time click. Clicking mouse left button only controls PTZ position at Area Zoom mode. Screen image of selected image area in the mouse dragged square Clicking mouse left button and dragging a square shapes selected image area on the monitor. 46 4.1. How to Use Web Viewer Screen image of expanded area Releasing mouse left button stimulates automatic PTZ function mode at the selected image area. At automatic PTZ function mode, Area Zoom pointer is enlarged and PTZ function execution is not available. Screen image of selected Move PTZ on menu At the Move PTZ zone of menu popped up by clicking mouse right button, reset function to 1x zoom, previous PTZ position, next PTZ position is available. PTZ operation at Area Zoom mode stores five positions of before and after the position change and deactivates Move PTZ zone of menu popped up by clicking mouse right button. 47 10X PTZ Network Camera SNP-1000A Storage item Go to 1x Zoom Previous PTZ Forward PTZ 48 Function Move to 1x Zoom from present PTZ position Move to previous PTZ position Move to next PTZ position 4.2. Using Administration page 4.2. Using Administration page 4.2.1. Initialization Screen after Connecting When connection is successful, the below screen will be displayed. 49 10X PTZ Network Camera SNP-1000A 4.2.2. Live Please Move to Web Viewer page [Web Viewer live screen] 50 4.2. Using Administration page 4.2.3. Basic Configures basic information for camera. Video/Audio Setup Item Description Compression Video compression mode (Compression mode of video in the camera) Video Size If the type of installed camera (NTSC/PAL) is selected, then the size of screen on the camera becomes selectable. Video Quality Selects the quality of video screen. In case of low speed internet, lower the video quality to see seamless video. Video FrameRate Configures the number of transmitted frame per second in the camera. 51 10X PTZ Network Camera SNP-1000A Item Description Selects the video channel to be used in the camera. Video Channel Selects whether to use the audio input channel in the camera or not. Selects whether to use the audio output in the camera or not. Configures the number of users who can be connected to the camera through the network(1~20 persons) Audio amplifying function onfigures Low for the microphone which has amplifying function and High for the microphone which has no amplifying function. (In case of Line-In signal, configure Low) Audio-In Channel Audio-Out Channel Max User Count Mic. Sensitivity Product Information Item Description Model Mac Address Displays model name of the camera. Displays MAC Address of the camera. Camera Name onfigures name of the camera, it help to classify several cameras. Location Description Memo 52 The location of the installed camera can be entered. Additional description related to the camera can be entered. The contact of camera administrator can be entered. 4.2. Using Administration page 4.2.4. Network Configures network information of the camera. Network Configuration According to the user’s network environment, it is classified into LAN, xDSL, DHCP. Item LAN xDSL DHCP Description In case the camera is connected to the local network or xDSL with a static IP address, configure network information to be assigned to the camera. In case of xDSL with a dynamic IP address, enter password in UserName and Password field. This case is selected in case of using IP sharing box/ cable modem. 53 10X PTZ Network Camera SNP-1000A Port/DDNS Configuration Item Connection Port HTTP Port/ FTP Port Use SWR Description This controls communication with camera. (Default : 4000) This helps to connect to web page or FTP server. (Default : http=80, ftp=21) Select if use of SWR function is available. The way of connection which used ID does not support. Select if DDNS server is available. DDNS server is connected to server without reference to changed IP because there is possibility that floating IP constantly is changed. ※ A detailed explanation about DDNS usage refers to <Appendix A. DDNS Usage>. Use DDNS 4.2.5. User This describes password change for administrator or user registration. 54 4.2. Using Administration page Item Description Administrator Password Change Change password of administrator Guest Setup User clicks ‘Guest’ button to decide whether allowing guest to connect Main Viewer. Current User You can register new user or delete, and set up user’s authority. ※ Set up user authority User’s authorities set up at ‘Current User’ are as follows. Item Video Control Description Use video related setup function (Compression, Resolution, Framerate, Quality) Pan, Tilt, Zoom, Audio output, Alarm output Audio Audio Input USE Whether relevant account is used (If not checked, not allowed log-in) 55 10X PTZ Network Camera SNP-1000A Example 1) In case control function is limited (Do not check Controls box) ※ Pan, tilt, zoom, audio output, alarm output function icon is inactivated Example 2) In case video function is limited (Do not check Video) ※ Compression, Resolution, Framerate, Quality set up icon is inactivated. 56 4.2. Using Administration page 4.2.6. Pan/Tilt/Zoom Configures PTZ Swing and Preset of the camera. 57 10X PTZ Network Camera SNP-1000A Item Channel PTZ Display OSD Display PTZ Camera Configura tion Preset Swing Group First Setup Swing Setup Group Setup 58 Second Setup Mode Speed Duration Group No. Preset No. Travel Speed Dwell Time Description Select the channel of camera. Display PTZ menu. Display OSD. Set or delete(delete, delete all) the Preset. Screen move the position of Preset. Surveille Pan/Tilt Swing at the position of preset, set up the swing menu. Surveille repeatedly at the position of preset, set up the Group menu. Indicate the first position of surveillant Preset Indicate the second position of surveillant Preset Select Pan/Tilt Mode. Set Swing speed between Presets. Set interval time on Preset. Set Group Number among 1~6 Set Preset included the Group. Set swing Speed between preset. Set interval time on Preset. 4.2. Using Administration page 4.2.7. Motion Detection This sets up motion detection function of camera. Item Grid Display Select Area MD Enable MD Sensitivity Description Basic grid, used to choose area on the screen, is displayed or hidden. When selecting motion detection area, click <Select All> button to select all areas, or click <Deselect> button to cancel the selected area. Decide whether you use motion detection function. Setting up sensitivity to detect motion to adjust input video by situation. You can select 1-5, and 5 is the highest. 59 10X PTZ Network Camera SNP-1000A 4.2.8. Alarm/Sensor This sets up necessary information when using alarm function by attaching sensor to camera. 60 4.2. Using Administration page Alarm/Sensor Setup ◊ Digital In Setup Item Description Sensor Type Types of sensors are ‘Normal open’ and ‘Normal close.’ This selects up type of connected sensor. ◊ Digital Out Setup Item Description Set up Alarm Out responding when event is recognized by connected sensor (Sensor 1) or Motion Detection (MD) Set up time to operate relay. It means the period from the time when sensor detects event to the time when relay is released. In case event occurs by sensor (Sensor 1) or Motion Detection (MD) on the screen, decide whether transferring related information to FTP. Alarm Duration FTP In case event occurs by sensor (Sensor 1) or Motion Detection (MD) on the screen, decide whether transferring related information by e-mail. E-mail E-mail/FTP Setup Set up FTP server and e-mail information to which related information is transferred in case alarm occurs. Item Mode Server Name FTP Description Select media for data transfer. Home Directory User ID User Password Enter domain or IP address of FTP server. Set up home directory to save relevant data at FTP server. Enter ID to connect FTP server. Enter PW to connect FTP server. 61 10X PTZ Network Camera SNP-1000A Item Description Recipient E-mail Address 1 Recipient E-mail Address 2 Server Name E-mail ID Password Mail Subject Mail Body Note You can designate up to two e-mail address receiving data when alarm occurs. In case you use outside e-mail server, enter the name of the outside e-mail server. Enter ID to connect the outside e-mail server. Enter PW to connect the outside email server. Enter the subject of mail to be transferred. Enter the body of mail to be transferred. If motion is detected, the contents transferred by email or to FTP are varied according to the set-up of ‘Video Compression’ at Admin page (Basic). MPEG : Video length is set by ‘Duration’ of ‘Digital Out Setup’. File extension is ‘ste’, you can play this by ‘SLiM Player’. JPEG : JPG type image file attached. 62 4.2. Using Administration page 4.2.9. Time Current Time Item Date Time Description Current setup date displayed Current setup time displayed Time Setup Item Set Manually Time Server Description Adjust time manually. Set up address of time server for Server 1 - 5. 63 10X PTZ Network Camera SNP-1000A 4.2.10. LOG Recent activities made for camera are displayed as log. Item Lines View Clear 64 Description Set up number of lines of the list. Log is viewed with number of lines you set up most recently. Delete logs. 4.2. Using Administration page 4.2.11. Upgrade Upgrade program of 10X PTZ Network Camera SNP-1000A. System Upgrade Configuration. Item Firmware/Web Description Upgrade firmware and Web-page of 10X PTZ Network Camera SNP-1000A. Factory Mode Setup If you click <Reset> button, server is returned to initial value when shipped from the factory after confirmation procedure by administrator. 65 10X PTZ Network Camera SNP-1000A 4.2.12. System Reboot System is rebooted after confirmation procedure of administrator. Click <OK> button to reboot System. 66 C h 5. H o w t o O p erat e C am era 10X PTZ Network Camera SNP-1000A 5.1. OSD Menu Organization PTZ camera can be set up on the OSD (On Screen Display) menu displayed on the video monitor. ① Camera Setting P1 P2 P3 ①Focus Mode ①Focus ②Zoom Tracking ➌Digital Zoom ➋White Balance AWB Mode ➊Brightness ➋Iris ③Exposure ➌Shutter ➍Sens-Up ➍Back Light ➎AGC ➏SSNR ➐Day & Night ⑧Others 68 High/Middle/Low/Off High/Normal/Off High/Middle/Low/Off Auto B/W Color ➊Sync ➋Image Adj. ➌Freeze P4 Auto/Manual/ One Shot AF Mode: On/Off Speed: Slow/Fast Off(2X~10X) ATW/AWC/MANUAL ►ATW -ATW(I): Indoor -ATW(O): Outdoor ►Manual -Red -Blue 25 Auto Manual: Iris Level --A.FLK Manual: 1/60~1/120,000, x2~x128 Auto: Sens-Up Limit x1~x128 Off Defaults OneShot AF ON Fast OFF ATW(O) 29 41 025 Auto 100 ESC 1/60 X4 OFF Normal Low Burst Level Sharpness Color On/Off 060 Internal 008 050 OFF 5.1. OSD Menu Organization ② Sequence Setting P1 P2 ①Preset ②Swing SEQ ③Group SEQ ④Tour SEQ ⑤PTZ Trace ⑥Auto Run ⑦Power On Resume P3 P4 ①Setting ②Edit ③Execute ④Clear ⑤Status ①Pan Swing ①Setting ②Execute ③Clear ②Tilt Swing ①Setting ②Execute ③Clear ①Setting ②Execute ③Clear ③P&T Swing ①Group1 ①Setting ②Execute ③Clear ②Group2 ①Setting ②Execute ③Clear ③Group3 ①Setting ②Execute ③Clear ④Group4 ①Setting ②Execute ③Clear ⑤Group5 ①Setting ②Execute ③Clear ⑥Group6 ①Setting ②Execute ③Clear ①Setting ②Execute ③Clear ①Trace1 ①Replay ②Memorize ②Trace2 ①Replay ②Memorize ③Trace3 ①Replay ②Memorize ④Trace4 ①Replay ②Memorize ➊Off ➋Preset: Preset No ③Swing: Swing Mode Pan/Tilt/P&T ➍Group: Group No ①Mode ➎Tour ➏Trace: Trace1~Trace4 ⑦A.Pan - ①Auto Pan Speed: 20~50 - ②Tilt Angle: 10~45 ➋Time 5,10,20,30(Sec), 1,2(Min) On/Off Defaults OFF 32 25 30sec OFF ③ P/T Setting P1 P2 ①Pan Limit ②Tilt Limit ③Area Setting ④Area Masking ➎Prop.P/T ➏Digital Flip ⑦Jog Speed P3 P4 ①Area1 ②Area2 ③Area3 ④Area4 ①Mask1 ②Mask2 ③Mask3 ④Mask4 ON/OFF ON/OFF Manual(10,20,30,40,50,60) ➊Area Name ➋Position ➌ON/OFF ➊Position ➋ON/OFF ➊Position ➋ON/OFF Defaults ➊Position ➋ON/OFF ON ON Manual 69 10X PTZ Network Camera SNP-1000A ④ OSD Setting P1 P2 ①Camera Name ➋Preset Number ③Preset Name ➍Sequence Status ➎Area Name ➏PTZ Position ➐Language P3 ①ON/OFF ②Edit ON/OFF ①ON/OFF ②Edit ON/OFF ON/OFF ON/OFF English, 中文, Francais, Deutsch, Espanol, Italiano P4 ➊Position ➋ON/OFF Defaults ON ON OFF OFF English ⑤ Initialize P1 P2 P3 ①Power On Reset ➋Initial Position ③Factory Default Set ④Camera Default Set ➎Auto Refresh P4 ➊Cancel ➋Execute ➊Position ➋ON/OFF ➊Cancel ➋Execute ➊Cancel ➋Execute OFF, 1~7Days Defaults OFF ➏ Status P1 P2 Note P3 P4 Defaults Preset setting is only possible within the OSD menu. Symbol Description Note When there are sub menus under the selected OSD menu. Numbers are displayed in white color like ① on the right top of the screen. When there is no sub menu under the selected OSD menu. Numbers are displayed in black color like ➊ on the right top of the screen. 70 5.2. PTZ Camera User Menu Settings 5.2. PTZ Camera User Menu Settings Execution of OSD Menu : After checking if the camera is in manual operation mode, press the OSD Menu key. The following commands are displayed on the monitor screen. Main Menu The selection key moves up and down. Press the execution key switch on the selected menu to change the setup menu. Press the ESC key to exit the OSD Menu. 5.2.1. Camera Setting Select the Camera Setting on the Main Menu screen to control camera settings 5.2.2. FOCUS In Focus menu, you can set up the focus mode among Auto, Manual or One Shot AF. 71 10X PTZ Network Camera SNP-1000A ➊Focus Mode Auto : The camera adjusts the focus automatically while monitoring the screen continuously in the auto mode. In the auto focusing mode, zoom key operation is not recognized as the input of the focus key. Manual : In the manual mode, users can adjust the camera focus manually. One Shot AF : Only when the camera does not move, it turns into the auto mode. It is the same as the manual mode. ②Zoom Tracking Mode: When you select ON, the Focus function is executed when the Zoom functionis on. When you select OFF, the Focus function is not executed even when the Zoom function is on. Speed: Fast will speed up the Zoom. Slow will slow down the Zoom. ➌Digital Zoom Magnification of the Digital Zoom can be selected among Off, 2X~10X. ※ It is recommended that the Digital Zoom should be set up before the preset operation. Caution Digital Zoom As the digital zoom magnification increases, the image quality is lowered. Auto-focus Auto-focus may not function normally under the following conditions. - When the light level in the surveillance area is low - When the slow-shutter works - When the amplification is increased - When the light level in the surveillance area is excessively high 72 5.2. PTZ Camera User Menu Settings - When the objects in the long and short distance are under the same surveillance area - When there is no contrast (white and black) in the object (e.g. sky or wall) - When the thin horizontal line is captured 5.2.3. White Balance The White Balance function corrects the abnormal white colour into the normal white colour under any colour temperature lighting. Select the mode among ATW, AWC and Manual. ATW is selected by default. WB Mode ATW Balances the colour automatically depending on the source of light from 1,800~10,500K colour temperature. - Indoor[ATW(I)] : Use this mode in the area under the limited colour temperature. - Outdoor[ATW(O)] : Use this mode in the area under the broad colour temperature. 73 10X PTZ Network Camera SNP-1000A AWC: Set up the lighting to the objects and corrects the right colour temperature to that of a white object. Camera works under the setup conditions. For the most appropriate condition under the current illumination, capture the white paper and then change the mode into AWC. Press the Enter key and then AWC Start will be displayed. When the adjustment is completed after pressing the Enter key for AWC Start, go to the upper menu. When conditions change, adjust the white balance function again. Manual Fine tuning is possible through this manual control mode. Select the colour temperature and increase or decrease the Red or Blue values to shift the colour of the object. - Red : Red Gain can be changed. - Blue : Blue Gain can be changed. White Balance may not function properly under the Note following conditions. When the colour temperature surrounding the object is very high. (e.g. clear sky, sunset) When it is dark around the object. When the camera is pointing towards a fluorescent lamp directly or when lighting conditions change a lot. 74 5.2. PTZ Camera User Menu Settings 5.2.4. Exposure Camera exposure can be controlled. ➊Brightness The brightness of the screen can be adjusted. ➋Iris Auto mode or manual mode can be selected. Auto: The brightness of the image signal can be adjusted automatically depending on the amount of light. Manual: The brightness of the image can be adjusted. ➌Shutter ---: Electronic shutter mode is enabled. The shutter speed is controlled automatically according to the brightness of the screen. A.FLK: Use this mode when the screen flickers because of inconsistent frequency with the surrounding lights. Manual - Shutter speed can be controlled manually. - Shutter speed can be adjusted from 1/60(1/50) second to 1/120,000 second. - Sens-Up function can be operated manually from x2 ~ x128. Note If the Shutter mode is ESC in the inner synchronization mode and the camera faces to the bright fluorescent lamp directly, the image may be unstable. Be careful to select the installation location. 75 10X PTZ Network Camera SNP-1000A If the Manual or A.FLK mode is selected for the Shutter menu, the Sens-Up function is disabled. ➍Sens-Up Auto: The low light level of the night or dark condition is detected automatically and the bright and clear image can be maintained. - Sens-Up Limit: Maximum accumulated magnification can be selected. Off: Sens-Up function is cancelled. Note As the accumulated magnification increases, the screen goes bright. But, the after image of the moving object also becomes larger and the optimum Auto Focus function may not work. 5.2.5. Back Light Unlike other cameras, Samsung Techwin’s unique W-III DSP chip gives you a clear image of the subject even with bright backlight. HIGH : Gain increased from 6dB up to 34dB. MIDDLE : Gain increased from 6dB up to 30dB. LOW : Gain increased from 6dB up to 18dB OFF : BLC function is cancelled. 76 5.2. PTZ Camera User Menu Settings 5.2.6. AGC When the brightness of the image taken under dark light is under a certain level, the AGC (Automatic Gain Control) functions to define whether to control the Gain automatically or not. HIGH : Gain increased from 6dB up to 34dB. NORMAL : Gain increased from 6dB up to 18dB. OFF : Gain is fixed at 6dB. 5.2.7. SSNR (Samsung Super Noise Reduction) SSNR function reduces background noise under low light conditions differently in different modes. The noise reduction effect grows in Off, Low, Middle and High modes in order. OFF : No noise reduction effect. LOW : Noise reduction effect is small but there is little afterimage. MIDDLE: Noise reduction effect is generally effective in this mode. Noise can be reduced properly and the afterimage is not strong. 77 10X PTZ Network Camera SNP-1000A HIGH : Noise reduction effect is excellent but afterimage is also strong. When you select the AGC mode as “OFF”, you Note cannot use the SSNR function. 5.2.8. Day & Night The darkness level is detected automatically under low light conditions such as at night or under dark light to keep the screen bright and clear. COLOR : Output images are displayed in colour all the time. Burst signal size can be adjusted. B/W : Output images are displayed in black and white all the time. Burst signal can be kept or removed. 78 5.2. PTZ Camera User Menu Settings AUTO : Under day condition, the mode is automatically changed into the COLOR mode to keep an optimum colour. At night, the mode is automatically changed into the B/W mode to distinguish dark images clearly. Note If the AGC is in OFF mode, the Auto mode cannot be used. Only COLOUR or B/W mode can be used. If the sunlight or halogen lamp is used in B/W mode, the focus may be blurred compared with the general illumination. 5.2.9. Others ①Sync Internal Sync is selected by default. Internal : Internal synchronization ➋Image Adj. Clarity of the video signal and saturation of the color may be adjusted. Sharpness : The overall sharpness of the image can be adjusted. Color : The overall colour density of the image can be adjusted. ➌Freeze Moving image can be stopped and replayed. ON : Image can be frozen. OFF : Frozen image is released and the film is replayed. 79 10X PTZ Network Camera SNP-1000A 5.3. Sequence Setting Sequence Setting Menu 5.3.1 Preset 12 items such as Pan/Tilt location, Zoom and Focus are selected among camera functions and they can be called for monitoring. Total 128 points can be preset. Setting : Select the Preset number for setup. Adjust Pan/Tilt/Zoom and press the Enter key to save the setting. If you want to change the 12 items such as Focus, Brightness, Iris and Scene Adj., use the Up/Down key to go to and select the item. If you don’t want to change the 12 items, press the ESC key to go to the next Preset step. Edit : You can edit the 12 preset items such as Pan/Tilt location, Zoom and Focus, which are selected among camera functions. Execute : Select the Preset number for execution. Clear : Select the Preset number to delete for clearing. Status : The current Preset number setup is displayed. 80 5.3. Sequence Setting Preset Menu Setting 1. Select the Preset item on the Sequence Setting Menu 2. Select the Setting item. 3. Select the Preset number. 4. Set up the Zoom and Focus. 5. To change the camera settings, select Edit from the upper menu first. Select the item to change, and then make the necessary adjustments. 6. If you select the Scene Adj. item, such items as Shutter, AGC, SSNR, Sens-Up, White Balance can be set up differently in every Preset item. 81 10X PTZ Network Camera SNP-1000A Note In the White Balance setting of the individual Preset Scene Adj., the AWC selection is not available. 5.3.2. Swing SEQ Swing surveillance can be executed and set up and the data can be deleted. Pan Swing : Swing surveillance for the Pan direction is executed and set up. Data is deleted. Tilt Swing : Swing surveillance for the Tilt direction is executed and set up. Data is deleted. P&T Swing : Swing surveillance both for the Pan and the Tilt directions are executed and set up simultaneously. Data is deleted. - Setting : The Preset Position for Swing function is selected by clicking the mouse and confirmed with the Execution key. SPD 82 5.3. Sequence Setting is the moving speed (01-64step). DWL is the stop time (00120sec). Press the Execution key in the location with selection mark to finish the setting process. - Execute : Swing surveillance is executed. Stop key designates this function. - Clear : Data in the Swing function is deleted. 5.3.3. Group SEQ Group SEQ: Sequence surveillance can be executed and set up and data can be deleted. Up to 6 groups can be registered. Setting : Preset position for swing is selected by clicking the mouse and confirmed with the Execution key. SPD is the moving speed (01~64 step). DWL is the stop time (00~120sec). Press the Execution key in the location with selection mark to finish the setting process. Execute : Swing surveillance can be executed. Stop key will stop this function. Clear : Swing data can be deleted. 5.3.4. Tour SEQ Group surveillance can be executed and set up and data can be deleted. 83 10X PTZ Network Camera SNP-1000A Setting : The registered Group Sequence is selected by clicking the mouse and confirmed with the Execution key. If the selected number is not registered, it cannot be input. Press the Execution key in the location with selection mark to finish the setting process. Execute : Group surveillance is executed. Clear : Group surveillance data are deleted. 5.3.5. PTZ Trace Maximum 4 patterns of the manual operation paths (for Pan, Tilt, Zoom and Focus) are memorized and replayed. Replay : The manual operation paths are repeated and replayed. Stop key will stop the replay. Note 84 If the operation range is limited using ①Pan Limit and ②Tilt Limit, please note that other operations 5.3. Sequence Setting Memorize: Manual operations for minimum 120 seconds after executing this function are memorized into the internal memory. Nevertheless, the memorizing time becomes different depending on the PTZ operation. OVER mark will finish this function. Note If the operation range is limited using ①Pan Limit and ②Tilt Limit, only the operations within the limited range are memorized. Note Press the OSD key to stop the internal memory to continue saving. 5.3.6. Auto Run If there is no controller operation by the user for a certain time, the sequence operation designated by the user will be executed. Mode: - OFF : Auto Run will be cancelled. - Preset : Auto Run in the corresponding Preset number - Swing : Auto Run in the corresponding Swing mode - Group : Auto Run in the corresponding Group number - Tour : Auto Run in the corresponding Tour number - Trace : Auto Run in the corresponding Trace number - A. Pan : 350° Auto Run in Pan direction ※ Auto Pan Speed: Pan operation in the speed designated by the user. ※ Tilt Angle: The tilt angle set up by the user is kept. 85 10X PTZ Network Camera SNP-1000A Time : Auto Run operation is executed after a certain time designated by the user.(Time can be set up by the unit of 5, 10, 20, 30 sec and 1~5 min.) 5.3.7. Power On Resume When the power supply for the camera is stopped for some reason, such as electricity failure, and resumed, the Sequence Settings before the power off are restored. 86 5.4. P/T Setting 5.4. P/T Setting 5.4.1. Pan Limit The moving range in the Pan direction can be limited. Position : Moving range can be set up. Set the position from the left using the Execution key. The stop position may change due to the initialization by such operation as power resumption depending on position setting. This does not mean it is out of order. On/Off : When this function is on, the limit is effective. Default setting is Off. 5.4.2. Tilt Limit Moving range in the tilt direction can be limited. Position : Moving range can be set up. Set the position from the top direction using the Execution key. The stop position may change due to initialization by such operation as power 87 10X PTZ Network Camera SNP-1000A resumption depending on position setting. This does not mean it is out of order. On/Off : The application of limitation will be determined. Default setting is Off. 5.4.3. Area Setting Areas can be indicated. Areas can be designated up to 4. Area Name : Area name can be set up. Use the Execution key to enter the area name. A maximum of 12 letters (English, Chinese, numbers) can be entered. When you finish inputting the name, adjust the position mark to ”SET” and press the Execution key. This is the end of Area Name setting. Area Position : Area range can be designated. Use the Execution key to determine the position from the left. If the area range is overlapped, the smaller area number will indicate the overlapping part. On/Off : It can be determined whether or not to activate the area mark. The activation becomes effective as soon as the position moves from the current area to other areas. Set up the OSD Setting as ON. If it is in OFF mode, this function does not work. Default setting is OFF. 88 5.4. P/T Setting 5.4.4. Area Masking If you want to exclude some areas for surveillance, they can be turned into black. You can mask 4 parts of one screen. Position : Use the Execution key to determine the position for screen operation from the left. On/Off : Operation of screen area masking can be determined. Default setting is OFF. Note If Area Masking is set while the Camera is in the Digital Flip posion, automatically the Camera moves the initial position which is not set for the Digital Flip and then Area Masking position can be set. This is not a malfunction. 5.4.5. Prop. P/T Pan and Tilt speeds can be changed depending on zoom magnification. Tele will slow down the speed of Pan/Tilt and Wide will increase the Pan/Tilt speed. It will take about 20 seconds for 1 cycle in Tele mode and about 3 seconds in the Wide mode. Default setting is ON.ed. Default setting is OFF. 89 10X PTZ Network Camera SNP-1000A 5.4.6. Digital Flip When you operate the Tilt up to 100° limit and keep it for a certain time, the image gets reversed automatically and the opposite Tilt area is seen. When you want to monitor the moving object under the camera, execute the Digital Flip function. You can observe the moving object without reversing of the screen. 5.4.7. Jog Speed Because using Pan/Tilt command protocol is fixed speed type ,so that occation that Pan/Tilt speed is slow, can adjust command rate by enter manual mode. 90 5.5. OSD Setting 5.5. OSD Setting 5.5.1. Camera Name Camera name is set up. If you want to edit the item, move the cursor. Then Note select the character. y Edit : A maximum of 12 characters consisting of English (or Chinese, Japanese), numbers and special characters can be input for Camera Name. y On/Off : The operation of this function is preset. Default setting is On. 91 10X PTZ Network Camera SNP-1000A 5.5.2. Preset Number Preset numbering is set up. (Default setting is ON.) 5.5.3. Preset Name Edit : A maximum of 12 characters consisting of English (or Chinese), numbers and special characters can be input for Preset Name. 92 5.5. OSD Setting On/Off : The operation of this function is predetermined. Default setting is On. 5.5.4. Sequence Status Display of the Sequence Group is set up. (Default setting is ON.) 5.5.5. Area Name Display of Area Name is set up. When the Area Name is OFF, the Area Name cannot be displayed. 93 10X PTZ Network Camera SNP-1000A 5.5.6. PTZ Position Pan and Tilt position and Zoom magnification are displayed. PTZ positions are not displayed in the OFF mode. (Only manual operation can display them.) 5.5.7. Language The OSD can be displayed either in English (default setting) , Chinese, French, German, Italy and Spanish. 94 5.6. Initialization Setting 5.6. Initialization Setting Initialization Menu ①Power On Reset Camera is initialized into the original status of power input. ➋Initial Position If you want to set the default direction of the camera so that the camera faces that direction when the power is turned on, you can set up the desired Pan and Tilt for the camera. ③Factory Default Settings Camera is initialized into the factory default settings. Data including Preset is deleted. This function is used for initialization all settings. ④Camera Default Settings If only the camera module is replaced due to camera module failure, the new camera module can be set up with the settings of the old camera module. ➎ Auto Refresh The electric circuit and the status of the equipment parts within the camera are optimized regularly. (The cycle can be set up.) If camera faces toward a certain source of light or if the settings cannot be kept because of the long time rotation filming of a certain area, the Auto Refresh function is used to maintain and reset the existing 95 10X PTZ Network Camera SNP-1000A camera settings. Default setting is OFF. OFF, 1-7 Days : This function is disabled in the OFF mode. 1-7 Days enables the Auto Refresh operation in the interval of the selected days. Auto Refresh takes less than 10 seconds. The message “Auto Refresh” disappears after finishing the operation. 5.7. Status The status of PTZ camera setting is displayed. CAM MODEL= 10NC CAM VERSION= 4.6 DOME VERSION= 1.00 CON PROTOCOL=SAMSUNG TW DOME ID= 001 CONTROLLER= Duplex-19200 96 Camera Model Camera S/W Version Control Board S/W Version Protocol Setup Dome Camera ID Communication Mode Setup C h 6. Troubleshooting 10X PTZ Network Camera SNP-1000A If there are problems in operation, please refer to the items below. If the problem persists, please contact the agent you purchased this product from. Problem Nothing appears on the screen. Solution Please check the power connection. Please check the images connecting the video signal line after Open MS-DOS window to check whether 10X PTZ Network Camera SNP-1000A is connected to network. ※ In case of ping 192.168.1.100, replace it with IP address set up. The video image is not clear. Please check if the lens is clean. Please clean the lens with a clean cloth or brush. Please adjust the contrast feature of the monitor. Please make sure that the screen is not exposed directly to a bright light. Please move the camera if necessary. The screen is dark. Please adjust the contrast feature of the monitor. If you have an intermediate device, set the 75Ω/Hi-z properly, and check the terminals. There is a problem with the camera operation. The camera surface is too hot and black stripes appear on the screen. 98 Please check if an appropriate power source to the camera complies with the manufacturer's standard requirement, or if the voltage keeps changing. Troubleshooting Problem The MOTION DETECTION function is not working. Solution Please check if 'MOTION DETECTION' mode is turned on. Please check if the MD LEVEL is too low. Please check the setting of the MD AREA. When camera cannot be controlled for Pan/ Tilt/ Zoom Inspect the cables(power or network) connected to the device. Colors are not quite right. Please check setting. The screen is flickering. Please check if the camera is facing directly into sunlight or fluorescent light. DAYNIGHT(Auto) mode is not working. Please check if the AGC menu is set to the OFF position. SENS-UP function is not working. Please check if the AGC menu is set to the OFF position. Connect to Admin page to check whether user control is selected. the 'WHITE BAL' Please check if the SHUTTER menu is set to MANUAL mode. Please check the limit of SENS-UP AUTO mode. Audio is not working Please check the audio is selected from admin page. Please check speaker volume from the viewer. In case input sound through microphone at Viewer is not outputted through Audio Out of camera, please check whether Audio Out channel is selected at admin page. Or check whether microphone is available at Viewer. 99 10X PTZ Network Camera SNP-1000A Problem Solution Please check audio driver is working in user’s PC. Please use the enclosed Audio Extension Cable to install easily when connecting the audio cable. Video is stopped Please check whether network cable of 10X PTZ Network Camera SNP1000A is correctly connected In case user uses hub or IP router, check whether these network equipments are working properly. Open MS-DOS window and check whether 10X PTZ Network Camera SNP-1000A is connected to network. No image from web viewer Click ‘refresh (shortcut; F5) ’ button at browser to recall the page Check whether power of camera and network cable is properly connected. Check whether computer is connected to network. If you use hub or router, check whether such equipments are properly operated. (Note: Open MS-DOS window and enter network ID of camera at ping 192.168.1.100) Connect to Admin page to check whether video output is selected. Image transferred to FTP or by E-mail cannot be viewed 100 Video may not be viewed since Divx codec is not installed in user’s PC. Divx codec can decode video compressed with MPEG4. Download and install the latest Divx codec, and check video. http://www.divx.com/divx/download A p p e n d ix A . D D N S U s a g e 10X PTZ Network Camera SNP-1000A Registration process of DDNS is as following: Step1) Complete the registration form in iPOLiS website. The website is ‘www.samsungipolis.com’. Figure A-1. Website of iPOLiS 102 DDNS Usage Figure A-2. Membership Registration: SIGNUP Figure A-3. Membership Registration: Input your information. 103 10X PTZ Network Camera SNP-1000A Step2) Register the equipment after login. Figure A-4. Login Figure A-5. The list of registered equipment. 104 DDNS Usage Figure A-6. Product Registration. (Confirm repetition certainly at domain registration.) Figure A-7. The list of registered equipment. 105 10X PTZ Network Camera SNP-1000A Step3) Configure DDNS information in the equipment. Click the part of Network Configuration in website of Network Camera. Click “USE DDNS” in order to do “Enable” and input the address of DDNS Server. (Default: www.samsungipolis.com ) Enter the ID and Password that is written when register product is in iPOLiS website. The Configuration of DDNS in SNP-1000A is Completed. 106 DDNS Usage Step4) Confirm the connection status of relevant product in product list of iPOLiS website. Figure A-8. The List of Product. Be able to confirm the information of connected equipment if click <check> button of ‘Product information’. 107 10X PTZ Network Camera SNP-1000A Figure A-9. Product information Move to Login website of relevant product if click <view> button of ‘ view’. The buttons which are <Edit> and <Delete> of ‘product management’ move to relevant page through input password to item that fertilize or erase information of registered equipment in List of product. Only, ‘ID(Domain)’ of product should establishes again as ‘ID(Domain)’ after deleting because it can’t be fertilized. Figure A-10. Edit/Delete 108 Specifications Specifications Camera Part Items Imaging device TV Total Number of Pixels Valid Pixel Horizontal Scan Frequency Vertical Scan Frequency Synchronization Image Output S/N Ratio Horizontal Resolution Minimum Light for Object Electronic Shutter Sens-Up Day & Night White Balance Flickerless Adjustment Iris Gain Control OSD Display Outline Correction Focal Length Digital Zoom Maximum Aperture Rate Coverage Angle Proximity Distance Horizontal Rotation Angle Horizontal Rotation SNP-1000AN SNP-1000AP 1/4” Color Vertical Double Density Interline CCD. 410,000pixel NTSC PAL 811(H) X 508(V) 795(H) X 596(V) 768(H) X 494(V) 752(H) X 582(V) 15.734kHz 15.625KHz 59.94Hz 50Hz Internal Sync 1.0p-p/75Ω Higher than 50dB (AGC OFF) 520 TV Lines (Color)/570 TV Lines(B/W) 0.7Lux(Color), 0.1Lux(B/W)/(@50IRE), 0.0007Lux (Day & Night is On.)/(@50IRE) Auto/Manual Auto/Manual (1/60 - 1/120,000) (1/50 - 1/120,000) ON (x2 - x128 Fields) / OFF ICR(Filter Switching) ON/OFF ATW(Indoor/Outdoor Selection)/AWC/ Manual (1,800K - 10,500K) Fixed Shutter Speed Fixed Shutter Speed (1/100) (1/120) Auto/Manual (Iris Level Adjustment Mode) Low, Middle, High, Off ON/OFF Adjustable Level F3.8mm(WIDE)~F38.0mm(TELE), 10X Optical Zoom OFF, 2~10X Selection (Total 100X Zoom) Wide Angle 1:1.6, Tele 1:2.8 Wide: 51.2°(H) X 39.3°(V) Tele: 5.58°(H) X 4.27°(V) 1.5m(Tele) 350° Manual/Program 109 10X PTZ Network Camera SNP-1000A Items SNP-1000AN Horizontal Rotation Speed Horizontal Minimum Moving Angle Vertical Rotation Angle Vertical Rotation Vertical Rotation Speed Vertical Minimum Moving Angle Preset Position Area Masking SNP-1000AP Manual: 0.5° ~ 70°/s(64 levels) Preset: 0.5° ~ 140°/s(64 levels) 0.02° -5°~ 185° (Digital Flip) Manual/Program Manual: 0.5° ~ 150°/s(64 levels) Preset: 0.5° ~ 100°/s(64 levels) 0.02° Alarm Operating Temperature Operating Humidity Power, Voltage Power Consumption Dimension Weight Max 128 points Max 4 locations 2 Alarm Inputs 1 Alarm Outputs (Relay: NC/NO/COM, 2A 30VDC Max) 0°C ~ 40°C 20% ~ 75%(Except for dew condensation) DC 12V±10% Operating 8.5Watts below Ø110 X 134.8mm Less than 0.85kg - Wall Mount Bracket : STB-280PW Option - Wall Mount Bracket : STB-230PW - Dome Housing : STH-1000PI ※ The product design and dimensions may change without previous notice for improvement of performance. Note The copyright of this manual belongs to Samsung Techwin Co. Ltd. Parts or the whole of this manual cannot be reproduced or transmitted by any electric, mechanic or audio method without the authorized written approval of Samsung Techwin. The contents of this manual may be changed for an improvement of functions. 110 Specifications Network Part Items Output Resolution Output Video Format Video Compression Stage Compression transmission speed Audio Format Ethernet Protocol Dynamic IP SNP-1000AN 5 stages (Very Low, Low, Middle, High, Very High) NTSC : MAX 30 frame/sec PAL : MAX 25 frame/sec Bi-directional audio, 8KHz ADPCM 10/100Mbps HTTP, TCP/IP, FTP, SMTP, DHCP, DNS, DDNS, NTP, PPPOE Supports XDSL and DHCP DDNS Supports DDNS Area Zoom Supports Area Zoom function Max. User 20 Users Supply Network Program S/W SNP-1000AP NTSC : 704 x 480(D1), 704 x 240(Half D1), 352 x 240(CIF) PAL : 704 x 576(D1), 704 x 288(Half D1), 352 x 288(CIF) MPEG4 / MJPEG Selectable Manager Standard Installation ※ The product design and dimensions may change without previous notice for improvement of performance. 111 10X PTZ Network Camera SNP-1000A Dimension 112 SAMSUNG TECHWIN SALES NETWORK SAMSUNG TECHWIN CO., LTD. 145-3, Sangdaewon-dong, Jungwon-gu, Seongnam-si, Gyeonggi-do, 462-120, Korea Tel: +82-31-740-8151~8 Fax: +82-31-740-8145 SAMSUNG OPTO-ELECTRONICS UK, LTD. Samsung House, 1000 Hillswood Drive, Hillswood Business Park Chertsey, Surrey KT16 OPS Tel: +44-1932-45-5308 Fax: +44-1932-45-5325 SAMSUNG OPTO-ELECTRONICS AMERICA, LTD. 1480 Charles Willard St. Carson, CA90746 Tel: +1-310-632-1234 Fax: +1-310-632-2195 www.samsungtechwin.com www.samsungipolis.com P/NO : Z6806.0915.01B