1
Please read this manual carefully first in order to get the most out of your
Discovery Kids Wrist Cam Watch.
Your Wrist Cam Watch can be used as a low-resolution digital camera and as
a web cam (to chat over the Internet). This camera is equipped with a 16Mb
built-in ROM, therefore you are able to use it to take up to 152 low-resolution
photos (under QCIF mode and high compression).
Please note that in order to speak with friends and colleagues over the
Internet, you will need a PC headset and microphone. Any standard PC
headset will operate with this digital camera and is available at your local
computer retailer.
Table of Contents
About Your Wrist Cam Watch...............................................................................4
Computer System Requirements........................................................5
Installing or Replacing the Batteries .................................................5
Getting Started.....................................................................................................7
Wrist Watch Cam Modes.....................................................................7
To Turn Off the Camera.......................................................................8
To Set the Time....................................................................................9
Using Your Camera.............................................................................................10
Taking Photos ....................................................................................10
Deleting Photos .................................................................................12
Your Photo Options .............................................................................................13
Storage ..............................................................................................13
Resolution..........................................................................................14
Compression......................................................................................14
Fluorescent Lamp Frequency ............................................................14
Installing the Software.......................................................................................15
Downloading Photos...........................................................................................19
Recording Video Clips ........................................................................................22
Using Your Camera as a Web Cam....................................................................23
Troubleshooting..................................................................................................25
Technical Specifications ....................................................................................27
Warranty..............................................................................................................28
Service................................................................................................................28
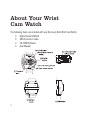
About Your Wrist
Cam Watch
The following items are included with your Discovery Kids Wrist Cam Watch.
• Digital Camera/Watch
• USB Connector Cable
• CD-ROM Software
• User Manual
4
Computer System
Requirements
•
•
•
•
•
•
Windows 2000/XP
Pentium-based PC (or equivalent)
80 MB hard disk free space and 32 MB or more RAM
Available USB Interface
CD-ROM Drive
Color display (24 bit or higher recommended)
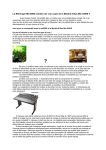
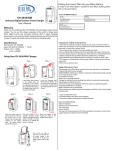
Installing or Replacing
the Batteries
You will need a small Phillips head screwdriver—the type found in a jeweler’s
or eyeglass kit.
1. Remove the wrist band so you can access the
battery compartments.
2. Use a small Phillips head screwdriver to loosen the screw. It is
not necessary to remove the screw completely. Each battery cover is
hinged. Carefully open the battery cover by swinging the door up toward
the center of the unit.
5
3. Insert 2 "AAA" batteries. Make sure the "+" and "-" ends are
inserted correctly, as indicated in the battery compartment.
4. Close each battery cover and tighten each screw.
5. Replace the wrist band.
Note: When the battery power is low you will hear a beeping sound when you
press the shutter button. Before you replace the batteries, please make sure
to download any photos that may be in the memory of the camera. Any stored
images will be lost when the batteries are removed.
• If you do not use this camera for quite a long period, please take out
the batteries to avoid the discharging or corrosion of the batteries.
• Please do not put the batteries into a fire to avoid explosion
subsequent injury to you or others around you.
Do not mix old and new batteries. Do not mix alkaline, standard (carbon
zinc), lithium or rechargeable (nickel cadium) batteries.
• Non-rechargeable batteries are not to be recharged.
• Only batteries of the same equivalent type as recommended are to
be used.
• Batteries are to be inserted according to the correct polarity (+ and
-). Incorrect insertion can damage the unit, provoke fire or cause the
batteries to explode.
• Dead or exhausted batteries are to be removed from the toy.
• Do not attempt to open batteries.
• The supply terminals are not to be short circuited.
• Batteries are harmful if swallowed. Keep out of reach of
young children.
6
• Dispose of batteries safely, following guidelines for your area.
Auto Energy-Save Mode
In order to conserve battery power, if the camera is not used within 30
seconds after turning it on, the camera will automatically enter into energy
saving mode. This will prolong the life of the batteries. To wake up the camera
from the energy saving mode, simply press the CAMERA MODE button.
Getting Started
When you start the camera mode, the LCD display will show the resolution
status (HI/LO) for 3 seconds and then show the remaining number of photos
you may take.
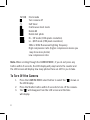
Wrist Watch Cam Modes
The CAMERA MODE select button lets you select the functions of the digital
camera. Press the CAMERA MODE select button repeatedly to scroll though
and select a particular mode. The following function icons will appear on the
LCD display. Below is a description of each function and its icon:
7
12:00
50/60
Hd
Ld
Clock mode
Turn camera off
Self timer
Continuous shoot mode
Delete All
Delete last photo
Hi - CIF mode (100k pixels resolution)
Lo - QCIF mode (25K pixels resolution)
50Hz or 60Hz fluorescent lighting frequency
High compression ratio (higher compression means you
may store more photos)
Low compression ratio
Note: When scrolling through the CAMERA MODE, if you do not press any
button within 5 seconds, the LCD display will jump back to the counter and
the LCD screen will display how many photos there are left for you to take.
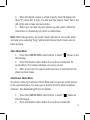
To Turn Off the Camera
1.
2.
3.
8
Press the CAMERA MODE select button to select the " " shown on
the LCD display.
Press the Shutter button within 5 seconds to turn off the camera.
The " " will disappear from the LCD screen and the time
will display.
To Set the Time
The Wrist Cam Watch has a 12 hour time display.
1. Press the MODE button to choose your setting. Press it the
following number of times according to which display you want to set:
a. Two times to enter the month
b. Three times to enter the date
c. Four times to enter the hour ( "A" =AM/"P"=PM)
d. Five times to enter the minute
2. Use the SET button to scroll through and select the correct
numbers or setting.
3. Press the MODE button to enter your setting. It will automatically
prompt you to enter the next setting. Continue to use the SET button to
enter the correct number or setting.
Press the MODE button to finish. The LCD will return to a 12 hour
time display.
9
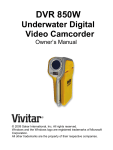
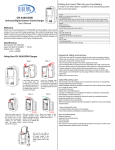
Using Your Camera
When taking pictures, aiming the lens as shown here will allow the lens to
record your images right side up.
When you wear the Watch Cam on your hand, pay attention to the LENS
IMAGE direction when taking your photos. To achieve the best clarity, make
sure that the distance between the camera and the subject is 5'.
Taking Photos
1. Press the CAMERA MODE select button one time to activate the
camera. The LCD display will show the number of photos you can take
before having to download them to your PC.
2. Point your wrist toward the image you would like to shoot. Try to
center the lens in front of the image.
3. Hold the camera steadily and press the shutter button to take a
photo. You will hear the camera "beep" once the photo has been taken.
The LCD display will count down each time you take a photo. It will
display how many pictures you have remaining to take.
10
4. When the digital camera is at full capacity, the LCD display will
show "0" photos left to take. You will hear the camera "beep" twice. You
will not be able to take any more photos.
5. Before you can take any more photos you will need to follow the
instructions to download your photos or delete them.
Note: When taking photos, the louder "beep" indicates a successful photo
shot and a low sounding "beep" will indicate the last photo taken was not
taken properly.
Auto-Shoot Mode
1. Press the CAMERA MODE select button to select " " shown on the
LCD display.
2. Press the Shutter button within 5 seconds to activate the 10
second timer. The camera will beep once every second.
3. After 10 seconds, the camera will beep twice to indicate that the
photo has been taken.
Continuous Shoot Mode
The photos taken by Continuous Shoot Mode will be saved as an AVI format
in the appointed place. You may open it directly from the photo download
software. See Downloading Photos for details.
1. Press the CAMERA MODE select button to select " " shown on
the LCD display.
2. Press the Shutter button within 5 seconds to activate the
11
continuous shooting mode and do not release the Shutter Button until
you want to stop shooting. The camera will beep once for each photo
taken till the Shutter button released or the memory is full.
3. Under the continuous shooting mode, the photos are taken in CIF &
QCIF modes and saved as a video format.
Note: Under the Continuous Shoot Mode, the shooting may fail due to poor
lighting. If so the continuous shooting will stop. If this happens you should
adjust the lighting or try shooting with a lower resolution setting.
Deleting Photos
You can delete photos individually or all at once. There are two different
trash can icons that indicate which option you have selected. Pay close
attention to which icon you have selected so you delete the right amount
of photos.
All Photos
1. Press the Camera mode select button to select the " " icon
shown on the LCD display. As you scroll through the icons this will be
the first trash can that appears. You will recognize it because it has two
handles on the lid.
2. Press the Shutter button and the photo counter will flash. Within 5
seconds press the Shutter button again. This will delete all the photos
stored in the memory.
12
Single Photo
1. Press the Camera mode select button to select the " " icon
shown on the LCD display. As you scroll through the icons this will be the
second trash can that appears. You will recognize it because it has one
handle on the lid.
2. Within 5 seconds press the Shutter button once. This will delete the
last photo taken.
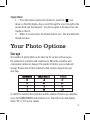
Your Photo Options
Storage
The number of photos that can be taken by the camera will vary upon
the selection of resolution and compression. When the resolution and
compression modes are hanged, the number of photos you can take will
change. Please refer to the list below to find out how many photos you
may take.
To check the selected the resolution and the number of photos you may take,
press the CAMERA MODE select button once. The LCD screen will display
either "HI" or "LO" and a number.
13
Resolution
The resolution status will always show on the LCD display in small characters
to the right of the time display. "HI" means CIF mode 352 x 288 Pixels, "LO"
means QCIF mode 176 x 144 pixels. The HI mode will allow you to take 19
photos and the LO mode will allow you to take 76 photos.
1. Press the CAMERA MODE select button to select
icon on
LCD display.
2. Press the shutter button once to switch between the HI mode or the
LO mode.
Compression
There is high density ("Hd") or low density ("Ld") compression ratio selection
for photos stored in the memory.
Selecting Ld
Press the CAMERA MODE selection button to check the current compression
selection. If the LCD shows "Hd" it means the present compression is "Ld".
If the LCD shows "Ld", press the Shutter button to change it to read "Hd".
Selecting Hd
If the LCD shows "Ld" it means the present compression is "Hd". If the LCD
shows "Hd", press the Shutter button to change it to read "Ld".
Fluorescent Lamp Frequency Selection
Normally 60Hz fluorescent lamp frequency is used in United States and
most of Asia and 50Hz is used in Japan and0Hz
Eurod iz d iz
n United States and
14
should set the fluorescent lamp frequency to that in your region.
Selecting 60Hz
Press the CAMERA MODE selection button to check the current frequency
selection. If the LCD display shows 60 it means the present frequency is set
for 50Hz. Press the Shutter button to change the frequency to 60 Hz.
Selecting 50Hz
If the LCD shows 50 it means the present is set for 60Hz. Press the Shutter
button to change the frequency to 50Hz.
Installing the Software
Important: Before attempting to install the software, make sure that you do
not have the camera or the USB cable attached to your computer. This may
cause your installation to fail. Do not connect the cable to the computer until
the entire installation process has been completed. Please follow the step by
step instructions that appear on the screen.
1. Insert the CD into your CD-Rom drive. Make sure your camera is
not connected to the computer.
2. On the "Install your camera software" screen, select your camera
model from the drop down list and click the "Install" button to install
Spy Shot Photo Manager followed by the installation of PhoTags
WebCam Express.
15
3.
On the "Spy Shot Photo Manager" screen, click the "Next" button.
4. Please review the license terms and click the "Agree" button
to continue.
5. Let the "Spy Shot Photo Manager" installer create the folder where
the program will be installed, and then click "Install".
16
6. Click "Finish" to let the "Spy Shot Photo Manager" installer finish
the installation program.
7. This will automatically launch the Install shield for the camera
driver. Click "Next" to continue.
17
8. Once the program has finished installing you will have to restart
your computer.
9. When you receive this message your have successfully installed
the "Spy Shot Photo Manager" software, the "PhoTags WebCam Express"
and the Camera driver.
18
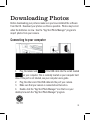
Downloading Photos
Before downloading your pictures make sure you have installed the software
from the CD. Download your photos as often as possible. Photos may be lost
when the batteries run low. Use the "Spy Shot Photo Manager" program to
import photos from your camera.
Connecting to your computer
1.
Plug the labeled end
of the USB cable into the socket marked
on your computer. This is normally located on your computer hard
drive. If the port is not labeled, see your computer users guide.
2. Plug the other end of the USB cable into the port your camera.
3. Make sure that your camera is connected and turned on.
4. Double-click the "Spy Shot Photo Manager" icon that is on your
desktop to launch the "Spy Shot Photo Manager" program.
19
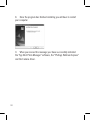
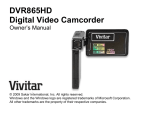
5.
Click on the "Get Photos" button on the Main Menu.
6. The "Get photos from Spy Shot camera" window will appear.
with the correct name of your camera device selected in the “Active
devices” list in the “Express” mode. Click the “Next” button to proceed.
NOTE: for Win XP users- the “JL 2005A Camera” device name appears
twice on the “Active device list”. If the selected device does not
download your photos try selecting the second “JL 2005A Camera”
device name.
20
8. The photos you have just imported will appear in the "Select
Photos" mode’s main window.
21
Recording Video Clips
You can use your Wrist Cam Watch to capture short movies called AVI files.
The length of time you can record an AVI while the camera is connected to
your computer will vary, depending on how much hard drive space you will
use to save the file. Please take note that these AVI files take up a lot of hard
drive space. This is done through the PhoTags WebCam Express program. This
next section will walk you though capturing an AVI file.
1. Double-click the "WebCam Express" icon that is on your desktop to
launch the "PhoTags WebCam Express" program. Adjust your WebCam
to the desired position. The screen will display what the WebCam "sees".
2. To add audio to your video, plug a microphone into your computer.
1. Click the "Capture" button to start recording the video. The recording
elapse time will appear under the video.
22
2. Click the "Pause" button to hold the recording. To continue recording
click the "Capture" button again.
3. To finish recording click the "Stop" button.
4. The videos will be automatically saved into a default directory. You
can view them in the “Playback” window.
Note: To learn how to capture JPEG snapshots from your WebCam or from
your existing AVI movies, go to the "Take Snapshots" section in the Quick
Start help. To change the user settings, go to the "Set User Preferences"
section in the Quick Start help.
Using Your Camera as a
Web Cam
You can use your Wrist Cam Watch as a webcam to chat with friends and
family, sending live video feeds straight to them. In order to use this function
you must make sure that you have YAHOO MESSENGER Ver 5.5 or later.
23
1.
Start Yahoo Messenger.
2. Select the "tools" listing on the top of the toolbar. Go to the drop
down menu and select the listing for "start my webcam".
3. You will see a window appear with the video that you currently
shooting. Now people who have your Yahoo login name will be able to se
your video.
24
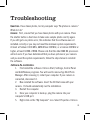
Troubleshooting
Question: I have taken photos, but my computer says "No photos in camera."
What do I do?
Answer: First, ensure that you have taken photos with your camera. Press
the shutter button a few times to take some sample photos and try again.
If you still get a no photos error, this indicates that the software was not
installed correctly or you may not meet the minimum system requirements.
At least a Pentium II 300 MHz, AMD Athlon 300 MHz, or a Celeron 400 MHz or
higher, at least 64 MB of RAM. Please note that the older AMD K6 processors
will not work. If you have determined that you have pictures in your camera
and you meet the system requirements, follow the steps below to reinstall
the software.
Software Re-installation:
1. First install the software. Click on Start, Settings, Control Panel
and Add/Remove programs. You will need to remove Spy Shot Photo
Manager. After removing it, restart your computer. If your camera is
connected, disconnect it.
2. Now reinstall the software. Insert the CD that came with your
camera. It should automatically run the installation.
3. Restart the computer.
4. Once your computer is back up, plug the camera into your
computer's USB port.
5. Right-click on the "My Computer" icon. Select Properties. Click on
25
hardware and then Device Manager.
If the camera is installed correctly, there will be a category listed for
"Imaging Devices" and clicking on the "+" next to it should reveal your
camera. If not, you will likely see "Digital Still Camera" under "Other
Devices" with a brightly colored marking next to it indicating it is not
functioning correctly. Right click on the non functioning device and
select uninstall. If a warning pops up, press OK.
6. Restart your computer again. Your camera is now
successfully installed.
Question: How do I make sure I don't lose important pictures?
Answer: Your camera uses flash memory which requires a constant electric
current to store your photos. Should your camera lose power (for instance if
the battery dies or is removed) all stored pictures will be lost. We recommend
always downloading your photos to your computer as soon as possible to
prevent unintentional data loss.
Question: I have a MAC, will your camera work?
Answer: Unfortunately, the system requirements for our cameras require a
Windows operating system. There is no Mac driver available and no current
plan to develop.
Technical Support
For technical support issues please visit our website at www.sakarhelp.com. You can
find manuals, software, drivers, and FAQ’s at the website.
26
Can’t find what you are looking for? Fill out an online ticket and one of our technical
support team members will answer your questions.
Or call 877-397-8200 to access our technical support information on the phone. For
question on warranty information please email [email protected].
Technical Specifications
Product Type: Digital Camera
Electronic Coupling Element: CMOS Sensor 100 K Pixels
Image Resolution: 352*288 Pixels (CIF) 176*144 Pixels (QCIF)
Lens: f=3.6mm F2.4 (55°)
Memory Device: Built-in 1*16Mb (SDRAM)
Memory Capacity: 19 images (CIF)(Lo) 76 images (QCIF)(Lo)
38 images (CIF)(Hi) 152 images (QCIF)(Hi)
Viewfinder: Built-in
Shutter Speed: 1/6-1/15000 seconds
Shoot Mode: Single/ Continuous Photography/ Automatic Shoot/PC Camera
Clock Mode: 12 hour circuit time display.
Automatic Energy Saving: automatically enter the energy saving mode in 30S
Image Process: Automatic Exposure / Automatic White Balance
Working Voltage: AAA 1.5*2/USB 5V
Transmission Interface: USB Interface Revision 1.1
Working Temperature: 0-40˚C
Operation System: Windows 98 Edition II/2000/XP
Windows and the Windows Logo are registered trademarks of Microsoft Corporation.
All other trademarks are the property of their respective.
27
One Year Warranty
This warranty covers for the original consumer purchaser only and is not transferable.
Products that fail to function properly UNDER NORMAL USAGE, due to defects in
material or workmanship. Your product will be repaired or (at our discretion) replaced
at no charge (excluding shipping, handling and insurance charges). Contact Sakar
International for details.
Not Covered by Warranty
Damages or malfunctions not resulting from defects in material or workmanship and
damages or malfunctions from other than normal use, including but not limited to,
repair by unauthorized parties, tampering, modification or accident. Contact Sakar
International for details.
What To Do When Service is Required
When returning your defective product (postage pre-paid) for service, your package
should include:
1. Copy of the original bill of sale.
2. A detailed written description of the problem.
3. Your return address and daytime telephone number.
4. A check or money order for USD $7.95 payable to Sakar International to
cover shipping, handling and insurance. (Other fees may apply for shipments
outside the US, please email, write or call for exact shipping charges.)
MAIL TO:
Customer Service / Sakar International
Attention: Service Department
195 Carter Drive
Edison, NJ 08817
28
FCC Notice
This device complies with part 15 of FCC Rules. Operation is subject to the following two
conditions: (1) This device may not cause harmful interference, and (2) This device must accept
any interference received, including interference that may cause undesired operation.
Warning: Changes or modipcations to this unit not expressly approved by the party responsible
for compliance could void the user’s authority to operate the equipment.
NOTE: This equipment has been tested and found to comply with the limits for Class B digital
device, pursuant to part 15 of the FCC Rules. These limits are designed to provide equipment
generates, uses and can radiate radio frequency energy and, if not installed and used in
accordance with the instructions, may cause harmful interference to radio communications.
However, there is no guarantee that interference will not occur in a particular installation. If
this equipment does cause harmful interference to radio or television reception, which can be
determined by turning the equipment off and on, the user is encouraged to try to correct the
interference by one or more of the following measures:
• Reorient or relocate the receiving antenna.
• Increase the separation between the equipment and receiver.
• Connect the equipment into an outlet on a circuit difference from that to which the receiver
is needed.
• Consult the dealer or an experienced radio/TV technician for help.
Shielded cable must be used with this unit to ensure compliance with the Class B FCC limits.
Under the environment with electrostatic discharge, the product may malfunction and require
user to reset the product.
JP8588-61007SM0004
29
© 2006 Discovery Communications, Inc. All rights reserved.
Windows and the Windows Logo are registered trademarks of Microsoft Corporation. All other trademarks
are the property of their respective companies.
Sakar International INC
195 Carter Drive
Edison, NJ 08817
For technical support, please call 877-397-8200