1
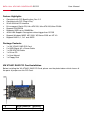
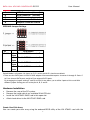
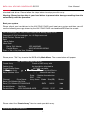
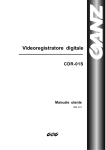
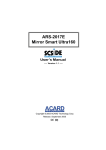
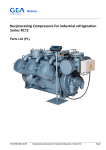
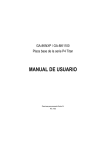
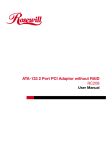
SATA+Ultra ATA RAID CONTROLLER RC212 User Manual SATA+ Ultra ATA RAID CONTROLLER RC212 User Manual Feature Highlights Compliant with PCI Specification, Rev. 2.2 Compliant with PCI “Plug & Play” 32-bit 33 MHz PCI interface Drive support: Serial ATA, Ultra ATA/133, Ultra ATA/100,Ultra ATA/66 Support ATA/ATAPI6 Supports SATA up to 150MB/Sec 48-bit LBA Support: Recognizes drives bigger than 137GB Support Windows 98SE, ME, 2000, XP, Server 2003 ant NT 4.0 Support RAID 0, 1, 0+1 and JBOD Package Contents 1 x VIA VT6421 RAID PCI Card 2 x SATA Signal & 2 x Power Cable 1 x IDE ATA/133 Cable 1 x Driver CD 1 x User Manual 1 x Floppy Disk VIA VT6421 RAID PCI Card Installation Before installing the VIA VT6421 RAID PCI Card, please see the photo below which shows all the ports & jumpers on this PCI Card. A B SATA Connector SATA Connector (External) (External) 3 SATA+ Ultra ATA RAID CONTROLLER RC212 C D E F G User Manual SATA Connector (Internal) SATA Connector (Internal) PATA Connector Jumpers control BC Switch Jumpers control AD Switch IDE/RAID: Jumper Settings JP J8-J11 1-2 close 2-3 close J12-J15 1-2 close 2-3 close Description Enable SATA Connector B Enable SATA Connector C Enable SATA Connector A Enable SATA Connector D Default Mode is all jumper 2-3 close, so C-D is active and A-B is inactive on default. 1.There are four SATA ports in RC212 RAID adapter. We named these ports character A through D. Ports C to D are internal SATA ports and A to B are external SATA ports. By changing the jumper setting (F and G) on RC212 that allows you to utilize 2 ports of this card. With different jumper setting you can active port A, B, C and D . Hardware Installation Remove the case of the PC system. Remove the inside slot of any available 32-bit PCI slot. Install the VIA VT6421 RAID card in this open slot. Attach hard drives to the VIA VT6421 RAID card. Create Your Disk Array You can create your own array using the onboard BIOS utility of the VIA VT6421 card with the 4 b e r SATA+ Ultra ATA RAID CONTROLLER RC212 User Manual attached hard drives. Please follow the steps below to setup your disk array. Warning: Please backup data in your hard drives to prevent data damage resulting from the unfamiliarity with the operation. Boot your system Please attach your hard drives to the VIA VT6421 RAID card, boot your system and then you will see the following message shown by the VIA VT6421 RAID card onboard BIOS on the screen: VIA Technologies, Inc. VIA VT6421 RAID BIOS Setting Utility v4.50 Copyright (C) VIA Technologies, Inc. All Right reserved. Scan Devices, Please wait… Raid None Define None Raid Serial_Ch1 Master: ST3160023AS Parallel Slave: WDC WD400JB-00FSA0 Press < Tab > Key into User Window! Please press “Tab” key to enter the BIOS utility Main Menu. The screen below will appear. VIA Tech. RAID BIOS Ver 4.50 Create Array Create a RAID array with Delete Array the hard disks attached to Create/Delete Spare VIA RAID controller Select F1next Vii ewBoot Array , : Move ve e to ext xtt: iView tem em m Array/disk Status Serial Number View ↑,↓ : Move to next item Enter : Confirm the selection ESC : Exit Channel Drive Name Array Name Mode Size(GB) Serial_Ch0 Master No Drive Serial_Ch1 Master ST3160023AS SATA 149.05 Parallel Master No Drive Parallel Slave WDC WD400JB-00FS ATA100 37.27 Please select the “Create Array” item to create your disk array. Auto Setup For Data Security 5 Status Hdd Hdd SATA+ Ultra ATA RAID CONTROLLER RC212 User Manual Array Mode RAID 1 (Mirroring) Select Disk Drives Start Create Process Totally, there are four configurations supported: RAID Configurations Number of disks level/Type needed RAID 0 Disk Striping 2 or 3 or 4 RAID 1 Disk Mirroring 2 RAID 0+1 Disk Striping 4 + Mirroring JBOD Disk 2 or 3 or 4 Concatenation Driver Installation Installing driver on Windows® 98SE/ME 1. 2. 3. 4. 5. 6. 7. 8. Start your PC. Windows ® will detect the VIA VT6421 RAID Card and find a “PCI RAID Controller”. Click the “Cancel” button to cancel the driver installation for the device at this moment. The driver for the device will be installed in the next step. Insert the Driver CD into the CD-ROM Drive, and then please browse CD and locate the Driver Folder “\RC212\” and double click “Setup.exe” to start the driver installation procedure. Follow the on-screen instructions to complete the installation. When the installation is complete, please select “Yes, I want to restart my computer now.” and restart your system. Once you have rebooted your computer. Windows® will detect the VIA VT6421 RAID card and find a “VIA VT6421 RAID Controller” device. When the “Add New Hardware Wizard” asks “What would you like to do?” select “Specify the location of the driver(Advanced)” and click “Next” button. When the “Add New Hardware Wizard” asks for the driver installation, uncheck all the boxes to allow Windows® to search its own driver database. Click “Next” to start the search. The “Add New Hardware Wizard” will find the driver for the device “VIA VT6421 RAID Controller”. Click “Next” to continue. When the driver installation is complete, click “Finish”. Your computer must be restarted in order to complete the installation, click “Yes” to restart your computer. Installing driver on Windows® 2000/XP/Server 2003 1. 2. Start your PC. Windows ® will detect the VIA VT6421 RAID Card and find a “RAID Controller”. Click the “Cancel” button to cancel the driver installation for the device at this moment. The driver for the device will be installed in the next step. Insert the Driver CD into the CD-ROM Drive, and then please browse CD and locate the Driver 6 SATA+ Ultra ATA RAID CONTROLLER RC212 3. User Manual Folder “\ RC212\” and double click “Setup.exe” to start the driver installation procedure. Follow the on-screen instructions to complete the installation. When the installation is complete, please select “Yes, I want to restart my computer now.” and restart your system. Installing driver on Windows® NT 1. 2. Start your PC, insert the Driver CD into the CD-ROM Drive, and then please browse CD and locate the Driver Folder “\ RC212\” and double click “Setup.exe” to start the driver installation procedure. Follow the on-screen instructions to complete the installation. When the installation is complete, please select “Yes, I want to restart my computer now.” and restart your system. Thank you for purchasing a quality Rosewill Product. Please register your product at : www.rosewill.com/ for complete warranty information and future support for your product. 7