1
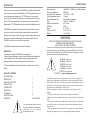
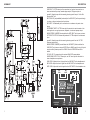
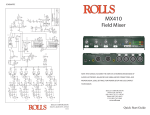
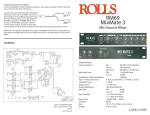
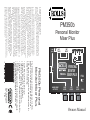
PWR
INST.
LEVEL
MIC
LEVEL
LINE
LEVEL
+
-
Owners Manual
Rolls Corporation
Salt Lake City, UT
1/03
• XLR Mic In & Pass Through
• Stereo or Mono 1/4" Line Input
• "Phantom" powering via the Line In
• Stereo or mono 1/4" Instrument In with built-in
DI outs
• Switchable ground lift on balanced outputs
• Two Headphone Outputs 1/4" and 1/8"
The PM350 mixes an XLR mic signal, 1/4 TRS
stereo or mono instrument signal, and a 1/4"
TRS stereo or mono monitor signal together for
headphone monitoring.
PM350b Personal
Monitor Mixer Plus
HEADPHONE
OUTPUTS
DC IN
12 VDC
PM350b
lift
gnd
mon
ster
This product is warranted to the original consumer purchaser to be
free from defects in materials and workmanship under normal installation, use
and service for a period of one (1) year from the date of purchase as shown on
the purchaser’s receipt.
The obligation of Rolls Corporation under this warranty shall be
limited to repair or replacement (at our option), during the warranty period of
any part which proves defective in material or workmanship under normal
installation, use and service, provided the product is returned to Rolls Corporation, TRANSPORTATION CHARGES PREPAID. Products returned to us or to
an authorized Service Center must be accompanied by a copy of the purchase
receipt. In the absence of such purchase receipt, the warranty period shall be one
(1) year from the date of manufacture.
This warranty shall be invalid if the product is damaged as a result of
defacement, misuse, abuse, neglect, accident, destruction or alteration of the
serial number, improper electrical voltages or currents, repair, alteration or
maintenance by any person or party other than our own service facility or an
authorized Service Center, or any use violative of instructions furnished by us.
This one-year warranty is in lieu of all expressed warranties,
obligations or liabilities. ANY IMPLIED WARRANTIES, OBLIGATIONS, OR
LIABILITIES, INCLUDING BUT NOT LIMITED TO THE IMPLIED
WARRANTIES OF MERCHANTABILITY AND FITNESS FOR A PARTICULAR PURPOSE, SHALL BE LIMITED IN DURATION TO THE ONE YEAR
DURATION OF THIS WRITTEN LIMITED WARRANTY. Some states do not
allow limitations on how long an implied warranty lasts, so the above limitation
may not apply to you.
IN NO EVENT SHALL WE BE LIABLE FOR ANY SPECIAL,
INCIDENTAL OR CONSEQUENTIAL DAMAGES FOR BREACH OF THIS
OR ANY OTHER WARRANTY, EXPRESSED OR IMPLIED, WHATSOEVER. Some states do not allow the exclusion or limitation of special,
incidental or consequential damages so the above limitation or exclusion may
not apply to you. This warranty gives you specific legal rights, and you may also
have other rights which vary from state to state.
stereo
PERSONAL
MONITOR
MIXER PLUS
mono
RIGHT
OUT
LEFT
OUT
INST.
IN
MIC
INPUT
MIC
THRU
LINE
INPUT
lift
gnd
Personal Monitor
Mixer Plus
LIMITED WARRANTY
PM350b
SPECIFICATIONS
INTRODUCTION
Thank you for your purchase of the PM350b Personal Monitor Mixer Plus.
This unit mixes a microphone signal with a 1/4" Tip-Ring-Sleeve stereo or
mono instrument level signal and a 1/4" TRS stereo or mono monitor
signal. The Mic Input and Thru jacks have a switchable ground lift, as do
the 1/4" TRS Instrument Outputs. The instrument input connects to two
independent 1/4" TRS balanced outputs via electronic balancing circuits.
The PM350b is designed for performers who want to monitor their own
sounds, such as their vocals and instruments, with the main mix via
headphones or earphones. It's very popular with drummers who need to
mix a click track with a monitor signal. Church choir singers love the
PM350b to monitor their voices over the musicians.
The PM350b is shipped with an external AC adapter.
INSPECTION
1. Unpack and inspect the PM350b box and package.
If obvious physical damage is noticed, contact the carrier immediately to
make a damage claim. We suggest saving the shipping carton and
packing materials for safely transporting the unit in the future.
2. Please complete the Warranty Registration Card and return it to the
factory.
TABLE OF CONTENTS
INTRODUCTION
INSPECTION
TABLE OF CONTENTS
DESCRIPTION
CONNECTION
OPERATION
SCHEMATIC
SPECIFICATIONS
WARRANTY
1
1
1
1
2
3
4
5
6
BACK COVER
This symbol indicates that there are
important operating and maintenance
instructions in the literature
accompanying this unit.
Max Input Level:
Inst. Input Impedance:
Inst. Output Freq. Response:
Output Impedance, Hdphn:
Output Impedance, Inst.:
Gain:
Hdphn Freq. Response:
S/N Ratio:
Power:
Size (W x H x D):
Weight:
-20 dB XLR, +40 dB Line, +15 dB Instrument
50K ohms
10 - 30 kHz +/- 3 dB
10 ohms
2 ea; 100 ohms balanced
20 dB 1/4", 50 dB XLR
20 - 20 kHz
90 dB
9 - 16 VDC
4.5" x 3.3" x 1.5"
1 lb (.45 Kg)
WARNING
USING THIS SYSTEM AT EXCESSIVE VOLUMES CAN CAUSE
PERMANENT HEARING DAMAGE.
USE AS LOW A VOLUME AS POSSIBLE
In order to use this system safely, avoid prolonged listening at excessive sound
pressure levels. Please use the following guidelines established by the Occupational Safety Health Administration (OSHA) on maximum time exposure to sound
pressure levels before hearing damage occurs.
90 dB SPL at 8 hours
95 dB SPL at 4 hours
100 dB SPL at 2 hours
105 dB SPL at 1 hour
110 dB SPL at 1/2 hour
115 dB SPL at 15 minutes
120 dB SPL - avoid or damage may occur
It is difficult to measure the exact Sound Pressure Levels (SPL) present at the
eardrum in live applications. In addition to the volume setting on this Personal
Monitor unit, the SPL in the ear is affected by ambient sound from floor wedges
or other devices. The isolation provided by the fit of quality earphones is also an
important factor in determining the SPL in the ear.
Follow these guidelines in the use of this product to protect your ears from
damage:
1. Turn up the volume only to the point where hearing is comfortable.
2. Ringing in the ears may indicate that the levels are too high. Lower the volume
level.
3. Have your ears checked by an audiologist on a regular basis. If you experience
wax buildup in your ears, stop using the system until an audiologist has examined your ears.
4. Wipe the earphones with an antiseptic before and after use to avoid infections.
Stop using the earphones if they are causing great discomfort or infection.
6
DESCRIPTION
SCHEMATIC
MIC
INPUT
mono
stereo
PM350b
INST.
IN
LEFT
OUT
lift
gnd
MIC
THRU
mon
ster
LINE
INPUT
lift
gnd
LINE INPUT: 1/4" TRS stereo jack for connection to a line level source such as a
mixer monitor/auxiliary output, cassette player output, CD player output etc.
ground lift: Header jumper for disconnecting chassis ground from pin 1 of the Mic
Input and Mic Thru.
MIC THRU: XLR jack paralleled (hard-wired) to the MIC INPUT jack for pass-through
to a mixer or other microphone level input device.
MIC INPUT: XLR balanced jack for connection to a condenser or dynamic microphone.
INSTRUMENT INPUT: 1/4" TRS stereo jack for connection to an instrument or line
level signal such as a guitar processor, keyboard, or instrument preamp output.
MONO/STEREO JUMPER: Selects whether the INST. INPUT jack is mono or stereo.
LEFT/RIGHT OUTPUTs: Electronically balanced 1/4" TRS outputs of the Instrument
Input.
ground lift: Header jumper for disconnecting chassis ground from the 1/4" TRS
instrument output jacks.
MONO/STEREO JUMPER (Located below the LINE INPUT): Selects whether the
LINE INPUT jack is mono or stereo. NOTE: When in MONO mode, the ring of the jack
may be used to "phantom power" the PM350. See the OPERATION section for
details.
DC IN 12 VDC: For connection to the external Rolls PS27 power adapter.
HEADPHONE OUTPUTS:1/4" Stereo jack, and 1/8" stereo jack for connection to
stereo headphones or earphones.
LINE LEVEL: Adjusts the level of signal from the LINE INPUT to the headphone mix.
MIC LEVEL: Adjusts the level of signal from the MIC INPUT to the headphone mix.
INST. LEVEL: Adjusts the level of signal from the INST. INPUT to the headphone mix.
PERSONAL
MONITOR
MIXER PLUS
RIGHT
OUT
DC IN
12 VDC
+
HEADPHONE
OUTPUTS
5
LINE
LEVEL
MIC
LEVEL
INST.
LEVEL
PWR
2
OPERATION
CONNECTION
MIC
THRU
MIC
INPUT
mono
stereo
PM350b
INST.
IN
LEFT
OUT
lift
gnd
Connect your headphones or earphones
to the proper Headphone Output.
mon
ster
LINE
INPUT
lift
gnd
• The MIC INPUT connects to either a dynamic or condenser microphone via
a standard XLR cable. If you are using a condenser type mic, you will need to
power it via phantom power from the mixer which connects to the MIC THRU
jack. This jack will pass the phantom power from a mixer on to the microphone.
• Connect the MIC THRU jack to the mixer or snake as necessary.
• The INSTRUMENT INPUT connects to a guitar preamp output, keyboard, or
any stereo or mono instrument level signal. Again, selecte stereo or mono.
• The INSTRUMENT OUTPUTs are electronically isolated and converts the
high impedance INSTRUMENT INPUT signal to low impedance so it can be
sent down a balanced line. These signals may then be plugged into an XLR
input on a mixer or snake by using a 1/4" TRS to XLR cable. Note that the
level of this signal may be too high for a mixer's microphone input - you may
experience distortion. In this
event, turn down the instrument
connected to the PM350 INSTRUMENT INPUT, pad the
input to the mixer's mic input, or
trim down the mic
input.
PERSONAL
MONITOR
MIXER PLUS
RIGHT
OUT
3
LINE
LEVEL
MIC
LEVEL
INST.
LEVEL
If the signal to the LINE INPUT or INSTRUMENT
INPUT is Tip-Sleeve mono, move the jumper to
connect the "mono" pins.
NOTE: If the LINE INPUT mono/stereo jumper is
missing, only one side of the headphones/earphones
will work.
LINE
INPUT
lift
gnd
• Setting the Mono/Stereo jumpers;
If the input to the LINE INPUT or INSTRUMENT
INPUT is a Tip-Ring-Sleeve stereo signal, set the
Mono/Stereo jumper for stereo operation as shown
here.
MIC
THRU
MONO
STEREO
HEADPHONE
OUTPUTS
• Phantom Powering the PM350b
A very useful feature of the PM350b is the ability to send
the 12VDC power to the unit via the LINE INPUT ring
connection. Make sure the Mono/Stereo jumper is in the
MONO position. Connect the 12VDC to the Ring of the
TRS plug as shown here.
LINE
INPUT
ROLLS WILL NOT BE HELD RESPONSIBLE FOR
DAMAGE DONE TO THE PM350 AS A RESULT OF
IMPROPER USE OF THIS
FEATURE. IF YOU ARE NOT
SURE HOW TO DO THIS
MIC
MIC
INST.
INPUT
THRU
INPUT
CORRECTLY, CONTACT A
QUALIFIED SERVICE TECHNICIAN.
NOTE: This unit cannot be
powered by standard 48 Volt
Phantom Power supplied by
mixers, phantom power adapters etc. The current (amperes) is insufficient to
power the PM350b. Also, any voltage greater than 16 VDC will damage the unit.
DC IN
12 VDC
+
HEADPHONE
OUTPUTS
Make sure the Rolls PS27 12VDC power supply is connected to an active AC
outlet, and all audio connections are in place.
lift
gnd
The diagram below shows an example of how to connect the PM350b for
proper operation.
• The LINE INPUT connects to either a 1/4" stereo or mono plug. If this plug is
Tip-Ring-Sleeve stereo and you're sending a stereo signal to this jack, select
the STEREO setting of the Mono/Stereo jumper. If the plug is Tip-Sleeve
mono, select the MONO setting of the Mono/Stereo jumper. The MONO
setting is also the proper selection if you are phantom powering the PM350b.
PWR
GROUND LIFT
The Mic Input and Mic Thru have a ground lift jumper provided to lift the XLR
pin 1 from chassis ground. The 1/4" TRS Instrument Outputs also have this
feature. If you experience a "hum" on the microphone or instrument outputs,
lifting the ground may elliminate the problem. To lift the ground, use a pair of
4
needle-nose pliers and carefully remove the header jumper. Replace the
jumper on the two pins labled "lift".