1
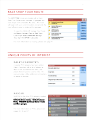
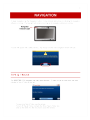
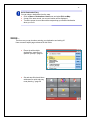
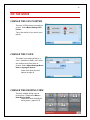
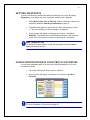
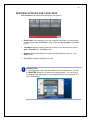
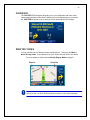
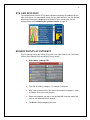
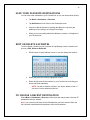
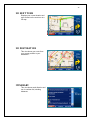
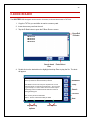
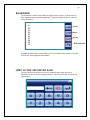
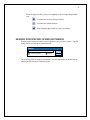
3 TABLE OF CONTENTS GETTING STARTED ........................................................................................................6 DALE JR. EDITION SPECIAL FEATURES......................................................................7 SELECT the GPS Pointer ....................................................................................................................... 7 Dale Jr.’s Voice ....................................................................................................................................... 7 Race Shop Tour Route ........................................................................................................................... 8 Unique Points of Interest ....................................................................................................................... 8 Dale’s favorite’s ....................................................................................................................................................................... 8 NASCAR ................................................................................................................................................................................. 8 BASIC OPERATIONS ......................................................................................................9 SPOTTER GPS Hardware ...................................................................................................................... 9 Mounting Your Device .......................................................................................................................... 10 Attaching the Mount .............................................................................................................................................................. 10 detaching the Mount.............................................................................................................................................................. 11 Power ..................................................................................................................................................... 12 Battery Status Icon ................................................................................................................................................................ 12 Charging the Battery ............................................................................................................................................................. 12 The SPOTTER can be used for navigation while the unit is recharging. ........................................ 12 Programs Window Overview ............................................................................................................... 13 NAVIGATION .................................................................................................................. 14 Tips & Tricks ......................................................................................................................................... 14 GPS Start Up ......................................................................................................................................... 15 First Trip ................................................................................................................................................ 16 Selecting a destination .......................................................................................................................................................... 16 More...................................................................................................................................................................................... 17 On the Move .......................................................................................................................................... 19 Change the GPS Pointer ....................................................................................................................................................... 19 Change the voice .................................................................................................................................................................. 19 Change the driving view ........................................................................................................................................................ 19 Make a Detour ...................................................................................................................................................................... 20 Search for a Point of Interest ................................................................................................................................................. 20 In Use ..................................................................................................................................................... 21 Selecting multiple stops for your trip ...................................................................................................................................... 21 Customizing your trip ............................................................................................................................................................ 21 Setting waypoints .................................................................................................................................................................. 22 Saving destinations in your trip as favorites ........................................................................................................................... 22 Saving a trip .......................................................................................................................................................................... 23 Loading a saved trip .............................................................................................................................................................. 23 Deleting a planned trip .......................................................................................................................................................... 23 Preview your route ................................................................................................................................................................ 23 Setting Routing options for your trip ...................................................................................................................................... 24 Preview Options for your trip ................................................................................................................................................. 25 Guidance .............................................................................................................................................................................. 26 Driving views ......................................................................................................................................................................... 26 4 ETA and distance .................................................................................................................................................................. 27 Nearby points of interest ....................................................................................................................................................... 27 Personalize ............................................................................................................................................ 29 Saving a destination as Home ............................................................................................................................................... 29 Saving a destination as Work ................................................................................................................................................ 29 Save your Favorite destinations ............................................................................................................................................ 30 Edit or delete Favorites ......................................................................................................................................................... 30 To choose a recent destination ............................................................................................................................................. 30 Other ways to select a destination ......................................................................................................................................... 31 To delete the recent list ......................................................................................................................................................... 31 To choose an Intersection as a destination............................................................................................................................ 31 Setting display mode ............................................................................................................................................................. 31 Selecting the language & voice guide .................................................................................................................................... 31 Customizing the guidance screen.......................................................................................................................................... 32 Setting Map Styles ................................................................................................................................................................ 32 Customizing routing options .................................................................................................................................................. 32 Display Screen Options ....................................................................................................................... 33 Driver Safety view ................................................................................................................................................................. 33 3D view ................................................................................................................................................................................. 33 2D Where Am I ..................................................................................................................................................................... 33 2D Next Turn......................................................................................................................................................................... 34 2D Destination ...................................................................................................................................................................... 34 Itinerary ................................................................................................................................................................................. 34 Night mode ........................................................................................................................................................................... 35 Advanced ............................................................................................................................................... 36 Advanced POI Search ........................................................................................................................................................... 36 Adjusting the POI settings ..................................................................................................................................................... 37 Selecting a destination using Lat and Long ........................................................................................................................... 37 Setting detours ...................................................................................................................................................................... 38 Ending a Detour .................................................................................................................................................................... 38 Optimizing stops ................................................................................................................................................................... 38 Enable Fuel Calculator .......................................................................................................................................................... 39 Change your entire trip .......................................................................................................................................................... 39 Setting map preferences ....................................................................................................................................................... 39 Setting Map Styles ................................................................................................................................................................ 40 Setting route preferences ...................................................................................................................................................... 40 Saving a route preference ..................................................................................................................................................... 41 Loading a saved routing profile ............................................................................................................................................. 41 Edit your road preferences .................................................................................................................................................... 41 Checking the GPS status ...................................................................................................................................................... 41 Adjusting your Safety View .................................................................................................................................................... 42 Track Playback ..................................................................................................................................................................... 42 Adjusting the volume ............................................................................................................................................................. 43 Setting the Language and Speech ........................................................................................................................................ 43 Adjusting Keyboard Settings ................................................................................................................................................. 44 Playing a demo ..................................................................................................................................................................... 44 MULTI-MEDIA FEATURES ............................................................................................ 45 Memory Card ......................................................................................................................................... 46 Inserting a Memory Card ....................................................................................................................................................... 46 Removing a Memory Card .................................................................................................................................................... 46 Movie Viewer ......................................................................................................................................... 47 Music Player .......................................................................................................................................... 48 E-Book Reader ...................................................................................................................................... 49 5 Bookmark.............................................................................................................................................................................. 50 Jump to the appointed page .................................................................................................................................................. 50 Search for specific word or phrase ........................................................................................................................................ 51 Photo Viewer ......................................................................................................................................... 52 SETTINGS MENU ........................................................................................................... 53 Language .............................................................................................................................................................................. 53 Backlight ............................................................................................................................................................................... 53 Power ................................................................................................................................................................................... 53 Sound ................................................................................................................................................................................... 53 Time...................................................................................................................................................................................... 53 System .................................................................................................................................................................................. 53 FREQUENTLY ASKED QUESTIONS ............................................................................ 54 TECHNICAL SPECIFICATIONS .................................................................................... 55 SAFETY & WARRANTY INFORMATION ...................................................................... 56 Safety Information ................................................................................................................................ 56 Care & Safe Keeping oF the SPOTTER GPS ...................................................................................... 56 Liability .................................................................................................................................................. 57 End User’s License Agreement ........................................................................................................... 57 Transplant GPS, Inc. Limited Warranty .............................................................................................. 60 FCC Part 15 Compliance Statement ................................................................................................... 61 CUSTOMER SERVICE ................................................................................................... 62 7 DALE JR. EDITION SPECIAL FEATURES SELECT THE GPS POINTER There are 4 GPS pointers from which to choose: the Amp Energy Car, the National Guard Car, the Team Hauler or the traditional arrow head. To change the GPS Pointer, select Menu>Setting> GPS Pointer Tap the vehicle of your choice, then OK. DALE JR.’S VOICE Forget the formal computer generated voices, hear directions and commentary like Dale was sitting in the seat next to you. NOTE: Dale‟s voice does not speak street names. To access voices which will speak street names, please see page 43. NASCARHomeTr ac k s ,NASCARSpeed Par k s ,NASCARSpr i ntCupSer i est r ac k s andt eam gar ages . 10 MOUNTING YOUR DEVICE Your SPOTTER GPS Navigator can be easily secured to either the windshield or the dashboard for optimal viewing while driving. The mounting system consists of the following pieces: Adjustable arm with suction cup SPOTTER cradle Dash disk with adhesive backing ATTACHING THE MOUNT 1. Select a location for the mount on the windshield or dashboard that does not obstruct the driver‟s view or interfere with the operation of the vehicle. 2. Clean and dry this area to remove any grease and dirt. If mounting the SPOTTER on the dashboard, remove the protective backing from the dash disc, exposing the adhesive. Adhere the disc to the dashboard in the desired location. The adhesive is permanent. 3. Place the suction cup on the desired location on the windshield or dash disc; push the locking lever towards the base of the mount. The mount should stick to the surface. If your mount does not stick, make sure the area is clean and dry, then try again. Locking Lever 4. Align the tabs on the adjustable arm with the slots on the SPOTTER cradle. Slide together until you feel a firm click. 5. Adjust the holder to the best viewing angle by: a. Loosening the adjustor dials b. Moving the corresponding part to the desired position c. Tightening the adjustor dials. 11 6. Align the grooves on the bottom of your unit with the tabs on the bottom of the SPOTTER cradle; gently push the unit into the cradle until the unit clicks into place. 7. To remove the SPOTTER from the mount, gently push back the tab on the top of the cradle until you hear a click releasing the unit. DETACHING THE MOUNT 1. Pull the locking lever away from the base of the mount. 2. Grasp the pull tab of the suction cup and gently pull away from the windshield or dash to break the suction. Caution! It is illegal in Minnesota to attach anything to the windshield. When using navigation aids in a vehicle, it is your sole responsibility to place, secure and use these aids in a manner that will not cause accidents, personal injury, property damage, or in any manner to obstruct your view. You, the user of this product, are solely responsible for observing safe driving practices. . 15 GPS START UP The SPOTTER GPS Navigator has an integrated GPS receiver. The first time you use the GPS receiver it may take up to 10 minutes to initialize. After the first time, GPS reception should start within one minute of turning on the device. If the navigation device has been switched off for more than a week, the next initialization can take up to 5 minutes. GPS Signals GPS signals are limited inside buildings, tunnels, and parking ramps. To work most effectively, mount the SPOTTER on the windshield for clear line of sight to the sky. To ensure ETA to your destination is accurate, select the correct time zone. From the Welcome menu • Tap Settings > Next > Next > Time Zone. • Select the time zone of your current location • Select Daylight savings (optional) Do NOT remove the SD card while operating the SPOTTER GPS Navigator! 16 FIRST TRIP SELECTING A DESTINATION The SPOTTER uses GPS satellites to calculate your exact position so you don‟t have to enter your starting point. Simply enter your destination and the SPOTTER will take you there, providing detailed turn instructions all the way. Tap Menu > Destination > Address. Enter the city or town name of your destination. Select the correct city or area when it appears in the list below. Scroll down to see more address options matching what you have typed. Enter the first three or four letters of the street name. Select the correct street name when it appears in the list below the street name field. Enter the house number and select Finish, or just select Finish to skip this step. A screen will then appear, showing you a map of the route. Select Drive to begin navigating your route. 17 Quick Destination Entry You can select a destination from the map. Click on Menu > Destination > Next arrow and select Pick on Map. A map of the area around your current location will be displayed. Touch the screen to move around the map and tap your desired destination when you find it. MORE... There‟s more you can do when entering your destination and setting off. Here are some helpful page references in this Guide: Plan a trip with multiple destinations, waypoints or optimize your trip – page 21. Set and save Work and Home addresses for quick and easy route planning – page 29. 18 Create and manage your favorite destinations – page 30. Choose to see an itinerary list of your route, a map of each turn, or a demo of the whole route – page 23. 19 ON THE MOVE CHANGE THE GPS POINTER There are 4 GPS pointers from which to choose. Select Menu>Setting> GPS Pointer. Tap on the vehicle of your choice, then tap OK. CHANGE THE VOICE The default voice setting is Dale Jr.‟s voice. In addition to Dale‟s voice, there are multiple voices from which to choose. Select Menu>Settings>Next> Next> Language & Speech. Learn more about the voice options on page 43. CHANGE THE DRIVING VIEW There are multiple driving views to choose from. Simply select Menu > Next>Driving Views. Learn more about the different driving views – pages 33-35. 20 MAKE A DETOUR Make a detour from your current itinerary. You can choose an alternate route, or just detour around a section of the route. Select Menu > Detour. Learn about the different detour options – pages 20. SEARCH FOR A POINT OF INTEREST If you are running low on gas, need a hotel or nearby restaurant, tap Menu > Nearby POI to search for what you need. Learn more about searching for POIs- pages 36. Do not attempt to change the settings, or set a destination while you are driving. Ask a passenger to make changes, or pull over safely. Do not leave your PND loose in the car while driving. Ensure it is correctly seated in your windshield mount. See page 10 for instructions. 21 IN USE SELECTING MULTIPLE STOPS FOR YOUR TRIP The SPOTTER GPS Navigator allows you to plan a trip with multiple destinations. Tap Menu, scroll to the next page and tap Plan or Edit Trip. Tap Add Stop and choose Address. Add the first address in the same way as detailed above; see Selecting A Destination on page 16. Tap Add Stop again to add your second, third, fourth, etc. address. CUSTOMIZING YOUR TRIP When you have entered all your stops you can change the order they appear in. Tap the address you wish to move. A pop-up menu will appear containing a list of options: Tap Move Up, Move Down, Move to Start or Move to End. The selected stop will move to its new position in the trip list. Show on Map If you select Show on Map from the pop-up menu, a map of the area around the selected stop will be displayed. Click the white X in the red circle to return to the trip list. The SPOTTER also has an Optimize Stops function to find the most efficient route. For more details see Optimizing stops on page 38. 22 SETTING WAYPOINTS You can route through a certain point without considering it as a stop. By setting Waypoints you can adjust the route, to calculate a detour via the waypoint. Select Menu > Next> Plan or Edit Trip. Enter the address or place in the same way detailed in Selecting a Destination on page 16. The address will appear on the trip list as a Stop, with a flag icon next to it. Tap on the address you wish to change to a Waypoint. A pop-up menu will appear containing a list of options. Tap Set as Waypoint. The address will now be listed as a Waypoint, with an arrow icon in front of the address or place to indicate that is it a Waypoint. Make a Waypoint a Stop To change a Waypoint back to a Stop, tap the address and select Set as Stop from the pop-up menu. SAVING DESTINATIONS IN YOUR TRIP AS FAVORITES You can save addresses listed on the trip list as Favorite destinations so you can access them quickly. Tap on the address you wish to save as a favorite. A pop-up menu will appear containing a list of options. Tap Add to Favorites. Do more with Favorites. For more information on Favorites see page 30. 23 SAVING A TRIP When you have finished entering all your addresses, you can save your trip to access at a later date, rather than start driving right away. Tap Save Trip. Enter a name for the trip you are saving. Tap Save and the trip will be saved to the memory card. LOADING A SAVED TRIP Tap Menu, scroll to the next page and tap Plan or Edit Trip. The last trip you planned will automatically load. If you wish to load an older trip, tap Load Trip and select the trip you wish to load from the list. DELETING A PLANNED TRIP Tap Clear. You will be asked to confirm this selection. To continue with deleting the trip, tap Yes in the Are you Sure? Window. PREVIEW YOUR ROUTE Once a multi-stop trip has been entered, press Calculate then a route screen will appear, showing you a preview map of the route. 24 SETTING ROUTING OPTIONS FOR YOUR TRIP Select Settings> Routing to change the routing options for your trip. The available settings are: Vehicle type: Choose from Automobile, RV, Motorcycle, Bicycle, Walking or Straight Line. RV Height Restrictions: Chose from a variety of heights to accommodate your vehicle. Routing type: Choose whether you want to always choose the route quickest in time or the shortest in distance, avoid expressways or a scenic route. Routing profile: Choose from Default routing or a routing profile previously created and saved. Tap OK to apply your routing preferences. For more information on how to save a routing profile - pages 40-41. 25 PREVIEW OPTIONS FOR YOUR TRIP Select Preview to see the preview options for your journey. Route Demo: See a preview of your trip, including instructions. You can choose to speed up the demo with Faster or slow it down by tapping Slower. Tap Close to exit. Turn Maps: Displays a map of each turn of the trip. You can choose to see the Next or Previous turn. Tap Close to exit. Itinerary: Shows each direction in a written list with distance to the turn. Tap Close to exit. Select Drive to begin navigating your route. Starting points If you are planning a trip in advance and are not at the start point of your trip, the SPOTTER will ask you to select your starting location. You can choose to navigate to the starting point, or to navigate directly to the destination from your current location. 26 GUIDANCE The SPOTTER GPS Navigator will guide you to your destination with clear visual instructions and spoken instructions. Whenever you are approaching your next turn, the SPOTTER will speak to you to alert you to the upcoming direction change. DRIVING VIEWS You can choose from six different screen display options. To access, tap Menu > Next> Driving Views. In the default mode, your screen will look like the one below. For more details on each view see Setting Display Mode on page 31. Zoom In Zoom Out Take a closer look Use the + and - in 2D or 3D driving view to zoom in or out of the map view. 27 ETA AND DISTANCE The estimated time of arrival (ETA) and the distance remaining are displayed on the right of the screen, no matter which driving view you have selected. You can choose what useful information is displayed at the bottom of your screen when you are driving, please see Customizing the guidance screen on page 32. NEARBY POINTS OF INTEREST If you‟re running low on gas, looking for a hotel or you want a bite to eat, CoPilot has millions of pre-loaded Points of Interest (POIs) to search. Select Menu > Nearby POI. From the list, select a category. For example, Restaurant. After a few moments a list of the nearest restaurants will appear, in order of distance from your current location. Select the restaurant you wish to visit and tap OK. A preview map of the route to your selected POI will appear. Tap Drive to begin navigating the route. 28 Widen your search The SPOTTER GPS Navigator will list the POIs within a ten mile radius of your current GPS position, to increase the radius by another ten miles tap More. POI in the city You can search for a POI within a city, near your current location or along your route by pressing Destination > POI Search. You can search for a particular POI within a category, by name. For more details, see Advanced POI Search on page 36. 29 PERSONALIZE Enter and save personal destinations, change the map style and color theme, adjust your routing options, and select the voice that guides you to your destination. With the SPOTTER you can personalize your device to behave exactly the way you need. SAVING A DESTINATION AS HOME Save your home address so you don‟t have to enter it every time you wish to be directed home. Menu > Destination > Home. Enter your home city/town name. Select the correct city or area when it appears in the list below the city field. Scroll down to see more address options matching what you have typed. Enter your street name. As you enter the street name the SPOTTER will list potential matches. Select the correct street name when it appears in the list below. Enter your house number and select Finish, or just select Finish to skip this step. SAVING A DESTINATION AS WORK Save your work address so you don‟t have to enter it every time you wish to be directed to work. Tap Menu > Destination > Work. Enter your work city/town name. Select the correct city or area when it appears in the list below the city field. Scroll down to see more address options matching what you have typed. Enter the street name. As you enter the street name the SPOTTER will list potential matches. Select the correct street name when it appears in the list below. Enter your office number and select Finish, or just select Finish to skip this step. 30 SAVE YOUR FAVORITE DESTINATIONS You can save other addresses to your Favorites list, so you can access them quickly. Tap Menu > Destination > Favorites. Tap Add New and it will return to the Destination menu. Choose to add the favorite by inputting the address or zip code (tap Address) or by locating it on a map (Pick on Map). When you‟ve successfully added the address or location, it will appear in your Favorites list. EDIT OR DELETE FAVORITES To edit or delete a location in your Favorites list, tap Manage, select a location and choose to Edit, Delete or Delete All. Edit will open an enter address screen so you can change the location. Delete will erase the currently highlighted location. Delete all will erase all the locations in your Favorites list. Including your Home and Work addresses. NOTE: You will be asked to confirm if you wish to delete an item. If you select Yes the address will be lost. TO CHOOSE A RECENT DESTINATION Select Menu > Destination > Recent provides quick and easy access to the last 50 destinations that you entered. Note: Your recent list will store the last 50 addresses you have entered. When the list is full each new address will replace an older inactive address. 31 OTHER WAYS TO SELECT A DESTINATION The SPOTTER GPS Navigator offers a variety of ways to select a destination. You can save locations as Home and Work for one click route finding, see previous page. In addition the SPOTTER let‟s you Pick on Map, Search for a Point Of Interest (POI), and select from Favorite or Recent destinations. TO DELETE THE RECENT LIST Select Menu > Destination > Next> Recent > Clear All TO CHOOSE AN INTERSECTION AS A DESTINATION Select Menu > Destination > Next> Intersection. Enter the City or Town and click next, you will be asked to enter the first road and then the second. The SPOTTER will calculate your route to the point where they meet. SETTING DISPLAY MODE You can choose from six different screen display options. To access tap Menu > Next> Driving Views. For more details see pages 33-35. SELECTING THE LANGUAGE & VOICE GUIDE You can alter the voice with which the guidance instructions are spoken. For more detail on altering the Language and Speech options see page 43. Tap Menu > Settings > Next> Next>Language and Speech. Select a voice using the up and down arrows next to the Choose a Voice field. Tap Test to hear a sample of the chosen voice. 32 CUSTOMIZING THE GUIDANCE SCREEN You can choose what useful information is displayed at the bottom of your screen when you are driving. Tap in the bottom right hand corner of the screen. Choose from Destination, Current Road, Next Crossroad, Next Major Road, Nearest Town, Speed & Distance, Altitude & Heading, and Latitude & Longitude. SETTING MAP STYLES Tap Menu > Settings > Map Styles. You can select from a range of industry leading map presentation styles and color themes using the Map Style list on the right of the screen. A preview is shown each time you select one, once you are happy with your selection tap OK. For more detail on changing the Map Styles see page 40. CUSTOMIZING ROUTING OPTIONS Once a destination has been entered the route screen will appear, showing you a preview map of the route. Select Routing to define a routing profile for the journey. For more details see Preview your route on page 23. 33 DISPLAY SCREEN OPTIONS DRIVER SAFETY VIEW We recommend you choose driver safety, which displays a simple turn instruction arrow with concise next turn instructions in large type. In driver safety mode, a map is only displayed as you approach a turn or are traveling below 10 mph. Adjusting the safety view You can alter the settings of the driver safety view. See Adjusting the Safety View on page 42. 3D VIEW This mode shows your current position, next turn and surrounding roads using a bird‟s eye view. 2D WHERE AM I This mode displays your current location a 2D map. 34 2D NEXT TURN Displays your current location and auto zooms into the next turn on a 2D map. 2D DESTINATION This view shows your route from your current position to your destination. ITINERARY This view shows each direction and turn in a written list, including distances. 35 NIGHT MODE Night mode can be activated on any of the display screen modes. It dims the GPS display to reduce glare and eye strain when driving at night. The SPOTTER will automatically switch to night mode based on the time and your location, or you can do it manually from the Driving Views menu. Tap Menu > Next> Driving Views> Next > Night Mode scroll to the nest page and select Night Map. To switch off Night Mode, just select Day Mode. You can also alter the day and night mode settings from the Map styles screen. See Setting Map Styles on page 40 for details. 36 ADVANCED ADVANCED POI SEARCH If you want to visit a specific POI without inputting the address, you can search the POI database and set it as a destination. Select Menu > Destination > Points of Interest Choose to select a category or search all. If you check the Pick Category box, tap the correct category. Tap Next. If you know the name of the place you want to visit, enter it here, or tap Next. Select a location option: choose from Near Current Location, Along my route, In a City or Near an Address to search for a related POI For Current location and Along my route, the POI list will be automatically generated. If you selected In a City or Near an Address, enter the name of the city or town nearest the POI you are searching for. Tap Next. The SPOTTER will then search the list of millions of POIs. When complete a list of the nearest matches will appear on screen. Highlight the correct one and tap details to view it on a map. The SPOTTER will also display the phone number for the POI if available. Tap OK and the SPOTTER will create a route from your current location to your selected POI. 37 ADJUSTING THE POI SETTINGS You can choose when to have POIs shown on screen and the distance at which you are alerted to them by adjusting the POI settings. Tap Menu > Settings > Next> POIs. Enable the POIs by checking the box. Disable by un-checking. Choose to Show POIs Always, Never or When Stopped from the drop down menu. In the Report POIs this far ahead field, select a distance between 0.2 and 25 miles. Select whether to show POIs that are on your route or nearby it by checking one of the options. Select specific POI categories to display by checking the boxes. Tap OK to apply the settings and return to the Settings menu. SELECTING A DESTINATION USING LAT AND LONG If you know the latitude and longitude of your destination you can enter them directly. Tap Menu > Destination scroll to the second screen and tap Coordinates. Choose to set the latitude and longitude in Degrees Minutes Seconds, Decimal Degrees or Decimal Minutes. Enter a latitude and longitude in the appropriate format depending on which one you selected. The SPOTTER will take a few moments to find the point. When it is located a map will appear with the location pinpointed by a red arrow. Select Drive to begin navigating your route. 38 SETTING DETOURS You can program your SPOTTER to make a detour on a part of the calculated route. Select Menu > Detour. From the Detour options, select Avoid Roads. An itinerary of your trip will appear. Click on the road you would like to avoid then select Avoid Road. The SPOTTER will take a few moments to plan an alternative to the selected road, and then announce any change in distance the new route will cause to your trip, and display a map of the new route. Tap Accept and the SPOTTER will begin directing you according to the new route. If you decide not to use the new route, select Decline. The SPOTTER will then return to your original route. The SPOTTER will save the details of roads you wish to avoid. To clear the memory, select Menu > Detour > Clear Avoided Roads. ENDING A DETOUR If you are on a detour route and would like to return to the original trip tap Menu > Detour > End Detour. OPTIMIZING STOPS The SPOTTER has an Optimize Stops function, which will automatically rearrange the stops within a trip to create the most efficient order. When you have programmed a trip with more than 3 stops, tap Optimize. The SPOTTER will take a few seconds to reorder your stops for the most efficient route. Your start point and destination will not be altered. You can optimize up to 50 stops at once. 39 ENABLE FUEL CALCULATOR The SPOTTER comes equipped with a fuel calculator for estimating the fuel cost of a trip. In the trip planning window click the Options button: • To see fuel cost estimated when the trip is calculated, type in the Vehicle Miles per Gallon and Cost per gallon. • To have break hours included in the trip ETA, select a time interval and break time. • When Optimize Final Destination is checked the position of the last stop on the destination list can be changed when the trip is optimized. (See previous section for more information.) CHANGE YOUR ENTIRE TRIP If you are unhappy with the entire route planned for you, tap Menu > Detour > Alternate route. The SPOTTER will compile a different route for you if a sensible alternative exists. A map of the proposed detour will be displayed. Select Accept to agree or Decline to return to the previous route. SETTING MAP PREFERENCES You can also set up what sort of maps the SPOTTER uses. Tap Menu > Settings > Map. The available settings are: Units: Choose to display Miles or KM on your maps. Map Rotation: Choose Heading Up to always be travelling upwards on the screen, or select North Up to hold the map static as you travel along your route. Stylus control: Select Box Zoom or Drag Map. General: Choose whether to display turn restrictions by checking or unchecking the box. Tap OK to apply the settings and return to the Settings menu. 40 SETTING MAP STYLES Tap Menu > Settings > Map styles. Choose the default setting for the day or night mode from the list, using the arrow buttons. The options are Automatic, Night and Day. If you select Automatic, the SPOTTER will automatically switch to night mode when it starts to get dark, based on the current time and location. To change the setting, tap the down arrow below Day/Night Mode, to select between Day and Night, once you have made your selection tap OK. You can select from a range of industry leading map presentation styles and color schemes using the Map Style: list on the right of the screen. A preview is shown each time you select one, once you are happy with your selection tap OK. SETTING ROUTE PREFERENCES You can set up your preferences to best suit you. Tap Menu > Settings > Routing. The available settings are: Vehicle type: Choose from Automobile, RV, Motorcycle, Bicycle, Walking or Straight Line. Routing type: Choose whether you want to always an Economic route or Avoid Expressways. Toll Roads: Choose to Use, Always Avoid or Avoid if Possible all toll roads your route may encounter. General: Tick the boxes if you would like to a Scenic Route, to Avoid Ferries, to Avoid propane restricted Tunnels, and/or keep International Borders Open. Tap OK to apply your new routing preferences. Use an existing profile To load an existing profile tap Load Routing Profile and select one of your previously saved ones or the Default profile. Click OK twice to return to the Settings menu and apply the profile. 41 SAVING A ROUTE PREFERENCE To save a routing profile scroll to the bottom of the page and tap Save as Routing Profile when prompted enter a name for your profile and tap OK. LOADING A SAVED ROUTING PROFILE To load an existing profile tap Load Routing Profile and select one of your previously saved ones or the Default profile. Click OK twice to return to the Settings menu and apply the profile. Edit your routing preference Edit your routing preferences by loading a saved profile, changing the settings and resaving with the same name. EDIT YOUR ROAD PREFERENCES After a routing profile has been added, you may view Edit Road Preferences. Scroll to the bottom of the page and tap View/Edit Road Preferences. The available settings are: For each road type: Choose whether you want to Strongly Avoid, Avoid, Neutral, Favor or Strongly Favor when choosing a route. Speed: Select an appropriate speed for each road, you can increase or decrease the speed in increments of 5. Note: It is not recommended to change the default route and road preferences as this will affect the route calculated and ETA shown. CHECKING THE GPS STATUS Tap Menu > Settings > GPS > GPS Status. The GPS Status screen shows detailed information regarding the GPS fix and signal strength your SPOTTER uses for guidance. From this screen you can see your current latitude and longitude position, the UTC time and date, your speed and your elevation (feet above sea level). 42 ADJUSTING YOUR SAFETY VIEW Tap Menu > Settings > Next> Driver Safety. From here you can alter the settings of the Safety View in the following ways: Display Map Near Turns: Decide whether to show a 2D/3D zoomed map on the approach to each turn or always show the Driver Safety screen. Check the box for Yes to display the map or No not to. When the Turn is Within: If you selected Yes above, choose the distance before the turn you would like the map to be displayed. The distance can be set between 0.3 miles and 1 mile. Map Type: If Display Map Near Turns is set to Yes, select whether to use a 2D or 3D map when approaching turns. Tap OK to save your new settings and exit. Tap Cancel to discard your changes. TRACK PLAYBACK You can play back a previously completed trip. Tap Menu > Settings> Next > Track Playback. Select the trip from the list. Tap Play to start playback. Adjust the playback speed using the up and down arrows next to the Track Playback Speed field. The available speeds are between 1.O X and As Fast As Possible. To stop playback, tap Stop. To exit, tap Cancel. 43 ADJUSTING THE VOLUME Tap Menu > System > Next> Volume. Use the + and - symbols to increase or decrease the volume of the spoken instructions. To turn off the „tap‟ sound which occurs when you touch the screen, uncheck the box marked Enable sounds for taps. Tap Menu > Settings > Guidance. Select at what distances your want the SPOTTER to speak to you when approaching a turn. Select what information you wish to be displayed on the customizable part of the screen, the options are Destination, Current Road, Next Crossroad, Next Major Road, Nearest Town, Speed & Distance, Altitude & Heading, Latitude & Longitude. Check the box to Display Route Arrow, or uncheck to remove. Tap OK to save your settings and exit. Tap Cancel to discard your changes. SETTING THE LANGUAGE AND SPEECH Tap Menu > Settings > Next> Next> Language and Speech. Select your choice of language using the up and down arrows next to the Choose a Language field. Select a voice using the up and down arrows next to the Choose a Voice field. Tap Test to hear a sample of the chosen voice. Street name text-to-speech Not all voices have street name text-to-speech capabilities. Select a voice with an * next to the name if you want street names announced. Dale Jr‟s voice does NOT announce street names. 44 ADJUSTING KEYBOARD SETTINGS Tap Menu > Settings > Next > Next > Device. Select the keyboard type of choice from the drop-down menu. The options are Alphabetical, QWERTY, AZERTY. Tap OK to save your settings and exit. Tap cancel to discard your changes. PLAYING A DEMO The SPOTTER contains a demonstration trip to a pre-defined destination. To view the demo: Tap Menu > Next> Next> Play scroll through and select Play Demo. Speed up by tapping Faster or slow down by tapping Slower. Tap Close to exit the demo mode. 46 MEMORY CARD The music, books, videos, and/or pictures used with these programs need to be stored on a storage or memory card (i.e. SD card). SD cards may be purchased at most stores carrying electronic devices and come in a wide range of capacity. Please follow the directions that come with your card for saving items to an SD card. INSERTING A MEMORY CARD 1. Locate the notched end of the memory card. This is the end to insert into the memory slot. 2. Locate the memory card slot on the right side of the SPOTTER. 3. With the memory card label facing front (i.e. same side as the screen) and the notched end of the card at the top, gently slide the card into the device, until it locks into place. When the card is locked in place, it will be even with the edge of the unit and not sticking out. Memory cards work best when the contact points of the card (i.e. the metal parts) are clean and undamaged. REMOVING A MEMORY CARD 1. To safely remove the memory card, exit out of any files being used from the memory card. 2. Gently press the memory card into the device until the lock disengages and the card pops out slightly. 3. Grabbing the edge of the card, carefully slide the memory card out of the unit and store in a safe place. Removing the memory card while using it may corrupt the files contained on the card. 47 MOVIE VIEWER The SPOTTER GPS Navigator can be used to watch movies and videos. It can play MP4, MPEG-1, AVI, WMV, ASF, 3GP and Divx files. 1. Copy the movie and/or video file you wish to view to a memory card. 2. Insert the memory card into the unit. 3. Tap the Video button to open the Video VIEWER screen. Close/Exit Video VIDEO Video file 1.wmv Video file 2.wmv Video file 3.wmv Search video files Enter/Select 4. Double click on the desired video or highlight it and tap Enter to play the file. The video will begin. NOTE: It will take a few minutes to search the files if the video player hasn‟t been used for awhile Play Stop Previous Next Full Screen Volume Video Progress Close/Exit Video 48 MUSIC PLAYER The music player enables you to turn your SPOTTER GPS Navigator into an MP3 player. It can play MP3, WMA, and PCM files. 1. Copy the desired music files to a memory card. 2. Insert the memory card into the unit. 3. Tap the Music button to open the MUSIC PLAYER screen. Close/Exit Video Music Playback MUSIC No. 01 02 03 04 Song Name Music 01 Music 02 Music 03 Music 04 Singer abc abc abc abc Search music files Enter/Select 4. Double click on the desired music or highlight it and tap Enter to play the file. The music will begin. Music progression Volume Return to Main Menu while listening to music Stop Previous Pause Next Loop 49 E-BOOK READER The SPOTTER GPS Navigator can be used to view texts, books and documents in TXT files. 1. Copy the TXT file you would like to read to a memory card. 2. Insert the memory card into the unit. 3. Tap the E-Book button to open the E-BOOK READER screen. Close/Exit E-Books E-Book eBook 01.txt eBook 02.txt eBook 03.txt eBook 04.txt Search book files Enter/Select 4. Double click on the desired book or highlight it and tap Enter to play the file. The book will appear. The Project Gutenberg EBook of History of the United States by Charles A. Beard and Mary R. Beard This eBook is for the use of anyone anywhere at no cost and with almost no restrictions whatsoever. You may copy it, give it away or re-use it under the terms of the Project Gutenberg License included with this eBook or online at www.gutenberg.net. Bookmark Jump Search Previous Title: History of the United States Author: Charles A. Beard and Mary R. Beard Auto Manual Page turning options Big font Next Small Font Font options 50 BOOKMARK The bookmark is useful when reading a lengthy book or article. It can be used to both mark and return to the last page read. Tap the bookmark button to enter the bookmark screen: 01 02 03 04 05 06 07 08 09 10 Jump Save Delete Exit bookmark Highlight the bookmark you would like to go to, then tap the jump button or tap save to save your current page as a bookmark. JUMP TO THE APPOINTED PAGE The jump feature can be used to return to a specific place when there is no bookmark set, but you know the page number. Tap the jump button to display the jump screen: 51 Enter the page number to jump to by tapping on the corresponding number. Use: to delete the previous number entered to delete all numbers entered after entering page number to jump to that page SEARCH FOR SPECIFIC WORD OR PHRASE Use the search feature to locate a term or phrase in your e-book or article. Tap the search button to bring up the search window: Search Check Check current page Check all Exit Tap in the input box to bring up a keyboard. Use the keyboard to enter the term or phrase you are looking for, then tap check. 52 PHOTO VIEWER The SPOTTER GPS Navigator can be used to view photos in JPEG, BMP, and PNG formats. 1. Copy the photo files for the pictures you would like to view to a memory card. 2. Insert the memory card into the unit. 3. Tap the Photo button to open the PHOTO VIEWER screen. Close/Exit Photo PHOTO photo 01.JPEG photo 02.JPEG photo 03.JPEG photo 04.JPEG Search photo files 4. Enter/Select Double click on the desired photo or highlight it and tap Enter to play the file. The photo will display. Auto Hand Slideshow/ Manual Previous Next Zoom In Zoom Out Change Ratio Dale Jr‟s dogs Full Screen View 53 SETTINGS MENU The SPOTTER allows users to make changes to various settings on their device. System S LANGUAGE Click on the national flag corresponding to the desired language. The system will save automatically and return to the menu. BACKLIGHT The backlight feature enables you to adjust the brightness of the screen and designate the length of time to wait before shutting down the back light. POWER The Power button allows you to see the battery status and adjust length of the standby time to meet your needs. SOUND Sound allows you to adjust the volume of the unit as well as the screen sound made when a button is tapped. TIME The Time button enables you to modify the date and the time, select your time zone, and you can also enable and disable day light savings time. SYSTEM The System button enables you to view information specific to your unit, such as available memory, and to re-calibrate the touch screen. 54 FREQUENTLY ASKED QUESTIONS Why won’t my unit turn on? Check the power. Does the battery need to be charged? Plug into a power source and then try to turn on the device. Why am I unable to get a GPS signal or fix? The very first time you use the SPOTTER GPS navigator, it can take up to 10 minutes to initialize the GPS. After the first time, GPS reception should start within 1 minute of turning on the device. If the navigation device has been switched off for more than 1 week, the next initialization can take up to 5 minutes. For the GPS to properly receive satellite data it needs a clear view of the sky. The most common limitations to receiving GPS signals are urban canyons, tunnels and metallic surfaces. Most of the time, this isn‟t an issue. If you are experiencing difficulty, place your unit near the rearview mirror. Why does my unit sometimes make a popping or static like noise? The popping/static noise comes from interference with cell phones. It doesn‟t impact the unit or its performance. If the occasional noise is bothersome, either turn the cell phone off or move the unit further away from the phone. Why does my unit not display the correct time? The device will show the time once the device has a GPS signal. Please make sure you have the correct time set. To verify you have the time set correctly, go to System Set>Time. In the Software, you can also check your time zone by selecting Menu>Settings>Time Zone. Although I am receiving turn-by-turn instructions on-screen, it is not speaking to me. Why is that? Check that the volume on your GPS is turned up. Go to Menu > Settings > Volume. If the volume is okay, check settings>language & speech to verify your voice selected is a Fulltext voice. This is noted by an * next to the voice name. Why does my unit sometimes miss announcing the street name? You can change the turn warning by going to Settings>Guidance>Choose when you want the device to speak the turn. Also check settings>language & speech to verify your voice selected is a Full-text voice. This is noted by an * next to the voice name. NOTE: Dale Jr‟s voice is only available in turn by turn directions, and not Full text-to-speech. My device provided me a route that was different than the one I would ordinarily expect the system to select. Why? The SPOTTER relies on the quality of navigation software and maps, and the complex interaction between then. The Route Profile setting determines the routing. The Quickest Route setting relies on fast roads such as interstates and highways. This is not necessarily the shortest route. The Shortest Route setting relies on the shortest distance between two points, which may or may not be the fastest. SAFETY & WARRANTY INFORMATION SAFETY INFORMATION Use this navigation system at your own risk. Caution! To prevent accidents, do not operate the navigation system while driving. Caution! Do not look at the display unless it is absolutely safe to do so! Caution! Traffic regulations have priority over any instructions from the navigation system. Caution! Follow the instructions of the navigation system only when the circumstances and the road traffic regulations allow you to do so! The navigation system guides you to your destination even if you deviate from the calculated route. Caution! Check that the unit is secured in the mount and adjusted properly before each journey. Caution! The United States government operates the Global Positioning System (GPS) and is solely responsible for its accuracy and maintenance. Changes by the United States government may affect the accuracy and performance of all GPS equipment, including your personal navigation device. Caution! Ordinances or laws may restrict use of certain abilities of your navigation device on public or private land. CARE & SAFE KEEPING OF THE SPOTTER GPS Protect the unit from moisture. It is not waterproof and is not protected against water damage. The warranty does not cover water damage. Do not open the unit's casing under any circumstances. Do not attempt to replace the battery. For problems related to the battery, contact Customer Support. Do not expose the unit to extreme heat or cold. This may damage the device or impair its function. Use only the charger provided or one that has been approved by the manufacturer. To clean the screen of the SPOTTER, use a dry cloth. Paper towels will scratch the screen. Ri ght way i sar egi s t er edt r ademar kofTr ans pl antGPS,I nc . 58 Limited Warranty: ALK warrants that the Software will perform substantially in accordance with the accompanying written materials for a period of 30 days from the date of purchase. Any implied warranties relating to the Software are limited to such 30 day period provided that limitation is permitted by applicable law. End-User Remedies: If the Software does not conform to the “Limited Warranty” above, ALK‟s entire liability and your sole and exclusive remedy will be, at ALK‟s option, either to (i) correct the error, or (ii) help you work around the error, or (iii) accept a return and issue a refund through your retailer. The Limited Warranty is void if failure of the Software has resulted from your fault, abuse, or misapplication. If we correct an error in the Software for you, then the unexpired portion of the Limited Warranty period as at the date you informed us of the error will apply to the corrected software once you have received the corrected version. NO OTHER WARRANTIES: EXCEPT AS SET OUT IN THE LIMITED WARRANTY, ALK DOES NOT WARRANT THAT THE SOFTWARE IS ERROR FREE. ALK DISCLAIMS ALL OTHER WARRANTIES WITH RESPECT TO THE SOFTWARE, WHETHER EXPRESS OR IMPLIED, INCLUDING BUT NOT LIMITED TO IMPLIED WARRANTIES OF MERCHANTABILITY, FITNESS FOR A PARTICULAR PURPOSE AND NON-INFRINGEMENT OF THIRD PARTY RIGHTS. Some jurisdictions do not allow the exclusion of implied warranties or limits on how long an implied warranty may last, or an exclusion of incidental damages. This means the above limitations or exclusions may not apply to you. This warranty gives you specific legal rights and you may also have other rights depending on your country. No Liability for indirect loss: In no event will ALK be liable to you for any loss of profit, wasted time, lost business or for any incidental, or indirect loss of any kind arising out of the performance or use of the Software, even if ALK has been advised of the possibility of such damages. Termination: Without prejudice to its other rights, ALK may terminate this License if you fail to comply with these terms and conditions. In that situation, you must destroy all copies of the Software. Limitations on Export: You hereby expressly agree not to export or re-export the Software, in whole or in part, in violation of any export laws or regulations of the United States. DISCLOSURE FOR PRODUCTS CONTAINING CANADIAN POSTAL CODE AND/OR CANADIAN STREET-LEVEL DATA: Based on Computer File(s) licensed from Statistics Canada. © Copyright, HER MAJESTY THE QUEEN IN RIGHT OF CANADA, as represented by the Minister of Industry, Statistics Canada 2003. ALK Technologies, Inc. is an Authorized User of selected Statistics Canada Computer File(s) and Distributor of derived Information Products under Licensing Agreement 6147. No confidential information about an individual, family, household, organization or business has been obtained from Statistics Canada. U.S. Government Restricted Rights: The Software is provided with restricted and limited rights. Use, duplication, or disclosure by the U.S. Government is subject to restrictions as set forth in the appropriate subparagraphs of the Commercial Computer – Restricted Rights clause at 48 C.F.R. 52.227-19 or in the appropriate subparagraphs of the Rights in Technical Data and Computer Software clause at 252.227-7013 of the Defense Federal Acquisition Regulations. The Copyright to the Software is held by ALK Technologies, Inc., 1000 Herrontown Road, Princeton, NJ 08540 USA. Choice of Law: This License is governed by the laws of England. END USER LICENSE FOR SPEECH PLAYBACK Please read the following agreement (“License”) carefully. This license applies to the speech playback function included in your Software, if any. Copyright (c) 2002, Xiph.org Foundation. Neither the name of the Xiph.org Foundation nor the names of its contributors may be used to endorse or promote products derived from this software without specific prior written permission. THIS SOFTWARE IS PROVIDED BY THE COPYRIGHT HOLDERS AND CONTRIBUTORS ``AS IS‟‟ AND ANY EXPRESS OR IMPLIED WARRANTIES, INCLUDING, BUT NOT LIMITED TO, THE IMPLIED WARRANTIES OF MERCHANTABILITY AND FITNESS FOR A PARTICULAR PURPOSE ARE DISCLAIMED. IN NO EVENT SHALL THE FOUNDATION OR CONTRIBUTORS BE LIABLE FOR ANY DIRECT, INDIRECT, INCIDENTAL, SPECIAL, EXEMPLARY, OR CONSEQUENTIAL DAMAGES (INCLUDING, BUT NOT LIMITED TO, PROCUREMENT OF SUBSTITUTE GOODS OR SERVICES; LOSS OF USE, DATA, OR PROFITS; OR BUSINESS INTERRUPTION) HOWEVER CAUSED AND ON ANY THEORY OF LIABILITY, WHETHER IN CONTRACT, STRICT LIABILITY, OR TORT (INCLUDING NEGLIGENCE OR OTHERWISE) ARISING IN ANY WAY OUT OF THE USE OF THIS SOFTWARE, EVEN IF ADVISED OF THE POSSIBILITY OF SUCH DAMAGE. Personal Use Only. You agree to use this Data together with COPILOT for the solely personal, non-commercial purposes for which you were licensed, and not for service bureau, time-sharing or other similar purposes. Accordingly, but subject to the restrictions set forth in the following paragraphs, you may copy this Data only as necessary for your personal use to (i) view it, and (ii) save it, provided that you do not remove any copyright notices that appear and do not modify the Data in any way. You agree not to otherwise reproduce, copy, modify, decompile, 59 disassemble or reverse engineer any portion of this Data, and may not transfer or distribute it in any form, for any purpose, except to the extent permitted by mandatory laws. Restrictions. Except where you have been specifically licensed to do so by ALK, and without limiting the preceding paragraph, you may not (a) use this Data with any products, systems, or applications installed or otherwise connected to or in communication with vehicles, capable of vehicle navigation, positioning, dispatch, real time route guidance, fleet management or similar applications; or (b) with or in communication with any positioning devices or any mobile or wireless connected electronic or computer devices, including without limitation cellular phones, palmtop and handheld computers, pagers, and personal digital assistants or PDAs. Warning. The Data may contain inaccurate or incomplete information due to the passage of time, changing circumstances, sources used and the nature of collecting comprehensive geographic data, any of which may lead to incorrect results. No Warranty. This Data is provided to you “as is,” and you agree to use it at your own risk. ALK and its licensors (and their licensors and suppliers) make no guarantees, representations or warranties of any kind, express or implied, arising by law or otherwise, including but not limited to, content, quality, accuracy, completeness, effectiveness, reliability, fitness for a particular purpose, usefulness, use or results to be obtained from this Data, or that the Data or server will be uninterrupted or error-free. Disclaimer of Warranty: ALK AND ITS LICENSORS (INCLUDING THEIR LICENSORS AND SUPPLIERS) DISCLAIM ANY WARRANTIES, EXPRESS OR IMPLIED, OF QUALITY, PERFORMANCE, MERCHANTABILITY, FITNESS FOR A PARTICULAR PURPOSE OR NON-INFRINGEMENT. Some States, Territories and Countries do not allow certain warranty exclusions, so to that extent the above exclusion may not apply to you. Disclaimer of Liability: ALK AND ITS LICENSORS (INCLUDING THEIR LICENSORS AND SUPPLIERS) SHALL NOT BE LIABLE TO YOU: IN RESPECT OF ANY CLAIM, DEMAND OR ACTION, IRRESPECTIVE OF THE NATURE OF THE CAUSE OF THE CLAIM, DEMAND OR ACTION ALLEGING ANY LOSS, INJURY OR DAMAGES, DIRECT OR INDIRECT, WHICH MAY RESULT FROM THE USE OR POSSESSION OF THE INFORMATION; OR FOR ANY LOSS OF PROFIT, REVENUE, CONTRACTS OR SAVINGS, OR ANY OTHER DIRECT, INDIRECT, INCIDENTAL, SPECIAL OR CONSEQUENTIAL DAMAGES ARISING OUT OF YOUR USE OF OR INABILITY TO USE THIS INFORMATION, ANY DEFECT IN THE INFORMATION, OR THE BREACH OF THESE TERMS OR CONDITIONS, WHETHER IN AN ACTION IN CONTRACT OR TORT OR BASED ON A WARRANTY, EVEN IF ALK OR ITS LICENSORS HAVE BEEN ADVISED OF THE POSSIBILITY OF SUCH DAMAGES. Some States, Territories and Countries do not allow certain liability exclusions or damages limitations, so to that extent the above may not apply to you. Export Control. You agree not to export from anywhere any part of the Data provided to you or any direct product thereof except in compliance with, and with all licenses and approvals required under, applicable export laws, rules and regulations. Entire Agreement. These terms and conditions constitute the entire agreement between ALK (and its licensors, including their licensors and suppliers) and you pertaining to the subject matter hereof, and supersedes in their entirety any and all written or oral agreements previously existing between us with respect to such subject matter. Governing Law. The above terms and conditions shall be governed by the laws of the Netherlands, without giving effect to (i) its conflict of laws provisions, or (ii) the United Nations Convention for Contracts for the International Sale of Goods, which is explicitly excluded. You agree to submit to the jurisdiction of the Netherlands for any and all disputes, claims and actions arising from or in connection with the Data provided to you hereunder. Restrictions. Except where you have been specifically licensed to do so by ALK, and without limiting the preceding paragraph, you may not (a) use this Data with any products, systems, or applications installed or otherwise connected to or in communication with vehicles, capable of vehicle navigation, positioning, dispatch, real time route guidance, fleet management or similar applications; or (b) with or in communication with any positioning devices or any mobile or wireless connected electronic or computer devices, including without limitation cellular phones, palmtop and handheld computers, pagers, and personal digital assistants or PDAs. Warning. The Data may contain inaccurate or incomplete information due to the passage of time, changing circumstances, sources used and the nature of collecting comprehensive geographic data, any of which may lead to incorrect results. 60 No Warranty. This Data is provided to you “as is,” and you agree to use it at your own risk. ALK and its licensors (and their licensors and suppliers) make no guarantees, representations or warranties of any kind, express or implied, arising by law or otherwise, including but not limited to, content, quality, accuracy, completeness, effectiveness, reliability, fitness for a particular purpose, usefulness, use or results to be obtained from this Data, or that the Data or server will be uninterrupted or error-free. Disclaimer of Warranty: ALK AND ITS LICENSORS (INCLUDING THEIR LICENSORS AND SUPPLIERS) DISCLAIM ANY WARRANTIES, EXPRESS OR IMPLIED, OF QUALITY, PERFORMANCE, MERCHANTABILITY, FITNESS FOR A PARTICULAR PURPOSE OR NON-INFRINGEMENT. Some States, Territories and Countries do not allow certain warranty exclusions, so to that extent the above exclusion may not apply to you. Disclaimer of Liability: ALK AND ITS LICENSORS (INCLUDING THEIR LICENSORS AND SUPPLIERS) SHALL NOT BE LIABLE TO YOU: IN RESPECT OF ANY CLAIM, DEMAND OR ACTION, IRRESPECTIVE OF THE NATURE OF THE CAUSE OF THE CLAIM, DEMAND OR ACTION ALLEGING ANY LOSS, INJURY OR DAMAGES, DIRECT OR INDIRECT, WHICH MAY RESULT FROM THE USE OR POSSESSION OF THE INFORMATION; OR FOR ANY LOSS OF PROFIT, REVENUE, CONTRACTS OR SAVINGS, OR ANY OTHER DIRECT, INDIRECT, INCIDENTAL, SPECIAL OR CONSEQUENTIAL DAMAGES ARISING OUT OF YOUR USE OF OR INABILITY TO USE THIS INFORMATION, ANY DEFECT IN THE INFORMATION, OR THE BREACH OF THESE TERMS OR CONDITIONS, WHETHER IN AN ACTION IN CONTRACT OR TORT OR BASED ON A WARRANTY, EVEN IF ALK OR ITS LICENSORS HAVE BEEN ADVISED OF THE POSSIBILITY OF SUCH DAMAGES. Some States, Territories and Countries do not allow certain liability exclusions or damages limitations, so to that extent the above may not apply to you. TRANSPLANT GPS, INC. LIMITED WARRANTY Hardware: Transplant GPS, Inc. warrants to the original end user (i.e. Customer) that this product will be free from defects in workmanship and materials, for one year from the date of original purchase from Transplant GPS, Inc. The provisions of this warranty shall not apply if, in Transplant GPS, Inc.‟s judgment, the product has been subject to misuse or neglect, improper installation, damaged in an accident, or repaired or altered in any way that adversely affects its performance and reliability. Transplant GPS, Inc.‟s sole obligation under this express warranty shall be, at Transplant GPS, Inc.‟s option, to replace the product or part with a comparable product or part, repair the product or part, or if neither repair nor replacement is reasonably available, Transplant GPS, Inc. may, in its sole discretion, refund to Customer the purchase price paid for the product or part. Replacement products or parts may be new or reconditioned. Transplant GPS, Inc. warrants any replaced or repaired product or part, and any hardware upgrade to which Customer is entitled under an agreement between Customer and Transplant GPS, Inc. for a period of ninety (90) days from shipment, or through the end of the original warranty, whichever is longer. All products or parts that are replaced become the property of Transplant GPS, Inc. This warranty does not cover products sold AS IS or WITH ALL FAULTS. Obtaining Warranty Service: Customer must contact Transplant GPS, Inc. within the applicable warranty period to obtain warranty service authorization. Dated proof of original purchase from Transplant GPS, Inc. or its authorized reseller will be required. Transplant GPS, Inc. is not responsible for Customer products or parts received without a warranty service authorization. Products or parts shipped by Customer to Transplant GPS, Inc. must be sent prepaid and packaged appropriately for safe shipment, and it is recommended that they be insured or sent by a method that provides for tracking of the package. THIS WARRANTY SHALL NOT BE EXTENDED, ALTERED OR VARIED EXCEPT BY A WRITTEN INSTRUMENT DULY SIGNED BY TRANSPLANT GPS, INC. WARRANTIES EXCLUSIVE. IF THIS PRODUCT DOES NOT OPERATE AS WARRANTED ABOVE, CUSTOMER‟S SOLE REMEDY FOR BREACH OF THAT WARRANTY SHALL BE REPLACEMENT OR REPAIR OF THE RODUCT OR PART OR REFUND OF THE PURCHASE PRICE PAID, AT TRANSPLANT GPS, INC.‟S DISCRETION. THIS WARRANTY IS IN LIEU OF ALL OTHER WARRANTIES (OR CONDITIONS), EXPRESSED OR IMPLIED, INCLUDING (WITHOUT LIMITATION), ANY WARRANTIES OF MERCHANTABILITY, NON-INFRINGEMENT, OR FITNESS FOR A PARTICULAR PURPOSE. TRANSPLANT GPS, INC. SHALL NOT BE LIABLE FOR LOSS OF PROFITS OR ANY SPECIAL, INCIDENTAL, OR CONSEQUENTIAL DAMAGES WHICH THE PURCHASER MAY SUSTAIN. IN NO EVENT SHALL TRANSPLANT GPS, INC.‟S LIABILITY EXCEED THE PURCHASE PRICE OF THE DEFECTIVE PRODUCT. TRANSPLANT GPS, INC. NEITHER ASSUMES NOR AUTHORIZES ANY OTHER PERSON TO ASSUME FOR IT ANY OTHER LIABILITY IN CONNECTION WITH THE SALE, INSTALLATION, MAINTENANCE OR USE OF ITS PRODUCTS. TRANSPLANT GPS, INC. SHALL NOT BE LIABLE UNDER THIS WARRANTY IF ITS 61 TESTING AND EXAMINATION DISCLOSE THAT THE ALLEGED DEFECT OR MALFUNCTION IN THE PRODUCT DOES NOT EXIST OR WAS CAUSED BY CUSTOMER‟S OR ANY THIRD PERSON‟S MISUSE, NEGLECT, IMPROPER INSTALLATION OR TESTING, 25 UNAUTHORIZED ATTEMPTS TO OPEN, REPAIR, OR MODIFY THE PRODUCT, OR ANY OTHER CAUSE BEYOND THE RANGE OF THE INTENDED USE, OR BY ACCIDENT, FIRE, LIGHTNING, OTHER HAZARDS, OR ACTS OF GOD. THIS WARRANTY DOES NOT COVER PHYSICAL DAMAGE TO THE SURFACE OF THE PRODUCT, INCLUDING CRACKS OR SCRATCHES ON OUTSIDE CASING. THIS WARRANTY DOES NOT APPLY WHEN THE MALFUNCTION RESULTS FROM THE USE OF THIS PRODUCT IN CONJUNCTION WITH ACCESSORIES, OTHER PRODUCTS, OR ANCILLARY OR PERIPHERAL EQUIPMENT AND TRANSPLANT GPS, INC. DETERMINES THAT THERE IS NO FAULT WITH THE PRODUCT ITSELF. THIS WARRANTY DOES NOT APPLY TO ANY MALFUNCTION OR FAILURE OF THE PRODUCT OR PART DUE TO ANY COMMUNICATION SERVICE CUSTOMER MAY SUBSCRIBE TO OR USE WITH THE PRODUCT. Limitation of Liability: TO THE FULL EXTENT ALLOWED BY LAW, TRANSPLANT GPS, INC. ALSO EXCLUDES FOR ITSELF AND ITS SUPPLIERS ANY LIABILITY, WHETHER BASED IN CONTRACT OR TORT (INCLUDING NEGLIGENCE), FOR INCIDENTAL, CONSEQUENTIAL, INDIRECT, SPECIAL, OR PUNITIVE DAMAGES OF ANY KIND, OR FOR LOSS OF REVENUE OR PROFITS, LOSS OF BUSINESS, LOSS OF INFORMATION OR DATA, OR OTHER FINANCIAL LOSS ARISING OUT OF OR IN CONNECTION WITH THE SALE, INSTALLATION, MAINTENANCE, USE, PERFORMANCE, FAILURE, OR INTERRUPTION OF THIS PRODUCT, EVEN IF TRANSPLANT GPS, INC. OR ITS AUTHORIZED RESELLER HAS BEEN ADVISED OF THE POSSIBILITY OF SUCH DAMAGES, AND LIMITS ITS LIABILITY TO REPLACEMENT, REPAIR, OR REFUND OF THE PURCHASE PRICE PAID, AT TRANSPLANT GPS, INC.‟S DISCRETION. THIS DISCLAIMER OF LIABILITY FOR DAMAGES WILL NOT BE EFFECTED IF ANY REMEDY PROVIDED HERE-IN SHALL FAIL OF ITS ESSENTIAL PURPOSE. Disclaimer: Some countries, states, or provinces do not allow the exclusion or limitation of implied warranties or the limitation of incidental or consequential damages for certain products supplied to consumers, or the limitation of liability for personal injury, so the above limitations and exclusions may be limited in their application to you. When the implied warranties are not allowed to be excluded in their entirety, they will be limited to the duration of the applicable written warranty. This warranty gives you specific legal rights which may vary depending on local law. Governing Law: This Limited Warranty shall be governed by the laws of the State of Minnesota, U.S.A. excluding its conflicts of laws principles and excluding the United Nations Convention on Contracts for the International Sale of Goods. FCC PART 15 COMPLIANCE STATEMENT This device is in conformance with Part 15 of the FCC Rules and Regulations for Information Technology Equipment. Operation of this product is subject to the following two conditions: 1. This device may not cause harmful interference. 2. This device must accept any interference received, including interference that may cause undesired operation. 62 CUSTOMER SERVICE At RightWay we believe that the customer deserves the best possible service and support. We look forward to assisting you in making the most of your RightWay product. On-Line www.RightWayGPS.com E-Mail All e-mails will be answered within 2 business days. Technical Support contact [email protected] for help trouble shooting, repair requests, ask questions about warranty Customer Service contact [email protected] for help with recent purchase such as order status, delivery information, billing questions, returns and other order related issues Sales Inquiries contact [email protected] for help finding the RightWay product right for you, purchasing information Telephone Telephone: (507) 529-1441 Service Hours: Monday through Friday, 8:30 a.m. to 5 p.m. CST (except National holidays) Snail Mail Transplant GPS, Inc. 5050 75th Avenue NW Byron MN 55920