Transcript
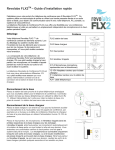
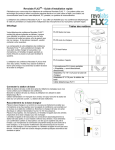
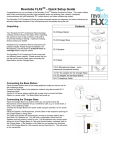
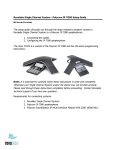
Revolabs Quick Start Guide
Using a Solo TableTop Wireless Microphone
Step 1
#
Step 2
#
Remove the microphone from the Charger Base. The microphones
turn on and mute themselves automatically when removed from
Charger Base (flashing RED LED) to prevent handling noise while
placing the microphone on the table.
The TableTop microphone should be centered on the table in front of
users, between 2 to 5 feet (.75 to 1.75m) away. It is always better to
put the microphone as close as possible to the person speaking, but
avoid placing the microphone where it might be blocked by laptops
or paperwork.
2 to 5 feet (.75 to 1.75m)
Flashing red = muted
Step 4
#
With the microphone in position, un-mute the microphone by
pressing and releasing the MUTE button (confirm by viewing
flashing GREEN LED).
Flashing green = un-muted
Mute/un-mute toggle button
To turn microphones off, first mute the microphone, and then plug
it into the Charger Base. Make sure the RED LED turns on.
Optionally, the microphone can be turned off manually. Simply press
and hold the MUTE button for ~10 seconds until the LED turns solid
RED and release button.
You are now ready to experience wireless, rechargeable and
secure (encrypted) collaborative freedom.
Revolabs Inc • 63 Great Road, Maynard, MA 01754 • 1-800-326-1088 • www.revolabs.com • [email protected]
QSG-TTM-v1.0-2007
Step 3
#