1
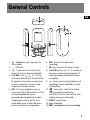
u s e r
m a n u a l
MC2601
MC2602
It is important to read this instruction book prior to using your new product for the first time.
FCC Information
EN
FCC Information
This device complies with Part 15 of the FCC
Rules. Operation is subject to the following two
conditions: (1) This device may not cause harmful
interference, and (2) this device must accept any
interference received, including interference
that may cause undesired operation.
In accordance with FCC requirements, changes or
modifications not expressly approved by
Thomson Inc. could void the user’s authority to
operate this product.
This equipment has been tested and found to
comply with the limits for a Class B digital device,
pursuant to Part 15 of FCC Rules. These limits are
designed to provide reasonable protection
against harmful interference in a residential
installation . This equipment generates, uses,
and can radiate radio frequency energy and, if
not installed and used in accordance with the
instructions, may cause harmful interference to
radio communications. However, there is no
guarantee that interference will not occur in a
particular installation. If this equipment does
cause harmful interference to radio or television
reception, which can be determined by turning
the equipment off and on, the user is
encouraged to try to correct the interference by
one or more of the following measures
• Reorient or relocate the receiving antenna.
• Increase the separation between the
equipment and receiver.
• Connect the equipment into an outlet on a
circuit different from that to which the receiver
is connected.
• Consult the dealer or an experienced radio/TV
technician for help.
Also, the Federal Communications Commission
has prepared a helpful booklet, "How To
Identify and Resolve Radio TV Interference
Problems." This booklet is available from the U.S.
Government Printing Office, Washington, DC
20402. Please specify stock number 004-00000345-4 when ordering copies.
This Class B digital apparatus complies with
Canadian ICES-003.
Cet appareil numérique de la class B est
conforme à la norme du NMB-003 du
Canada
CAUTION
RISK OF ELECTRIC SHOCK
DO NOT OPEN
THE LIGHTNING
FLASH AND ARROWHEAD WITHIN THE
TRIANGLE IS A
WA R N I N G S I G N
ALERTING YOU OF
"DANGEROUS
VOLTAGE" INSIDE
THE PRODUCT.
CAUTION: TO REDUCE THE
RISK OF ELECTRIC SHOCK,
D O N OT R E M OV E C OV E R
( O R BAC K ) . N O U S E R S E RV I C E A B L E PA RT S I N S I D E . R E F E R S E RV I C I N G
T O Q UA L I F I E D S E RV I C E
PERSONNEL.
THE EXCLAMATION
POINT WITHIN THE
TRIANGLE IS A
WARNING
SIGN
ALERTING YOU OF
I M P O R TA N T
INSTRUCTIONS
A C C O M PA N Y I N G
T H E P R O D U C T.
SEE MARKING ON BOTTOM / BACK OF PRODUCT
WARNING: TO PREVENT FIRE OR ELECTRICAL
SHOCK HAZARD, DO NOT EXPOSE THIS PRODUCT
TO RAIN OR MOISTURE.
The descriptions and characteristics given in this document are given as a general indication and not as a guarantee. In
order to provide the highest quality product possible, we reserve the right to make any improvement or modification
without prior notice. The English version serves as the final reference on all products and operational details should
any discrepancies arise in other languages.
FCC Information
EN
RCA
MC2601
RCA
MC2602
Equipment tested for
compliance as a
complete unit
Equipment tested for
compliance as a
complete unit
Product Registration
Please fill out the product registration card and
return it immediately. Returning this card
allows us to contact you if needed.
Technical Specification
Product: Digital Audio Player
Brand: RCA
Model: MC2601/ MC2602
For Your Records
Keep your sales receipt for proof of purchase to
obtain warranty parts and service.
In the event that service should be required,
you may need both the model number and the
serial number. In the space below, record the
date and place of purchase, and the serial
number:
Date of Purchase
Place of Purchase
Serial No.
Electrical Consumption
Lithium polymer battery (internal)
IMPORTER
Comercializadora Thomson de México, S.A. de C.V.
Álvaro Obregón No. 151. Piso 13.
Col. Roma. Delegación Cuauhtémoc
C.P. 06700. México, D.F.
Telefono: 52-55-11-020360
RFC: CTM-980723-KS5
Service Information
This product should be serviced only by those
specially trained in appropriate servicing
techniques. For instructions on how to obtain
service, refer to the warranty included in this
Guide.
Important Safety Instructions
EN
PLEASE READ AND SAVE FOR FUTURE REFERENCE
Some of the following information may
not apply to your particular product;
however, as with any electronic product,
precautions should be observed during
handling and use.
• Read these instructions.
• Keep these instructions.
• Heed all warnings.
• Follow all instructions.
• Do not use this apparatus near water.
• Clean only with dry cloth.
• Do not block any ventilation openings.
Install in accordance with the
manufacturer’s instructions.
• Do not install near any heat sources
such as radiators, heat registers, stoves,
or other apparatus (including
amplifiers) that produce heat.
• Do not defeat the safety purpose of
the polarized or grounding-type plug.
A polarized plug has two blades with
one wider than the other. A grounding
type plug has two blades and a third
grounding prong. The wide blade or
the third prong is provided for your
safety. If the provided plug does not fit
into your outlet, consult an electrician
for replacement of the obsolete outlet.
• Protect the power cord from being
walked on or pinched particularly at
plugs, convenience receptacles, and
the point where they exit from the
apparatus.
• Only use attachments/accessories
specified by the manufacturer.
• Use only with the cart, stand, tripod,
bracket, or table specified by the
manufacturer, or sold with the
apparatus. When a cart is used, use
caution when moving the
cart/apparatus combination to avoid
injury from tip-over.
]
Portable Cart Warning
• Unplug this apparatus during lightning
storms or when unused for long
periods of time.
• Refer all servicing to qualified service
personnel. Servicing is required when
the apparatus has been damaged in
any way, such as power-supply cord or
plug is damaged, liquid has been
spilled or objects have fallen into the
apparatus, the apparatus has been
exposed to rain or moisture, does not
operate normally, or has been
dropped.
Important Safety Instructions
• ADDITIONAL SAFETY INFORMATION
• Apparatus shall not be exposed to
dripping or splashing and no objects
filled with liquids, such as vases, shall
be placed on the apparatus.
• Always leave sufficient space around
the product for ventilation. Do not
place product in or on a bed, rug, in a
bookcase or cabinet that may prevent
air flow through vent openings.
• Do not place lighted candles,
cigarettes, cigars, etc. on the product.
• Connect power cord only to AC power
source as marked on the product.
• Care should be taken so that objects do
not fall into the product.
• Do not attempt to disassemble the
cabinet. This product does not contain
customer serviceable components.
• IF YOUR PRODUCT OPERATES ON
BATTERIES, adhere to the following
precautions:
A. Any battery may leak electrolyte if
mixed with a different battery type, if
inserted incorrectly, or if all batteries
are not replaced at the same time.
B. Any battery may leak electrolyte or
explode if disposed of in fire or an
attempt is made to charge a battery
not intended to be recharged.
C. Discard leaky batteries immediately.
Leaking batteries can cause skin burns
or other personal injury. When
discarding batteries, be sure to dispose
of them in the proper manner,
according to your state/provincial and
local regulations.
EN
End User License Agreement
EN
IMPORTANT: READ CAREFULLY BEFORE
DOWNLOADING OR INSTALLING THIS
SOFTWARE!
THIS END USER LICENSE AGREEMENT (THIS
“EULA”) IS A LEGAL AGREEMENT BETWEEN
YOU AND THOMSON INC., OR ANY THOMSON
GROUP ENTITY, AS DEFINED BELOW
(COLLECTIVELY “THOMSON ENTITY”), FOR THE
RCA OR THOMSON BRANDED PORTABLE
DIGITAL AUDIO/VIDEO DEVICE
APPLICATION/DRIVER SOFTWARE PROGRAM
AND ASSOCIATED DOCUMENTATION, IF ANY
(COLLECTIVELY, THE “PROGRAM”). THIS EULA
CONTAINS IMPORTANT LEGAL LIMITATIONS,
RESTRICTIONS AND DISCLAIMERS, AND ALSO
SPECIFIES THE DURATION OF YOUR LICENSE.
BY INSTALLING THE PROGRAM OR CLICKING ON
THE ACCEPTANCE BUTTON OF THE PROGRAM,
COPYING OR OTHERWISE USING THE
PROGRAM, YOU ACKNOWLEDGE AND AGREE
THAT YOU HAVE READ THIS EULA,
UNDERSTAND IT, AND AGREE TO BE BOUND BY
ITS TERMS AND CONDITIONS. YOU MAY USE
THE PROGRAM ONLY IN ACCORDANCE WITH
THIS EULA, AND ANY SUCH USE IS HEREBY
UNDERSTOOD TO BE CONDITIONAL UPON
YOUR SPECIFIC AGREEMENT TO THE
UNMODIFIED TERMS SET FORTH HEREIN. IF
YOU DO NOT AGREE WITH ALL OF THE TERMS
OF THIS EULA, CLICK ON THE REJECTION
BUTTON AND/OR DO NOT INSTALL THE
PROGRAM AND/OR DO NOT USE THE
PROGRAM.
1. LICENSE
(a) Under this EULA, you are granted a license (i)
to use the Program on a single workstation, and
(ii) to make one (1) copy of the Program into
any machine-readable form for backup of the
Program, provided the copy contains all of the
original Program's proprietary notices.
(b) You may transfer the Program and license to
another party only as a part of the
Thomson/RCA branded Portable Digital
Audio/Video Device (“A/V Device”), and only if
the other party agrees to accept the terms and
conditions of this EULA. If you transfer the
Program, you must at the same time either
transfer all copies to the same party or destroy
any copies not transferred.
(c) The terms of this EULA will govern any
software upgrades or updates provided by
THOMSON Entity that replace and/or
supplement the original Program, unless such
upgrade or update is accompanied by separate
license terms and conditions in which case the
terms of that separate license will govern. You
acknowledge and agree that THOMSON Entity
may automatically download upgrades or
updates to the Program software to your
computer in order to update, enhance, and/or
further develop the Program.
2. LICENSE RESTRICTIONS
(a) Except for the licenses expressly granted to
you in this EULA, no other licenses or rights are
granted or implied.
(b) You may not (i) make the Program available
over a network where it could be used by
multiple computers at the same time; (ii)
modify, translate, reverse engineer, decompile,
disassemble (except to the extent that this
restriction is expressly prohibited by law), or
create derivative works based upon the
Program; or (iii) copy the Program, except as
expressly permitted herein. You agree that you
shall only use the Program in a manner that
complies with all applicable laws in the
jurisdictions in which you use the Program,
including, but not limited to, applicable
restrictions concerning copyright and other
intellectual property rights.
(c) The Program may contain pre-release code
that does not perform at the level of a final
code release. In such case, the Program may not
operate properly. Updated versions of the
Program may be downloaded from
www.rca.com (if purchased in the United States)
and www.thomson-lyra.com (if purchased in
Europe).
End User License Agreement
(d) THOMSON Entity is not obligated to provide
support services for the Program.
(e) The Program is provided with “RESTRICTED
RIGHTS”. Use, duplication, or disclosure by the
U.S. Government is subject to restrictions as set
forth in subparagraph (c)(1)(ii) of DFARS
252.227-7013, or FAR 52.227-19, or in FAR
52.227-14 Alt. III, as applicable.
3. TERM AND TERMINATION
(a) Your license is effective on the date you
accept this EULA and remains in effect until this
EULA is terminated by either party.
(b) You may terminate this EULA and the
associated license, without any notice or delay,
by destroying or permanently erasing the
Program and all copies thereof.
(c) If you fail to comply with any of the terms of
this EULA, in whole or part, your license will
automatically terminate without notice from
THOMSON Entity.
(d) Upon termination of this EULA and your
associated license, you shall cease all use of the
Program and destroy or permanently erase the
Program and all full or partial copies thereof.
4. WARRANTY DISCLAIMER
THE PROGRAM IS PROVIDED “AS IS” WITHOUT
WARRANTY OF ANY KIND, EITHER EXPRESSED
OR IMPLIED, INCLUDING, BUT NOT LIMITED TO
THE IMPLIED WARRANTIES OF
MERCHANTABILITY, FITNESS FOR A PARTICULAR
PURPOSE, TITLE OR NON-INFRINGEMENT. THE
ENTIRE RISK AS TO THE QUALITY AND
PERFORMANCE OF THE PROGRAM IS WITH YOU.
SHOULD THE PROGRAM PROVE DEFECTIVE, YOU
(AND NOT THOMSON ENTITY, ITS SUPPLIERS, OR
ITS DEALERS) ASSUME THE ENTIRE COST FOR ALL
NECESSARY REPAIR OR CORRECTION.
This exclusion of warranty may not be allowed
under some applicable laws. As a result, the
above exclusion may not apply to you, and you
may have other rights depending on the law
that applies to you.
5. OWNERSHIP RIGHTS
All title and intellectual property rights in and to
the Program and any copies thereof are owned
by THOMSON Entity or its suppliers. All title and
intellectual property rights in and to the content
which may be accessed through use of the
Program is the property of the respective
content owner and may be protected by
applicable copyright or other intellectual
property laws and treaties. This license grants
you no rights to use such content.
6. LIMITATION OF LIABILITY
(a) TO THE MAXIMUM EXTENT PERMITTED BY
APPLICABLE LAW, IN NO EVENT SHALL
THOMSON ENTITY, OR ITS DEALERS BE LIABLE
FOR ANY SPECIAL, INCIDENTAL, INDIRECT, OR
CONSEQUENTIAL DAMAGES WHATSOEVER
(INCLUDING, WITHOUT LIMITATION, DAMAGES
FOR LOSS OF PROFITS, BUSINESS INTERRUPTION,
CORRUPTION OF FILES, LOSS OF BUSINESS
INFORMATION, OR ANY OTHER PECUNIARY
LOSS) REGARDLESS OF CAUSE OR FORM OF
ACTION, INCLUDING CONTRACT, TORT, OR
NEGLIGENCE, ARISING OUT OF YOUR USE OF OR
INABILITY TO USE THE PROGRAM, EVEN IF
THOMSON ENTITY HAS BEEN ADVISED OF THE
POSSIBILITY OF SUCH DAMAGES. BECAUSE
SOME STATES AND JURISDICTIONS DO NOT
ALLOW THE EXCLUSION OR LIMITATION OF
LIABILITY OF CONSEQUENTIAL OR INCIDENTAL
DAMAGES, THE ABOVE LIMITATION MAY NOT
APPLY TO YOU.
(b) YOU ASSUME RESPONSIBILITY FOR THE
SELECTION OF THE APPROPRIATE PROGRAM TO
ACHIEVE YOUR INTENDED RESULTS, AND FOR
THE INSTALLATION, USE, AND RESULTS
OBTAINED.
EN
End User License Agreement
EN
7. WINDOWS MEDIA
The software embedded within your A/V Device
(the “Device Firmware”) contains software
licensed from Microsoft that enables you to play
Windows Media Audio (WMA) files (“WMA
Software”). The WMA Software is licensed to
you for use with your A/V Device under the
following conditions. By installing and using this
version of the Device Firmware, you are
agreeing to these conditions. IF YOU DO NOT
AGREE TO THE END USER CONDITIONS OF THIS
SECTION 7, DO NOT INSTALL OR USE THIS
VERSION OF THE DEVICE FIRMWARE.
The WMA Software is protected by copyright
and other intellectual property laws. This
protection also extends to documentation for
the WMA Software, whether in written or
electronic form.
GRANT OF LICENSE. The WMA Software is only
licensed to you as follows:
You may use this version of the Device Firmware
containing the WMA Software only as such use
relates to your A/V Device.
You may not reverse engineer, decompile, or
disassemble the WMA Software, except and only
to the extent that such activity is expressly
permitted by applicable law.
You may transfer your right to use the Device
Firmware only as part of a sale or transfer of
your A/V Device, on the condition that the
recipient agrees to the conditions set forth
herein. If the version of the Device Firmware
that you are transferring is an upgrade, you
must also transfer all prior versions of the Device
Firmware that you have which include the WMA
Software.
MICROSOFT IS NOT PROVIDING ANY WARRANTY
OF ANY KIND TO YOU FOR THE WMA
SOFTWARE, AND MICROSOFT MAKES NO
REPRESENTATION CONCERNING THE
OPERABILITY OF THE WMA SOFTWARE.
The WMA Software is of U.S. origin. Any export
of this version of the Device Firmware must
comply with all applicable international and
national laws, including the U.S. Export
Administration Regulations, that apply to the
WMA Software incorporated in the Device
Firmware.
Content providers are using the digital rights
management technology for Windows Media
contained in your A/V Device (“WM-DRM”) to
protect the integrity of their content (“Secure
Content”) so that their intellectual property,
including copyrights, in such content is not
misappropriated. Your A/V Device uses WMDRM software to play Secure Content (“WMDRM Software”). If the security of the WM-DRM
Software in your A/V Device has been
compromised, owners of Secure Content
(“Secure Content Owners”) may request that
Microsoft revoke the WM-DRM Software’s right
to acquire new licenses to copy, display, and/or
play Secure Content. Revocation does not alter
the WM-DRM Software's ability to play
unprotected content. A list of revoked WMDRM Software is sent to your A/V Device
whenever you download a license for Secure
Content from the Internet or from a computer.
Microsoft may, in conjunction with such license,
also download revocation lists onto your A/V
Device on behalf of Secure Content Owners.
End User License Agreement
8. THIRD PARTY SOFTWARE
ANY THIRD PARTY SOFTWARE THAT MAY BE
PROVIDED WITH THE PROGRAM IS INCLUDED
FOR USE AT YOUR OPTION. IF YOU CHOOSE TO
USE SUCH THIRD PARTY SOFTWARE, THEN
SUCH USE SHALL BE GOVERNED BY SUCH THIRD
PARTY'S LICENSE AGREEMENT, AN ELECTRONIC
COPY OF WHICH WILL BE INSTALLED IN THE
APPROPRIATE FOLDER ON YOUR COMPUTER
UPON INSTALLATION OF THE SOFTWARE.
THOMSON ENTITY IS NOT RESPONSIBLE FOR
ANY THIRD PARTY’S SOFTWARE AND SHALL
HAVE NO LIABILITY FOR YOUR USE OF THIRD
PARTY SOFTWARE.
9. GOVERNING LAW
If you acquired this A/V Device in the United
States, this EULA shall be governed and
construed in accordance with the laws of the
State of Indiana, U.S.A. without regard to its
conflict of laws principles. If you acquired this
A/V Device within the European Union, this
EULA shall be governed and construed in
accordance with the laws of France, without
regard to its conflict of laws principles. If you
acquired this A/V Device outside the United
States or the European Union, then local law
may apply.
10. GENERAL TERMS
This EULA can only be modified by a written
agreement signed by you and THOMSON Entity,
and changes from the terms and conditions of
this EULA made in any other manner will be of
no effect. If any portion of this EULA shall be
held invalid, illegal, or unenforceable, the
validity, legality, and enforceability of the
remainder of the Agreement shall not in any
way be affected or impaired thereby. This EULA
is the complete and exclusive statement of the
agreement between you and THOMSON Entity,
which supersedes all proposals or prior
agreements, oral or written, and all other
communications between you and THOMSON
Entity, relating to the subject matter of this
hereof. “THOMSON Group Entity” when used
in this EULA shall mean any person,
corporation, or other organization, domestic or
foreign, including but not limited to
subsidiaries, that is directly or indirectly
controlled by Thomson, French company. For
purposes of this definition only, the term
“control” means the possession of the power to
direct or cause the direction of the
management and policies of an entity, whether
by ownership of voting stock or partnership
interest, by contract, or otherwise, including
direct or indirect ownership of more than fifty
percent (50%) of the voting interest in the
entity in question.
EN
Table of Contents
EN
FCC Information
End User License Agreement
Suppressing Stereo Signal . . . . . . . . . . . . . . . . . . . .12
Before You Begin . . . . . . . . . . . . . . . . .2
Radio Recording . . . . . . . . . . . . . . . . .13
Stop Listening to the Radio
Recording Duration
Connecting to Computer . . . . . . . . . . . .5
Listening to Recording
Charging the Battery
Deleting Recording
Transferring Files to the Player
Voice Recording . . . . . . . . . . . . . . . . . .14
General Controls . . . . . . . . . . . . . . . . . .6
Recording Duration
Listening to Recording
File Menu . . . . . . . . . . . . . . . . . . . . . . . .7
Deleting Recording
How Files are Organized
File Menu Navigation
Line-in Recording . . . . . . . . . . . . . . . . .15
Recording Duration
Player Menu . . . . . . . . . . . . . . . . . . . . .8
Listening to Recording
Player Menu Navigation
Deleting Recording
Music & Audible Playback . . . . . . . . . . .9
Picture Playback . . . . . . . . . . . . . . . . . .16
Turning On and Off Player
Viewing Picture
Playing / Pausing
Activating Slideshow
Skipping Files
Viewing Slideshow
Scanning Files
Random Playback
Video Playback . . . . . . . . . . . . . . . . . .17
Repeat Playback . . . . . . . . . . . . . . . . . . . . . . . . . . . .10
Converting Video
DSP
Viewing Video . . . . . . . . . . . . . . . . . . . . . . . . . . . . . .18
My Selections
Skipping Video
Scanning Video
Radio . . . . . . . . . . . . . . . . . . . . . . . . . .11
Listening to Radio
Setting the Player . . . . . . . . . . . . . . . .19
Manual and Preset Modes
Settings
Manual Tuning
System Info
Saving Preset Stations . . . . . . . . . . . . . . . . . . . . . . . .12
Selecting Preset Stations
Clearing Presets
1
More Information . . . . . . . . . . . . . . . .20
Warranty . . . . . . . . . . . . . . . . . . . . . . .22
Before You Begin
Dear RCA Customer,
Thank you for purchasing the RCA Digital Audio Player. This product will play open
mp3 and Windows Media™ audio (WMA) content as well as content purchased from
most online music download services.
After purchasing and downloading music to your PC, you are now ready to move
content to your player. To transfer the music, you should use Windows Media Player
or the application recommended by the online music download service.
(Note: Services and applications must be Windows Media audio-compliant and
support Digital Rights Management.)
Unpacking your unit
When you unpack your new player, be
sure you have removed all the accessories
and documentation. The items below
should have been packed in the box with
your player.
• Digital Audio Player
• Music Management CD
• Earphones
• USB cable
• Line-in cable
• Neck strap
What’s so special about this
mp3 player?
This player is meant to play mp3 and
Windows MediaTM audio files and view
picture and video clip files.
To do so, you need the use of a Windows
computer with a USB port , USB cable and
a music management software.
EN
Computer system
requirements
• Pentium III 500MHz or higher
recommended
Macintosh iMac G3 or higher
• Windows ® 2000 (SP3 or
higher), or XP
Mac OS X Version 10.2 or higher
• Internet Explorer 4.0 or higher
• Internet access
• 200MB free hard disk space for the
software
• 64MB RAM (128 MB recommended)
• CD-ROM drive capable of digital audio
extraction
• USB port (2.0 recommended)
• Sound card
2
Before You Begin
Caution while Driving
EN
!
Warning:
Use of this product is for your
personal use only. Unauthorized
recording or duplication of copyrighted
material may infringe upon the rights of third
parties and may be contrary to copyright laws.
Use of headphones while operating an
automobile or moving vehicle is not
recommended and is unlawful in some
states and areas. Be careful and attentive
on the road. Stop operation of the unit if
you find it disruptive or distracting while
driving.
Precautions for the Unit
Headset Safety
• Do not use the unit immediately after
transportation from a cold place to a
warm place; condensation problem
may result.
• Avoid shock to the unit.
• Do not store the unit near fire, places
with high temperature or in direct
sunlight.
• Do not operate or store unit in places
with frequent static electricity or
electrical noise (e.g. speaker, TV set).
• Clean the unit with a soft cloth or a
damp chamois leather. Never use
solvents.
• The unit must only be opened by
qualified personnel.
Have a Blast- Just Not in
Your Eardrums
Make sure you turn down
the volume on the unit
before you put on
headphones. Increase the volume to the
desired level only after headphones are
in place.
• Do not play your headset at a high
volume. Hearing experts warn against
extended high-volume play.
• If you experience a ringing in your
ears, reduce volume or discontinue use.
• You should use extreme caution or
temporarily discontinue use in
potentially hazardous situations. Even
if your headset is an open-air type
designed to let you hear outside
sounds, don’t turn up the volume so
high that you are unable to hear what
is around you.
Caution
• Keep product out of direct sunlight.
Exposure to direct sunlight or extreme
heat (such as inside a parked car) may
cause damage or malfunction.
• Do not expose to rain or moisture.
3
Before You Begin
Important Battery
Information
• Charge the unit for at least 2 hours
before first use.
• Charge the unit for at least 2 hours
after putting away the unit for a long
time.
• The battery used in this device may
present a risk of fire or chemical burn if
mistreated. Do not separately
recharge, disassemble, heat above
100ºC (212ºF), or incinerate.
• Battery replacement should only be
made by a trained technician. Refer to
Limited Warranty for details.
• Do not attempt to open the unit. No
user serviceable parts inside.
• To reduce risk of injury, use only
rechargeable batteries recommended
by the manufacturer for this product.
Other types of batteries may burst
causing damage and personal injury.
• Keep the unit away from children. Do
not disassemble or incinerate.
• Use USB port of PC or the specified
charger (not included). Use of another
charger may present a risk of fire or
explosion.
incinerate, or expose to high
temperatures. Examples of high
temperatures that may damage your
product include leaving it in a locked
car in summer, or putting it on top of
heat generating electronic devices
(such as power amplifiers and
computer monitors ).
• Dispose of used battery
promptly. Keep away from
children. Do not disassemble
and do not dispose of in fire.
EN
Caution
• The battery used in this device may
present a risk of fire, explosion, or
chemical burn if mistreated. Do not
separately recharge, disassemble,
4
Connecting to Computer
EN
Charging the Battery
The player’s battery can only be charged
through the USB port of a computer.
1. Open the cover of the USB jack and
connect the smaller end of the USB
extension cable to the USB jack on the
player.
2. Insert the larger end of the USB
extension cable into the USB port on
the computer tightly. Once connected,
the display shows as below:
3. Press and hold
to enter battery
charging mode. The display shows as
below with the battery icon
animating.
• Charge the unit for at least 2 hours
before first use.
• You can still transfer files to the player
in the battery charging mode.
• When the battery is full, the display
shows “Battery full”.
5
Note: The player will
automatically go to battery
charging mode if the battery
level is low.
Attention: Do not separately recharge,
disassemble, incinerate, or expose to high
temperatures over 45ºC (113ºF). Examples of
high temperatures that may damage your
product include leaving it in a locked car in the
summer, the dashboard of car or putting it on
top of other heat generating electronics devices
(such as power amplifiers and computer
monitors).
Transferring Files to the
Player
You should refer to the software manual
for details in software installation,
connecting your player with the
computer and transferring files to the
player.
Attention: Do not disconnect
the USB connection during
music download. Doing so may
corrupt system files or the files being
downloaded.
General Controls
EN
1.
2.
3.
4.
5.
: headphone jack, input jack for
line-in cable.
: USB jack.
: 1) press once to switch on the
player; 2) starts and pauses playback.
Slide SEL to the
/
to : 1) skip
and search backward or forward a file;
2) go back or forward in a menu level
in menu navigation; 3) select radio
frequency or preset stations.
SEL : 1) in music playback, press to
store music files in My Selections; 2) for
sectioned audible files, press
repeatedly during playback to select
skipping by section or by file; 3) in
radio mode, press to select between
preset and manual tuning modes.
6. REC : press to start and pause
recording;
7. M : press to access the player’s menu.
8. Slide SEL to the + or – to : 1) increase or
decreases volume during playback; 2)
move upward or downward in menu
navigation.
9.
: 1) press once to stop playback and
recording; 2) press and hold to switch
off the player.
10.
: lock switch - slide to the locked
icon to prevent accidental key
activation. The lock icon shows on the
display when keys are locked.
11. RESET : reset button.
12. Neck strap hole
13. MIC : microphone for voice recording.
6
File Menu
EN
How Files are Organized?
File Menu Navigation
The files transferred to the player will be
sorted automatically so that you can
easily find and play them. They are
sorted as below in the library mode:
• Music* (contains music files)
• Audiobooks (contains audible files)
• Radio Recs (contains radio recording)
• Voice Recs (contains voice recording)
• Line-in Recs (contains line-in
recording)
• My Selections (contains a playlist of
your preferred music files)
• Pictures (contains photo files)
• Video (contains video files)
• Slide to the
to go to the next
menu level.
• Slide to the + or – to move along
menu items at the same level.
• Slide to the
to go to the previous
menu level.
• If the selected item is a music, audible,
recording, photo or video files, slide to
the
or
to start playback.
File menu
*Music files are further sorted as below:
• Artists
• Albums
• Titles
• Genres
• Years
The file menu is displayed when M is
pressed during playback.
7
Player Menu
Player Menu
The player menu lets you access more
features of the player.
• If you are in Radio, Voice Recording,
Line-in Recording, Picture or Video
mode, press M once to access the
player menu.
EN
Player menu
Radio mode
Depending on the mode you are in (e.g.
music playback, radio recording etc.), the
items available in the player menu may
vary.
Follow the steps below to access the
player menu:
• If you are at the file menu navigation
screen, press M once to access the
player menu.
File menu
• If you are at the playback screen, press
M twice to access the player menu.
Playback
screen
Player Menu Navigation
• Slide to the
to go to the next
menu level
• Slide to the + or – to move along menu
items at the same level.
• Slide to the
to go to the previous
menu level.
• Items in the player menu include:
- Go to (to access radio, voice
recording and line-in recording
modes)
- Shuffle (refer to p.9)
- Repeat (refer to p.10)
- DSP (refer to p.10)
- Slideshow (refer to p.16)
- Clear MySel (refer to p.10)
- Settings (refer to p.19)
- System Info (refer to p.19)
8
Music & Audible Playback
EN
Turning On and Off Player
• Press
to turn on the unit.
• To turn off the player completely, press
and hold .
If skipping by file is selected, sliding to at
any time during playback will only go to
the previous file.
Scanning Files
Playing / Pausing
• Press
to begin playback.
• Press
once to pause playback, press
again to resume playback.
During playback, total time, elapsed
playback time and file information show
on the display. If music files contain lyrics,
they will be displayed with the lyrics
function turned on (refer to page 19).
Playback
screen
• To fast reverse quickly, slide and hold to
the
during playback.
• To fast forward quickly, slide and hold
to the
during playback.
Random Playback
1. Press M once or twice to access to player
menu (refer to page 8 for more details).
2. Slide to the + or – to highlight
“Shuffle”.
3. Press SEL repeatedly to select the
shuffle mode on or off. The shuffle
icon lights on the display when
activated.
Note: random playback is not available
for audible files.
Skipping Files
• To skip to the next file, slide to the
.
• To skip to the previous file, slide to the
within the beginning 4 seconds of
the current file. Otherwise, slide to the
twice.
Note: for sectioned audible files, press
SEL and then perform the steps above to
go to the previous or next audible section.
Press SEL repeatedly to select skipping by
file or by section.
9
Tips: Shuffle on + Repeat
one = a file is selected
randomly and played
repeatedly.
Shuffle on + Repeat All = Files are
played in random order repeatedly.
Music & Audible Playback
Repeat Playback
1. Press M once or twice to access to
player menu (refer to page 8 for more
details).
2. Slide to the + or – to highlight
“Repeat”.
3. Press SEL repeatedly to select a repeat
mode (Repeat One , Repeat All
and Repeat Off). The corresponding
icon lights on the display.
Note: repeat playback is not available
for audible files.
• Press SEL once while you are listening
to a preferred music file with “Added
to MySel” shows on the display briefly.
• Press SEL once while you are browsing
music files in the navigation menu,
“Added to MySel” shows on the
display briefly (see “File Menu - How
Files are Organized” and “File Menu
Navigation” for details).
2. Select “My Selections” folder from the
file menu (see “File Menu - How Files
are Organized” and “File Menu
Navigation” for details).
3. Press
to begin playback.
DSP
DSP feature consists a number of sound
effects.
1. Press M once or twice to access to
player menu (refer to page 8 for more
details)
2. Slide to the + or – to highlight “DSP”.
3. Press SEL repeatedly to select an
effect mode (Flat, Bass, Pop, Rock and
Jazz).
Note: DSP is not available for audible
files.
• To clear My Selections, press M once
or twice to access to player menu
(refer to page 8 for more details).
Slide to the + or – to highlight “Clear
MySel” and then press SEL to confirm
clearing.
My Selections
My Selections is a playlist of your
preferred music files (audible, radio,
voice and line-in recorded files are not
selectable).
1. Select your preferred files in one of
the following ways:
10
EN
Radio
EN
Listening to Radio
Manual Tuning
1. Press M once or twice to access to
player menu (refer to page 8 for
more details).
2. While “Go to” is highlighted in the
menu, slide to the
to enter into
the submenu.
• Slide to the
or
once to tune
down or up frequency band. or
• Slide and hold to the
or
until
you see “Searching...” to start
automatic search for the next
available station. or
• Slide and hold to the
or
to tune
down or up the frequency band at a
faster rate until you release the
button.
Go to
Shuffle
Repeat
DSP
>
Off
Off
Flat
3. While “Radio” is highlighted, slide to
the
to switch on the radio.
Radio
Voice Recording
Line-in Recording
Manual and Preset Modes
Press SEL repeatedly to select between
the two modes while listening to the
radio. See picture below for details.
Manual mode – tuning to stations
manually,
Preset mode – selecting stations saved
in preset memory.
Radio preset
mode
Preset mode
11
Radio
Saving Preset Stations
Suppressing Stereo Signal
1. Tune to a station to be saved as a
preset station (refer to manual
tuning).
2. Press M.
3. Slide to the + or – to highlight “Save
to Preset” and slide to the
.
4. Slide to the
or
to select a preset
number.
5. Press SEL to save the selected station
in the selected preset number or press
M to exit without saving.
If FM stereo reception is weak, select
mono sound to reduce the noise.
1. While listening to the radio, press M
to view the radio sub-menu.
2. Slide to the + or – to highlight
"Mode".
3. Press SEL repeatedly to select
between stereo or mono sound.
Selecting Preset Stations
1. Make sure you are in preset mode.
Refer to “Manual and Preset Modes”
on the previous page.
2. Slide to the
or
to select a preset
number.
EN
Stop Listening to the Radio
• Press and hold to switch off the
player. OR
• Press M while listening to the radio.
Select “Go to” by pressing SEL and
then “Library” by pressing SEL again.
The player will return to the file menu.
Clearing Presets
1. In preset mode, select the preset
station to be cleared, press M to view
the radio sub-menu.
2. Slide to the + or – to highlight "Clear
Preset".
3. Press SEL to confirm clearing.
12
Radio Recording
EN
Radio station can be recorded as mp3
files.
1. Tune to the station to be recorded.
2. Press REC to start recording. Press REC
to pause recording and again to
resume.
3. Press
to stop recording. Recorded
file is stored in the “Radio Recs” folder.
Radio
recording
mode
Recording Duration
1. While listening to the radio, press M to
view the radio sub-menu.
2. Slide to the + or – to highlight
"RecDur" (recording duration).
3. Press SEL repeatedly to select among
max, 1 hour, 30 min and 5 min.
13
Listening to Recording
1. In the file menu, slide to the + or – to
highlight "Radio Recs".
2. Slide to the
to view recorded files
and then slide to the + or – to highlight
a desired recording.
3. Press
or slide to the
to play the
highlighted file.
Deleting Recording
1. In the file menu, slide to the + or – to
highlight "Radio Recs".
2. Slide to the
to view recorded files
and then slide to the + or – to highlight
an unwanted recorded file.
3. Press M and then slide to the + or – to
highlight "Delete File".
4. Press SEL to confirm deletion.
Tips: Refer to page 8 for details
on the file menu.
Voice Recording
Voice can be recorded through the
microphone as a “.wav” file.
1. Press M once or twice to access to
player menu (refer to page 8 for more
details).
2. While “Go to” is highlighted in the
menu, slide to the
to enter into the
submenu.
3. Slide to the + or – to highlight “Voice
Recording”.
Radio
Voice Recording
Line-in Recording
4. Slide to the
, “Ready” shows on the
display.
5. Press REC to start recording. Press REC
to pause recording. Press again to
resume.
6. Press
to stop recording. Recorded
file is stored in the “Voice Recs” folder.
Voice
recording
mode
Listening to Recording
EN
1. In the file menu, slide to the + or – to
highlight "Voice Recs".
2. Slide to the
to view recorded files
and slide to the + or – to highlight a
desired recording.
3. Press
or slide to the
to play the
highlighted file.
Deleting Recording
1. In the file menu, slide to the + or – to
highlight "Voice Recs".
2. Slide to the
to view recorded files
and slide to the + or – to highlight an
unwanted recorded file.
3. Press M and then slide to the + or – to
highlight "Delete File".
4. Press SEL to confirm deletion.
Tips: Refer to page 8 for details
on the file menu.
Recording Duration
1. Press M in voice recording mode to
view its sub-menu.
2. Slide to the + or – to highlight
"RecDur" (recording duration).
3. Press SEL repeatedly to select among
max, 1 hour, 30 min and 5 min.
14
Line-in Recording
EN
Recording an audio source as mp3 files
can be made through a line-in cable
connected to the headphone jack.
1. Press M once or twice to access to
player menu (refer to page 8 for more
details).
2. While “Go to” is highlighted in the
menu, slide to the
to enter into the
submenu.
3. Slide to the + or – to highlight “Line-in
Recording”.
Radio
Voice Recording
Line-in Recording
4. Slide to the
, “Ready” shows on the
display.
5. Press REC to start recording. Press REC
to pause recording. Press again to
resume.
6. Press
to stop recording. Recorded
file is stored in the “Line-in Recs”
folder.
Line-in
recording
mode
Recording Duration
1. Press M in line-in recording mode to
view its sub-menu.
2. Slide to the + or – to highlight
"RecDur" (recording duration).
3. Press SEL repeatedly to select among
max, 1 hour, 30 min and 5 min.
15
Listening to Recording
1. In the file menu, slide to the + or – to
highlight "Line-in Recs".
2. Slide to the
to view recorded files
and then slide to the + or – to highlight
a desired recording.
3. Press
or slide to the
to play the
highlighted file.
Deleting Recording
1. In the file menu, slide to the + or – to
highlight "Line-in Recs".
2. Slide to the
to view recorded files
and then slide to the + or – to highlight
an unwanted recorded file.
3. Press M and then slide to the + or – to
highlight "Delete File".
4. Press SEL to confirm deletion.
Tips: Refer to page 8 for details
on the file menu.
Adjust the volume level of the source
audio device in order to achieve the
optimum recording quality. The source
output varies from model to model.
You might want to experiment with a
few recordings to determine the
proper volume output of the source to
get optimum recording quality from
the player. Recommend starting the
source at around the room volume
level.
Picture Playback
Viewing Picture
Viewing Slideshow
1. In the file menu, slide to the + or – to
highlight "Pictures".
2. Slide to the
to view picture files and
then slide to the + or – to highlight a
desired picture.
3. Press
or slide to the
to play the
highlighted picture.
4. Slide to the or
to view previous
or next picture.
5. Press to stop viewing pictures and
return to the file menu.
1. In the file menu, slide to the + or – to
highlight "Pictures".
2. Press
to start slideshow. Pictures
change according to the duration you
have selected in “Activating
Slideshow”.
• Press
to pause slideshow and again
to resume it.
• Slide to the
or
to view previous
or next picture.
3. Press to stop slideshow and return to
the file menu.
EN
Activating Slideshow
1. Press M once or twice to access to
player menu (refer to page 8 for more
details).
2. Slide to the + or – to highlight
"Slideshow".
3. Press SEL repeatedly to select among
off, 3, 5, 10 and 15 seconds. This is the
viewing duration of each picture in the
slideshow.
• If you want to turn off slideshow, select
“Off” in the above step.
Attention: Picture and
converted video files should be
transferred via Windows
Explorer (drag-and-drop) in the shown
root directory. Picture and video files
will not play from any created
subfolders.
Tips: Refer to the software
user manual for transferring
picture or video clip files to
the player.
16
Video Playback
EN
Converting Video
Your video has to be converted to
optimum size before transferring to this
player for playback. To do so, you need to
install the RCA Video Converter in your
computer (Windows 2000 and XP only).
1. Load the music management CD
included with this player in your
computer. Installation will start
automactically after the installation of
device installer and Yahoo! Music
Engine. Follow the instructions on
screen to install the converter.
2. Launch the video converter after
installation succeeded.
• You can connect the player to the
computer and select it as the output
location.
4. Under “Settings”, select “Quality
Level” as “High” (default) for the best
viewing quality.
You may also want to select between
“Full Image” and “Full Screen”.
• Full image - the converter will keep the
whole original image to be seen.
However, the player’s screen may not
be occupied fully.
• Full screen - the converter will resize
the image to fit the player’s screen.
Some parts of the original image may
be cut.
Original
3. Under “Files”, select the “Input Video”
file and “Output File” locations from
the file directory of your computer by
clicking the corresponding button
on the right.
• As a shortcut, you may also drag and
drop the source video file to the “Input
Video” field.
17
Full image
Full screen
5. Under “Selection”, drag the two
arrows to assign the start and end
points of the video to be converted.
The corresponding time stamps show
above the arrows for reference. If you
need to convert the whole video, drag
the arrows to the beginning and the
end times of the video.
6. Click “Convert” to start video
convertion. The converted file will be
saved at the output location you have
assigned.
Video Playback
Attention: Picture and
converted video files should
be transferred via Windows
Explorer (drag-and-drop) in
the shown root directory. Picture and
video files will not play from any
created subfolders.
EN
Viewing Video
1. In the file menu, slide to the + or – to
highlight "Video".
2. Slide to the
to view video files and
then slide to the + or – to highlight a
desired video.
3. Press
or slide to the
to play the
highlighted video.
• Press
to pause playback and again
to resume it.
4. Press to stop viewing video and
return to the file menu.
Skipping Video
Before transferring video files to your
portable device, you must use the video
transcoder software to convert the
video to a format suitable for playing
in your portable device. This video
transcoder software relies on the video
codecs already installed in your
computer. Make sure the video file you
wish to convert plays on your computer
before using the video transcoder
software. Note that some video files
that play on your computer may rely on
specialized video playback applications
that are not compatible with the video
transcoder software.
• To skip to the next video, slide to
the
.
• To skip to the previous video, slide to
the .
Scanning Video
• To fast reverse quickly, slide and hold
to the
during playback.
• To fast forward quickly, slide and hold
to the
during playback.
Tips: Refer to the software
user manual for transferring
picture or video clip files to
the player.
18
Setting the Player
EN
Settings
1. Press M once or twice to access the
player menu (refer to page 8 for more
details)
2. Slide to the + or – to highlight
“Settings”.
3. Slide to the
to enter the setting
menu. Slide to the + or – to highlight a
desired option. The following items
are available.
• Brightness (adjusts the display
brightness, 8 levels available),
• Screensaver (adjusts the duration
before screensaver activation, 5
options available),
• Power Save (adjusts the duration
before automatic shut down, 5
options available),
• FreqStep (Frequency Step) (selects
between US and Europe frequency
mode),
• Lyrics (hides or shows lyrics on the
playback screen if they are available.
Refer to “About Lyrics” on this page),
• Language (selects the display
language),
• Flip Display (flips the display by 180o
rotation),
• Restore Defaults (restores all
settings to default values by pressing
SEL or sliding to the
).
19
4. Unless otherwise indicated, select
available options within each item by
pressing SEL or sliding to the
repeatedly. To exit the setting menu,
press M.
System Info
1. Press M once or twice to access to
player menu (refer to page 8 for more
details)
2. Slide to the + or – to highlight “System
Info”.
3. Slide to the
to check memory
usage and firmware version.
About Lyrics. The unit
supports LRC lyric format
(seperated file with the same
name as the original music file but
with .lrc as the file extension) and
Lyrics3 V2.0 lyric format (lyrics
already embedded in the music files).
For LRC format, you should copy both
music and LRC lyric files to the unit in
the same folder.
For Lyrics3 format, you only need to
copy the music files to the unit.
More Information
Troubleshooting Tips
The player does not turn on when
the PLAY button is pressed?
• Battery may be empty.
• Press the reset button to reset the
player.
Skipping tracks or bad sound
quality?
• Repeat, random or playlist function
may be activated.
• There may be strong magnetic fields
(e.g. too close to TV) near the unit.
• Low Battery level.
Cannot perform playback?
• LOCK function may be activated.
• There may be no mp3/WMA tracks in
the internal memory.
USB display does not appear when
connected to computer?
• Check connection between your unit
and the computer. (Refer to the
software instruction manual)
• You may have to re-associate the
drive letter that was assigned to the
device. Please check your help on
Windows for details on assigning a
different drive letter.
Cannot playback tracks on the
player.
• Make sure audio tracks are encoded
in the mp3 or Windows Media
formats at supported bitrates.
Bitrates supported by the player:
mp3 – 32 to 320 kbps
wma – 48 to 192 kbps
• WMA or audiobooks files may be DRM
protected and you don’t have the
proper rights (license) to play the files.
• Check the website and/or application
help system of the music download
service provider from where the
content was purchased for
license acquisition details. For more
information on how license
acquisition works, go to
www.microsoft.com/windows/window
smedia/forpros/drm/default.mspx.
• Play the original or downloaded song
on your computer to ensure that
there was nothing wrong with the
encoding of the mp3 or WMA.
Cannot view picture or video clip
files.
• Video clip files must be converted to
optimum format by video converter.
• Picture and converted video clip files
must be copied to the root directory
on the player for viewing.
Cannot show lyrics?
• Refer to page 19 for setting the unit
to show lyrics and the lyric format
supported.
20
EN
More Information
EN
The player does not work after
reformat.
• In case you need to reformat the
player, it must be in FAT32 format. The
player does not work in NTFS format.
My computer does not boot-up if
the player is connected prior to
turning on the PC.
• In order to improve the performance
of your portable music player and
allow a faster download experience,
the storage in your device has been
formatted using a larger sector size.
The BIOS in some older computers
does not support this larger sector
size, which causes it not to recognize
the device when the PC is booting-up.
To correct this, simply disable the
"boot from USB" option in your
computer BIOS or wait until your
computer has completed its boot-up
sequence before connecting your
portable music player.
Check for Updates
Visit http://www.rca.com/
digitalaudiodownloads for the latest
news and firmware upgrades for our
Digital Audio Player. You must update
your system after new downloads have
been made in order for the new
applications to be executed.
21
Note:
For better result, we
recommend a constant
encoded bit rate from 32 to 320kbps
for mp3 and 48kbps to 192kbps for
Windows Media Audio.
Nevertheless, your unit can play tracks
encoded in variable bit rate (VBR).
This unit may temporarily cease to
function if subjected to electrostatic
disturbance. To resume to normal
functioning, you may use a pin to
activate the reset button.
Frequently Asked
Questions
You can get FAQ information at
www.rca.com/digitalaudiofaq.
Specifications
Weight: 30g
Dimensions: 70.6 mm (Length) x 32mm
(Width) x 14.4mm (Thickness).
Canadian Limited Warranty
Thomson multimedia Ltd. warrants to the purchaser or gift recipient that if any manufacturing
defect becomes apparent in this product within 1 year from the original date of purchase, it will be
replaced free of charge, including return transportation.
This warranty does not include damage to the product resulting from accidents, misuse or leaking
batteries.
Should your product not perform properly during the warranty period, either:
1. Return it to the selling dealer with proof of purchase for replacement,
OR
2. Remove the batteries (where applicable), and pack product complete with accessories in the
original carton (or equivalent).
— Mail prepaid (with proof of purchase) and insured to:
Thomson multimedia Ltd.
6200 Edwards Blvd.,
Mississauga, Ontario L5T 2V7
Canada
The provisions of this written warranty are in addition to and not a modification of or subtraction
from the statutory warranties and other rights and remedies contained in any applicable legislation,
and to the extent that any such provisions purport to disclaim, exclude or limit any such statutory
warranties and other rights and remedies, such provisions shall be deemed to be amended to the
extent necessary to comply therewith.
If you are unable to find a qualified servicer for out of warranty service, you may write to:
Thomson Inc.
P.O. Box 0944
Indianapolis, Indiana, U.S.A., 46206-0944
Attach your sales receipt to this booklet for future reference. This information is required if service is
needed during the warranty period.
PURCHASE DATE
NAME OF STORE
22
EN
Thomson Inc.
P.O. Box 1976
Indianapolis, IN 46206-1976
© 2006 Thomson Inc.
Trademark(s) ® Registered
Marca(s) ® Registrada(s)
Marque(s) ® Deposée(s)
www.rca.com
Printed In China / Impreso en China
Tocom (v3.0)
u s e r
m a n u a l
Software
Installation
File Transfer
It is important to read this instruction book prior to using your new product for the first time.
End User License Agreement
EN
IMPORTANT: READ CAREFULLY BEFORE
DOWNLOADING OR INSTALLING THIS SOFTWARE!
THIS END USER LICENSE AGREEMENT (THIS “EULA”) IS A
LEGAL AGREEMENT BETWEEN YOU AND THOMSON INC.,
OR ANY THOMSON GROUP ENTITY, AS DEFINED BELOW
(COLLECTIVELY “THOMSON ENTITY”), FOR THE RCA OR
THOMSON BRANDED PORTABLE DIGITAL AUDIO/VIDEO
DEVICE APPLICATION/DRIVER SOFTWARE PROGRAM AND
ASSOCIATED DOCUMENTATION, IF ANY (COLLECTIVELY,
THE “PROGRAM”). THIS EULA CONTAINS IMPORTANT
LEGAL LIMITATIONS, RESTRICTIONS AND DISCLAIMERS,
AND ALSO SPECIFIES THE DURATION OF YOUR LICENSE.
BY INSTALLING THE PROGRAM OR CLICKING ON THE
ACCEPTANCE BUTTON OF THE PROGRAM, COPYING OR
OTHERWISE USING THE PROGRAM, YOU ACKNOWLEDGE
AND AGREE THAT YOU HAVE READ THIS EULA,
UNDERSTAND IT, AND AGREE TO BE BOUND BY ITS
TERMS AND CONDITIONS. YOU MAY USE THE PROGRAM
ONLY IN ACCORDANCE WITH THIS EULA, AND ANY SUCH
USE IS HEREBY UNDERSTOOD TO BE CONDITIONAL UPON
YOUR SPECIFIC AGREEMENT TO THE UNMODIFIED TERMS
SET FORTH HEREIN. IF YOU DO NOT AGREE WITH ALL OF
THE TERMS OF THIS EULA, CLICK ON THE REJECTION
BUTTON AND/OR DO NOT INSTALL THE PROGRAM
AND/OR DO NOT USE THE PROGRAM.
1. LICENSE
(a) Under this EULA, you are granted a license (i) to use
the Program on a single workstation, and (ii) to make one
(1) copy of the Program into any machine-readable form
for backup of the Program, provided the copy contains all
of the original Program's proprietary notices.
(b) You may transfer the Program and license to another
party only as a part of the Thomson/RCA branded
Portable Digital Audio/Video Device (“A/V Device”), and
only if the other party agrees to accept the terms and
conditions of this EULA. If you transfer the Program, you
must at the same time either transfer all copies to the
same party or destroy any copies not transferred.
(c) The terms of this EULA will govern any software
upgrades or updates provided by THOMSON Entity that
replace and/or supplement the original Program, unless
such upgrade or update is accompanied by separate
license terms and conditions in which case the terms of
that separate license will govern. You acknowledge and
agree that THOMSON Entity may automatically download
upgrades or updates to the Program software to your
computer in order to update, enhance, and/or further
develop the Program.
2. LICENSE RESTRICTIONS
(a) Except for the licenses expressly granted to you in this
EULA, no other licenses or rights are granted or implied.
(b) You may not (i) make the Program available over a
network where it could be used by multiple computers at
the same time; (ii) modify, translate, reverse engineer,
decompile, disassemble (except to the extent that this
restriction is expressly prohibited by law), or create
derivative works based upon the Program; or (iii) copy
the Program, except as expressly permitted herein. You
agree that you shall only use the Program in a manner
that complies with all applicable laws in the jurisdictions
in which you use the Program, including, but not limited
to, applicable restrictions concerning copyright and other
intellectual property rights.
(c) The Program may contain pre-release code that does
not perform at the level of a final code release. In such
case, the Program may not operate properly. Updated
versions of the Program may be downloaded from
www.rca.com (if purchased in the United States) and
www.thomson-lyra.com (if purchased in Europe).
(d) THOMSON Entity is not obligated to provide support
services for the Program.
(e) The Program is provided with “RESTRICTED RIGHTS”.
Use, duplication, or disclosure by the U.S. Government is
subject to restrictions as set forth in subparagraph
(c)(1)(ii) of DFARS 252.227-7013, or FAR 52.227-19, or in
FAR 52.227-14 Alt. III, as applicable.
3.TERM AND TERMINATION
(a) Your license is effective on the date you accept this
EULA and remains in effect until this EULA is terminated
by either party.
(b) You may terminate this EULA and the associated
license, without any notice or delay, by destroying or
permanently erasing the Program and all copies thereof.
(c) If you fail to comply with any of the terms of this
EULA, in whole or part, your license will automatically
terminate without notice from THOMSON Entity.
(d) Upon termination of this EULA and your associated
license, you shall cease all use of the Program and destroy
or permanently erase the Program and all full or partial
copies thereof.
4. WARRANTY DISCLAIMER
THE PROGRAM IS PROVIDED “AS IS” WITHOUT
WARRANTY OF ANY KIND, EITHER EXPRESSED OR
IMPLIED, INCLUDING, BUT NOT LIMITED TO THE IMPLIED
WARRANTIES OF MERCHANTABILITY, FITNESS FOR A
PARTICULAR PURPOSE, TITLE OR NON-INFRINGEMENT.
THE ENTIRE RISK AS TO THE QUALITY AND
PERFORMANCE OF THE PROGRAM IS WITH YOU.
SHOULD THE PROGRAM PROVE DEFECTIVE, YOU (AND
NOT THOMSON ENTITY, ITS SUPPLIERS, OR ITS DEALERS)
ASSUME THE ENTIRE COST FOR ALL NECESSARY REPAIR
OR CORRECTION.
End User License Agreement
This exclusion of warranty may not be allowed under some
applicable laws. As a result, the above exclusion may not
apply to you, and you may have other rights depending on
the law that applies to you.
5. OWNERSHIP RIGHTS
All title and intellectual property rights in and to the
Program and any copies thereof are owned by THOMSON
Entity or its suppliers. All title and intellectual property
rights in and to the content which may be accessed
through use of the Program is the property of the
respective content owner and may be protected by
applicable copyright or other intellectual property laws
and treaties. This license grants you no rights to use such
content.
6. LIMITATION OF LIABILITY
(a) TO THE MAXIMUM EXTENT PERMITTED BY
APPLICABLE LAW, IN NO EVENT SHALL THOMSON ENTITY,
OR ITS DEALERS BE LIABLE FOR ANY SPECIAL, INCIDENTAL,
INDIRECT, OR CONSEQUENTIAL DAMAGES WHATSOEVER
(INCLUDING, WITHOUT LIMITATION, DAMAGES FOR LOSS
OF PROFITS, BUSINESS INTERRUPTION, CORRUPTION OF
FILES, LOSS OF BUSINESS INFORMATION, OR ANY OTHER
PECUNIARY LOSS) REGARDLESS OF CAUSE OR FORM OF
ACTION, INCLUDING CONTRACT, TORT, OR NEGLIGENCE,
ARISING OUT OF YOUR USE OF OR INABILITY TO USE THE
PROGRAM, EVEN IF THOMSON ENTITY HAS BEEN ADVISED
OF THE POSSIBILITY OF SUCH DAMAGES. BECAUSE SOME
STATES AND JURISDICTIONS DO NOT ALLOW THE
EXCLUSION OR LIMITATION OF LIABILITY OF
CONSEQUENTIAL OR INCIDENTAL DAMAGES, THE ABOVE
LIMITATION MAY NOT APPLY TO YOU.
(b) YOU ASSUME RESPONSIBILITY FOR THE SELECTION OF
THE APPROPRIATE PROGRAM TO ACHIEVE YOUR
INTENDED RESULTS, AND FOR THE INSTALLATION, USE,
AND RESULTS OBTAINED.
7. WINDOWS MEDIA
The software embedded within your A/V Device (the
“Device Firmware”) contains software licensed from
Microsoft that enables you to play Windows Media Audio
(WMA) files (“WMA Software”). The WMA Software is
licensed to you for use with your A/V Device under the
following conditions. By installing and using this version
of the Device Firmware, you are agreeing to these
conditions. IF YOU DO NOT AGREE TO THE END USER
CONDITIONS OF THIS SECTION 7, DO NOT INSTALL OR USE
THIS VERSION OF THE DEVICE FIRMWARE.
The WMA Software is protected by copyright and other
intellectual property laws. This protection also extends to
documentation for the WMA Software, whether in
written or electronic form.
GRANT OF LICENSE. The WMA Software is only licensed to
you as follows:
You may use this version of the Device Firmware
containing the WMA Software only as such use relates to
your A/V Device.
You may not reverse engineer, decompile, or disassemble
the WMA Software, except and only to the extent that
such activity is expressly permitted by applicable law.
You may transfer your right to use the Device Firmware
only as part of a sale or transfer of your A/V Device, on the
condition that the recipient agrees to the conditions set
forth herein. If the version of the Device Firmware that
you are transferring is an upgrade, you must also transfer
all prior versions of the Device Firmware that you have
which include the WMA Software.
MICROSOFT IS NOT PROVIDING ANY WARRANTY OF ANY
KIND TO YOU FOR THE WMA SOFTWARE, AND
MICROSOFT MAKES NO REPRESENTATION CONCERNING
THE OPERABILITY OF THE WMA SOFTWARE.
The WMA Software is of U.S. origin. Any export of this
version of the Device Firmware must comply with all
applicable international and national laws, including the
U.S. Export Administration Regulations, that apply to the
WMA Software incorporated in the Device Firmware.
Content providers are using the digital rights
management technology for Windows Media contained in
your A/V Device (“WM-DRM”) to protect the integrity of
their content (“Secure Content”) so that their intellectual
property, including copyrights, in such content is not
misappropriated. Your A/V Device uses WM-DRM software
to play Secure Content (“WM-DRM Software”). If the
security of the WM-DRM Software in your A/V Device has
been compromised, owners of Secure Content (“Secure
Content Owners”) may request that Microsoft revoke the
WM-DRM Software’s right to acquire new licenses to copy,
display, and/or play Secure Content. Revocation does not
alter the WM-DRM Software's ability to play unprotected
content. A list of revoked WM-DRM Software is sent to
your A/V Device whenever you download a license for
Secure Content from the Internet or from a computer.
Microsoft may, in conjunction with such license, also
download revocation lists onto your A/V Device on behalf
of Secure Content Owners.
EN
End User License Agreement
EN
8. THIRD PARTY SOFTWARE
ANY THIRD PARTY SOFTWARE THAT MAY BE PROVIDED
WITH THE PROGRAM IS INCLUDED FOR USE AT YOUR
OPTION. IF YOU CHOOSE TO USE SUCH THIRD PARTY
SOFTWARE, THEN SUCH USE SHALL BE GOVERNED BY
SUCH THIRD PARTY'S LICENSE AGREEMENT, AN
ELECTRONIC COPY OF WHICH WILL BE INSTALLED IN THE
APPROPRIATE FOLDER ON YOUR COMPUTER UPON
INSTALLATION OF THE SOFTWARE. THOMSON ENTITY IS
NOT RESPONSIBLE FOR ANY THIRD PARTY’S SOFTWARE
AND SHALL HAVE NO LIABILITY FOR YOUR USE OF THIRD
PARTY SOFTWARE.
9. GOVERNING LAW
If you acquired this A/V Device in the United States, this
EULA shall be governed and construed in accordance with
the laws of the State of Indiana, U.S.A. without regard to
its conflict of laws principles. If you acquired this A/V
Device within the European Union, this EULA shall be
governed and construed in accordance with the laws of
France, without regard to its conflict of laws principles. If
you acquired this A/V Device outside the United States or
the European Union, then local law may apply.
10. GENERAL TERMS
This EULA can only be modified by a written agreement
signed by you and THOMSON Entity, and changes from the
terms and conditions of this EULA made in any other
manner will be of no effect. If any portion of this EULA
shall be held invalid, illegal, or unenforceable, the validity,
legality, and enforceability of the remainder of the
Agreement shall not in any way be affected or impaired
thereby. This EULA is the complete and exclusive
statement of the agreement between you and THOMSON
Entity, which supersedes all proposals or prior agreements,
oral or written, and all other communications between
you and THOMSON Entity, relating to the subject matter
of this hereof. “THOMSON Group Entity” when used in
this EULA shall mean any person, corporation, or other
organization, domestic or foreign, including but not
limited to subsidiaries, that is directly or indirectly
controlled by Thomson, French company. For purposes of
this definition only, the term “control” means the
possession of the power to direct or cause the direction of
the management and policies of an entity, whether by
ownership of voting stock or partnership interest, by
contract, or otherwise, including direct or indirect
ownership of more than fifty percent (50%) of the voting
interest in the entity in question.
Table of Contents
End User License Agreement
Transferring Pictures and Videos
. . . . . . . . . . . . . . . . . . . . . . . . .9
Before You Begin . . . . . . . . . . .1
Computer System Requirements . . .1
What’s so special about this mp3
player? . . . . . . . . . . . . . . . . . . . . . . . .2
Disconnecting the Player . . . .10
Getting Started . . . . . . . . . . . .3
Troubleshooting Tips . . . . . . .11
Disconnecting Your Player from
the Computer . . . . . . . . . . . . . . . . . .10
Insert the Included CD-ROM into
CD-ROM Drive . . . . . . . . . . . . . . . . . .3
Connecting to the Computer . .4
Connecting the Player to the
Computer . . . . . . . . . . . . . . . . . . . . . .4
Transferring Music . . . . . . . . . .5
Transferring Files to the Digital
Audio Player . . . . . . . . . . . . . . . . . . . .5
Transferring Files via Yahoo! Music
Engine . . . . . . . . . . . . . . . . . . . . . . . . .6
Transferring Files via Windows Media
Player . . . . . . . . . . . . . . . . . . . . . . . . .7
Transferring Files via Windows Explorer
(Drag and Drop) . . . . . . . . . . . . . . . . .8
The descriptions and characteristics given in this document are given as a general indication and not as a guarantee. In
order to provide the highest quality product possible, we reserve the right to make any improvement or modification
without prior notice. The English version serves as the final reference on all products and operational details should
any discrepancies arise in other languages.
EN
Before You Begin
EN
Dear RCA Customer,
Thank you for purchasing the RCA
Digital Audio Player. Our products
will play open mp3 and Windows
Media™ audio (WMA) content and
for certain models, content
purchased from most online music
download services.
After purchasing and downloading
music to your PC, you are now ready
to move content to your player. To
transfer the music, you may use the
applications recommended by the
online music download service.
!
Warning:
Use of this product is for your
personal use only. Unauthorized
recording or duplication of
copyrighted material may infringe
upon the rights of third parties and
may be contrary to copyright laws.
1
Computer System
Requirements
• Pentium III 500MHz or higher
recommended
• Windows® 2000, or XP
• Internet Explorer 4.0 or higher
• Internet access
• 200MB free hard disk space for the
software
• 64MB RAM (128 MB recommended)
• CD-ROM drive capable of digital audio
extraction
• USB port (2.0 recommended)
• Sound card
Before You Begin
What’s so special about
this mp3 player?
This player is meant to play mp3 and
Windows MediaTM audio files
transferred in the built-in flash memory.
To do so, you need the use of a
Windows computer with USB port and a
music management software (Yahoo!
Music Engine or Window Media Player
recommended).
These components do the following:
• to use a music management software
to organize your music collection,
• to enable you to transfer files from
your computer to your Digital Audio
Player.
EN
The Music Management CD that comes
with your Digital Audio Player contains
all of the necessary software
components you need to make your
Digital Audio Player work properly.
2
Getting Started
EN
Inserting the Included CDROM into CD-ROM Drive
1. Turn on your computer and place the
Music Management CD that comes
with your digital audio player into your
computer.
Note:
Don’t connect the USB device
to the PC or digital audio player before
or during the CD-ROM installation.
This player is supported by Windows
2000 and XP only. No driver for
Windwos 98 is provided.
3
2. If the setup screen does not appear,
double click My Computer, double click
your CD-ROM drive icon, and double
click “Install” to run the installer.
Note: The Music Management
CD may contain one or more
music management software that can
help transfer music content to your
digital audio player. Please refer to the
relevant section in the user manual for
basic transfer operations of your
installed software.
Connecting to the Computer
Connecting the Player to
the Computer
Connect the Digital Audio Player to your
computer. If a USB connection cable is
provided, connect it to the player first
before the computer. The larger end of
the cable should be connected to the
computer while the smaller end to the
player.
The player
Some models can be directly connected to
the USB port of the computer. If
necessary, an optional USB extension
cable can be used.
EN
Note
It might take several seconds
for the device (the Digital Audio
Player) to be detected, especially in
Windows 2000/XP. Click Refresh in My
Computer or Explorer to make sure the
device has been detected.
Note
The Digital Audio Player is
capable of transferring files
at full-speed when a USB 2.0
connection is used. USB 2.0 is up to
40 times faster than USB 1.1. If a
USB 2.0 port is available on your
computer, use it to connect to your
Digital Audio Player. The player is still
backward compatible with the older
USB 1.1 ports. However, you will not
be able to take full advantage of the
potential speed increase.
The digital audio player will appear as a
removable disk drive.
4
Transferring Music
EN
Transferring Files to a
Digital Audio Player
Depending on the availability of software
on your Music Management CD specific
to your digital audio player, you can
transfer files to your Digital Audio Player
via 1) Yahoo! Music Engine (Windows XP
only), 2) Windows Media Player or 3)
Windows Explorer (requires no software
installation).
If your Digital Audio Player isn’t already
connected to your computer, connect it to
the computer using the provided USB
cable as illustrated on the previous page.
• Transferring files via Yahoo! Music
Engine (Windows XP only) - refer to
page 6,
• Transferring files via Windows Media
Player - refer to page 7,
• Transferring files via Windows Explorer
(drag-and-drop) - refer to page 8.
Attention
Do not disconnect the USB
connection during music
download. Doing so may corrupt system
files or the files being downloaded.
5
Note
Secure music download files
can be transferred to your
player through Windows Media Player
or Yahoo! Music Engine. (Note:
Services and applications must be
Windows Media audio-compliant and
support Digital Rights Management.
Windows XP with Service Pack 1
required.) (Apple iTunesTM music
content is not supported).
For more information on Yahoo! Music
Engine, visit
http://music.yahoo.com/
For more information on Windows
Media Player, visit
http://www.microsoft.com/windows/w
indowsmedia.
Some wma files may be DRM
protected. You must acquire licenses
for DRM protected wma files before
they can be played on the player.
For more information, go to
www.microsoft.com/windows/
windowsmedia/drm
Transferring Music
Transferring Files via
Yahoo! Music Engine
(Windows XP only)
Yahoo! Music Engine lets you manage
your music easily and organize like a pro.
Create your own playlists: music for
work, the gym, or even dinner. You can
also buy music and transfer to your
digital audio player in seconds. Just drag
and drop and you ‘re done. For more
information on the installation and
operations, please visit:
http://music.yahoo.com/
Transfer to Device button and select
the drive letter to where the playlist is
to be transferred. OR
5. From My Music: drag and drop files
from My Music to the digital audio
player. (You may also drag artists and
albums from My Music).
6. The Yahoo! Music Engine will check to
see if there is sufficient storage space
on the device to copy the songs. If not,
you will have to reduce the number of
songs you are transferring.
Note: Yahoo! Music Engine
only works on Windows XP.
with Service Pack 1 or higher.
1. Launch the Yahoo! Music Engine.
2. Attach the digital audio player to your
computer. You should see the Jukebox
name appear in the left navigation
pane.
3. In the Yahoo! Music Engine, click My
Music or click on a playlist on the left
navigation pane.
4. From a playlist (My Playlists in the left
navigation pane): at the bottom of the
Yahoo! Music Engine window, click the
Attention
Make sure all data are
transferred to the Digital
Audio Player before unplugging the
USB connection.
6
EN
Transferring Music
EN
Transferring Files via
Windows Media Player
If you want to take your music collection
with you, you can easily synchronize
items in your library to your digital audio
player. The Sync feature in the latest
version of Windows Media Player and
allows you to synchronize files in
categories and playlists in your library to
your digital audio player. For complete
details, see the “Synchronizing media to
your device” topic in the Windows
Media Player help documentation.
1. Connect your player to the computer
and open Windows Media Player,
select Library from the menu bar, a
screen will appear as below:
2. From the left column, select the songs,
categories and/or playlist items you
want to copy to the player.
3. Drag the selected items to the right
column.
7
4. Select Sync from the menu bar, a
screen will appear as below:
5. Select Start Sync, the selected items
will now be automatically transferred
to your player.
Attention
Make sure all data are
transferred to the Digital
Audio Player before unplugging the
USB connection.
Transferring Music
Transferring Files via
Windows Explorer (Drag
and Drop)
From Windows Explorer, highlight all the
files/folders you want to transfer to your
Digital Audio Player and drag them to the
drive letter that is associated with it.
EN
Attention
Some wma files may be DRM
protected and they must be
transferred to your player via music
management software that supports
Windows Media DRM such as Yahoo!
Music Engine and Windows Media
Player. You cannot listen to these
protected files if transferred via
Windows Explorer.
For more information, go to
www.microsoft.com/windows/
windowsmedia/drm
Attention
Make sure all data are
transferred to the Digital
Audio Player before unplugging the
USB connection.
8
Transferring Pictures and Videos
EN
Picture and converted video files should
be transferred via Windows Explorer
(drag-and-drop) in the shown root
directory. Picture and video files will not
play from any created subfolders.
Make sure the video file you wish to
convert plays on your computer before
using the video transcoder software.
Note that some video files that play on
your computer may rely on specialized
video playback applications that are not
compatible with the video transcoder
software.
Attention
Make sure all data are
transferred to the Digital
Audio Player before unplugging the
USB connection.
Before transferring video files to your
portable device, you must use the video
transcoder software to convert the video
to a format suitable for playing in your
portable device. This video transcoder
software relies on the video codecs
already installed in your computer.
9
Disconnecting the Player
Disconnecting Your Player
from the Computer
For Windows XP, from the System Tray,
double click the left mouse button on the
icon
and select Safely Remove
Hardware. Select the drive corresponding
to your player and click STOP.
Before disconnecting the USB connection
from the computer or the Digital Audio
Player, be sure the "Safe to Remove
Hardware" message is displayed.
Attention
If you want to go back to USB
mode for file transfer at this
stage, you need to unplug and connect
the player to the PC again.
Attention
The Stop a Hardware device screen
appears. Select the device to be stopped
again for confirmation and click OK.
Make sure all data are
transferred to the Digital
Audio Player before unplugging the
USB connection.
The description on this page is based
on Windows XP. If you are running
other operating systems, there may be
some differences. See the Windows
Help for details about safely removing
hardware.
You can also stop your player by left
clicking on the
icon from the system
tray and selecting the drive
corresponding to your player.
10
EN
Troubleshooting Tips
EN
After connecting the player to computer,
"USB connected" does not appear on the
display.
• Make sure the device is powered on. Some
players do not automatically come on when
plugged into the computer.
• Make sure that the USB connections to the
computer and device are securely in.
Cannot access the player via Windows
2000 computer.
• Install the Service Pack 3 for Windows 2000.
Visit www.windowsupdate.
microsoft.com to check for the latest
updates.
Cannot playback tracks on the player.
• Make sure audio tracks are encoded in the
mp3 or Windows Media formats at supported
bitrates. Please check the player’s user
manual for bitrates supported.
• WMA files may be DRM protected and you
don’t have the proper rights (license) to play
the files.
• Check the website and/or application help
system of the music download service
provider from where the content was
purchased from for license acquisition details.
• For more information on how license
acquisition works, go to
www.microsoft.com/windowsmedia/drm
11
What does the PlaysForSure logo mean?
(available on certain models)
• PlaysForSure is a new logo program from
Microsoft®. Consumers can match the
PlaysForSure logo on a large selection of
devices and online music stores. If you see the
logo, you’ll know your digital media will play
for sure.
• For more information on the Microsoft
PlaysForSure program, visit
www.PlaysForSure.com.
• For more information on RCA PlaysForSure
devices, visit www.rca.com.
The device cannot be recognized by
Audible Manager
• Your previously installed Audible Manager
may not work with this player. You have to
reinstall Audible Manager completely by
following the instructions from your CD-ROM
which comes with this digital music player.
IMPORTADOR
Comercializadora Thomson de México, S.A. de C.V.
Álvaro Obregón No. 151. Piso 13.
Col. Roma. Delegación Cuauhtémoc
C.P. 06700. México, D.F.
Telefono: 52-55-11-020360
RFC: CTM-980723-KS5
Thomson Inc.
P.O. Box 1976
Indianapolis, IN 46206-1976
© 2006 Thomson Inc.
Trademark(s) ® Registered
Marca(s) ® Registrada(s)
Marque(s) ® Deposée(s)
www.rca.com
Printed In China / Impreso en China
TOCOM (v1.0) MC2600