1
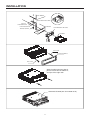
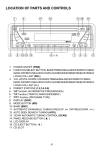
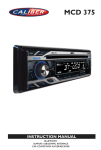
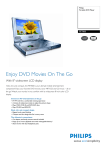
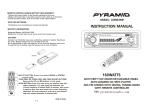
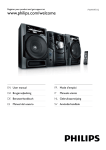
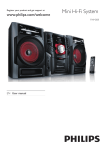
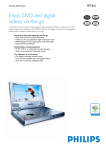
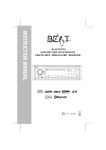
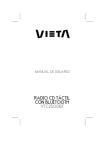
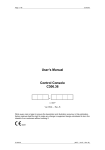
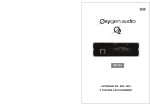
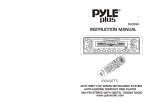
PLCD35
INSTRUCTION MANUAL
CAR AUDIO
REMOTE CONTROLLER
ANTI-THEFT FLIP DOWN DETACHABLE PANEL
AUTO-LOADING COMPACT DISC PLAYER
AM/FM-MPX DIGITAL PLL TUNING RADIO
WITH INFRARED REMOTE CONTROLLER
www.pyleaudio.com
CUSTOMER NOTICE
For CD/RW+RDS+MP3 model with optional SUBWOOFER function
1
4
3
2
FLIP DOWN DETACHABLE CD/RW Mp3 PLAYER
OPEN
6
5
BND/ENTER
+
/9
REMOTE
-
/8
SEL
1 PAU
7
8
2 SCN
3 RPT
4 SHF
5
6
0/CLK
AF
TA
PTY
Mp3
APS
7/ SW
MODE PWR
9 10 11 12 13 14 15 16 17 18 19 20
For CD/RW+MP3 model with optional SUBWOOFER function
FLIP DOWN DETACHABLE CD/RW Mp3 PLAYER
OPEN
BND/ENTER
+
/9
REMOTE
-
/8
SEL
1 PAU
2 SCN
3 RPT
4 SHF
5
6
0/CLK
MUTE
DSP
SCAN
Mp3
APS
7/ SW
MODE PWR
21 22 23
For CD/RW+RDS model with optional SUBWOOFER function
FLIP DOWN DETACHABLE CD PLAYER
OPEN
BAND
+
REMOTE
-
SW
SEL
1 PAU
2 SCN
3 RPT
4 SHF
5
6
CLK
1
AF
TA
PTY
APS
MODE
PWR
BASIC OPERATION
For CD model with optional SUBWOOFER function
FLIP DOWN DETACHABLE CD PLAYER
OPEN
BAND
+
REMOTE
-
SW
SEL
1 PAU
2 SCN
3 RPT
4 SHF
5
6
CLK
RESET
24
25
CDC CONNECTOR OR AUX CABLE
2
MUTE
DSP
SCAN
A.PS
MODE
PWR
BASIC OPERATION
1. OPEN BUTTON
Press it to flip down the front panel then you can insert the cd disc into the cd
compartment.
2.3.7 SEL (AUDIO MODE SELECT)/ +/- BUTTONS
Press SEL button to change the mode in the sequence of
VOL
(Volume)
BAS
(Bass)
TRE
(Treble)
BAL
(Balance)
FAD
(Fader)
A. The volume level can be adjusted at any time by pressing the audio level+or- button
as select mode has been initially defaulted at volume mode.
B. The volume level is also obtained by stepping through the SEL button until
the function VOL is displayed and then press + or - button to adjust the sound level.
C. Press and hold the + or - button to adjust the sound level.
D. Adjust sound balance between front and rear speakers by using + and - buttons.
E. Press SEL button hold for more than 2 seconds and select + or- button can have a beep
sound.
4.6.TRACK UP /DOWN BUTTONS
button allow you to track forwards.
A. During CD mode, press
Hold the
button allow you to skip forwards.
button allow you to track forwards.
B. During Mp3 mode, press
button allow you to skip forwards.
Hold the
For Mp3 playing (MP3 model only), these two buttons act as the digit 8 & 9 key.
or
for more than 2 seconds you can
C. During RADIO mode, press and hold
manual search channel.Then press
or
, you can have auto search channel.
5. BAND BUTTON
Press it to select your desired radio band and the band which is selected will be
displayed on LCD. Press it hold for more than 2 seconds can have LOUD mode.
LOUD MODE:
When reduce the volume to half level, press it to enhance the bass effect.
For Mp3 playing (MP3 model only), this button can act as the ENTER key.
8-9-10-11-12-13. PRESET MEMORY BUTTONS
A). To memorize the current frequency, press any one of the six preset Buttons hold for more
than 2 seconds.
B).To recall the preset memory, press one of the preset buttons [0-6].
C).RADIO MODE
When pressed short, these keys select a preset station directly, When pressed longer
than one seconds, current station is stored in preset memory bank. When PTY mode is
selected, the preset memory buttons is shared as follows:
PTY music group - - PTY speech group - - OFF MUSIC SPEECH
1. POP M, ROCK M
1. NEWS, AFFAIRS, INFO
2. EASY M, LIGHT M
2. SPORT, EDUCATE, DRAMA
3. CLASSICS, OTHER M
3. CULTURE, SCIENCE, VARIED
4. JAZZ, COUNTRY
4. WEATHER, FINANCE, CHILDREN
5. NATION M, OLDIES
5. SOCIAL, RELIGION, PHONEIN
6. FOLK M
6. TRAVEL, LEISURE, DOCUMENT
D).In CDP mode, press 1PAU button to pause CDP playing, press it again to resume
CDP playing.
E). In CDP mode, press 2SCN button to play the first 10 seconds part of each song, press
it again to stop scanning and retain playing the song currently selected.
F). In CDP mode, press 3RPT button to play the current track repeatedly. Press it again to
cancel this mode.
G).In CDP mode, press 4SHF button to play the track in random order. Press it again to
cancel this mode.
H).In CDC mode (optional), M5/M6 are used as UP/DOWN buttons to select DISC.
3
BASIC OPERATION
14. CLOCK BUTTON
Press it to display time on LCD for few seconds. Press it hold and then press
button to adjust hour or minute.
or
15. AF BUTTON (for RDS model only)
AF [ALTERNATIVE FREQUENCIES]
When pressed short, AF switching mode is selected and the state of AF switching
mode is displayed by AF segment in display.
Segment off: AF switching mode off.
Segment on: AF switching mode on, and has RDS information.
Segment flashing: AF switching mode is selected, but RDS information is not
received yet.When AF switching mode is selected, the radio checks the signal
strength of AF all the time. The interval of checking time of each AFs depends on
the signal strength of current station, from a few minute for strong station to a few
seconds for weak station. Everytime that new AF is stronger than current station, it
switches over to that frequency for very short time, and NEW FREQUENCY is
displayed for 1-2 second. Because the mute time of AF switching or checking time
is very short, it is almost inaudible in case of normal program.When pressed long,
it is activated of regional mode on /off .
Regional mode ON
AF switching or PI SEEK is implemented to the station which have all PI codes are
the same as current station.REG of individual segment is turned on also together
with displaying REG ON numeric display for a few seconds.
Regional mode OFF
The regional code in the format of PI code is ignored when AF switching or PI SEEK
is implemented. REG of individual seg. is turned off together with displaying REG
OFF on numeric display for a few seconds.
16. TA BUTTON (for RDS model only)
TA function [TRAFFIC ANNOUNCEMENT] BUTTON
When pressed short, it is activated as TA mode on or off.
When TA mode is on and traffic announcement is transmitted:
1). When the unit is in CD mode, it will switch to radio mode temporarily.
2). Temporary switch over to an EON linked station when EON detects a traffic
announcement on that other program.
3). If the volume level was under the threshold point, it will be raised to the threshold
point.
But the user changed the volume level which was more than the threshold point
(min. TA volume level), it will be set to the last level.
When pressed long , it is selected EONTA LOCAL / EONTA DISTANCE mode.
The purpose of this key is to reduce unwanted EON TA switching, which EON TA
information was received from current station and the radio switched to that EON
linked station, but no information could not be received because the EON linked
station is located too far from that area.
So the radio is switched back to current station again.
In above operation, a customer listen to a wrong program or mute sound for a while.
EONTA LOCAL mode
When the filed strength level of EON linked is less than the threshold level, the radio
does not switch that station, and a customer can hardly listen to any disturbances.
When EONTA LOACL mode is selected, EONTA LO on numeric display is indicated
for a few seconds.
EONTA DISTANCE mode
EON TA switching is try to implemented by the information of current station .
When EONTA DISTANCE mode is selected, EONTA DX on numeric display is
indicated for a few seconds.
4
BASIC OPERATION
17. PTY(PROGRAM TYPE) BUTTON
This key is operated as follows:
PTY MUSIC group- - PTY SPEECH group- - PTY OFF
While selecting PTY TYPE, its selection is implemented by preset buttons as
described in preset key. When PTY is selected, the radio starts to search
corresponding PTY information, and stops if the corresponding PTY information is
detected.
If corresponding PTY information is not existed any more, PTY type is automatically
exit to normal mode.
18. APS/MP3 BUTTON
In radio mode:
When short pressing, the radio searches for each preset station.
When the field strength level is more than the threshold level of stop level, the radio is
holding at that preset number for few secretary with releasing mute, and than
searches again. In FMband, FM 1, FM 2 and FM 3 is checked one at a time. When
long pressing (more than 1 second),the radio searches from the current frequency
and checks the signal strength level until 1 cycle search is finished. And then 6
strongest stations are preset to the corresponding preset number.
The AS operation is implemented in the each band of selected band. When the AS
operation is finished, the radio executes the preset scan.
In MP3 mode, press 0-9 and ENTER button to play the track in 1-108 number.
19. MODE BUTTON
Press it repeatedly to select CDP, AUX and RADIO mode in sequence and
circulation.
For SUB WOOFER function(optional), press and hold for more than 2 seconds can have
WOOFER Mode.
For Mp3 playing (MP3 model only), this button can act as the digit 7 key.
20. POWER BUTTON
Press it to turn on or off the unit.
21. MUTE BUTTON
Press it to eliminate the sound immediately.
22. DSP BUTTON
Press it to switch between 4 preset equalizer curves: FLAT, CLAS, POP M, ROCK
M. The sound quality will be changed.
23. SCAN BUTTON
Press it to scan up by one channel step with station detection.If a valid signal has
detected, the current frequency is blinked within 5 seconds,then press it again to
stop scan and remain the current frequency; otherwise, the unit continue to scan
up by one channel step with station detection 5 seconds later.
24. FLASHING LED
If the front panel is not on the main unit, LED will be flashing.
25. RESET
RESET button is placed on the housing and must be activated with either a ballpoint
pen or thin metal object.The RESET button is to be activated for the following
reasons:
- Initial installation of the unit when all wiring is completed.
- All the function buttons do not operate.
- Error symbol on the display.
Note:If press RESET button, the unit can’t work yet, please use a cotton swab
soaked in isopropyl alcohol to clean the socket on the back of the front panel.
5
ELECTRIC CONNECTION
FOR 4X7W or4X30W
AUX cable (optional)
ANTENNA CONNECTOR
RCA RED
LCH WHITE
OR
CDC connector (optional)
IGNITION RED
SWITCH (B+)
YELLOW
MEMORY (B+)
FUSEBOX
FRONT RCA OUTPUT
CABLE (optional)
GROUND (B-) BLACK
AUTO
BLUE
ANTENNA
RCH RED
LCH WHITE
WHITE
GREY
WHITE/BLACK
GREY/BLACK
GREEN
VIOLET
GREEN/BLACK
VIOLET/BLACK
FRONT
FRONT
LchSPK
RchSPK
REAR
LchSPK
REAR
RchSPK
FOR SUBWOOFER (4X7W or 4X30W)
AUX cable (optional)
ANTENNA CONNECTOR
RCA RED
LCH WHITE
OR
CDC connector (optional)
IGNITION RED
SWITCH (B+)
YELLOW
MEMORY (B+)
SUB WOOFER
RCA
FRONT RCA OUTPUT
CABLE (optional)
GROUND (B-) BLACK
AUTO
BLUE
ANTENNA
FRONT
LchSPK
RCH RED
LCH WHITE
WHITE
GREY
WHITE/BLACK
GREY/BLACK
GREEN
VIOLET
GREEN/BLACK
VIOLET/BLACK
LchSPK
REAR
GREEN
FUSEBOX
FRONT
RchSPK
REAR
RchSPK
NOTE:
In spite of having any kinds of speaker system,must use 4 ohms impedance of speaker
to reduce the distortion during high volume level.
6
INSTALLATION
DASH BOARD
METAL MOUNTING STRAP
HEX NUT
SPRING WASHER
CONSOLE
PLAIN WASHER
SLIDE BRACKET HOUSING
TAPPING SCREW
HEX BOLT
KEY PLATE
PLASTIC TRIM OUT
KEY PLATE
While installing the front panel,
please mount the left side first,
then push the right side.
TAPPING SCREW (M1.7X4 KM BLACK)
7
INSTALLATION
CAUTION: Do not install the detachable panel before connecting the wire.
1. The unit is designed for negative terminal of the battery which is connected to the
vehicle metal. Please confirm it before installation.
2. If the car interior is extremely hot, as after being parked in the sun, do not use the
player until the car has been driven for a while to cool off the interior.
3. Press the OPEN button to flip down the front panel (see fig.1), then take away the
front panel (see fig.2) and put it in the protective case (see fig.3) safe keeping.
4. Install the front panel back into its bracket and then push it back to the position for
playing (see fig.4).
FRONT PANEL
FRONT PANEL
OPEN BUTTON
( FIG.1)
( FIG.2)
PROTECTIVE CASE
FRONT PANEL
FRONT PANEL
( FIG.3)
( FIG.4)
8
DISC NOTES
DISC PLAY:
Cleaning discs
Before playing, clean the disc with a clean, lint-free.
Flip the disc in the direction of the arrow.
NOTE:
Do not use so solvents such as benzine, thinners. Commercially available
cleaners or anti static spray damage the unit.
Insert a disc with the label surface down. Doing so may damage the unit.
NOTE:
Do not try to insert another disc when one has been already inserted.
Doing so may damage the unit.
Handle the disc by its edge. And to keep the disc clean, do not touch the surface.
Do not stick paper or tape on the disc.
Do not expose the disc to direct sunlight or heat sources such as hot air ducts. Or leave
it in a car parked in direct sunlight where there can be a considerable rise in
temperature.
Label
surface up
Preparing the Remote Control
Inserting the Batteries
1. Open the battery compartment cover.
2. Insert the new batteries.Make sure that the positive and negative terminals of
thebatteries are oriented indicated.
3. Close the cover
Using the Remote Control
Face the remote control towards the player front face IR mark (remote control signal
receiver).
Operation angle: About ± 30 degree in each the direction of the front of the IR mark.
9
SPECIFICATIONS
GENERAL
Power requirement.............................................................................................DC 12V
Current consumption .....................................................................................5A or 15A
POWER OUTPUT ................................................................................4x7W or 4x30W
FM SECTION
Frequency range
For 3 Bands
(Europe)
For 2 Bands
(Europe)
For 2 Bands
(U.S.A.)
87.5 to 108 MHz
87.5 to 108 MHz
87.5 to 107.9 Mhz
Usablesensitivity ......................................................................................................3uV
I.F Frequency .................................................................................................10.7MHz.
AM SECTION
Frequency range
For 3 Bands
(Europe)
For 2 Bands
(Europe)
For 2 Bands
(U.S.A.)
522 to 1620 KHz
522 to 1620 KHz
530 to 1710 Khz
For 3 Bands
(Europe)
For 2 Bands
(Europe)
For 2 Bands
(U.S.A.)
LW SECTION
Frequency range
144 to 288 KHz
LINE - OUT [OPTION]
Output ........................................................................500mV @ FM 10% THDPOWER
CD PLAYER
System ..............................................................................compact disc audio system
Usable disc ..............................................................................................compact disc
Signal format ..................................................................sampling frequency 44.1KHz
No of quantization bits ............................................................................................1bit
Frequency characteristics .............................................5-40Hz-5dB 10K-20KHz - 5dB
Signal to noise radio ....................................................... 70dB [1KHz][IEC-A net work]
Number of channels .....................................................................................2 STEREO
Chassis dimensions ................................................................184 [W] X 54[H] X 170[D]
10
TROUBLE SHOOTING
Before going through the check list, check wiring connection. Should any of the
problems persist after check list has been made, consult your nearest service dealer.
Symptom
No power.
Disc cannot be
loaded or ejected.
Cause
Solution
The car ignition switch is
not on.
If the power supply is properly
connected to the car accessory
terminal, switch the ignition key
to “ACC”.
The fuse is blown.
Replace the fuse.
Presence of disc inside
the player.
Remove the disc in the player,
then put a new one.
Inserting the disc in reverse Insert the compact disc with
direction.
the label facing upward.
No sound.
Sound skips.
The disc is extremely
dirty or defective.
Clean the disc or try to play a
new one.
Temperature inside the car
is too high.
Cool off or until the ambient
temperature return to normal.
Condensation.
Leave the player off for an hour,
then try again.
Volume is in minimum.
Adjust volume to a desired level.
Wiring is not properly
connected.
Check wiring connection.
The installation angle is
more than 30 degrees.
Adjust the installation angle less
than 30 degrees.
The disc is extremely dirty
or defective disc.
Clean the compact disc, then
try to play a new one.
The operation keys The built-in microcomputer
do not work.
is not operating properly
due to noise.
Press the RESET button.
Front panel is not properly fixed
into its place.
The radio does not
work.
The antenna cable is not
connected.
Insert the antenna cable firmly.
The signals are too weak.
Select a station manually.
11
88-C2330-01