1
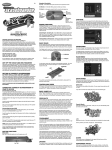
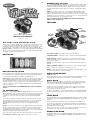
E
CONNECTING TO A VCR
To connect Play TV Monster Truck to your VCR, insert the yellow video
plug from the Main Unit into the video-in (Yellow) jack on your VCR, the
white audio plug into the left audio-in (white) jack. Then set the VCR to
the appropriate video input mode (see your VCR’s operating manual for
details).
NOTE: If your VCR is not stereo, you can either plug the white audio
plug into the audio-in jack, or if you would like to hear the sounds from
both the left and right audio channels, you can use a 2 into 1 audio cable
(available at your local electronics store) to allow you to connect both the
white and red plugs to the single audio-in jack.
TM
ADULT SUPERVISION IS RECOMMENDED WHEN CONNECTING
CABLES TO A TV AND VCR.
FEATURES
NITRO
GEAR
SHIFTER
Model 74026
For 1 player / Ages 8 and up
ON / OFF
BUTTON
HORN /
WEAPON /
ENTER
INSTRUCTION MANUAL
P/N 82385500 Rev.A
Get off the couch and into the arena!
The roar of your engine barely drowns out the roar of the crowd! You hit
the gas and your truck springs to life, tearing onto the arena floor.
Cheers mix with the sounds of crunching metal as you smash into other
monster trucks. You’re number one and on top of the world! Play TV
Monster Truck not only puts you on top of the world but also behind the
wheel of your very own monster truck. Are you ready to tame this 1500
horsepower, metal-crunching machine?
SETTING UP
STEERING
WHEEL
RESET
ON / OFF BUTTON - This button turns the unit on and off.
STEERING WHEEL - Use this to steer your monster truck left and right.
GEAR SHIFTER - Move it forward to give your monster truck the gas.
Center the shifter to brake. Pull back the shifter to make your monster
truck drive in reverse.
NITRO - Press this button to give your monster truck an extra burst of
speed.
HORN / WEAPON / ENTER – Use this button to enter selections during
menu screens, shoot weapons, or activate your horn.
BATTERY INSTALLATION
On the bottom of the main unit, open the battery compartment and insert
four (4) C batteries as indicated inside the compartment (alkaline batteries recommended). Replace the battery compartment door.
NOTE: Batteries in the Main Unit should give you about 8 hours of game
play (if alkaline batteries are used). The game will not operate normally
when the batteries begin to run low. The screen may be blurred and
resetting the game may not work. Be sure to install fresh batteries. There
is also no memory function. All game data will be erased when the batteries are replaced.
RESET - Using a blunt object, press this button to reset the game. Just
be careful, this will erase your current game.
START YOUR ENGINE!
HOW TO PLAY
At the Main Menu screen, use your steering wheel to highlight one of the
following options: Rally Race, Jump Mode, or Demolition Mode.
RALLY RACE
When you choose this game, you must then choose a course to drive:
The Dirty Dash, Mud Madness, Deep Freeze, and Midnight Rush. Each
course varies in its intensity and requires different skills to win.
ADULT SUPERVISION IS RECOMMENDED WHEN INSTALLING BATTERIES.
Finally, you must pick a driver. You have six to choose from and each
has their own car crushing truck. Each truck is different, so be sure to
choose the best truck for the job.
TV CONNECTION
It’s time to race! When you see the green light, move the GEAR SHIFTER
forward to hit the gas. Now just stay in front until you roar past the finish
line!
NOTE: To connect Play TV Monster Truck directly to a TV, the TV must
be equipped with audio and video input jacks. They are commonly found
on the front of the TV near the contrast, color, and picture adjustment
controls or on the rear of the TV near the antenna and cable/satellite
jacks.
If your TV has audio and video input jacks, insert the yellow video plug
from the Main Unit into the video-in (yellow) jack on your TV, the white
audio plug into the left audio-in (white) jack. Then set the TV to the
appropriate video input mode (see your TV’s operating manual for
details).
NOTE: If your TV is not stereo, you can either plug the white audio plug
into the audio-in jack, or if you would like to hear the sounds from both
the left and right audio channels, you can use a 2 into 1 audio cable
(available at your local electronics store) to allow you to connect both the
white and red plugs to the single audio-in jack.
If your TV does not have audio and video input jacks, you may connect
Play TV Monster Truck through a VCR connected to your TV.
JUMP MODE
At the Main Menu, turn the STEERING WHEEL until Jump Events is highlighted. Then press the HORN / WEAPON / ENTER button to lock in your
selection.
Next, choose Car Lot Carnage. In Car Lot Carnage, the objective is to
smash as many used cars as possible by launching into the parking lot.
Press your Nitro Button for an extra boost into the lot. The more cars you
smash the more cash you earn.
Once you’ve chosen your event, choose which driver and monster truck
you’d like to use. Then see how far that big truck can fly!
DEMOLITION MODE
At the Main Menu, turn the STEERING WHEEL until Demolition Events is
highlighted. Then press the HORN / WEAPON / ENTER button to lock in
your selection.
Now you have two events to choose from. In Demolition Derby, you get
to smash other monster trucks! You have a variety of weapons at your
disposal. When a weapon Icon appears, drive your truck over it to pick it
up. Then use your weapon by pressing the HORN / WEAPON / ENTER
button. Weapons either shoot a tire iron from the front of your truck or
drop a bomb from the back of your truck. Use your weapons to smash
the other trucks before they smash you. The last truck moving on the
field is the winner.
King of the Hill is similar to Demolition Derby, except in this event, you
must try to hold the position on the top of the volcano while all the other
trucks are trying to do the same. If you successfully push the other
trucks off the top of the volcano or into the volcano pit you win!
After you’ve chosen your event, choose a player just as before. Then
jump, smash, and crush your way to victory!
MAINTENANCE
• Handle this device carefully.
• Store this device away from dusty or dirty areas.
• Keep this device away from moisture or extreme temperature.
• Do not disassemble this device. If a problem occurs, press the Reset
button, or remove and replace the batteries to reset the device, or try
new batteries. If problems persist, consult the warranty information
located at the end of this instruction manual.
• Use only the recommended battery type.
• Do not mix old and new batteries.
• Do not mix alkaline, standard (carbon-zinc) or rechargeable (nickelcadmium) batteries.
TROUBLE SHOOTING
• Do not use rechargeable batteries.
TV
To locate your auxiliary channel, which is usually not 3 or 4, but a gaming
channel found mostly between 2 and 99, (example 2,1, 0, 99). First try 00
to see if it is the auxiliary channel. Channel down from 3 until a Line 1 or
Line 2, Video 1 or Video 2, Front, Aux, AV, etc., appears on screen, then
push the power button on the game and it should automatically come on
if you have selected the correct channel. If this does not work, another
way to determine your auxiliary channel is to take a look at your television remote. There may be a button on the remote that may take you
directly to the correct channel. The buttons you are looking for may be
labeled Input, AUX, AV, Line, TV/Video, or Video. If your remote has one
of these buttons, turn your television back to Channel 3 and select that
button. The power button on the game should be turned on in order for
the game to appear on the television. If your television remote does not
have any of these buttons, and channel 00 is not working, you may need
to search the main menu for a way to determine your auxiliary channel. If
none of these methods have helped you locate your auxiliary channel,
you may need to check your owner's manual and/or contact a local television repair company.
• Do not attempt to recharge non-rechargeable batteries.
VCR
When connecting to a VCR, you must first start with a blue background
showing on your television screen. To obtain a blue screen, try inserting
a videotape into the VCR, let it start to play, then hit the stop button. This
may give you a blue screen, then you can channel down to your auxiliary
channel. If the blue screen still does not appear, try entering your TV
and/or VCR main menu and see if it gives you options to select a blue
screen background. Many times if you enter the main menu on your television you can change the setting from cable to video and display a blue
screen. Also if you have an older television, you may locate a hidden
door on your television that has color, picture, horizontal, vertical, and
cable, antennae buttons. If your television includes this panel, you can
select the antennae/cable button and see the blue screen appears. If you
have tried all of these options and are still unsuccessful connecting the
console, then you may need to check your VCR owner’s manual or contact the manufacturer to find out how to set up your VCR for console
games.
Remember, you can't play our games through a cable box or satellite, so
if you own one of these make sure it is turned off before connecting the
game. You can connect our games through DVD players with the same
connection as a VCR.
If you still have difficulty with setup or operation of your game, please
call our players helpline between M-F, 9:00am - 5:00pm CST at 1-800803-9611.
If you choose to use an AC Adapter we suggest the following :
Output:
-Voltage: 6 Volts DC
-Current: 300 mA (minimum)
Polarity: Negative Center
Plug Size: 5.5 mm outside diameter, 2.1 inside diameter.
AC Adapters are available at most electronic stores.
If you use the product with a transformer, regularly examine for damage
to the cord, plug, enclosure and other parts. In the event of any damage, do not use the toy with the transformer.
CAUTION
• As with all small batteries, the batteries used with this device
should be kept away from small children who might still put things
in their mouths. If a battery is swallowed, consult a physician
immediately.
• Remove any exhausted batteries from the device.
• Do not short-circuit the supply terminals.
• Insert batteries with the correct polarity.
Please retain this for future reference.
This device complies with Part 15 of the FCC Rules. Operation is subject
to the following two conditions: (1) this device may not cause harmful
interference and (2) this device must accept any interference received,
including interference that may cause undesired operation.
WARNING: Changes or modifications to this unit not expressly approved
by the party responsible for compliance could void the user’s authority to
operate the equipment.
NOTE: This equipment has been tested and found to comply with the
limits for a Class B digital device, pursuant to Part 15 of the FCC Rules.
These limits are designed to provide reasonable protection against harmful interference in a residential installation. This equipment generates,
uses and can radiate radio frequency energy and if not installed and
used in accordance with the instructions, may cause harmful interference
to radio communications. However, there is no guarantee that interference will not occur in a particular installation. If this equipment does
cause harmful interference to radio or television reception, which can be
determined by turning the equipment off and on, the user is encouraged
to try to correct the interference by one or more of the following measures:
• Reorient or relocate the receiving antenna.
• Increase the separation between the equipment and receiver.
• Connect the equipment into an outlet on a circuit different from that to
which the receiver is connected.
• Consult the dealer or an experienced radio TV technician for help.
90-DAY LIMITED WARRANTY
(This product warranty is valid in the United States and Canada only)
Radica Games Limited warrants this product for a period of 90 days from
the original purchase date under normal use against defective workmanship and materials (batteries excluded). This warranty does not cover
damage resulting from accident, unreasonable use, negligence, improper
service or other causes not arising out of defects in material or workmanship. Radica Games Limited will not be liable for any costs incurred
due to loss of use of this product or other incidental or consequential
costs, expenses or damages incurred by the purchaser. Some states do
not allow the exclusion or limitation of incidental or consequential damages, so the above limitations may not apply to you. This warranty gives
you specific legal rights and you may also have other legal rights, which
vary from state to state.
During this 90-day warranty period, the game will either be repaired or
replaced (at our option) without charge to the purchaser when returned
prepaid with proof of date of purchase to: Radica USA, Ltd., 13628-A
Beta Road, Dallas, Texas 75244, USA. Please remove the batteries and
wrap the unit carefully before shipping. Please include a brief description
of the problem along with your return address and mail it postage prepaid.
IMPORTANT: Before returning the unit for repair, test it with fresh alkaline batteries. Even new batteries may be defective or weak and low battery power is a frequent cause of unsatisfactory operation.
• Be sure you insert the battery correctly and always follow the
device and battery manufacturer’s instructions.
• Do not dispose of batteries in fire.
• Batteries might leak if improperly installed, or explode if
recharged, disassembled or heated.
RADICA: ®
PLAYTV MONSTER TRUCK
IS A TRADEMARK
OF RADICA GAMES LTD.
© 2004 RADICA GAMES LTD.
PRODUCT SHAPE™
ALL RIGHTS RESERVED