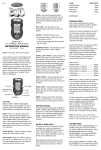
1
E
Passing
When on the ball if you press Button C whilst you are directing the controller, the ball will
be passed along the ground in the direction you are facing or, if there is one of your teammates standing roughly in the direction you are facing and within passing distance then
the ball will be played straight to your team-mate’s feet.
Kicking
To kick the ball in the normal way the controller should be directed in the desired direction
and Button B should be pressed. Note that is you quickly press Button B it will perform a
pass.
Lift and Bend
When the ball has been kicked as opposed to being passed it is possible to apply varying degrees of lift and bend to it. To do this the controller must be redirected within a
very short time after button B is pressed. It is not necessary to release Button B before
redirecting
Redirection Table for lift and bend
Controls are based on player facing forward. Change depending on which direction the
player is facing.
go to war- but only 15 of them are allowed to volunteer for each mission. Can you see
them coming over the hill? Fortunately for all concerned, the innocent are added to the
experienced troop of survivors from previous missions.
There are 24 missions to complete, each one with a different terrain and objective and
split into a maximum of six phases. The number of kills for and against you are represented by HOME and AWAY respectively.
In Play
All the action takes place in the playfield which takes up the main part of the screen. You
do not control the troopers but instead determine their behaviour using the control pad.
Troopers will only follow their leader but can be encouraged to run round in circles, shoot
anything that moves, throw grenades, shoot bazookas, drive tanx, fly choppas, split up
and do their own thing and die.
All troopers start as Privates and their rank increases for every phase they survive,
although they only receive promotion when a mission is complete. After every three missions the raw recruits are higher in rank because they have already received extra battle
training
The bullets fired by your troopers are clever. They will not kill a fellow trooper- unless he is
wounded. All other weaponry kills everyone.
D-PAD POSITION
RESULT
Centred Joypad
Straight Lobbed Kick
Moving Troops
Up
Normal Straight Kick
Move the pointer around the screen until its tip touches the desired destination. Not the
way that you can view the immediate area surrounding the active troop.
Up + Left
Normal Kick bending to the left
Left
Lobbed kick bending to the left
• Press the A- Button to make the troop leader move towards the pointer’s tip. The rest of
the troop will follow in rank and file.
Model 75067
For 1 or 2 players / Ages 8 and up
Down + Left
Up and under bending to the left
Using Weapons
Down
Normal Straight Kick
It couldn’t be simpler….
INSTRUCTION MANUAL
Down + Right
Up and under bending to the right
Right
Lobbed kick bending to the right
• Press the B- Button to turn the pointer into a crosshair and make the trooper or troop
shoot at the centre of the crosshair.
Up + Right
Normal Kick bending to the right
P/N 82395200 Rev.A
WARNING: EPILEPSY AND SEIZURES READ
BEFORE OPERATING YOUR ARCADE LEGENDS
SENSIBLE SOCCER
A few people may experience epileptic seizures when viewing flashing lights or patterns in
our daily environment. These persons may experience seizures while watching TV pictures
or playing video games. Players who have not had any seizures may nonetheless have an
undetected epileptic condition.
Consult your physician before playing video games if you have an epileptic condition or
experience any of the following symptoms while playing video games: altered vision, eye
or muscle twitching, other involuntary movements, loss of awareness of your surroundings, mental confusion and/or convulsions.
BATTERY INSTALLATION
This game is powered by four (4) AA (LR6) batteries.
• Using a screwdriver, loosen the screw until the battery compartment door can be
removed.
• Insert four (4) AA (LR6) batteries (we recommend alkaline) as indicated inside the battery
compartment.
• Replace the battery compartment door and tighten the screw with a screwdriver. Do not
over-tighten.
ADULT SUPERVISION IS RECOMMENDED WHEN CHANGING BATTERIES.
TV CONNECTION
NOTE: To connect Sensible Soccer directly to a TV, the TV must be equipped with audio
and video input jacks or a Scart input. They are commonly found on the front of the TV
near the contrast, colour, and picture adjustment controls or on the rear of the TV near the
antenna and cable/satellite jacks.
SHOOT
Boarding Vehicles
You can use either the pass or the kick buttons to shoot at goal. Depending on the current
difficulty level, you can also use the SHOOT button. See options for more details. The
SHOOT button works in a number of ways.
Move the pointer around the screen until it’s tip touches the desired vehicle. The pointer
will change to show that the empty vehicle may be boarded.
Whilst Attacking
The player will shoot towards goal. If the ball is in the air he will head towards goal. If the
player is near the ball he will slide and knock it towards goal.
• Press and hold the A-Button to make the vehicle move towards the trooper destination
determination pointer. The longer the A-Button is held down, the faster the vehicle will
move.
Whilst Defending
• Press the B-Button to make the trooper (or troop) shoot the vehicle’s weapon (if it has
one). Note that grenades and bazookas cannot be used while inside a vehicle.
The player will do a lofty boot up the pitch to clear the ball. If the ball is in the air, the player will head the ball to safety. If the player is near the ball he will slide and knock it to
safety.
SET PIECES
All set pieces and throws work as a normal kick or pass except that illegal or illogical
angles cannot be chosen by the taker.
GOALKEEPERS
Goalkeepers are always under computer control except when they have the ball in their
hands or when they are about to take a goal kick, in which case all they can do is kick the
ball out.
THE BENCH
The bench can be called on at any time during the game when the ball is out of play or a
free kick is awarded, or before the beginning of a half. To access the bench press the controller three times in any direction in quick succession. Moving the controller up and down
the bench enables the selection of the manager or substitutes, press B to select. Press
left or right to exit the bench.
The Manager
CONNECTING TO A VCR
To connect Sensible Soccer to your VCR, insert the yellow video plug from the Main Unit
into the video in (yellow) jack on your VCR, the white audio plug into the left audio in
(white) jack or via the Scart adaptor. Then set the VCR to the appropriate video input
mode (see your VCR’s operating manual for details).
ADULT SUPERVISION IS RECOMMENDED WHEN CONNECTING CABLES TO A TV
AND VCR.
SENSIBLE SOCCER
Download the Original Mega Drive manual at www.radicauk.com
“There a few games that can claim to have had such a defining effect as Sensible Soccer.
From the moment it was launched, Sensi, as it affectionately became known, was quite
simply a phenomenon. A sports game loved by sports fans and non sports fans alike.
That's because it's almost perfect in every way. Beautifully presented, tactical, deep, but
above all, fun. Sensi was a jewel in the crown of the 16-bit generation and to play it again
is to revisit an old friend. I lost a lot of hours of my life to Sensible Soccer in the 90s, and
now I guess I'll be losing a few more.”- Miles Guttery, Games Journalist, February 2005.
With over 15 million fans, Sensible Soccer was the most played football game of the early
90’s. It’s top down style, detailed mini-sprites and incredibly intuitive gameplay made it
the football game of choice and provided the springboard that turned Sensible Software
into one of the most successful developers of the decade.
• Press and hold the B-Button then press the A-Button to make the troop leader throw a
grenade or fire his bazooka at the centre of the crosshair.
The Manager is the chap in the brown coat and he is used to change the team formation
on the pitch. Select the new formation and press B to confirm.
Substitutions
• Press the A-Button to make the trooper (or troop) board the vehicle
Leaving Vehicles
Move the pointer until its tip touches the occupied vehicle. The pointer will change to
show the vehicle may be abandoned.
• Press the A-Button to make the trooper (or troop) leave the vehicle.
Landing Choppas
When a trooper (or troop) is in a choppa flying above the terrain, touching the choppa with
the pointer will change it into a “The Choppa can Land Symbol” –This means the choppa
can land.
• Press the A-Button when the “The Choppa Can Land Symbol” is shown to make the
choppa land. Once the choppa has landed, select it to make the troop disembark.
Form A New Troop (Or Two)
There are times when the strategy dictates that the troopers spilt up – perhaps to execute
classic “pincer movement”. So long as you have enough troopers you can make a maximum of two new troops from the original Snake Troop, and those are: Eagle Troop and
Panther Troop.
• Press the Start Button to access the status panel.
• Use the pointer to select the names of the troopers you’d like to form a new troop (the
names will be highlighted). Notice that the troop’s logo has spilt into two.
• Select the troop’s logo to form a new troop with the troopers whose names were highlighted.
Up to two substitutions can be made during the game. First select the player you wish to
bring on and then select the player you wish to replace.
• Select a troop logo then press the Start Button to resume play in control of the active
troop. Note new troops may be formed inside a vehicle, but only the highlighted troops
will exit the vehicle.
THE MENUS
Share And Share Alike
OPTIONS
The options menu allows you to alter the game length, sounds, difficulty level, weather
and pitch condition.
Hold on – who takes all the grenades and bazookas when a troop splits? It’s up to you to
decide. Notice that when you spilt a troop , any grenades and bazookas are outlined. By
selecting the grenades or bazookas, the outline changes to reflect the quality of weapons
– all half or none – that the new troop will take.
• The solid outline represents all the weapons
Difficulty Level
• The dotted outline represents half of the weapons
Changing the difficulty level will effect the controls during a match.
• No outline represents none of the weapons
Beginner - Easier computer teams, easy ball dribbling ability enabling the player to turn
quickly without losing and the SHOOT button is employed for all players.
Regrouping Troops
Normal - Normal computer opposition, easy ball dribbling ability and the SHOOT button
works for star players only.
To bring separate troops together simply walk them into each other whereupon the troopers will automatically regroup as a single troop.
A Mission Reminder
Expert - Computer opposition at hardest level, only star players have the easy dribbling
ability and the SHOOT button works for star players only.
Select the map at the bottom of the Status panel for an overview of the area and the
active troop’s position (indicated by a big red cross). Note that enemy troops are not
shown on this map – it’d spoil the surprise. Press any button to return to play.
CONTROLS
MATCH MODES
Mission Complete
Sensible Soccer has two different game environments, the menu and on the pitch. To use
the menus, move the directional controls on your control pad to highlight each option box.
Press button B to select the option currently highlighted.
Once you have selected from National, Club or custom teams you will reach a second
options menu enabling you to select match mode.
You did it – you saved the day. And you can save your state of play, too ………
Friendly
PLAYER CONTROL
A single match between two players or 1 player and the computer. Once the conditions or
season is selected, choose the teams by highlighting them. Press the B button once to
select the team as a red computer team and twice to select as a blue player team. The
correct number of teams must be chosen before the game can continue. Once teams are
chosen select Play Match to go to the Pre-Match Tactics screen.
At the end of every mission you are returned to Boot Hill to admire the view. See that little
picture in the top- right hand corner of Boot Hill? Yeah, the one marked Save move the
pointer to it.
During the game you may only control one player of your team at any one time. The man
currently under your control is the one with the white number above his head. Control will
be changed to another man if the man currently under your control is too far away from
the ball or if he has lost his footing for any reason.
Cup
OFF THE BALL CONTROLS
These controls apply when the man under your control is not in possession of the ball.
Running
To direct your man simply press your controller in the direction you want him to run. A
running man can intercept the ball from an opponent in possession.
Sliding Tackles
When running off the ball it is possible to slide into the ball or an opponent by pressing
button B. This will make your player slide in the direction he is facing. Whilst a man is sliding it is possible to get him to deflect the ball in a direction different to the one which he is
sliding when he makes contact with it. To do this the controller must be redirected whilst a
man is in mid slide before he has made contact with ball. This is a skill which has to be
mastered.
Headers
A knockout tournament. Up to 64 teams can be selected, as any combination of Player or
Computer teams. Selection of the Starting Month will determine the conditions throughout
the tournament. Please note that the save game facility is not functional.
League
Resuming Saved Games
See that little picture in the top left hand corner of Boot Hill ? Yeah, the one marked Load;
move the pointer to it.
• Press the A or B – Button to select Load and call up a special Load Screen.
Further pre-customised tournaments are available depending on which team set is selected.
• Press the D-Pad up or down to change the letter
• Press the D-Pad left or right to move through the letters
EDIT TEAMS
This allows you to edit any team’s name, player names, manager name, country of origin
and kit colours
PRE-MATCH TACTICS
ON THE BALL CONTROLS
CANNON FODDER
When on the ball simply press your controller in the direction in which you want the player
to dribble the ball. You will find that as the player gathers speed it is harder for him to
change direction and retain control of the ball. This is another skill that has to be mastered. (The way dribbling works can be altered by changing the difficulty setting from the
options menu).
A special five-letter pass code is given. Write it down – it contains information about the
state of play so you can return to this exact point at a later date. Press any Button to
return to Boot Hill.
To enter a pass code, do this:
Before the game each player can edit their team and tactics. To swap players simply
select the first player you wish to change using the B Button, followed by the player you
wish to swap him for. You can swap as many times as you like before the game begins. To
select tactics simply highlight the desired option and press Button B.
Dribbling
• Press the A or B – Button to select save and call up a special Save Screen.
Between 2 and 20 teams can compete in the league, as any combination of Player and
Computer teams. Please note that the save game facility is not functional.
When the ball is in the air and you press button B, instead of sliding into the ball the man
under your control will attempt to head the ball. Such headers can also be deflected in a
similar way to sliding tackles but redirecting must take place before contact has been
made.
These controls apply only when your man is in direct possession of the ball. The control
methods described can be adjusted to suit your own preferences by changing the difficulty level in the option menu.
Saving Games
Download the Original Mega Drive manual at www.radicauk.com
War has never been so much Fun! Cannon Fodder took the Sensible Software ethos of
creating addictively playable games to a whole new level. The game went straight to the
top of the charts on its launch in 1993 and contributed to Sensible Software having the
number one slot in the Video games Charts for 50 weeks between 1992 and 1994.
FROM CONSCRIPTS TO TROOPERS
Before you play, you need to call up some fit young men to become troopers. As luck
would have it, over at Boot Hill there is a queue of some 360 eager conscripts waiting to
• Press any other Button to enter the pass code. If the pass code is invalid, you will be
told. Select Load and try again.
BE THE FITTEST
And survive with the following handy hints.
• Don’t wait until you see the whites of their eyes – shoot them before they shoot you.
• Look out for secret hidden zones where special equipment may be found.
• Please don’t leave the screaming wounded to die. Bite the bullet, so to speak, and do
the decent thing: finish them off.
A full detailed manual can be downloaded at www.radicauk.com
MEGA – LO – MANIA
Download the original mega Drive manual at www.radicauk.com
Sensible Software’s first ever Mega Drive game was an instant classic, bringing complex
god sims to the masses. The aim is simple; command a tribe of humans as they evolve
from a primitive race to complex, technologically advanced beings. Each “epoch” consists
of 3 Islands, which must be conquered before your tribe can progress. Mine raw materials
and develop weapons as you fight opposing tribes in your bid to become omnipotent!
There are many functions used to play Mega-Lo- Mania. They are represented either by
words or by a special picture called an icon. The function of a word or icon is selected or
activated by using the Handy pointer.
Press the D-Pad in any direction to move the Handy Pointer so it is outstretched finger
touches the desired function.
Press the B-Button to select the icon’s function.
Variable Icons have numbers below then which can be increased or decreased.
Press the B-Button to increase the number of the variable icon.
Press the C-Button to decrease the number of a variable icon.
Player Select
Here’s where you decide which Team you wish to control. There is a choice of four Team
Leaders each one representing a different colour, and they are Scarlet (red), Oberon
(Yellow), Caesar (Green) and Madcap (Blue). Use the descriptions provided to help make
your decision. The three remaining Team Leaders will become your opponents controlled
by the computer, so chose wisely. When you have selected a Team Leader you will be
presented with the options screen.
Press the D-Pad to move the Handy Pointer to the desired Team Leader’s face.
Press the B-Button to choose the Team Leader. (The Handy Pointer will change to that
colour to that of the chosen Team).
The Options Screen
PLAY ISLAND
Select this to make the final preparations for play.
The Number Of Men Playing In This Island
So, you selected “PLAY ISLAND” option did you? Well done. You will notice that the area
of the screen between the words “1st EPOCH” and the Man Pool have been replaced by
a picture of Tower, a number and an arrow pointing upwards.
The reason is this: you now get to decide how many Men will play on the Island shown.
You can’t place the entire Man Pool on an Island – and don’t go leaving yourself
short(remember: Men not transferred to this Island will be used on other Islands, and one
Man on an Island is almost useless so chose your number wisely). Use the Handy Pointer
to touch the number beneath the tower.
Press the B- Button to transfer Men from the Man Pool to a Tower ready to be placed on
the Island Map shown.
Press the C- Button to transfer Men from the Tower back to the Man Pool.
Men are transferred from the Man Pool to a Tower.
Place Starting Tower In This Sector
When you are satisfied with the number of Men transferred from the Man Pool to the
Tower you must decide in which sector on the Island Map it is to be placed. The position
of the Tower will become the starting point for your conquest. Note that each sector is a
self- sufficient unit with its own elements and technology level so chose wisely. Use the
Handy Pointer to select a sector on the Island Map shown.
the antennae/cable button and see the blue screen appears. If you have tried all of these
options and are still unsuccessful connecting the console, then you may need to check
your VCR owner’s manual or contact the manufacturer to find out how to set up your VCR
for console games.
Remember, you can't play our games through a cable box or satellite, so if you own one
of these make sure it is turned off before connecting the game. You can connect our
games through DVD players with the same connection as a VCR.
If you still have difficulty with setup or operation of your game, please call our players
helpline mentioned at the end of this manual.
If you choose to use an AC Adapter we suggest the following :
Output:
- Voltage: 6 Volts DC
- Current: 300 mA (minimum)
Polarity: Negative Center
Plug Size: 5.5 mm outside diameter, 2.1 inside diameter.
AC Adapters are available at most electronic stores.
If you use the product with a transformer, regularly examine for damage to the cord, plug,
enclosure and other parts. In the event of any damage, do not use the toy with the transformer.
CAUTION
• As with all small batteries, the batteries used with this device should be kept away
from small children who might still put things in their mouths. If a battery is swallowed, consult a physician immediately.
Here you can see the options screen. From here you can set certain parameters, view the
islands in an Epoch and begin play.
Your opponents will then place their Towers in the remaining Sectors. Note that your
opponents will sometimes place their Towers before you. Let the conquest commence!
1.YOUR TEAM LEADER
The Play Display
• Be sure you insert the battery correctly and always follow the device and battery
manufacturer’s instructions.
2.THE OPPOSING TEAM LEADER
With the Towers positioned on the Island, the screen changes to show the Play Display.
This is where Mega-Lo-Mania is played.
• Do not dispose of batteries in fire.
3.THE CURRENT ISLAND
4.THE CURRENT ISLAND’S NAME
1.The Island Map
• Batteries might leak if improperly installed, or explode if recharged, disassembled
or heated.
5.THE CURRENT EPOCH
2.The Sector Display
6.OPTIONS
3.The Passage of Time
MAINTENANCE
7.PLAY ISLAND
4.The Island’s Name
• Handle this device carefully.
8.YOUR MAN POOL
5.The Sector Display Technology Level
• Store this device away from dusty or dirty areas.
9.THE THREE ISLANDS IN THE CURRENT EPOCH
6.The Team’s Shield
• Keep this device away from moisture or extreme temperature.
7.Men In The Tower
• Do not disassemble this device. If a problem occurs, press the Power button off and on,
or remove and replace the batteries to reset the device, or try new batteries. If problems
persist, consult the warranty information located at the end of this instruction manual.
Your Team Leader
This is just to remind you who he or she is
The Opposing Team Leaders
Here you can see the Team Leaders you are up are up against on the Island Map shown.
The Island Map
This is a small – scale plan view of the island you are about to play. Each Island is spilt
into Sectors from a minimum of two and a maximum of 16.
The Island Map
Here it is again: a plan view of the Island. You will only ever see two different Symbols on
this Island Map: an Army and a Tower, both in the colours of the Teams they represent.
Use the Handy Pointer to select and highlight a Sector on the Island Map. The chosen
Sector will be shown in detail on the Sectors Display. Note that a Sector’s highlight will
flash when you are being told something by one of your Men.
The Sector Display
• Use only the recommended battery type.
• Do not mix old and new batteries.
• Do not mix alkaline, standard (carbon-zinc) or rechargeable (nickel-cadmium) batteries.
• Do not use rechargeable batteries.
• Do not attempt to recharge non-rechargeable batteries.
The first 27 Islands are evenly divided into nine groups known as Epochs. The 28th and
final Island, Mega-Lo-Mania, is the scene for the Mother Of All Battles To reach Mega
–Lo-Mania you must conquer the Islands in the nine Epochs IN ORDER.
When a Sector is displayed on the Island Map, the Sector Display shows it in detail with
all the buildings and Men in action. Only one Sector is shown in full at any one time. Note
you can view any Sector but you can only control the ones in which you have placed
Towers.
The Current Island’s Name
The Passage Of Time
• This product is not suitable for children under 36 months.
The Mega-Lo-Mania universe runs at three different speeds: normal, nippy (three times
normal speed) and fast (nine times normal speed). Note that everything is affected by the
Passage of Time – the speed at which you and your opponents play, designs are made,
buildings constructed and so on.
• Disconnect the transformer before cleaning the console or controller.
Press the B-Button to view the next Island in this Epoch.
If you are attacked when time is running fast and the “AUTO SLOW” function is “ON”, the
Passage Of Time will automatically change to normal.
• Transformers used with the toy are to be regularly examined for damage to the
cord,plug, enclosure and other parts. In the event of such damage, the toy must not be
used with this transformer until the damage has been repaired.
Press the C-Button to view the previous Island in the Epoch.
The Sector Display Technology Level
• The toy is not to be connected to more than one power supply.
More commonly know as Tech Levels. Each Sector of an Island has it’s own Technology
Level which relates to the historical state of the Men in the Sector’s Tower. When you
begin playing an Island, it’s Sectors, and thus the Teams, are all set at the same
Technology Level. A Sector’s Technology Level will only advance if it’s owner shows signs
or progress via Designs.
• Packaging should be kept as it contains important information.
“We’ve Advanced A Tech Level”
(This product warranty is valid in the United Kingdom only)
Your Chief Designer will tell you this is when one of your Sectors advances a Tech Level.
As you advance through the Tech Levels you will notice the look of your Buildings and
that of your Men’s clothing changes accordingly. A Sector you own cannot advance by
more than three Tech Levels per Epoch.
All products in the RADICA® range are fully guaranteed for a period of 6 months from the
original purchase date under normal use, against defective workmanship and materials
(batteries excluded). This warranty does not cover damage resulting from accident, unreasonable use, negligence, improper service or other causes not arising out of defects in
material or workmanship.
The Current Epoch
Every Island has a name. The Island’s in the 1st Epoch are called Aloha, Bazooka and
Cilla. The subsequent Island’s names follow the English alphabet sequence. You can play
the Islands in an Epoch in any order but to move onto the next Epoch you must conquer
them all. There are two ways to view other Islands in the current Epoch (Use the Handy
Pointer to touch the current Island’s name.
Options
Selecting this Option calls up eight new options: “CONTINUE” “AUTO SLOW ON”
“SPEECH ON” “MUSIC ON” “SFX ON” “HELP ON” “SOUND TEST” AND “LOAD/SAVE”
Continue
Select this to leave the other options as they are and return to the Options Screen.
Auto Slow ON
The speed at which the Mega- Lo-Mania universe runs can be adjusted during play. The
“AUTO SLOW” Option acts as a fail-safe (see THE PASSAGE OF TIME in original Mega
Drive manual). Select the “AUTO SLOW” Option to turn this feature “ON” or “OFF”.
Speech On
Sampled speech in software is usually a novelty, but not in Mega-Lo-Mania. Actors were
commissioned to play the parts of the characters you will hear during play. They will alert
you to events. Even your opponents will talk to you! Select this option to turn “OFF” or
“ON” the speech heard during play. We recommend that you leave it “ON”
Music On
An atmospheric soundtrack can accompany play. Select the “MUSIC” Option to turn
“OFF” or “ON” the soundtrack
Sound FX On
Certain events during play have associated sounds to enrich the proceedings. Select the
“SOUND FX” Option to turn “ON” or “OFF” those sounds.
Help On
When you use the Handy Pointer to touch certain areas of the screen you will notice
words appearing in a box. This is to remind you what the unction in questions does.
Select the “HELP” Option to turn this feature “OFF” or “ON2
Sound Test
The Team’s Shields
These are the Shields of the Teams on the Island Map shown. The Teams’ Shields are also
used to form Alliances and to show details of Armies. When a Team has been removed
from an Island, their shield is no longer shown.
Men In The Tower
The number below this icon (which cannot be selected) shows the number of Men living in
the Tower in a Sector. You will notice the number of Men rises. This is not because they
are inviting friends round for tea. It is because they are very clever and can reproduce The
more Men in a Tower, the faster they reproduce. At least one Man must remain in the
Tower.
Press the D-Pad up or down to move the handy pointer to the desired option.
When you select an Icon such as “View Element Stocks “ you will see all Elements currently being Gathered or Mined as well as the one corresponding to the icon selected.
Load/Save
Each Epoch has an associated 11-letter code. The codes vary because they also take into
consideration your performance in any previous Epochs you have played. To view the
code for an Epoch, select the “SAVE” word and write down the letters you will be shown
beneath it.
Press the A-Button to delete, one by one, the registered letters.
Use the Handy Pointer to select the island you wish to view.
YOUR MAN POOL
These are the Men available for conquering Islands. The very first time you play Mega-LoMania you start with 100 men in your Man Pool. Any Men not used on an island remain in
the Man Pool for use in other Islands. Any men remaining in the Man Pool when an Epoch
is complete will stay there ready for use in the next Epoch. An additional 100 Men are
added to the Man Pool when you begin a new Epoch
6 MONTH PRODUCT WARRANTY
In the unlikely event that you do experience a problem within the first 6 months, please
telephone the Technical Support team: Tel. 0871 222 8278. Calls are charged at 10p per
minute and will show up on your standard telephone bill. Helpline hours are 2pm11pm, Monday to Friday.
IMPORTANT: Always test the product with fresh alkaline batteries. Even new batteries
may be defective or weak and low battery power is a frequent cause of unsatisfactory
operation.
YOUR STATUTORY RIGHTS ARE NOT EFFECTED.
Distributed in the U.K. by:
RADICA U.K. Ltd.
The Old Stables, Munns Farm,
Cole Green, Hertfordshire,
SG14 2NL, England
TV
VCR
Press the B or C Button to register the letter.
Please retain this for future reference.
TROUBLE SHOOTING
The Three Islands In The Current Epoch
Press the D-Pad in any direction to move the Handy Pointer to the desired letter.
• The transformer is not a toy.
These Icons often look different but their function is the same. When you select the large
Icon seen here you will be returned to the previous Control Menu.
“NO WAY!”
This is what you are told if you enter an incorrect code. Try again.
ENTER CODE
• Use only with the recommended transformer type.
Return To Previous Control Menu
To locate your auxiliary channel, which is usually not 3 or 4, but a gaming channel found
mostly found between 2 and 99 (example 2, 1, 0, 99), first try 00 to see if it is the auxiliary
channel. Channels downwards from 3 until a Line 1 or Line 2, Video 1 or Video 2, Front,
Aux, AV, etc., appears on screen, then push the power button on the game and it should
automatically come on if you have selected the correct channel. If this does not work,
another way to determine your auxiliary channel is to take a look at your television remote.
There may be a button on the remote that may take you directly to the correct channel.
The buttons you are looking for may be labeled Input, AUX, AV, Line, TV/Video, or Video. If
your remote has one of these buttons, turn your television back to Channel 3 and select
that button. The power button on the game should be turned on in order for the game to
appear on the television. If your television remote does not have any of these buttons, and
channel 00 is not working, you may need to search the main menu for a way to determine
your auxiliary channel. If none of these methods have helped you locate your auxiliary
channel, you may need to check your owner's manual and/or contact a local television
repair company.
To enter a code, and so play an Epoch from scratch (no, you can’t have codes for incomplete Epochs), first select the “LOAD” word. You now have to register the code’s 11 letters. Select the “DELETE LETTER” symbol to remove, one by one, the registered letters.
Select the “ENTER CODE” symbol to enter the code.
• Insert batteries with the correct polarity.
Most of these Icons are used to assign tasks to your Men and perform other functions
essential to play. Icons are grouped according to their functions in Control Menus.
Selecting some icons will result in the existing Control Menu being replaced by a new one.
New Icons will appear when necessary (an arrow pointing to or from them show they can
be used). Note the Control Menus are only presented for Sectors in which you have
placed Towers. Some Icons, such as “Men In The Tower” one, are for reference only and
cannot be selected.
When you move from one of your Sectors to another, the Control Menu shown will stay
the same, only details will relate to the chosen Sector.
Press the A, B or C Button to hear Sound FX, Music or Speech relating to the number
shown. Note that when selecting “MUSIC 0” will cause any music to cease.
• Do not short-circuit the supply terminals.
Function Icons Control Menu
From here you can listen to all the Sound FX Music and Speech used in Mega-Lo-Mania.
When you select this Option you will be presented with four new options: “SFX 1” “MUSIC
0” “SPEECH 1” and “QUIT”
Press the D-Pad left or right to decrease or increase the number beside the Option.
• Remove any exhausted batteries from the device.
When connecting to a VCR, you must first start with a blue background showing on your
television screen. To obtain a blue screen, try inserting a videotape into the VCR, let it
start to play, then hit the stop button. This may give you a blue screen, then you can
channel down to your auxiliary channel. If the blue screen still does not appear, try entering your TV and/or VCR main menu and see if it gives you options to select a blue screen
background. Many times if you enter the main menu on your television you can change
the setting from cable to video and display a blue screen. Also if you have an older television, you may locate a hidden door on your television that has color, picture, horizontal,
vertical, and cable, antennae buttons. If your television includes this panel, you can select
RADICA:®
ARCADE LEGENDS IS A TRADEMARK
OF RADICA GAMES LTD.
©2005 RADICA GAMES LTD.
PRODUCT SHAPE™
ALL RIGHTS RESERVED
Game Software ©SEGA CORPORATION,
1988-1995 ©SEGA OF AMERICA, 1992 All rights reserved.
SEGA and the Sega Logo are registered trademarks of Sega Corporation.
Manufactured and distributed by Radica under license by Sega Toys.
"Sensible" is a registered trademark of Sensible Limited. Used under license by Codemasters.
"Codemasters"® and the Codemasters logo are registered trademarks owned by Codemasters.
"GENIUS AT PLAY"™ is a trademark of Codemasters.
All rights reserved. "Cannon Fodder" is a registered trademark of Sensible Limited. Used under
license by Codemasters. "Codemasters"® and the Codemasters logo are registered trademarks
owned by Codemasters. "GENIUS AT PLAY"™ is a trademark of Codemasters.
"Meg-lo-mania" is a trademark of Sensible Limited. Used under license by Codemasters.
"Codemasters"® and the Codemasters logo are registered trademarks owned by Codemasters.
"GENIUS AT PLAY"™ is a trademark of Codemasters.