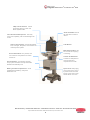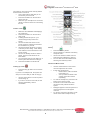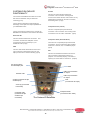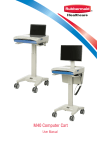
1
® RealPresence Practitioner Cart 8000 ® User’s Guide Manufactured by: Rubbermaid Healthcare • 16905 Northcross Drive • Suite 200 • Huntersville NC 28078 Polycom RealPresence® Practitioner Cart® 8000 User Manual p/n 1793149 Rev C 03/13 Revision A B Date 9/2012 3/2013 C 4/2013 Changes Initial Release Call out min power cord size p-18 Update TOC Change transportation/storage parameters, Include operating parameters p-3 Add patient warning pp-3 and 12 Update images pp-5,6,7,8 Join split Service section p-17 Changed reflect ANSI/AAMI 60601-1:2006 and CSA C22.2 p-18 ® ® RealPresence Practitioner Cart 8000 TABLE OF CONTENTS Warnings Summary 2 Polycom® RealPresence® Practitioner Cart® 8000 Overview 4 General Features 4 Keypad Overview 6 Keyless Entry Operation 7 Manual Override Lock 7 Power Up 8 ® ® Polycom HDX 8000 Equipment and Accessories 8 Placing, Answering and Ending a Call 9 MultiPoint Video Calls 10 Cameras and Camera Presets 10 Sharing Content 11 Full Screen and Picture in Picture Viewing 11 Custom I/O Data Plate Functionality 13 Battery Removal and Replacement 14 Maintenance 16 Cleaning 16 Basic Troubleshooting 17 Service and Support 17 Statement of Use 18 Manufactured by: Rubbermaid Healthcare • 16905 Northcross Drive • Suite 200 • Huntersville NC 28078 Polycom RealPresence® Practitioner Cart® 8000 User Manual p/n 1793149 Rev C 03/13 ® ® RealPresence Practitioner Cart 8000 WARNINGS SUMMARY Unplugging the cart does not electrically de-energize the cart, hazardous electrical current remains as long as the cart remains powered on. To de-energize the cart, use the power button to turn off the cart, then unplug the cart and place the plug in the holder. If on-off switch is pressed, it will power off entire cart, even in battery mode. In combination with a low speed of movement, continuous activation of moving switch, very low stopping distances- there is no need to have an additional emergency switch. Do not position Practitioner Cart to make it difficult to disconnect MAINS power on device Removal of the plug will isolate the device from MAINS. The cart power system is designed for powering cart mounted equipment only. Do not connect cart mounted equipment into a power source that is not mounted to the cart Do not connect any equipment to the cart which is powered from a separate mains power outlet. There is a user accessible mains power outlet provided on the cart for powering devices rated less than 65W, this power rating should not be exceeded. DO NOT OPERATE the cart or any equipment installed on the cart while the cart is plugged in If the external power cord PROTECTIVE EARTH (ground) CONDUCTOR is broken or otherwise disconnected. The cart and equipment installed on the cart may be safely operated using internal battery power. Where the integrity of the external PROTECTIVE EARTH (ground) CONDUCTOR arrangement is in doubt, operate the equipment using the internal electrical power source (battery). DO NOT OPERATE POWER SYSTEM IF WET. If your cart becomes wet, unplug it immediately, wipe off any excess liquid, and allow it to dry before using again. Do not touch the patient and parts of non-medical electrical equipment in the patient environment after removal of covers, connectors or other parts of the enclosure that could be removed without using a tool. Do not unplug the camera or display power cord while touching the patient. Breaking the seal on the lead acid battery to add water will damage the battery and could cause injury. EQUIPMENT not suitable for use in the presence of a FLAMMABLE ANESTHETIC FIXTURE WITH AIR, or WITH METERED OXYGEN OR NITROUS OXIDE. The supplied spiral cord is rated for medical use. Connecting the cord to an outlet that is not medical grade (indicated with a green dot) will not ensure grounding protection. Spiral cord, power system and cart are for INDOOR use only. DO NOT OPERATE OUTDOORS. Keep spiral cord away from water. DO NOT PLUG CORD INTO OUTLET IF WET. Manufactured by: Rubbermaid Healthcare • 16905 Northcross Drive • Suite 200 • Huntersville NC 28078 Polycom RealPresence® Practitioner Cart® 8000 User Manual p/n 1793149 Rev C 03/13 2 ® ® RealPresence Practitioner Cart 8000 Inspect spiral cord before each use. DO NOT USE CORD IF DAMAGED. Fully insert spiral cord plug into outlet. DO NOT unplug by pulling on cord. DO NOT remove, bend or modify any metal prongs or pins of spiral cart cord. DO NOT use excessive force to make connections. DO NOT ALLOW CORD TO OVERHEAT DO NOT drive, drag or place objects over spiral cord. Do not stand or walk on spiral cord. Only authorized personnel, experienced in servicing electrical equipment should open the power system. Do not use an electrical extension cord with your cart. Use caution, maintain control of the cart while moving the cart over thresholds. Signal Word Level of Hazard IMPORTANT Indicates a situation that does not present any hazard but is very important in maintaining a well functioning cart. ATTENTION Consult accompanying document to avoid a potentially hazardous situation which may result in minor or moderate injury. ELECTRICAL Indicates an impending electrical hazard which, if not avoided, may result in personal injury, fire and/or death. Symbol Polycom Take Back and Recycling Program CART DISPOSAL Dispose of carts in accordance with local environmental guidelines and regulations for waste.If further information is required please contact: LEAD BATTERY MUST BE RECYCLED Transport/Storage Care should be taken to transport and store this system within a temperature range of 4 to 131º F (-20º C to 55º C);; Humidity 0% RH to 90% RH non-condensing Operating Environment Operating Environment parameters for this system are: • Temperature 50 to 104°F (10 to 40°C) • Humidity 0 to 60% RH non-condensing • Pressure 700 hPa to 1060 hPa • Altitude 10000ft (3000m) max. [email protected] Manufactured by: Rubbermaid Healthcare • 16905 Northcross Drive • Suite 200 • Huntersville NC 28078 Polycom RealPresence® Practitioner Cart® 8000 User Manual p/n 1793149 Rev C 03/13 3 ® ® RealPresence Practitioner Cart 8000 Polycom® RealPresence® Practitioner Cart® 8000 OVERVIEW The Polycom® RealPresence® Practitioner Cart® 8000 brings High Definition telehealth technology to the patient point of care. This solution enables medical professionals to provide patients access to care regardless of time or distance constraints. The Practitioner Cart solution is also ideal for broadcasting medical procedures for education or telemonitoring. Below is a pictoral overview of the major end items of the Polycom® RealPresence® Practitioner Cart® 8000. 1 2 3 4 5 10 6 11 7 12 8 13 9 14 15 GENERAL FEATURES OF THE Polycom® RealPresence® Practitioner Cart® 8000 1. 2. 3. 4. 5. 6. 7. 8. Polycom Eagle Eye III HD Camera Custom Camera Mount Sound Bar 24” LCD Monitor HDX Microphone Array Keypad with LCD Display Locking Technology Tray and Secured Technology Cabinet Secured Technology Cabinet with Polycom HDX 8000 9. Locking Storage Drawer 10. 6’ Spiral Power Cord and Mounting Bracket 11. Storage Bins, Both Sides 12. User Accessible Power Outlet (Located in Technology Tray) 13. Custom I/O Data Plate 14. Battery and PDU Compartment 15. 4” Double Wheel Casters, Front Locking Manufactured by: Rubbermaid Healthcare • 16905 Northcross Drive • Suite 200 • Huntersville NC 28078 Polycom RealPresence® Practitioner Cart® 8000 User Manual p/n 1793149 Rev C 03/13 4 ® ® RealPresence Practitioner Cart 8000 1080p 12x HD Camera: Allows top quality video for codec and Room Systems alike. Audio Sound Bar: Sound bar has audio control on device. Omni Directional Microphone: Has easy push mute capability, with visual LED lights for mode. LCD Control Keypad: Controls the drawer lock, work light, lift system, and monitors the onboard power system LCD Monitor Multi-Purpose Bins: Can be removed for emptying or cleaning. Secure AV Cabinet: Key locked, and fan cooled AV compartment for codec and/or PC. Custom I/O Data Plate: Custom I/O data plate for various inputs and outputs into the codec. Secure Drawers: Accessed by keyless entry system. Drawers are fully removable. Drawers automatically lock. Battery and PDU Compartment: 55 Ah sealed lead acid battery, and power distribution unit. Spiral Cord: Always plug cart in when not in use or if power levels reach low levels. Hang cord on rear handle when not in use. Manufactured by: Rubbermaid Healthcare • 16905 Northcross Drive • Suite 200 • Huntersville NC 28078 Polycom RealPresence® Practitioner Cart® 8000 User Manual p/n 1793149 Rev C 03/13 5 ® ® RealPresence Practitioner Cart 8000 KEYPAD FEATURES Up/Down Arrows: Used to raise and lower the work surface. LCD Contrast: Adjustable by repeatedly pressing the SETUP key and UP/DOWN arrows at the same time. Power Button: Press and hold this button to shut off all cart power. This should be done only if the cart will not be plugged in or used for an extended period of time. or the first time the cart is used. Message Center: Indicates status of locking system and battery/charging status. Battery Level Indicator: Battery indicator will alarm at 20% remaining life. Immediately plug in cart and alarm will go off. Lock Button: Secures locking system. Clear Button: Clears entry if mistake is made when entering PIN. Mute Button: Press button to mute alarm when battery reaches 20%. If battery reaches 10%, mute will not work. Cart must be plugged in. Keyboard Light: Automatically shuts off after a preset time. Manufactured by: Rubbermaid Healthcare • 16905 Northcross Drive • Suite 200 • Huntersville NC 28078 Polycom RealPresence® Practitioner Cart® 8000 User Manual p/n 1793149 Rev C 03/13 6 ® ® RealPresence Practitioner Cart 8000 KEYLESS ENTRY OPERATION Keyless entry includes a numeric keypad on the top of the user interface containing the digits 0-9 for user entry into the drawer. Each time a number is pressed, a corresponding * will appear on the The drawer is designed so that it can be removed from the unit. The unit may auto-lock with a drawer removed. The drawer may be reinserted into a locked unit without unlocking the unit. When a drawer is fully inserted into a locked telemedicine cart, the newly inserted drawer will be locked. The electronic keyless entry unit will only work when the unit and the battery are charged to an operating level. LCD display verifying that a number has been pressed. Upon entry of a correct code, the unit will unlock the drawers and the message “DRAWERS UNLOCKED” will appear on the LCD display. MANUAL OVERRIDE LOCK The keyless entry system is equipped with a redundant manual lock that is located on the back of the cart. The manual lock allows the drawer to be unlocked when the unit is use during a low voltage shutdown. The hard lock is located on the rear panel of the cart. The rotary latch hard lock has two positions. The key is included in the extra parts kit. If an invalid code is entered, the message “ERROR INVALID CODE” will appear. Position 1 is the unlocked position. This position unlocks the drawers. The key cannot be removed. Position 2 is the normal operating position. It enables the keyless entry system to operate. The unit will automatically relock the drawer according to a preset time ranging from 1-255 seconds SETTING CODES – see Control Board Software Manual LOCK allows the user to lock the drawer before the automatic relock occurs. CLEAR button is provided to allow the user to clear the numeric entry if he or she enters or starts to enter an incorrect code. Default code = 1234 Keyless entry models can be programmed with up to 128 access codes. Note: Lock codes and the auto lock-down timer are set using control board configuration software available to administrators and authorized technicians. Contact your service representative to acquire a copy of the configuration software and manual. The configuration software is also available for download at: www.rubbermaidtelemedicine.com/welcome Manufactured by: Rubbermaid Healthcare • 16905 Northcross Drive • Suite 200 • Huntersville NC 28078 Polycom RealPresence® Practitioner Cart® 8000 User Manual p/n 1793149 Rev C 03/13 7 ® ® RealPresence Practitioner Cart 8000 Practitioner Cart POWER UP HDX 8000 HARDWARE AND ACCESORIES With the system completely turned off, press the Power button on the Control Keypad. The keypad LCD will light up, the controller will beep. All devices integrated into the Practitioner Cart will automatically turn on and boot up. HDX 8000 High definition Voice, Video & Content Flexible audio and video inputs/outputs If on-off switch is pressed, it will power off entire cart, even in battery mode. In combination with a low speed of movement, continuous activation of moving switch, very low stopping distances- there is no need to have an additional emergency switch. Polycom EagleEye Camera True high definition image capture Enhanced image quality in all calls, not just HD 12x zoom 180 degree panning radius Quick, sharp focus when using the manual pan/tilt/zoom or preset camera locations. MONITOR. a. The power indicator will illuminate. b. The generic logo will flash until a video signal is sent to the monitor input. NOTE: Initially the monitor may identify no signal until the HDX 8000 boots up to a certain point. CAMERA a. b. HDX 8000 a. b. Initially the camera will spin from left to right, then to center. The camera image is not displayed until the HDX 8000 is fully booted. A blue light will illuminate. NOTE: The Technology cabinet will have to be unlocked and opened to see light. Initial Polycom splash screen will appear along with series of green LED lights. This signifies that the HDX 8000 is booting up. Multi-Function Remote Control Controls features and functions of the HDX series systems Uses four (4) AAA batteries (included) Upon complete boot up, the display will show the HDX 8000 Home screen. As long as the data patch cord has been plugged into the custom I/O data plate, the Practitioner Cart will be fully operational, upon completion of initial setup (completed first time Practitioner Cart is turned on and set up). Omni-directional HDX Microphone Array 360 degree coverage 22 kHz high fidelity audio PLACING, ANSWERING, AND ENDING CALLS To Answer an Incoming Call Manufactured by: Rubbermaid Healthcare • 16905 Northcross Drive • Suite 200 • Huntersville NC 28078 Polycom RealPresence® Practitioner Cart® 8000 User Manual p/n 1793149 Rev C 03/13 8 ® ® RealPresence Practitioner Cart 8000 The system is set to auto-answer calls by default. If auto-answer is turned off: Your system will ring and alert you onscreen that you have a call Press the Call button on the remote to answer the call Make sure your microphone is not muted, unless you wish to remain on mute during the call. To Place a Call 1. 2. 3. 4. 5. 6. 7. 8. Make sure the HDX 8000 and display(s) are powered on Press the Call button on the remote to place a call A dialing window will open on your monitor along the top of the home screen. Use the numbers and arrows on the remote control to navigate to and select the IP address for your call. Use the keypad to dial the IP or number of the site you are calling. When dialing an IP address, use the dot button on the remote control. Arrow to the Quality window to select a speed. Use the center button as an Enter button. You can specify that you are dialing IP, or let the system auto detect the call type. Press the Call button to dial the call. Placing a Call Through the Directory or Call History Press the Directory button Arrow to Directory or Recent Call History and press Enter Arrow to the desired number, then the press the green call button to select it. You can also access the address book with the green Directory button. Volume and Mute Control To Hang Up a Call Press the Hang Up button on the remote control If you are in a multipoint call, the system will ask you to confirm that you wish to hang up. Use the center button in the arrow pad to confirm hang up. If you are in a Point to Point call, the call will drop immediately, without confirmation. Use the Volume button on the remote control to adjust the call volume. If there areg audio issues: o Check that the audio sound bar power light is on. o Turn up audio sound bar to full volume. (Press the + button repeatedly). To mute the microphone, press the mute button on the remote control The button in the center of the HDX microphone array will also mute the system Red lights appear on the microphone & a muted microphone icon will appear onscreen To unmute, press the mute button on the remote or the HDX microphone array. Manufactured by: Rubbermaid Healthcare • 16905 Northcross Drive • Suite 200 • Huntersville NC 28078 Polycom RealPresence® Practitioner Cart® 8000 User Manual p/n 1793149 Rev C 03/13 9 ® ® RealPresence Practitioner Cart 8000 MULTIPOINT VIDEO CALLS MP Plus is available for the HDX 8000 series, and included with some models/bundles. If your system has MP Plus, it’s a built in four port MCU that is activated with the purchase of a MultiPoint Plus Software License Key. HDX 8000 systems can be upgraded to 8 ports. This license allows you to connect up to three or seven far sites to one conference, and supports mixed IP and ISDN endpoints. Once you have activated the MultiPoint License in your HDX 8000 series, it’s easy to make a multipoint call. You can add participants at any time during your conference, and can disconnect individuals or all sites at any time. Press the Directory button on the remote, or arrow to “Directory” on the home dialing screen. Select “New” Select “MultiPoint” Select the participants and speed for the call, and assign a name to the group Future calls to the group can now be made by selecting the group from the address book. Using an External Bridge If you connect, or bridge more sites, or if you do not have a MultiPoint License, you can connect your videoconference over an external bridge. There are many bridging services available. CAMERAS AND CAMERA PRESETS Controlling the Near and Far End Cameras Press the Near or Far button on the remote control. The on-screen camera icon will point towards you if controlling the near end camera, or away from you if you are controlling the far end camera. Use the arrows on the remote to move the camera up/down and left/right The Zoom In/Out button will zoom the image as desired. NOTE: Some system administrators will not allow far end camera control. Adding a Site to a MultiPoint Call Call the first site as described in section Making a Call. While in a call, press the Call button on the remote. Dial the number you wish to call, or select it from the address book. Repeat these steps until all sites are connected. Disconnecting a Site in a MultiPoint Call While in a MultiPoint call, you can disconnect sites one at a time at any time during the call. Press the Hang up button. The disconnect screen will show you the sites connected into the call Press the number on the keypad, 1,2,3, etc, that corresponds with the site you want to disconnect. The system will disconnect the site immediately; there will be no secondary confirmation. To disconnect the entire call, press the Hang Up button twice, or select Hang Up All. Using the Directory to Store a MultiPoint Call Manufactured by: Rubbermaid Healthcare • 16905 Northcross Drive • Suite 200 • Huntersville NC 28078 Polycom RealPresence® Practitioner Cart® 8000 User Manual p/n 1793149 Rev C 03/13 10 ® ® RealPresence Practitioner Cart 8000 Displaying a Secondary Camera or DVD/VCR What is a Camera Preset? The HDX 8000 series can store 100 local camera presets, letting you aim and zoom to specific locations with the touch of a button. This is similar to the radio presets in a car. You may also set camera presets for the far end location, if their system supports presets, and they allow remote sites to control their camera. Presets provide a quick, convenient way to move the camera to frequently used positions in the room. SHARING CONTENT To Store a Camera Preset Connecting a Laptop or PC Press the Near or Far button on the remote to let the system know which camera you are going to assign presets to. Adjust the camera position as described above. When at the desired location, press and hold 0-9 on the keypad The camera location will now be assigned to that preset number To re-assign a preset, re-aim the camera, then press 0-9. This will override the existing preset. To clear all Presets, press Near, then select “delete” When you power on the system, it will default to the preset position 0 You can connect your PC directly into the VGA input connection on the Custom I/O Panel on the left side of the Practitioner Cart, allowing you to share live PC graphics during a videoconference. This is called “content sharing”. Do not connect any equipment to the cart which is powered from a separate mains power outlet. There is a user accessible mains power outlet provided on the cart for powering devices rated less than 65W, this power rating should not be exceeded. To Send PC Content Make sure your laptop is set up to share from the VGA out (monitor) port. You may need to enable your VGA port with a keyboard command, commonly Function+F5 or +F8. Consult your laptop user manual for instructions for your brand and model. Ideal PC screen resolution is 1024x768; Default image to a lower resolution if needed. Press the Content button on the remote control Your video feed will be replaced with live graphics from the connected PC. Far sites will view your PC content while sharing is activated. NOTE: If planning on using the audio from your PC you must connect the audio 3.5mm connector from your PC to the Custom I/O Panel Using Camera Presets If you have purchased a secondary camera or DVD/VCR, it can be used during video conferences. Arrow to the secondary camera (S-Video) or DVD/VCR (Composite) icon, and then press Enter. To return to the main camera, repeat the above steps, selecting the first icon. To view your presets, press the Preset button on the remote During a conference, press 0-9 to move the camera to its preset position. The camera can be controlled with the arrows and zoom button after being moved to a preset location. This will not affect or change your preset assignments. Manufactured by: Rubbermaid Healthcare • 16905 Northcross Drive • Suite 200 • Huntersville NC 28078 Polycom RealPresence® Practitioner Cart® 8000 User Manual p/n 1793149 Rev C 03/13 11 ® ® RealPresence Practitioner Cart 8000 Using Picture-In-Picture with Dual Monitor Viewing Sending Content During MultiPoint Calls with Two Monitors By default, you will see content in monitor one and the speaking remote site on monitor two. If you would like to see all remote sites while sharing PC content, open administrative settings on the HDX. In the monitor section, select: Monitor one screen: Check Near, and Far, Uncheck Content Monitor two screen: Check Near, Far, and Content Swapping PIP Image with Full Screen To Stop PC Content and Return to Video Conference During video conferences, one monitor will show the near end, while the other shows the far end. If a far end site sends PC content, the content is displayed on one monitor, while far end video displays on the other monitor. Local video can be viewed in PIP on the monitor with the far end. Press the Content button on the remote control. Your video feed will resume. You can disconnect the cable without any harm to your computer, open documents, open programs, or the HDX 8000. Occasionally, you will want to swap the images seen in the small and large windows. Press the Camera button on the remote control Select the camera already being used to swap the images Repeat these steps to swap the images back. Ending Picture-In-Picture Display FULL SCREEN & PICTURE IN PICTURE VIEWING To end PIP display, push the Display button on the remote control or place the remote on the table. Single Monitor Video Viewing When dialing from the home screen, you will see the near end video view in a small window. Upon connecting, the far end will automatically switch to full monitor view. Most users prefer to view their local video as well, so they know what the far end is seeing during the conference. The HDX 8000 series has a built in Picture-in-Picture support, as well as Dual Monitor Emulation. Using Picture-In-Picture with Single Monitor Viewing Press Display (Picture-In-Picture) button on the remote control twice The PIP window will open with a yellow border around it While this yellow border is on, push the display button to move the viewing window between the four corners of the screen The PIP border will turn blue when it is locked into position The PIP window displays what your main camera is sending to the far end. If a far site sends any type of content, you will see their content in the main part of the screen, and the people on the far end in your PIP window. You will lose local view of your room. Do not touch the patient and parts of nonmedical electrical equipment in the patient environment after removal of covers, connectors, or other parts of the enclosure that could be removed without using a tool. Manufactured by: Rubbermaid Healthcare • 16905 Northcross Drive • Suite 200 • Huntersville NC 28078 Polycom RealPresence® Practitioner Cart® 8000 User Manual p/n 1793149 Rev C 03/13 12 ® ® RealPresence Practitioner Cart 8000 S-Video CUSTOM I/O DATAPLATE FUNCTIONALITY The Custom I/O DataPlate is located on the left side of the Practitioner Cart just below the Technology Tray. This is an S-Video female Panel Mount connection. This connection is designed to connect a document camera, video camera or any peripheral that requires an S-Video connection and analog video. (Input) The I/O Panel is designed to take maximum advantage of the input and output capabilities of your HDX 8000 codec. Composite Video (Yellow) The I/O connections included on the Custom I/O DataPlate are described in the sections that follow: This is a Composite (RCA) female barrel connection. This connection is for analog video connections such as VCR’s and DVD’s. (Input) Ethernet/LAN This is an RJ45 Panel Mount connection. This connection is where the LAN patch cord is connected for wired connectivity to your Practitioner Cart. (Input) Composite Audio (Red and White) There are two Composite (RCA) female barrel connections. These connections allow auxiliary audio from a camera, PC, or VCR/DVD player. (Input) VGA This is a VGA female Panel Mount connection. This connection is designed to plug into your laptop to allow for PC Content sharing. (Input) DVI This is a DVI female Panel Mount Connection. This connection is designed to attach to a projector or a secondary display, to emulate or expand your views within a conference. (Output) DVI (Connected to Second Display Out HDMI USB 2.0 (Connected to PC Inputs Ethernet /LAN USB 3.0 (Connected to PC Inputs S-Video (Connected to split S-Video Input) VGA (Connected to PC Input) 3.5mm (F) (Connected to PC audio) Composite Video (Connected to split S-Video Input Connection) Composite Audio (Connected to Aux Audio) The Custom I/O DataPlate Manufactured by: Rubbermaid Healthcare • 16905 Northcross Drive • Suite 200 • Huntersville NC 28078 Polycom RealPresence® Practitioner Cart® 8000 User Manual p/n 1793149 Rev C 03/13 13 ® ® RealPresence Practitioner Cart 8000 REMOVE BATTERY ACCESS PANEL AND BATTERY ACCESS STRAP BATTERY REMOVAL AND REPLACEMENT Only use batteries specified by Rubbermaid Medical. Failure to do so will void power system warranty. Call customer service for details. Do not replace battery in oxygen rich environments as it is possible for sparking to occur. a. Unplug power cord from battery access panel b. Using 4mm hex key or 5/32” remove two fasteners on lower rear panel of battery access panel and place aside c. Remove Battery Retainer Strap by depressing the tab on the clasp and unthreading strap from buckle Always turn off the cart and unplug the power cord from the wall outlet when removing the battery. a b There are two conditions when a battery should be disconnected: 1. When the battery needs replacing 2. When the cart will be placed into longterm storage (more than 60 days without use) DISCONNECT BATTERY CABLES FROM THE BATTERY TOOLS REQUIRED 1. Ball End Metric Tool Set 2. 10mm Open End Wrench a. Remove the black boot from the terminal. b. Use wrench or screwdriver to remove bolt from battery terminal. STEPS FOR BATTERY REMOVAL 1. Power Down the System a. Turn off any components plugged into cart (example – PC, Monitor) b. Turn off Power System by Holding On/Off switch for 2 seconds WARNING: Do not allow any metal objects or Tools to contact both the terminal and other metal parts (including the other battery terminal) at the same time. LONG TERM BATTERY STORAGE (Greater than 2 Months) WARNING: If cart will not be used for more than 2 months, turn off the cart by holding the on/off button. The battery will need to be recharged every 30 days to prevent damage. c. Remove the red terminal cover d. Use wrench or screwdriver to remove bolt from the battery terminal e. Place disconnected cables off to side f. Grasp handles on battery and slowly pull out If you wish to store the battery separate from the cart, store battery in a cool dry location. UNPLUG POWER CORD FROM THE OUTLET a c Manufactured by: Rubbermaid Healthcare • 16905 Northcross Drive • Suite 200 • Huntersville NC 28078 Polycom RealPresence® Practitioner Cart® 8000 User Manual p/n 1793149 Rev C 03/13 14 ® ® RealPresence Practitioner Cart 8000 c. Fasten Black Connector to black (-) Terminal using terminal bolt. d. Cover terminal bolt with protective black boot. Tuck the excess battery cables into the battery cavity. e. Place Battery Access Panel back on cart and tighten fasteners with Allen key. f. Reconnect power cord to Battery Access Panel LEAD BATTERY MUST BE RECYCLED b PLACE BATTERY BACK INTO CART a. a c With the bottom of the battery facing the cart, slide the battery into the cart. The terminal ends should be pointing out towards the back of the cart. e CHECK BATTERY LEVEL AND CHARGE CONNECT BATTERY LEADS TO BATTERY WARNING: Always connect the Red (+) terminal first. Do not allow any metal objects or tools to contact a terminal and other metal parts (including the other battery terminal) at the same time. a. b. Fasten Red Connector (+) Terminal using terminal bolt. A harmless spark may occur when connector touches terminal. Quickly tap connector to terminal to diminish effect. a. Plug unit into wall b. The control keypad display will indicate the battery charge level, or the battery indicator bars will scroll to indicate that the battery is charging. c. The battery is fully charged, when the charge level bars, located inside the battery icon, stop scrolling. .. . Cover terminal bolt with protective red boot. Manufactured by: Rubbermaid Healthcare • 16905 Northcross Drive • Suite 200 • Huntersville NC 28078 Polycom RealPresence® Practitioner Cart® 8000 User Manual p/n 1793149 Rev C 03/13 15 ® ® RealPresence Practitioner Cart 8000 RECOMMENDATIONS: MAINTENANCE Unless it is covered in this manual, DO NOT service or make any modificiaton or replace any parts on your cart. Only Rubbermaid or an approved technician should service or make modificaitons to the cart. DO NOT use the cart if any pieces are missing or if there is any damage to the cart. In these cases, immediately contact Rubbermaid Customer Service for more information. Clean plastic components with diluted, non-abrasive solutions. Suggested cleaners are water, soap, diluted bleach and alcohol solutions. Remove pen and dry erase marker stains with a soft cloth and 91% isopropyl alcohol. Remove iodine stains with a soft cloth and any cleaners suggested above. DO NOT use the following chemicals to clean your cart: Acetone, Mineral Spirits, Abrasive Cleansers, Paint Thinner or any other harsh or toxic chemicals. CLEANING OF HIGH TOUCH POINT ITEMS Cables: Always keep the cables neatly organized and be sure to route excess cables away from moving components with wire tires or cable clips. 1. 2. Casters: To ensure that the cart travels smoothly, check the casters periodically to make sure they are free of debris and clean. Keep the cart away from uneven, dirty or damaged surfaces. 3. Fasteners: If fasteners become loose please notify Rubbermaid Customer Service. If fasteners need to be tightened, do not over tighten screws. In addition to damaging the screw, components can be damaged. 4. 5. Spiral Cord: Periodically inspect cord and plug to ensure plug is not bent and cable is not frayed. Work Surface is fully removable to facilitate cleaning (see Step 1 of Startup instructions) Document Protector is removable for cleaning by pulling up on back corners. To replace press nylon fastener into hole in work surface. Document protector is a replaceable item Back Handle is fully removable (see Step 9 of Startup instructions) Rear Bins can be removed by grabbing outside edge of bin and lifting up Keyboard Tray and Mouse Pads - Tray and mouse pads are composed of melamine resin and are easy to wipe down. CLEANING CAUTION: Verify that your cart is turned off and unplugged from the wall outlet before cleaning. Allow your cart to dry completely before plugging the power cord into a wall outlet. When cleaning the cart, wipe cleaners off of surface with a damp cloth and thoroughly dry. Never cover the cart or its components in liquid or allow liquids to flow into the cart. Never use steel wool or other abrasive material as these could damage the surface finish Before using any cleaner on the cart, first test on a small area to ensure that the surface is not harmed. These guidelines cannot guarantee infection control. The hospital’s Infection Control administrator should be consulted for cleaning procedures and processes. Manufactured by: Rubbermaid Healthcare • 16905 Northcross Drive • Suite 200 • Huntersville NC 28078 Polycom RealPresence® Practitioner Cart® 8000 User Manual p/n 1793149 Rev C 03/13 16 ® ® RealPresence Practitioner Cart 8000 Keyless Entry System Does Not Work Check the battery charge. If at 0%, recharge the battery by plugging in the power cord into a working medical grade outlet Verify the code that you are inputting into the system is the proper access code If this persists, contact the Polycom Service Department . BASIC TROUBLESHOOTING Cart will Not Power Up: Plug power cord into working medical grade outlet. Check to ensure power cord is plugged securely into back of cart Check to see if the keypad control display shows that the cart is charging when plugged in. If the charge level is critically low the keypad control will display battery low recharge. If the cart does not start, check to see if the cables to the power supply interface are securely plugged in. SERVICE AND SUPPORT Service Level Commitment Polycom is committed to providing best-in-class service. This document details our standard warranty and instructions on how to request service using our customer support system. Cart will Not Charge: Check to ensure external spiral cord is plugged into base of cart. Ensure the outlet the cart is plugged into is functionally operational Plug the power cord into a working hospital grade outlet. Check to make sure the power cord is plugged securely into the back of the cart. Check to see if the LCD display indicates the station is charging when plugged in. If the charge level is critically low LCD will display battery low recharge. If the cart still does not charge, check to see if cables to the power supply interface are securely plugged in. Service Details: Components generally requiring on-site technical assistance may include, but are not limited to: cart electronics, lift mechanism, power system, locking mechanism and structural failures. Components that generally do not warrant on-site technical assistance may include, but are not limited to: power cord, drawers, battery replacement and casters. REPLACEMENT PARTS AND/OR TO REQUEST SERVICE FOR THE Polycom® RealPresence® Practitioner Cart® 8000 Audible Alarm will Not Turn Off: When the battery reaches approximately 10% of capacity remaining, the audible alarm will sound. The alarm may be muted for 1 minute. Until the cart is plugged in to charge, the audible alarm will continue to sound every minute. If alarm fails to shut off after plugging in cart for several minutes, turn off the unit by holding on/off button for 2 seconds. If this persists, contact the Polycom Service Department Please call us at 1-888-248-4143 Address: Polycom Inc. 6001 America Center Dr. P.O. Box 641390 San Jose, CA. 95164 Cart Is Hard To Push: Check that the caster locks are in the unlocked (up) position Examine casters to see if any debris is caught in them Manufactured by: Rubbermaid Healthcare • 16905 Northcross Drive • Suite 200 • Huntersville NC 28078 Polycom RealPresence® Practitioner Cart® 8000 User Manual p/n 1793149 Rev C 03/13 17 ® ® RealPresence Practitioner Cart 8000 telecommunications utility to the Internet. Decisions concerning diagnosis and treatment are solely performed by the remote clinician. Depending on medical devices being used, a trained and qualified medical professional healthcare provider working within the scope of their license should facilitate and assist patients with use of the Polycom Practitioner Cart and medical devices. STATEMENT OF USE The Polycom Practitioner Cart Telemedicine system is intended for operation by a professional healthcare provider. The Practitioner Cart may be used to achieve the following: (a) Enable a remote clinician to consult with patients and make a diagnosis Contraindications (b) Enable a professional healthcare provider to have real-time images and audio sent and received from medical devices to allow a remote clinician to review the images, diagnose and provide care from a distance (c) This product is not intended for use in life sustaining or life saving applications The Polycom Practitioner Cart does not provide an alternative to contacting emergency services if a patient has a health problem that requires immediate attention. Transport real-time images of patients, images and sounds from medical devices for educational purposes Compliance/Classification This product is a Class 1 Medical Device Data System (MDDS) Indications for Use ANSI/AAMI ES60601-1 2005(R2012): Medical electrical equipment, Part 1: General requirements for basic safety and essential performance; Amendment No.2: 2010/05/30 The Polycom Practitioner Cart is indicated for use in real-time video consultation for acquisition, communication, and display of medical images. The system transfers synchronous real-time video and sounds between the clinician and the patient. Medical devices approved by governance of the local authority can be used to provide real-time medical images and sounds to the system to enable remote clinicians to offer high level assessment and diagnosis. Clinicians can also contact patients directly through the video conference connection. The communication connectivity is via a standard public CAN/CSA-C22.2 No. 60601-1: 2008: Medical electrical equipment, Part 1: General requirements for basic safety and essential performanceIEC 60601-1-2 Collateral Standard: Electromagnetic Compatibility – Requirements and tests All configurations of the cart shall comply with the requirements of UL 60601-1:2003. Anybody connecting Medical Equipment to this cart is responsible that the system complies with the requirements for Medical Electrical Systems. Attention is drawn to the fact that local laws take priority over the above mentioned requirements. If in doubt, consult your local representative or the technical service department Class A, Group 1 ISM Equipment Internally powered device with no applied parts. This equipment is designed for continuous operation. This device is classified IPXO for water ingress Input 120 VAC, 60 Hz, 5.1A for North America use 16 AWG minimum power cord type SJT with Hospital Grade or Hospital Only mains power plug. Contact Us Polycom Inc. 6001 America Center Drive San Jose, CA 95164 1-888-248-4143 Manufactured by: Rubbermaid Healthcare • 16905 Northcross Drive • Suite 200 • Huntersville NC 28078 Polycom RealPresence® Practitioner Cart® 8000 User Manual p/n 1793149 Rev C 03/13 18 ® ® RealPresence Practitioner Cart 8000 Manufactured by: Rubbermaid Healthcare • 16905 Northcross Drive • Suite 200 • Huntersville NC 28078 Polycom RealPresence® Practitioner Cart® 8000 User Manual p/n 1793149 Rev C 03/13 1