1
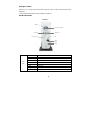
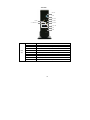
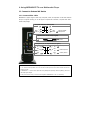
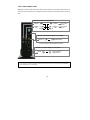
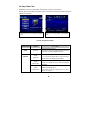
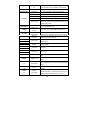
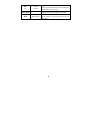
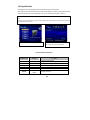
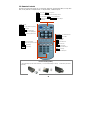
Contents
Introduction ........................................................................................ 3
Specifications ......................................................................................................................... 3
Precautions............................................................................................................................. 4
System Requirements........................................................................................................... 4
Package Content ................................................................................................................... 5
Product Overview................................................................................................................... 5
1. Using MEDIAGATE T1 as a Multimedia Player............................... 7
1.1 Connect to External AV Device.................................................................... 7
1.1.1 Connect Video Cable................................................................................................... 7
1.1.2 Connect Audio Cable................................................................................................... 8
1.2 Basic Setup ....................................................................................................... 9
1.2.1 Video Setup .................................................................................................................. 9
1.2.2 Audio Setup ................................................................................................................ 11
1.2.3 Network Setup............................................................................................................ 12
1.2.4 Screen Setup.............................................................................................................. 14
1.2.5 Preview Setup ............................................................................................................ 14
1.2.6 LED Setup................................................................................................................... 15
1.2.7 Time Setup.................................................................................................................. 15
1.3 Basic Screen Menu ....................................................................................... 16
1.3.1 Mode Selection, Media Type Selection................................................................... 16
1.3.2 File Selection .............................................................................................................. 18
1.4 Play Video Files ............................................................................................. 19
1.5 Play DVD Files................................................................................................ 22
1.6 Play Music Files ............................................................................................. 24
1.7 Play Photo Files ............................................................................................. 26
1.8 Make a Play-List............................................................................................. 28
1.9 Remote Controls............................................................................................ 29
1.10 Others............................................................................................................. 30
1.10.1 Music Slide Show..................................................................................................... 30
1
1.10.2 MP3 Quick Play ....................................................................................................... 30
1.10.3 Change Background Image ................................................................................... 30
2. Playing your TiVo® files................................................................. 31
2.1 Connect to External AV Device ..................................................................31
2.1.1 Connect Video Cable ................................................................................................ 31
2.1.2 Connect Audio Cable ................................................................................................ 32
2.2 Connecting to your TiVo® ...........................................................................33
2.2.1 Setting up the Network Connection......................................................................... 33
2.2.2 Connection via DHCP Server or Router................................................................. 34
2.2.3 Direct connection via Cross-Over............................................................................ 35
2.2.4 TiVo® file selection.................................................................................................... 37
2.2.5 Playing your TiVo® files............................................................................................ 38
3. Use as External USB HDD........................................................ 39
3.1 Insert Hard Disk (for drive-less MEDIAGATE T1 version) ...................39
3.2 Copy Data via USB ........................................................................................40
3.2.1 Windows 98SE........................................................................................................... 40
3.2.2 Windows ME............................................................................................................... 41
3.2.3 Windows 2000, XP .................................................................................................... 42
3.2.4 Mac .............................................................................................................................. 43
4. Accessing PC via Network....................................................... 44
4.1 Connect LAN Cable .......................................................................................44
4.2 Setting Network Configurations.................................................................44
4.2.1 Windows 98SE, ME................................................................................................... 45
4.2.2 Windows 2000............................................................................................................ 47
4.2.3 Windows XP ............................................................................................................... 50
4.2.4 Firmware Upgrade..................................................................................................... 54
Technical Support .......................................................................... 54
2
Introduction
The MEDIAGATE T1 digital multimedia player, supports dual data access mode via the internal 3.5” HDD and a
10/100Mbps network. Easily enjoy Digital Movie, Digital Music, and Digital Photo data on your TV. Network the
MEDIAGATE T1 with your personal computer, home entertainment center, TV, and even your TiVo®, for the ultimate
media center!
Ø
Ø
Ø
Ø
Ø
Ø
Ø
Dual Data Access Mode via 10/100Mbps LAN and 3.5” HDD inside
Digital Multimedia Player via Home TV or Car TV
USB 2.0 External Storage via PC (FAT32)
Audio - Stereo, Digital Coaxial & Optical 5.1ch. Sound
Video - Composite, S-Video, HD Component 480p, 720p, 1080i
DVD Manager - Playback of DVD File same as Original DVD Title
Firmware Upgradeable
Specifications
Product Name
MEDIAGATE T1
Power
5V 1.5A /12V 1.5A
Weight
2.3lbs with HDD
Dimension
57 x 150 x 185 mm
Available OS
Windows 98SE/ME/2000/XP, Mac OS10 or higher
USB Interface
480Mbps USB 2.0 (USB 1.1 Compatible) / Slave
Network Interface
10/100 Mbps LAN (RJ-45)
HDD Type
3.5”IDE HDD
HDD File System
FAT32
TV Type
NTSC / PAL
Supported Format
Movie
MPEG 1, 2, 4 (MPG, MPEG, AVI, M2V, DAT, VOB, IFO etc.)
XviD (except GMC, Qpel option applied) TiVo series 2 compatible
Music
MP3, OGG Vorbis, WAV, WMA (except WMA9 pro.lossless)
Photo
JPG (JPEG)
Video Output
COMPOSITE
S-VIDEO
COMPONENT Y, Pb, Pr (480p, 720p, 1080i Progressive Scan)
Audio Output
STEREO L-R
DIGITAL COAXIAL, OPTICAL (DTS Pass-Through Only)
Working Temperature
0°æ
C ~ 60°æ
C
Working Humidity
10% ~ 50%
3
Precautions
?áWe strongly recommend you back up your data stored in your MEDIAGATE T1. We are not responsible for data
damage or loss due to failure of the HDD.
?ËIt is strongly recommended the user unplug the power adaptor when MEDIAGATE T1 is not in use for extended
periods of time.
? MEDIAGATE T1 does not support the XviD codec of video files that has GMC, Qpel option.
?«MEDIAGATE T1 only supports “Pass-Through” for DTS Audio codec.
?K
Do not power off while a file is playing.
?ëIf the length of the USB cable is too long (recommend: up to 3 meters), MEDIAGATE T1 may not operate properly.
?‹If you have a USB 1.1 Host Adapter, MEDIAGATE T1 will only work at USB1.1 speed.
?+Data damage or loss may be caused if less than 6GB of storage is available on internal HDD.
?áVery Important! If an unformatted HDD is inserted into MEDIAGATE T1, a computer will not be able to detect the
HDD. Make sure that the HDD is formatted.
? Dropping MEDIAGATE T1 can cause damage. Be careful of drops, sharp impact, or shock. If MEDIAGATE T1 is
damaged by dropping, impacting, or shocking, contact the manufacturer or your place of purchase.
?K
We recommend you use only the supplied cables and/or accessories. This will insure the best performance of your
MEDIAGATE T1. Using other cables or accessories may not support the best performance.
?‹Very Important! Keep MEDIAGATE T1 away from water and heavy moisture. If MEDIAGATE T1 is exposed to
moisture of any kind, unplug from the PC, network, and/or power right away. If you use the MEDIAGATE T1 under
these conditions, the HDD may be damaged or you may receive an electric shock.
?kDo not touch the MEDIAGATE T1 with wet hands. It may cause electric shock.
? Keep away from heat and direct light.
?W
Keep away from devices that transmit strong magnetic signals. It may cause data damage or loss on HDD.
?—
Do not disassemble. Doing so may cause damage or loss of data. (May void warranty)
http://www.pogoproducts.com/warranty.html
System Requirements
?á
USB Requirements
- Windows 98SE, ME, 2000, XP / MAC OS 10 or higher
- Available USB 2.0, 1.1 Port (Recommend USB 2.0)
?7
Network Requirements
- Windows 98SE, ME, 2000, XP
- Available 10/100 Ethernet LAN Port, RJ-45 (Recommend 100Mbps)
4
Package Content
?áMEDIAGATE T1, Cradle, Remote Control, Battery, Composite + Stereo L-R Cable, USB Cable, Power Adapter,
User Manual
** Optional Package: External Remote Control IR Receiver, Carrying Bag
Product Overview
- Front View -
1. ENTER
2. NAVIGATION KEYS
3. POWER
5. STOP/INIT
6. IR
4. PLAY/PAUSE
7. PWR
8. NET
9. HDD
Front
View
1. ENTER
Select or play a file
2. NAV. KEYS
Navigation Key, Up, Down, Left, Right
3. POWER
Power On, Off
4. PLAY / PAUSE
Play all files from selected file / Pause
5. STOP / INIT
Stop / Return to Mode Selection Screen
6. IR
IR receiving area for remote signals
7. PWR
Power LED
8. NET
Network LED
9. HDD
HDD LED
5
- Back View -
1. IR-EXT
2. USB
3. OPTICAL
9. CVBS
4. S-VIDEO
10. STEREO L-R
5. COAXIAL
6. Y, PB, PR
7. LAN
8. PWR
Back
View
1. IR-EXT
Connect external remote control IR receiver
2. USB
Connect USB cable
3. OPTICAL
Connect Optical cable for 5.1 ch. digital audio output
4. S-VIDEO
Connect s-video for video output
5. COAXIAL
Connect coaxial cable for 5.1 ch. digital audio output
6. Y, PB, PR
Connect component Y, Pb, Pr cable for video output
7. LAN
Connect LAN cable for networking
8. PWR
Connect power adapter
9. CVBS
Connect composite cable for video output
10. STEREO L-R
Connect stereo cable for audio output
6
1. Using MEDIAGATE T1 as a Multimedia Player
1.1 Connect to External AV Device
1.1.1 Connect Video Cable
MEDIAGATE T1 supports 3 types of video output; “Composite, S-video, and Component”. Use the video connection
that your TV supports. Normally, your TV will support a composite video connection; a composite video cable is
included in this package.
?áComposite: Yellow RCA cable. (Supplied)
Yellow
(CVBS)
Yellow
(CVBS)
Connect to Composite
(CVBS) Jack of TV
?áS-Video: Black rounded cable (not supplied)
Connect S-Video
Jack of TV
S-VIDEO
?áComponent: Y, Pb, Pr component cable (not supplied)
Red
(Pr)
Red
(Pr)
Connect Pr Jack of TV
Blue
(Pb)
Blue
(Pb)
Connect Pb Jack of TV
Green
(Y)
Green
(Y)
Connect Y Jack of TV
ü If a normal screen is not visible after connecting video cable, please check the following:
1. “TV “– Switch to Video Input Mode: Turn on TV and switch to video input mode, same as video connection. See TV users
manual for more info.
2. “MEDIAGATE T1” – Switch to Video Output Mode: Press [VIDEO] button repeatedly. Whenever [VIDEO] is pressed, the
video output signal is changed.
3. After you see a normal screen, you must save video configurations of MEDIAGATE T1 .See “1.2.1 Video Setup”.
7
1.1.2 Connect Audio Cable
MEDIAGATE T1 supports 3 types of audio output; Stereo, Coaxial, and Optical. Use the audio connection that your TV
or Audio set supports. Normally, your TV will support a stereo audio connection. This package contains a stereo audio
cable.
?áStereo: Red & White RCA Cable (supplied)
Red
(STEREO-R)
Red
(STEREO-R)
(STEREO-L)
White
(STEREO-L)
White
Connect Stereo-R
Jack of TV.
Connect Stereo-L
Jack of TV.
?áOptical (¨ ): Optical Cable for Digital 5.1 ch. (not supplied)
Connect Optical Jack of
Amplifier or Receiver
OPTICAL (¨ )
ü Don’t connect optical and coaxial cable together at the same time.
?áCoaxial: Coaxial cable for Digital 5.1 ch. (not supplied)
Connect Coaxial jack of
Amplifier or Receiver.
COAXIAL
ü If you cannot hear sound after connecting the Optical or Coaxial Cable, you will have to change audio setup of MEDIAGATE
T1 to Encoded Digital. See “1.2.2 Audio Setup”
8
1.2 Basic Setup
1.2.1 Video Setup
IMPORTANT! The MEDIAGATE T1 video output mode and TV set input mode must be on the same setting.
ü If you cannot see a normal screen after connecting the video cable, please check the following:
1. “TV “– Switch to Video Input Mode: Turn on TV and switch to video input mode, same as video connection. See TV users manual
for more info.
2. “MEDIAGATE T1” – Switch to Video Output Mode: Press [VIDEO] button repeatedly. Whenever [VIDEO] is pressed, the video
output signal is changed.
3. After you see a normal screen, you must save the video configurations of MEDIAGATE T1.
TV Video
Input Mode
MEDIAGATE T1
Video
Output Mode
Connection Jack
of TV, MEDIAGATE
T1
Video Cable Type
(HD Component OFF)
CVBS or Composite Jack
Yellow RCA Cable
TV Out: PAL C/S-Video
(Generally Yellow Jack)
(Supplied)
TV Out: NTSC C/S-Video
Normal Video
(HD Component OFF)
TV Out: NTSC C/S-Video
S-Video
(HD Component OFF)
TV Out: PAL C/S-Video
S-Video Jack
S-Video Cable
* Black rounded
(HD Component OFF)
TV Out: NTSC C/YPbPr
Component 480i
(HD Component OFF)
TV Out: PAL C/YPbPr
(HD Component OFF)
Component 3 Jack
Component Cable
Component 480p
HD Component Out On 480p
* Y (Green), Pb(Blue), Pr(Red)
* Y (Green), Pb(Blue), Pr(Red)
Component 720p
HD Component Out On 720p
Component 1080i
HD Component Out On 1080i
ü NTSC, PAL: Standard of TV Output. Select the proper setting for using in your country.
9
< Setup Procedure>
1. Turn on MEDIAGATE T1 and press [SETUP] in
the Mode Selection screen.
2. Select the ‘TV Out’ icon and press [ENTER].
Setup box will be displayed under the icon menu.
3. Select the Video Output Mode that you want
and press [ENTER].
4. Press [SETUP] to save configurations.
10
1.2.2 Audio Setup
This is a guide for setting the audio output of your MEDIAGATE T1. You can use Stereo or Digital 5.1 ch.
ü Analog /DCPM: Select when you connect the supplied audio cables (Red / White) to TV or Audio set directly.
ü Encoded Digital: Select when you want to listen through 5.1Ch / DTS Dolby by connecting receiver (or amplifier) with Optical or
Coaxial cable.
<Setup Procedure>
1. Press [SETUP] in the Mode Selection screen.
2. Select the ‘Audio’ icon and press [ENTER].
Setup box will be displayed under the icon menu.
3. Select the Audio Output Mode that you want
and press [ENTER].
4. Press [SETUP] to save configurations.
11
1.2.3 Network Setup
MEDIAGATE T1 can connect to a network. It is possible to obtain the IP address automatically from your DHCP Server
or Router, or manually set a specific IP address. Check your network environments.
ü DHCP On: You can use this option to obtain the IP address automatically from a DHCP Server or Router.
ü DHCP Off: When it is not possible to obtain the IP address automatically, you must use this option. Enter the IP address and Subnet
mask manually.
‘DHCP On’ Setup Procedure
1. Press [SETUP] in the Mode Selection screen.
2. Select the ‘Network’ icon and press [ENTER].
Setup box will be displayed under the icon menu.
3. Select DHCP: On and press [ENTER].
4. Press [SETUP] to save the configurations.
ü When you use ‘DHCP On’, you can see the IP
address in the MENU screen after selecting the
[PC-Network] icon in the Mode Selection screen.
12
<DHCP Off Setup Procedure>
1. Press [SETUP] in the Mode Selection screen.
2. Select the ‘Network’ icon and press [ENTER].
Setup box will be displayed under the icon menu.
3. Select ‘DHCP: Off and press [ENTER].
4. Select 'IP Addr' and press [ENTER]
The IP address Input box will be displayed. Enter
the IP address with the arrow and number
buttons on the remote control. Press [ENTER].
5. Select 'Subnet' and press [ENTER].
The Subnet mask Input box will be displayed.
Enter the Subnet mask with the arrow and
number buttons on the remote control. Press
[ENTER].
6. Press [SETUP] to save the configurations.
ü When you use ‘DHCP Off’, you can see the IP
address in the MENU screen after selecting [PCNetwork] icon in the Mode Selection screen.
13
1.2.4 Screen Setup
This is a guide for setting the TV Type. You can use 4:3 Letter Box, 4:3 Pan Scan, and 16:9. The default setting is
4:3 Letter Box.
<Setup Procedure>
1.Press [SETUP] in the Mode Selection Screen.
2. Select the ‘Screen’ icon and press [ENTER].
Setup box will be displayed under the icon menu.
3. Move to and select either 4:3 Letter box, 4:3
Pan scan or 16:9, and press [ENTER].
4. Press [SETUP] to save the configurations.
1.2.5 Preview Setup
It is possible to enable or disable “Preview the photo file as a thumbnail image” before playing.
<Setup Procedure>
1. Press [SETUP] in the Mode Selection screen.
2. Select the ‘Preview’ icon and press [ENTER].
Setup box will be displayed under the icon menu.
3. Move to and select Photo preview “On or Off”
and press [ENTER].
4. Press [SETUP] to save the configurations.
14
1.2.6 LED Setup
You may switch the backlight LED arrow buttons on the front of the MEDIAGATE T1 on or off.
<Setup Procedure>
1. Press [SETUP] in the Mode Selection screen.
2. Select the ‘LED’ icon and press [ENTER].
Setup box will be displayed under the icon menu.
3. Move to and select LED “On or Off” and press
[ENTER].
4. Press [SETUP] to save the configurations.
1.2.7 Time Setup
You may enter your Standard Time Zone and enable or disable Daylight Savings Time.
<Setup Procedure>
1. Press [SETUP] in the Mode Selection screen.
2. Select the ‘Time’ icon and press [ENTER].
Setup box will be displayed under the icon menu.
3. Select your Standard Time Zone and press
[ENTER].
4. Press [SETUP] to save the configurations.
15
1.3 Basic Screen Menu
1.3.1 Mode Selection, Media Type Selection
After turning on MEDIAGATE T1, you will see the Mode Selection screen. In this screen, you can select the internal
HDD or Networked Computers. Press [ENTER] after moving to the selected icon with the arrow keys.
ü If there is no HDD or network connection available, the icons will not be highlighted.
1) Using the Built-in HDD
1. Select the 'MediaGate' icon in the Mode
Selection screen and press [ENTER] to access
HDD's files.
2. [Media Type Selection] Select a media type
you wish to play and press [ENTER].
- Movie: Select to play Video files
- Music: Select to play Music files
- Photo: Select to view Photo files
- Playlist: Select when making a play list including
video, music, photo files
- Setup: Select to enter setup screen.
16
2) Use Networking Computer
1. Select the 'PC-Network' icon in the Mode
Selection screen and press [ENTER] to access
networking computers’ files.
2. [Media Type Selection] Select a media type
you wish to play and press [ENTER].
- Movie: Select to play Video files
- Music: Select to play Music files
- Photo: Select to view Photo files
- Playlist: Select when making a play list,
including video, music, photo files
- Setup: Select to enter Setup screen.
3. [Computer list on network] Computer list on
network will be displayed. Move to a computer and
press [ENTER].
17
1.3.2 File Selection
After selecting a Media type, the ‘File Selection’ screen will be displayed. Move to a file that you want to play and press
[ENTER] or [PLAY/PAUSE].
IconMenuTray
1. [ENTER] button
Play one file that you select. After playback is finished, the ‘file selection screen’ will appear.
2. [PLAY/PAUSE] button After playing the file that you’ve selected, the next file will automatically play.
3. ?ÿ?ÿ button
4.
?á button
5.
?á button
Move to files by pressing ?ÿ ?ÿ arrow buttons.
Move up one directory by pressing
arrow button.
Go to ‘Icon Menu Tray’ placed at the top of screen by pressing
button. In order to return to the ‘file
selection screen’, press the ?^ arrow button or select the ‘Exit’ icon.
6. Icon Menu Tray Descriptions
Go to the ‘Icon Menu Tray’ placed at the top of screen by pressing the
press ?Warrow button or select the ‘Exit’ icon.
button. In order to return to file selection,
Back:
Return to previous directory
Allplay:
After playing a selected file, Allplay will play the next file automatically. It is the
same as [PLAY/PAUSE] button.
Menu:
Return to Media Type screen
Exit:
Exit Icon Menu Tray and return to file selection screen.
18
1.4 Play Video Files
MEDIAGATE T1 can play AVI, MPG, MPEG2 (TiVo®), MPEG4, DAT, M2V, and VOB video files.
Select the ‘Movie’ icon in the Media Type Selection screen. The Video file list will be displayed. Select a file and press
[ENTER] or [PLAY/PAUSE].
Select the ‘Movie’ icon in the Media Type Selection
Select a file and press [ENTER] or [PLAY/PAUSE]
screen.
button.
< Function and Button Descriptions>
Remote Control
Function
Descriptions
AUDIO
Dual Audio
It is possible to switch audio language when the audio format
is dual-audio. For example, English and Spanish.
SUBTITLE
Subtitle
Move& Size
It is possible to change subtitle size and location.
arrow buttons changes size and ?a?a arrow buttons
changes location. After changing, press [ENTER].
Subtitle
Select or Hide
The subtitle name is displayed on screen automatically.
However, it is possible to open or hide other preferable
subtitle files.
Subtitle
Language Select
It is possible to switch each subtitle language when the
subtitle is dual language format
* When selecting ‘Discriminating subtitle language’, the first subtitle
language will be displayed.
19
Subtitle
Sync.
4, 5, 6
Number Button
Subtitle
Color Change
Subtitle color is changed when pressing numbers 4 or 6.
In order to return default color (white), press number 5.
Zoom Vertical
Zoom screen vertically.
Zoom Full
Scr. SIZE
Enlarge the overall screen.
Custom
Enlarge or reduce the screen by with arrow buttons.
Default
Return to original screen size and position.
Screen Position
TIME SEARCH
Jump to Preferable
Playback Time
CANCEL
Delete Input
Numbers
Move the screen to the direction with arrow buttons. Press
[Brt.Cont] key to return to the original screen position when
applying Screen position.
Move to a selected time of a file.
In time search box, this button deletes all numbers in 0.
Brt. CONT
Control luminosity, color
depth, brightness
When pressing this button, 3 modes will switch. After
selecting a mode, change settings with ?™?™arrow buttons.
FILE INFO
Show File
Information
Displays the file information being played. To hide the
information, press this button again.
Fast Forward
When pressing this button, play speed is changed 8x, 16x, or
32x fast forward.
Rewind
When pressing this button, play speed is changed 8x, 16x, or
32x fast backward.
FF
arrow button
REW ?á?¡
?á
It is possible to set the subtitle sync. with (one second)
(60 second) when motion and subtitle sync is not matched.
arrow button
VOLUME +
?áarrow button
VOLUME ?áarrow button
Volume Up
Volume Down
Volume up.
Volume down.
MUTE
Sound Off
Mute the sound. In order to hear sound, press this button
again.
ENTER
Playback a File
Play a file. After finishing playback, return to file selections
screen.
PLAY / PAUSE
II
Playback
Next All Files
After the file that you select is played, the next file will be
played automatically. It is the same as the [PLAY/PAUSE]
button.
PLAY / PAUSE
II
Pause
Pauses playback. Press this button again to resume
playback.
PREV
I?á?k
Playback
Previous File
Play a previous file from the current playback file. If you used
[ENTER] for playback, you cannot use this function. This is
available using [PLAY/PAUSE] button or 'ALLPLAY'.
20
NEXT
I
Playback
Next File
Play file after a current playback file. If you used [ENTER] for
playback, you cannot use this function. This is available using
[PLAY/PAUSE] button or 'ALLPLAY'.
0
Number button
Screen Reset
If a frame or video file is broken, a green color runs on the
overall screen. Press number [o “Zero”] for screen reset.
MENU
Menu Icon Popup
Popup menu displays 'File Info, Time Search, Subtitle, and
Scr.Size' functions. In order to hide the popup, press this
button again.
21
1.5 Play DVD Files
DVD manager function supports DVD backup files and will play the same as the original DVD.
Make a folder and then save all backup files into the folder. After connecting TV (or Monitor), select VIDEO_TS.IFO file
at the folder. Make sure that all files, including VIDEO_TS.IFO, from one DVD title are located in one folder.
ü If you cannot find the VIDEO_TS.IFO file among the backup files from the original DVD title, the DVD manager function will not
work.
ü When you play a DVD file located in a networked computer, playback time may be delayed. It is recommended that you use the
built-in HDD for optimum performance.
Select the ‘Movie’ icon in Media Type Selection screen.
Move to the folder that contains the DVD backup files
and select the ‘video_ts.ifo’ file. Press [ENTER].
< Function and Button Descriptions>
Remote Control
Function
Description
AUDIO
Select Audio Type
SUBTITLE
Select Subtitle Type
Audio type will be changed when pressed.
Subtitle type will be changed when pressed.
Scr. SIZE
Screen Size
Screen size will be changed when pressed.
MENU
Go to Menu
Move to main menu while playing DVD.
SLOW
Playback Slow
Play slowly at 1/2x, 1/4x, and 1/8x speed when pressed.
REPEAT
Chapter, Title
Repeat
Set chapter, title repeat.
22
A-B REPEAT
A-B repeat
Set the A-B repeat.
TITLE
Go to Title Menu
ANGLE
Angle
FILE INFO
Show File
Information
TIME SEARCH
Jump to Preferable
Playback Time
CANCEL
Delete Input
Numbers
Brt. CONT
Control luminosity, color
depth, brightness
PREV
I?á?%
Playback
Previous Chapter
NEXT
I
Playback
Next Chapter
Play the next chapter.
Fast Forward
When pressing this button, play speed is accelerated to 8x,
16x, 32x, or 48x fast forward.
Rewind
When pressing this button, play is reversed by 8x, 16x, 32x,
or 48x speed.
ENTER
Playback
Play ‘Video_ts.ifo’ file.
PLAY / PAUSE
II
Pause
FF
REW
?á?Ó
VOLUME +
Volume Up
VOLUME -
Volume Down
MUTE
Sound Off
Move to title menu while playing DVD.
Apply angle function.
Show the file information being played. To
hide the information, press this button again.
Move to a selected time of a file.
In time search box, this button deletes all numbers in 0.
When pressing this button, 3 modes will switch. After
selecting a mode, change settings with the arrow buttons.
Play the previous chapter.
Pause playback. Press this button again to resume.
Volume up.
Volume down.
Mute the sound. In order to hear sound, press this button
again.
23
1.6 Play Music Files
It is possible to play MP3, OGG, WAV, and WMA music files.
Select the Music icon in the Media Type Selection screen. The Music file list will be displayed. Select a file and press
[ENTER] or [PLAY/PAUSE] button.
Select the Music icon in the Media Type Selection
Select a file and press [ENTER] or [PLAY/PAUSE]
screen.
button.
< Function and Button Descriptions>
Remote Control
Function
Description
FILE INFO
Show File
Information
Show the file information being played. To hide the
information, press this button again.
TIME SEARCH
Jump to Preferable
Playback Time
CANCEL
Delete Input
Numbers
Brt. CONT
Control luminosity, color
depth, brightness
When pressing this button, 3 modes will switch. After
selecting a mode, change settings with the arrow buttons.
PREV
I?á?R
Playback
Previous File
Play a previous file from the current playback file. If you used
[ENTER] for playback, you cannot use this function. This is
available in playing all files while using [PLAY/PAUSE] button
or 'ALLPLAY'.
Move to a selected time of a file.
In time search box, this button deletes all numbers in 0.
24
NEXT
I
Playback
Next File
Play file after the current playback file. If you used [ENTER]
for playback, you cannot use this function. This is available in
playing all files while using [PLAY/PAUSE] button or
'ALLPLAY'.
FF
Go to 10 Sec. in
Forward
Go to 10 sec. in forward and play when a file is being played.
REW
?á?#
Go to 10 Sec. in
Backward
Go to 10 sec. in backward and play when a file is being
played.
ENTER
Playback a File
Play a file. After finishing playback, return to file selections
screen.
PLAY / PAUSE
II
Playback
Next All Files
After the file that you select is played, the next file will be
played automatically. It is the same as the [PLAY/PAUSE]
button.
PLAY / PAUSE
II
Pause
Pause playback. Press this button again to resume playback.
VOLUME +
Volume Up
VOLUME -
Volume Down
MUTE
Sound Off
SUBTITLE
Hide Mp3 Subtitle
Volume up.
Volume down.
Mute the sound. In order to hear sound, press this button
again.
It is possible to show mp3 subtitle if the file data is available
This button will also hide the subtitle.
ü How to Play MP3 without TV set. MP3 Quick Play
Make a 'music' folder (in lower case letters) at the root directory of the MEDIAGATE T1 HDD. Save MP3 files in the folder. If the HDD
is divided into two or more partitions, make a 'music' folder at the first partition.
Turn on MEDIAGATE T1 and just press [PLAY/PAUSE] button. MP3 files at 'music' folder will be played automatically.
25
1.7 Play Photo Files
It is possible to play JPG (JPEG) photo files.
Select the Picture icon in the Media Type Selection screen. The Photo file list will be displayed. Select a file and press
[ENTER] or [PLAY/PAUSE] button.
Select the Picture icon in the Media Type Selection
Select a file and press [ENTER] or [PLAY/PAUSE]
screen.
button.
< Function and Button Descriptions>
Remote Control
Function
Description
FILE INFO
Show File
Information
Show the file information. In order to hide the information,
press this button again.
PREV
I?á?¶
Playback
Previous File
Play a previous file from the current playback file. If you used
[ENTER] for playback, you cannot use this function. This is
available while playing all files using [PLAY/PAUSE] button or
'ALLPLAY'.
NEXT
I
Playback
Next File
Play next file from the current playback file. If you used
[ENTER] for playback, you cannot use this function. This is
available while playing all files using [PLAY/PAUSE] button or
'ALLPLAY'.
ENTER
Playback a File
Play a file. After finishing playback, return to file selections
screen.
PLAY / PAUSE
II
Playback
Next All Files
After the file that you select is played, the next file will be
played automatically. It is the same as [PLAY/PAUSE]
26
PLAY / PAUSE
II
FF
REW
?á?ã
ANGLE
PAN
?¸ ?¸ ?á
Pause
Pause playback. Press this button again to resume.
Zoom In
Enlarge a photo.
Zoom Out
Reduce a photo.
Rotation
Rotate a photo.
Panning
Move the position of photo.
ENTER
ReturntoOriginalPhoto
Return to original photo.
Brt. CONT
Control luminosity, color
depth, brightness
When pressing this button, 3 modes switch. After selecting a
mode, change settings with arrow buttons.
ü Photo Slide Show
If you play all files with 'PLAYALL' icon or [PLAY/PAUSE], photo slide show will be started.
ü Music Slide Show
Make a 'music' folder (in lower case letters) at the root directory of the MEDIAGATE T1 HDD. Save MP3 files in the folder. If the HDD
is divided into two or more partitions, make a 'music' folder at the first partition.
Turn on MEDIAGATE T1 and just press [PLAY/PAUSE] button. MP3 files at 'music' folder will be played automatically.
When you play one or all photo files, you can listen to mp3 music and see the photo slide shows simultaneously.
Note: You cannot listen to MP3 music files while viewing a slide show if your MEDIAGATE T1 doesn’t have a HDD.
ü Photo Preview On, Off
It is possible to enable or disable ”preview the photo file as a thumbnail image” before playing at SETUP screen.
27
1.8 Make a Play-List
User can register all media types of files like video, music, and photo to a play-list. The registered media files play-list
will be played without discriminating media type.
ü It is not possible to play each registered file independently. Use 'Random, PLAY all' icon or [PLAY/PAUSE] button. Additionally,
registered play-list will be deleted after rebooting.
1. Select the Play List icon in the Media Type Selection
2. Select a file and press [ENTER] to add to Play-List.
screen.
After adding, press [ ?á] to move to the 'Menu Icon tray'.
Select the 'List' icon and press [ENTER].
3. The Play-List screen will appear. You’ll see the added
files. Play as the following,
- Random icon: play in random.
- Allplay icon: play in order from selected file.
- Play/Pause button: play in order from selected file.
* In order to move up to the Menu Icon Tray, press the [ ] button.
* Delete (X) icon means to delete all the added files.
* In order to delete an added file, select the file on the Play-List screen and press [ENTER] twice.
* In order to change location among added files, select the file you wish to move and press [ENTER]. Now move to the
other file where you want to add and press [ENTER].
28
1.9 Remote Controls
This guide is for basic remote control use. For more details, please see; ‘3.3 Basic Screen Menu’, ‘3.4 Play Video
Files’, ‘3.5 Play DVD Files’, ‘3.6 Play Music Files’, ‘3.7 Play Photo Files’, ‘3.8 Make a Play-List’.
POWER TurnOn/ Off SETUP Go to Setup Screen.
MENU Go to DVDMainMenu, DisplayMenu IconWhenPlaying Video File.
TITLE Go to DVDTitleMenu ANGLE DVDAngle, Photo Rotation
REPEAT Set DVDChapter, TitleRepeat A-B REPEAT Set DVDA-BRepeat.
SLOW PlayDVDSlowly.
ENTER PlayaFile.
?á?B?B?B ArrowKey(?B: Returnto UpDirectory)
FILEINFO ShowFileInfo.
TIMESEARCH Jumpto Specificplaytime
Brt.CONT Set Luminosity, Color Depth, Brightness
MEDIATYPE Go to MediaTypeSelectionScreen
MAINPAGE Go to ModeSelectionScreen.
PLAY/PAUSE Playnext allfiles
Pause
STOP Stopsplayback
VIDEO ChangeVideo Output Mode
REW PlayFaster inBackward.
AUDIO ChangeAudio TypeofVideo, DVDfile
FF PlayFaster inForward.
SUBTITLE Sub-titleSettings
PREV Go to PreviousPage,
Scr. SIZE ScreenSizeSettings
PlayPreviousFileinPlayAll
NEXT Go to Next Page
PlayNext FileinPlayAll
How to Insert/Change Battery
1. Pull off the battery tray from remote control body. 2. Put the enclosed battery on the tray. 3. Insert the tray into remote
control body.
29
1.10 Others
1.10.1 Music Slide Show
Make a 'music' folder (in lower case letters) at the root directory of the MEDIAGATE T1 HDD. Save MP3 files in the
folder. If the HDD is divided into two or more partitions, make a 'music' folder at the first partition.
Turn on MEDIAGATE T1 and press [PLAY/PAUSE] button. MP3 files at 'music' folder will be played automatically.
When you play one or all photo files, you can listen to mp3 music and see the photo slide shows simultaneously.
*Note: You cannot listen to MP3 music files while viewing a slide show if your MEDIAGATE T1 doesn’t have a HDD.
1.10.2 MP3 Quick Play
For listening to MP3 files without TV set.
Make a 'music' folder (in lower case letters) at the root directory of the MEDIAGATE T1 HDD. Save MP3 files in the
folder. If the HDD is divided into two or more partitions, make a 'music' folder at first partition.
Turn on MEDIAGATE T1 and press [PLAY/PAUSE] button. MP3 files at 'music' folder will be played automatically.
Additionally, after rebooting MEDIAGATE T1, the last played file will resume play.
Note: You cannot listen to MP3 music files while viewing a slide show if your MEDIAGATE T1 does not have a HDD.
1.10.3 Change Background Image
It is possible to change the background image on MEDIAGATE T1. Save ‘mybg.jpg’ on the root directory of the
MEDIAGATE T1 HDD. Background image will be changed as ‘mybg.jpg’.
* Recommend using 720x480 pixels image.
30
2. Playing your TiVo® files
2.1 Connect to External AV Device
2.1.1 Connect Video Cable
You must connect MEDIAGATE T1 to an AV device (such as a TV set) in order to transfer your TiVo® files.
MEDIAGATE T1 supports Composite, S-video, and Component video connections. Use the video connection that your
TV supports. Normally, your TV supports a composite video connection; a composite video cable is included in this
package.
?áComposite: Yellow RCA cable. (Supplied)
Yellow
(CVBS)
Yellow
(CVBS)
Connect to Composite
(CVBS) Jack of TV
?áS-Video: Black rounded cable (not supplied)
Connect S-Video
Jack of TV
S-VIDEO
?áComponent: Y, Pb, Pr component cable (not supplied)
Red
(Pr)
Red
(Pr)
Connect Pr Jack of TV
Blue
(Pb)
Blue
(Pb)
Connect Pb Jack of TV
Green
(Y)
Green
(Y)
Connect Y Jack of TV
ü If a normal screen is not visible after connecting video cable, please check the following:
1. “TV “– Switch to Video Input Mode: Turn on TV and switch to video input mode, same as video connection. See TV users
manual for more info.
2. “MEDIAGATE T1” – Switch to Video Output Mode: Press [VIDEO] button repeatedly. Whenever [VIDEO] is pressed, the
video output signal is changed.
3. After you see a normal screen, you must save video configurations of MEDIAGATE T1. See “1.2.1 Video Setup”.
31
2.1.2 Connect Audio Cable
You’ll need to connect the audio cable in order to hear the audio coming from the MEDIAGATE T1. MEDIAGATE T1
supports 3 types of audio output; Stereo, Coaxial, and Optical. Use the audio connection that your TV or Audio set
supports. Normally, your TV will support a stereo audio connection. This package contains a stereo audio cable.
?áStereo: Red & White RCA Cable (supplied)
Red
(STEREO-R)
Red
(STEREO-R)
(STEREO-L)
White
(STEREO-L)
White
Connect Stereo-R
Jack of TV.
Connect Stereo-L
Jack of TV.
?áOptical (¨ ): Optical Cable for Digital 5.1 ch. (not supplied)
Connect Optical Jack of
Amplifier or Receiver
OPTICAL (¨ )
ü Don’t connect optical and coaxial cable together at the same time.
?áCoaxial: Coaxial cable for Digital 5.1 ch. (not supplied)
Connect coaxial jack of
Amplifier or Receiver.
COAXIAL
ü If you cannot hear sound after connecting the Optical or Coaxial Cable, you will have to change audio setup of MEDIAGATE
T1 to Encoded Digital. See “1.2.2 Audio Setup”
32
2.2 Connecting to your TiVo®
2.2.1 Setting up the Network Connection
MEDIAGATE T1 communicates with your TiVo® via a Local Area Network (LAN). There are two ways to connect
MEDIAGATE T1 to your TiVo® box: connection via a DHCP (Dynamic Host Configuration Protocol) Server or Router,
or direct connection using a cross - over LAN cable. You may need to use a USB to Ethernet adapter to connect to
your TiVo® box, which will allow your TiVo® to connect to your network. For information on TiVo® Network Adapters,
please check the TiVo® Store online.
33
2.2.2 Connection via DHCP Server or Router
In this section, your TiVo® box and MEDIAGATE T1 will be connected to a DHCP Server or router. It is possible to
obtain the IP address automatically if you are using a DHCP Server or Router.
ü DHCP On: You can use this option to obtain the IP address automatically from a DHCP Server or Router.
ü You may use a standard straight-through Ethernet LAN cable for this setup.
‘DHCP On’ Setup Procedure
1. Turn on MEDIAGATE T1 and press [SETUP] in
Mode Selection screen.
2. Select the ‘Network’ icon and press [ENTER].
Setup box will be displayed under the icon menu.
3. Select DHCP: On and press [ENTER].
4. Press [SETUP] to save the configurations.
ü When you use ‘DHCP On’, you can see the IP
address in the MENU screen after selecting the
[PC-Network] icon in the Mode Selection screen.
Once you see the IP Address, your MEDIAGATE
T1 will be connected to the network.
34
2.2.3 Direct connection via Cross-Over
MEDIAGATE T1 can connect directly to your TiVo® box via a cross-over LAN cable.
ü A cross-over Ethernet LAN cable (sold separately) will be required for this setup.
ü Please refer to your TiVo® owners manual on how to manually specify an IP Address and Subnet Mask on your TiVo® box. This
will be necessary for a direct connection.
<DHCP Off Setup Procedure>
1. Press [SETUP] in Mode Selection screen.
2. Select the ‘Network’ icon and press [ENTER].
Setup box will be displayed under the icon menu.
3. Move to DHCP Off and press [ENTER].
4. Select 'IP Addr' and press [ENTER]
The IP address Input box will be displayed. Enter
the IP address with the arrow and number
buttons on the remote control. We recommend
using the IP Address shown in the example.
Press [ENTER].
5. Select 'Subnet' and press [ENTER].
The Subnet mask Input box will be displayed.
Enter the Subnet mask with the arrow and
number buttons on the remote control. We
recommend using the subnet shown in the
example. Press [ENTER].
6. Press [SETUP] to save the configurations.
35
ü When you use ‘DHCP Off’, you can see the IP
address you set in the MENU screen after
selecting ‘PC-Network’ icon in Mode Selection
screen.
ü The IP Address of the MEDIAGATE T1 MUST be within the same range as your TiVo® box. For example, if MEDIAGATE T1 is at
192.168.0.2 and the TiVo® is on 192.168.1.3, then they will not be able to communicate. The first three sets of numbers must match,
while the fourth set of number(s) must be unique. The Subnet Mask must always match.
Your TiVo® Media Access Key
ü Once the MEDIAGATE T1 and your TiVo® are on the same network, you must enter your TiVo® Media Access Key in the
MEDIAGATE T1 setup to allow file transfers. Please check your TiVo® Account Settings for your Media Access Key.
ü The TiVo® icon in the Mode Selection screen will NOT highlight if the MEDIAGATE T1 is not connected to the TiVo® box.
<Access Procedure>
1. In the Setup menu, select the ‘Security’ icon
and press [ENTER]. Setup box will be displayed
under the icon menu.
2. Press [ENTER] to start entering your Media
Access Key.
3. Enter your TiVo® Media Access Key using the
number keys on the MEDIAGATE T1 remote,
then press [ENTER].
36
2.2.4 TiVo® file selection
This section will explain how to transfer your TiVo® files into the MEDIAGATE T1.
<Setup Procedure>
1. In the Mode Selection screen, select the TiVo®
icon and press [ENTER].
2. Select your TiVo® account and press
[ENTER]. Your TiVo® recordings should now be
displayed.
3. Select the file you wish to download and press
[ENTER]. You can also select multiple files to
download by selecting those files and pressing
the [ENTER] button.
3. Press [ ?á] to go to the ‘Icon Menu Tray’.
4. Select DOWNLOAD and press [ENTER].
5. Select [O] and press [ENTER] to start the
download. Press the [STOP] button to cancel
download.
37
2.2.5 Playing your TiVo® files
You can watch your TiVo® recordings that are now stored on your MEDIAGATE T1.
<Setup Procedure>
1. Select the 'MediaGate' icon in the Mode
Selection screen and press [ENTER] to access
the HDD files.
2. Select the ‘Movie’ icon and press [ENTER].
3. Select the 'TiVo' folder and press [ENTER].
Your TiVo® recordings will now be displayed.
4. Select the file you wish to play and press
[ENTER].
38
3. Use as External USB HDD
3.1 Insert Hard Disk (for drive-less MEDIAGATE T1 version)
ü Use 3.5” IDE Hard Disk for data storage. Section 1.1 is for drive-less MEDIAGATE T1 models. Please skip to 3.2 if
you have the MEDIAGATE T1 with built-in drive.
ü Hard Disk should be “Master.” However, if the Hard Disk supports “Single” mode, you should set it to
“Single“ mode.
ü For users installing a new drive: All hard-disk drives used with MEDIAGATE T1 need to be formatted in FAT32. If
you are unsure about formatting, please consult with your PC tech for further formatting information.
1. Unscrew the 4 corner screws and open by sliding
the side cover in the direction pointed by the arrow.
2. Connect Power and IDE connector to Hard
Disk.
3. Close by sliding the side cover in the direction
pointed by the arrow.
4. Finish assembly by reinstalling four corner
screws.
39
3.2 Copy Data via USB
You may use the MEDIAGATE T1 as an external USB hard disk drive. Data can be copied from your PC to the HDD of
MEDIAGATE T1 via USB. It is possible to play media files saved in the hard disk on your TV.
* When connecting MEDIAGATE T1 to your PC, you must connect the power adapter of MEDIAGATE T1.
3.2.1 Windows 98SE
ü You must first install the Windows 98 Driver before connecting to the PC. Please insert Windows 98 CD driver to begin installation
wizard. After finishing installation, Connect MEDIAGATE T1 to PC via USB cable, and plug power adapter of MEDIAGATE T1 into AC
outlet.
1) After installing the driver, connect MEDIAGATE T1
and plug in power cable. Next, check to see if the
driver is installed correctly by going to [Start menu,
Settings, Control Panel, System, Device Manager,
Hard disk controllers] You should see Hi-Speed USBIDE Bridge Controller.
3) After copying data, remove MEDIAGATE T1 by
using the remove icon
at the task bar on the
lower right hand corner of your screen. If you do not
follow this procedure, data and MEDIAGATE T1 may
be damaged.
2) Check ‘My Computer’ or ‘Explorer’, there should be
a new hard drive designated volume. You can copy
any data to this volume.
ü If a new volume is not present, check HDD format
and HDD file system. Windows 98SE will only detect
FAT32 file system.
40
3.2.2 Windows ME
1) After connecting MEDIAGATE T1 to your computer
and plugging in power cable, Windows will install the
driver automatically. Check the driver installation by
going to [Start menu, Settings, Control Panel, (view
all Control Panel options), System, Device Manager,
Universal Serial Bus controllers] You should see a
USB Mass Storage Device.
3) After copying data, remove MEDIAGATE T1 by
using remove icon
at task bar on the lower right
hand corner of your screen. If you do not follow this
procedure, data and MEDIAGATE T1 may be
damaged.
2) Check ‘My Computer’ or ‘Explorer’, there should be
a new hard drive designated volume. You can copy
any data to this volume.
ü If a new volume does not appear, check HDD format
and HDD file system. Windows ME will only detect
FAT32 file system.
41
3.2.3 Windows 2000, XP
1) After connecting MEDIAGATE T1 and plugging in
AC power cable, Windows will install the driver
automatically. Check the driver installation by going
to [Start menu, Settings, Control Panel, (switch to
Classic View on Windows XP), System, Hardware,
Device manager, Universal Serial Bus controllers] You
should see a USB Mass Storage Device.
2) Check ‘My Computer’ or ‘Explorer’, there should be
a new hard drive designated volume. You can copy
any data to this volume.
3) After copying data, remove MEDIAGATE T1 by
using remove icon
at task on the lower right
hand corner of your screen. If you do not follow this
procedure, data and MEDIAGATE T1 may be
damaged.
ü If you see ‘Non High-Speed USB Hub Message’:
This message will be displayed on Windows XP when
you plug MEDIAGATE T1 into USB 1.1 spec. Host
adapter.
ü If new volume has not appeared, check HDD format
and HDD file system. Windows 2000 and XP need to
detect MEDIAGATE T1 as a FAT32 file system.
42
3.2.4 Mac
ü MEDIAGATE T1 will only work with Mac 10.0 or higher.
You will not need to install the installation driver for Mac OS 10.x version or higher, as the MEDIAGATE T1 will be
detected automatically. If the MEDIAGATE T1 is detected correctly, a drive icon will appear on your monitor. You can
then copy any data to this volume.
To safely disconnect MEDIAGATE T1, highlight the drive, click on File at the top of your screen and select “Eject”
To uninstall the MEDIAGATE T1 safely, drag and drop the MediaGate icon to your trash bin and unplug MEDIAGATE
T1.
43
4. Accessing PC via Network
4.1 Connect LAN Cable
When connecting Computer to MEDIAGATE T1
When connecting with a Router or Hub
directly
Connect LAN cable to LAN port between
MEDIAGATE T1 and PC. In this case, you will
need to use a Cross-Over LAN cable.
[TIP] If the computer’s LAN card is connected to
the Internet, you can mount an additional LAN
card to your PC and connect this LAN card to
MEDIAGATE T1.
Connect LAN cable between MEDIAGATE T1
LAN port and Router or Hub.
In this case, you will need to use a Direct LAN
Cable (straight-through).
4.2 Setting Network Configurations
After connecting LAN cable, you must set the network configurations of the Computer and MEDIAGATE T1.
You will need to share a folder on your Windows computer and use the same ‘IP Address range’ and same ‘Subnet
Mask ‘ between the computer and MEDIAGATE T1. For example:
Computer
MEDIAGATE T1
IP Address
192.168.0.2
192.168.0.3
Subnet Mask
255.255.255.0
255.255.255.0
*It is possible to assign IP address and Subnet Mask of MEDIAGATE T1 as dynamic or static.
44
4.2.1 Windows 98SE, ME
1) Select a folder that you’ll want to share. Right-click
the folder and click ‘Sharing’ in pop-up menu.
3) After that, the shared folder will be displayed as the
following picture:
4) Go to [Control panel, Network] and double click the
‘TCP/IP->LAN card’ that you want to use on your
computer.
ü In order to see LAN Card name, go to [Control Panel,
System, Device Manager, Network adaptors]
2) Check ‘Shared As’ and write your file designation in
‘Share Name’. For example, “My Movie”
ü Make sure ‘Share Name’ is a maximum of 12
characters in English.
ü We recommend you check ‘Read Only’ at ‘Access
Type’
ü Do not write anything at ‘Passwords’
5) Check ‘Specify an IP address’, and enter the ‘IP
address’ & ‘Subnet mask’ that you want to use.
For example, you may enter:
IP address: 192.168.0.3
Subnet mask: 255.255.255.0
45
After entering IP and Subnet, press [SETUP] again to
save the configurations.
ü If you are connected to a DHCP Server or Router,
select ‘DHCP: ON’. You will be given an automatic IP
Address and Subnet Mask from the DHCP Server or
Router. You can then see the IP Address/Subnet Mask
that was issued.
ü If you are connected to a DHCP Server or Router,
select ‘Obtain an IP address automatically’. You will be
ü The IP Address of the MEDIAGATE T1 MUST be on
given an automatic IP Address and Subnet Mask.
the same range as the computer or network.
For
example, if MEDIAGATE T1 is at 192.168.0.2 and the
computer is on 192.168.1.3, then they will not be able to
communicate.
The first three sets of numbers must
match, while the fourth set of number(s) must be unique.
6) Set the network configurations of MEDIAGATE T1.
The Subnet Mask must always match.
ü You must connect MEDIAGATE T1 to a TV set for this
setup. See “3.1.1 Connect Video Cable”.
Press [SETUP] on MEDIAGATE T1 remote control to
display the Setup screen. Select ‘DHCP: Off’ and
enter the IP address & Subnet mask.
For example, you may enter:
IP Address: 192.168.000.002
Subnet mask: 255.255.255.0
<MEDIAGATE T1’s IP Address>
46
4.2.2 Windows 2000
1) Select a folder that you’ll want to share. Right-click
the folder and click ‘Sharing’ in pop-up menu.
ü It is recommended that you only allow “Read” at
Permissions.
2) Check ‘Share this folder’ and write your file
designation in ‘Share Name’. For example, “My Movie”
ü Make sure ‘Share Name’ is a maximum of 12
characters in English.
4) After that, the shared folder will be displayed as the
following picture.
5) Go to [Settings, Control Panel, Administrative
Tools, Computer Management, Local Users and
Groups, Users] and double click ‘Guest’.
3) Click ‘Permissions’ and check whether the
“Everyone” account is visible. If not, add “Everyone”.
account.
47
6) Check ‘User cannot change password’ and
‘Password never expires’.
7) Go to [Control Panel, Network and Dial-up
Connections] and select Properties of ‘Local Area
Connections’ by right clicking with mouse.
9) Check ‘Use the following IP address’, and enter the
‘IP address’ & ‘Subnet mask’ that you want to use.
For example, you may enter:
IP address: 192.168.1.3
Subnet mask: 255.255.255.0
ü If you see two or more ‘Local area connections’, select
the one that you will use for connecting to MEDIAGATE.
ü If you are connected to a DHCP Server or Router,
select ‘Obtain an IP address automatically’. You will be
given an automatic IP Address and Subnet Mask.
8) Double click on the ‘Internet Protocol (TCP/IP).
48
10) Set the network configurations of MEDIAGATE T1.
ü You must connect MEDIAGATE T1 to a TV set for this
setup. See “3.1.1 Connect Video Cable”.
Press [SETUP] on MEDIAGATE T1 remote control to
display the Setup screen. Select DHCP: Off and
enter the IP address & Subnet mask.
<MEDIAGATE T1’s IP Address>
For example, you may enter:
IP Address: 192.168.001.002
Subnet mask: 255.255.255.0
After entering IP Address and Subnet, press [SETUP]
again to save configurations.
ü If you are connected to a DHCP Server or Router,
select ‘DHCP: ON’. You will be given an automatic IP
Address and Subnet Mask from the DHCP Server or
Router. You can then see the IP Address/Subnet Mask
that was issued.
ü The IP Address of the MEDIAGATE T1 MUST be on
the same range as the computer or network. For
example, if MEDIAGATE T1 is at 192.168.0.2 and the
computer is on 192.168.1.3, then they will not be able to
communicate.
The first three sets of numbers must
match, while the fourth set of number(s) must be unique.
The Subnet Mask must always match.
49
4.2.3 Windows XP
1) Select a folder that you’ll want to share. Right-click
the folder and click ‘Sharing and Security’ in pop-up
menu.
3) After that, the shared folder will be displayed as the
following picture.
4) Go to [Settings, Control Panel, Administrative
Tools, Computer Management, Local Users and
Groups, Users] and double click ‘Guest’.
ü This is for Windows XP Professional. Windows XP
Home users will not see this figure. Proceed to Step 6) if
you are using Windows XP Home Edition.
ü If you can’t find ‘Administrative Tools’ in Control Panel,
click “Switch to classic view” in the upper-left corner of
the screen.
2) Check ‘Share this folder on the network’ and write
your file designation in ‘Share name’.
For example, “My Movie”
ü Make sure the ‘Share name’ is a maximum of 12
characters in English.
5) Check ‘User cannot change password’ and
‘Password never expires’.
>> See next page
50
.
7) Double click on ‘Internet Protocol (TCP/IP)’
6) Go to [Control Panel, Network Connections] and
select ‘Local area connections’ properties by right
clicking with your mouse.
8) Check ‘Use the following IP address’, and enter the
‘IP address’ & ‘Subnet mask’ that you want to use.
ü If you see two or more ‘Local area connections’, select
the one that you will use for connecting to MEDIAGATE
T1.
For example, you may enter:
IP address: 192.168.1.3
Subnet mask: 255.255.255.0
51
ü If you are connected to a DHCP Server or Router,
Check ‘Off’ and click ‘OK’
select ‘Obtain an IP address automatically’. You will be
given an automatic IP Address and Subnet Mask.
9) Referring back to the Step 7) figure, click the
‘Advanced’ Tab. Disable ‘Internet Connection Firewall’
by un-checking the box.
10) Set the network configurations of MEDIAGATE T1.
ü You must connect MEDIAGATE T1 to a TV set for this
setup. See “3.1.1 Connect Video Cable”.
ü If you use Service Pack 2, refer to the following figures.
Click ‘Settings’ at ‘Windows Firewall’
Press [SETUP] on MEDIAGATE T1 remote control to
display the Setup screen. Select DHCP: Off and
enter the IP address & Subnet mask you want to use.
For example, you may enter:
IP Address: 192.168.001.002
Subnet mask: 255.255.255.0
After entering the IP Address and Subnet, press
[SETUP] again to save configurations.
52
ü If you are connected to a DHCP Server or Router,
select ‘DHCP: ON’. You will be given an automatic IP
Address and Subnet Mask from the DHCP Server or
Router. You can then see the IP Address/Subnet Mask
that was issued.
ü The IP Address of the MEDIAGATE T1 MUST be on
the same range as the computer or network.
For
example, if MEDIAGATE T1 is at 192.168.0.2 and the
computer is on 192.168.1.3, then they will not be able to
communicate.
The first three sets of numbers must
match, while the fourth set of number(s) must be unique.
The Subnet Mask must always match.
<MEDIAGATE T1’s IP Address>
53
4.2.4 Firmware Upgrade
Download upgrade file from www.pogoproducts.com when available. After connecting MEDIAGATE T1 to TV set,
move to the upgrade file and press [ENTER]. Upgrade is progressed automatically.
After finishing upgrade, you can check firmware version on Setup screen. Press [SETUP] button.
Technical Support
Contact:
PoGo! Products, Inc
590 W. Central Ave.
Suite E
Brea, CA 92821
www.pogoproducts.com
E-mail [email protected]
714-671-1854
866-forpogo
54