1
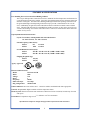
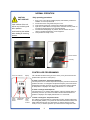
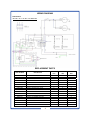
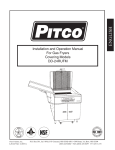
CRISP N’ HOLD
FOOD HOLDING STATION
Free-Standing Floor MODELS: PCF14, PCF18
OWNERS / OPERATORS MANUAL
PCF18
(shown)
TABLE OF CONTENTS
SAFETY PRECAUTIONS……………………………..………..
FEATURES & SPECIFICATIONS………..……………..…….
UNPACKING AND INSPECTION……………………………..
INSTALLATION & START-UP…………………………………
NORMAL OPERATION ..…...…………………………………
CONTROLLER PROGRAMMING…………………………….
DAILY CLEANING PROCEDURES………………..………….
WIRING DIAGRAMS & REPLACEMENT PARTS…...………
TROUBLESHOOTING GUIDE ………………………………..
WARRANTY STATEMENT……….……………….…………..
Part Number: L20-354 Rev 2 (05/12)
Pitco Frialator, Inc.
2
3
4
5
6
6
7
8
9
10
Printed in The United States of America
P.O. Box 501, Jct I-89 & I-93, Concord, NH 03302-0501 509 Route 3A, Bow, NH 03304
TEL:(603)225-6684
FAX:(603)225-8497
SAFETY PRECAUTIONS
WARNING: ELECTRIC SHOCK HAZARD
WARNING
All service requiring access to non-insulated components must be performed by
qualified service personnel. Failure to heed this warning may result in severe
electric shock.
CAUTION: ELECTRIC SHOCK HAZARD
Disconnect this appliance from electrical power before performing any
maintenance or service.
CAUTION: BURN HAZARD
Exposed metal surfaces can be hot to the touch and may cause burns.
IMPORTANT SAFETY INSTRUCTIONS
When using electrical appliances basic safety precautions should be adhered to, including the following:
1)
Be familiar with the appliance use, limitations and associated restrictions. Operating instructions must
be read and understood by all persons using or installing this appliance.
2)
This appliance must be grounded. Connect only to properly grounded outlet.
3)
Use this appliance only for its intended use as described in the manual.
a.
This equipment is specifically designed to hold pre-cooked food at temperature.
b.
This equipment is intended for use in commercial establishments only.
c.
This equipment is not designed for industrial or laboratory use.
4)
Cleanliness of this appliance and accessories is essential to good sanitation.
5)
DO NOT submerge this appliance in water. This appliance is not jet stream approved. DO NOT direct
water jet or steam jet at this appliance, or at any control panel or wiring. DO NOT splash or pour
water on, in or over any controls, control panel or wiring. DO NOT use corrosive chemicals or vapors
in this appliance.
6)
DO NOT store this appliance outdoors. DO NOT use this product near water – for example,
near a kitchen sink, in a wet basement, or near a swimming pool, and the like.
7)
DO NOT operate this appliance if it has a damaged cord or plug, if it is not working properly, or if it has
been damaged or dropped. Do not immerse cord or plug in water, keep cord away from heated
surfaces, and do not let cord hang over edge of table or counter.
8)
Only qualified service personnel should service this appliance.
9)
DO NOT cover or block any openings on the appliance.
NOTE:
The technical content of this manual, including any wiring diagrams, schematics, parts
breakdown illustrations and/or adjustment procedures, is intended for use by qualified
technical personnel and is subject to change without notice.
2
FEATURES & SPECIFICATIONS
Free-Standing Forced Convection Food Holding Cabinets
The Crisp n’ Hold provides a heated stream of air to maintain fried food temperature and freshness for
a specified period of time after cooking. Forced air is heated through an electric resistance heater and
ducted to a food grate. The heated air is discharged through small circular openings in the bottom of
the grate and through a slotted opening located front top to provide a warm blanket of air over the
food. Additionally, the grate has small round embossments to minimize hot metal contact with the
food. The PCF14 & PCF18 are free-standing floor models on casters, so they can be moved for convenience and cleaning. Swivel front casters have brakes. Controls are located in the cabinet below the
warmer for easy access.
Capacity/Dimensional Characteristics
Layout: Two models, with adjustable and removable dividers:
14” with 2 sections; 18” with 3 sections
Internal Capacity (cubic inches):
PCF14
837
2 sections
PCF18
1050
3 sections
Overall Dimensions inches (mm):
PCF14
45.5”H x 34.5”D x 15.5”W (1156H x 876D x 394D)
PCF18
45.5”H x 34.5”D x 19.6”W (1156H x 876D x 498D)
Shipping Weight lbs (kg):
PCF14
132 (60)
PCF18
145 (66)
Agency Approvals
Electrical Characteristics
Model:
Watts:
Voltage:
Phase:
Frequency:
Full Load Amps:
Plug configuration:
PCF14 & PCF18
1820
120
1
60 HZ
15.1 amps
NEMA 5-20P
Cabinet Material: 300 series stainless steel….400 series stainless and aluminized where appropriate.
Controls: Programmable digital controller with low temperature alarm.
Heater System: Electrical resistance 900 watt heaters with blower fan for circulation, located away from oils
and vapors.
Performance: Temperature range to 210° F. Preheat to 160° F in 20 minutes.
Specifications subject to change through product improvement and innovation.
3
UNPACKING AND INSPECTION
This appliance
should be
thoroughly
cleaned prior to use.
See the CLEANING
INSTRUCTIONS, on page 7
of this manual.
NOTE: DO NOT discard
the carton or other packing
materials until you have
inspected the appliance for
hidden damage and tested
it for proper operation.
1.
Remove the cabinet from shipping carton, ensuring that all packing materials and protective plastic has been removed from the unit. Inspect all
components for completeness and condition.
2.
If any freight damage is present, a freight claim must be filed immediately
with the shipping company.
3.
Freight damage is not covered under warranty.
4.
Check to insure all components are included: cabinet, instruction packet
and additional accessories, such as product dividers.
5.
Read operation instructions completely.
6.
Connect power cord to grounded and properly wired electrical source as
specified.
7. Appliance should be thoroughly cleaned before use. See CLEANING
INSTRUCTIONS, page seven.
Refer to SHIPPING DAMAGE CLAIM PROCEDURE
on bottom of this page.
FREIGHT DAMAGE PROCEDURE
NOTE: For your protection, please note that equipment in this shipment was carefully inspected and packaged
by skilled personnel before leaving the factory. Upon acceptance of this shipment, the transportation company
assumes full responsibility for its safe delivery.
IF SHIPMENT ARRIVES DAMAGED:
1.
VISIBLE LOSS OR DAMAGE: Be certain that any visible loss or damage is noted on the freight bill or
express receipt, and that the note of loss or damage is signed by the delivery person.
2.
FILE CLAIM FOR DAMAGE IMMEDIATELY: Regardless of the extent of damage. Contact your dealer
immediately.
3.
CONCEALED DAMAGE: If damage is unnoticed until the merchandise is unpacked, notify the transportation company or carrier immediately, and then file a “CONCEALED DAMAGE” claim with them. This should
be done within fifteen (15) days from the date the delivery was made to you. Be sure to retain the container for inspection.
Pitco cannot assume liability for damage or loss incurred in transit, freight damage is not covered under warranty. We will, however, at your request, supply you with the necessary documents to support your claim.
4
INSTALLATION & START-UP
WARNING:
Risk of personal injury
Installation procedures must be
performed by a qualified technician
with full knowledge of all applicable
electrical codes.
Failure can result in personal injury
and property damage.
Location
For proper operation and maximum performance, locate the Crisp n’
Hold in an ambient air temperature of 70º F (21ºC).
Avoid areas near exhaust fans where there is active air movement.
For safe operation, locate the unit a reasonable distance from combustible walls and materials.
To prevent injury and damage, locate the unit at a proper and safe
working height. The location should be level, clean of debris, and
strong enough to support the weight of a fully loaded unit.
Start-up
IMPORTANT:
Power cord is 7' long.
If necessary, contact a licensed
electrician to install an appropriate
20 amp electrical circuit with correct
NEMA receptacle.
CAUTION:
Electrical Shock Hazard
1.
Plug the Crisp n’ Hold into a properly grounded electrical receptacle.
2.
Ensure all plastic and packaging materials have been removed.
3.
Familiarize yourself with the controls.
4.
On/Off switch is located inside the cabinet below the product
station. Set POWER switch to “ON” position.
5.
Do not load product into the cabinet. Allow the heat to remove
any residual oils which may adhere to inside metal surfaces. A
slight emission of smoke is normal for the first few hours of
operation.
The ground prong of the power cord
is part of a system designed to protect you from electric shock in the
event of internal damage.
DO NOT cut off the large round
ground prong or twist a blade to fit
an existing receptacle.
IMPORTANT:
Not under warranty:
Damage to unit due to being
connected to the wrong voltage or
phase is NOT covered by warranty.
CAUTION:
Risk of personal injury
Unit is not waterproof, to avoid
electrical shock keep unit and
counter from being submerged in
water. Do not operate if unit has
been submerged in water.
GROUNDING INSTRUCTIONS
This appliance is equipped with a cord having a grounding
wire with a grounding plug which must be plugged into an
outlet that is properly installed and grounded. In the event of
an electrical short circuit, grounding reduces the risk of electric shock by providing an escape wire for the electric current.
WARNING—Improper use of the grounding can result in
a risk of electric shock. Consult a qualified electrician or
serviceman if the grounding instructions are not completely
understood, or if doubt exists as to whether the appliance is
properly grounded.
5
NORMAL OPERATION
CAUTION:
HOT SURFACE
Inner surfaces of the unit
will be very hot during and
after operation.
Daily operating procedures
1.
2.
3.
4.
5.
Avoid touching the cabinet
when loading or removing
product.
6.
Prior to use, unit must be installed properly and tested by a trained installation or service professional.
Unit must be clean and grease-free prior to use.
Verify that the grease pan, heat duct and air filters are installed
Open door, locate switch to the right of the controller and turn power on.
The motors should begin to turn and create airflow.
Unit will automatically begin to preheat, allow 20 minutes for unit to
climb to operating temperature of 160º degrees F.
Load product into Crisp n’ Hold.
Product Divider
On/Off Switch
Food Bay
CONTROLLER PROGRAMMING
Heat “ON” Indicator
Display
The controller has been factory pre-set at 175°F (79°C), and has a low temperature alarm pre-set for 140°F (60°C).
To View or Change the Temperature Setpoints
Turn the power on. To view the temperature setpoint, press and hold the temperature set button. To change the temperature setpoint, press and hold the
temperature set button; press the up or down arrow button until the desired
air temperature is displayed. The display will advance in 1° increments.
175
To View or Change Alarm Setpoints
Turn the power on. To view the alarm setpoint, press and hold the alarm reset button; press the up or down arrow button until the desired alarm temperature is displayed. The display will advance in 1° increments.
Alarm
Reset
Button
Temperature
Set Button
Up and
Down
Arrow
Buttons
To View or Change the Temperature Scale
The cabinet is programmable for a temperature scale in degrees Fahrenheit
and Centigrade (Celsius). Turn power off. Hold down both arrow buttons and
while holding both arrows, turn power back on. Display will show current
scale (°C or °F). If desired, push the up or down arrow to change the scale.
6
CLEANING PROCEDURES
CAUTION:
ELECTRIC SHOCK
HAZARD
Disconnect appliance from
electric power before cleaning.
1.
After all food products have been removed from the cabinet, turn the
power switch to “OFF” and allow the cabinet to cool.
2.
Unplug the unit prior to any cleaning.
3.
Grease/crumb pan is located beneath the unit, inside the cabinet.
Access by opening cabinet door. Remove and clean the grease /
crumb pan from the bottom of the unit by sliding it out towards the
operators side of the unit. Clean the pan as well as pan housing.
4.
The air filter can be easily removed without tools for cleaning by lifting
up and pulling towards the front of the unit. Clean by hand washing or
run through an automatic washer. Reinstall when filter is dry and
clean.
5.
Remove the product dividers and food bay bottom. Clean the inside
of the unit as well as the removed parts. Reinstall when all parts are
dry and clean.
CAUTION:
HOT SURFACE
Exposed surfaces
can be hot to the touch and
may cause burns. Allow appliance to cool before cleaning.
IMPORTANT: DO NOT
spill or pour water into controls,
6.
control panel or wiring. Water
damage is not covered by
warranty.
CAUTION:
Inspect and clean the areas where there are vents, making sure no
water gets into the internal controls or electrical areas of the cabinet.
Removal of air filter
Grease/crumb pan
Product Divider
Beware of sharp
edges on sheet
metal during cleaning, especially during removal of grease
filters.
Food
Bay
Cleansers, detergents, degreasers, sanitizers, or bleaching agents that contain chlorides or phosphates will cause permanent damage to stainless steel products. The damage appears as pits, eruptions, voids, small holes, severe discoloration or dulling of the metal finish. Water with high chloride
content can also damage stainless steel. If unsure of your water quality, we recommend you
CAUTION
have it tested. THIS DAMAGE IS PERMANENT, COSTLY TO REPAIR, AND IS NOT COVERED BY THE WARRANTY.
RECOMMENDED TIPS FOR CLEANING STAINLESS STEEL
Purpose
Routine
cleaning
Frequency
Daily
Cleaning Agent
Soap, ammonia
detergent and water
Method of Application
Sponge with cloth, rinse with clear water
and wipe dry.
Smears/
Fingerprints
As
needed
Stainless steel cleaner
or similar products
Rub with soft cloth as directed on package.
Rub in direction of grain of stainless steel.
Do not use on vinyl trim.
Stubborn
spots and
stains
Daily
as
needed
Any chloride-free
or
phosphate-free
cleaner
Apply with damp sponge or cloth. Rub in
direction of grain of stainless steel. Rinse
thoroughly, especially if cleaner contains
chlorine bleach, do not use on vinyl trim.
Hard water
spots
Daily
as needed
Vinegar
Swab with cloth.
Rinse with water and wipe dry.
7
WIRING DIAGRAM
PCF14 & PCF18
1820 watts, 120v, 15.1A, 60Hz, 1 Ph, NEMA 5-20P
REPLACEMENT PARTS
PART NUMBER
DESCRIPTION
PCF14
120V
PCF18
120V
X
X
PCF14
240V
18614-0362
MOTOR C-FRAME 120V CNH
18614-0364
MOTOR C-FRAME 240V CNH
18614-0365
WHEEL,BLWR,3.125" CW ROT
X
X
X
18614-0359
INLET SCREEN 3.81"
X
X
X
18600-0061
THERMAL DISC AUTO RESET
X
X
X
18612-0113
TUBULAR ELEMENT 900W/120V
X
X
X
18616-0223
RELAY SPST-NO,240V,24VAC
X
X
X
X
18616-0229
CONTROL WGRN LGHT ROHS
X
X
X
18312-0189
CONTROL OVERLAY
X
X
X
18602-0172
ROCKER SW SPST ON/OFF
X
X
X
18616-0198
PROBE 3/16 X 1.5 X 18.5
X
X
X
18616-0135
TRNSFORMER B24-N0120-015
X
X
18616-0131
CONTROL TRANFRMR NTI-2575
18602-0174
GREASE BAFFLE PCF14
18602-0175
GREASE BAFFLE PCF18
18605-0018
14/3 HSJO CORD W/6-15PLUG
18605-0017
14/3 HSJO CORD W/5-20PLUG
X
X
X
X
X
X
8
X
TROUBLESHOOTING GUIDE
SYMPTOM
No power to unit
POSSIBLE CAUSE
SUGGESTED REMEDY
Not plugged in or circuit breaker
tripped
Check or reset circuit breaker
Connect to proper receptacle
Power cord damaged
Check - replace if required
Power switch damaged or defective
Check - replace if required
Operation where product temp is too
high
Check product temps going into holding cabinet
Thermostat incorrectly set or defective
Check proper operation or calibration
of thermostat
Unit is on, motors
are running but no
heat
Internal wiring error
Call service technician
Element hi-limit trip /defective
Call service technician
Takes too long to
get to temperature
Improper voltage
Call service technician to verify incoming voltage matches cabinet
specifications.
Food dries out too
quickly
Unit is hot
Internal wiring error
but low or no airflow
Circulation motor has quit
Call service technician
Call service technician
Improper voltage
Call service technician to verify incoming voltage matches cabinet
specifications.
NOTE:
NOTE:
The technical content of this manual,
including any wiring diagrams, schematics, parts breakdown illustrations and /
or adjustment procedures, is intended
for use ONLY by qualified technical
personnel.
For warranty service, call Pitco direct at
800-258-3708 for authorization, we will
dispatch the nearest authorized service
agency.
9
Pitco Warranty:
Pitco Frialator, Inc. warrants to the original user of its commercial cooking equipment and related equipment that said appliances and related
equipment will be free from defects in material and workmanship under normal use for a period of one (1) year from the date of installation,
with appropriate documentation, to a maximum of fifteen (15) months from the date of manufacture, subject to the following additions, exceptions, exclusions & limitations.
This warranty is limited to the repair or replacement at the Company’s option, without charge, of any part found to be defective within the
warranty period and reasonable expenses incurred for freight and material for the installation of such part; in addition, the Company’s obligation shall be limited to reimbursement for normal labor on such parts. Pitco Frialator, Inc. agrees to pay the Authorized Service and Parts
Distributor for any labor and material required to repair or replace, at the Company’s option, any part which may fail due to defects in material or workmanship during the above general warranty period.
How to Keep Your Warranty in Force
● Make sure any shipping damages are reported immediately. Damages of this nature are the responsibility of the carrier.
● Install the unit properly. This is the responsibility of the installer and the procedures are outlined in the equipment manual.
● Do not install appliance in a home or residence.
● Maintain appliance properly. This is the responsibility of the user of the appliance and the procedures are outlined in the manual.
● Adjustments, such as calibration, leveling, tightening of fasteners or plumbing or electrical connections normally associated with initial
installation, if necessary, are outlined in the manual.
● Damages due to flood, fire, or other acts of God, are not covered by the warranty.
● Use appliance only for its intended purpose. If it is used for a purpose other than for which it was intended or designed, any resulting
damages are not covered under warranty.
● Do not materially alter or modify the appliance from the condition in which it left the factory.
● Do not obliterate, remove or alter the serial number rating plate.
● Use only genuine OEM parts from Pitco Frialator, Inc. or its Authorized Parts and Service Distributors. Repairs are not covered by the
warranty.
● If any other failure occurs which is not attributable to a defect in materials or workmanship, it is not covered by the warranty.
This warranty specifically excludes parts which wear or would be replaced under normal usage, including, but not limited to, electric lamps,
fuses, interior or exterior finishes and gaskets.
Limits to the Warranty
Outside the United States and Canada, this warranty is limited to the replacement of parts and Pitco Frialator, Inc. will not bear any other
expense be it labor, mileage, freight or travel. If any oral statements have been made regarding this appliance, these statements do not
constitute warranties and are not part of the contract of sale. This limited warranty constitutes the complete, final and exclusive statement
with regard to warranties. THIS LIMITED WARRANTY IS EXCLUSIVE AND IS IN LIEU OF ALL OTHER WARRANTIES WHETHER
WRITEN, ORAL OR IMPLIED, INCLUDING, BUT NOT LIMITED TO, ANY WARRANTY OF MERCHANTABILITY OR FITNESS FOR A
PARTICULAR PURPOSE OR WARRANTY AGAINST LATENT DEFECTS.
Limitations of Liability
In the event of a warranty or other claim, the sole obligation of Pitco Frialator, Inc. will be the repair or replacement, at the company’s option,
of the appliance or the component part. The repair or replacement will be at the expense of Pitco Frialator, Inc. except as limited by this
warranty statement. Any repair or replacement under this warranty does not constitute an extension in time to the original warranty. Parts
covered under this warranty will be repaired or replaced, at the Company’s option, with new or functionally operative parts. The liability of
Pitco Frialator, Inc. on any claim of any kind, including claims based on warranty, express or implied contract, negligence, strict liability or
any other legal theories, will be exclusively the repair or replacement of the appliance. This liability will not include, and the purchaser specifically renounces any right to recover special, incidental, consequential or other damages of any kind, including but not limited to, injuries
to persons, damage to property, loss of profits or anticipated loss of the use of this appliance. If any provision of this warranty is unenforceable under the law of any jurisdiction, only that provision will be inapplicable there, and the remainder of the warranty will remain unaffected.
The maximum exclusion or limitation allowed by law will be substituted for the unenforceable provision.
How to Obtain Warranty Service
First direct your claim to the Pitco Frialator, Inc. Authorized Service and Parts Distributor closest to you. Give the complete model, serial and
code numbers, voltage, gas type, and description of the problem. Proof of the date of installation and/or the sales slip may also be required.
If this procedure fails to be satisfactory, write to: The Service Manager, Pitco Frialator, Inc., PO Box 501, Concord, NH 03302-0501 USA.
This warranty gives you certain specific legal rights; you may have other rights which may vary from state to state.
Pitco Frialator, Inc.
PO Box 501, Jct I-89 & I-93, Concord, NH 03302-0501
509 Route 3S, Bow, NH 03304
Phone: 603-225-6684 ● Fax: 603-225-8497
Sales & Marketing E-mail: [email protected] ● Service E-mail: [email protected]
Company Website: www.pitco.com
10