1
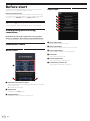
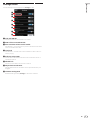
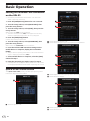
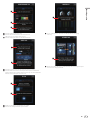
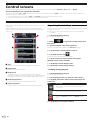
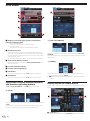
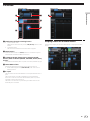
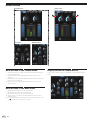
Remote Control Application for the XDJ-R1
remotebox
http://pioneerdj.com/support/
The Pioneer DJ support site shown above offers FAQs, information on software and various other types of
information and services to allow you to use your product in greater comfort.
Operating Instructions
Before start
remotebox is a smartphone/tablet application for connecting to the
XDJ-R1 wirelessly to operate the XDJ-R1 remotely.
Help screen
How to read this manual
In this manual, names of channels and buttons indicated on the product, names of menus in the software, etc., are indicated within square
brackets ([ ]). (e.g. [MASTER] channel, [ON/OFF], [File] menu)
1
2
3
Operating environment
iPhone-, iPod touch- and iPad-compatible iOS 4.3 or later required
4
5
6
Downloading and installing
remotebox
Download the remotebox application using a mobile
device or computer, then install it on the mobile device.
! The remotebox application can be downloaded from the App Store.
1Quick Start Guide
Used to open the Quick Start Guide.
remotebox Panels
2About remotebox
Used to display the application’s version information.
Menu screen
3License Agreement
Used to display the software license agreement.
4Disclaimer
Used to display the disclaimer.
5Online Support Site
Used to display the online support site.
6Trademarks, Licenses, etc.
Used to display trademarks, licenses, etc.
1
2
3
1Operation area selection panel
When an operation area is selected and tapped, the screen switches
to the control screen.
l Control screens on page 6
2Help button
Used to open the [Help] screen.
3Settings button
Used to check and change the various settings.
2
En
Before start
Settings screen
Various settings can be changed at the [Settings] screen.
1
2
3
4
5
6
7
8
1Link with XDJ-R1
Used to turn the link with the XDJ-R1 on and off.
2SSID of the connected XDJ-R1
3Auto transition when track is loaded
Sets whether or not to automatically switch to the deck screen when
tracks are loaded on the deck.
4Load Lock
Sets whether or not new tracks can be loaded on a deck on which a
track is playing.
5Software Take OVER
Used to switch the software take over function when the XDJ-R1 is
operated on and off.
6Needle lock
Used to turn the needle lock function on and off.
7Adjust knob acceleration
Sets the speed at which remotebox controls operate when they are
dragged.
8Initialize Setting Data
Resets the settings on the [Settings] screen to their defaults.
En
3
Basic Operation
Setting the wireless LAN connection
on the XDJ-R1
! Perform the procedure below on the XDJ-R1. Also refer to the
XDJ-R1’s operating instructions.
1 Press the [INFO(UTILITY)] button for over 1 second.
2 Turn the rotary selector, select [WLAN INFO], then
press the rotary selector.
1
2
3 Turn the rotary selector, select [SSID], then press the
rotary selector.
Make a note of the [SSID] for future reference.
! The first 9 characters of the [SSID] are displayed. Turn the rotary
selector to display the portion that is not initially displayed.
4 Press the [BACK(TOP)] button.
Press to return to the previous screen.
5 Turn the rotary selector, select [PASSWORD], then
press the rotary selector.
1 Used to select the operation area.
2 Used to switch the types of operations areas that can be selected.
Make a note of the [PASSWORD] for future reference.
6 From the wireless LAN connection settings on the
mobile device or computer, display the connectable
[SSID]s.
! See your device’s operating instructions for instructions on searching for or displaying connectable [SSID]s.
7 On the mobile device or computer, select the [SSID]
checked in step 3.
1
8 Input the password you made a note of in step 5.
! For safety, be sure to change the default password. For instructions
on changing the password, see the XDJ-R1’s operating instructions.
2
QUICK START GUIDE screen
The [QUICK START GUIDE] screen provides simple operating instructions for the respective control screens.
1 Used to display the currently playing track’s information.
2 Used to select the category.
1
1
1 Select the operation area.
2
1 Used to jump by letter.
2 Used to select the track.
4
En
Basic Operation
1
1
2
3
1
2
3
Used to load the selected track.
Used to add the selected track to the TAG LIST.
The TAG LIST is created in the Playlist.
Used to display the details of the selected track.
1 For all of the controls, the level can be adjusted by dragging
vertically.
1
1
2
1 When the mobile device is turned sideways after selecting the operation area, the display switches.
1 Used to play the track from the position that is touched.
2 Used to select the function to be operated. Tap the selected tab
again to switch the number of beats of the loop, to switch between
the hot cue and sampler functions, etc.
1
2
1 When on, the effect’s parameters are locked.
2 Use this to change the effect’s parameters.
En
5
Control screens
The XDJ-R1 can be operated remotely using the control screens. There are four control screens: [BROWSE], [DECK], [FX] and [MIXER].
About the displays on the smartphone and tablet
The display differs when [CD] or [USB] is selected for the medium on the XDJ-R1 from when [MIDI] is selected. Furthermore, in each case there are
both vertical and horizontal displays.
! For the smartphone version, the menu, [Help] and [Settings] screens cannot be displayed horizontally.
! The QUANTIZE function can only be turned on and off for the tablet version.
BROWSE screen
This screen is used to browse the contents of the USB device connected
to the XDJ-R1.
When rekordbox library information is stored on the USB device, the
music files can be displayed in the categories set with rekordbox (album,
artists, etc.).
1
2
4
Organizing Music in Playlists
Playlists can be created according to your DJ performance requirements
to organize the library.
* The playlist create, edit and sort functions can only be used with
remotebox.
1 Tap the [PLAYLIST] category.
A list of playlists is displayed.
2When
box opens.
is tapped, the playlist name input
3 Input the playlist name, then tap [Save].
3
5
The newly created playlist is added to the [PLAYLIST] category.
4 Tap the newly created playlist to open it.
5 Tap [Edit] and then tap
.
A panel for selecting tracks to be added opens.
6 Tap the tracks you want to add to the playlist.
(Multiple tracks can be selected.)
1Title
The location (level) currently being browsed is displayed here.
2Back button
Used to return to the level above.
3Display area
The albums, titles, etc., in the location (level) currently being
browsed are displayed as a list here. When a track is tapped, the load
icon appears, and the track can be loaded by tapping the load icon.
4Now Playing button
Used to display the XDJ-R1’s current playback status.
5Jumping by letter
Used to scroll the list to the line starting from the specified letter.
7 Tap [Done] to finish adding tracks.
8 Tap [Done] to finish playlist editing.
Editing existing playlists
1 Tap the [PLAYLIST] category.
A list of playlists is displayed.
2 Tap the playlist which you want to edit to open it.
3 Tap [Edit], then add or delete tracks and change the
track order.
Icon
Description
When tapped, a panel for selecting tracks to be added to the
playlists opens.
When dragged, the order of the tracks can be changed.
When tapped, [DELETE] is displayed. Tap [DELETE] to delete
tracks.
4 Tap [Done] to finish playlist editing.
6
En
Organizing playlists
1 Tap the [PLAYLIST] category.
A list of playlists is displayed.
2 Add or delete playlists.
Description
Control screens
Icon
Use this to create a new playlist.
! When a playlist name is swiped, [Delete] is displayed. Tap [Delete]
to delete the selected playlist.
3 Tap [Edit] to edit or move the playlist name.
Icon
Description
Playlists can be moved by dragging them.
When this is tapped, [Delete] is displayed. Tap [Delete] to delete
the selected playlist.
! When a playlist name is tapped, the playlist name input box opens.
Input the playlist name then tap [Save]. The playlist name is
changed.
4 Tap [Done] to finish editing the playlists.
Display screen on a tablet device
The horizontal display screen on a tablet device is displayed as shown
below.
! With the tablet version, two levels are displayed and either of the two
levels can be selected.
En
7
DECK screen
(CD/USB mode)
(MIDI mode)
1
2
3
1
3
4
5
6
7
1Display of currently playing track’s information/
channel switching button
!
!
[HOT CUE/SAMPLER]
In the CD/USB mode
The music file’s information is displayed here.
In the MIDI mode
The channel switches each time the button is tapped.
2Needle search pad
The sound at a certain position can be played easily by touching
your finger to the needle search pad at that position. You can move
quickly to the desired playing position by moving your finger along
the pad without lifting it.
* The needle search function can only be used with remotebox.
3Track search o,p buttons
These work in the same way as the [TRACK SEARCHo,p] buttons on the XDJ-R1.
The hot cue or sampler mode can be selected by tapping [HOT CUE/
SAMPLER].
Hot cues and samplers can be operated by tapping the function operating buttons.
[TEMPO]
4Function selection buttons
1
5Function operating buttons
6CUE button
This works in the same way as the [CUE] button on the XDJ-R1.
7f button
This works in the same way as the [f] button on the XDJ-R1.
Operations using the function selection
and function operating buttons
[LOOP], [HOT CUE/SAMPLER] and [TEMPO] can be switched.
The tempo and sync operations can be performed with the function
operating buttons by tapping [TEMPO].
! 1When the tempo slider is double-tapped, it returns to its default
position.
Display screen on a tablet device
The horizontal display screen on a tablet device is displayed as shown
below.
[LOOP]
1
1
One of two auto beat loop beat number types can be selected by tapping
[LOOP].
The auto beat loop size can be changed and auto beat looping can be
turned on and off by tapping the function operating buttons.
1 QUANTIZE button
This works in the same way as the [QUANTIZE] button on the XDJ-R1.
8
En
FX screen
(CD/USB mode)
(MIDI mode)
4
2
3
Control screens
1
1
5
3
1TAP button/Channel switching button
! In the CD/USB mode
These works in the same way as the [TAP (AUTO)] button on the
XDJ-R1.
! In the MIDI mode
The channel switches each time the button is tapped.
Display screen on a tablet device
The horizontal display screen on a tablet device is displayed as shown
below.
2HOLD button
Holds the effect. When the [HOLD] button is on and the X-Y pad is
touched then released, the effect remains on.
3COLOR FX SELECT (NOISE, PITCH, CRUSH, FILTER)
button, BEAT FX SELECT (TRANS, FLANGER, ECHO, ROLL)
button
Switches the beat effect (BEAT FX) and color effect (COLOR FX) type.
4LEVEL/DEPTH fader
Adjusts the quantitative parameter of the BEAT FX function.
! When double-tapped, the [LEVEL/DEPTH] fader returns to its
default position.
5X-Y pad
The parameters of two selected effects can be operated with the X-Y
pad.
The amount of the color effect (COLOR FX) can be adjusted in
the vertical direction, the size of the beat effect (BEAT FX) can be
adjusted in the horizontal direction.
The effect is on while the X-Y pad is being touched, and turns off
when the pad is released.
En
9
MIXER screen
(CD/USB mode)
(MIDI mode)
MIXER FADER
MIXER FADER
1
MIXER ISO
MIXER IN-OUT
MIXER screen in the CD/USB mode
Display screen on a tablet device
— MIXER FADER: The CH TRIM, CH FADER and CROSS FADER functions can be operated.
— MIXER ISO: The CH ISO and CROSS FADER functions can be
operated.
— MIXER IN-OUT: The MASTER, BOOTH, HEAD PHONE and AUX MIC
functions can be operated.
* When controls or sliders are double-tapped, they return to their
default position.
The horizontal display screen on a tablet device is displayed as shown
below.
MIXER screen in the MIDI mode
MIXER FADER: Same as for the CD/USB mode.
MIXER ISO: Same as for the CD/USB mode.
MIXER IN-OUT: Same as for the CD/USB mode.
When controls or sliders are double-tapped, they return to their
default position.
* For MIXER FADER and MIXER ISO, the channel switches each time
the 1 channel switching button is tapped.
—
—
—
*
10
1
En
Others
About trademarks and registered
trademarks
Others
! Pioneer, rekordbox and remotebox are trademarks or registered
trademarks of the PIONEER CORPORATION.
! Apple, iPad, iPod, iPod touch, iPhone, iTunes, Safari, Finder, Mac,
Macintosh and Mac OS are trademarks of Apple Inc., registered in
the U.S. and other countries.
! iOS is a trademark on which Cisco holds the trademark right in the
US and certain other countries.
The names of companies and products mentioned herein are the trademarks of their respective owners.
Cautions on copyrights
Recordings you have made are for your personal enjoyment and according to copyright laws may not be used without the consent of the copyright holder.
! Music recorded from CDs, etc., is protected by the copyright laws of
individual countries and by international treaties. It is the full responsibility of the person who has recorded the music to ensure that it is
used legally.
! When handling music downloaded from the Internet, etc., it is the
full responsibility of the person who has downloaded the music to
ensure that it is used in accordance with the contract concluded
with the download site.
Using the support site
Please read the remotebox’s operating instructions before making inquiries about remotebox operating procedures and technical issues. Also
check the XDJ-R1 FAQ provided on the Pioneer DJ Global site.
<Pioneer DJ Global site>
http://pioneerdj.com/support/
! PIONEER CORPORATION collects your personal information for the
following purposes:
1 To provide customer support for your purchased product
2 To inform you of product or event information by e-mail
3 To obtain feedback collected by survey for product planning
purposes
— Your personal information is kept confidential corresponding to
the privacy policy set forth by our company.
— For Pioneer’s privacy protection policy, see the Pioneer DJ Global
site.
! When making inquiries concerning this software, be sure to specify
the model name and the name of the manufacturer of your mobile
device, the connected peripheral equipment and the version of the
operating system being used, and provide a concrete description of
the problem and symptoms you are experiencing.
— To inquire about configuring your computer with non-Pioneer
peripheral devices and to obtain the corresponding technical
support, contact the specific manufacturer or retailer.
! Pioneer plans to provide version updates for improving the software’s
functions and performance in the future. We encourage you to make
these updates and always use the latest version of the software.
© 2013 PIONEER CORPORATION.
All rights reserved.
PIONEER CORPORATION
1-1, Shin-ogura, Saiwai-ku, Kawasaki-shi, Kanagawa 212-0031, Japan
<DRI1112-A>
En
11