1
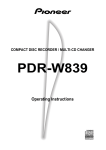
COMPACT DISC RECORDER / MULTI-CD CHANGER
PDR-W37
Operating Instructions
WARNING: TO PREVENT FIRE OR SHOCK HAZARD,
DO NOT EXPOSE THIS APPLIANCE TO RAIN OR
MOISTURE.
IMPORTANT NOTICE [For U.S. model]
The serial number for this equipment is located
on the rear panel. Please write this serial
number on your enclosed warranty card and
keep it in a secure area. This is for your security.
IMPORTANT
CAUTION
RISK OF ELECTRIC SHOCK
DO NOT OPEN
The lightning flash with arrowhead symbol, within
an equilateral triangle, is intended to alert the user
to the presence of uninsulated "dangerous voltage"
within the product's enclosure that may be of
sufficient magnitude to constitute a risk of electric
shock to persons.
CAUTION:
TO PREVENT THE RISK OF ELECTRIC SHOCK, DO
NOT REMOVE COVER (OR BACK). NO USERSERVICEABLE PARTS INSIDE. REFER SERVICING
TO QUALIFIED SERVICE PERSONNEL.
The exclamation point within an equilateral
triangle is intended to alert the user to the
presence of important operating and
maintenance (servicing) instructions in the
literature accompanying the appliance.
CAUTION:
¶ Use of controls or adjustments or performance of procedures other than those specified herein hazardous radiation
exposure.
¶ The use of optical instruments with this product will increase eye hazard.
Note: This equipment has been tested and found to comply with the limits for a Class B digital
device, pursuant to Part 15 of the FCC Rules. These limits are designed to provide reasonable protection against harmful interference in a residential installation. This equipment generates, uses,
and can radiate radio frequency energy and, if not installed and used in accordance with the instructions, may cause harmful interference to radio communications. However, there is no guarantee
that interference will not occur in a particular installation. If this equipment does cause harmful
interference to radio or television reception, which can be determined by turning the equipment off
and on, the user is encouraged to try to correct the interference by one or more of the following
measures:
– Reorient or relocate the receiving antenna.
– Increase the separation between the equipment and receiver.
– Connect the equipment into an outlet on a circuit different from that to which the receiver is
connected.
– Consult the dealer or an experienced radio/TV technician for help.
[For U.S. model]
CAUTION:
This product satisfies FCC regulations when shielded cables and connectors are used to connect the
unit to other equipment. To prevent electromagnetic interference with electric appliances such as radios
and televisions, use shielded cables and connectors for connections.
Information to User
Alteration or modifications carried out without appropriate authorization may invalidate the user’s right to operate
the equipment.
[For Canadian model]
CAUTION: TO PREVENT ELECTRIC SHOCK DO NOT
USE THIS (POLARIZED) PLUG WITH AN EXTENSION
CORD, RECEPTACLE OR OTHER OUTLET UNLESS THE
BLADES CAN BE FULLY INSERTED TO PREVENT BLADE
EXPOSURE.
ATTENTION:
POUR PREVENIR LES CHOCS
ELECTRIQUES NE PAS UTILISER CETTE FICHE
POLARISEE AVEC UN PROLONGATEUR, UNE PRISE
DE COURANT OU UNE AUTRE SORTIE DE
COURANT, SAUF SI LES LAMES PEUVENT ETRE
INSEREES A FOND SANS EN LAISSER AUCUNE
PARTIE A DECOUVERT.
IMPORTANT SAFETY INSTRUCTIONS
READ INSTRUCTIONS — All the safety and operating
instructions should be read before the product is
operated.
RETAIN INSTRUCTIONS — The safety and operating
instructions should be retained for future reference.
HEED WARNINGS — All warnings on the product and in the
operating instructions should be adhered to.
FOLLOW INSTRUCTIONS — All operating and use
instructions should be followed.
CLEANING — Unplug this product from the wall outlet
before cleaning. The product should be cleaned only
with a polishing cloth or a soft dry cloth. Never clean
with furniture wax, benzine, insecticides or other volatile
liquids since they may corrode the cabinet.
ATTACHMENTS — Do not use attachments not
recommended by the product manufacturer as they
may cause hazards.
WATER AND MOISTURE — Do not use this product near
water — for example, near a bathtub, wash bowl,
kitchen sink, or laundry tub; in a wet basement; or near
a swimming pool; and the like.
ACCESSORIES — Do not place this product on an unstable
cart, stand, tripod, bracket, or table. The product may
fall, causing serious injury to a child or adult, and serious
damage to the product. Use only with a cart, stand,
tripod, bracket, or table recommended by the
manufacturer, or sold with the product. Any mounting
of the product should follow the manufacturer’s
instructions, and should use a mounting accessory
recommended by the manufacturer.
CART — A product and cart combination should be moved
with care. Quick stops, excessive force, and uneven
surfaces may cause the product and cart combination
to overturn.
obsolete outlet. Do not defeat the safety purpose of the
polarized plug.
•
If this product is equipped with a three-wire grounding
type plug, a plug having a third (grounding) pin, it will
only fit into a grounding type power outlet. This is a
safety feature. If you are unable to insert the plug into
the outlet, contact your electrician to replace your
obsolete outlet. Do not defeat the safety purpose of the
grounding type plug.
POWER-CORD PROTECTION — Power-supply cords should
be routed so that they are not likely to be walked on or
pinched by items placed upon or against them, paying
particular attention to cords at plugs, convenience
receptacles, and the point where they exit from the
product.
OUTDOOR ANTENNA GROUNDING — If an outside
antenna or cable system is connected to the product,
be sure the antenna or cable system is grounded so as
to provide some protection against voltage surges and
built-up static charges. Article 810 of the National
Electrical Code, ANSI/NFPA 70, provides information
with regard to proper grounding of the mast and
supporting structure, grounding of the lead-in wire to an
antenna discharge unit, size of grounding conductors,
location of antenna-discharge unit, connection to
grounding electrodes, and requirements for the
grounding electrode. See Figure A.
LIGHTNING — For added protection for this product during
a lightning storm, or when it is left unattended and
unused for long periods of time, unplug it from the wall
outlet and disconnect the antenna or cable system.
This will prevent damage to the product due to lightning
and power-line surges.
POWER LINES — An outside antenna system should not be
located in the vicinity of overhead power lines or other
electric light or power circuits, or where it can fall into
such power lines or circuits. When installing an outside
antenna system, extreme care should be taken to keep
from touching such power lines or circuits as contact
with them might be fatal.
OVERLOADING — Do not overload wall outlets, extension
cords, or integral convenience receptacles as this can
result in a risk of fire or electric shock.
VENTILATION — Slots and openings in the cabinet are
provided for ventilation and to ensure reliable operation
of the product and to protect it from overheating, and
these openings must not be blocked or covered. The
openings should never be blocked by placing the product
on a bed, sofa, rug, or other similar surface. This
product should not be placed in a built-in installation
such as a bookcase or rack unless proper ventilation is
provided or the manufacturer’s instructions have been
adhered to.
POWER SOURCES — This product should be operated only
from the type of power source indicated on the marking
label. If you are not sure of the type of power supply to
your home, consult your product dealer or local power
company.
LOCATION – The appliance should be installed in a stable
location.
NONUSE PERIODS – The power cord of the appliance
should be unplugged from the outlet when left un-used
for a long period of time.
GROUNDING OR POLARIZATION
•
If this product is equipped with a polarized alternating
current line plug (a plug having one blade wider than the
other), it will fit into the outlet only one way. This is a
safety feature. If you are unable to insert the plug fully
into the outlet, try reversing the plug. If the plug should
still fail to fit, contact your electrician to replace your
[For Canadian model]
This Class B digital apparatus complies with
Canadian ICES-003.
[Pour le modèle Canadien]
Cet appareil numérique de la classe B est
conforme à la norme NMB-003 du Canada.
OBJECT AND LIQUID ENTRY — Never push objects of any
kind into this product through openings as they may
touch dangerous voltage points or short-out parts that
could result in a fire or electric shock. Never spill liquid
of any kind on the product.
SERVICING — Do not attempt to service this product
yourself as opening or removing covers may expose
you to dangerous voltage or other hazards. Refer all
servicing to qualified service personnel.
DAMAGE REQUIRING SERVICE — Unplug this product
from the wall outlet and refer servicing to qualified
service personnel under the following conditions:
•
When the power-supply cord or plug is damaged.
•
If liquid has been spilled, or objects have fallen into the
product.
•
If the product has been exposed to rain or water.
•
If the product does not operate normally by following
the operating instructions. Adjust only those controls
that are covered by the operating instructions as an
improper adjustment of other controls may result in
damage and will often require extensive work by a
qualified technician to restore the product to its normal
operation.
•
If the product has been dropped or damaged in any
way.
•
When the product exhibits a distinct change in
performance — this indicates a need for service.
REPLACEMENT PARTS — When replacement parts are
required, be sure the service technician has used
replacement parts specified by the manufacturer or
have the same characteristics as the original part.
Unauthorized substitutions may result in fire, electric
shock, or other hazards.
SAFETY CHECK — Upon completion of any service or
repairs to this product, ask the service technician to
perform safety checks to determine that the product is
in proper operating condition.
WALL OR CEILING MOUNTING — The product should not
be mounted to a wall or ceiling.
HEAT — The product should be situated away from heat
sources such as radiators, heat registers, stoves, or
other products (including amplifiers) that produce heat.
ANTENNA
LEAD IN
WIRE
GROUND
CLAMP
ANTENNA
DISCHARGE UNIT
(NEC SECTION 810-20)
ELECTRIC
SERVICE
EQUIPMENT
GROUNDING CONDUCTORS
(NEC SECTION 810-21)
GROUND CLAMPS
Fig. A
POWER SERVICE GROUNDING
ELECTRODE SYSTEM
(NEC ART 250, PART H)
NEC — NATIONAL ELECTRICAL
CODE
[For U.S. and Canadian models]
DANGER – LASER RADIATION WHEN
OPEN. AVOID DIRECT EXPOSURE TO
BEAM.
This caution can be found on the rear panel of the
unit.
Contents
1
Before You Start
Checking what's in the box .................................................. 5
Using this manual ................................................................ 5
Putting the batteries in the remote ...................................... 5
Hints on installation ............................................................ 5
Avoiding condensation problems ......................................... 6
Maintaining your CD recorder ............................................. 6
Moving the unit .................................................................... 6
CD lens cleaner ..................................................................... 6
Power cord caution .............................................................. 6
About CD, CD–R and CD–RW Discs .................................... 6
Consumer-use discs .............................................................. 6
Recording copyright material .............................................. 7
Recording and finalizing discs ............................................ 7
Playing partially recorded discs ........................................... 7
2
Connecting Up
Rear panel ............................................................................ 8
Connecting optical cords ...................................................... 8
Connecting coaxial cords ..................................................... 8
Connecting stereo audio cords ............................................. 8
Connecting the control cord ................................................ 8
Plugging in ........................................................................... 8
Connecting a keyboard ........................................................ 9
Keyboard controls ................................................................. 9
3
Editing CD text ................................................................... 24
Copying track names to other tracks ................................. 25
Recording fade ins and fade outs ....................................... 26
Automatically numbering tracks ....................................... 26
Setting the silence threshold .............................................. 27
Manually numbering tracks .............................................. 27
Starting tracks in time increments .................................... 28
Changing the recording speed ........................................... 28
Setting the recording level ................................................. 28
Setting the balance ............................................................. 29
6
Finalizing a disc ................................................................. 30
Erasing a CD–RW disc ....................................................... 31
Marking recorded tracks to skip ......................................... 33
Playing a disc with skip IDs ............................................... 34
7
8
Quick CD recording ............................................................ 13
Recording tracks during playback ..................................... 13
Setting the headphone level ............................................... 13
Playing a CD. ...................................................................... 14
Playback modes .................................................................. 15
Starting playback with a timer .......................................... 15
Using the menu features .................................................... 15
Switching the display ......................................................... 16
5
Recording Features
Introduction ....................................................................... 19
Recording a CD................................................................... 19
Recording individual tracks ............................................... 20
Recording from anywhere on the disc ............................... 21
Recording a programmed selection ................................... 22
Using CD text ...................................................................... 23
Recording Other Sources
Introduction ....................................................................... 38
Monitoring a source for recording ..................................... 38
Digital synchro recording .................................................. 39
Analog synchro recording .................................................. 40
Manual recording (analog or digital) ............................... 41
Recording blank sections ................................................... 42
Controls and Displays
Getting Started
Playback Functions
Programming a playlist (3-CD changer) .......................... 35
Clearing the playlist ........................................................... 35
Programming a playlist (CD-R) ........................................ 36
Using the repeat modes ...................................................... 36
Using the random mode .................................................... 37
Fading in and fading out ................................................... 37
Front panel ......................................................................... 10
Remote control ................................................................... 11
Display ................................................................................ 12
4
Finalizing and Erasing
9
Additional Information
Handling discs .................................................................... 43
Storing discs ........................................................................ 43
Discs to avoid ...................................................................... 43
Recording CDs .................................................................... 43
Digital and analog sources ................................................ 43
Digital recording restrictions ............................................. 44
Digital recording from DAT ................................................ 44
Digital signal interruptions ................................................ 44
Power interruptions ............................................................ 44
Miscellaneous information ................................................ 44
Understanding display messages ....................................... 45
Error messages ................................................................... 46
Messages relating to recording ........................................... 47
Digital synchro recording troubleshooting ....................... 47
Troubleshooting ................................................................. 48
Specifications ...................................................................... 49
1 Before You Start
Checking what's in the box
Thank you for buying this Pioneer product. Before starting to set up
your new CD recorder, please check that you have received the
following supplied accessories:
• Stereo audio cords (x2)
• AC power cord
• Two 'AA' size R6P batteries • Remote control unit
• Warranty card
• These operating instructions
Using this manual
This manual is for the PDR–W37 Compact Disc Recorder/Multi-CD
Changer. It is split into two sections; the first covers setting up, and
the second, using the recorder. Set up, which starts here, shows you
how to install and connect up the recorder to the rest of your
system.
In the second section of the manual, starting on page 10, you'll
learn how to use the various features of the recorder. The final part
of the manual provides a list of display messages, a troubleshooting
section, and technical specifications.
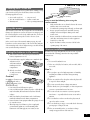
Putting the batteries in the remote
1 Turn over the remote control, then press and slide the
battery compartment cover off.
30
30
7m (23ft.)
Keep in mind the following when using the
remote control:
• Make sure that there are no obstacles between the remote
and the remote sensor on the unit.
• Use within the operating range and angle, as shown right.
• Remote operation may become unreliable if strong
sunlight or fluorescent light is shining on the unit’s
remote sensor.
• Remote controllers for different devices can interfere with
each other. Avoid using remotes for other equipment
located close to this unit.
• Replace the batteries when you notice a fall off in the
operating range of the remote.
Hints on installation
We want you to enjoy using this unit for years to come, so please
bear in mind the following points when choosing a suitable
location for it:
2 Put in the batteries supplied, taking care to match the plus
and minus ends of
each battery with the
markings inside the
compartment.
Do...
✓ Use in a well-ventilated room.
✓ Place on a solid, flat, level surface, such as a table, shelf or
3 Slide the cover back
on, and your remote
is ready for use.
Don’t...
✗ Use in a place exposed to high temperatures or humidity,
Caution!
Incorrect use of batteries can
result in hazards such as
leakage and bursting. Please
observe the following:
• Don’t mix new and old batteries together
• Don’t use different kinds of battery together—although they
may look similar, different batteries may have different
voltages.
• Make sure that the plus and minus ends of each battery
match the indications in the battery compartment.
• Remove batteries from equipment that isn’t going to be used
for a month or more.
• When disposing of used batteries, please comply with
governmental regulations or environmental public
instruction’s rules that apply in your country or area.
stereo rack.
including near radiators and other heat-generating
appliances.
✗ Place on a window sill or other place where the player will
be exposed to direct sunlight.
✗ Use in an excessively dusty or damp environment.
✗ Place directly on top of an amplifier, or other component in
your stereo system that becomes hot in use.
✗ Use near a television or monitor as you may experience
interference— especially if the television uses an indoor
antenna.
✗ Use in a kitchen or other room where the player may be
exposed to smoke or steam.
✗ Use on a thick rug or carpet, or cover with cloth—this may
prevent proper cooling of the unit.
✗ Place on an unstable surface, or one that is not large
enough to support all four of the unit’s feet.
5
1 Before You Start
Avoiding condensation problems
About CD, CD–R and CD–RW Discs
Condensation may form inside the player if it is brought into a
warm room from outside, or if the temperature of the room rises
quickly. Although the condensation won’t damage the player, it
may temporarily impair its performance. For this reason you
should leave it to adjust to the warmer temperature for about an
hour before switching on and using.
This unit is compatible with three different types of compact disc:
Maintaining your CD recorder
To clean the compact disc recorder, wipe with a soft, dry cloth. For
stubborn dirt, wet a soft cloth with a mild detergent solution made
by diluting one part detergent to 5 or 6 parts water, wring well, then
wipe off the dirt. Use a dry cloth to wipe the surface dry. Do not use
volatile liquids such as benzene and thinner which may damage
the surfaces.
Moving the unit
Before moving this unit, remove all discs, then close the tray. The
CD SELECT lights should all turn off. At this point, hold down the
7 button (CD-R side) and press PLAY MODE on the front panel.
When you see the message OK! you can then switch the unit off
and unplug from the wall outlet. This procedure returns the unit to
its shipping position. You cannot use the unit when the display
reads OK! — normal operation resumes when power is switched
back on.
Never lift or move the unit during playback or recording— discs
rotate at a high speed and may be damaged.
Playback-only CDs
This unit will playback any ordinary audio CDs
carrying the Compact Disc Digital Audio mark
shown right.
CD-Recordable discs
Recordable CDs, or CD-R, carry the mark shown
right, and are 'write once'. This means that once
something is recorded on the disc it is permanent— it can't be re-recorded or erased.
CD-Rewritable discs
Rewritable CDs, or CD-RW, carry the mark shown
right. As the name indicates, you can erase and rerecord material on these discs so that they can be
used over and over again.
Consumer-use discs
This recorder is only compatible with special consumer-use CD-R
and CD-RW discs. These are clearly marked For Music Use
Only, For Consumer, or For Consumer Use. Other types
of CD-R or CD-RW discs, such as those available for computerbased CD recorders, will not work with this recorder.
Pioneer has checked the following branded discs for compatibility
with this recorder (as of May 2000):
• Eastman Kodak Company
CD lens cleaner
• FUJI PHOTO FILM CO., LTD.
The compact disc recorder's pickup lens should not become dirty in
normal use, but if for some reason it should malfunction due to
dirt or dust, consult your nearest Pioneer authorized service center.
Although lens cleaners for compact disc recorders are commercially
available, we do not recommend using them since some may
damage the lens.
• Hitachi Maxell, Ltd.
• MITSUI CHEMICALS, INC.
• TAIYO YUDEN CO., LTD.
• TDK CORPORATION
• VERBATIM CORPORATION
• PIONEER CORPORATION
6
Power cord caution
• SONY CORPORATION
Handle the power cord by the plug part. Do not pull out the plug by
tugging the cord, and never touch the power cord when your hands
are wet, as this could cause a short circuit or electric shock. Do not
place the unit, a piece of furniture, or other object on the power
cord or pinch the cord in any other way. Never make a knot in the
cord or tie it with other cords. The power cords should be routed so
that they are not likely to be stepped on. A damaged power cord can
cause a fire or give you an electric shock. Check the power cord
once in a while. If you find it damaged, ask your nearest Pioneer
authorized service center or your dealer for a replacement.
• RITEK CORPORATION
Sample discs from the following makers have also been checked for
compatibility (as of May 2000), although at the time of writing
discs branded under these names are not available.
• Mitsubishi Chemical Corporation
• RICOH COMPANY, LTD.
Note: Discs from any of the above makers may also be sold under
different brand names.
1 Before You Start
Recording copyright material
The price of a consumer-use disc includes a copyright fee that has
been paid to the copyright owner (in countries where the copyright
fee collection system has been established based on their respective
copyright laws). This means that you can use these discs to record
music and other material for your personal use. If you want to use
a disc for anything other than personal use, you must get
permission from the copyright owner (note that copyright laws vary
from country to country; check the copyright-related laws in your
particular country for more information).
Broadcast programs, CDs, other recorded media (cassettes, vinyl
records, etc.) and musical performances are all protected by
copyright laws. You must get permission from the copyright owner
if you sell, transfer, distribute or lease a disc recorded from the
above mentioned sources, or if you use it as part of a business (such
as for background music in a store).
Recording and finalizing discs
Unlike other recording media, recordable CDs have a number of
distinct states, and what you can do with a disc depends on the
current state of the disc. Figure 1. (right) shows the three states—
blank, partially recorded, and finalized— and summarizes what’s
possible (✔) and impossible (✘) in each.
The process of finalization fixes the contents of a CD-R in place for
good by creating a Table of Contents (TOC, for short) at the
beginning of the disc. This tells a CD player exactly what's on the
disc and where to find it. Once a CD-R is finalized, further
recording and other changes become impossible. The CD recorder
and other CD players treat a finalized disc as an ordinary playbackonly CD. (See page 31 for more information on finalizing CD-Rs.)
CD-rewritable discs can be finalized in the same way as CD-R discs,
but even after finalization, the disc can still be erased and used over
again. Remember that CD-RW discs can only be played on players
that are specifically designed to play CD-RW discs: most home CD
players will not play these discs, even after the disc has been
finalized. (See page 30 for more information on finalizing CD-RWs.)
fig 1. differences between recordable and rewritable discs.
✔
✘
✘
✘
Recordable
Erasable
Skip ID set/clear
Play in ordinary
CD player
✔
✘
✘
✘
Recordable
Erasable
Skip ID set/clear
Play in ordinary
CD player
✔
✔
✔
✘
Recordable
Erasable
Skip ID set/clear
Play in ordinary
CD player
✘
✔
✘
✘
Recordable*
Erasable
Skip ID set/clear*
Play in ordinary
CD player**
Record
✔
✘
✔
✘
Recordable
Erasable
Skip ID set/clear
Play in ordinary
CD player
Finalize
✘
✘
✘
✔
Recordable
Erasable
Skip ID set/clear
Play in ordinary
CD player
* Once the CD-RW has been erased, it becomes recordable
again and skip IDs can be set and cleared.
** In general, current CD players cannot play CD-RW discs.
However, this situation may change.
Playing partially recorded discs
Partially recorded discs (discs which contain recorded material but
have not yet been finalized) can be played in the 3-CD changer of
this unit with the following limitations:
• It will take longer than usual to read the disc when you load
it and start playback.
• When the partially recorded disc is stopped, the display will
not show any disc time information. During playback, only
track elapsed time is displayed; you cannot switch to any
other display mode.
• If you play a CD-RW from which tracks have been erased,
you may still hear the erased tracks and the disc may not
play correctly.
• It may not be possible to play an unfinalized disc if there is
very little blank space left.
7
2 Connecting Up
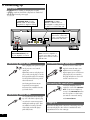
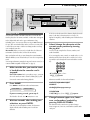
Rear panel
Important: Before making or changing any rear panel
connections, make sure that all the components are switched off
and unplugged from the power supply.
Connect to the OPTICAL IN or
COAXIAL IN of a CD-R,
MiniDisc or DAT recorder, or
other digital recording device to
be able to record from this unit.
Connect to the OPTICAL OUT
or COAXIAL OUT of a CD,
MiniDisc, DAT or other digital
equipment for digital recording.
LINE
REC
PLAY
IN OUT
DIGITAL
IN
L
DIGITAL
OUT
CONTROL
1
OPTICAL
Connect to the TAPE/MD/
CD-R LINE IN/OUT jacks
of your amplifier or receiver.
2
COAXIAL
COAXIAL
OPTICAL
Connect to the CONTROL
OUT of a Pioneer amplifer or
receiver to be able to use the
amp/receiver's remote control
with this unit.
Connecting optical cords
Connecting stereo audio cords
Before plugging in an optical cord, pull
out the protective cover from the
optical jack.
OPTICAL
2
LINE
Optical interconnects only plug in one
way, so make sure the plug is correctly
lined up with the jack before inserting.
You should hear it click into position
when fully inserted.
Avoid using optical interconnects
longer than 3 meters. Optical
interconnects are available from any
good audio dealer.
COAXIA
L
Use a regular interconnect with a pintype (also called RCA or phono) plug
on each end to connect components
with digital coaxial-type jacks. These
are available from any good audio
dealer. Make sure that the plug is
pushed fully home.
The two sets of stereo audio cords
supplied connect this unit to your
amplifier/receiver’s analog line
inputs/outputs. Be sure to fully insert
each plug for the best connection.
The plugs and jacks are color-coded
to make connection easier.
Connecting the control cord
Use a mono miniplug cord (not
supplied) to connect the CONTROL
OUT of your Pioneer amplifier or
receiver to the CONTROL IN of this
unit. If you plan to use this feature,
you must also connect the analog
audio LINE IN/OUTs.
Connecting coaxial cords
8
AC IN
IN
R
1
After completing all other
connections, connect the
power cord and plug into a
standard AC wall outlet.
Plugging in
After double-checking all the connections, connect the power cord
to this unit and plug the other end into a standard wall outlet.
Congratulations! You’re done setting up.
2 Connecting Up
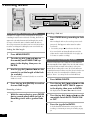
Connecting a keyboard
You can choose to use a connected keyboard to control many of the
playback and recording features of the PDR-W37. This is useful
when you want to name your CD-Rs or CD-RWs for future
reference. This unit is designed for use with a U.S.English keyboard, connected to the KEYBOARD
INPUT on the front panel with a six-pin mini DINtype jack (see right).
◊ÛB¿ˆ≤≥
COMPACT DISC RECORDER / MULTI-CD
CHANGER
OPEN/CLOSE
1
0
2
0
3
0
3- COMPACT DISC MULTI CHANGER
3-CD CONTROL
INPUT
PLAY MODE
¡ ¢
41
POWER
DISPLAY
6
— OFF _ ON
KEYBOARD
INPUT
PHONE
7
When using the keyboard for playback and
DIN
connector
recording features (such as inputting CD text,
erasing, repeating tracks, etc.), the instructions are
the same as those for the remote control and the front panel
controls. However, use the keys on your keyboard corresponding to
the buttons on both the front panel and the remote control (see
below for a full list).
Connect the keyboard’s DIN connector to the KEYBOARD INPUT
on the front panel at right.
Esc
F1
~
!
`
1
F2
@
#
2
Caps Lock
W
A
Shift
^
5
R
D
X
F5
%
4
E
S
Z
F4
$
3
Q
Tab
F3
F
C
^
6
T
:
;
}
]
|
\
"
'
?
/
F12
Backspace
=
{
[
>
.
F11
+
P
L
<
,
F10
_
0
O
K
M
F9
)
9
I
J
N
F8
(
8
U
H
B
F7
&
7
Y
G
V
F6
Print Scroll
Pause
Screen Lock
Inserl
Home
Page
Up
Num
Lock
/
Delete
End
Page
Down
7
8
Home
Enter
Shift
*
9
Pg Up
4
5
6
1
2
3
End
+
Pg Dn
Enter
Ctrl
Alt
Alt
Ctrl
0
Ins
Del
Keyboard controls
Key
Function
Key
Function
F1
TEXT
Scroll Lock
7
F2
NAME CLIP
Pause
6
F3
SCROLL
Home
Move cursor to first
character position
Space
Space
Delete
Delete a character
Enter
ENTER
End
Move cursor to last
character position
Backspace
Backspace
Shift + F1
DISC 1
Shift + F2
DISC 2
Shift + F3
DISC 3
≠
Shift + F4
CD-R
Num Lock
PROGRAM
Shift + F5
REC START
/
REPEAT
Shift + F6
REC MODE
*
RANDOM
Shift + F7
ERASE
-
CLEAR
Shift + F8
FINALIZE
+
>10
Shift + Caps Lock
Small/Large Caps
0–9
0–9
Print Screen
DISPLAY
¡
+
1
¢
4
A–Z character keys
9
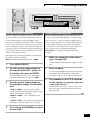
3 Controls and Displays
Front panel
1
2
3
COMPACT DISC RECORDER / MULTI-CD
CHANGER
4
5
6
7
8
◊ÛB¿ˆ≤≥
CD SELECT
OPEN/CLOSE
OPEN/CLOSE
1
1
0
2
0
3
0
0
3- COMPACT DISC MULTI CHANGER
COMPACT DISC DIGITAL RECORDER
2
3
REC/
REC MUTE
CD=CD-R
START
REC MODE
ERASE
FINALISE
SYNCHRO
¶
MENU/
DELETE
NAME
AUTO SPACE
REC THIS
3-CD CONTROL
PLAY MODE
POWER
— OFF _ ON
¡ ¢
41
6
INPUT
7
¡ ¢
41
DISPLAY
PHONE
1
2
3
4
5
6
7
8
9
10
10
REC VOL
DISPLAY
CHARACTER
KEYBOARD
INPUT
6
7
PUSH ENTER
CD TEXT
9
¶
CD-R CONTROL
10
11 12 13 14
OPEN/CLOSE ) 1 / 2 / 3 – Press to open/close
disc tray 1, 2 or 3 from the changer.
Changer disc tray
CD SELECT 1/2/3 – Press to select and play disc
1, 2 or 3 from the changer. (p.14)
CD = CD-R START / REC THIS – Press to start
recording from disc(s)/tracks in the CD changer. (p.13,
19–22)
CD-R disc tray
CD-R functions
REC MODE – Use to select the copy mode: disc, track
or program. (p.19–22)
ERASE – Use to select the erase mode: last track,
multiple tracks, all tracks or TOC. (p.31–32)
FINALIZE – Press to start finalizing a disc. (p.30)
SYNCHRO – Use to select the synchro recording mode
when recording from an external component. (p.39–40)
AUTO SPACE – Press to switch on/off automatic track
spacing when copying a programmed playlist. (p.22)
NAME– Use to cycle through CD text naming options.
(p.23–24)
MENU/DELETE – Press to cycle through the
preference menu options. Press to delete characters while
editing CD text. (p.15, 23–24)
OPEN/CLOSE 0 – Press to open/close the CD-R disc
tray.
REC / REC MUTE ¶ – Press to put the recorder into
record-pause mode ready for recording (p.41). Once
recording, use to record blank sections onto a disc. (p.42)
POWER –OFF / -ON – Press to switch the unit on
or off.
3-CD Controls
4 1 – Press for reverse track skip; press and hold
for fast reverse playback. (p.14)
15
11
12
13
14
15
16
Hi-bit Legato Link Conversion
16
¡ ¢ – Press for forward track skip; press and hold
for fast forward playback. (p.14)
DISPLAY – Use to switch the CD display mode (p.16)
6 – Press to play a disc or pause a disc that’s already
playing (press again to restart playback). (p.14)
7 – Press to stop playback. (p.14)
PLAY MODE – Set the play mode to play one disc, all
discs in the changer, or all discs in both the changer and
CD-R. (p.15)
PHONES – Plug in a pair of headphones.
KEYBOARD INPUT – Connect a key board to input
CD text. (p. 9)
INPUT – Use to select the externel input to use: optical,
coaxial, or analog line in. (p.38–41)
CD-R Controls
4 1 – Press for reverse track skip; press and hold
for fast reverse playback. (p.14)
¡ ¢ – Press for forward track skip; press and hold
for fast forward playback. (p.14)
DISPLAY – Use to switch the CD-R display mode.
(p.17–18)
6 – Press to play a disc or pause a disc that’s already
playing (press again to restart playback). Also use when
recording to start or pause recording. (p.14)
7 – Press to stop playback or recording.
‡ REC VOL (Jog dial)– Turn to adjust the recording
level. Push to switch between fixed and variable level
recording in digital recording mode (p. 28, 38–40). Also
turn to select options in the menu (p.15); cycle through
characters in CD text (p.23); skip tracks while stopped or
during playback (p.14). Push the jog dial to select
characters in CD text (p.24); confirm menu settings
(p.15); play a disc (when stopped) (p.14).
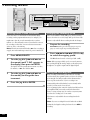
3 Controls and Displays
Remote control
1
2
3
4
5
6
7
8
9
10
DISPLAY/CHARA – Press to switch between display
modes (p.16), and between upper- and lower-case
characters while using CD text (p.23).
SCROLL – Press to scroll through long names in CD
text. (p.16, 23)
MENU/DELETE – Press to access the preference
menu options (p.15). Press to delete characters while
editing CD text (p.23–24).
FADER – Press to fade in or fade out during playback or
recording. (p.26,37)
PLAY MODE – Set the play mode to play one disc, all
discs in the 3-CD changer, or all discs in both the changer
and CD-R. (p.15)
10/0 MARK–Use in selecting tracks over ten, as well
as for choosing symbols when using CD text (p.23).
Playback control buttons
4 ¢ – Skip back/forward tracks. (p.14)
3 – Start or resume playback, or start recording from
record-pause mode.
1 ¡ – Press and hold for fast-reverse and fastforward playback, and to move cursor position when using
CD text. (p.23)
ENTER –Confirm menu settings (p.15); confirm
characters in CD text (p.24).
7 – Stop playback or recording.
REC THIS – Press to record the track that’s currently
playing in the changer. (p.13)
Disc select buttons
DISC 1/2/3 – Press to select and play disc 1, 2 or 3
from the changer. (p.14)
CD-R – Switch to the CD recorder and play the currently
loaded CD/CD-R/CD-RW (p.14).
Playback / skip buttons
PROGRAM – Program the playback track order.
(p.35,36)
CHECK – Check the tracks of a programmed playlist
(p.35), and monitor the CD changer (p.28).
CLEAR – Clear the last programmed track in program
play mode. (p.35)
RANDOM – Start random track/disc playback. (p.37)
REPEAT – Set the repeat mode. (p.36)
SKIP PLAY – Press to switch skip play on or off (p.31).
SKIP ID SET/CLEAR – Set or clear a track skip ID
for the current track. (p.33)
1
DISPLAY
/CHARA NAME CLIP
TIME
ABC
SCROLL
2
MENU/
DELETE
3
FADER
4
5
6
PLAY
MODE
11
DEF
1
2
3
GHI
JKL
MNO
4
5
6
PQRS
TUV
WXYZ
7
8
9
MARK
10/0
4
NAME
13
¢
14
8
15
>10
CURSOR
3
7
1
ENTER
REC
THIS
8
DISC 1
9
PROGRAM CHECK
10
SKIP PLAY
¡
7
DISC 2
DISC 3
12
13
14
15
REPEAT
CLEAR
COMPACT DISC RECORDER/
MULTI-CD CHANGER
REMOTE CONTROL UNIT
11
CD-R
CLEAR RANDOM
SKIP ID
SET
12
Î
NAME CLIP – Press to copy the current CD text to the
recorder’s memory.
Number / Letter buttons – Use to jump directly to
track numbers for playback, selecting track numbers for
editing / programming, and selecting letters when using
CD text.
NAME – Use to cycle through the CD text naming
options. (p.23)
>10– Use to select track numbers over 10.
8 – Pause playback or recording.
11
3 Controls and Displays
Display
1 2
3
DISC# DISC
TRACK#
ARTST#
MIN
TRK
SEC
TOTAL
TRK
STEP REMAIN
DISC 1
DISC 2
DISC 3
SINGLE ALL RELAY FADER SCAN RDM RPT- 1 PGM
STEP CD TEXT
CD-RW
FINALIZE
MANUAL
TRACK
SYNC-1
SKIP ON VOL FIX DIG ANA
REC
MIN
dB
SEC
PARTIAL A.SPACE
Hi
COPY
8
L
–dB
R
REC THIS
40
18
6
0
ANALOG
OPTICAL
OVER
COAXIAL
4
1
2
3
4
12
5
6
DISC 1/2/3 – Indicates discs loaded.
DISC Lights when disc information is displayed.
TRACK Lights when track information is displayed.
ARTST Lights when artist information is displayed.
Message/time display
Status indicators
PARTIAL – Lights when a partially recorded CD-R or
CD-RW is loaded into the 3 CD changer. Random and
repeat play functions are not available when this is lit.
A. SPACE – Lights when automatic track spacing is on
in program copy mode.
SINGLE / ALL / RELAY – Indicates the play mode.
FADER – Blinks during fade in or fade out.
SCAN – Blinks while checking playback from the CD
changer (after CHECK is pressed).
RDM – Lights in random-play mode.
RPT / RPT-1 – Lights when disc repeat / track repeat
is on.
PGM – Lights in program-play mode.
SKIP ON – Lights to indicate that a track’s skip ID is
set. SKIP blinks when clearing or setting a skip ID (ON
does not appear).
VOL – Lights when the volume level is set to something
other than 0dB.
FIX – Lights when fixed recording level is on.
DIG / ANA – Indicates whether internal recording is
via a digital or analog link.
7
5
6
7
8
9
8
9
REC THIS / Hi / COPY– Lights during CD
recording and indicates high-speed copying.
# – Lights when a disc in the changer is playing or
paused.
* – Lights when a disc in the changer is paused.
Level meter
# – Lights when the recorder is playing, paused or
recording.
* – Lights when the recorder is paused.
CD-R function indicators
CD TEXT– Lights if the current CD contains CD text.
CD / CD-R / CD-RW – Indicates the type of disc
currently loaded in the recorder.
FINALIZE – Blinks during auto-finalization recording;
lights if a finalized CD-RW disc is loaded.
MANUAL – Indicates manual track numbering.
TRACK – Blinks during recording or monitoring when
a new track will start using auto track numbering.
SYNC / SYNC-1 – Lights up when the recorder is in
automatic synchro recording.
REC – Lights when in record or record-pause mode.
Blinks during record-muting.
ANALOG / OPTICAL / COAXIAL – Lights
when the corresponding analog or digital input is selected.
4 Getting Started
TIME
MENU/
DELETE
◊ÛB¿ˆ≤≥
COMPACT DISC RECORDER / MULTI-CD
CHANGER
OPEN/CLOSE
OPEN/CLOSE
1
4
0
0
3- COMPACT DISC MULTI CHANGER
COMPACT DISC DIGITAL RECORDER
¢
CD=CD-R
MENU
/DELETE
START
REC THIS
¶
ENTER
REC VOL
POWER
— OFF _ ON
PUSH ENTER
CD TEXT
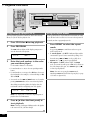
Quick CD recording
Although the PDR-W37 has many advanced recording features,
duplicating a CD is pretty much a one-touch operation. Before
starting, make sure that the recorder is connected to your amplifer
and that everything is plugged in to a power outlet.
6
Press CD =CD-R START (REC THIS).
The recorder automatically copies at double speed, so if
you're listening to the recording as it's being made it will
sound a little strange!
After the CD in the changer has finished playing, the
recorder will finalize the CD-R to make it playable on most
ordinary CD players (for more information on this process,
turn to page 7). This process takes just a few minutes after
the CD has been copied.
For detailed information on other recording features, see chapters
5, 6, 8, and 9.
1
Hi-bit Legato Link Conversion
Press the POWER button to switch
on.
Remove the disc from the recorder before switching off.
The display lights up.
Recording tracks during playback
2
Press OPEN/CLOSE 10 to eject the
3-CD changer disc tray.
Place the CD you want to copy, with the label face up, on to
the disc tray, making sure that it is seated properly in the
disc guide.
Note: Do not use an adapter with 8cm CD-singles. The
disc tray has guides for both 12cm and 8cm discs.
3
Press OPEN/CLOSE 10 to close the
disc tray.
4
Press OPEN/CLOSE 0 to eject the
CD-R disc tray.
You also have the option of choosing to record the track that’s
currently playing in the changer. Make sure there is a CD-R or CDRW in the recorder, then simply press CD= CD-R START (REC
THIS) while the track is playing, and the CD changer will jump to
the beginning of the track and the CD-R starts recording. The
recorder stops automatically at the end of the track.
Setting the headphone level
You can set the headphone level so that the output is relatively
louder or softer.
1
Press MENU/DELETE.
2
Turn the jog dial until H.P. LEVEL
appears in the display, then press to
ENTER.
Place a blank CD-R or CD-RW disc, with the label/nonrecording side face up, on to the disc tray. Again, make
certain that it is seated correctly in the disc guide.
5
The display shows the current level: H (high), or L (low).
Be careful when handling CD-R and CD-RW discs not to
leave fingerprints on the recording surface.
3
Press OPEN/CLOSE 0 to close the
disc tray.
Turn the jog dial (4 and ¢ on
the remote)to change the level.
4
Press the jog dial (ENTER) to confirm
the new level.
The recorder reads the disc to see what you've loaded. After a
few seconds it should tell you that you’ve loaded a
NEW DISC.
13
4 Getting Started
DISPLAY
/CHARA
TIME
ABC
DEF
1
2
3
GHI
JKL
MNO
4
5
6
PQRS
TUV
WXYZ
7
8
9
◊ÛB¿ˆ≤≥
COMPACT DISC RECORDER / MULTI-CD
CHANGER
MARK
10/0
>10
4
CD SELECT
OPEN/CLOSE
0
2
0
3
0
3- COMPACT DISC MULTI CHANGER
0
2
COMPACT DISC DIGITAL RECORDER
3
¢
3
OPEN/CLOSE
1
1
3-CD CONTROL
POWER
¡ ¢
41
COPY CONTROL
41
DISPLAY
¡ ¢
DISPLAY
CHARACTER
1
¡
7
DISC 1
DISC 2
— OFF _ ON
6
7
6
8
DISC 3
CD TEXT
CD-R
3-CD changer controls
Playing a CD
This section takes you through using the basic playback controls of
the CD changer and CD-R. The steps below describe playing a disc
in tray 1 of the disc changer, but the playback controls for the CD-R
and for other discs loaded into the changer work in the same way.
1
To pause playback, press 8 (6 on
the front panel). To resume playback,
press again.
6
To fast-reverse or fast-forward, press
and hold 1 or ¡ (41 or
¡¢ on the front panel).
If the recorder isn't already on, press
POWER to switch on.
Press OPEN/CLOSE 10 (front panel
only) to eject the CD changer disc
tray.
• To open the CD-R tray, press OPEN/CLOSE 0 on the
right-hand side of the unit.
Place a CD, with the label face up, on to the disc tray,
making sure that it is seated properly in the disc guide.
Note: Don’t use an adapter when playing 8cm CD-singles.
The disc tray has guides for both 12cm and 8cm discs.
3
Press OPEN/CLOSE 10 again to
close the disc tray.
4
Press DISC 1 (CD SELECT 1 on the
front panel) to start playback.
• For CD-R playback, press CD-R on the remote control
(6 on the front panel).
CD-R controls
5
Release to resume normal playback.
The display lights up.
2
7
Hi-bit Legato Link Conversion
If you reach the end of the disc while pressing ¡
(¡ ¢), the display shows DISC END and the recorder
goes into play-pause mode (you can still reverse-search).
7
To skip back or forward to another
track, press 4 or ¢ (41 or
¡¢ on the front panel).
Pressing ¢ (¡ ¢) once skips to the start of the
next track on the disc. Further presses take you to
subsequent tracks.
Pressing 4 (4 1) once takes you to the beginning
of the current track. Further presses skip to the start of
previous tracks.
You can use the track skip buttons while the disc is paused
or stopped, too. The track number changes while the disc
remains paused/stopped.
8
• If the disc contains CD text, the CD TEXT indicator lights
up and the entire disc title automatically scrolls across the
display. The first 12 characters of the disc title will remain in
the display. You can switch information displays by pressing
DISPLAY (DISPLAY/CHARA when using the CD-R). See
page 23 for more on CD text.
To skip directly to another track, press
the corresponding number button.
• For track numbers 1 to 10, use the corresponding number.
• For track numbers over 10, press the >10 button, then enter
the track number. For example, to select track 20 press >10,
2, then 10/0.
9
To stop playback, press 7.
If the disc was paused, then the pause mode is canceled.
14
4 Getting Started
TIME
MENU/
DELETE
◊ÛB¿ˆ≤≥
COMPACT DISC RECORDER / MULTI-CD
CHANGER
CD SELECT
OPEN/CLOSE
1
PLAY
MODE
1
0
2
0
3
0
3- COMPACT DISC MULTI CHANGER
2
COMPACT DISC DIGITAL RECORDER
3
MENU
/DELETE
PLAY MODE
6
CD TEXT
DISC 1
DISC 2
Hi-bit Legato Link Conversion
DISC 3
Playback modes
Starting playback with a timer
The different play modes let you play either a single disc, or up to
four discs one after another for an uninterrupted playing time of up
to five hours.
You can use this unit with a standard audio timer to start playback
at a set time. Simply load a disc (or discs) and set the timer. When
power is restored to this unit by the timer, playback will start
automatically in the default ALL mode. Playback starts with the CD
selected (shown in the display) when the unit was last turned off.
1
2
Load a disc into disc tray 1 of the
changer.
Press OPEN/CLOSE 2 0.
Disc tray 1 closes and 2 opens. Load a disc into tray 2 of the
changer, then close the disc tray.
3
Load discs into tray 3 and the CD-R
(if you want to).
Load them in the same way as described above.
4
Press PLAY MODE to select the disc
playback mode.
Press repeatedly to switch between the three play modes:
5
• Before setting the timer, make sure that all discs loaded
into the changer have been read by the unit (wait for the
TOC READ message to disappear).
Using the menu features
Several features of the CD recorder can be accessed by using the
MENU/DELETE key. This menu is like a selection of preferences
that will stay in memory even if the system is turned off (see note
below). The jog dial cycles you through the features listed below
(refer to the page numbers listed to set your preferences in the
menu).
• Headphone level (p.13)
• Fader length (p.26)
• ALL – all discs loaded in the changer play one after the
other (default mode)
• Automatic track numbering (p.26)
• SINGLE – a single disc from the changer plays, then stops
• Time increment recording (p.28)
• RELAY – all discs in the changer, followed by the disc in the
CD-R tray, play one after the other
• Recording balance (p.29)
Press DISC 1 (CD SELECT 1 on the
front panel) to start playback.
• Silence threshold for auto track numbering (p.27)
Note: The time increment will default to OFF when: recording is
stopped; auto track numbering is turned off; power is switched off.
If you're in SINGLE mode, press the DISC (CD SELECT)
button for the disc you want to play.
In ALL or RELAY modes, you can start playback from a disc
other than 1. However, playback will still stop after disc 3
(ALL mode) or the disc in the CD-R tray (RELAY mode).
• You can also start playback using the 6 button on the
3-CD changer side. Playback will start from whichever
CD SELECT button is lit.
15
4 Getting Started
TIME
DISPLAY
/CHARA
SCROLL
COMPACT DISC RECORDER / MULTI-CD
CHANGER
◊ÛB¿ˆ≤≥
3- COMPACT DISC MULTI CHANGER
4
COMPACT DISC DIGITAL RECORDER
¢
41
¡ ¢
DISPLAY
CD TEXT
Switching the display
(CD changer side)
The recorder can display various kinds of disc and track information while stopped, and in both playback and copying modes. If the
CD contains text information, this can be displayed during
playback, and while the CD is stopped. The information applies
only to the currently playing disc. The DISPLAY button switches
between the different display modes.
When a disc with text is loaded into the recorder, the entire disc title
automatically scrolls across the display. The first 12 characters of
the disc title remain.
Pressing SCROLL once takes you past the last (12th) character
shown on the display. Press SCROLL at any time to see the full title
scroll across the display.
By continuing to press DISPLAY, you can cycle through the
displays for CD-3, returning then to CD-1.
After you have pressed DISPLAY, you can press 4 and
¢ (4 1 or ¡¢ on the CD changer front
panel) to see track and time information for the disc
selected (up to a maximum of 30 tracks). See below for
more information on track and time displays.
During playback or play-pause, press
DISPLAY to switch the display mode.
There are five different displays. Press DISPLAY repeatedly
to switch between them:
• Track number / time elapsed
TRK
When all discs are stopped, press
DISPLAY to switch the display mode.
Press DISPLAY repeatedly to show disc name, artist name,
and the total playing time of each disc loaded in turn. If the
CD contains no text information, only the display for
number of tracks and total disc time is shown for each disc.
CD1
O1
TRACK
TRK
O3
MIN
SEC
CD TEXT
It's a Bust
• Track number / time remaining
TRK
CD1
MIN
O1:1O
• Track name
CD1
• Number of tracks / total disc time (CD-1)
Hi-bit Legato Link Conversion
O1
REMAIN MIN
SEC
O2:54
SEC
39:13
• Disc time remaining
TRK
• Disc name (CD-1)
CD1
AL
REMAIN MIN
SEC
44:52
CD TEXT
DISC
NEW MUSIC
• Number of tracks / total disc time
• Artist name (CD-1)
TRK
CD1
O6
REMAIN MIN
SEC
46:O2
CD TEXT
ARTST
JAZZ:Pfeuti
• Number of tracks / total disc time (CD-2)
• Disc name (CD-2)
• Artist name (CD-2)
16
Note: If the CD contains no text information, only the
time displays are shown.
4 Getting Started
TIME
DISPLAY
/CHARA
COMPACT DISC RECORDER / MULTI-CD
CHANGER
◊ÛB¿ˆ≤≥
3- COMPACT DISC MULTI CHANGER
4
COMPACT DISC DIGITAL RECORDER
¢
41
¡ ¢
DISPLAY
CHARACTER
CD TEXT
(CD-R side)
When the CD-R is stopped, press
DISPLAY to switch the display mode.
There are four different displays. Press DISPLAY repeatedly
to switch between them:
• Number of tracks / total disc time
TOTAL
CD-R
TRK
REMAIN MIN
O3
Hi-bit Legato Link Conversion
During playback or play-pause, press
DISPLAY to switch the display mode.
There are five different displays. Press DISPLAY repeatedly
to switch between them:
• Track name
TRACK
CD TEXT
It's a Bust
SEC
39:13
• Track number / time elapsed
• Disc name (CD-1)
TRK
CD-R
MIN
O1
SEC
O1:1O
CD TEXT
DISC
NEW MUSIC
• Track number / time remaining
• Artist name (CD-1)
TRK
CD-R
REMAIN MIN
O1
SEC
O2:54
CD TEXT
ARTST
JAZZ:Pfeuti
• Disc time remaining
• Recording time left on CD-R/CD-RW disc
TRK
CD-R
AL
REMAIN
MIN
TRK
CD-R
AL
REMAIN
MIN
SEC
44:52
SEC
35:14
• Number of tracks / total disc time
TOTAL
After you have pressed DISPLAY, you can press 4 and
¢ (4 1 or ¡ ¢ on the CD-R front panel) to
see track and time information for the disc (see below for
more information on track and time displays).
CD-R
TRK
O8
MIN
SEC
47:O2
Note: If the CD contains no text information, only the
time displays are shown.
Note: If the CD contains no text information, only the
time displays are shown.
17
4 Getting Started
TIME
DISPLAY
/CHARA
COMPACT DISC RECORDER / MULTI-CD
CHANGER
◊ÛB¿ˆ≤≥
3- COMPACT DISC MULTI CHANGER
COMPACT DISC DIGITAL RECORDER
DISPLAY
DISPLAY
CHARACTER
CD TEXT
During recording from the CD
changer, press DISPLAY to switch the
display mode.
There are five different displays. Press DISPLAY (same for
both CD changer and CD-R sides) repeatedly to switch
between them:
Hi-bit Legato Link Conversion
During recording, press DISPLAY to
switch the display mode.
There are three different displays. Press DISPLAY repeatedly
to switch between them:
• Elapsed recording time
• Track number / elapsed track recording time
DISC
TRK
TRK
MIN
1–O1–O1
SEC
O1:1O
• Recording time left on CD-R/CD-RW disc
REMAIN MIN
• Track number / remaining track recording time
CD-R
AL
SEC
73:19
• Total elapsed recording time
• Disc time remaining
TRK
CD-R
AL
REMAIN
MIN
SEC
44:52
• Recording time left on CD-R/CD-RW disc
REMAIN MIN
CD-R
AL
SEC
73:19
• Total elapsed recording time
Note: Although compatible with 80 minute discs, the
remaining recording time display will show 79:57 for blank
80 minute discs.
18
Note: Although compatible with 80 minute discs, the
remaining recording time display will show 79:57 for blank
80 minute discs.
5 Recording Features
TIME
COMPACT DISC RECORDER / MULTI-CD
CHANGER
◊ÛB¿ˆ≤≥
CD SELECT
OPEN/CLOSE
OPEN/CLOSE
1
1
2
0
3- COMPACT DISC MULTI CHANGER
0
0
COMPACT DISC DIGITAL RECORDER
2
3
CD=CD-R
3
0
START
REC MODE
FINALISE
REC THIS
7
DISC 1
DISC 2
7
7
DISC 3
CD TEXT
Introduction
Recording CDs from the disc changer has several advantages over
recording from an external CD player.
3
Hi-bit Legato Link Conversion
Press REC MODE.
The display shows DISC REC.
If you want to switch the copying speed, do so here. The
default is 2x speed. See Changing the recording speed on
page 28 to change it.
• Double speed recording lets you record a disc in half the
regular time.
• Automatic spacing when individual tracks are recorded.
• Automatic SCMS copying makes sure that, whenever
possible, you'll get a digital copy. In the event of a disc
preventing digital copying with SCMS, the link beween the
changer and the CD-R automatically switches to analog.
4
The FINALIZE indicator blinks.
Remember: Finalizing a CD-R fixes the tracks on the
disc—you can't record anything else on to the disc, but it
does become playable on most ordinary CD players.
Recording a CD
If you want to duplicate a CD exactly as it is, the easiest way is to
follow the steps in Quick CD recording on page 13. The instructions here give you a little more control over the recording you
make.
1
5
Load a CD-R or CD-RW into the
CD-R tray.
If the disc isn't blank, make sure that there is enough space
on the disc for what you want to record (see Switching the
Display on pages 16–18 to check this).
Press the DISC (CD SELECT on the
front panel) button for the disc you
want to record.
If you want to adjust the recording level, do so here. The
default is 0dB. See Setting the recording level on page 28 to
adjust it.
Load the CD you want to copy in to
the CD changer.
You can use any of the three disc trays in the changer.
2
If you want the disc finalized after
recording, press FINALIZE.
6
Press CD =CD-R START (front panel
only).
The recorder starts copying the disc. If FINALIZE is on, the
recorder will finalize the disc after copying it.
• If the button is blinking, there’s not enough space on the
disc for what you want to record. Press again to start
recording anyway, or press 7 to cancel.
19
5 Recording Features
TIME
COMPACT DISC RECORDER / MULTI-CD
CHANGER
◊ÛB¿ˆ≤≥
CD SELECT
OPEN/CLOSE
OPEN/CLOSE
1
1
2
4
¢
0
3- COMPACT DISC MULTI CHANGER
0
0
2
COMPACT DISC DIGITAL RECORDER
3
CD=CD-R
3
0
START
REC MODE
REC THIS
41
¡ ¢
7
DISC 1
DISC 2
7
7
DISC 3
CD TEXT
Recording individual tracks
Here's how to copy individual tracks from any disc in the changer:
1
5
Load the CD(s) you want to copy
tracks from in to the CD changer.
3
Press REC MODE twice.
The display shows TRACK REC.
If you want to switch the copying speed, do so here. The
default is 2x speed. See Changing the recording speed on
page 28 to change it.
4
Press the CD SELECT button for the
disc you want to record.
On the remote, use the three DISC buttons.
20
If you want to adjust the digital recording level, do so here.
The default is 0dB. See Setting the recording level on page
28 to adjust it.
Load a CD-R or CD-RW into the
CD-R tray.
If the disc isn't blank, make sure that there is enough space
on the disc for what you want to record (see Switching the
Display on page 16–18 to check this).
Use 41 and ¡ ¢ (CD
changer side) to select the track you
want to record.
On the remote, use the number buttons (or 4 and
¢).
You can use any of the three disc trays in the changer.
2
Hi-bit Legato Link Conversion
6
Press CD= CD-R START (front panel
only).
The recorder starts copying the track and stops automatically when it's finished.
• If the button is blinking, there’s not enough space on the
disc for what you want to record. Press again to start
recording anyway, or press 7 to cancel.
• If you want to now finalize the disc, turn to page 30.
5 Recording Features
TIME
COMPACT DISC RECORDER / MULTI-CD
CHANGER
◊ÛB¿ˆ≤≥
CD SELECT
OPEN/CLOSE
1
4
¢
2
OPEN/CLOSE
1
0
3- COMPACT DISC MULTI CHANGER
0
0
COMPACT DISC DIGITAL RECORDER
2
3
CD=CD-R
3
0
START
REC MODE
REC THIS
¡ ¢
41
7
DISC 1
DISC 2
8
6
7
7
DISC 3
CD TEXT
Recording from anywhere on the disc
Here's how to record starting from any point on the disc:
1
6
DISC REC – This will record the rest of the disc (or the
rest of a playlist when using programmed play), starting
from the point where you have paused the track.
TRACK REC – This will record the rest of the track,
starting from the point where you paused.
Load a CD-R or CD-RW into the
CD-R tray.
If you want to switch the copying speed, do so here. The
default is 2x speed. See Changing the recording speed on
page 28 to change it.
If the disc isn't blank, make sure that there is enough space
on the disc for what you want to record (see Switching the
Display on page 16–18 to check this).
3
4
Use 4 1 and ¡¢ (CD
changer side) to select the track you
want to start from.
On the remote, use the number buttons to choose the track
directly (or use 4 and ¢).
5
If you want to adjust the digital recording level, do so here
as well. The default is 0dB. See Setting the recording level
on page 28 to adjust it.
Press the CD SELECT button for the
disc you want to record.
On the remote, use the three DISC buttons. The disc will
begin playback from the first track.
Press REC MODE to switch between
recording options.
There are two recording options:
Load the CD(s) you want to record
tracks from in to the CD changer.
You can use any of the three disc trays in the changer.
2
Hi-bit Legato Link Conversion
7
Press CD =CD-R START (front panel
only).
The recorder starts recording the section of the disc, and
stops automatically when it's finished.
• If the button is blinking, there’s not enough space on the
disc for what you want to record. Press again to start
recording anyway, or press 7 to cancel.
• If you want to now finalize the disc, turn to page 30.
Press 6 (8 on the remote) at the
point at which you want to start
recording.
21
5 Recording Features
TIME
ABC
DEF
1
2
3
GHI
JKL
MNO
4
5
6
PQRS
TUV
WXYZ
7
8
9
MARK
COMPACT DISC RECORDER / MULTI-CD
CHANGER
1
10/0
0
>10
4
¢
◊ÛB¿ˆ≤≥
OPEN/CLOSE
OPEN/CLOSE
2
0
3- COMPACT DISC MULTI CHANGER
COMPACT DISC DIGITAL RECORDER
0
CD=CD-R
3
0
START
REC MODE
AUTO SPACE
REC THIS
REC
THIS
DISC 1
7
DISC 2
7
7
DISC 3
CD TEXT
Hi-bit Legato Link Conversion
PROGRAM
Recording a programmed selection
You can automate the process of making a mix CD by using the
programming function of the disc changer.
1
Load a CD-R or CD-RW into the
CD-R tray.
If the disc isn't blank, make sure that there is enough space
on the disc for what you want to record (see Switching the
Display on pages 16–18 to check this).
3
Program a playlist of tracks you want
to record.
For detailed instructions on programming a playlist see
Programming a playlist (3-CD changer) on page 35.
4
Press REC MODE.
The display shows PROGRAM REC.
If you want to switch the copying speed, do so here. The
default is 2x speed. See Changing the recording speed on
page 28 to change it.
If you want to adjust the digital recording level, do so here.
The default is 0dB. See Setting the recording level on page
28 to adjust it.
22
If you want to automatically space
the tracks on the recording, press
AUTO SPACE.
Switching on automatic spacing makes sure that there's
four seconds of silence between each recorded track.
Load the CD(s) you want to program
tracks from in to the CD changer.
You can use any of the three disc trays in the changer.
2
5
6
Press CD= CD-R START (REC THIS).
Recording stops automatically after the playlist has finished.
• If the button is blinking, there’s not enough space on the
disc for what you want to record. Press again to start
recording anyway, or press 7 to cancel.
If the playlist is longer than the recording time available on
the CD-R/CD-RW, recording stops when the end of the disc is
reached.
• If you want to now finalize the disc, turn to page 30.
5 Recording Features
TIME
DISPLAY
/CHARA
ABC
DEF
1
2
3
GHI
JKL
MNO
4
5
6
PQRS
TUV
WXYZ
7
8
9
MARK
COMPACT DISC RECORDER / MULTI-CD
CHANGER
◊ÛB¿ˆ≤≥
3- COMPACT DISC MULTI CHANGER
NAME
COMPACT DISC DIGITAL RECORDER
10/0
NAME
¶
REC VOL
DISPLAY
ENTER
CHARACTER
7
7
PUSH ENTER
CD TEXT
Using CD text
You can name a CD-R or CD-RW so that when you load the disc
into the player, the disc name, track title, or artist name can appear
in the display. Each title can be up to 120 characters long,
including spaces. You can store all the text (up to 2000 characters)
for up to three non-finalized discs in the recorder at one time. This
is useful when you want to edit the text during another recording
session with the same disc.
If the disc is already named, the character display shows the
name (or the first 12 characters if it is too long to be
displayed completely), with a blinking cursor under the first
character.
4
Be careful: When you set text for a fourth disc, the oldest text
information (for the first disc) is deleted from memory.
Once you finalize a CD-R, you can’t change the text information.
With CD-RW discs, text is deleted when you erase the corresponding
track.
You can input characters using the front panel, remote control, or a
connected IBM-compatible PC keyboard (see page 9).
1
2
Hi-bit Legato Link Conversion
Select/change the character at the
current cursor position by turning
the jog dial.
See below for the complete list of letters, numbers, and
symbols available.
If you’re using the remote control, use numbers keys 1-9 for
numbers and the letters shown above each key. Press a key
repeatedly to cycle through the letters and numbers on that
ABC
D EF
key.
Make sure the disc you want to name
is loaded into the recorder and is
stopped.
1
2
3
GHI
JK L
MNO
4
5
6
PQ R S
TUV
WXYZ
7
8
MARK
10/0
9
TEXT
>10
0!"#$%&’()*+,-./<=>
?@[]ˆ_'{|}<space>
For track names: Before proceeding to step 2, you must
choose the track you want to name by turning the jog dial.
You can also name tracks during playback.
Characters available for disc and track names:
Press NAME.
ABCDEFGHIJKLMNOPQRST
UVWXYZ
Press NAME to switch between disc and artist name:
DISC NAME
abcdefghijklmnopqrstuvwxyz
ARTIST NAME
1234567890
!"#$%&’()*+,-./<=> ?@[]ˆ_'{|}<space>
If you are naming a track, go to step 3.
The default is disc title. Press 7 at any time to exit.
3
5
Wait two seconds after making your
selection, or press ENTER.
Change between upper case, lowercase, and numbers/symbols by
pressing DISPLAY/CHARA.
If the disc doesn't already have a name, the character
display is blank, with a blinking cursor on the first
character.
The character at the current cursor position changes
between uppercase, lowercase, and numbers/symbols with
each press.
23
5 Recording Features
DISPLAY
/CHARA
TIME
ABC
MENU/
DELETE
DEF
1
2
3
GHI
JKL
MNO
4
5
6
PQRS
TUV
WXYZ
7
8
9
COMPACT DISC RECORDER / MULTI-CD
CHANGER
◊ÛB¿ˆ≤≥
OPEN/CLOSE
MARK
0
3- COMPACT DISC MULTI CHANGER
COMPACT DISC DIGITAL RECORDER
NAME
10/0
4
¢
NAME
MENU/
DELETE
¡ ¢
DISPLAY
¶
41
1
ENTER
7
7
PUSH ENTER
CD TEXT
6
Confirm the character and move the
cursor to the next character position
by pressing the jog dial (or ¡).
For the remote, move the cursor to the next character
position by pressing ENTER.
• Move the cursor backwards or forwards along the display
using 1 and ¡.
The CD recorder can store information for up to three discs at one
time. When an unfinalized CD-R containing CD text is loaded, this
text will automatically return to memory. Before finalizing the CDR, you can go back and edit the text as many times as you like, or
until you input CD text for a fourth disc (this will erase the oldest
information in memory).
• Insert a new character into a name by moving the cursor
to the character position you want and repeating steps 4–
6.
1
Load the CD-R or CD-RW you wish to
edit.
• Erase the character at the current cursor position by
pressing MENU/DELETE.
2
Press NAME.
Choose the name you wish to edit as in steps 1–3 of Using
CD text.
3
Press NAME again to enter the text
and return to the title selection
display.
If you are inputting a track title, you must assign it to a
track number using 4 or ¢, or the corresponding
number on the remote control. Pressing NAME twice takes
you back to the previous menu (step 2).
Note: After you have finished setting the names you want in CD
text, be sure to eject the disc or, if you have finished all the
recording and editing that you want do to, finalize the disc as
shown on page 30.
24
Hi-bit Legato Link Conversion
Editing CD text
The characters on either side of the current cursor position
close to fill up the gap.
7
REC VOL
CHARACTER
¡
Edit the text.
See step 6 of Using CD text.
4
Eject or finalize the disc.
See Finalizing a disc on page 30 if you have finished all
the recording and editing that you want do to.
5 Recording Features
TIME
NAME CLIP
COMPACT DISC RECORDER / MULTI-CD
CHANGER
NAME
4
◊ÛB¿ˆ≤≥
3- COMPACT DISC MULTI CHANGER
COMPACT DISC DIGITAL RECORDER
¢
CURSOR
NAME
¶
1
ENTER
¡
41
REC VOL
¡ ¢
PUSH ENTER
CD TEXT
Copying track names to other tracks
If you need to name several tracks with similar names—several
parts of one suite, for example—you can name the first one using
the procedure detailed above, then simply copy that name to the
other tracks and edit them as required. This can save you a lot of
time over naming each track individually. The recorder stores the
last three names you've copied using the name clip function in its
memory (up to 40 characters each). When you copy another track
name, the oldest one is deleted from memory.
1
Go to the track with the name you
want to copy.
7
Hi-bit Legato Link Conversion
Use the jog dial to select one of the
previous three names stored, then
press the jog dial (ENTER).
On the remote, use the 4 and ¢ buttons to select a
name, then press ENTER.
The display flashes Name Insert briefly and the selected
name is inserted at the point you chose.
• Edit the name further if necessary.
8
Press NAME to leave the track name
mode.
Use one of the usual methods—track skip, direct selection,
etc.
2
Press NAME CLIP to copy the currently displayed into memory.
The display should confirm that the track name has been
copied.
If the message (c) Copyright appears in the display, the
name is copyright protected (as in the case of playback only
discs) and it can’t be copied.
3
Go to the track that you want to
copy the name to.
4
Press NAME to start editing the
current track name.
5
Move the cursor to the position you
want to insert the copied name.
Use the 1 and ¡ buttons to move the cursor around
the character display.
6
Press NAME CLIP again.
The most recently clipped name appears.
25
5 Recording Features
TIME
MENU/
DELETE
FADER
COMPACT DISC RECORDER / MULTI-CD
CHANGER
◊ÛB¿ˆ≤≥
3- COMPACT DISC MULTI CHANGER
4
COMPACT DISC DIGITAL RECORDER
¢
MENU/
DELETE
¶
ENTER
7
REC VOL
7
PUSH ENTER
CD TEXT
Recording fade ins and fade outs
Sometimes, for example if you're recording just an excerpt from
something, it may be better to fade in the recording, then fade out
again at the end, rather than start and end abruptly. You can also
set longer or shorter fade times so that they match the fades on
other songs in your mix. Note that you can’t record a fade in when
in synchro recording mode (although you can record a fade out).
Recording a fade out
•
Press MENU/DELETE.
2
Turn the jog dial (4 and ¢ on
the remote) until FADER TIME appears in the display, then press to
ENTER.
3
4
• You can also just press 7 if you don’t need a fade out.
If you record a fade out during all-track sync mode, the
synchro mode is canceled after the fade out (see pages 38–
41 for more on synchro recording).
Automatically numbering tracks
Use the jog dial (4 and ¢ on the
remote) to set the length of the fade
(in seconds).
You can record from any source, letting the recorder number the
tracks automatically. From a digital source (CD, MD, DAT, or DCC),
the recorder will start new tracks as they change on the source
material. When recording other sources, the recorder will start a
new track if it detects more than 2 seconds of silence before the next
sound on the source. You can adjust the level that the recorder
regards as “silence” (see Setting the silence threshold below).
Each turn will take you forward (or back) one second. The
default is 5 seconds.
1
Press MENU/DELETE.
2
Turn the jog dial (4 and ¢ on the
remote) until AUTO TRACK appears
in the display, then press to ENTER.
Press the jog dial (ENTER) to confirm
the new fade length.
Recording a fade in
•
Press FADER during recording to fade
out.
After recording the fade out, the recorder goes into recordpause mode. This happens in either normal or synchro
record mode.
Setting the fade length
1
Hi-bit Legato Link Conversion
With the source playing, press FADER
during record-pause mode to fade in.
Recording starts with a gradual fade
in.
The display shows either ON or OFF. ON is the default.
3
4
Turn the jog dial (4 and ¢ on the
remote)to switch AUTO TRACK ON
or OFF.
Press the jog dial to ENTER.
To check that tracks will start at the correct points on the
recording, see Monitoring a source for recording on page
38.
26
5 Recording Features
TIME
MENU/
DELETE
COMPACT DISC RECORDER / MULTI-CD
CHANGER
3- COMPACT DISC MULTI CHANGER
4
◊ÛB¿ˆ≤≥
COMPACT DISC DIGITAL RECORDER
¢
MENU/
DELETE
¶
41
ENTER
REC VOL
¡ ¢
PUSH ENTER
CD TEXT
Hi-bit Legato Link Conversion
Setting the silence threshold
Manually numbering tracks
If you're recording from CD, MD, DCC or DAT, you can usually let
the recorder number the tracks automatically as they change on
the source material. When recording other digital or analog
sources, the recorder will start a new track if it detects more than 2
seconds of silence before the next sound on the source. However if
you’re recording a noisy vinyl record or a classical recording with
long quiet sections, the recorder may not always recognize the gap
between tracks. For this reason you can adjust the level of sound
that the recorder regards as “silence”.
Although automatic track numbering is the default mode of the
recorder, you can number tracks manually as recording is taking
place. In some cases—such as recording from digital satellite or
Laserdisc, or from an analog source—auto track numbering may
not work reliably (in these cases, a new track is started after the
recorder detects 2 seconds of silence before the next sound on the
source), and it's better to use manual track numbering.
Each input (analog, coaxial, and optical) has its own threshold
level, which can be set independently.
Remember: It is not possible to edit track numbers after
recording.
Note: The maximum analog threshold level is -66dB.
1
Make sure automatic track numbering is switched OFF.
1
Press MENU/DELETE.
See Automatically numbering tracks on page 26 to switch
it off.
2
Turn the jog dial (4 and ¢ on
the remote) until A.LVL. appears in
the display, then press to ENTER.
2
You can use manual numbering in any record mode, but it
is best suited to manual digital-input or analog-input
recording (see page 41 for more on these recording modes).
The display shows the current “silence” threshold for
automatic track numbering. The default is -54dB.
3
3
Turn the jog dial (4 and ¢ on
the remote)to change the threshold
level.
-78dB to -66dB – Use these levels if you find the
recorder is putting in new track numbers during very quiet
sections of classical music, for example.
Start recording.
Press ¡¢ on the CD-R side(¢
on the remote) at any point you want
a new track to start.
CD tracks must be at least four seconds long—the recorder
won't let you start a new track less than four seconds into
the current track.
-60dB to -48dB – A ‘mid’ level suitable for most
recordings.
-42dB to -24dB – If the recorder is not putting in new
track numbers because the original source is too noisy.
4
Press the jog dial (ENTER) to confirm
the new level.
27
5 Recording Features
TIME
MENU/
DELETE
◊ÛB¿ˆ≤≥
COMPACT DISC RECORDER / MULTI-CD
CHANGER
4
¢
3- COMPACT DISC MULTI CHANGER
COMPACT DISC DIGITAL RECORDER
MENU/
DELETE
REC MODE
ENTER
¶
41
REC VOL
¡ ¢
PUSH ENTER
CD TEXT
Hi-bit Legato Link Conversion
Starting tracks in time increments
Changing the recording speed
If you aren't able to set track numbers automatically during
recording (a radio program with interviews, for example), you
might want to have the recorder start tracks after every three
minutes or so. This will make it easier to listen back to sections of
the recording at a later date. You can set the time increment to
either one, three, or five minutes.
The recorder defaults to double (x2) speed, but if you want to
listen to the CD as it's recorded, single (x1) speed is better. This
feature is only available when recording from the CD changer.
1
Note: The time increment will default to OFF when: recording is
stopped; auto track numbering is turned off; power is switched off.
pages 19–22 for step-by-step recording instructions.
2
1
Press MENU/DELETE.
2
Turn the jog dial (4 and ¢ on
the remote) until T. INC. appears in
the display, then press to ENTER.
The display shows the current time increment: one, three,
five minutes, or OFF. The default is OFF.
3
Turn the jog dial (4 and ¢ on
the remote) to change the time
increment.
4
Press the jog dial to ENTER.
Prepare for recording
REC MODE must be pressed before going to step 2. See
Press 41 or ¡¢ (CD-R side)
to switch the copying speed.
The Hi indicator shows the selected speed (x1 or x2).
Note: When copying at double speed, you can only monitor
the recording through the analog outputs, or through a pair of
headphones. No signal is output from the digital outputs.
Setting the recording level
When recording commercially produced CDs, the recording
level has already been optimized and you don't need to change
it. Boosting the level will generally result in distortion where
there are peaks in the music. If you're recording a noncommercially produced CD that has been consistently underrecorded, you may need to boost the level.
If you're putting together a mix CD of tracks from different discs
you might find that some tracks sound louder than others
because average volumes vary. To even this out you may want
to reduce the recording level of some tracks.
This feature is only available when recording from the CD
changer.
Note: If you are recording DTS encoded audio CDs or HDCD
format CDs, the digital recording level must be set to 0dB for
recording.
28
5 Recording Features
TIME
MENU/
DELETE
◊ÛB¿ˆ≤≥
COMPACT DISC RECORDER / MULTI-CD
CHANGER
3- COMPACT DISC MULTI CHANGER
COMPACT DISC DIGITAL RECORDER
MENU/
DELETE
REC MODE
1
ENTER
¶
¡
REC VOL
PUSH ENTER
CD TEXT
Hi-bit Legato Link Conversion
CHECK
1
Prepare for recording
REC MODE must be pressed before going to step 2. See
pages 19–22 for step-by-step recording instructions.
2
Press CHECK to start the CD playing.
The track/disc to be recorded starts playing and the SCAN
indicator starts blinking.
Setting the balance
You can increase the relative volume of the right or left channel for
both recording and playback. However, It is generally not necessary
to change the balance of a commercially recorded source.
1
Make sure the recorder is stopped,
then press REC MODE.
The recorder goes into record-pause.
3
Press the REC VOL. knob to adjust
the current recording level.
You see the current setting. If the FIX indicator lights, it
means the fixed setting is on, and you cannot change the
level. Press the REC VOL. knob again to turn it off.
Use the level meter to gauge the best recording level (the
loudest sounds in the source should reach no higher than
the 0dB mark on the meter; the red segments in the level
meter should not light at all.
2
Press MENU/DELETE.
3
Turn the jog dial until BALANCE
appears in the display, then press to
ENTER.
4
Adjust the balance using the jog dial
(1 and ¡).
You can adjust the balance from 0dB (default) to around
-5dB in either direction.
To fix the recording level at your setting, press the REC
VOL. knob again (the FIX indicator lights).To reset the
recording level to zero, hold down the REC VOL. knob for
three seconds.
4
When you’re satisfied with the
recording level, press CHECK again.
• Pressing the jog dial (ENTER) and holding for 3 seconds
resets to center position.
5
Press the jog dial (ENTER) to confirm
the balance.
29
6 Finalizing and Erasing
COMPACT DISC RECORDER / MULTI-CD
CHANGER
◊ÛB¿ˆ≤≥
OPEN/CLOSE
0
3- COMPACT DISC MULTI CHANGER
COMPACT DISC DIGITAL RECORDER
FINALISE
6
CD TEXT
Finalizing a disc
Before you can play a CD-R on an ordinary CD player, the disc must
go through a process called finalization. Once finalized, a CD-R
disc is no longer recordable. Finalization is not reversible for CD-Rs
so be absolutely sure that everything on the disc is the way you
want it before you start.
CD-RW discs can also be finalized, although you can still erase the
disc afterward and reuse it, so it's not anything like as final as it is
with a CD-R disc. A finalized CD-RW disc can only be played on a
CD player that is compatible with CD-RW discs (at present, there
are very few of these).
Caution!
Finalization takes a few minutes. During this time never switch off
the power to the unit— the disc may be damaged as a result.
1
Load the CD–R or CD–RW you want
to finalize.
• Check that the disc is free from dust, dirt and scratches—if
necessary, clean the disc following the guidelines on page 43.
2
Press FINALIZE.
The recorder goes into record-pause mode, then the display
changes to:
MIN
TOC
SEC
O1:56
REC
• Press 7 (CD-R side) here to cancel finalization.
30
3
7
Hi-bit Legato Link Conversion
Press 6 (CD-R side) to start finalization.
Finalization takes about 2 minutes; you'll see how long
there is still to go in the display.
After finalization is complete:
If a CD-R is loaded, the CD-R indicator changes to CD.
If a CD-RW is loaded, the finalize indicator lights in the
display.
• None of the controls on the player or the remote have any
effect during finalization. If, however, the recorder hasn't
managed to finalize the disc within 10 minutes, you can
abort the operation by pressing 7. If you do this, the disc
won't be playable on an ordinary CD player.
6 Finalizing and Erasing
COMPACT DISC RECORDER / MULTI-CD
CHANGER
◊ÛB¿ˆ≤≥
3- COMPACT DISC MULTI CHANGER
COMPACT DISC DIGITAL RECORDER
ERASE
¶
REC VOL
¡ ¢
41
6
7
PUSH ENTER
CD TEXT
Erasing a CD–RW disc
Although more expensive than CD-R discs, the great advantage of
CD-RW is that the discs can be erased and reused. Various erase
options are available depending on whether or not the disc has
been finalized.
Hi-bit Legato Link Conversion
When a non-finalized disc is loaded:
1
Press ERASE.
2
Use the jog dial (or press 41 or
¡ ¢) to change the erase option.
A third, special option, erases (re-initializes) the whole disc. This
process takes quite a long time to complete and should be used for
recovering damaged discs, not for erasing tracks from a healthy
disc.
Switch between:
• Erase just the last track
ERASE
Caution!
Never switch off the power during CD-RW erasing— the disc may
be damaged as a result.
LAST
?
CD-RW
ALL
?
CD-RW
• Erase all tracks
ERASE
If the message CHECK DISC appears any time during any erase
process, hit eject, take out the disc, clean it, then try the erase
command again.
• Erase multiple tracks (erase from track ... to track ... )
Be sure to remove the disc from the recorder before switching off
the power, otherwise the erase operation will not be completed.
ERASE
O2–1O ?
CD-RW
Keep pressing 4 1 (or ¡¢) to change the
‘erase from’ track— the ‘erase to’ track is always the last
track.
• Press 7 or ERASE again to cancel erase here.
3
Press 6 (CD-R side).
4
Eject or finalize the disc.
You must eject, then re-insert the disc if you want to record
any new tracks. See Finalizing a disc on page 30 if you
have finished all the recording and editing that you want do
to.
31
6 Finalizing and Erasing
COMPACT DISC RECORDER / MULTI-CD
CHANGER
◊ÛB¿ˆ≤≥
3- COMPACT DISC MULTI CHANGER
COMPACT DISC DIGITAL RECORDER
ERASE
¶
41
REC VOL
¡ ¢
6
7
PUSH ENTER
CD TEXT
Hi-bit Legato Link Conversion
Re-initializing a disc
When a finalized disc is loaded:
1
1
Press ERASE.
Press and hold ERASE for about four
seconds.
The display indicates initialize mode.
2
Use the jog dial (or press 41 or
¡¢) to change the erase option.
INITIALIZE
Switch between:
• Erase the TOC (‘de-finalize’ the disc so that further
recording is possible)
ERASE
TOC
?
2
ERASE
• You can halt this erase process by holding down the 7
button for 10 seconds. Make sure, however, that you erase
the disc completely at a later date since you can’t use a
partially erased disc.
3
ALL
?
• Press 7 to cancel erase here.
3
Press 6 (CD-R side).
The display shows the time remaining to completion.
• You can halt this erase process by holding down the 7
button for 10 seconds. Make sure, however, that you erase
the disc completely at a later date since you can’t use a
partially erased disc.
4
Eject the disc.
You must eject, then re-insert the disc if you want to record
any new tracks.
32
Press 6 (CD-R side).
The process takes about half the length of the disc. The
display shows the time left to completion.
Be careful: When you erase the TOC, the CD text
information for the disc is also copied to memory for editing
purposes, erasing the oldest text information stored (as
explained on page 30).
CD-RW
FINALIZE
CD–RW
• Press 7 to cancel initialize here.
CD-RW
FINALIZE
• Erase all tracks
?
Eject the disc.
You must eject, then re-insert the disc if you want to record
any new tracks.
6 Finalizing and Erasing
TIME
COMPACT DISC RECORDER / MULTI-CD
CHANGER
◊ÛB¿ˆ≤≥
OPEN/CLOSE
3- COMPACT DISC MULTI CHANGER
4
0
COMPACT DISC DIGITAL RECORDER
¢
CD-R CONTROL
41
REC VOL
7
6
7
¶
¡ ¢
PUSH ENTER
CD TEXT
Hi-bit Legato Link Conversion
SKIP ID
SET
CLEAR
Marking recorded tracks to skip
Although you can’t erase tracks on a CD-R disc, you can set what
are called ‘skip IDs’. These tell a CD player (though many do not
recognize skip IDs) not to play a particular track, but to skip to the
next one on the disc.
You can also set skip IDs on CD-RWs, although it's probably a less
useful feature since you can always erase the last track.
Once a skip ID is set, you can clear it, but be careful: you can set up
to 21 skip IDs per disc, but repeatedly setting and clearing skip IDs
in different recording sessions will reduce this number.
Note: Once a disc has been finalized, you can’t set or clear skip
IDs. However, CD-RWs can be un-finalized, so you can always go
back and change those you have set (see p.32 for more on this).
Setting skip IDs:
1
Play the track you want to to skip.
2
Press SKIP SET.
3
Press SKIP SET again to set the skip
ID for the track playing.
The SKIP indicator lights in the display once a skip ID has
been set.
• To cancel, press 6 (or SKIP CLEAR).
4
Set further skip IDs by repeating
steps 1 to 3.
5
When you're finished, press 7 to stop
the disc and press 0 (CD-R side).
Until you eject the disc, the recorder stores the skip ID
information in its memory. On pressing 0, the recorder
writes the skip ID information onto the disc.
Be careful: don’t switch off the unit before ejecting the
disc—you’ll lose this sessions skip ID changes!
The SKIP indicator starts to blink.
O2
SKIP
SET?
SKIP
• If the track you selected in step 1 above already had a skip
ID set, playback jumps to the next track that doesn’t have a
skip ID set.
• Use the 4 and ¢ buttons (or JOG dial on the front
panel) if you want to change the track again here.
• If there's no room left on the disc to record another skip ID,
the display will show the message SKIP FULL.
33
6 Finalizing and Erasing
TIME
COMPACT DISC RECORDER / MULTI-CD
CHANGER
◊ÛB¿ˆ≤≥
OPEN/CLOSE
0
3- COMPACT DISC MULTI CHANGER
4
COMPACT DISC DIGITAL RECORDER
¢
3
CD-R CONTROL
7
6
¶
REC VOL
7
PUSH ENTER
CD TEXT
SKIP PLAY
SKIP ID
SET
CLEAR
Clearing skip IDs:
1
2
Hi-bit Legato Link Conversion
Use the 4 and ¢ buttons (or the
jog dial) to select the track you want
to clear the skip ID for.
4
Clear further skip IDs by repeating
steps 1 to 3.
5
When you're finished, press 7 to stop
the disc and press 0 (CD-R side).
Skip play must be off (the SKIP ON indicator does not light
in the display) for you to choose tracks with skip IDs. Press
SKIP PLAY on the remote to turn it off. The SKIP indicator
lights if the track selected is marked with a skip ID.
Until you eject the disc, the recorder stores the skip ID
information in its memory. On pressing 0, the recorder
writes the skip ID information onto the disc.
Press SKIP CLEAR.
Be careful: don’t switch off the unit before ejecting the
disc—you’ll lose this sessions skip ID changes!
The SKIP indicator starts to blink.
O2
SKIP
CLR?
Playing a disc with skip IDs
• If the track you selected in step 2 above didn’t have a skip ID
set, playback jumps to the next track that does.
If you're not sure whether a disc has skip IDs programmed, look for
the SKIP ON indicator in the display when you load a disc—it
will light automatically if one or more are present.
• Use 4 and ¢ (or the jog dial) if you want to change
the track again here.
1
SKIP
• If there's no room left on the disc to clear a skip ID, the
display will show the message SKIP FULL.
3
Press SKIP CLEAR again to clear the
skip ID for the track playing.
The SKIP indicator disappears once the skip ID has been
cleared.
• To cancel, press 6 (or SKIP SET).
Load a disc.
The SKIP ON indicator lights up if there are any skip IDs
on the disc. This means the player won't play those tracks
that are marked by skip IDs.
2
Press SKIP PLAY to switch skip play
on/off, then press 3 (6 on the
front panel).
When you turn off skip play, the player ignores the skip IDs
and plays all tracks on the disc.
• If there were no skip IDs on the disc in the first place, the
SKIP PLAY button has no effect.
34
7 Playback Functions
TIME
ABC
PLAY
MODE
DEF
1
2
3
GHI
JKL
MNO
4
5
6
PQRS
TUV
WXYZ
7
8
9
3- COMPACT DISC MULTI CHANGER
MARK
10/0
◊ÛB¿ˆ≤≥
COMPACT DISC RECORDER / MULTI-CD
CHANGER
COMPACT DISC DIGITAL RECORDER
>10
4
¢
3
PLAY MODE
6
7
DISC 1
DISC 2
DISC 3
PROGRAM CHECK
CLEAR
7
6
CD TEXT
Programming a playlist (3-CD changer)
Programming a playlist means telling the player precisely which
tracks, and in what order, you want played. You can program a
sequence of up to 30 tracks, playing tracks from any of the discs
loaded in the changer, and playing tracks more than once if you
like.
3
7
Hi-bit Legato Link Conversion
Press 3 (6 on the front panel) to
start playback.
Clearing the playlist
Clear the playlist by either:
• pressing 7 while the disc is stopped.
1
With all discs stopped(with CD 1, 2,
or 3 in the display), press PROGRAM.
The PGM indicator lights and the display prompts you to
enter the first disc/track in the playlist:
CD–
2
TRK––
• pressing PLAY MODE.
• ejecting a disc in the changer (or the CD-R disc tray to clear
a CD-R playlist).
Clearing a track from the playlist
With playback stopped, delete the last (most recently) programmed
track by pressing CLEAR. Press repeatedly to clear several steps.
PGM
Enter the disc/track numbers in the
order you want them played.
Use the DISC buttons to select the disc.
Use the number buttons to select tracks:
• For track numbers 1 to 10, use the corresponding number
button.
• For track numbers over 10, press the >10 button, then enter
the track number. For example, to select track 20 press
>10, 2, then 10/0.
Checking what's in the playlist
When the disc is stopped you can check the contents of the playlist
using the CHECK button. Each press steps through the playlist,
showing the step number and the corresponding disc and track
number.
Adding a track to the playlist
During playback, you can add the track currently playing to the
playlist by pressing PROGRAM twice. If there is currently no
playlist, then one is created.
• You can also use the 4 and ¢ buttons to select tracks,
pressing PROGRAM after each to enter it into the playlist.
After adding a track to the playlist, the display shows the disc
and track number and the total playing time of the playlist:
TRK
CD2
O1
MIN
SEC
O8:39
Note: The display will not show the total playing time of
playlists that exceed 100 minutes.
35
7 Playback Functions
TIME
ABC
DEF
1
2
3
GHI
JKL
MNO
4
5
6
PQRS
TUV
WXYZ
7
8
9
◊ÛB¿ˆ≤≥
COMPACT DISC RECORDER / MULTI-CD
CHANGER
3- COMPACT DISC MULTI CHANGER
MARK
10/0
COMPACT DISC DIGITAL RECORDER
>10
4
¢
3
¶
7
REC VOL
6
PUSH ENTER
CD-R
CD TEXT
Hi-bit Legato Link Conversion
PROGRAM
REPEAT
Programming a playlist (CD-R)
Using the repeat modes
You can program a playlist for a disc that's in the CD-R disc tray.
When you eject the disc, the playlist is lost.
Use the repeat function to repeat either the current track, an entire
disc, or all discs loaded over and over. You can set the repeat mode
in normal, random or program play modes.
1
Press CD-R then 7 to stop playback.
2
Press PROGRAM.
Press REPEAT to select the repeat
mode.
The PGM indicator lights and the display prompts you to
enter the first track in the playlist:
Keep pressing REPEAT to switch between the two repeat
modes and repeat off:
CD–R
3
TRK––
PGM
Enter the track numbers in the order
you want them played.
Use the number buttons to select tracks:
• For track numbers 1 to 10, use the corresponding number
button.
• For track numbers over 10, press the >10 button, then enter
the track number. For example, to select track 20 press >10,
2, then 10/0.
• You can also use the 4 and ¢ buttons to select tracks,
pressing PROGRAM after each to enter it into the playlist.
After adding a track to the playlist, the display shows the
track number and the total playing time of the playlist:
TRK
CD-R
O3
MIN
SEC
O8:39
Note: The display will not show the total playing time of
playlists that exceed 100 minutes.
4
Press 3 (6 on the front panel) to
start playback.
Note: Clearing, checking and adding tracks to the playlist
is the same as for the 3-CD disc changer.
36
• 1-track repeat – the RPT-1 indicator lights and the
current track repeats. To start a new track repeating, select
the track using 4 and ¢ (or the jog dial). Press
REPEAT twice (or 7) to cancel repeat playback.
• All repeat – the RPT indicator lights. In SINGLE
mode, the current disc will repeat; in ALL mode, all discs in
the 3-CD changer will repeat. Press REPEAT again (or 7)
to cancel repeat playback.
Note: You can’t use repeat play in RELAY mode.
Switching to RELAY mode will cancel repeat play. (see page
15 for more on play modes).
7 Playback Functions
TIME
TIME
FADER
7
CD-R
RANDOM
Using the random mode
Fading in and fading out
To have the recorder play tracks in a different order each time you
play a disc, use the random play mode. Each track will play just
once, but the order will be random. When all the tracks have been
played, the disc stops.
CD-R side only
Use the fader feature to fade the volume down gradually and pause
playback, or to have the player fade in the volume when you
resume playback. You can also set the length of time over which
you want to fade in or fade out (See Setting the fade length on
page 26).
Press RANDOM to start random
playback.
Note: You can only hear the fades through the analog outputs.
The RDM indicator lights and a track is chosen at random.
To select a new random track at any time, press RANDOM.
Press 7 to cancel random play.
• You can’t use random play in RELAY mode. Switching to
RELAY mode will cancel random play. (see page 15 for
more on play modes).
• For random play of a disc loaded into the CD-R tray, press
CD-R on the remote first, then RANDOM.
Press FADER during playback to
pause the disc.
The FADER indicator in the display blinks and the volume
fades to silence over the length of time you have set. The
unit then pauses playback.
Press FADER to resume playback of a
paused disc.
The FADER indicator in the display blinks and the volume
starts to fade in.
37
8 Recording Other Sources
COMPACT DISC RECORDER / MULTI-CD
CHANGER
◊ÛB¿ˆ≤≥
3- COMPACT DISC MULTI CHANGER
COMPACT DISC DIGITAL RECORDER
¶
INPUT
REC VOL
7
PUSH ENTER
CD TEXT
Hi-bit Legato Link Conversion
Introduction
Monitoring a source for recording
Use the various recording modes described here when you're
recording from a component connected to the recorder either
directly via an optical or coaxial digital connection, or via your
amplifier to the the analog line in jacks.
Using the monitor facility you can listen to a source connected to
the analog or digital inputs. This is especially useful for cueing up
for the next recording and also for checking that tracks are starting
in the proper places during automatic track numbering.
For most sources, both analog and digital, it's convinient to use
one of the synchro recording modes: 1-track, all track or all track
with finalize.
1
Stop playback of any discs playing in
this unit.
2
Start playing the source.
3
Press INPUT to select the input to be
monitored.
Should your particular recording application need it, there's also a
manual recording mode.
When recording from external sources, bear in mind the following:
• Most CDs, MDs, DCCs and DATs are digital-copy protected,
which generally means that you can make a copy of the
original, but not a copy of a copy.
Pressing INPUT repeatedly switches the active input:
ANALOG
• When recording incompatible or copy-proteced digital
sources, use the analog inputs.
• When recording digitally from DAT, the start ID track
markers on the tape may be after the start of the track.
Check the tape you’re planning to record and manually
insert new start IDs before recording.
– OPTICAL 1 – OPTICAL 2 – COAXIAL
The recorder's display indicates the current input.
4
The display shows monitoring information.
If the source is digital, the display indicates the type of
source if it recognizes it (CD, MD, DVD, DAT, DCC) and the
sampling rate (32kHz, 44kHz, 48kHz). If the digital signal is
incompatible or copy-protected, the display shows
Can’t REC.
These points are covered in more detail in Additional Information
on pages 43–44.
• When automatic track numbering has been selected, the
TRACK indicator will light for 2 seconds at track start points
(except digital formats listed above, where track numbers
change with those on the source material).
See Setting the silence threshold on page 27 if you find the
recorder can’t recognize the gaps between tracks.
The display shows MONITOR.
The level meter shows the recording level. Adjust using the
REC VOL knob.
5
38
To stop monitoring, press 7 (CD-R
side).
8 Recording Other Sources
COMPACT DISC RECORDER / MULTI-CD
CHANGER
◊ÛB¿ˆ≤≥
OPEN/CLOSE
0
3- COMPACT DISC MULTI CHANGER
COMPACT DISC DIGITAL RECORDER
SYNCHRO
¶
INPUT
REC VOL
DISPLAY
CHARACTER
7
7
PUSH ENTER
CD TEXT
Digital synchro recording
If you have a CD, MD, DAT or DCC player connected to either of the
digital inputs of this recorder, you can make digital recordings
from it very simply using this mode.
5
Hi-bit Legato Link Conversion
Make sure that the source is not
playing, then press SYNCHRO.
Digital synchro recording will not work if the source is
already playing!
Note that double speed recording is not possible in this mode.
Pressing SYNCHRO repeatedly switches the synchro mode:
1
Make sure that any discs loaded in
the CD changer are stopped.
• 1-track synchro – recorder stops recording when it
encounters a new track number/start ID on the source or 2
seconds of silence.
2
Load a CD–R or CD–RW disc.
• all-track synchro – recorder stops recording when it
detects more than 5 seconds of silence in the source
material.
If it’s a blank disc, the display shows NEW DISC.
If the disc isn’t blank, use the DISPLAY button to check that
there's enough space on it for what you want to record.
3
• all-track with finalize – as all-track synchro, but the
recorder automatically finalizes the disc after recording.
The SYNCRO indicator and SYNC(-1) will start to blink
when the recorder is ready.
Press INPUT to choose optical or
coaxial input.
To cancel recording here, press 7.
Pressing INPUT repeatedly switches the active input:
ANALOG
– OPTICAL 1 – OPTICAL 2 – COAXIAL
The recorder's display indicates the current input.
4
If you want to adjust the recording
level:
Start playing a sample of the source material, then turn the
REC VOL knob to adjust the recording level (clockwise to
increase or anticlockwise to reduce). Use the level meter to
guage the the best recording level (the loudest sounds in the
source should just reach 0dB on the meter; the red segments
in the level meter should not light at all).
• Push the REC VOL knob for 3 seconds to reset the recording
level. This means that the recording level will be the same as
the source.
6
Play the source.
The recorder starts recording automatically.
Press DISPLAY to switch displays during recording.
7
The recorder goes into record-pause
after recording.
Be careful: In all-track synchro mode, if the recorder
detects another signal, recording starts again.
• If you're using all-track synchro with finalize, the recorder
will start finalizing the disc after a minute of silence.
• Press 7 to finish the recording before ejecting the disc.
If you find that digital synchro recording does not seem
to work, see Digital synchro recording troubleshooting on
page 47 for possible remedies.
39
8 Recording Other Sources
COMPACT DISC RECORDER / MULTI-CD
CHANGER
◊ÛB¿ˆ≤≥
OPEN/CLOSE
0
3- COMPACT DISC MULTI CHANGER
COMPACT DISC DIGITAL RECORDER
SYNCHRO
¶
INPUT
REC VOL
DISPLAY
CHARACTER
7
7
PUSH ENTER
CD TEXT
Analog synchro recording
Pressing SYNCHRO repeatedly switches the synchro mode:
Use the analog line inputs when recording from your turntable,
cassette deck, or other analog audio source.
• 1-track synchro – recorder stops recording when it
encounters more than 2 seconds of silence.
Note that double speed recording is not possible in this mode.
• all-track synchro – recorder starts a new track when it
encounters another signal after more than 2 seconds of
silence*. Recording stops when the recorder detects more
than 5 seconds of continuous silence.
1
2
Make sure that any discs loaded in
the CD changer are stopped.
• all-track with finalize – as all-track synchro, but the
recorder automatically finalizes the disc after recording.
Load a CD–R or CD–RW disc.
The SYNCRO indicator and SYNC(-1) will start to blink
when the recorder is ready.
If it’s a blank disc, the display shows NEW DISC.
If the disc isn’t blank, use the DISPLAY button to check that
there's enough space on it for what you want to record.
3
Press INPUT to choose the analog
line inputs.
To cancel recording here, press 7.
6
ANALOG
Use the DISPLAY button to switch displays during recording.
– OPTICAL 1 – OPTICAL 2 – COAXIAL
The recorder's display indicates the current input.
4
If you want to adjust the recording
level:
Start playing a sample of the source material, then turn the
REC LEVEL knob to adjust the recording level (clockwise to
increase or anticlockwise to reduce). Use the level meter to
guage the the best recording level (the loudest sounds in the
source should just reach 0dB on the meter; the red segments
in the level meter should not light at all).
5
Play the source.
The recorder starts recording automatically.
Pressing INPUT repeatedly switches the active input:
Make sure that the source is not
playing, then press SYNCHRO.
Analog synchro recording will not work if the source is
already playing!
40
Hi-bit Legato Link Conversion
7
The recorder goes into record-pause
after recording.
Be careful: In all-track synchro mode, if the recorder
detects another signal, recording starts again.
• If you're using all-track synchro with finalize, the recorder
will start finalizing the disc after a minute of silence.
• Press 7 to finish the recording before ejecting the disc.
* Track numbering may not work reliably for some
sources (such as those which are very noisy, or those
which contain pauses or very quiet sections).
8 Recording Other Sources
COMPACT DISC RECORDER / MULTI-CD
CHANGER
◊ÛB¿ˆ≤≥
OPEN/CLOSE
0
3- COMPACT DISC MULTI CHANGER
COMPACT DISC DIGITAL RECORDER
REC/
REC MUTE
¶
¶
INPUT
¡ ¢
REC VOL
DISPLAY
CHARACTER
7
6
7
PUSH ENTER
CD TEXT
Manual recording (analog or digital)
The main use for manual recording mode is when there are no
specific start and/or end points in the source material— when
you're recording from a tuner or a satellite decoder, for example.
1
Make sure that any discs loaded in
the CD changer are stopped.
2
Load a CD–R or CD–RW disc.
If it’s a blank disc, the display shows NEW DISC.
5
6
ANALOG
Adjust the recording level, if
necessary:
• To adjust the recording level, see step 4 of Digital synchro
recording on page 39.
• To adjust the analog recording level, see step 4 of Analog
synchro recording on page 40.
Press INPUT to choose the input to
use.
Pressing INPUT repeatedly switches the active input:
For digital sources, check that the
signal is compatible.
Set the source playing (if it isn't already) and check the
display. If you see the message Can't REC the digital
signal is either a format that the recorder doesn't recognize,
or the source is copy protected. Record through the analog
line inputs if you see either message.
If the disc isn’t blank, use the DISPLAY button to check that
there's enough space on it for what you want to record.
3
Hi-bit Legato Link Conversion
7
Press 6 (CD-R side) to start recording.
8
Start the source playing.
– OPTICAL 1 – OPTICAL 2 – COAXIAL
The recorder's display indicates the current input.
4
During recording, press ¡ ¢ (CD-R side) anywhere
you want a new track to start (auto track numbering must
be off—see page 26 to do this).
Press REC.
The recorder indicates that it's in record-pause mode.
9
When you're finished, press 7 to stop
recording.
If you want to finalize the disc after recording, see page 30.
41
8 Recording Other Sources
COMPACT DISC RECORDER / MULTI-CD
CHANGER
◊ÛB¿ˆ≤≥
3- COMPACT DISC MULTI CHANGER
COMPACT DISC DIGITAL RECORDER
REC/
REC MUTE
¶
6
CD TEXT
Recording blank sections
This feature is useful when you want to put some space at the end
of a recording session so that the next recording doesn't start after
the last too closely, but use it wherever you need some blank space
recorded on the disc. Note that you can’t start a recording with a
muted section; only after the recording has started, or at the end of
a recording.
1
While recording, or in record-pause
mode, press ¶.
The REC indicator starts blinking and a blank space of
about four seconds is recorded. The recorder then goes into
record-pause. If you start recording again, a new track is
started.
• If you press and hold ¶,you can record a blank for as long
as you hold down the button.
• Pressing ¶, (without holding) in record-pause mode
records four seconds of silence from the current position.
Use this to create spaces between tracks when recording in
1-track synchro mode, for example.
• It is not possible to record a blank section if the disc was
stopped (not recording) just before you record-paused.
2
To finish the recording session here,
press 7.
• To restart recording, press 6.
42
7
Hi-bit Legato Link Conversion
9 Additional Information
Handling discs
Discs to avoid
When holding CDs of any type, take care not to leave fingerprints,
dirt or scratches on the disc surface. Hold the disc by its edge or by
the center hole and edge. Damaged or dirty discs can affect
playback and/or recording performance. Take care also not to
scratch the label side of the disc. Although not as fragile as the
recording side, scratches can still result in a disc becoming
unusable.
CDs spin at high speed inside the recorder during playback and
recording. If you can see that a disc is cracked, chipped, warped, or
otherwise damaged, don't risk using it in your CD recorder—you
could end up damaging the unit.
Should a disc become marked with fingerprints, dust, etc., clean
using a soft, dry cloth, wiping the disc lightly from the center to the
outside edge as shown in the diagram below. If necessary, use a
cloth soaked in alcohol, or a commercially available CD cleaning
kit to clean a disc more thoroughly. Never use benzine, thinner or
other cleaning agents, including products designed for cleaning
vinyl records.
Wipe lightly from the
center of the disc
using straight strokes.
Don’t wipe the disc
surface using circular
strokes.
This recorder is designed for use with conventional, fully circular
CDs only. Use of shaped CDs is not recommended for this product.
Pioneer disclaims all liability arising in connection with the use of
shaped CDs.
Recording CDs
This recorder is designed to let you make extremely high quality
digital recordings onto recordable compact discs. For flexibility, you
can use either rewritable discs (CD-RW) or write-once discs (CD-R).
For more general information on the discs you can and can’t use
with this recorder, see About CD, CD-R and CD-RW Discs on page
6. The overview on these pages gives you an idea of what's possible,
and also provides guidance on what to avoid and things to be
careful of when recording.
Storing discs
Digital and analog sources
Although CD, CD-R and CD-RW discs are more durable than vinyl
records, you should still take care to handle and store discs
correctly. When you're not using a disc, return it to its case and
store upright. Avoid leaving discs in excessively cold, humid, or hot
environments (including under direct sunlight).
This recorder has both an optical and a coaxial digital input, as
well as a pair of analog inputs. Use a digital input when:
When labeling discs, use a felt-tip pen sold for marking CDs. Don't
glue paper or put stickers onto the disc, or use a pencil, ball-point
pen or other sharp-tipped writing instrument. These could all
damage the disc.
For more detailed care information see the instructions that come
with discs.
• recording from a CD/MD/DAT/DCC player or digital satellite
with a digital output.
Use the analog inputs when:
• recording from a digital component that does not have a
digital output (such as some portable equipment).
• recording from an incompatible digital source (such as a
high sampling-rate DAT tape).
• recording a digital copy-protected source (see below).
• recording from any analog source (radio broadcasts, vinyl
records, cassette tapes, etc.).
43
9 Additional Information
Digital recording restrictions
This unit has been designed exclusively for recording and playback
of audio discs— you can’t record other CD formats, such as
computer CD-ROMs or Dolby Digital (AC-3). If you record from a
disc format such as CD+Graphics, Video CD, or other format that
includes both digital audio and video or text, you will only be able
to record the audio part of the disc.
In addition to standard audio CDs, this recorder will record DTS
encoded audio CDs and HDCD format CDs. However, the recording
level must be set to 0dB.
Almost all commercial digital source material is protected by
copyright laws. For this reason, this recorder uses special consumeruse blank CD-R and CD-RW discs on which a copyright fee has
already been paid. A further restriction is SCMS (Serial Copy
Management System). This generally allows just one generation of
digital recording. In other words, you can make a digital recording
from an original source (such as a commercial CD), but you can’t
then make further digital recordings from that copy. Most digital
recording equipment uses the SCMS system, including CD-R and
MD recorders, and DAT decks. You may also find that you can’t
record certain DVD discs as the digital output of the DVD player can
be disabled by the disc.
If you do encounter SCMS or other digital-copy restrictions, you
can always record through the analog inputs.
Digital recording from DAT
If you’re recording a DAT tape that was recorded using the DAT
machine's auto ID function, the IDs on the tape are slightly after
the beginning of the actual recording. This can cause problems for
the CD recorder:
• The start of the track may not be recorded.
• The track number will be recorded on the disc after the start
of the track
• The beginning of the next track on the DAT is
unintentionally recorded
44
To avoid these problems, we recommend recording start IDs on the
DAT manually, if possible. Refer to the instructions for your DAT
recorder for more information.
You might also encounter problems if you try to synchro-record all
tracks from a DAT that is set to program play. If you want to record
a DAT in program play mode, use the 1-track synchro recording
mode— see page 39 for how to do this.
Digital signal interruptions
Sources of signal interruption include power or source component
failure, accidental disconnection of the interconnect cord, and
interruption of digital satellite broadcasts. In all these cases, if the
signal resumes within about five seconds, the result will just be a
blank section on the disc. If the interruption is longer than five
seconds, the recorder displays the error message: D.IN UNLOCK and recording is paused.
Power interruptions
Never switch off this recorder while it's copying, recording,
finalizing, or while the display shows PMA REC (Program
Memory Area Recording). If there's a power failure, or you
accidently disconnect the power from the wall outlet while
recording is in process, you'll lose at least part of the recording.
After recording, always remove the disc from the recorder before
switching the power off. Failure to do this could result in you losing
some of the recorded material on the disc.
Miscellaneous information
• The minimum recordable time is four seconds. Even if you
try and record something shorter than this, the track that
the recorder creates will be four seconds.
• The maximum number of tracks on a disc is 99.
9 Additional Information
Understanding display messages
Below is a list of messages you’ll see during normal operation with
a brief explanation of what they mean. If you need more
information, turn to the page indicated.
Message
OPEN
Description
The disc tray is open.
CLOSE
The disc tray is closing.
NEW DISC
A blank disc is loaded.
NO DISC
An attempt is made to start playback without a disc loaded.
SET UP
The unit is setting up for recording. Wait for the message to disappear.
TOC READ
The recorder is reading the disc’ s TOC (Table of Contents). Wait for the
message to disappear.
The unit is in 1-track synchro recording mode. Recording starts when the
recorder detects a source input signal.
The unit is in all-track synchro recording mode. Recording starts when the
recorder detects a source input signal.
The recorder is monitoring the input selected with the INPUT button.
SYNC–1
SYNC–ALL
MONITOR
CD
(MD, DAT, DVD,
DCC)
PMA REC
SKIP SET ?
SKIP CLR ?
ERASE TOC ?
ERASE ALL ?
INITIALIZE ?
ERASE LAST ?
OPTICAL
(COAXIAL, ANALOG)
Page
p. 13
p. 39–40
p. 39–40
p. 38
The recorder displays the source it is monitoring (CD, MD, DAT DVD, or
DCC) during record setup.
p. 38
The recorder is writing TOC data to the disc’ s PMA (Program Memory
Area). Never turn off the power while this display is showing.
Confirm that you want to set a skip ID by pressing the
SKIP SET button.
Confirm that you want to clear a skip ID by pressing the
SKIP CLEAR button.
Confirm that you want to erase the TOC of a finalized CD–RW disc to
return it to a non-finalized state. After doing this, you can record more
material on the disc.
Confirm that you want to erase all tracks recorded on a CD–RW disc by
pressing 6.
Confirm that you want to re-initialize the CD–RW disc by pressing 6.
p. 44
Confirm that you want to delete the last track on a CD-RW disc by pressing
6.
The recorder shows the current input mode —digital or analog. Switch
using the INPUT button.
p. 31–32
p. 33
p. 34
p. 31–32
p. 31–32
p. 31–32
p. 38–40
45
9 Additional Information
Error messages
Below is a list of error messages you may see during playback or
recording, with possible causes and remedies. If you need more
information, turn to the page indicated.
Message
CHECK DISC
Cause
The disc is damaged or dirty.
The disc is loaded upside down.
46
CHECK
(blinking
display)
A system error occurred, perhaps due to noise
or static electricity.
E1
The disc was not loaded properly.
E2
The disc mechanism is not working properly.
Remedy
Take out the disc and check for dust, dirt,
scratches, etc. Clean as necessary.
Take out the disc and reload it label-side up.
If the same message is displayed again after the
disc is reloaded, unplug the power cord and plug
it in again. If the message is still displayed, please
contact a Pioneer authorized service center.
Unplug the power cord and plug it in again. If
the same message is displayed again, please
contact a Pioneer authorized service center.
Open the disc tray and reload the disc. Make sure
that it is seated properly in the disc guide.
Open the disc tray and make sure that nothing is
obstructing it. If the problem persists, contact a
Pioneer authorized service center.
9 Additional Information
Messages relating to recording
Message
Can't REC
D.IN UNLOCK
Can't SYNC
Cause
The input signal is digital-copy
protected with SCMS.
The digital source was interrupted.
The source is not audio, or is an
incompatible format (e.g. a
CD–ROM).
The digital source is not recognized as
CD, MD, DVD, DAT, or DCC.
CHECK
INPUT ?
The source player was already playing
when the SYNCHRO button was
pressed.
REPAIR
The recorder was switched
off/unplugged after recording without
ejecting the disc. The recorder could
not write essential recording
information onto the disc.
REC FULL
No more recording is possible because
the available recording time of the disc
has been used up, or 99 tracks have
already been recorded on the disc.
The loaded disc is a CD–R or CD–RW
disc for professional use without the
Consumer Use designation.
Pro DISC
Digital synchro recording troubleshooting
If digital synchro-recording fails to operate correctly, check the
following:
1 Pause playback of the source, then press the
digital synchro button again.
If you’re recording from a portable CD player, etc., make
sure that the shock-protection feature is switched off.
Remedy
Record the source through the analog
inputs.
Check that the digital input cable is
connected properly and that the power of
the source player is on.
Check that the source is a regular music
source.
Page
p. 41
If recording from a source other than CD,
MD, DVD, DAT or DCC, try using the
manual digital recording mode.
Stop the source player. After a short time,
SYNC–1 or SYNC–ALL is displayed,
and the recorder goes into synchro–recordpause mode.
While REPAIR is displayed, the recorder
automatically examines the recorded area
of the disc and updates the track numbers
and recording time data. This process takes
about 40 minutes for a fully recorded disc.
Finalization or further recording is possible
once the REPAIR message disappears.
Use another disc, or erase the
CD–RW disc.
p. 42
Load a CD–R or CD–RW disc that is
designated as being for consumer use.
p. 44
p. 39, 40
p. 6
3 If none of the above solves the problem, use
manual digital recording to record.
• Digital synchro-recording uses a digital sub-signal
contained in the source player’s digital output. Some CD/
MD/DAT/DVD players are not compatible with synchro
recording.
2 Start playback of the source component
once you see the SYNCHRO indicator start
to blink.
47
9 Additional Information
Troubleshooting
Power does not come on
• Check that the unit is plugged into a standard AC power
outlet.
• If the unit is connected to another component’s power output,
check that the other component is switched on.
No sound when playing a disc
• Check that all connections to the amplifier are correct and
that all interconnects are firmly connected.
Can’t record
• Check that all connections to the amplifier and any other
components are correct and that all interconnects are firmly
connected.
• Check that the disc you’re trying to record onto hasn’t already
been finalized. If it has, use another disc, or erase the TOC
(CD-RW only) – page 31–32.
• Check that you’ve selected the correct input. Use the INPUT
button to switch inputs.
• Check that the recording level is not set too low – pages 28,
39–41.
Recorded sound is distorted
• Check that all connections to the amplifier and any other
components are correct and that all interconnects are firmly
connected.
• There may be interference from a nearby TV. Switch the TV off
during recording, or move the unit further away.
• Check that the recording level is not set too high.– pages 28,
39–41.
• Some analog sources output a very high level signal that may
distort the recording. In this case, turn down the recording
level – pages 40–41.
• Check that the disc is not warped, damaged or dirty – page 43.
Can’t operate using the remote control
• Check that the batteries in the remote are not exhausted.
• Check that there are no obstacles between the remote and the
remote sensor.
• Check that no bright lights (including sunlight) are shining
onto the remote control sensor on the main unit.
• Check that you’re operating the remote within its operating
range – page 5.
48
Some tracks are skipped without being played
• The disc loaded contains skip IDs – pages 33–34.
A recorded CD-R/CD-RW disc won’t play on
other CD players
• Check that the disc has been finalized – page 30.
• Most ordinary CD players will not play CD-RW discs.
9 Additional Information
Specifications
1. General
3. Input jacks
Model ..................................................... Compact disc audio system
Applicable discs ......................................... CDs, CD-Rs and CD-RWs
Power supply .............................................................AC 120 V, 60 Hz
Power consumption .................................................................. 17 W
Operating temperature ......... +5 °C to +35 °C (+41 °F to +95 °F)
Weight (without package) ................................... 5.7 kg (12 lb 9oz)
Max. dimensions ........................ 420 (W) x 128 (H) x 380 (D) mm
16-9/16 (W) x 5-1/16 (H) x 14-15/16 (D) in.
Optical digital input jacks
Coaxial digital input jack
Audio LINE input jacks
Control IN jack
2. Audio unit
Frequency characteristics ........................................... 2 Hz to 20 kHz
Playback S/N ............................................................... 112 dB (EIAJ)
Playback dynamic range .............................................. 98 dB (EIAJ)
Playback total harmonic distortion ........................ 0.0017 % (EIAJ)
Playback channel separation ....................................... 98 dB (EIAJ)
Recording S/N ............................................................... 92 dB (EIAJ)
Recording dynamic range ............................................ 92 dB (EIAJ)
Recording total harmonic distortion ........................ 0.004 % (EIAJ)
Output voltage ............................................................................ 2.0 V
Wow-flutter ......................................... Less than measurement limit
((±0.001 % W.PEAK) (EIAJ))
Number of channels .......................................... 2 channels (stereo)
Coaxial output .............................................. 0.5 Vpp ±20 % (75 Ω)
Optical output ................... –15 to –21 dBm (wavelength: 660 nm)
Frequency deflection: Level 2 (standard mode)
*Recording specification values are for the LINE input (analog)
4. Output jacks
Optical digital output jack
Coaxial digital output jack
Audio LINE output jack
5. Accessories
Remote control unit ......................................................................... 1
Size AA/R6P dry cell batteries .......................................................... 2
Stereo audio cord ............................................................................. 2
AC power cord ................................................................................... 1
Operating instructions ..................................................................... 1
Warranty card ................................................................................... 1
NOTE:
The specifications and design of this product are subject to change
without notice, due to improvements.
49
U
We Want You Listening For A Lifetime
We
Want You
Selecting fine audio equipment such as the unit you’ve just
purchased is only the start of your musical enjoyment. Now
it’s time to consider how you can maximize the fun and
excitement your equipment offers. This manufacturer and the
Electronic Industries Association’s Consumer Electronics
Group want you to get the most out of your equipment by
playing it at a safe level. One that lets the sound come through
loud and clear without annoying blaring or distortion-and,
most importantly, without affecting your sensitive hearing.
Sound can be deceiving. Over time your hearing “comfort
level” adapts to higher volumes of sound. So what sounds
“normal” can actually be loud and harmful to your hearing.
Guard against this by setting your equipment at a safe level
BEFORE your hearing adapts.
To establish a safe level:
÷ Start your volume control at a low setting.
÷ Slowly increase the sound until you can hear it comfortably
and clearly, and without distortion.
Once you have established a comfortable sound level:
÷ Set the dial and leave it there.
Information courtesy of the Deafness Research Foundation.
O
NIC
U
RIES
SS
IND
ST
•A
Taking a minute to do this now will help to prevent hearing
damage or loss in the future. After all, we want you listening
for a lifetime.
Used wisely, your new sound equipment will provide a
lifetime of fun and enjoyment. Since hearing damage from
loud noise is often undetectable until it is too late, this
manufacturer and the Electronic Industries Association’s
Consumer Electronics Group recommend you avoid prolonged
exposure to excessive noise. This list of sound levels is
included for your protection.
Decibel
Level Example
30
Quiet library, soft whispers
40
Living room, refrigerator, bedroom away from traffic
50
Light traffic, normal conversation, quiet office
60
Air conditioner at 20 feet, sewing machine
70
Vacuum cleaner, hair dryer, noisy restaurant
80
Average city traffic, garbage disposals, alarm clock
at two feet.
THE FOLLOWING NOISES CAN BE
DANGEROUS UNDER CONSTANT EXPOSURE
90
Subway, motorcycle, truck traffic, lawn mower
100
Garbage truck, chain saw, pneumatic drill
120
Rock band concert in front of speakers, thunderclap
140
Gunshot blast, jet plane
180
Rocket launching pad
EST
1924
•
LISTENING
For A Lifetime
N
A
O CIATIO
ELECTR
1924
•
EST
N
•
SS
IND
RIES
ELECTR
NIC
ST
O
O CIATIO
We
Want You
LISTENING
For A Lifetime
Published by Pioneer Corporation.
Copyright © 2000 Pioneer Corporation.
All rights reserved.
PIONEER CORPORATION
4-1, Meguro 1-Chome, Meguro-ku, Tokyo 153-8654, Japan
PIONEER ELECTRONICS [USA] INC.
P.O. BOX 1540, Long Beach, California 90801-1540, U.S.A.
PIONEER ELECTRONICS OF CANADA, INC. 300 Allstate Parkway, Markham, Ontario L3R OP2, Canada
PIONEER EUROPE NV
Haven 1087, Keetberglaan 1, B-9120 Melsele, Belgium TEL: 03/570.05.11
PIONEER ELECTRONICS AUSTRALIA PTY. LTD. 178-184 Boundary Road, Braeside, Victoria 3195, Australia, TEL: [03] 9586-6300
PIONEER ELECTRONICS DE MEXICO S.A. DE C.V. San Lorenzo 1009 3er Piso Desp. 302 Col. Del Valle Mexico D.F. C.P. 03100
TEL: 5-688-52-90
<00G00ZF0S00>
Printed in
<PRB1309-A>