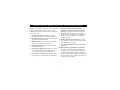
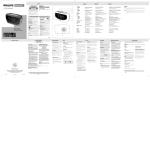
1
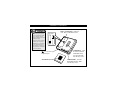
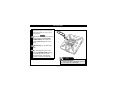
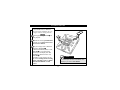
Digital Audio Player
SA101
NO
BOOKMA
RK
YE
S
DELETE
DIS
PLA
Y
D
L
O
H
MO
DE
/EQ
VOL
UME
4.
5V
D
C
DA
TA
I/O
SAFETY
INFORMATION
Know these safety symbols
For details on warranty registration or the Player, visit the
Philips web site:
www.rush.philips.com
CAUTION
t ATTENTION s
For questions about RealJukebox and its features, visit:
www.real.com
Record your Player’s model and serial numbers here. The
serial number is located inside the battery compartment,
and the model number is on the back of the Player.
Model number: _________________________________
Serial number: __________________________________
This “bolt of lightning” indicates uninsulated
material within your unit may cause an
electrical shock. For the safety of everyone in
your household, please do not remove the
product covering.
IN CANADA
The “exclamation point” calls attention to
features for which you should read the
enclosed literature closely to prevent operating and maintenance problems.
English: This digital apparatus does not exceed the
Class B limits for noise emissions from digital
apparatus as set out in the Radio Interference
Regulations of the Canadian Department of
Communications.
Français: Cet appareil numérique n’émet pas de bruits
radioélectriques dépassant les limites
applicables aux appareils numériques de
Classe B prescrites dans le Régelement sur le
Brouillage Radioélectrique édicté par le
Ministère des Communications du Canada.
WARNING: To prevent fire or shock hazard, do not
expose this equipment to rain or moisture.
CAUTION: To prevent electric shock, match the
wide blade of the plug to a wide slot, and fully insert.
3
IMPORTANT SAFETY INSTRUCTIONS - Please read before operating equipment.
7. Install in accordance with the manufacturer’s
instructions. Do not block any of the ventilation
openings. For example, the appliance should not be
situated on a bed, sofa, rug, or similar surface or
placed in a built-in installation, such as a bookcase or
cabinet that may impede the flow of air through the
ventilation openings.
This product was designed and manufactured to meet strict
quality and safety standards. There are, however, some
installation and operation precautions which you should be
particularly aware of.
1. Read these instructions. Read all the safety and
operating instructions before operating the appliance.
2. Keep these instructions. Retain the safety and operating instructions for future reference.
8. Do not install near any heat sources such as radiators, heat registers, stoves, or other apparatus (including amplifiers) that produce heat.
3. Heed all warnings. Adhere to all warnings on the
appliance and in the operating instructions.
9. Only use attachments/accessories specified by the
manufacturer.
4. Follow all instructions. All operating and use instructions should be followed.
10. Refer all servicing to qualified service personnel.
Servicing is required when the apparatus has been
damaged in any way, such as the power-supply cord
or plug has been damaged; liquid has been spilled or
objects have fallen into the apparatus; or the apparatus
has been exposed to rain or moisture, does not operate
normally, or has been dropped.
5. Do not use this apparatus near water – for example,
near a bathtub, washbowl, kitchen sink, or laundry
tub, in a wet basement, near a swimming pool, etc.
6. Clean only with a damp cloth. The appliance should
be cleaned only as recommended by the manufacturer.
4
TABLE OF CONTENTS
RealJukebox Features . . . . . . . . . . . . . .18-20
Playing Music . . . . . . . . . . . . . . . . . . . . . . .21
Adjusting Volume and Sound . . . . . . . . . . .22
Putting Buttons on Hold . . . . . . . . . . . . . . .23
Display . . . . . . . . . . . . . . . . . . . . . . . . . . . .24
Selecting Tracks/Searching . . . . . . . . . . . . .25
Repeating and Shuffling Tracks . . . . . . . . .26
Bookmarks . . . . . . . . . . . . . . . . . . . . . . . . .27
Clearing Tracks . . . . . . . . . . . . . . . . . . . . . .28
Carrying Pouch . . . . . . . . . . . . . . . . . . . . . .29
Smart Help . . . . . . . . . . . . . . . . . . . . . .30-31
Limited Warranty . . . . . . . . . . . . . . . . .32-33
Index . . . . . . . . . . . . . . . . . . . . . . . . . . . . . .34
Safety . . . . . . . . . . . . . . . . . . . . . . . . . . . . .3-4
Table of Contents . . . . . . . . . . . . . . . . . . . . .5
General Information . . . . . . . . . . . . . . . . . . .6
Maintenance . . . . . . . . . . . . . . . . . . . . . . . . .7
Batteries . . . . . . . . . . . . . . . . . . . . . . . . . . . .7
Power Adapter . . . . . . . . . . . . . . . . . . . . . . .8
Controls . . . . . . . . . . . . . . . . . . . . . . . . . .9-10
Connecting RUSH to your Computer . . . .11
Installing RealJukebox . . . . . . . . . . . . . . . .12
Recording Formats (Encoding Options) . . .13
Using RealJukebox . . . . . . . . . . . . . . . . . . .14
SmartMedia Card . . . . . . . . . . . . . . . . . . . .15
Preventing Card Erasure and Overwriting .16
RealJukebox On-line Tutorial . . . . . . . . . . .17
Windows is a registered trademark of Microsoft Corporation.
Pentium is a registered trademark of Intel Corporation.
RealJukebox is a registered trademark of RealNetworks
Corporation. Audible and AudibleReady are registered trademarks of Audible, Inc. All rights reserved. All trade names referenced are the service mark, trademark or registered trademarks of
their respective manufacturers.
The Player complies with the Federal Communications
Commission Rules, Part 15. Operation is subject to the following
two conditions:
1. This device may not cause harmful interference, and
2. This device must accept any interference received, including
interference that may cause undesired operation.
5
GENERAL INFORMATION
COMPUTER REQUIREMENTS
• Windows 95 or 98; Internet Explorer 3.01 or
above; Netscape 4.0 or above; and Internet
access
• Intel® Pentium® 200 MHz
• 64 MB internal memory (recommended)
• Free on the personal computer (PC): 15 MB for
the RealJukebox software, plus 1 MB for every
minute of music you store on the PC
• CD-ROM drive
• Parallel port with ECP/EPP mode
• 16 bit sound card
• 256 color video card
RUSH is a solid-state, portable, digital audio player.
It can:
• play MP3 format files that you get from the
Internet, and
• play digitized and compressed CD tracks, tape
tracks, audio books, newspapers, sound effects,
etc., that are encoded into MP3 format using
RealJukebox.
Because the Player is fully electronic with no moving parts and lasers, you can play music while you
are moving without missing the quality.
SUPPLIED ACCESSORIES
Make sure you received all these items. If an item is
missing, please contact your dealer.
• one parallel cable
• one power adapter
• one blue SmartMedia card
• one protective rubber seal for the DATA I/O jack
• one SmartMedia card holder with label and
chrome stickers
• one RUSH installation CD-ROM
• one set of in-ear headphones
• one carrying pouch
• two AAA, R03 or UM4 alkaline batteries
HEADPHONE USE
Listen at a moderate volume. Using headphones at
high volume can impair your hearing. Do not use
headphones while driving or cycling.
COPYRIGHT INFORMATION
Unauthorized duplication and distribution of
Internet/CD recordings violate copyright law and
international treaties. You should use the MP3 software only for personal purposes.
6
MAINTENANCE
BATTERIES
BATTERIES
1. Remove the battery compartment lid and insert two
AAA batteries (preferably alkaline) as indicated by
the + and – symbols inside the battery
compartment.
2. Replace the battery compartment lid.
Powered will appear very briefly on the display.
• Do not expose the Player, batteries, or
SmartMedia cards to strong magnetic fields,
humidity, rain, sand, or excessive heat caused
by heating equipment or direct sunlight.
• Do not drop the Player or allow objects to fall
on the Player.
• Do not allow the Player to contact water. Dry
the surface of the Player if it becomes wet.
Water entering the Player may cause major
damage.
• To clean the Player, use a soft, slightly dampened chamois leather. Do not use any cleaning
agents containing alcohol, ammonia, benzene,
or abrasives as these may harm the Player.
INDICATION OF EMPTY BATTERIES
The number of blocks inside the battery symbol
indicates the power level.
• When the power is almost empty, the symbol
starts to flash. Replace the batteries or change to
AC power. Details are on page eight.
• Battery Low appears on the display if you ignore
the flashing battery symbol. The Player will shut
off automatically.
Smart Help
• Remove the batteries if they are dead or if
the Player will not be used for more than two weeks.
• Batteries contain chemical substances, so dispose of
them properly.
• Remove the batteries from the Player when you use
the AC adapter.
NO
BOOKMARK
YES
DELETE
DISP
LAY
LD
HO
MOD
E/EQ
4.5
V
DA
TA
I/O
DC
VOLU
ME
7
POWER ADAPTER
BEGIN
1
Make sure your local voltage matches the 4.5V voltage
of the adapter.
NO
4
BOOKMA
RK
YE
S
2
DELETE
DIS
Remove the batteries
from the Player.
PLA
Y
D
L
O
H
MO
DE
/EQ
VOLU
ME
3
3
V
D
C
DA
TA
I/O
4.5
Connect the adapter to
the Player's 4.5V DC jack and
to an AC power outlet.
Powered will appear briefly
on the display (if there are no
batteries in the Player).
3
Wall
Outlet
Power
Adapter
1
4
Always disconnect the
adapter from the AC power
outlet if you are not using it.
4.5V DC jack
3
Player Display
8
CONTROLS
NO ■ – Press to turn off the
Player or to stop playback.
Display – Shows the current activity of the
Player and gives details about the current track
or file. Details are on page 24.
BOOKMARK – Use to set
bookmarks. Details are on
page 27.
YES © – Press to turn on the
Player or to start or pause playback.
DELETE – Press to delete the
current track, erase the
SmartMedia card, or clear bookmarks. Details are on page 28.
NO
BOOKMA
RK
YE
DIS
§§, ©© – Press to skip to the
PLA
Y
D
L
O
H
MO
DE
/EQ
VOLU
ME
V
D
C
DA
TA
I/O
4.5
beginning of a current/previous/next track or file. Press to
search backward or forward
within a track or file. Details
are on page 25.
S
DELETE
VOLUME ▼, ▲ – Press to
adjust the volume.
DATA I/O – Connect the supplied parallel
cable here and to the parallel port of your
computer. Details are on page 11.
4.5V DC – Connect the
power adapter here when you
are not using batteries.
Details are on page eight.
9
HOLD © – Slide switch to the
right to lock buttons and prevent them from accidental use.
Details are on page 23.
DISPLAY button – Press to see
file details, such as the name of a
song, artist, album, track number,
or elapsed playing time. Details
are on page 24.
MODE/EQ – Press to shuffle
or repeat playback. Details
are on page 26. Press to
select a sound mode: Normal,
Jazz, Rock, or Classic.
Details are on page 22.
CONTROLS, CONTINUED
General Info
Inf o
Your Player consists of materials which can be recycled if
disassembled by a specialized
company. Please observe the
local regulations to dispose of
packing materials, dead batteries and old equipment.
EJEC
Two AAA
CARD
We have reduced the packaging to its minimum and made
it easy to separate into two
materials: cardboard (box) and
polyethylene (bags).
Battery Compartment – Install two
AAA, R03, or UM4 batteries here.
T
CARD EJECT – Push
the switch toward the
SmartMedia card to
eject the card. Make
sure the Player is off.
– 3.5 mm stereo
headphone jack
SmartMedia Card
CARD INSERT – Insert the
SmartMedia card here. Make
sure the Player is off.
10
CONNECTING RUSH TO YOUR COMPUTER
BEGIN
1
Press NO ■ to turn off the
Player. Make sure the computer is
off.
1
4
NO
BOOKMARK
YE
S
DELETE
DISP
D
LAY
L
O
H
MO
/EQ
VOLU
ME
5V
D
C
DA
TA
I/O
4.
If a printer cable is connected to
the parallel port on your computer,
disconnect the printer cable.
5
DE
2
3
TO
P
3
DATA I/O
Jack
Connect the supplied parallel
cable to the computer's parallel
port. Remove the protective rubber
seal from the DATA I/O jack on the
Player, then connect the small end of
the cable to the DATA I/O jack.
3
Press YES © to turn on the
Player.
Press the POWER button on the
computer to turn on your computer.
Parallel Port on
back of computer
Parallel Cable
4
5
2
Smart Help
• Make sure the top of the parallel cable (marked
TOP) is facing up when you connect the cable to the
DATA I/O jack.
• Keep the protective rubber seal in place on the DATA
I/O jack when not in use.
11
INSTALLING REALJUKEBOX
Install the RealJukebox software to manage
your playlist on your PC. RealJukebox lets you:
• Record CD tracks onto your PC or send the
CD songs to RUSH for portable playback.
• Index your songs according to artist, album,
or genre.
• Download music from the Internet.
BEGIN
1
RealJukebox works in ECP (Extended
Capability Port or Printer Port) mode. To make
sure your computer is in ECP mode, select My
Computer → Control panel → System →
Device Manager → Ports. Select ECP at
Ports.
2
Insert the RealJukebox CD into your
computer’s CD-ROM drive. The setup
screen will appear on your monitor.
3
Follow the on-screen directions to install
the RealJukebox software. Refer to page 13
when setting the Encoding Options.
More details about RealJukebox are on
pages 13-14 and 17-20.
IF YOU ARE NOT IN ECP MODE:
• Restart your computer.
• Refer to your computer instruction manual, or contact the dealer to enter BIOS setup.
• Select ECP as the parallel port mode.
IF YOUR COMPUTER DOES NOT SUPPORT
ECP MODE:
• Refer to your computer instruction manual, or contact the dealer to select EPP (Enhanced Parallel
Port) or bi-directional mode.
Smart Help
• Connect to the Internet while using
RealJukebox to use all the features.
• If any other media player is listed as the default
device for your computer, the RealJukebox player
will not function properly until that device is disabled.
• ECP provides high performance, bi-directional
communication between a host adapter and a
peripheral.
12
RECORDING FORMATS (ENCODING OPTIONS)
RUSH plays files recorded in MP3, Wave
Audio, or RealAudio format. Before recording,
select a format and a Secure Files setting.
BEGIN
1
While installing RealJukebox (details are
on page 12), select Encoding Options.
2
The following formats will be available.
Select your format.
• MP3 (MPEG layer 3 Audio) compression
levels are 96, 64, and 56 Kbps stereo, using
the supplied RealJukebox software. If you
upgrade your software, RUSH can play music
with compression levels up to 224 Kbps.
• RealAudio (from RealNetworks) saves
your music as RealAudio (.rmx) secure or
RealAudio unsecured (.rmj) files.
Compression levels are 96, 64, and 44 Kbps
stereo and 32 Kbps monaural.
• Wave Audio is unencoded, uncompressed
music. It has the best sound but uses the most
disk space, as much as 650 megabytes per
CD.
• Secure Files On: Files can only be played
on the PC on which they were recorded.
• Secure Files Off: The files can be played
on more than one PC.
13
Note
• A higher Kbps number means better sound
quality. However, as the Kbps number
increases, so does the amount of disk space
used.
• For the best recording results, activate Use
Error Correction. From the main
RealJukebox menu, select Options, then
choose Preferences, then Recording Options.
Select Use Error Correction, then click OK.
USING REALJUKEBOX
Play the broadest range of digital
music. Listen to music while you
record.
Download and install new
plug-ins and updates. Go
to the on-line tutorial,
Access the Philips
SmartConnect web site.
Put your CD collection on your
PC. Record CDs at high speed.
Create and save Playlists. Sort
and manage songs and CDs by
genre, artist, album, song title,
etc.
Portable Players/Storage
Find and download music,
including MP3 songs, from the
Internet.
Drag and drop music from
RealJukebox to RUSH!
14
Download a CD track
or artist and album
information.
SMARTMEDIA CARD
You can store up to an hour of music
on the card, erasing and overwriting
as much as you want.
NO ■ Button
1
Bottom of RUSH
BEGIN
1
Press NO ■ to turn off the Player
before inserting or removing the card.
2 Insert a SmartMedia Card into
CARD INSERT with the clipped corner of the card aligned as shown on
the Player.
3 To remove the card, slide the
CARD EJECT switch toward the
card and remove the card.
NO
3
T
EJEC
SmartMedia Card
CARD EJECT
Switch
CARD INSERT
Smart Help
•
•
•
•
CARD
2
These messages may appear on the display.
Blank 32 Mb means your card is blank.
Card details appears if the card contains files.
Wrong Card appears if the format is incompatible with the Player.
No Audio Tr means the track is not an audio track or your card is blank.
15
PREVENTING CARD ERASURE AND OVERWRITING
BEGIN
1
To prevent accidental erasure or
overwriting of your card, place a
chrome sticker (supplied) over the
circle on the front of the card.
1
2
2
If you later decide to erase or overwrite your card, remove the chrome
sticker first. Details are on page 28.
Write Protect may appear on the display if you forget to remove the chrome
sticker and try to delete tracks or erase
your card.
Chrome Sticker
SmartMedia Card
Note
• Use only the Philips blue SmartMedia cards for your Player. Do
not use SmartMedia cards from a digital camera or computer.
• After a SmartMedia card has been formatted for MP3 files, the card will
not be recognized by your PC or digital camera.
• Chrome stickers are supplied with the SmartMedia card.
16
REALJUKEBOX ON-LINE TUTORIAL
The RealJukebox on-line tutorial is a helpful
resource when you want more information on
RealJukebox features. To get to this information,
follow the steps below. Read the tutorial before
using and recording files.
BEGIN
1
Use your Internet browser to go to:
www.real.com
2
At the www.real.com site, select
RealJukebox.
3
Select RealJukebox Central, usually
located at the bottom of the page.
4
5
Choose Using RealJukebox.
At Using RealJukebox, select the information you want to study, including Quick
Start, Advanced Features, or Service &
Support.
Smart Help
You also may go to the on-line tutorial by
selecting Help in RealJukebox.
17
REALJUKEBOX FEATURES
SENDING FILES TO RUSH
FROM YOUR PC
MAKING MP3 FILES FROM A CD
1
2
BEGIN
Double-click to select the
RealJukebox symbol on your PC.
Insert an audio CD in the CD-ROM
drive. CD track details will appear on the
screen. (Make sure you have selected
record/play CD at the left of the
RealJukebox screen.)
3
Select the track you want to record in
MP3.
4
From Controls in the RealJukebox toolbar, choose Record. The recording status
will appear on the screen. When recording
is complete, the track will be stored in the
Music Library of RealJukebox on your
PC.
Note: If you choose Record without choosing a track, the entire audio CD will be
recorded. RealJukebox will record the entire
audio CD within the same time it takes to
play the first few tracks, depending on the
total amount of tracks. You can stop recording at anytime by selecting Stop.
BEGIN
1
Before connecting the RUSH Player to your computer, insert batteries or connect the power adapter.
Details are on pages seven, eight, and 11. Make sure a
SmartMedia card is in the Player.
2
Press YES © to turn on the RUSH Player.
3
Double-click the RealJukebox symbol to select
RealJukebox on your PC.
4
Single click the plus symbol
beside Portable Players/Storage to access Philips
RUSH → Flash Card details.
5
To transfer an MP3 file to RUSH, click on the file
and drag it from the Music Library to the Flash Card
detail listed under Portable Players/Storage →
Philips Rush.
6
Click Flash Card, then Begin Transfer (at the bottom of the screen) to copy the tracks to the RUSH
SmartMedia card. The status of the transfer will show
on the screen.
18
REALJUKEBOX FEATURES, CONTINUED
ORGANIZING THE LIBRARY
CREATING A PLAYLIST
You can organize the Master Library
into three groupings: Artist, Album or
Genre.
Enter the Master Library from the
Options menu: (Options)
→Preferences →Music Library
→Master Library. Your Master
Library can be organized in several
ways, allowing you to select the way
you want to group your music.
Create a playlist for playback on your computer
or to download to RUSH.
BEGIN
1
Click New Playlist at the bottom of the
screen.
2
Type in a name for your playlist. Click OK
to add that name to the playlist at the left of your
screen.
3
Select the music from your master library
that you want to put in the playlist.
Note
To personalize your groupings
while you are in RealJukebox, right click
on the track that you want to rename. A
menu will appear. Select rename, then
rename the information as you wish.
4
Drag and drop the desired songs to your
playlist. Click the file name to review the list
that you have created.
19
REALJUKEBOX FEATURES, CONTINUED
DOWNLOADING MUSIC
FROM THE INTERNET
BEGIN
1
With access to the Internet on your
PC, click get music in RealJukebox.
RealJukebox will connect you to the
Internet.
2
Select your music and download it
to your library and playlist. Follow the
steps on the site; different sites may
vary.
Note
For MP3 news and files, try these web sites:
Emusic . . . . . . . . . . . . .http://www.emusic.com
Audible Inc. . . . . . . . . .http://www.audible.com
AudioExplosion, Inc.http://www.audioexplosion.com
AudioHighway.comhttp://www.audiohighway.com
Big Heavy Worldhttp://www.bigheavyworld.com
MP3.com . . . . . . . . . . . . .http://www.mp3.com
SINC Recordingshttp://www.sincrecordings.com
Songs.com . . . . . . . . . . .http://www.songs.com
Some sites may charge you for the music that you
download. Carefully review the information provided
by the site.
20
PLAYING MUSIC
BEGIN
1
Press YES © to turn on the
Player. Philips RUSH will appear
on the display, then playback will
begin. (If the Player is already on,
press YES © to start playback.)
If no card is inserted, Insert Card
will appear.
3
1
2
NO
BOOKMARK
YE
S
DELETE
DIS
PLA
Y
D
L
O
H
Press YES © briefly to pause
playback. To resume playback,
press YES © again. (Press NO ■
once to stop playback.)
MO
DE
/EQ
VOL
UME
D
C
DA
TA
I/O
3
4.5
V
2
Press NO ■ twice to turn off the
Player during playback.
If playback is stopped, press NO ■
once to turn off the Player.
Smart Help
Track playback will resume at the point at
which it was last stopped, even if you turn off the
Player.
21
ADJUSTING VOLUME AND SOUND
BEGIN
1
Press and hold VOLUME ▼ or
▲ to decrease or increase the volume.
The volume bar will appear on the display.
2
Press and hold MODE/EQ for
two seconds until you see one of the
sound modes: Normal, Jazz, Rock, or
Classic.
NO
BOOKMARK
YE
S
DELETE
DIS
PLA
Y
MO
D
L
O
H
DE
3
D
C
DA
TA
I/O
4.5
V
Press MODE/EQ briefly and
repeatedly until your preferred
sound mode appears on the display.
The setting will be saved, even if the
Player is turned off.
/EQ
VOL
UME
1
22
2
3
PUTTING BUTTONS ON HOLD
HOLD prevents the Player’s buttons
from operating accidentally.
BEGIN
1
Press the HOLD © switch to
the right as indicated to lock the buttons. When HOLD is activated,
will appear on the display and the
buttons will not function.
If you try to turn the Player on or off
when HOLD is active, Hold Switch
will appear on the display.
NO
YE
S
DELETE
DIS
PLA
Y
D
L
O
H
MO
DE
2
/EQ
DA
TA
I/O
D
C
VOL
UME
4.5
V
To use the buttons again, cancel
HOLD by sliding the HOLD ©
switch to the left.
1
BOOKMARK
23
2
DISPLAY
BEGIN
1
Press the DISPLAY button
repeatedly to see information about
the items stored on the SmartMedia
card.
2
3
NO
BOOKMARK
2
Press YES © to have your chosen
detail remain on the screen. Otherwise,
the display will return to the first
choice listed within four seconds.
YE
S
DELETE
DIS
PLA
Y
D
L
O
H
MO
DE
3
/EQ
VOL
UME
If you want to see the details under
Option?
• Press YES © while the display
shows Option?
• Press the DISPLAY button briefly
and repeatedly until you see your
option.
3
4.5
V
D
C
1
DA
TA
I/O
General Info
Inf o
Display information includes: TRACK song title; ARTIST name, if entered, or No Artist Info; ALBUM title,
if entered, or No Album Info; CARD title, if entered, or No Card Info; FILE name;
TRACK TIME, including Remained Time (remaining playing time of current track) and Total Time (total playing time of file); and Option?, including technical details such as Free Memory, Total Memory, Sampling Frq.
(Frequency) and Compression rate. Additional details are on page 19.
24
SELECTING TRACKS/SEARCHING
BEGIN
1
Press §§ or ©© once or
repeatedly until the desired track
number appears on the display.
2
To search within a track, press
and hold §§ or ©©. Watch the
track time on the display; when the
desired point is reached, release the
§§ or ©© button.
NO
BOOKMARK
YE
S
DELETE
DIS
PLA
Y
D
L
O
H
MO
DE
/EQ
VOL
UME
2
1
4.5
V
D
C
DA
TA
I/O
1
25
2
REPEATING AND SHUFFLING TRACKS
BEGIN
1
Press the MODE /EQ button
briefly and repeatedly to select:
REPEAT 1 – repeats current track;
REPEAT ALL – repeats all tracks;
or SHUFFLE – plays tracks in random order. Your selection will
appear on the display in the bottom
left corner.
NO
BOOKMARK
YE
S
DELETE
DIS
PLA
Y
D
L
O
H
2
To return to normal playback,
press the MODE/EQ button
repeatedly until the display is clear.
MO
DE
/EQ
VOL
UME
4.5
V
D
C
DA
TA
I/O
26
1
2
BOOKMARKS
BOOKMARK allows you to start
playback instantly at a selected point
within a file/track. You can set up to
10 bookmarks.
3
2
1
BEGIN
1
When the desired point is reached
during playback, press and hold
BOOKMARK for more than two
seconds. Mark Set appears on the
display.
NO
BOOKMARK
YE
S
DELETE
DIS
PLA
Y
D
L
O
H
MO
DE
2
Repeat step 1 to set other bookmarks.
/EQ
VOL
UME
V
D
C
DA
TA
I/O
3
4.5
To start playback from a bookmark, press BOOKMARK quickly
and repeatedly until you see the
desired bookmark on the display.
Playback will begin automatically.
Note
Setting more than 10 bookmarks will overwrite your original set of bookmarks.
27
CLEARING TRACKS
When clearing tracks, bookmarks, or
the SmartMedia card, use DELETE
only when you are absolutely sure you
no longer want the existing contents!
3
BEGIN
2
NO
BOOKMARK
YE
2
S
Within 15 seconds, press DELETE
repeatedly to see: Delete Track? Erase
Card? or Clear Marks?
DELETE
DIS
PLA
Y
D
L
O
H
MO
DE
3
/EQ
VOL
UME
If you no longer wish to delete the
information, press NO ■.
To delete the bookmark, track, or card,
press YES ©. If you chose Erase
Card at step 2, the display asks: Are
You Sure? To delete the entire card,
press YES ©.
Depending on your selection, the display shows Clearing Marks, Clearing
Tracks, or Erasing Card, then Marks
Cleared, Track Deleted, or Card
Erased.
DA
TA
I/O
C
During playback, press YES © to
pause playback.
4.5
V
D
1
1
Note
The Player will clear all bookmarks automatically if you choose Clear Marks?.
28
CARRYING POUCH
Disconnect the headphones before
using the pouch.
BEGIN
1
1
Store your extra SmartMedia
card(s) in the pocket.
2
2
Insert the Player into the pouch
with the display screen facing the plastic square.
3 Insert the strap through the plastic
square and pull the strap to adjust it
securely.
4
3
Adjust the elastic cords to make
sure all the buttons are accessible.
Detachable key ring
Push back the hinge of the key ring,
then hook it onto a belt, etc.
Belt strap
If your belt is a suitable width, thread
the belt through the strap at the back of
the pouch.
29
4
SMART HELP
If you have questions about RealJukebox, visit www.Real.com .
For help with the RUSH Player, visit www.rush.philips.com, or call Philips at 1-800-531-0039.
The display is blank or there is no sound.
• Make sure the batteries are inserted correctly. Install new ones if necessary. Details are on pages
seven and 10.
• Make sure the power adapter is connected securely. Check the power supply at the wall outlet.
Details are on page eight.
• Press YES © until information appears on the display. Details are on page 21.
• Make sure the headphones are connected securely.
RUSH does not respond when you press buttons.
• Turn off Hold. Details are on page 23.
• Remove the batteries, then replace them after several seconds.
Sound skips during playback on RUSH.
• If the file was recorded at a compression level exceeding 224 Kbps, use a lower compression
level to record CD tracks into MP3 format. Details are on page 13.
Unable to download MP3 file
• Check the batteries. Make sure the connections between RUSH and your PC are secure. Details
are on pages 11 and 18.
• Make sure your computer is in ECP mode. Details are on page 12.
30
SMART HELP, CONTINUED
External drive of PC has no power.
• Secure all connections. Turn on the power at the wall outlet. Turn on the PC.
SmartMedia card can not be inserted or will not play.
• Insert card correctly. Details are on page 15.
• Use MP3 format. Details are on page 13.
• The card may be damaged. Replace the card.
• Use only Philips blue SmartMedia cards.
Do not use cards from a digital camera or another MP3 player.
RUSH skips or repeats files during playback.
• Press MODE/EQ to cancel Shuffle or Repeat mode. Details are on page 26.
Long delay between songs
• This could occur if you alternate between recording in MP3, RealAudio, or Wave Audio formats.
Group songs according to format before transferring them to RUSH.
Note
Player Weight
65 g (without batteries)
Player Dimensions (mm)
70.5 (w) x 70.5 (h) x 17.7 (d)
Amplifier system
Audio out . . . . . . . . . . . .2 x 5mW
Signal to Noise ratio . . . . . .>60dB
Frequency response .30Hz - 16KHz
31
Connections
I/O Interface 26-pin mini connector
DC jack . . .3.5 mm, 4.5V center '+'
Power Supply
Batteries .Two AAA, R03, or UM4
External supply . . . . . . . .4.5V DC
LIMITED WARRANTY
PORTABLE AUDIO
90 days Free Exchange / One year Free Parts
This product must be carried in for an exchange.
WHO IS COVERED?
You must have proof of purchase to exchange the product. A
sales receipt or other document showing that you purchased the
product is considered proof of purchase. Attach it to this
owner’s manual and keep both nearby.
WHAT IS COVERED?
Warranty coverage begins the day you buy your product. For 90
days thereafter, a defective or inoperative product will be
replaced with a new, renewed, or comparable product at no
charge to you. From 90 days to one year from the day of purchase, all parts will be repaired or replaced, but you pay for all
labor charges. After one year from the day of purchase, you pay
for the replacement or repair of all parts, and for all labor
charges.
A replacement product is covered only for the original warranty
period.When the warranty on the original product expires, the
warranty on the replacement product also expires.
WHAT IS EXCLUDED?
Your warranty does not cover:
• labor charges for installation or setup of the product, adjustment of customer controls on the product, and installation or
repair of antenna systems outside of the product.
• product repair and/or part replacement because of misuse,
accident, unauthorized repair or other cause not within the
control of Philips Consumer Electronics.
• reception problems caused by signal conditions or cable or
antenna systems outside the unit.
• a product that requires modification or adaptation to enable it
to operate in any country other than the country for which it
was designed, manufactured, approved and/or authorized, or
repair of products damaged by these modifications.
• incidental or consequential damages resulting from the product. (Some states do not allow the exclusion of incidental or
consequential damages, so the above exclusion may not apply
to you.This includes, but is not limited to, prerecorded material, whether copyrighted or not copyrighted.)
• a product used for commercial or institutional purposes.
WHERE IS EXCHANGE AVAILABLE?
You may exchange the product in all countries where the product is officially distributed by Philips Consumer Electronics. In
countries where Philips Consumer Electronics does not distribute the product, the local Philips service organization will
attempt to provide a replacement product (although there may
be a delay if the appropriate product is not readily available).
BEFORE REQUESTING EXCHANGE...
Please check your owner’s manual before requesting an
exchange. Adjustments of the controls discussed there may save
you a trip.
32
LIMITED WARRANTY
EXCHANGING A PRODUCT IN U.S.A.,
PUERTO RICO OR U.S.VIRGIN ISLANDS...
Contact your dealer to arrange an exchange. Or, ship the product, insured and freight prepaid, and with proof of purchase
enclosed, to the address listed below.
Small Product Service Center
Philips Service Solutions Group
907 Snapps Ferry Road, Plant 2, Building 6
Greeneville, TN 37743
(In U.S.A., Puerto Rico and U.S.Virgin Islands, all implied warranties,including implied warranties of merchantability and fitness for a particular purpose, are limited in duration to the duration of this express warranty. But, because some states do not
allow limitations on how long an implied warranty may last,
this limitation may not apply to you.)
EXCHANGING A PRODUCT IN CANADA...
Please contact Philips at:
purpose. Philips is not liable under any circumstances for any
direct, indirect, special, incidental or consequential damages,
howsoever incurred, even if notified of the possibility of such
damages.)
TO GET OUT-OF-WARRANTY EXCHANGE...
In U.S.A., Puerto Rico or U.S.Virgin Islands, contact Philips
Service Solutions Group at 1-800-531-0039 to obtain the cost of
out-of-warranty exchange. Then carefully pack the product and
ship it to the Small Product Service Center (address listed at
left). In Canada, call the phone number listed above under
“Exchanging a Product in Canada” to obtain the cost of out-ofwarranty exchange.
REMEMBER...
Please record the model and serial numbers found on the
product below. Also, please fill out and mail your warranty
registration card promptly. It will be easier for us to notify you
if necessary.
MODEL # __________________________________
1-800-661-6162 (French Speaking)
1-800-363-7278 (English Speaking)
SERIAL # __________________________________
(In Canada, this warranty is given in lieu of all other warranties.
No other warranties are expressed or implied, including any
implied warranties of merchantability or fitness for a particular
This warranty gives you specific legal rights.You may have other rights which vary from state/province to state/province.
Philips Service Solutions Group, P.O. Box 2976, Longview,Texas 75606, (903) 242-4800
33
INDEX
batteries ...........................7, 10
BOOKMARK button.......9, 27
bookmarks, setting of...........27
CARD EJECT................10, 15
CARD INSERT .............10, 15
carrying pouch .....................29
chrome sticker......................16
clearing tracks ......................28
compression levels...............13
connections...........................11
controls .............................9-10
DATA I/O jack .................9, 11
DC jack...............................8-9
DELETE button ...............9, 28
Display ...................................9
DISPLAY button..............9, 24
maintenance ...........................7
Master Library .....................19
MODE/EQ button......9, 22, 26
MP3
files, making of ..............18
format.............................13
sending to RUSH ...........18
NO ■ button ....................9, 21
on-line tutorial......................17
parallel cable ........................11
playing music.......................21
Playlist..................................19
power adapter.........................8
headphone jack ....................10
HOLD © switch ..............9, 23
RealAudio ............................13
RealJukebox
installing.........................12
using ..............13-14, 17-20
recording formats.................13
repeating tracks ....................26
limited warranty..............32-33
safety precautions ...............3-4
general information................6
34
"searching" §§ , ©©
buttons..............................9, 25
secure files ...........................13
shuffling tracks.....................26
Smart Help......................30-31
SmartMedia Card...........10, 16
erasure…… ....................16
overwriting.....................16
storage…… ....................29
software, installation of .......12
specifications........................31
table of contents.....................5
track selection ......................25
volume, adjusting of ............22
VOLUME o,p buttons ..9, 22
Wave Audio..........................13
YES © button.............9, 11, 21
www.rush.philips.com