1
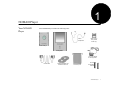
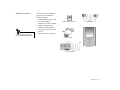
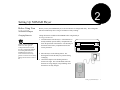
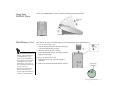
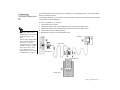
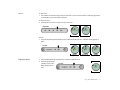
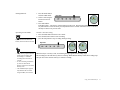
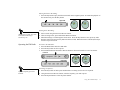
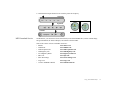
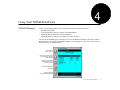
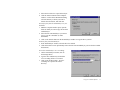
Creative NOMAD®
Digital Audio Player
User Guide
On-line Version
Getting Started
Creative NOMAD® Digital Audio Player
NOMAD Manager Software
Creative Digital Center by MusicMatch™ Software
Information in this document is subject to change without notice and does not represent a commitment on the part of Creative Technology Ltd. No part of this manual
may be reproduced or transmitted in any form or by any means, electronic or mechanical, including photocopying and recording, for any purpose without the written
permission of Creative Technology Ltd. The software described in this document is furnished under a license agreement and may be used or copied only in accordance
with the terms of the license agreement. It is against the law to copy the software on any other medium except as specifically allowed in the license agreement. The
licensee may make one copy of the software for backup purposes.
Copyright © 1999 by Creative Technology Ltd. All rights reserved.
Version 1.0 (CLI): June 1999
Sound Blaster, the Sound Blaster logo, and the Creative logo are registered trademarks, and Sound Blaster Live! and Environmental Audio are trademarks of Creative
Technology Ltd. in the United States and/or other countries. NOMAD is a registered trademark of Aonix and is used by Creative Technology Ltd. and/or its affiliates
under license. EMusic, EMusic.com, and the EMusic.com logo are trademarks of EMusic.com Inc. MP3.com and the MP3.com logo are trademarks of MP3.com,
Inc. MusicMatch, MusicMatch Jukebox, and the MusicMatch logo are trademarks of MusicMatch, Inc. Xing and the Xing logo are trademarks of Xing Technology
Corporation. Microsoft and Windows are either registered trademarks or trademarks of Microsoft Corporation in the United States and/or other countries. Pentium
is a registered trademark of Intel Corporation.
All other brand and product names listed are trademarks or registered trademarks of their respective holders.
All specifications subject to change without prior notice. Use of this product is subject to the limited warranty. Actual contents may differ slightly from those pictured.
This product is designed to assist you in reproducing material for which you own the copyright or are authorized to copy by the copyright owner or by exemption in
applicable law. Unless you own the copyright or have such authorization, you may be violating copyright law and may be subject to payment of damages and other
remedies. If you are uncertain about your rights, you should contact your legal advisor.
C re a ti v e End- Us e r So ft wa re Lic e ns e Ag ree m e nt
PLEASE READ THIS DOCUMENT CAREFULLY BEFORE USING THE SOFTWARE. BY USING THE SOFTWARE, YOU AGREE TO BE BOUND BY THE TERMS OF THIS AGREEMENT. IF YOU DO
NOT AGREE TO THE TERMS OF THE AGREEMENT, DO NOT OPEN THE SEALED DISK PACKAGE, INSTALL OR USE THE SOFTWARE. PROMPTLY RETURN, WITHIN 15 DAYS, THE SOFTWARE,
ALL RELATED DOCUMENTATION AND ACCOMPANYING ITEMS TO THE PLACE OF ACQUISITION FOR A FULL REFUND.
This is a legal agreement between you and Creative Technology Ltd.
and its subsidiaries (“Creative”). This Agreement states the terms and
conditions upon which Creative offers to license the software sealed in
the disk package together with all related documentation and
accompanying items including, but not limited to, the executable
programs, drivers, libraries and data files associated with such programs
(collectively, the “Software”).
LICENSE
1. Grant of License
The Software is licensed, not sold, to you for use only under the terms
of this Agreement. You own the disk or other media on which the
Software is originally or subsequently recorded or fixed; but, as
between you and Creative (and, to the extent applicable, its licensors),
Creative retains all title to and ownership of the Software and reserves
all rights not expressly granted to you.
2. For Use on a Single Computer
The Software may be used only on a single computer by a single user
at any time. You may transfer the machine-readable portion of the
Software from one computer to another computer, provided that (a)
the Software (including any portion or copy thereof) is erased from
the first computer and (b) there is no possibility that the Software will
be used on more than one computer at a time.
3. Stand-Alone Basis
You may use the Software only on a stand-alone basis, such that the
Software and the functions it provides are accessible only to persons
who are physically present at the location of the computer on which
the Software is loaded. You may not allow the Software or its
functions to be accessed remotely, or transmit all or any portion of the
Software through any network or communication line.
4. Copyright
The Software is owned by Creative and/or its licensees and is
protected by United States copyright laws and international treaty
provisions. You may not remove the copyright notice from any copy
of the Software or any copy of the written materials, if any,
accompanying the Software.
5. One Archival Copy
You may make one (1) archival copy of the machine-readable portion
of the Software for backup purposes only in support of your use of the
Software on a single computer, provided that you reproduce on the
copy all copyright and other proprietary rights notices included on the
originals of the Software.
6. No Merger or Integration
You may not merge any portion of the Software into, or integrate any
portion of the Software with, any other program, except to the extent
expressly permitted by the laws of the jurisdiction where you are
located. Any portion of the Software merged into or integrated with
another program, if any, will continue to be subject to the terms and
conditions of this Agreement, and you must reproduce on the merged
or integrated portion all copyright and other proprietary rights notices
included in the originals of the Software.
7. Network Version
If you have purchased a “network” version of the Software, this
Agreement applies to the installation of the Software on a single “file
server”. It may not be copied onto multiple systems. Each “node”
connected to the “file server” must also have its own license of a
“node copy” of the Software, which becomes a license only for that
specific “node”.
8. Transfer of License
You may transfer your license of the Software, provided that (a) you
transfer all portions of the Software or copies thereof, (b) you do not
retain any portion of the Software or any copy thereof, and (c) the
transferee reads and agrees to be bound by the terms and conditions
of this Agreement.
9. Limitations on Using, Copying, and Modifying the Software
Except to the extent expressly permitted by this Agreement or by the
laws of the jurisdiction where you acquired the Software, you may not
use, copy or modify the Software. Nor may you sub-license any of
your rights under this Agreement.
10.Decompiling, Disassembling, or Reverse Engineering
You acknowledge that the Software contains trade secrets and other
proprietary information of Creative and its licensors. Except to the
extent expressly permitted by this Agreement or by the laws of the
jurisdiction where you are located, you may not decompile,
disassemble or otherwise reverse engineer the Software, or engage in
any other activities to obtain underlying information that is not visible
to the user in connection with normal use of the Software.
In particular, you agree not for any purpose to transmit the Software
or display the Software's object code on any computer screen or to
make any hardcopy memory dumps of the Software's object code. If
you believe you require information related to the interoperability of
the Software with other programs, you shall not decompile or
disassemble the Software to obtain such information, and you agree
to request such information from Creative at the address listed below.
Upon receiving such a request, Creative shall determine whether you
require such information for a legitimate purpose and, if so, Creative
will provide such information to you within a reasonable time and on
reasonable conditions.
In any event, you will notify Creative of any information derived from
reverse engineering or such other activities, and the results thereof
will constitute the confidential information of Creative that may be
used only in connection with the Software.
TERMINATION
The license granted to you is effective until terminated. You may
terminate it at any time by returning the Software (including any portions
or copies thereof) to Creative. The license will also terminate
automatically without any notice from Creative if you fail to comply
with any term or condition of this Agreement. You agree upon such
termination to return the Software (including any portions or copies
thereof) to Creative. Upon termination, Creative may also enforce any
rights provided by law. The provisions of this Agreement that protect the
proprietary rights of Creative will continue in force after termination.
LIMITED WARRANTY
Creative warrants, as the sole warranty, that the disks on which the
Software is furnished will be free of defects, as set forth in the Warranty
Card or printed manual included with the Software. No distributor,
dealer or any other entity or person is authorized to expand or alter this
warranty or any other provisions of this Agreement. Any representation,
other than the warranties set forth in this Agreement, will not bind
Creative.
Creative does not warrant that the functions contained in the Software
will meet your requirements or that the operation of the Software will be
uninterrupted, error-free or free from malicious code. For purposes of
this paragraph, “malicious code” means any program code designed to
contaminate other computer programs or computer data, consume
computer resources, modify, destroy, record, or transmit data, or in some
other fashion usurp the normal operation of the computer, computer
system, or computer network, including viruses, Trojan horses, droppers,
worms, logic bombs, and the like. EXCEPT AS STATED ABOVE IN
THIS AGREEMENT, THE SOFTWARE IS PROVIDED AS-IS
WITHOUT WARRANTY OF ANY KIND, EITHER EXPRESS OR
IMPLIED, INCLUDING, BUT NOT LIMITED TO, ANY
IMPLIED WARRANTIES OF MERCHANTABILITY AND
FITNESS FOR A PARTICULAR PURPOSE. CREATIVE IS NOT
OBLIGATED TO PROVIDE ANY UPDATES, UPGRADES OR
TECHNICAL SUPPORT FOR THE SOFTWARE.
Further, Creative shall not be liable for the accuracy of any information
provided by Creative or third party technical support personnel, or any
damages caused, either directly or indirectly, by acts taken or omissions
made by you as a result of such technical support.
You assume full responsibility for the selection of the Software to
achieve your intended results, and for the installation, use and results
obtained from the Software. You also assume the entire risk as it applies
to the quality and performance of the Software. Should the Software
prove defective, you (and not Creative, or its distributors or dealers)
assume the entire cost of all necessary servicing, repair or correction.
This warranty gives you specific legal rights, and you may also have
other rights which vary from country/state to country/state. Some
countries/states do not allow the exclusion of implied warranties, so the
above exclusion may not apply to you. Creative disclaims all warranties
of any kind if the Software was customized, repackaged or altered in any
way by any third party other than Creative.
LIMITATION OF REMEDIES AND DAMAGES
THE ONLY REMEDY FOR BREACH OF WARRANTY WILL BE
THAT SET FORTH IN THE WARRANTY CARD OR PRINTED
MANUAL INCLUDED WITH THE SOFTWARE. IN NO EVENT
WILL CREATIVE OR ITS LICENSORS BE LIABLE FOR ANY
INDIRECT, INCIDENTAL, SPECIAL OR CONSEQUENTIAL
DAMAGES OR FOR ANY LOST PROFITS, LOST SAVINGS,
LOST REVENUES OR LOST DATA ARISING FROM OR
RELATING TO THE SOFTWARE OR THIS AGREEMENT,
EVEN IF CREATIVE OR ITS LICENSORS HAVE BEEN
ADVISED OF THE POSSIBILITY OF SUCH DAMAGES. IN NO
EVENT WILL CREATIVE’S LIABILITY OR DAMAGES TO
YOU OR ANY OTHER PERSON EVER EXCEED THE AMOUNT
PAID BY YOU TO USE THE SOFTWARE, REGARDLESS OF
THE FORM OF THE CLAIM.
Some countries/states do not allow the limitation or exclusion of liability
for incidental or consequential damages, so the above limitation or
exclusion may not apply to you.
PRODUCT RETURNS
If you must ship the software to Creative or an authorized Creative
distributor or dealer, you must prepay shipping and either insure the
software or assume all risk of loss or damage in transit.
U.S. GOVERNMENT RESTRICTED RIGHTS
All Software and related documentation are provided with restricted
rights. Use, duplication or disclosure by the U.S. Government is subject
to restrictions as set forth in subdivision (b)(3)(ii) of the Rights in
Technical Data and Computer Software Clause at 252.227-7013. If you
are sub-licensing or using the Software outside of the United States, you
will comply with the applicable local laws of your country, U.S. export
control law, and the English version of this Agreement.
CONTRACTOR/MANUFACTURER
The Contractor/Manufacturer for the Software is:
Creative Technology Ltd
31, International Business Park
Creative Resource
Singapore 609921
GENERAL
This Agreement is binding on you as well as your employees, employers,
contractors and agents, and on any successors and assignees. Neither the
Software nor any information derived therefrom may be exported except
in accordance with the laws of the U.S. or other applicable provisions.
This Agreement is governed by the laws of the State of California
(except to the extent federal law governs copyrights and federally
registered trademarks). This Agreement is the entire agreement between
us and supersedes any other understandings or agreements, including,
but not limited to, advertising, with respect to the Software. If any
provision of this Agreement is deemed invalid or unenforceable by any
country or government agency having jurisdiction, that particular
provision will be deemed modified to the extent necessary to make the
provision valid and enforceable, and the remaining provisions will
remain in full force and effect.
For questions concerning this Agreement, please contact Creative at the
address stated above. For questions on product or technical matters,
contact the Creative technical support center nearest you.
ADDENDUM TO THE MICROSOFT SOFTWARE LICENSE
AGREEMENT (WINDOWS 95)
IMPORTANT: By using the Microsoft software files (the “Microsoft
Software”) provided with this Addendum, you are agreeing to be bound
by the following terms. If you do not agree to be bound by these terms,
you may not use the Microsoft Software.
The Microsoft Software is provided for the sole purpose of replacing the
corresponding files provided with a previously licensed copy of the
Microsoft software product identified above (“ORIGINAL
PRODUCT”). Upon installation, the Microsoft Software files become
part of the ORIGINAL PRODUCT and are subject to the same warranty
and license terms and conditions as the ORIGINAL PRODUCT. If you
do not have a valid license to use the ORIGINAL PRODUCT, you may
not use the Microsoft Software. Any other use of the Microsoft Software
Safety Information
The following sections contain notices for various countries:
❑ Consult the dealer or an experienced radio/TV technician.
CAUTION: This device is intended to be installed by the user in a CSA/
TUV/UL certified/listed IBM AT or compatible personal computers in
the manufacturer’s defined operator access area. Check the equipment
operating/installation manual and/or with the equipment manufacturer to
verify/confirm if your equipment is suitable for user-installed
application cards.
To comply with the limits for the Class B digital device, pursuant to Part
15 of the FCC Rules, this device must be installed in computer
equipment certified to comply with the Class B limits.
ATTENTION: Ce carte est destiné à être installé par l’utilisateur, dans
un ordinateur compatible certifié CSA/TUV/UL ou listé IBM AT, à
l’intérieur de la zone définie par le fabricant. Consulter le mode
d’emploi ou le fabricant de l’appareil pour vérifier ou confirmer si
l’utilisateur peut y installer lui-même des cartes périphériques.
Modifications
Caution
Name:
Creative Labs Inc.
Address:
1901 McCarthy Boulevard
Milpitas, CA. 95035
United States
Tel: (408) 428-6600
All cables used to connect the computer and peripherals must be shielded
and grounded. Operation with non-certified computers or non-shielded
cables may result in interference to radio or television reception.
Any changes or modifications not expressly approved by the grantee of
this device could void the user’s authority to operate the device.
Notice for the USA
Notice for Canada
FCC Part 15: This equipment has been tested and found to comply with
the limits for a Class B digital device, pursuant to Part 15 of the FCC
Rules. These limits are designed to provide reasonable protection against
harmful interference in a residential installation. This equipment
generates, uses, and can radiate radio frequency energy and, if not
installed and used in accordance with the instructions, may cause
harmful interference to radio communications. However, this notice is
not a guarantee that interference will not occur in a particular installation.
If this equipment does cause harmful interference to radio or television
reception, which can be determined by turning the equipment off and on,
the user is encouraged to try one or more of the following measures:
This apparatus complies with the Class “B” limits for radio interference
as specified in the Canadian Department of Communications Radio
Interference Regulations.
❑ Reorient or relocate the receiving antenna.
❑ Increase the distance between the equipment and receiver.
❑ Connect the equipment to an outlet on a circuit different from that
to which the receiver is connected.
Declaration of Conformity
According to the FCC96 208 and ET95-19 documents,
Cet appareil est conforme aux normes de CLASSE “B” d’interference
radio tel que spécifié par le Ministère Canadien des Communications
dans les règlements d’interférence radio.
Compliance
This product conforms to the following Council Directive:
❑ Directive 89/336/EEC, 92/31/EEC (EMC)
declares under its sole responsibility that the product
Trade Name:
Creative Labs
Model Number:
DAP-3201
has been tested according to the FCC / CISPR22/85
requirements for Class B devices and found compliant with
the following standards
EMI/EMC:
ANSI C63.4 1992, FCC Part 15 Subpart B
This device complies with part 15 of the FCC Rules.
Operation is subject to the following two conditions:
1. This device may not cause harmful interference, and
2. This device must accept any interference received, including
interference that may cause undesirable operation.
Ce matériel est conforme à la section 15 des régles FCC. Son
Fonctionnement est soumis aux deux conditions suivantes:
1. Le matériel ne peut étre source D’interférences et
2. Doit accepter toutes les interférences reques, Y compris celles
pouvant provoquer un fonctionnement indésirable.
Compliance Manager
Creative Labs, Inc.
1999
Contents
Introduction........................................................................................................vii
System Requirements ..............................................................................................................................vii
Handling Instructions..............................................................................................................................viii
1
NOMAD Player .................................................................................................. 1
Your NOMAD Player................................................................................................................................ 1
Optional accessories ...................................................................................................................... 2
Location of Controls...................................................................................................................... 3
Docking Station ............................................................................................................................. 3
What is MP3?............................................................................................................................................. 4
MP3 Conversion ........................................................................................................................................ 4
Extracting from an Audio CD....................................................................................................... 4
Encoding to MP3........................................................................................................................... 4
2
Setting Up NOMAD Player................................................................................ 5
Before Using Your NOMAD Player.........................................................................................................5
Charging Batteries ......................................................................................................................... 5
Using Your NOMAD Player..................................................................................................................... 6
Flash Memory Card ...................................................................................................................................6
Connecting NOMAD Player to a PC........................................................................................................ 7
To Change the BIOS Setting.........................................................................................................8
Installing Software in Windows................................................................................................................ 8
NOMAD Manager..................................................................................................................................... 8
Contents
v
3
Using Your NOMAD Player .............................................................................. 9
Using the Player......................................................................................................................................... 9
Key Lock........................................................................................................................................ 9
Changing Modes............................................................................................................................ 9
Playback MP3 File ...................................................................................................................... 10
Searching MP3 File..................................................................................................................... 10
Equalizer Mode............................................................................................................................ 11
Erasing MP3 File............................................................................................................. 12
Operating in Voice Mode................................................................................................ 12
Operating the FM Radio ............................................................................................................. 13
MP3 Download Service .............................................................................................................. 14
4
Using Your NOMAD Software........................................................................ 15
NOMAD Manager................................................................................................................................... 15
Moving MP3 Files in Windows Explorer .................................................................................. 18
Creative Digital Audio Center by MusicMatch™................................................................................. 19
Playback....................................................................................................................................... 20
Add Files to the Music Library................................................................................................... 21
Automatic Playlists...................................................................................................................... 21
Manual Playlists .......................................................................................................................... 22
Track Info ........................................................................................................................ 23
Record Tracks.............................................................................................................................. 23
CDDB .............................................................................................................................. 24
Add a Title ................................................................................................................................... 24
Add Tracks................................................................................................................................... 24
Tag.................................................................................................................................... 25
Content CD .............................................................................................................................................. 27
APPENDIX
A
Technical Specifications and Troubleshooting ................................................ 31
NOMAD Player DAP-3201.................................................................................................................... 31
NOMAD Docking Station
DS-3201................................................................................................................................................. 32
Troubleshooting ....................................................................................................................................... 33
Contents
vi
Introduction
The NOMAD is a next-generation digital audio player that does not use a cassette tape or a CD.
You can enjoy music stored in the built-in flash memory or the flash memory card of the player, use
NOMAD to record interviews and lectures, or preset up to 10 of your favorite FM stations.
Using the Creative Digital Center by MusicMatch, you can use your computer to copy tracks from your
favorite CDs to NOMAD memory, or you can purchase CD-quality MP3 files through worldwide web
sites or online services to store and play on your NOMAD.
Even during strenuous activity or after repeated playbacks, the sound does not skip or fade. The NOMAD
is light due to its magnesium case and it is resistant to external shocks due to its solid-state construction.
The display screen in the center of the NOMAD Player gives information about the current status such as
the title of the selection and playing time.
System
Requirements
The minimum system requirements for NOMAD are as follows:
• A Pentium® 200 MHz or higher PC (Pentium II or better recommended for MP3 encoding)
• 32 MB RAM (64 MB recommended)
• 30 MB free hard disk space (for MP3 content storage)
• SVGA graphics adapter (256 colors, 640x480 minimum)
• Available parallel port
• CD-ROM or DVD-ROM drive for software installation and CD ripping
• Sound Blaster® Live!™ for Environmental Audio™ effects MP3 encoding
• Microsoft Windows® 95 or Windows® 98
• Microsoft Internet Explorer 3.0 or later
Netscape Navigator 3.0 or lager
• Recommended Internet connection for Internet MP3 downloading (any charges incurred are the
responsibility of the user)
Introduction
vii
Handling
Instructions
Avoid exert severe impact on the Player
•
Vibration during walking or exercising does not affect the NOMAD Player and playback.
However, dropping the Player on a solid surface or dropping a heavy object on the Player may result
in distorted sound and internal damage.
Prevent water from entering the Player
•
•
Water entering the Player set can damage it.
When the Player set comes into contact with water, dry it immediately with a dry cloth. If the Player
set is not functioning, call Technical Support.
Storing the Player set
•
When storing the NOMAD Player, docking station, and memory card, avoid places with high
humidity, strong magnetic fields, or high heat.
Introduction
viii
1
NOMAD Player
Your NOMAD
Player
Your NOMAD Player includes the following items:
Stereo
headphones
Flash memory
card (64-MB
model only)
NOMAD Player
Docking station
AC current adapter
for docking station
Parallel cable
Software installation CD
and MP3 content CD
Protective pouch
Two AAA
rechargeable
batteries
NOMAD Player
1
Optional accessories
For the latest list of accessories,
visit www.nomadworld.com.
Accessories for your NOMAD
player that can be purchased
separately include:
• Additional flash memory card
• Car cassette adapter
• Additional AC current adapter
• Additional parallel cable
• Additional docking station
• Carrying case with clasp (not
shown)
• Portable headset (not shown)
Additional flash memory card
Parallel cable
AC current adapter
Docking station
Car cassette adapter
NOMAD Player
2
Location of Controls
Front
LCD
Headphone jack
Back
Slot open
Flash memory card slot
Microphone
Play/pause/preset
station select
Stop/power off
Volume
Skip track forward
Scan frequency forward
Preset station/scan
frequency reverse
Voice record/delete
Mode select
Repeat/equalizer
mode
Hold
Eject flash
memory card
Docking station connector
Battery case
Docking Station
Front
End
Player connector
Data LED
Indicator (green)
AC adapter jack
Parallel cable connector
Power/charge LED
indicator (red)
NOMAD Player
3
What is MP3?
MP3 is an acronym for Moving Picture Experts Group (MPEG) Layer 3, a type of audio data compression
that can reduce digital sound files by a 12:1 ratio with virtually no loss in quality. It is an efficient way to
store high-quality music or other audio content on your computer. MP3 files can be 1/4 to 1/20 the size
of a commercial CD audio file—yet retain a high sound quality. MP3 files usually have the extension
.MP3, and can be downloaded from the Internet, or can be legally made for personal use from the Audio
CDs that you purchased.
MP3 Conversion
Extracting from an Audio
CD
Audio CD extraction is the first phase in the MP3 conversion process. It is the reading of data off an Audio
CD and storing it temporarily on your hard drive.
You need an application that can direct the CD-ROM drive to extract this audio data. This program is
known as a ripper. It reads the data off the Audio CD and in some cases stores it in a file.
For the latest list of accessories,
visit www.nomadworld.com.
The duration of the Audio CD extraction phase depends on many factors. The speed of a CD-ROM drive
is one of the most important elements in overall extraction speed. The speed ratings commonly seen on
CD-ROM drives—such as 8X, 24X, etc.—refers to the speed at which it can read data CDs or CD-ROMs.
Your particular drive may be fast for data, but slow for audio.
Other factors are defects or scratches on an Audio CD. When playing the Audio CD in a CD-ROM drive,
the data lost due to error is negligible. But when data is read incorrectly and put through the MP3 encoding
phase, the distortion is highly noticeable. To avoid this distortion, the Audio CD extraction software may
read the data two or three times to make sure it was read correctly. This error-checking feature is an option
in most Audio CD data extraction software. Be sure error-checking is enabled in your Audio CD
extraction software.
Encoding to MP3
It is illegal to encode MP3 files for
trade or sale unless you have the
expressed and explicit permission
of the copyright holder(s).
The data extracted from an Audio CD are one of the many types of data an MP3 encoder may process.
Encoders typically expect data to be in .WAV format. They read .WAV data and output MP3 data. These
data are put into an MP3 file.
MP3 encoding is the compressing of data by transforming it into the frequency domain. MP3 encoding/
compression is quality lossy compression and the amount of loss (of quality) is dependent upon the
sampling rate of the output and the bitrate of the output. The higher the sampling and bitrates used, the
better the quality of the sound.
NOMAD Player
4
2
Setting Up NOMAD Player
Before Using Your
NOMAD Player
Before you use your NOMAD Player, be sure the batteries are charged and ready. The rechargeable
batteries included may take as long as 90 minutes to fully recharge.
Charging Batteries
Charge the batteries included with NOMAD before using the Player.
+
-
+
-
Never use non-rechargeable
batteries or other types of
rechargeable batteries such as
Ni-Cad or rechargeable alkaline.
Non-rechargeable batteries in
NOMAD Player while it is
connected to the station may
generate excessive heat or battery
leakage that can lead to a risk of
fire.
To charge the batteries:
1. Load the batteries into the Player. If the batteries are
already installed, open the battery compartment and
check the placement of the batteries. The drawing on
the bottom of the battery compartment shows the
correct placement.
2. Place the Player in the docking station. The
docking station locks the Player in position during
recharging.
3. Connect the adapter to the docking station as
shown to the right. The red LED blinks when the
batteries are being charged; it stops blinking when
the batteries are fully charged.
Setting Up NOMAD Player
5
Using Your
NOMAD Player
To use your NOMAD Player, remove it from the docking station as shown below.
Remove the
player
Top View
Flash Memory Card
• Formatting deletes all files from
memory. After formatting for
the NOMAD Player, your
camera or other SmartMedia
device will have to reformat the
card before it can be reused.
Depending on your camera, it
may not be able to reformat the
card for its own use.
• The files stored on the flash
memory card continue, in
sequence, the track numbers in
the Player’s internal memory.
Lift the player
MP3 files can be stored on the flash memory card and played back on the NOMAD Player.
To insert the flash memory card:
1. Push the Slot Open button on the side of the player
to open the flash memory card slot.
2. Insert the card into the slot as shown.
3. Check that the flash memory card indicator picture
appears on the display.
To remove the flash memory card:
1. Push the Eject lever up. The card is pushed
outwards.
2. Remove the card from the flash memory card slot.
Flash memory
card indicator
Setting Up NOMAD Player
6
Connecting
NOMAD Player to a
PC
• The batteries must be in the
NOMAD Player to download or
upload files from or to the
player.
• You may need to change a BIOS
setting to download MP3 files
from the PC to the Player.
The BIOS setting to be changed
depends on the type of CMOS
setup utility in the PC, which
may be different from the
CMOS described in “To Change
the BIOS Setting” on page 8.
To download MP3 files or to upload voice recordings between NOMAD and a PC, the docking station
must be connected to the PC.
A parallel port on the PC is also required. If a printer cable is connected to the parallel port, disconnect
it temporarily to connect NOMAD.
To connect NOMAD to your computer:
1. Turn off the power to the PC.
2. Connect the parallel cable to the parallel port on the PC and the docking station.
3. Connect the adapter to the docking station and to the wall outlet as shown below.
4. Insert the Player into the docking station.
5. Restart the PC and refer to the instructions below.
AC Adapter
Parallel cable
PC parallel port
NOMAD Player
Docking station
Setting Up NOMAD Player
7
To Change the BIOS
Setting
1. During the memory check, press the DELETE key.
2. On the CMOS Setup Utility menu, select the Integrated Peripherals screen by using the arrow keys
and press the ENTER key.
3. Browse to the option Parallel Port Mode and select ECP or ECP/EPP.
4. Press the ESC (Escape) key to return to the CMOS Setup Utility menu.
5. Press the F10 key to save the setting and exit the CMOS Setup Utility. Your computer should continue
to start up.
Installing Software
in Windows
To install the NOMAD Manager software:
1. Insert the Creative NOMAD Manager installation CD into the CD-ROM drive. If the setup program
does not run automatically, continue with step.
If the setup program does run automatically, go to step 4.
2. Click Start, click on Run.
3. On the Run dialog, type D:\NOMAD\SETUP.EXE (D:\ represents your CD-ROM drive) and click
the OK button.
4. On the NOMAD splash screen, select NOMAD Manager and any other available software you want
to install and click OK.
5. Follow the instructions on-screen to continue with the installation.
6. When prompted to restart your system, remove the CD from the CD-ROM drive and click the Finish
button.
NOMAD Manager
NOMAD Manager allows you to download MP3 and other file types to and from your NOMAD Player.
For details on how to download MP3 files to the Player, refer to NOMAD Player’s online help.
Format the internal memory of the
NOMAD Manager before copying
MP3 files into internal memory.
For details on how to create MP3 files from Audio CDs, refer to MusicMatch’s online help.
Setting Up NOMAD Player
8
3
Using Your NOMAD Player
Using the Player
If no Player operations are entered
in three minutes, it turns off
automatically.
Key Lock
Repeat the current song
To power the Player ON/OFF:
1. Press the Play button to turn
Battery Indicator
Hold
on the power.
DBB (Dynamic
“Welcome to NOMAD”
Base Boost)
appears on the NOMAD
display before beginning MP3
Mode.
2. To turn off the power, press
and hold the Stop button for more than one second.
Repeat all songs
Shuffle all songs
Flash memory card indicator
Recording
Track number
Song title
The Hold switch allows you to lock the control keys and keep them from being changed accidentally
during strenuous activity.
To lock the keys:
1. Lower the Hold switch to lock the keys.
Changing Modes
When you turn on NOMAD Player by pressing the Play button, the default mode is MP3. Press the
Mode button once to open FM Radio mode, press the Mode button again to open Voice mode.
Left Side
Using Your NOMAD Player
9
Playback MP3 File
To play MP3 files, they must first
be stored in the NOMAD Player.
1. Press the Mode button and
select the MP3 Mode. “MP3
Left Side
Mode” appears on the LCD for
three seconds before the first
track begins to play.
2. Press the Play button to play
the current track; press it again
to pause. While paused, the Track State Indicator flashes. During playback, the title of the recording,
artist’s name, and playing time scroll and then the elapsed time of the track is displayed on the LCD.
Right Side
TrackState
3. Press the Stop button to stop the playback. If held down for longer than one second, the Player is
turned off.
Searching MP3 File
Forward
In Stop mode:
1. Press the Forward button to skip to the next track. Once a track is selected, it begins playing in three
seconds unless another operation is chosen.
In Playback mode:
1. Press the Forward button to skip to the next track.
Right Side
Using Your NOMAD Player
10
Reverse
In Stop mode:
1. Press the Reverse button to skip to the previous track. Once a track is selected, it starts playing in three
seconds unless you select another operation.
In Playback mode:
1. Press the Reverse button to skip to the previous track.
Right Side
Repeat:
1. Press the Repeat/EQ button and then select either Repeat, Repeat All, or Shuffle which appears in
order.
Left Side
Repeat
Equalizer Mode
Repeat All
Shuffle
1. Press and hold the Repeat/EQ button to select the Equalizer mode.
2. Select an option among
Left Side
Normal, Classic, Jazz,
Rock that appears in
turn.
Using Your NOMAD Player
11
Erasing MP3 File
1. Press the Mode button
Right Side
and select MP3 mode.
2. Select a track using the
Forward or Reverse
button.
3. Press and hold the
Erase/Rec button. A message to confirm appears on the LCD: Press the Play button to erase; press
any other button to cancel or do not press any button for three seconds. When the action is cancelled,
the Player returns to its previous state.
Operating in Voice Mode
To make a Voice Recording:
1. Press the Mode button and select Voice mode.
2. Press the Erase/Rec button to start recording.
3. Press the Stop button to stop recording and begin filing.
If you hold down the Rec/Erase
button, the Erase mode is selected.
Right Side
• Filing time is proportional to the
length of the recording time.
For example, a 10-minute
recording takes less than 10
seconds.
• A voice recording is indicated
by V001 for the internal
memory and V101 for the flash
memory card.
• The NOMAD Player supports
only MI-SC4 files recorded
using the 8Khz, mono format.
When the Player’s memory is full, an informing message appears and recording stops.
The recording uses internal memory first for recording. When internal memory is full, the recording stops
and you must select external memory to continue recording.
Using Your NOMAD Player
12
Playing back Voice Recording:
1. Press the Play button to play back the current track. Press it again to pause. To resume the playback of
the current track, press the Play button.
Right Side
After a track is erased, each of the
track numbers following it
decreases by one.
Operating the FM Radio
Erasing Voice Recording:
1. Select a track using the Forward or Reverse button.
2. After selecting a track, press and hold the Rec/Erase button.
3. When the message to confirm appears on the LCD: Press the Play button to erase; press any other
button to cancel or do not press any button for three seconds. When the action is cancelled, the Player
returns to its previous state.
To listen to the FM radio:
1. Press the Mode button and select FM mode.
2. Press the Play button to select a preset.
3. Press and hold either the Forward or Reverse button to fast-scan forward or reverse for stations.
Left Side
Right Side
1
Up to ten frequency presets are
available.
2
Presetting a Frequency:
1. Press the Play button to find a preset number that is not being used or one to be replaced.
2. Using the Forward or Reverse button, select the frequency you want to preset.
3. Press the Repeat button to select the preset number.
Using Your NOMAD Player
13
4. Hold down the Repeat button for one second to preset the frequency.
Right Side
Right Side
Left Side
MP3 Download Service
On the Internet, you can locate web sites from which you can download MP3 files, with or without charge,
and get information, the latest techniques, and software related to MP3.
Some of the current web sites with MP3 content are:
www.emusic.com
• EMusic
www.audible.com
• Audible.Inc.
www.audioexplosion.com
• Audio Explosion,Inc.
www.audiohighway.com
• audiohighway.com
www.bigheavyworld.com
• www.BigHeavyWorld
www.mp3.com
• MP3.com
www.sincrecordings.com
• SINC Recordings
www.songs.com
• songs.com
www.nomadworld.com
• Creative NOMAD™ World
Using Your NOMAD Player
14
4
Using Your NOMAD Software
NOMAD Manager
Creative Nomad Manager allows you to manage the contents on your Nomad Player:
• Play MP3 files directly.
• View and manage the memory contents of the Nomad Player.
• Download MP3 and other files to the Nomad Player.
• Upload the memory contents (except MP3 files) to the computer.
You can start Nomad Manager by clicking on its icon on the Windows Desktop or selecting it from the
Programs menu—click Start on the Windows Taskbar, select Programs, select Creative, select Creative
Nomad, and click on Nomad Manager.
Refreshes the
memory contents
Opens the Computer window
for sending files to and from
Nomad Manager
Uploads voice recordings
in NOMAD Player to the
computer hard disk
Lists accessible Internet
connections
Opens the dialog for
configuring NOMAD Manager
Using Your NOMAD Software
15
To format the internal or external memory:
1. Select the icon for the internal or external memory.
2. Click the Format icon.
If the internal memory is
formatted, you can proceed with
adding files to the Player.
To view status of the Player memory:
1. Click the View button to drop down the Explorer.
2. Select the internal or external memory to view the files on the Player.
The amount of memory used and available are displayed at the bottom of the window.
If you change the external memory (the flash card), click the Refresh button to display the file information
for the new card.
To copy files from your hard disk (or other sources):
1. On the Nomad Manager window, click the Transfer button. The Computer window is displayed next
to the Nomad Manger.
2. Use the View button in the Computer window to locate files on your hard disk (or other sources) to
copy to the Player memory.
Using Your NOMAD Software
16
3. Select the first file to be copied to the Player.
4. Click the Transfer button on the Computer
window. On the Choose Destination dialog,
select the memory to which you want to
transfer the selected file, and click OK.
To transfer files from the Nomad Player to your
hard disk:
1. With the Computer window open, open the
folder to which you want to copy the file from
Nomad Player.
2. Select the file in Nomad Player you want to
copy to your PC’s hard disk (or other
destination).
3. Click on the Transfer button on the Nomad Player window to copy the file to your PC.
To delete files from Nomad Player:
1. In the Nomad Player window, select the file to be deleted.
2. Click on the Delete icon to permanently remove the file from Nomad Player (you are asked to confirm
the deletion).
To archive Nomad Player voice recordings:
1. On the Nomad Player window, click on
the Settings button.
2. Type the drive and directory in which the
voice recording archive is to located.
3. Click on the Archive button. All voice
recordings are copied to the archive
directory.
Using Your NOMAD Software
17
To convert a voice recording to a WAV file:
1. Use NOMAD Player to make a voice recording. See “Operating in Voice Mode” on page 12.
2. Turn on the NOMAD Player and, with Stand-By selected, place it in the docking station.
3. Open NOMAD Manager on your computer.
4. Click on Archive and download the SC4 voice recording to your computer’s hard disk.
5. Use the View button to select the hard disk and browse to locate the SC4 file.
6. Right click on the SC4 file name in the list and choose “Convert to Wave” on the menu.
Moving MP3 Files in
Windows Explorer
You can also perform the transfer, copying, and deletion of files in Windows Explorer.
Open Windows Explorer and NOMAD Manager. Drag and drop files (except *.CDA) from your
Windows Explorer to the Manager. You can also drag and drop all files (except *.MP3) from the Manager
to Windows Explorer.
When you right-click a file in the Computer window of NOMAD Manager, you can download to Internal
Memory or External Memory by choosing from the context menu.
Using Your NOMAD Software
18
Creative Digital
Audio Center by
MusicMatch™
Creative Digital Audio Center (CDAC) allows you to record songs from your CDs and to convert .WAV
files to digital format. If you have an audio card with Environmental Audio—Sound Blaster Live! or
Sound Blaster Live! Value—the titles supporting EA can be played back with the original presets or you
can change the settings.
To open MusicMatch:
1. Click Start on the Taskbar, select Creative, select Digital Audio Center, and click on Creative Digital
Audio Center by MusicMatch.
Alternatively, on the Windows Desktop, double-click the Creative Digital Audio Center icon
This section is an introduction to
Creative Digital Audio Center. For
more detailed information, use the
Help button to display the online
documentation available.
The PlayList is minimized when you open
MusicMatch. You can do everything from
the minimized PlayList that you can do from
the maximized PlayList Control by using the
Options menu on the Player.
The left/right micro arrows
allow you
to minimize/maximize the PlayList for a
different view.
Using Your NOMAD Software
19
If a title supports Environmental Audio (EA), an
EA symbol
appears before the title in the
expanded PlayList Control. To make changes to
the EA presets for the title, double-click the
symbol to display the EA dialog.
Playback
The Playback buttons all apply to the current PlayList, except Rec which
opens the Recorder.
Volume Control is found to the right of the Playback buttons. Click and
drag the volume button to adjust playback volume.
Choose Play from the Playback Buttons to listen to the current title or double click the song title in the
PlayList. The current title is prominently displayed in the screen under the Playback buttons. Song time
elapsed and total time are displayed to the right of the Playback Buttons ,and the name of the artist is
displayed under the song title screen.
Using Your NOMAD Software
20
Add Files to the Music
Library
Once you add a song to your Music
Library, you cannot rename the
original file. To do so, you need to
re-add that song to the Music
Library.
The Music Library button
opens the Music Library. Alternatively, go to the Music Library by
clicking on the Options button, select View on the menu, and click on Show Music Library. Click Add to
browse for a music directory.
To add tracks from your hard drive to the Music Library, choose Add in the Music Library, and browse
for the song files. You can add previously downloaded files, in MP2, MP3, or RealAudio formats, to your
Music Library. Files are not encrypted. Files can be added individually, or as a group by holding down
the control button, (CTRL on your keyboard).
Once a song or set of songs is recorded, they appear in your Music Library. Song titles, artist name, and
album title are included during the recording process. Choose Tag from the Music Library to assign other
sorting characteristics to your tracks for use when creating your PlayLists.
Automatic Playlists
To create an Automatic PlayList, click the Auto DJ on the maximized PlayList Controls, or from the
Options menu, select File, and click on Auto-Create New PlayList. The automatic PlayList is based on
your sorting preferences.
First, you are asked to define the length of the program. Then, select the First Criteria category from the
list. For example, you can have the Jukebox select only tracks from your “Classic Rock” titles. To further
define your PlayList, continue with Second and Third Criteria categories. For example, select only
“Classic Rock” titles with a preference rating of “Excellent” (Second Criteria) and which are appropriate
for “Party” situations (Third Criteria). You may select more than one category in each criteria by
CONTROL-clicking on multiple categories.
Using Your NOMAD Software
21
The And/And Not feature allows you to either include or exclude that category in your PlayList. “And”
tells the Jukebox to look only for songs within the category selected; “And Not” tells the Jukebox to
exclude songs from this category. In the above example, if you choose “Party” and “And Not” for the
Third Criteria, the MusicMatch Jukebox selects all your classic rock titles with an excellent rating which
you have listed as appropriate for situations other than parties.
Manual Playlists
You can create a Manual PlayList by either of the following:
• Double click on a song title
• Click and drag the track title to the PlayList screen at the top right hand corner
You may also add songs to the PlayList by using the Windows Explorer drag-and-drop functionality. To
facilitate song selection, you can sort your database in alphabetical order in any category by clicking on
the category heading.
When selecting a song, the track indicator micro arrow on the left side of the Music Library highlights the
track’s information in each category. You can double click, or click and drag anywhere on the highlighted
area to add the track to your PlayList.
If you are creating a PlayList and do not have enough track information to recognize the song, highlight
the track and click on the track indicator micro arrow. This previews the song for you before adding it to
the PlayList. You can change the order of the songs in your PlayList by drag and drop.
To add multiple songs at one time to the PlayList, either hold down the SHIFT key and highlight tracks
in a group, or hold down the CONTROL key and select various tracks throughout the list. Then, right
click and select add, or simply drag the selected tracks to the PlayList screen.
To delete songs from the PlayList, highlight the track and select Delete Track from either Edit menu, or
hit the delete key on your keyboard.
Using Your NOMAD Software
22
Track Info
The Track Info button on the Digital Audio Center
opens the Track Info screen.
Record Tracks
To record tracks from your CD library into the MusicMatch Jukebox, put a music CD in your CD-ROM
drive and open the Recorder by clicking the Options button, selecting View, and click on Show Recorder.
Select the tracks you want to record and click on Start.
Using Your NOMAD Software
23
CDDB
The CDDB button on the Recorder opens your Web browser and connects you, through the Internet, to a
database comprised of thousands of music titles.
The serial number of your CD is matched with CDDB records, and title, artist, and track data is transferred
to the Recorder screen. The information is placed in the Music Library when the recording is completed.
Using CDDB removes the necessity of filling in all of the CD disk data manually. There is no fee for using
this service.
To use the feature for the first time, choose and enter a user name and select the server nearest you when
prompted.
You are prompted to set up CDDB preferences each time you insert a disk. To disable the prompt, or select
a different server (for example, if your server location is down), choose Options from your Recorder, and
click CDDB Preferences.
If CDDB does not return any CD information and you do not enter it manually, the track (Track 1, Track
2, etc.) and track time are displayed, but the artist display screen remains blank.
Add Tracks
To add tracks from your Music Library to your Player one at a time, drag and drop the track from your
Music Library into your PlayList screen or simply double click the track in the Music Library.
You can select several tracks at once to add to the PlayList by holding down the SHIFT key and
highlighting several songs in a row, or holding down the CONTROL (CTRL) key, to add several songs
that you select in random order. You can add up to 999 tracks to a single PlayList, from your music
database.
Using Your NOMAD Software
24
Tag
The Tag option on the Music Library or Track Info screens, opens the Track Information screen. The
Track Information allows you to add information that is displayed in the Track Info screen each time the
track is played.
Highlight a song in the Music Library and click Tag to open the Track Information screen. If CD
information was input before recording by choosing CDDB or by manually typing the data in, it is
displayed in the Track Title, Track #, Track Time, Artist, and Album fields.
Enter song Lyrics, Notes, and Artist Bios in the text box provided. Select the box that corresponds to the
type of information you want to enter. Artist URL’s and e-mail addresses entered in the Notes and Bios
sections are automatically listed in the Artists URL and Artist Email fields as well. Text space is unlimited
and information can be displayed in the Track Info screen while the song is playing.
When you record an entire CD, much of the information remains the same for each track. To avoid
redundant data entry, select the box to the left of the field to have that information apply to each song on
the CD. For example, in the Artist and Album fields. If this information was not entered prior to
recording, you can manually enter it one time, then check the boxes next to the Artist and Album fields.
From the Track Title field you can scroll to other songs on the CD. The Artist and Album information
from the initial entry is applied to all tracks on the CD.
Tag Art adds the album cover for display while that song is playing. Download or scan the CD jacket and
save the .BMP or .JPG file into your MusicMatch Jukebox subdirectory. Choose Tag Art and browse for
the .BMP or .JPG file you just created, then click Done. The image appears in the Player, next to the
volume control, each time the song is played, if Show Art is selected. Standard image size is 100 X 100
pixels. Click the box next to Tag Art to apply CD art to all tracks on the CD
When you add or change track information, you are prompted to save the track information for that song
before you can scroll to another track from the Track Title field. When you choose Yes, all tracks in the
Music Library are scanned for changes. You can view this process at the top of the screen. If you click
the Save button at the bottom of the screen, the same scan process occurs. In this case, the information is
saved and Tag screen closed.
If you add songs to your Music Library that have track information associated with them using ID3 tags,
MusicMatch recognizes and displays that data in the Track Information screen (version 3.1 and later).
To restore ID3 tags that were associated with files added to MusicMatch Jukebox prior to version 3.1,
choose Convert ID3 Tags.
Tracks purchased from www.musicmatch.com include both album art and lyrics.
Using Your NOMAD Software
25
Content CD
NOMAD includes a CD, CONTENT CD, that offers sample MP3 files for downloading, manipulating,
and enjoying while you are learning to use the NOMAD Player, NOMAD Manager, and MusicMatch.
To open the Content CD:
1. With Windows 95/98 running,
place the Content CD in the
CD-ROM drive. The NOMAD
software opens your Web
browser and displays the
NOMAD home page.
The NOMAD home page,
“Introduction,” describes the
CD’s contents and presents the
URL for the NOMAD Web
site.
In order to access the NOMAD
Web site, you must be connected to
the Internet.
Click on the URL,
www.nomadworld.com, to
access the NOMAD Web site.
Using Your NOMAD Software
26
2. On the NOMAD CONTENTS
CD home screen, click Music
Catalog to display the directory
of music genres represented on
the Content CD.
3. Click on one of the music types
displayed to open a listing of
the selections available on the
Content CD for that genre.
Using Your NOMAD Software
27
4. Select Intro to return to the home
screen and select Partners to
display a screen listing the Web
sites that have contributed titles
to the Content CD.
Click on any of the Partners’
names to access their Web site.
Using Your NOMAD Software
28
A
Technical Specifications and Troubleshooting
NOMAD Player
DAP-3201
Memory Capacity
❑ Internal Memory 32 MB
❑ Flash memory card 32 MB (available separately for 32 MB model)
Power
❑ 3V
Battery
❑ Two AAA high-capacity rechargeable (Ni-MH) batteries included with the NOMAD Player
❑ 5-hour or longer playing time (with fully charged Ni-MH and alkaline batteries)
LCD
❑ 16-letter display (95 x 12 dots, 11 x 12 dots)
Dimensions (W x H x D) / Weight
❑ 58 x 85 x 17 mm / 64g (without batteries)
Case
❑ Magnesium
Data Transmission Speed
❑ 1 Mbps or better (ECP Mode)
Memory Socket
❑ Flash memory card socket
FM Tuner
❑ 88 MHz ~ 108 MHz
Voice Recording Format
❑ ADPCM Type
Noise Ratio
❑ 95 dB
Technical Specifications and Troubleshooting
31
Headphone Power Output
❑ 6 mW
Output Frequency Range
❑ 20 ~ 20KHz
NOMAD Docking
Station
DS-3201
Power
❑ DC 9V, 500 mA
Dimension (W x H x D) / Weight
❑ 92 x 1332 x 50 mm / 165g
Case
❑ Plastic
LED Indicator
❑ Data, Power/Charge
Technical Specifications and Troubleshooting
32
Troubleshooting
If your NOMAD Player does not work, check the following before calling Technical Support:
The Player does not work or nothing is displayed on the LCD
❑
Check the rechargeable batteries and their charge level. Two 1.5V AAA batteries (general or
rechargeable) are required.
❑ Check the polarity (+, -) of the batteries.
The buttons on the Player do not work
❑
The Hold switch may be on. In Hold mode, the buttons do not work.
NOMAD Manager reports that Player is not connected
❑
Check that the parallel port is set
to ECP or ECP/EPP in the CMOS
setup.
Check the condition of the batteries supplying power to the Player, the connection between the
docking station and the Player, and the connection between the parallel port of the PC and the parallel
cable.
The flash memory card cannot be inserted
❑
Check the orientation of the card, see “Flash Memory Card” on page 6.
❑ There are two types of flash memory cards, each of which works at 3.3V or 5V. The NOMAD Player
does not use the 5V smart card.
Flash memory card is not recognized
❑
Reformat the memory card using NOMAD Manager.
NOMAD Player does not support 2MB and 4MB SmartMedia. Use only 8MB, 16MB, and 32MB
flash memory cards; Creative Flash Memory Cards, available at www.nomadworld.com, are highly
recommended.
❑ Creative Flash Memory Card uses a proprietary format to optimize audio playback. The format is not
compatible with your digital still camera (or other SmartMedia products). You cannot, for example,
share the flash memory card between NOMAD and your camera.
❑
Technical Specifications and Troubleshooting
33
SmartMedia card is not recognized by my digital still camera after using it in NOMAD Player
❑
Format the SmartMedia card in the NOMAD Player using NOMAD Manager. Then,insert the
SmartMedia card into your digital still camera and format it using the camera. It should now be usable
in your camera.
The files on the flash memory card are not recognized
❑
❑
A flash memory card that has been used by any other MP3 player cannot be used.
Using NOMAD Manager, format the flash memory card and copy the files again.
The NOMAD Player seems to hang
❑
Try resetting the Player by removing and reinserting a battery. The Player should resume normal
operation. If the problem persists, try reformatting the memory by using NOMAD Manager.
Technical Specifications and Troubleshooting
34