1
FW-
D5
D1
+
Mini Hi-Fi System
with DVD and 3 CD changer
1
pg 001-41/D5-D1/21-Eng new
1
6/8/01, 11:32 AM
3139 115 20051
English
México
Es necesario que lea cuidadosamente su instructivo de manejo.
Français
PRECAUCIÓN - ADVERTENCIA
Español
Verifique que el voltaje de alimentación
sea el requerido para su aparato
No abrir, riesgo de choque eléctrico
ATENCIÓN
Para evitar el riesgo de choque eléctrico, no quite la tapa.
En caso de requerir servicio, dirijase al personal calificado.
Português
Descripción: . . . . . . . . . . . . . . . . . . . . . .
Modelo : . . . . . . . . . . . . . . . . . . . . . . . . .
Alimentación: . . . . . . . . . . . . . . . . . . . . .
Consumo: . . . . . . . . . . . . . . . . . . . . . . . .
Importador: . . . . . . . . . . . . . . . . . . . . . . .
Domicilio: . . . . . . . . . . . . . . . . . . . . . . . .
Localidad y Telefono: . . . . . . . . . . . . . . .
Exportador: . . . . . . . . . . . . . . . . . . . . . . .
País de Origen: . . . . . . . . . . . . . . . . . . . .
Nº de Serie: . . . . . . . . . . . . . . . . . . . . . .
Minisistema de Audio
FW-D5, FW-D1
110–127/220–240 V; ~50–60 Hz
230 W, 130 W
Philips Mexicana, S.A. de C.V.
Norte 45, # 669, Col. Industrial Vallejo
C.P. 02300 México D.F., Tel. 7284200
Philips HK, Ltd.
China
______________________________
LEA CUIDADOSAMENTE ESTE INSTRUCTIVO
ANTES DE USAR SU APARATO.
2
pg 001-41/D5-D1/21-Eng new
2
6/8/01, 11:32 AM
3139 115 20053
LASER
Type
Wave length
Output Power
Beam divergence
TruSurround and the SRS symbol are trademarks of SRS
Labs., Inc. TruSurround technology is manufactured
under license from SRS Labs., Inc.
Semiconductor laser GaAlAs
650 nm (DVD)
785 nm (VCD/CD)
7 mW (DVD)
10 mW (VCD/CD)
60 degree.
This product incorporates copyright protection
technology that is protected by method claims of
certain U.S. patents and other intellectual property
rights owned by Macrovision Corporation and other
rights owners. Use of this copyright protection
technology must be authorised by Macrovision
Corporation, and is intented for home and other limited
viewing uses only unless otherwise authorised by
Macrovision Corporation. Reverse engineering or
disassembly is prohibited.
Dolby Surround and the double-D symbol d are
trademarks of Dolby Laboratories Licensing Corporation.
Manufactured under license from Dolby Laboratories
Licensing Corporation.
CAUTION
VISIBLE AND INVISIBLE LASER RADIATION WHEN OPEN
AVOID EXPOSURE TO BEAM (WARNING LOCATION:
INSIDE ON LASER COVERSHIELD)
The region code for FW-D5/21M and
FW-D1/21M is 3.
3
The region code for FW-D5/21, /30
and FW-D1/21, /30 is 4.
4
English
Français
USE OF CONTROLS OR ADJUSTMENTS OR
PERFORMANCE OF PROCEDURES OTHER THAN
THOSE SPECIFIED HEREIN MAY RESULT IN
HAZARDOUS RADIATION EXPOSURE.
NEVER MAKE OR CHANGE CONNECTIONS WITH THE
POWER SWITCHED ON.
Español
This unit employs a laser. Only a qualified service person
should remove the cover or attempt to service this device,
due to possible eye injury.
Manufactured under license from Dolby Laboratories.
“Dolby”, “AC-3” and the double-D symbol are
trademarks of Dolby Laboratories. Confidential
Unpublished Works. ©1992-1997 Dolby Laboratories,
Inc. All rights reserved.
Português
LASER SAFETY
Since it is usual for DVD movies to be released at
different times in different regions of the world, all
players have region codes and discs can have an
optional region code. If you load a disc of a different
region code to your player, you will see the region code
notice on the screen. The disc will not play, and should
be unloaded.
For Customer Use:
Read carefully the information located at the bottom of
your DVD-VIDEO player and enter below the Serial No.
Retain this information for future reference.
Model No. __________________________
Serial No. __________________________
3
pg 001-41/D5-D1/21-Eng new
3
6/8/01, 11:32 AM
3139 115 20053
English
Français
Español
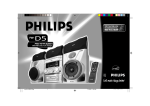
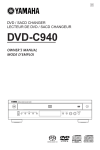
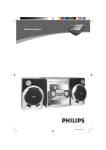
FW-D5
Português
FW-D1
4
pg 001-41/D5-D1/21-Eng new
4
6/8/01, 11:32 AM
3139 115 20053
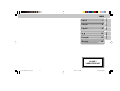
Español ..................................80
Français
Français .................................42
Español
English .....................................6
English
INDEX
Português ............................154
Português
...............................................118
Warranty ..............................192
Australia/New Zealand/Brasil/Mexico
CLASS 1
LASER PRODUCT
5
pg 001-41/D5-D1/21-Eng new
5
6/8/01, 11:32 AM
3139 115 20053
INDEX
English
General Information ......................................................................... 7
Safety Information ............................................................................ 7
Preparation ................................................................................ 8 - 10
Controls .....................................................................................11 - 13
Operating The System ........................................................... 14 - 16
DVD-VIDEO ...............................................................................17 - 31
CD ...............................................................................................32 - 34
Tuner ..........................................................................................35 - 36
AUX/CDR .......................................................................................... 37
Clock ................................................................................................. 37
Timer ................................................................................................. 38
Specifications ................................................................................. 39
Maintenance ................................................................................... 40
Troubleshooting .......................................................................40 - 41
6
pg 001-41/D5-D1/21-Eng new
6
6/8/01, 11:32 AM
3139 115 20054
IMPORTANT:
PLEASE NOTE THAT THE
VOLTAGE SELECTOR
LOCATED AT THE REAR OF
THIS SYSTEM IS PRESET AT
220V FROM THE FACTORY.
FOR COUNTRIES THAT
OPERATE AT 110V, PLEASE
ADJUST TO 110V BEFORE YOU
SWITCH ON THE SYSTEM.
General Information
• The typeplate (which contains the
serial number) is located at the rear
of the system.
• Recording is permissible if
copyright or other rights of third
parties are not infringed.
Environmental Information
All unnecessary packaging has been
omitted. We have tried to make the
packaging easy to separate into three
materials: cardboard (box), polystyrene
foam (buffer) and polyethylene (bags,
protective foam sheet).
SAFETY INFORMATION
Accessories (Supplied)
Safety Information
– Remote control
– Batteries (two AA size) for remote
control
– AM loop antenna
– FM wire antenna
– AC power cord
– For model FW-D5 only
CS-05 speaker package (includes one
pair of surround speakers and one
centre speaker)
– CVBS cable cinch
• Before operating the system, check that
the operating voltage indicated on the
typeplate (or the voltage indication
beside the voltage selector) of your
system is identical with the voltage of
your local power supply. If not, please
consult your dealer. The typeplate is
located at the rear of your system.
• When the system is switched on, do not
move it around.
• Place the system on a solid base (e.g. a
cabinet).
• Place the system in a location with
adequate ventilation to prevent internal
heat build-up in your system. Allow at
least 10 cm (4 inches) clearance from
the rear and the top of the unit and 5 cm
(2 inches) from each side.
• Do not place the system on soft carpet
that will cover the ventilation hole at
the bottom.
• Do not expose the system to excessive
moisture, rain, sand or heat sources.
• Under no circumstances should you
repair the system yourself, as this will
invalidate the warranty!
• If the system is brought directly from a
cold to a warm location, or is placed in a
very damp room, moisture may
condense on the lens of the CD/DVD
unit inside the system. Should this
occur, the player will not operate
normally. Leave the power on for about
one hour with no disc in the system until
normal playback is possible.
• Electrostatic discharge may cause
unexpected problems. See whether
these problems disappear if you unplug
the AC power cord and plug it in again
after a few seconds.
• To disconnect the system from the
power supply completely, remove
the AC power plug from the wall
socket.
English
GENERAL INFORMATION
Your system consists of materials which
can be recycled and reused if disassembled
by a specialized company. Please observe
the local regulations regarding the disposal
of packaging materials, exhausted
batteries and old equipment.
7
pg 001-41/D5-D1/21-Eng new
7
6/8/01, 11:32 AM
3139 115 20054
PREPARATION
English
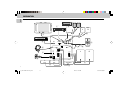
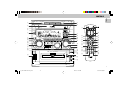
Rear Connections
AUDIO IN
I
H
AUDIO OUT
surr.
L
surr.
R
W
G
J
STANDBY ON
SU
BW O
OFER LEVEL CONT
MIN
RO
L
MAX
CUT OFF FREQUENCY
HIGH POWER SUBWOOFER
60Hz
K
150Hz
AUX/CDR-IN LINE-OUT SURROUND OUT
AUDIO
DIGITAL
OUT
S-VIDEO
OUT
(Y/C)
VIDEO OUT
(CVBS)
SUBWOOFER
OUT
L
F
R
B
FM ANTENNA 75Ω
AM ANTENNA
A
CENTER
+
–
VOLTAGE
SELECTOR
L
110V127V
220V240V
AC
MAINS
~
REAR
SURROUND
+
L
–
–
R
+
FRONT
+
L
R
L
–
–
R
+
M
L
R
surr.
surr.
E
8
pg 001-41/D5-D1/21-Eng new
8
C
CENTER
D
6/8/01, 11:32 AM
3139 115 20054
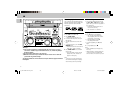
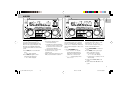
A AM Loop Antenna
Connection
Connect the supplied loop antenna to the
AM ANTENNA terminal. Place the AM loop
antenna far away from the system and
adjust its position for the best reception.
B FM Wire Antenna
Connection
Connect the supplied FM wire antenna to
the FM ANTENNA 75 Ω terminal. Adjust
the position of the FM antenna for the best
reception.
Outdoor Antenna
For better FM stereo reception connect an
outdoor FM antenna to the FM ANTENNA
75 Ω terminal using a 75 Ω coaxial wire.
C Speakers Connection
• Connect the right speaker to Front
terminal R, with the coloured wire to +
and the black wire to -.
• Connect the left speaker to Front
terminal L, with the coloured wire to +
and the black wire to -.
• Clip the stripped portion of the speaker
wire as shown.
CAUTION:
– For optimal sound performance, it is
recommended to use the supplied
speakers.
– Do not connect more than one speaker
to any one pair of +/- speaker
terminals.
– Do not connect speakers with
impedance lower than the speakers
supplied. Please refer to the
SPECIFICATIONS section of this manual.
D Centre Speaker Connection
(for model FW-D5 only)
Connect the black (non-marked) wires to
the black CENTER terminal and the blue
(marked wires) to the blue CENTER
terminal.
E Rear Surround Speakers’
Connection (for model FW-D5
F Subwoofer Out Connection
H Line Out Connection (wireless
Connect the optional active subwoofer to
the SUBWOOFER OUT terminal. The
subwoofer reproduces just the low bass
sound effect (e.g. explosions, the rumble of
spaceships, etc.). Be sure to follow the
instructions supplied with the subwoofer.
ready)
You can connect the audio left and right
LINE OUT terminals to a optional CD
Recorder's ANALOGUE IN terminals. This
allows you to record in an analogue format.
G Wireless Surround Out
Connection (for model FW-D5
only)
You may connect the transmitter of the
wireless rear speakers (not supplied) to the
SURROUND OUT terminal.
Note:
– Availability of a wireless transmitter and
its peripherals are subjected to the
approval of local authorities. Please
check with the respective local safety or
approving authority.
only)
Connect the black (non-marked) wires to
the black REAR SURROUND terminals and
the coloured (marked) wires to the grey
REAR SURROUND terminals.
English
PREPARATION
You can also install additional optional
front active speakers away from the system
(e.g. in another room) to reduce the
inconvenience of running long speaker
wires across rooms. You can place as many
remote speakers as you like provided they
operate at the same radio frequency.
Connect the wireless radio frequency
transmitter to the LINE OUT terminals.
Place the active speakers at your preferred
location. Be sure to follow the instructions
supplied with the active speakers.
I Connecting other
equipment to your system
You can connect the audio left and right
OUT terminals of a TV, VCR, Laser Disc
player, DVD player or CD Recorder to the
AUX/CDR IN terminals at the rear of the
system.
12 mm
unlock
pg 001-41/D5-D1/21-Eng new
lock
9
9
6/8/01, 11:32 AM
3139 115 20054
PREPARATION
English
J Video Out Connection
Connect the VIDEO OUT (CVBS) terminal at
the rear of the system to the TV or VCR
VIDEO IN terminal for viewing or recording.
Note:
– You can also choose to connect the
S-VIDEO OUT (Y/C) terminal at the rear
of the system to the S-VIDEO IN of the
TV using an optional S-VIDEO cable.
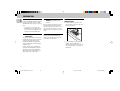
L Adjusting the Operating
Voltage (not available for all
Inserting batteries into the
Remote Control
versions)
Before connecting the AC power cord to a
wall outlet, make sure that the voltage
selector at the rear of the system is set to
the local power line voltage. If not, reset
the selector before connecting to the wall
outlet.
• Insert the batteries (Type R06 or AA)
into the remote control as shown in the
battery compartment.
M AC Power Supply
K Audio Digital Out
Connection
You can record the digital sound from the
CD/DVD, through this output, on any audio
equipment with digital input (e.g. CD
Recorder, Digital Audio Tape (DAT) deck,
Digital to Analogue Converter and Digital
Signal Processor).
Connect one end of the cinch cable (not
supplied) to the DIGITAL OUT socket and
the other end to the audio equipment's
digital input. When connecting the cinch
cable, make sure it is fully inserted.
After all other connections have been
made, connect the AC power cord to the
system and to the wall outlet.
• To avoid damage from possible battery
leakage, remove dead batteries or
batteries that will not be used for a long
time. For replacement, use type R06 or
AA batteries.
10
pg 001-41/D5-D1/21-Eng new
10
6/8/01, 11:32 AM
3139 115 20054
English
CONTROLS
OPEN•CLOSE
DISC CHANGE
6
CD 1
CD 2
7
CD 3
8
5
TV/AV
3CD
3
CHANGER
4
3
DVD MINI HIFI SYSTEM
STANDBY
ON
CHAP.
P2
FM LW
AMW
SLEEP
P4
P5
P3
DIM
LEFT
TIMER
CENTER
RIGHT
9
P6
SURR CHANNEL SURR
POWER SAVE
RDS / CD TEXT
SURROUND CONTROL
5.1CH / STEREO / SURR / 3D
IR SENSOR
CD 1 • 2 • 3
2
3
5
6
7
8
9
CD
SEARCH•TUNING
STOP•CLEAR
TUNER
PLAY PAUSE
AUX
PREV
PRESET ▲
SIDE NEXT
@
PERSONAL
C
VE
DS
C
#
DBB
VOLUME
SCAN
A-
RET
UR
N
B
0
!
PROG
≥
DIM
CLOCK/
TIMER
AXIS
OK
%
DVD
MENU
SOUND JOG
DVD JOG
^
&
*
(
≤
PLAYBACK
MODE
DVD / VCD / CD PLAYBACK
DVD
OPEN / CLOSE
MIC LEVEL
VCD
SHUFFLE
¤
·
0
VOLUME
^
!
^
à
É
≤
)
!
‹
Å
MENU
OSD
SURR.
STOP
›
*
fi
#
á
OK
DVD
$
DVD
§
REPEAT
‚
É
DVD
C
PB
CDR
BAND
▲
VCD • CD
£
1
4
É
P1
TITLE
É
FTS
∞
AUX/CDR
NEWS / T.A.
1
2
⁄
º
ª
•
2
TUNER
CD
DVD
Ç
í
ECHO
PROG.
PLAY
É
ë
KEY CONTROL
AUDIO
A-B
KARAOKE
VEC
DBB
TIMER
0
!
°
‡
FTS
DSC
!
§
∞
ª
fl
¡
CD
MIC
™
11
pg 001-41/D5-D1/21-Eng new
11
6/8/01, 11:32 AM
3139 115 20054
CONTROLS
English
12
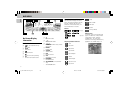
Controls on the system and
remote control
1 STANDBY ON
– to switch the system on or to standby
mode.
– to use for EASY SET.
2 IR SENSOR
– sensor for the infrared remote control.
3 SOURCE – to select the following:
DVD / (VCD•CD)
– to select DVD mode. When in DVD
mode, you can play DVD, VCD or CD.
CD / (CD 1•2•3)
– to select CD mode. When CD playback
is stopped, press to select disc tray 1,
2 or 3.
TUNER / (BAND)
– to select Tuner mode. When in tuner
mode, press to select the waveband:
FM or MW.
AUX / (CDR)
– to select sound from an external
source (e.g. TV, VCR, Laser Disc player,
DVD player or CD Recorder). When in
AUX mode, press to select either AUX
or CDR.
TV/AV (only on the remote control)
– to select TV or Video mode.
4 DISPLAY SCREEN
– to view the current setting of the
system.
5 CD CAROUSEL TRAY
6 DISC CHANGE
– to change CD(s).
pg 001-41/D5-D1/21-Eng new
12
7 OPEN•CLOSE
– to open or close the CD carousel tray.
8 CD 1 / CD 2 / CD 3 (CD DIRECT
PLAY)
– to select a CD tray for playback.
9 SURROUND SOUND DISPLAY
PANEL (for model FW-D5 only)
– to view the selected Surround setting.
0 SURROUND CONTROL (SURR) (for
model FW-D5 only)
– to select Multichannel Sound, Stereo,
Surround or 3D Sound mode for DVD
operation only.
! MODE SELECTION
SEARCH•TUNING à á
(1 2)
for DVD/VCD/CD
– to search backward/forward
(except for CD playback in DVDVIDEO tray).
for TUNER
– to tune to a lower or higher radio
frequency.
for CLOCK (on the system only)
– to set the hour.
for TV VOL.
– to adjust the TV volume if the
remote operates your TV.
STOP•CLEAR Ç
for DVD/VCD/CD
– to stop playback (in DVD mode
only).
for CD
– to stop playback or to clear a
programme (in CD mode only).
for TUNER
– to stop programming.
for DEMO (on the system only)
– to start or stop demonstration
mode.
PLAY PAUSE ÉÅ
for DVD/VCD/CD
– to start or interrupt playback.
for DVD/VCD
– to watch a still picture.
í PREV / NEXT ë
(PRESET)
for DVD/VCD/CD
– to skip to the beginning of the
current, previous, or next title or
track.
for VCD only
– to select next or previous MENU
(for VCD with PBC on).
– to select next or previous VCD track
during playback (for VCD with PBC
off).
for TUNER
– to select a preset radio station in
memory.
for CLOCK (on the system only)
– to set the minute .
@ CLOCK/TIMER
– to view the clock, set the clock or set
the timer.
# SOUND CONTROL
– to select the desired sound feature :
VEC, PERSONAL, DSC or DBB.
6/8/01, 11:32 AM
$ SOUND JOG
– to select the desired sound effect of
VEC/PERSONAL/DSC/DBB setting.
You must select the respective sound
feature first.
VEC
– to select the desired Virtual
Environment Control effect : HALL,
CLUB, DISCO, CINEMA, CONCERT or
ARCADE.
PERSONAL
– to select up to 6 personal preferred
Spectrum Analyser settings :
PERSONAL 1-6.
DSC
– to select the desired Digital Sound
Control effect : OPTIMAL, CLASSIC,
TECHNO, VOCAL, ROCK or JAZZ.
DBB
– to select a Dynamic Bass Boost level :
BEAT, PUNCH or BLAST.
% n
– to connect headphones.
^ VOLUME
– to increase or decrease the volume.
& DIM
– to select brightness for the display
screen : DIM 1, DIM 2, DIM 3 or DIM
OFF.
3139 115 20054
* PROGram (FTS- Favourite track
selection)
for DVD/VCD/CD
– to programme disc tracks.
for TUNER
– to programme preset radio
stations.
for CLOCK (on the system only)
– to select 12 or 24 hour in clock
setting mode.
( DVD-VIDEO DISC TRAY
) OPEN/CLOSE 0
– to open or close the DVD-VIDEO tray.
¡ MIC LEVEL (not available for all
versions)
– to adjust the mixing level for karaoke
in DVD mode only.
™ MIC (not available for all versions)
– to connect microphone jack.
£ PLAYBACK MODE
– to view the selected playback mode :
DVD, VCD or CD.
≤ DVD MENU
– to access the DVD disc menu.
∞ OK
– to confirm the selection.
§ AXIS ( 1 2 3 4 )
– to select the direction of cursor
movement : up/down or left/right.
– (on the remote control only)
to select movement of cursor: left,
right, up or down.
pg 001-41/D5-D1/21-Eng new
13
≥ DVD JOG
– to move the cursor up/down or left/
right. You must select the AXIS
movement direction first.
• SCAN
for DVD
– to playback the first 10 seconds of
each chapter within a title.
for VCD/CD
– to playback the first 10 seconds of
each track.
ª A - B (in DVD mode only)
– to playback a certain scene or passage
of a disc repeatedly.
º PBC (PLAYBACK CONTROL)
– to switch on or off PBC mode (for VCD
version 2.0 only).
⁄ RETURN
– to return to the previous MENU level
during playback.
¤ REPEAT
– to repeat a disc track, a disc, or all
available discs (in CD mode only).
– to repeat playback a Chapter/Index,
Title/Track or Disc (in DVD mode only).
‹ OSD MENU (ON SCREEN
DISPLAY)
– to switch on or off the on screen
display on the TV screen.
› ECHO -/+ (not available for all
versions)
– to adjust the echo level for karaoke.
fi AUDIO
– to select different audio languages
available in the DVD disc.
fl TIMER
– to switch on or off the timer.
(not available for all
‡ KARAOKE
versions)
– to switch the Karaoke features ON/
OFF mode.
° KEY CONTROL -/+ (not
available for all versions)
– to adjust the key to suit your vocal
range.
· SHUFFLE
– to play all the available discs and their
tracks in random order.
‚ DIGIT 0 – 9
(numbers consisting more than two
figures must be keyed in within 2
seconds.)
for DVD/VCD/CD
– to key in a disc title or track for
playback or programming.
for VCD with PBC on only
– to select a track.
for TUNER
– to key in a preset radio station.
B
– to switch the system to standby mode.
Notes for remote control:
– First select the source you wish to
control by pressing one of the
source select keys on the remote
control (e.g. DVD, TUNER, etc.).
– Then select the desired function
(É, í, ë, etc.).
English
CONTROLS
13
6/8/01, 11:32 AM
3139 115 20054
OPERATING THE SYSTEM
English
DVD MINI HIFI SYSTEM
STANDBY
ON
NEWS / T.A.
FTS
TITLE
P1
CHAP.
P2
FM LW
AMW
SLEEP
P4
P5
P3
DIM
LEFT
TIMER
CENTER
RIGHT
P6
SURR CHANNEL SURR
POWER SAVE
RDS / CD TEXT
SURROUND CONTROL
To start the demonstration mode
• Press and hold Ç(on the system only)
for 5 seconds when the system is in
standby mode.
™ The demonstration will begin.
5.1CH / STEREO / SURR / 3D
IR SENSOR
CD
RET
UR
N
SEARCH•TUNING
STOP•CLEAR
TUNER
PLAY PAUSE
PRESET ▲
SIDE NEXT
PERSONAL
C
VE
DS
C
DBB
DIM
CLOCK/
TIMER
DVD
AXIS
DVD
MENU
OK
SOUND JOG
DVD JOG
Important:
Before you operate the system,
complete the preparation procedures.
Demonstration mode
The system has a demonstration mode that
shows the various features offered by the
system. When the system is switched
on for the first time, the demonstration
mode will start automatically.
Notes:
– During the demonstration, if you press
any source (or standby-on) button, the
system will switch to the respective
mode (or standby).
– When the system is switched to standby
mode, the demonstration will resume 5
seconds later.
You can also switch on the system by
pressing any one of the CD DIRECT PLAY
buttons.
Easy Set
AUX
PREV
VOLUME
PROG
• Press DVD, CD, TUNER or AUX.
CDR
BAND
B
SCAN
A-
CD 1 • 2 • 3
DVD
▲
C
PB
VCD • CD
Switching the system ON
To stop the demonstration mode
• Press and hold Ç(on the system only)
for 5 seconds when the system is in
demonstration mode.
™ The demonstration will stop.
™ "DEMO OFF" will be displayed.
™ The system will switch to standby
mode.
Notes:
– When the system is switched on from
the main power outlet, the CD carousel
tray may open and close again to
initialize the set.
– Even though the AC power cord is
removed from and reconnected to the
wall socket, the demonstration will
remain off until it is switched on again.
EASY SET allows you to store all available
radio stations automatically.
Switching the system to
standby mode
• Press and hold STANDBY ON (on the
system only) for 5 seconds; when the
system is in standby or demonstration
mode.
™ "EASY SET" will be displayed, and
followed by "TUNER" and then
"AUTO".
™ EASY SET will start searching for all
radio on FM band and then followed
by radio stations on MW band.
™ All available radio stations with
sufficient signal strength will be
stored. Up to 40 presets may be
stored.
• Press STANDBY ON or B on the
remote control.
™ The system will switch to standby
mode.
Notes:
– EASY SET will start with the FM band, if
there are still presets available, the
system will continue to store the MW
band.
– When EASY SET is used, all previously
stored radio stations will be replaced.
– The last preset radio station will appear
on the display when EASY SET is
completed.
Selecting the Source
• Press the desired source selection
button: DVD, CD, TUNER or AUX.
™ The display indicates the selected
source.
Note:
– For an external source, make sure you
have connected the audio left and right
OUT terminals of the external
equipment (TV, VCR, Laser Disc player,
DVD player or CD Recorder) to the AUX/
CDR IN terminals.
14
pg 001-41/D5-D1/21-Eng new
14
6/8/01, 11:32 AM
3139 115 20054
Dim mode
You can select the desired brightness for
the display.
• Press DIM to select DIM 1, DIM 2,
DIM 3 or DIM OFF display mode.
™ The DIM appears on the display.
™ "DIM 1", "DIM 2", "DIM 3" or
"DIM OFF" will be displayed
depending on the mode selected.
DIM OFF - normal brightness with
Spectrum Analyser On
FTS
TITLE
P1
CHAP.
P2
FM LW
P3
AMW
SLEEP
P4
P5
DIM
TIMER
TITLE
P1
CHAP.
P2
FM LW
P3
AMW
SLEEP
P4
P5
P1
TITLE
CHAP.
P2
P3
FM LW
AMW
SLEEP
P4
P5
P1
TITLE
CHAP.
P2
P3
FM LW
AMW
SLEEP
P4
P5
DIM
TIMER
P6
Adjust VOLUME to increase or decrease
the sound level.
PERSONAL SOUND
You can store up to 6 personal settings.
Sound Control
1 Press to select the PERSONAL feature.
2 Adjust the JOG to select the desired
Personal setting.
™ The selected personal setting number
will appear on the display.
™ If no name has been stored
previously, "PERSONAL X" will be
displayed. "X" is the setting number.
For Optimal sound listening, you can
only select one of the following sound
controls at a time : VEC, PERSONAL or
DSC .
Personal Setting
You can adjust the personal setting to your
desired level with the JOG control.
For Personal Listening
Connect the headphones plug to the n
socket at the front of the system. The
speakers will be muted.
VIRTUAL ENVIRONMENT CONTROL
(VEC)
The VEC feature enables you to adjust the
system to select a type of environment.
DIM
TIMER
P6
DIM 2 - half brightness with Spectrum
Analyser On
FTS
FTS
Volume Control
P6
DIM 1 - normal brightness with
Spectrum Analyser Off
FTS
DIM 3 - half brightness with Spectrum
Analyser Off and all LEDs on the
system will be switched off.
English
OPERATING THE SYSTEM
DIM
TIMER
P6
1 Press to select the VEC feature.
2 Adjust the JOG to select the desired
VEC setting : HALL, CLUB, DISCO,
CINEMA, CONCERT or ARCADE.
™ The selected environment is
encircled.
™ "HALL, CLUB, DISCO,
CINEMA, CONCERT or
ARCADE" will be displayed.
1 Press and hold PERSONAL for about 5
seconds to switch on the personal
setting mode.
™ "SELECT PRESET NUMBER" will
be displayed.
2 Adjust the JOG to select the desired
preset number for personal setting and
press á to confirm the selection.
™ "ADAPT LOW FREQ LEVEL" will
be displayed.
3 Adjust the JOG to select the desired
Spectrum Analyser band level for low
frequency.
™ The level will increase or decrease
between+3 and -3.
4 Press á to confirm the selection.
™ "ADAPT MID FREQ LEVEL" will
be displayed, followed by "ADAPT
HIGH FREQ LEVEL".
15
pg 001-41/D5-D1/21-Eng new
15
6/8/01, 11:32 AM
3139 115 20054
OPERATING THE SYSTEM
English
• Repeat step 3 - 4 to select the desired
middle and high frequencies of the
Spectrum Analyser band levels.
5 You can edit the name for the personal
setting.
™ The first character of the setting
name will be flashing.
6 Adjust the JOG to select the desired
letter, number or symbol.
™ "A to Z", "0 to 9" or "*, -, +, \, /, _".
7 Press á to confirm the selection.
™ The next character for editing will be
flashing.
• Repeat steps 6 - 7 to store up to 10
characters.
8 To store the setting, press PERSONAL
again.
• Before storing the setting, you can
press à to retrace the steps.
• To exit without storing the setting,
press Ç.
Notes:
– During personal setting, if no button is
pressed within 90 seconds, the system
will exit personal setting mode
automatically.
– It is not possible to adjust the DBB level
during personal setting, "USE JOG"
will be displayed.
DIGITAL SOUND CONTROL (DSC)
The DSC feature enables you to adjust the
system to suit your type of music.
1 Press to select the DSC feature.
2 Adjust the JOG to select the desired
DSC setting : OPTIMAL, CLASSIC,
TECHNO, VOCAL, ROCK or JAZZ.
™ The selected digital sound is
encircled.
™ "OPTIMAL, CLASSIC, TECHNO,
VOCAL, ROCK or JAZZ" will be
displayed.
Note:
– Some CDs might be recorded in high
modulation, which causes a distortion
at high volume. If this occurs, switch off
DBB or reduce the volume.
Automatic DSC-DBB / VEC-DBB
selection
The best DBB setting is generated
automatically for each DSC or VEC
selection. You can manually select the DBB
setting that best suits your listening
environment.
Note:
– For a neutral setting, select CLASSIC.
DYNAMIC BASS BOOST (DBB)
There are three DBB settings to enhance
the bass response.
1 Press to select the DBB feature.
2 Adjust the JOG to select the desired
DBB level : BEAT, PUNCH or BLAST.
™ The DBB LED will be lit.
™ "BEAT", "PUNCH" or "BLAST" will
be displayed.
To switch off DBB
1 Press DBB briefly.
2 Adjust the JOG until "DBB OFF" is
displayed.
16
pg 001-41/D5-D1/21-Eng new
16
6/8/01, 11:32 AM
3139 115 20054
General Information
DVD-Video
Video CD
Audio CD
• Digital video discs provide perfect
digital, studio-quality pictures; three
dimensional digital; multi-channel
audio; story sequences screened from
your choice of camera angle; sound
tracks in as many as eight languages;
and up to 32 subtitles if available on
disc.
• DVD-Video uses state-of-the-art MPEG2
data compression technology to register
an entire movie on the single 5-inch
disc. DVD's variable bitrate
compression, running up to 9.8 Mbits/
second, captures even the most complex
pictures in their original quality.
• The crystal-clear digital pictures have a
horizontal resolution of over 500 lines,
with 720 pixels (picture elements) to
each line. This resolution is more than
double that of VHS, superior to Laser
Disc, and entirely comparable with
digital masters made in recording
studios.
• In addition to the DVD-Video discs, you
will be able to play all Video CDs and
Audio CDs (including finalised CD
Recordable and CD Rewritable).
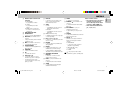
You will recognise
DVD-Video discs by
the logo shown at
right. Depending on
the material on the disc (a movie, video
clips, a drama series, etc.) the disc may
have one or more Titles. Each Title may
have one or more Chapters. To make
playback easy and convenient, your player
lets you select Titles and Chapters.
You will recognise Video
CDs by the logo shown at
right. Depending on the
material on the disc (a
movie, video clips, a
drama series, etc.) the disc may have one
or more tracks. Tracks may have one or
more indexes, as indicated on the disc
case. To make playback easy and
convenient, your player lets you select
tracks and indexes.
Audio CDs contain music
tracks only.
You will recognise CDs by
their logo which is shown
at right. You can play them in conventional
style through a stereo system, using the
keys on the remote control and/or front
panel, or via the TV using the On-Screen
Display (OSD).
DVD-VIDEO DISC
TITLE 1
CHAPTER 1
CHAPTER 2
TITLE 2
CHAPTER 1
CHAPTER 2
AUDIO CD
TRACKS
VIDEO CD
CHAPTER 3
TRACK 1
INDEX 1
INDEX 2
TRACK 2
INDEX 1
English
DVD-VIDEO
INDEX 2
1
2
3
4
5
6
7
8
9 10 11 12 ...
INDEX 3
17
pg 001-41/D5-D1/21-Eng new
17
6/8/01, 11:32 AM
3139 115 20054
DVD-VIDEO
English
Surround Setup (for FW-D5
DVD MINI HIFI SYSTEM
STANDBY
ON
NEWS / T.A.
FTS
P1
TITLE
CHAP.
P2
FM LW
AMW
SLEEP
P4
P5
P3
DIM
LEFT
TIMER
CENTER
DVD operation only)
RIGHT
P6
SURR CHANNEL SURR
POWER SAVE
RDS / CD TEXT
SURROUND CONTROL
5.1CH / STEREO / SURR / 3D
IR SENSOR
CD 1 • 2 • 3
DVD
RET
UR
N
CD
SEARCH•TUNING
STOP•CLEAR
TUNER
PLAY PAUSE
PRESET ▲
SIDE NEXT
PERSONAL
C
VE
DS
C
DBB
VOLUME
PROG
DIM
CLOCK/
TIMER
DVD
AXIS
DVD
MENU
OK
SOUND JOG
DVD JOG
PLAYBACK
MODE
DVD / VCD / CD PLAYBACK
DVD
OPEN / CLOSE
MIC LEVEL
VCD
Multichannel sound
MULTICHANNEL SOUND gives you a
completely new listening sensation. You
will have the feeling of being in the middle
of the action, because sound is coming
from everywhere around you. Look for
discs with the
mark
which indicates the material is encoded for
multichannel surround sound.
AUX
PREV
B
SCAN
A-
C
PB
CDR
BAND
▲
VCD • CD
CD
MIC
Notice that DVDs do not always carry full
multichannel surround. To be sure that a
disc is multichannel encoded, consult your
dealer.
Most ordinary stereo tapes and discs can
be replayed using surround sound settings
with good results. If the reproduction is
distorted in surround mode, switch to
normal stereo mode.
The availability of the various surround
sound modes described depends on the
number of speakers used and the incoming
sound information.
Setting up the Multichannel
system
You must set up the system properly in
order to enjoy the MULTICHANNEL to the
fullest. First, connect the speakers.
5-Speaker Connection
• Front speakers: Connect the front
speakers to the FRONT terminals.
• Centre speaker: Connect the centre
speaker to the CENTER terminals.
• Rear (surround) speakers: Connect
either the wired rear surround speakers
or a pair of wireless rear speakers (not
supplied) to the SURROUND OUT
terminals.
CENTER
REAR
SURROUND
FRONT
REAR
LEFT
FRONT
LEFT
REAR
RIGHT
FRONT
RIGHT
18
pg 001-41/D5-D1/21-Eng new
18
6/8/01, 11:32 AM
3139 115 20054
Positioning the Speakers
Switching Surround Control
Sound
To get the best surround sound effect,
place the speakers as follows.
FRONT
LEFT
SUBWOOFER
CENTER
SPEAKER
MINI HIFI
SYSTEM
TV
SURROUND
LEFT
LEFT
SURR
You can switch through the different
surround modes. Note that the
possibilities are related to speaker setup as
defined.
FRONT
RIGHT
SURROUND
RIGHT
Front Left and Right Speakers
For the best sound, place the Left and Right
speakers at an angle of approximately 45
degrees to the listener. If the speakers'
magnetic field affects the television
picture, increase the distance between the
TV and the speakers.
Centre Speaker
For the best sound, place the centre
speaker at the same height as the left and
right speakers. Place the centre speaker
directly above or beneath the television.
Rear (surround) Speakers
The surround speakers should be placed at
normal listening ear level or mounted on
the wall at the back of the room. Most
important, experiment when placing the
surround speakers in order to obtain the
best sound.
• Press SURROUND CONTROL (or
SURR on the remote control) to select :
MULTICHANNEL, STEREO, SURROUND
or 3D SURROUND mode.
™ The message "DOLBY DIGITAL
AC3 5.1 CHANNEL, STEREO,
SURROUND or 3D SURROUND"
will be displayed.
Multichannel (5.1)
In addition to SURROUND,
the surround mode used
will be displayed. AC3
must be available on the
source material.
Stereo
All sound is reproduced and
played through the front left
and right speakers. This
enables standard stereo
reproduction.
LEFT
SURR
LEFT
SURR
CENTER
RIGHT
CHANNEL SURR
CENTER
Surround
This surround mode enables
normal surround sound
reproduction with two
speakers. Depending on the source
material, Dolby Pro Logic or MPEG is
reproduced (for connection to another
Dolby Pro Logic decoder).
3D Surround
The sound of the rear
channel is simulated by the
front left and right
speakers.
LEFT
SURR
CENTER
English
DVD-VIDEO
RIGHT
CHANNEL SURR
CENTER
RIGHT
CHANNEL SURR
Note:
– Always refer to OSD when selecting
surround control sound. When in stop
mode, the player will not display the
correct surround selection.
RIGHT
CHANNEL SURR
19
pg 001-41/D5-D1/21-Eng new
19
6/8/01, 11:32 AM
3139 115 20054
DVD-VIDEO
English
1
2
3
4
5
FTS
6
7
TITLE
P1
CHAP.
P2
9
8
FM LW
AMW
SLEEP
P4
P5
P3
DIM
10
TIMER
P6
Menu bar/Status window
The status window displays the current
status of the player and appears with the
first part of the menu bar. (You must
activate this in the Features Menu, see
Personal Preferences for details).
General
Angle
Child Lock On
Child Safe
Resume
Action prohibited
Disc type
14
13
12
11
Tray status
6
– DVD TITLE number
7
– DVD CHAPTER number
8
– TRACK/TOTAL TIME in hours, minutes
and seconds
9 REPEAT
– REPEAT active
0 SHUFFLE
– SHUFFLE active
! DVD
– DVD disc inserted
@ VCD
– (Video)CD disc inserted
# DVD MENU
– DVD MENU active
$ 3D SURROUND (for model FW-D5
only)
– 3D SURROUND active
On Screen Display
information
TITLE
CHAP.
DISPLAY indications
1
–
2
–
3
–
4
–
5
–
(for model FW-D5 only)
AC-3 active
SCAN
SCAN active
Repeat A-B active
Remote control active (flashing)
FTS
Favourite Track Selection active
Temporary feedback field icons
Default screen
The default screen is displayed when the
player is in STOP mode. It may contain a
'Status Window' and a 'Temporary
Feedback Field'. This screen gives
information concerning prohibited actions,
playback modes, available angles, etc.
Scan
Repeat All
Repeat Title
Repeat Track
Repeat Chapter
Shuffle
Shuffle Repeat
Repeat A to end
Repeat A-B
20
pg 001-41/D5-D1/21-Eng new
20
6/8/01, 11:32 AM
3139 115 20054
Turning On the power
Preparation
NTSC/PAL Setting
Before viewing the DVD or VCD, ensure
that the PAL or NTSC setting of the system
matches your TV set.
1 Before connecting the system to the
power source, press and hold DVD and
à (on the system only). While holding
DVD and à, plug in the power cord.
2 After PAL or NTSC appears on the
display, release DVD and à at the
same time.
™ The PAL or NTSC that appears on the
display indicates the current setting.
• To change the setting, press ë within
3 seconds.
™ After selected, the set will
automatically switch to the last
NTSC or PAL setting everytime the
DVD or VCD source is selected.
3 Remove the AC power plug from the
wall outlet, then reconnect the power
plug and switch on the system again.
1 Switch on the TV and select the video in
channel to which you connected your
DVD-Video player.
2 Press DVD.
™ The player display lights and the
"Initial Setup" screen appears.
The ‘Initial Setup’ will only appear the very
first time you turn on the player. In ‘Initial
Setup’, you may have to set your personal
preferences for some of the player’s most
relevant items. See ‘Initial Setup’.
Initial Setup
Manual Operation
After switching on the player for the very
first time, the ‘Initial Setup Screen’ will
appear.
The menu for the first item to be set is
displayed and the first option is
highlighted.
Automatic setting
When settings will be taken from your TV
or Home Cinema system, the message
‘Auto configuring in process’ will appear.
Menus for which no settings are available
will be displayed. They have to be set
manually.
The following items may have to be set in
INITIAL SETUP:
Notes:
– Preferences have to be set in the order
in which the item menus will appear on
the screen.
– The ‘Initial Setup’ screen will only
disappear after the settings for the last
item have been confirmed.
– If any keys other than 3 or 4 or OK are
pressed, Ä will appear on the screen.
– If the player is switched off while
setting personal preferences, all
preferences have to be set again after
switching the player on again.
Audio language
The sound will be in the
language you choose if it
is available on the disc in
play. If the language you
select is not available,
speech will revert to the
first spoken language on
the disc. You can choose
from different languages.
1 Use the 3 or 4 keys to go through the
options in the menu.
™ The icon of the selected option will
be highlighted.
2 Press OK to confirm your selection and
to go to the next menu.
English
DVD-VIDEO
Menu language
The On Screen Menus will be displayed in
the language you choose. You can choose
from different languages.
Subtitle language
The subtitles will be in the
language you choose if it
is available on the disc in
play. If the language you
select is not available,
subtitles will revert to the
first subtitle language on
the disc. You can choose
from different languages.
Initial Setup
Audio language
English
Español
Français
Português
Russian
Polish
Initial Setup
Subtitle language
English
Español
Français
Português
Russian
Polish
21
pg 001-41/D5-D1/21-Eng new
21
6/8/01, 11:32 AM
3139 115 20054
DVD-VIDEO
English
TV Shape
If you have a wide screen (16:9) TV, select
16:9.
If you have a regular (4:3) TV, select 4:3.
If you have a 4:3 TV, you can also select
between:
Letterbox for a ‘wide-screen’ picture with
black bars top and bottom, or Pan Scan, for
a full-height picture with the sides
trimmed. If a disc has Pan Scan, the picture
then moves (scans) horizontally to keep the
main action on the screen.
LETTERBOX
PAN SCAN
Country
Select your country. This also is used as
input for the ‘Parental Control’ feature. (see
‘Access Control’)
Note:
– All these items may have to be set
during ‘Initial Setup’. After that, they
can always be changed in the Personal
Preferences Menu.
OSD Menu
A number of operations can be carried out
via the menu bar on the screen. The
following functions are available via the
menu bar:
V
W
X
Y
Z
}
a
c
d
e
f
g
h
Personal preference
Title/Track
Chapter/Index
Audio language
Subtitle language
Angle
Zoom
FTS-Video
Sound
Picture by Picture
Slow motion
Fast motion
Time search
• The menu bar can be accessed by
pressing any of the following keys on
the remote control: OSD MENU and
AUDIO.
• The various items can be selected by
pressing the OSD MENU button, then
the 4 or 3 keys or by pressing the
relevant keys on the remote control.
• Pressing OSD MENU while the menu
bar is displayed will clear the menu bar
from the screen.
• When selecting an item in the menu bar,
the selected item will be highlighted
and the appropriate cursor keys to
operate this item will be displayed
below the icon.
• < or > indicates that more items are
available at the left/right of the menu
bar. Press 1 or 2 to select these items.
Personal preferences
You can set your personal preferences for
some of the player features : PICTURE,
SOUND, LANGUAGE and FEATURE.
General operation:
1 Press OSD MENU on the remote
control.
2 Select V in the menu bar.
™ The Personal Preferences menu
appears.
• Use the 1 or 2 / 3 or 4 keys (or DVD
JOG) to toggle through the menus, sub
menus and submenu options.
™ When a menu item is selected, the
cursor keys (on the remote control) to
operate the item are displayed next
to the item.
3 Press OK to confirm and return to the
main menu.
Note:
– The DVD JOG can only move within one
direction at a time, either up/down or
left/right. Press AXIS on the system to
select the movement direction before
using DVD JOG.
22
pg 001-41/D5-D1/21-Eng new
22
6/8/01, 11:33 AM
3139 115 20054
The following items can be adapted:
Sound
Picture
– TV Shape
See ‘Initial Setup’
– Black level shift (NTSC only)
Adapts the colour dynamics to obtain
richer contrasts. Select ON or OFF.
– Digital output
Factory setting: ALL. This means that
digital output is switched on. If you are
not connecting equipment with a digital
input, change the setting to OFF.
If your equipment doesn’t include a
digital multi-channel decoder, set the
digital output to PCM (Pulse Code
Modulation).
– Analogue output
Select Stereo, Surround, 3D Sound or
Multichannel.
– Video shift
The factory centres the video on your
screen. Use this setting to personalize
the position of the picture on your TV by
scrolling it to the left or right.
– Karaoke vocal (not available for all
versions)
Put this setting to ON only when a
multi-channel karaoke DVD is being
played. The karaoke channels on the
disc will then be mixed into a normal
stereo sound.
– Speaker
Allows you to select speaker settings,
volume balance and delay time and to
test the speaker settings.
Speaker settings are only active on the
Analogue Multi-Channel Output (see
Appendix - page 30).
Note:
– After selecting the desired Analogue
Output , if the message appeared on the
TV OSD and the system display screen
do not match with the setting, press
SURROUND CONTROL (or SURR on the
remote control) until the selected
setting reached.
– Night Mode
Optimises the dynamics of the sound
with low volume playback.
Features
– Access Control
Access Control contains the following
features:
Child Lock…When Child Lock is set to
ON, a 4-digit code needs to
be entered in order to play
discs.
Parental control…Allows the
conditional presentation of
DVDs containing Parental
Control information. (see
‘Access Control’)
English
DVD-VIDEO
– Status Window
Displays the current status of the player
and is displayed with the menu bar.
When disc playback is stopped, it is
displayed with the ‘Temporary Feedback
Field’ in the default screen.
Factory setting is ON. Select OFF to
suppress display of the Status
Window.
– Low power Standby (not applicable
for this model)
Language
Select the required Menu, Audio and
Subtitle language. See ‘Initial Setup’.
Audio language and Subtitle language can
also be adapted via the Menu bar on the
screen.
– PBC (Playback Control)
The PBC can be set to ON or OFF (only
applicable for Video CD playback).
– Beeper (not applicable for this model)
The beeper can be set to ON or OFF.
23
pg 001-41/D5-D1/21-Eng new
23
6/8/01, 11:33 AM
3139 115 20054
DVD-VIDEO
English
Authorising discs
• Insert the disc. See ‘Loading disc’.
™ The 'child protect' screen will appear.
Access control; child lock
(DVD and VCD)
Activating/deactivating the child lock
1 When disc playback is stopped, select
ACCESS CONTROL in the
features menu using the 3 or 4 keys.
2 Enter a 4-digit code of your own choice.
3 Enter the code a second time.
4 Move to Child lock using the 3 or 4
keys.
5 Move to LOCK/UNLOCK icons using
the 2 key.
6 Select LOCK icon using the 3 or 4
keys.
7 Press OK or 1 to confirm, then press 1
again to exit the menu.
™ Now unauthorised discs will not be
played unless the 4-digit code is
entered.
8 Select UNLOCK icon to deactivate the
Child Lock.
Note:
– Confirmation of the 4-digit code is
necessary when the code is entered for
the very first time, changed or
cancelled.
24
pg 001-41/D5-D1/21-Eng new
24
– Multi-volume VCDs may have a different
ID for each volume. In order to make the
complete set ‘child safe’, each volume
has to be authorised.
Deauthorising discs
• Insert the disc. See ‘Loading disc’.
™ Playback starts automatically.
• Press Ç while { is visible.
™ The | will appear and the disc is
now deauthorised.
You will be asked to enter your secret code
for ‘Play Once ‘or ‘Play Always.’ If you
select ‘Play Once’, the disc can be played
as long as it is in the player and the player
is ON. If you select ‘Play Always’, the disc
will become child safe (authorised) and can
always be played, even if the Child Lock is
set to ON.
Notes:
– The player memory maintains a list of
50 authorised (‘Child safe’) disc titles. A
disc will be placed in the list when ‘Play
Always’ is selected in the ‘child protect’
screen. Each time a ‘child safe’ disc is
played, it will be placed on top of the
list. When the list is full and a new disc
is added, the last disc in the list will be
removed from the list.
– Double sided DVDs may have a different
ID for each side. In order to make the
disc ‘child safe’, each side has to be
authorised.
Access control; Parental
control (DVD-Video only)
Movies on DVDs may contain scenes not
suitable for children. Therefore, disc may
contain ‘Parental Control’ information
which applies to the complete disc or to
certain scenes on the disc. These scenes
are rated from 1 to 8, and alternative, more
suitable scenes are available on the disc.
Ratings are country dependent. The
‘Parental Control’ feature allows you to
prevent discs from being played by your
children or to have certain discs played
with alternative scenes.
Activating/Deactivating Parental
Control
1 When disc playback is stopped, select
ACCESS CONTROL in the Features
menu using the 3 or 4 keys.
2 Enter your 4-digit code. If necessary,
enter the code a second time.
3 Move to Parental Control using the 3 or
4 keys.
4 Move to VALUE ADJUSTMENT (1-8)
using the 2 key.
5 Then use the 3 or 4 keys or the digit
keys ( 0-9) on the remote control to
select a rating from 1 to 8 for the disc
inserted.
Rating 0 (displayed as ‘– –’):
Parental Control is not activated. The
Disc will be played in full.
6/8/01, 11:33 AM
3139 115 20054
Ratings 1 to 8:
The disc contains scenes not suitable for
children. If you set a rating for the
player, all scenes with the same rating
or lower will be played. Higher rated
scenes will not be played unless an
alternative is available on the disc. The
alternative must have the same rating or
a lower one. If no suitable alternative is
found, play will stop and the 4-digit
code has to be entered.
6 Press OK or 1 to confirm, then press 1
again to exit the menu.
Country
1 When disc playback is stopped, select
ACCESS CONTROL in the Features
menu using the 3 or 4 keys.
2 Enter the 4-digit code.
3 Move to CHANGE COUNTRY using the
4 key.
4 Press the 2 key.
5 Select a country using 3 or 4.
6 Press OK or 1 to confirm, then press 1
again to exit the menu.
Changing the 4-digit code
1 When disc playback is stopped, select
ACCESS CONTROL in the Features
menu using the 3 or 4 keys.
2 Enter the old code.
3 Move to CHANGE CODE using the 4
key.
4 Press the 2 key.
5 Enter the new 4-digit code.
6 Enter the code a second time and
reconfirm by pressing OK.
7 Press 1 to exit the menu.
If you forget your 4 digit code
1 Press 9 to exit ‘Child Protect’ screen.
2 Select ACCESS CONTROL in the
Features menu using the 3 and 4 keys.
3 The 4-digit code can be cancelled by
pressing 9 four times in the ‘Access
Control’ dialog.
4 You can then enter a new code (twice!)
as described above (Changing the 4 digit
code).
On this basis, Philips cannot warrant
functioning of the PARENTAL CONTROL
system and disclaims any liability of
unintended watching of disc content.
If in doubt, please check the system with
the disc before you allow children access
or apply to the relevant disc publisher for
more information.
Operation
Loading discs
Parental Control Disclaimer
This DVD player features the PARENTAL
CONTROL system which is intended to
activate when playing DVD discs made
with certain software coding. This is
according to technical standards adopted
by the set maker and disc content
industries.
1 Press OPEN/CLOSE 0 on the front of
the player. The disc tray opens.
2 Load your chosen disc in the tray, label
side up (also when a double sided DVD
is inserted). Make sure it is sitting
properly in the correct recess.
3 Gently push the tray, or press OPEN/
CLOSE 0 to close the tray.
™ "READ" appears in the status
window and on the player display,
and playback starts automatically.
Please note that the PARENTAL CONTROL
system will not operate if the DVD disc
does not have the appropriate software
coding. Also note that at the time of
release of this DVD player, certain aspects
of the said technical standards had not
been fully settled among the set maker and
the disc content industries.
Notes:
– If ‘Child Lock’ is set to ON and the disc
inserted is not in the ‘child safe’ list (not
authorised), the 4-digit code must be
entered and/or the disc must be
authorised. (see ‘Access Control’)
– The DVD tray will open or close only
when the system is in DVD mode.
Playing a DVD
Playing a title
1 After inserting the disc and closing the
tray, playback starts automatically.
™ The status window and the display
show the type of disc loaded, as well
as information about the disc’s
contents and playing time.
• The disc may invite you to select an
item from a menu. If the selections are
numbered, press the appropriate
numerical key; if not, use the 1 or 2 /
3 or 4 keys to highlight your selection,
then press OK.
™ The currently playing title and
chapter number are shown in the
menu bar and display.
™ The elapsed playing time is shown in
the status window and the display.
• For model FW-D5 only - If required, you
can use the SURROUND CONTROL (or
SURR on the remote control) key to
select Multichannel, Stereo, Surround or
3D-Surround. Play may stop at the end
of the Title, and the player may return to
the DVD menu. To go on to the next title,
press 2.
2 To stop play at any other time, press
Ç.
™ The default screen will appear, giving
information about the current status
of the player.
English
DVD-VIDEO
25
pg 001-41/D5-D1/21-Eng new
25
6/8/01, 11:33 AM
3139 115 20054
DVD-VIDEO
English
• You can RESUME play from the point at
which you stopped play. Press 2 (PLAY);
when you see the RESUME icon . on
the screen, press 2 (PLAY) again.
™ The RESUME feature applies not only
to the disc in the player, but also to
the last four discs you have played.
Simply reload the disc, press
2 (PLAY); when you see the RESUME
icon . on the screen , press
2 (PLAY) again.
Note:
– Since it is usual for DVD movies to be
released at different times in
different regions of the world, all
players have region codes. Discs can
have an optional region code. If you load
a disc of a different region code into
your player, you will see the region code
notice on the screen. The disc will not
play and should be removed from the
player.
26
pg 001-41/D5-D1/21-Eng new
26
Playing a VCD
Playing a disc
1 After inserting the disc and closing the
tray, playback starts automatically.
™ The status window and the display
show the type of disc loaded, as well
as information about the disc’s
contents and playing time.
• The disc may invite you to select an
item from a menu. If the selections are
numbered.
™ The currently playing track number is
shown in the menu bar and the
display. The elapsed playing time is
shown in the status window and the
display.
• For model FW-D5 only - If required, you
can use the SURROUND CONTROL (or
SURR on the remote control) key to
select Multichannel, Stereo, Surround or
3D-Surround.
2 To stop play at any time, press Ç.
™ The default screen will then appear.
• You can RESUME play from the point at
which you stopped play. Press 2 (PLAY);
when you see the RESUME icon . on
the screen, press 2 (PLAY) again.
™ The RESUME feature applies not only
to the disc in the player, but also to
the last four discs you have played.
Simply reload the disc, press
2 (PLAY); when you see the RESUME
icon . on the screen , press
2 (PLAY) again.
Note:
– When PBC mode is switched on,
RESUME play is not available.
General features
Note:
– Unless stated otherwise, all operations
described are based on remote control
operation. A number of operations can
also be carried out via the menu bar on
the screen.
Moving to another title/TRACK
When a disc has more than one title or
track (which you can see from both the
menu bar and the display), you can move to
another title/track as follows:
1 Select W (TITLE/TRACK) in the menu
bar.
2 Press ë briefly during play to select
the next title/track.
• Press í briefly during play to return to
the beginning of the current title/track.
Press í briefly again to step back to
the previous title/track.
3 To exit, press 1 or 2.
6/8/01, 11:33 AM
Moving to another chapter/index
When a title has more than one chapter or
a track has more than one index (which you
can see from the display and on the menu
bar), move to another chapter/index as
follows:
1 Select X (CHAPTER/INDEX) in the menu
bar.
2 Press ë briefly during play to select
the next chapter/index.
• Press í briefly during play to return to
the beginning of the current chapter/
index. Press í twice briefly to step
back to the previous chapter/index.
• To go directly to any chapter or index,
enter the number using the digit keys
(0-9).
3 To exit, press 1 or 2.
Note:
– If the number has more than one digit,
press the keys in rapid succession.
3139 115 20054
Still Picture and Frame-by-frame
playback
1 Select e (PICTURE BY PICTURE) in
the menu bar.
2 Use the 4 key to enter the picture by
picture menu.
™ The player will go into PAUSE mode.
3 Use the cursor keys 1 or 2 to select the
previous or next picture frame.
4 To exit Picture by picture mode, press
2 (PLAY) or 3 on the remote control.
Search
1 Select g (FAST MOTION) in the menu
bar.
2 Use the 4 keys to enter the Fast Motion
menu.
3 Use the 1 or 2 keys to select the
required speed: -32, -8 or -4
(backward), or +4, +8, +32 (forward).
4 Select 1 to play at normal speed again.
5 To exit Fast Motion mode, press
2 (PLAY) or 3 on the remote control.
To search forward or backward through
different speeds, you can also hold down
à or á.
Repeat
DVD-Video Discs - Repeat chapter/
title/disc
• To repeat the chapter currently playing,
press REPEAT.
™ REPEAT CHAPTER appears on the display.
• To repeat the title currently playing,
press REPEAT a second time.
pg 001-41/D5-D1/21-Eng new
27
™ REPEAT TITLE appears on the display.
• To repeat the entire disc, press REPEAT
a third time.
™ REPEAT appears on the display.
• To exit Repeat mode, press REPEAT a
fourth time.
Video-CDs - Repeat track/disc
• To repeat the track currently playing,
press REPEAT.
™ REPEAT TRACK appears on the display.
• To repeat the entire disc, press REPEAT
a second time.
™ REPEAT appears on the display.
• To exit Repeat mode, press REPEAT a
third time.
Repeat A-B
To repeat a sequence in a title:
• Press Repeat A-B at your chosen
starting point;
™ A- appears briefly on the screen.
• Press Repeat A-B again at your chosen
end point;
™ A-B repeat appears briefly on the display,
and the repeat sequence begins.
• To exit the sequence, press Repeat A-B.
Scan
Plays the first 10 seconds of each chapter/
index on the disc.
• Press SCAN.
• To continue play at your chosen chapter/
index, press SCAN again or press
2 (PLAY) on the remote control.
Shuffle
DVDs
This shuffles the playing order of chapters
within a title, if the title has more than one
chapter.
• Press SHUFFLE during play.
™ SHUFFLE appears on the screen for
about two seconds.
• To return to normal play, press
SHUFFLE again.
VCDs
This shuffles the playing order of the
tracks, if the disc has more than one track.
• Press SHUFFLE during play.
™ SHUFFLE appears on the screen for
about two seconds.
• To return to normal play, press
SHUFFLE again.
Time search
The Time Search function allows you to start
playing at any chosen time on the disc.
1 Select h (TIME SEARCH) in the menu
bar.
2 Press 4.
™ The player will go into PAUSE mode.
™ A time edit box appears on the
screen, showing the elapsed playing
time of the current disc.
3 Use the digit keys ( 0-9) to enter the
required start time. Enter hours, minutes
and seconds from right to left in the box.
™ Each time an item has been entered,
the next item will be highlighted.
6/8/01, 11:33 AM
4 Press OK to confirm the start time.
™ The time edit box will disappear and
play starts from the selected
time position on the disc.
English
DVD-VIDEO
Zoom
The Zoom function allows you to enlarge
the video image and to pan through the
enlarged image.
1 Select a (ZOOM) in the menu bar.
2 Press 3 or 4 to activate the ZOOM
function and select the required zoom
factor: 1.33 or 2 or 4.
™ The player will go into PAUSE mode.
™ The selected zoom factor appears
below the Zoom icon in the
menu bar and ‘Press OK to pan’
appears below the menu bar.
™ The picture will change accordingly.
3 Press OK to confirm the selection.
™ The panning icons appear on the
screen: 1 or 2 / 3 or 4 and OK.
4 Use the 1 or 2 / 3 or 4 keys to pan
across the screen.
5 When OK is pressed only the zoomed
picture will be shown on the screen.
6 If you wish to zoom at any moment,
press a (ZOOM) and select the
required zoom factor as described
above.
7 To exit Zoom mode, press 2 (PLAY),Ç
or OSD MENU.
™ If you press 2 (PLAY), playback will
resume.
27
3139 115 20054
DVD-VIDEO
English
FTS-Video
– The FTS-Video function allows you to
store your favourite titles and chapters
(DVD) and favourite tracks and indexes
(VCD) for a particular disc in the player
memory.
– Each FTS programme can contain 20
items (titles, chapters).
– Each time an FTS programme is played
it will be placed on top of the list. When
the list is full and a new programme is
added, the last programme in the list
will be removed from the list.
– The selections can be played at any time.
– For VCD, FTS programme is not available
whenever PBC mode is switched on.
Storing a FTS-Video Program
1 In STOP mode, select FTS-Video c in
the menu bar.
2 Press 4 to open the menu.
™ The FTS-Video menu appears.
Storing titles/tracks
1 Press 4 to select TITLES/TRACK.
2 Use 1 or 2 to select the required title/
track.
28
pg 001-41/D5-D1/21-Eng new
28
3 Press OK if you wish to store the entire
title/track.
™ The title/track number will be added
to the list of selections.
When your FTS Program is complete, press
É(PLAY) to start play, or Ç to go back to
Stop mode. In either case, the FTS Program
will be automatically memorised.
Storing chapters/indexes
1 Press 4 on the selected title/track
number.
™ The title/track number will be marked
and the highlight moves to the first
available chapter/index number for
this title/track.
2 Use 1 or 2 to select the required
chapter/index number.
3 Press OK to confirm the selection.
™ The title-chapter/track-index selection
will be added to the list of selections.
4 Press OSD MENU to exit the FTSVideo c menu.
Special DVD-features
Erasing a FTS-Video Program
1 In STOP mode, select FTS-Video c in
the menu bar.
2 Use 4 to select PROGRAM.
3 Use 1 or 2 to select the required
selection number.
4 Press OK to erase the selection.
5 Press OSD MENU to exit.
Checking the contents of DVD : Menus
For titles and chapters, selection menus
may be included on the disc. The DVD’s
menu feature allows you to make
selections from these menus.
• Press the appropriate digit keys (0-9);
or use the 1 or 2 / 3 or 4 keys to
highlight your selection, then press OK.
Title menus
1 Press DVD MENU.
™ If the current title has a menu, the
menu will appear on the
screen. If no menu is present in the
title, the disc menu will be
displayed.
2 The menu can list camera angles,
spoken language and subtitle options,
and chapters for the title.
3 To remove the title menu, press DVD
MENU again.
If you wish to erase all selections:
1 In STOP mode, select FTS-Video c in
the menu bar.
2 Use 4 to select CLEAR ALL.
3 Press OK.
™ All selections will now be erased.
4 Press OSD MENU to exit.
6/8/01, 11:33 AM
Disc menu
1 Select W (TITLE/TRACK) in the menu
bar, then press DVD MENU.
™ The disc menu is displayed.
• To remove the disc menu, select W
(TITLE/TRACK) in the menu bar, then
press DVD MENU again.
Camera Angle
If the disc contains sequences recorded
from different camera angles, the angle
icon appears, showing the number of
available angles and the angle being
shown currently. You can then change the
camera angle if you wish.
1 Select } (ANGLE) in the menu bar.
2 Use the 3 or 4 keys to select the
required angle in the angle icon.
™ After a small delay, play changes to
the selected angle. The angle icon
remains displayed until multiple
angles are no longer available.
Changing the audio language
1 Select Y (AUDIO) in the menu bar or
press AUDIO on the remote control.
2 Press 3 or 4 repeatedly to see the
different languages.
3139 115 20054
Subtitles
1 Select Z (SUBTITLE) in the menu bar.
2 Press 3 or 4 repeatedly to see the
different subtitles.
Notes:
– When PBC menu consists of more than
one page, use í or ë keys to go
through the pages.
– When PBC mode is switched on,
RESUME play, Repeat A-B, SCAN and
SHUFFLE are not functional.
Playing an audio CD
Special VCD-Features
Playback Control (PBC)
PBC ON
1 Load a Video CD with PBC and press
PBC to switch on PBC mode.
2 Press 2(PLAY).
™ The PBC menu appears on the TV
screen.
• Go through the menu with the keys
indicated on the TV screen until your
chosen passage starts to play. If a PBC
menu consists of a list of titles, you can
select a title directly.
3 Enter your choice with the digit keys
(0-9).
4 Press RETURN to go back to the
previous menu.
When PBC OFF
1 Press PBC to switch off PBC mode.
2 Playback will resume when press
2 (PLAY).
™ The PBC menu does not appear on
the TV screen.
pg 001-41/D5-D1/21-Eng new
29
Pause
• Press ; during play.
• To return to play, press 2 (PLAY).
Moving to another track
• Press ë briefly during play to go to the
next track.
• Press í briefly during play to return to
the beginning of the current track. Press
í briefly again to step back to the
previous track.
• To go directly to any track, enter the
track number using the digit keys (0-9).
Shuffle
• Press SHUFFLE during play.
™ The order of the tracks is changed.
• To return to normal play, press
SHUFFLE again.
1 After loading the disc, playback starts
automatically.
• If the TV is on, the Audio CD screen
appears.
™ The number of tracks and the total
playing time will be shown on the
screen and on the player display.
™ During play, the current track number
and its elapsed playing time will be
shown on the screen and on the
player display.
2 Playback will stop at the end of the disc.
• To stop play at any other time, press
Ç.
Repeat track/disc
• To repeat the track currently playing,
press REPEAT.
™ REPEAT TRACK appears on the display.
• To repeat the entire disc, press REPEAT
a second time.
™ REPEAT appears on the display.
• To exit Repeat mode, press REPEAT a
third time.
Repeat A-B
To repeat a sequence:
• Press Repeat A-B at your chosen
starting point;
™ A- appears briefly on the player
display.
• Press Repeat A-B again at your chosen
end point;
™ A-B appears briefly on the display,
and the sequence begins to play
repeatedly.
• To exit the sequence, press Repeat A-B
again.
English
DVD-VIDEO
Scan
Plays the first 10 seconds of each track on
the disc.
• Press SCAN.
• To continue play at your chosen track,
press SCAN again or press 2 (PLAY).
FTS (Favourite Track Selection)
– The FTS feature allows you to store your
favourite tracks for a particular disc in
the player memory.
– Each FTS programme can contain 20
tracks.
– Each time an FTS programme is played it
will be placed on top of the list. When
the list is full and a new programme is
added, the last programme in the list
will be removed from the list.
– The selections can be played at any
time.
29
6/8/01, 11:33 AM
3139 115 20054
DVD-VIDEO
English
Switching FTS ON/OFF
1 Use 3 or 4 to move to the top.
2 Use 1 or 2 to select either ON or OFF.
Storing an FTS Program
1 Load a disc and stop playback.
2 Use 4 to go to the list of available
tracks.
3 Use 1 or 2 to select tracks from the list.
To go directly to any track, enter the
track number using the digit keys (0-9).
4 Store each track by pressing OK.
™ The track numbers will be added to
the list of selected tracks.
™ The number of tracks and the playing
time of the programme will be
shown on the screen and the player
display.
When your FTS Program is complete, press
É(PLAY) to start play, or Ç to go back to
Stop mode. In either case, the FTS Program
will be automatically memorised.
Erasing a track from an FTSprogramme
1 Use 4 to go to the list of selected
tracks in programme.
2 Use 1 or 2 to select the track number
you wish to erase.
3 Press OK.
™ The track number will be erased from
the list of selected tracks.
Erasing the complete programme
• Use 4 to select CLEAR ALL and press
OK.
™ The complete FTS programme for the
disc will be erased.
Appendix
6 Channel settings
Front speakers
L (Large): When the front speakers can
reproduce low frequency
signals below 120Hz
S (Small): When the front speakers
cannot produce low frequency
signals below 120Hz
Subwoofer
On:
When you connect a subwoofer
Off:
When the subwoofer is not
connected.
* You can use your TV as centre speaker.
When centre speaker is turned on, the
audio L/R as well as the audio from the
scart will contain the centre speaker
audio.
Center
speaker
Centre speaker*
L (Large): When the centre speaker can
reproduce low frequency
signals below 120Hz
S (Small): When the centre speaker
cannot produce low frequency
signals below 120Hz
Off:
When the centre speaker is not
connected.
Surround speakers
L (Large): When the surround speakers
can reproduce low frequency
signals below 120Hz
S (Small): When the surround speakers
cannot produce low frequency
signals below 120Hz
Off:
When the surround speakers
are not connected.
Front speaker
left
Rear speaker
(left surround)
TV
Front speaker
right
Rear speaker
(right surround)
Delay times
The DVD player is set to reproduce
correctly synchronised Digital Surround
Sound in a listening area where the
surround speakers are about 150cm nearer
to the listening position than the front
speakers, and the centre speaker is in line
with the front speakers. To adjust for other
listening area arrangements, certain delay
times required.
30
pg 001-41/D5-D1/21-Eng new
30
6/8/01, 11:33 AM
3139 115 20054
Setting up Karaoke (in DVD
mode only)
MIC LEVEL
MIC
(not available for all versions)
1 Load a karaoke disc into the player.
2 Set the MIC LEVEL control to the
minimum level to prevent acoustic
feedback (e.g. loud howling sound)
before connecting the microphone.
3 Connect a microphone to MIC socket.
4 Press 2 (PLAY) to start playback.
5 Press KARAOKE on the remote
control to switch on the Karaoke mode.
6 Karaoke menu bar appears.
™ Move to the function you want to
change using 3 or 4 keys then use
1 or 2 keys to scroll to your
preferred option.
7 Adjust the MIC LEVEL control.
8 Adjust ECHO -/+ ( j ) to the level
you desire.
9 Adjust KEY CONTROL -/+ ( k ) to
change the key of your vocal range.
10 Select the different MODE SELECTION
l you desire. (see Karaoke General
Features).
11 Shift to VOCAL m to fade out the
original vocal from a karaoke disc.
When you start singing or talking
through the microphone, the original
vocal will fade out automatically.
12 Shift to VOCAL CANCEL to cancel out
the original vocal from the sound.
13 Press KARAOKE button to exit the
menu screen.
General features
Karaoke ON/OFF ( i )
• To switch karaoke features ON/OFF
mode.
Echo -/+ ( j )
• Can be adjusted in the range of
{0.....+7).
Vocal ( m )
• Available options for vocal are:.
ON
– normal mode, all music
and vocals are played.
CANCEL – cancel original vocals.
FADE
– removes original vocals
when you start singing
through the microphone.
English
DVD-VIDEO
Key Control -/+ ( k )
• Can be adjusted in the range of
{-7 ......0.....+7).
Mode Selection ( l )
• Works correctly only on karaoke disc.
• Only two channels are available.
• For VCD Karaoke disc,
™ Selection between L+R / L / R
L+R Left + Right
L Left
R Right
• For DVD Karaoke disc,
™ Selection between M1 / M2 / V1 / V2
M1 All channels
M2 Music channels only
V1 Vocal 1 output
V2 Vocal 2 output
Note:
– In the karaoke disc, karaoke L, R, M1,
M2, V1, V2 are recorded. In some
discs, the M1, M2, V1, V2 may not be
recorded in the disc.
31
pg 001-41/D5-D1/21-Eng new
31
6/8/01, 11:33 AM
3139 115 20054
CD
English
OPEN•CLOSE
DISC CHANGE
CD 1
CD 2
CD 3
3CD
CHANGER
Discs for playback
CD Direct Play
This system can play all digital audio CD,
finalised digital audio CD-Recordable and
finalised digital audio CD-Rewritable
format discs.
• You can play a CD directly by pressing
the CD 1, CD 2 or CD 3 button. The CD
player will stop at the end of playback of
the selected disc.
™ A lit button indicates that a disc is
loaded in the disc tray.
™ The selected disc is encircled.
Loading the CD Changer
Playing a CD
DVD MINI HIFI SYSTEM
STANDBY
ON
NEWS / T.A.
FTS
P1
TITLE
CHAP.
P2
FM LW
AMW
SLEEP
P4
P5
P3
DIM
LEFT
TIMER
CENTER
RIGHT
P6
SURR CHANNEL SURR
POWER SAVE
RDS / CD TEXT
SURROUND CONTROL
5.1CH / STEREO / SURR / 3D
IR SENSOR
BAND
CDR
CD
TUNER
AUX
SEARCH•TUNING
STOP•CLEAR
PLAY PAUSE
PREV
PRESET ▲
SIDE NEXT
B
PERSONAL
C
VE
PROG
DIM
DS
C
DBB
VOLUME
SCAN
A-
RET
UR
N
CD 1 • 2 • 3
DVD
▲
C
PB
VCD • CD
CLOCK/
TIMER
DVD
AXIS
DVD
MENU
OK
SOUND JOG
DVD JOG
Warning!
1) This system is designed for conventional CDs. Do not use any accessories
such as disc stabilizer rings or CD treatment sheets, etc., which may damage
the CD mechanism.
2) Do not load more than one disc into each tray.
3) When the CD carousel tray is loaded with CDs, do not turn over or shake the
system. This may jam the changer.
You may load three discs in the CD carousel tray for continuous playback without
interruption.
1 Press CD to select CD mode.
2 Press OPEN•CLOSE.
™ The CD carousel tray slides out.
3 Load a CD with the printed side up in
the right tray.
• You can load another disc in the left
tray.
• To load the third disc, press the DISC
CHANGE button.
™ The CD carousel will rotate until the
empty tray is ready for loading.
4 Press OPEN•CLOSE to close the CD
carousel tray.
™ The total number of tracks and the
playing time of the selected disc
appear on the display.
1 Press 2 (PLAY) to start playback.
™ The disc tray, track number and
elapsed playing time of the current
track appear on the display.
• To interrupt playback, pressÅ.
™ The playing time flashes.
• To resume playback, press 2 (PLAY)
again.
2 To stop playback, press Ç.
Notes:
– All the available discs will play once,
then stop.
– When the CD has stopped playing, the
system will switch to standby mode
after 30 minutes if no button is pressed.
Note:
– To ensure good system performance,
wait until the CD changer completely
reads the disc(s) before proceeding.
32
pg 001-41/D5-D1/21-Eng new
32
6/8/01, 11:33 AM
3139 115 20054
Disc Change
You can change the outer two discs while
the third inner disc is stopped or is playing.
1 Press DISC CHANGE.
™ The CD carousel tray slides out.
2 Replace the discs in the left and right
disc trays.
• If you wish to change the inner disc
during playback, press DISC CHANGE
again.
™ "DISC CHANGE" will be displayed.
™ The CD will stop playing.
™ The CD carousel tray will close to
retrieve the inner CD then open again
with the inner CD accessible.
3 Press OPEN•CLOSE to close the CD
carousel tray.
Selecting a desired track
Selecting a desired track when
playback is stopped
1 Press í or ë (or Digit 0-9 on the
remote control) until the desired track
appears on the display.
2 Press 2 (PLAY) to start playback.
™ The selected track number and
elapsed playing time appear on the
display.
Selecting a desired track during
playback
• Press í or ë (or Digit 0-9 on the
remote control) until the desired track
appears on the display.
™ The selected track number and
elapsed playing time appear on the
display.
• If you press í once it will skip to the
beginning of the current track and play
the track again.
Note:
– Pressingí during shuffling can only
skip to the beginning of the current
track.
Searching for a particular
passage during playback
• Press and hold à or á until the
desired passage is located.
™ The volume will be reduced.
• Play returns to normal when à or á
is released.
Programming Tracks
Programming tracks of a loaded CD is
possible when playback is stopped. The
display will indicate the total tracks stored
in the programme. Up to 40 tracks can be
stored in the memory in any order. When
40 tracks are stored and you attempt to
store another track, the display will show
"PROGRAM FULL".
1 Load the desired discs in the disc trays.
2 Press PROG to start programming.
™ The PROG starts flashing.
3 Press the CD (CD 1•2•3) or CD 1/2/3
button to select the disc.
4 Press í or ë (or Digit 0-9 on the
remote control) to select the desired
track.
5 Press PROG to store the track.
• Repeat steps 3 to 5 to store other discs
and tracks.
6 Press Ç once to end programming.
™ The total number of tracks
programmed and total playing time
appear on the display.
Notes:
– If the total playing time is more than
"99:59" or if one of the programmed
tracks has a number greater than 30,
then "--:--" appears on the display
instead of the total playing time.
– If the system is reading the disc,
programming is not possible,
"READING" will be displayed and
followed by "DISC X" "X" is the
current read disc number.
– During programming, if no button is
pressed within 20 seconds, the system
will exit programme mode
automatically.
English
CD
Reviewing the programme
Reviewing of the programme is possible
only when playback is stopped.
1 Press í or ë repeatedly to review
the programmed tracks.
2 Press Ç once to exit review mode.
Playing the programme
1 Press 2 (PLAY) to start programme
playback.
™ "PLAY PROGRAM" will be
displayed.
™ The track number and elapsed
playing time of the current track will
appear on the display.
• If you press REPEAT during programme
playback, the current track or all
programmed tracks will be played
repeatedly.
™ "TRACK" or "PROGRAM" will be
displayed.
™ The REPEAT and PROG appear on the
display.
33
pg 001-41/D5-D1/21-Eng new
33
6/8/01, 11:33 AM
3139 115 20054
CD
English
2 Press Ç to stop programme playback.
Shuffle (only on remote control)
Repeat (only on remote control)
Notes:
– If you press any of the CD DIRECT PLAY
buttons, the system will play the
selected disc or track and the stored
programme will be ignored temporarily.
The PROG display also will disappear
temporarily from the display. It will
reappear when playback of the selected
disc ends.
– REPEAT DISC mode is not available
when programme playback begins.
In shuffle mode, the system plays all the
available discs and their tracks in random
order. Shuffle may be used also when
tracks are programmed.
You can play the current track, a disc or all
available discs repeatedly.
Erasing the programme (when
playback is stopped)
• Press Ç.
™ "PROGRAM CLEARED" will be
displayed.
Note:
– The programme will be erased when the
system is disconnected from the power
supply or when the CD carousel tray is
opened.
To shuffle all the discs and tracks
1 Press SHUFFLE.
™ "SHUFFLE" will be displayed.
™ The SHUFFLE, the disc and the track
selected at random appear on the
display.
• The discs and the tracks will be played
in random order until you press Ç.
• If you press REPEAT during shuffling,
the current track or all available discs
will be played repeatedly.
™ "TRACK" or "ALL DISC" will be
displayed.
™ The REPEAT and SHUFFLE appear on the
display.
2 Press SHUFFLE again to resume normal
playback.
™ The SHUFFLE disappears from the
display.
1 Press REPEAT on the remote control to
select the various repeat modes.
™ "TRACK", "DISC", "ALL DISC" or
"OFF" will be displayed.
™ The REPEAT appears on the display.
• The selected track, selected disc or all
available discs will now be played
repeatedly until you press Ç.
2 Press REPEAT until the "OFF" mode is
displayed to resume normal playback.
™ The REPEAT disappears from the
display.
Notes:
– REPEAT DISC mode is not available
during programme play or shuffle mode.
– You can also repeat shuffling a
programme.
™ "TRACK" or "PROGRAM" will be
displayed.
™ The REPEAT, PROG and SHUFFLE appear
on the display.
Note:
– REPEAT DISC mode is not available
when shuffle is selected.
34
pg 001-41/D5-D1/21-Eng new
34
6/8/01, 11:33 AM
3139 115 20054
Storing Preset Stations
DVD MINI HIFI SYSTEM
STANDBY
ON
NEWS / T.A.
FTS
P1
TITLE
CHAP.
P2
FM LW
AMW
SLEEP
P4
P5
P3
DIM
LEFT
TIMER
CENTER
RIGHT
P6
SURR CHANNEL SURR
POWER SAVE
RDS / CD TEXT
SURROUND CONTROL
5.1CH / STEREO / SURR / 3D
IR SENSOR
BAND
CDR
CD
TUNER
AUX
SEARCH•TUNING
STOP•CLEAR
PLAY PAUSE
PREV
PRESET ▲
SIDE NEXT
B
PERSONAL
C
VE
PROG
DIM
DS
C
DBB
VOLUME
SCAN
A-
RET
UR
N
CD 1 • 2 • 3
DVD
▲
C
PB
VCD • CD
CLOCK/
TIMER
DVD
AXIS
DVD
MENU
OK
SOUND JOG
DVD JOG
Note:
– For 'EASY SET' feature, please refer to
page 14.
Tuning to radio stations
1 Press TUNER (BAND) to select TUNER
mode.
™ "TUNER" will be displayed.
A few seconds later, the current radio
frequency will be displayed.
2 Press TUNER (BAND) again to select
the desired waveband : FM or MW.
3 Press à or á for more than one
second, then release.
™ The display will show "SEARCH"
until a radio station with sufficient
signal strength is found.
• Repeat this procedure until the desired
radio station is reached.
• To tune to a weak radio station, briefly
press à or á repeatedly until the
display shows the desired frequency
and/or when the best reception has
been obtained.
You can store up to 40 radio stations in the
memory. When a preset radio station is
selected, the preset number appears next
to the frequency on the display.
Automatic programming
1 Press TUNER (BAND).
2 Press PROG for more than one second.
™ The PROG starts flashing and "AUTO"
will be displayed.
™ The system will search for every
available radio station in the FM
waveband first, then search the MW
waveband.
™ All available radio stations will be
stored automatically. The frequency
and preset number will be displayed
briefly.
™ The system will stop searching when
all the available radio stations are
stored or when the memory for 40
preset radio stations is used.
™ The system will remain tuned to the
last stored preset radio station.
Notes:
– You can cancel the automatic
programming by pressing PROG orÇ
(on the system only).
– If you want to reserve a section of
preset numbers, for example preset
numbers 1 to 9, select preset 10 before
starting automatic programming, only
the preset numbers 10 to 40 will be
programmed.
English
TUNER
Manual programming
1 Press TUNER (BAND).
2 Press TUNER (BAND) again to select
the desired waveband : FM or MW.
3 Press PROG for less than one second.
™ The PROG starts flashing.
™ The next available preset number will
be displayed for selection.
4 Press à or á to tune to the desired
frequency.
• If you wish to store the radio station to
another preset number, press í or ë
(or Digit 0-9 on the remote control) to
select the desired preset number.
5 Press PROG again.
™ The PROG disappears and the radio
station will be stored.
• Repeat steps 3 – 5 to store other preset
radio stations.
Notes:
– When 40 radio stations are stored and
you attempt to store another radio
station, the display will show
"PROGRAM FULL". If you want to
change an existing preset number,
repeat steps 3 – 5.
35
pg 001-41/D5-D1/21-Eng new
35
6/8/01, 11:33 AM
3139 115 20054
TUNER
English
– You can cancel manual programming by
.
pressing Ç (on the system only).
– During programming, if no button is
pressed within 20 seconds, the system
will exit programme mode
automatically.
Tuning to Preset Radio
Stations
• Press í or ë (or Digit 0-9 on the
remote control) to select the desired
preset number.
™ The preset number, radio frequency,
and waveband appear on the display.
Changing the MW tuning grid
(not available for version /30)
The frequency step can be changed if
necessary. In North and South America, the
frequency step between adjacent channels
in the MW band is 10 kHz. In other parts of
the world, it is 9 kHz. The frequency step
presetted in the factory is 9 kHz.
For MW band
To change from 9 kHz to 10 kHz or vice
versa
Changing of tuning grid will erase all
previously stored preset stations.
1 Disconnect the system from the AC
power supply (pull out the AC power
cord).
2 Press TUNER and TUNING á
depressed while reconnecting the
system to the AC power supply.
™ Display will show "GRID 9" or
"GRID 10".
Notes:
– GRID 9 indicates that the tuning grid is
in step of 9 kHz in MW band. GRID 10
indicates that the tuning grid is in step
of 10 kHz in MW band.
– FM tuning grid will also be changed
from 50 kHz to 100 kHz or vice versa.
All preset radio stations will also be
erased.
36
pg 001-41/D5-D1/21-Eng new
36
6/8/01, 11:33 AM
3139 115 20054
CLOCK
DVD MINI HIFI SYSTEM
DVD MINI HIFI SYSTEM
STANDBY
ON
NEWS / T.A.
FTS
P1
TITLE
CHAP.
P2
FM LW
AMW
SLEEP
P4
P5
P3
DIM
LEFT
TIMER
CENTER
STANDBY
ON
NEWS / T.A.
RIGHT
FTS
P6
P1
TITLE
CHAP.
P2
FM LW
AMW
SLEEP
P4
P5
P3
DIM
LEFT
TIMER
SURR CHANNEL SURR
RDS / CD TEXT
POWER SAVE
RDS / CD TEXT
SURROUND CONTROL
SURROUND CONTROL
5.1CH / STEREO / SURR / 3D
CDR
TUNER
AUX
SEARCH•TUNING
STOP•CLEAR
PLAY PAUSE
PREV
PRESET ▲
SIDE NEXT
PERSONAL
C
VE
C
PB
DS
C
DIM
CLOCK/
TIMER
CD 1 • 2 • 3
BAND
CDR
DVD
CD
TUNER
AUX
SEARCH•TUNING
PLAY PAUSE
PREV
PRESET ▲
SIDE NEXT
PERSONAL
C
VE
VOLUME
PROG
DVD
AXIS
STOP•CLEAR
DIM
DS
C
DBB
DBB
VOLUME
PROG
RET
UR
N
VCD • CD
B
SCAN
A-
B
SCAN
A-
BAND
CD
▲
RET
UR
N
CD 1 • 2 • 3
DVD
5.1CH / STEREO / SURR / 3D
IR SENSOR
▲
C
PB
VCD • CD
RIGHT
P6
SURR CHANNEL SURR
POWER SAVE
IR SENSOR
CENTER
English
AUX/CDR
CLOCK/
TIMER
DVD
DVD
MENU
OK
AXIS
SOUND JOG
DVD JOG
Selecting External Equipment
If you have connected the audio out
terminals of the external equipment (TV,
VCR, Laser Disc player, DVD player, or CD
Recorder) to the AUX/CDR IN terminals,
you can hear the enhanced sound from the
system.
1 Press AUX (CDR) to select the CDR
mode.
™ "CDR" will be displayed.
2 Press AUX (CDR) again to select
external (normal AUX) mode.
™ "AUX" will be displayed.
Notes:
– There are two Auxiliary modes:
i. the normal AUX mode.
ii. the CDR mode, where the LINE OUT
of this mini system is muted. You will
not be able to record or listen to the
sound from the LINE OUT.
– You are advised not to listen to and
record from the same source
simultaneously.
– All the sound control features (e.g. DSC,
DBB, etc.) are available for selection.
OK
DVD
MENU
SOUND JOG
DVD JOG
View Clock
Clock Setting
You can view the clock (if it is set) if the
system is in Standby mode or when any
sound source is selected (CD, TUNER, etc.).
The clock will be displayed for about seven
seconds.
The clock can be set in either 12- or 24hour mode, e.g. "AM 12:00" or
"00:00". Before setting the clock, you
must be in the View Clock mode.
• Press CLOCK/TIMER briefly.
™ "PM 10:38 or 22:38" (the
current time) will be displayed
depending on whether you have
selected 12- or 24-hour mode.
™ "--:--" will be displayed if the
clock is not set.
1 Press CLOCK/TIMER to select clock
mode.
2 Press PROG (on the system only) to
select 12- and 24- hour mode.
™ If 12-hour mode is selected,
"AM 12:00" starts flashing.
™ If 24-hour mode is selected, "00:00"
starts flashing.
3 Set the hour with à or á on the
system.
4 Set the minute with í or ë on the
system.
37
pg 001-41/D5-D1/21-Eng new
37
6/8/01, 11:33 AM
3139 115 20054
TIMER
English
5 Press CLOCK/TIMER again to store the
setting.
™ The clock starts.
• To exit without storing the setting, press
Ç on the system.
Notes:
– During clock setting, if no button is
pressed within 90 seconds, the system
will exit clock setting mode
automatically.
– When a power interruption occurs, the
clock setting is erased.
Timer Setting
• The system can switch on to CD or
TUNER mode automatically at a preset
time. It can serve as an alarm to wake
you up.
• Before setting the timer, make sure the
clock is set correctly.
• The timer will always be switched on
once it is set.
• The volume of the timer will
increase from the minimum level
until the volume level before the set
is switched to standby mode.
1 Press and hold CLOCK/TIMER for more
than 2 seconds to select timer mode.
™ "AM 12:00" or "00:00" or the last
timer setting starts flashing
depending on whether you have
selected 12- or 24-hour mode.
™ The TIMER starts flashing.
™ The selected source is lit while other
available sources are flashing.
2 Press CD or TUNER to select the
desired source.
• Before selecting CD, make sure a CD is
loaded in the CD tray.
3 Press à or á on the system to set
the hour for the timer to start.
4 Press í or ë on the system to set
the minute for the timer to start.
5 Press CLOCK/TIMER to store the start
time.
™ The timer is now set.
™ The TIMER remains on the display.
• At the preset time, the timer will be
activated.
™ The selected source will be played.
Notes:
– During timer setting, if no button is
pressed within 90 seconds, the system
will exit timer setting mode
automatically.
– If the source selected is TUNER, the last
tuned frequency will be switched on.
– If the source selected is CD, playback
will begin with the first track of the
selected disc or programme. If the CD
trays are empty, TUNER will be selected
instead.
To switch off the TIMER
• Press TIMER on the remote control.
™ The timer is now switched off.
™ The display will show "CANCEL"
and the TIMER disappears.
To start the TIMER again (for the same
preset time and source)
• Press TIMER on the remote control.
™ The timer is now on.
™ The TIMER appears on the display.
38
pg 001-41/D5-D1/21-Eng new
38
6/8/01, 11:33 AM
3139 115 20054
Specifications
AMPLIFIER
Output power
FW-D5 ......................... 3000 W PMPO / 2 x 50 W RMS(1)
Left/Right Channel ........................... 2 x 50 W RMS(1)
Centre Channel ........................................... 50 W, 6 Ω
Surround Channel ................................. 2 x 50 W, 6 Ω
FW-D1 ......................... 1200 W PMPO / 2 x 50 W RMS(1)
Signal-to-noise ratio .................................... ≥ 75 dBA (IEC)
Frequency response ......................... 20 – 20000 Hz, ± 3 dB
Input sensitivity
AUX In / CDR In ............................................ 500 mV / 1V
Output
Speakers ................................................................. ≥ 6 Ω
Centre Speaker (for FW-D5 only) ........................... ≥ 6 Ω
Surround Speakers (for FW-D5 only) ...................... ≥ 6 Ω
Headphones ............................................. 32 Ω – 1000 Ω
Subwoofer Out ............................ 1.5 V ±2dB, > 22000 Ω
Line Out .......................................... 1 V ±2dB, > 22000 Ω
Digital Out ......................................................... 1 coaxial
................................................ IEC 958 for CDDA / LPCM
............................ IEC1937 for MPEG1, MPEG2 and AC-3
Surround Out wireless (for FW-D5 only) ............. 750 mV,
±2dB, > 22000 Ω
(1) (6 Ω, 1 kHz, 10% THD)
DVD-VIDEO PLAYER
Playback System ............................... DVD-Video/ Video CD
CD (CD-R & CD-RW)
Video
DA converter ......................................................... 10 bits
Digital compression ............................. MPEG 2 for DVD,
............................................................... MPEG 1 for VCD
Video output ................................................ 1 Vpp (75 Ω)
S-Video output ......................................... Y: 1 Vpp (75 Ω)
............................................................. C: 0.3 Vpp (75 Ω)
CD PLAYER
Number of programmable tracks .................................... 40
Frequency response ...................................... 20 – 20000 Hz
Signal-to-noise ratio ............................................. ≥ 76 dBA
Channel separation .................................... ≥ 79 dB (1 kHz)
Total harmonic distortion ........................... < 0.02% (1 kHz)
TUNER
FM wave range ........................................... 87.5 – 108 MHz
MW wave range (9 kHz) .............................. 531 – 1602 kHz
MW wave range (10 kHz) ............................ 530 – 1700 kHz
Tuning grid ............................................................. 9/10 kHz
Number of presets ............................................................ 40
Antenna
FM ................................................................. 75 Ω wire
AM ........................................................... Loop antenna
SPEAKERS
System ............... Shielded 2-way; double port bass reflex
Impedance .................................................................... 6 Ω
Woofer ..................................................................... 1 x 6.5"
Tweeter .................................................................... 1 x 2.5"
Dimensions (w x h x d) ..................... 240 x 310 x 315 (mm)
Weight ............................................................ 3.85 kg each
SURROUND SPEAKERS (FW-D5)
System ........................................................ closed satellite
Impedance .................................................................... 6 Ω
Speaker Driver ........................................... 1 x 3” full range
Dimensions (w x h x d) ..................... 230 x 130 x 155 (mm)
Weight .............................................................. 1.2 kg each
English
SPECIFICATIONS
GENERAL INFORMATION
Material/finish ...................................... Polystyrene/Metal
AC Power
For Version /21-21M ................ 110 – 127 / 220 – 240 V;
.................................................... 50/60 Hz Switchable
For Version /30 ................................. 230 – 240 V; 50 Hz
Power Consumption
Active
FW-D5 .............................................................. 230 W
FW-D1 .............................................................. 130 W
Standby
FW-D5 ............................................................. < 24 W
FW-D1 .............................................................. < 24 W
Dimensions (w x h x d) ...................... 265 x 310 x 390 (mm)
Weight (without speakers) ...................................... 10.8 kg
Subject to modification
CENTRE SPEAKER (FW-D5)
System ................................................ shielded bass reflex
Impedance .................................................................... 6 Ω
Speaker Driver ........................................... 1 x 3” full range
Dimensions (w x h x d) ..................... 230 x 130 x 155 (mm)
Weight ....................................................................... 1.3 kg
39
pg 001-41/D5-D1/21-Eng new
39
6/8/01, 11:33 AM
3139 115 20054
MAINTENANCE
TROUBLESHOOTING
English
Maintenance
Cleaning the Cabinet
• Use a soft cloth slightly moistened with
a mild detergent solution. Do not use a
solution containing alcohol, spirits,
ammonia or abrasives.
Cleaning Discs
• When a disc becomes
dirty, clean it with a
cleaning cloth. Wipe
the disc from the
centre out.
• Do not use solvents
such as benzine,
thinner, commercially available cleaners,
or antistatic spray intended for analogue
records.
Cleaning the disc lens
• After prolonged use, dirt or dust may
accumulate at the disc lens. To ensure
good playback quality, clean the disc
lens with Philips CD Lens Cleaner or any
commercially available cleaner. Follow
the instructions supplied with cleaner.
Warning! Under no circumstances
should you try to repair the set
yourself as this will invalidate the
guarantee. Do not open the set as
there is a risk of electric shock.
• If a fault occurs, check the points listed
below before taking the system for
repair.
• Should any problems persist after you
have made these checks, consult your
nearest dealer or service centre.
DVD-Video Player Operation
Distorted picture or no colour with
player menu.
• The disc format does not match your
TV's video signal (PAL/NTSC).
™ Replace a recommended disc (refer to
the instruction of this manual).
• The system setting is not correct.
™ Make sure the NTSC/PAL setting at the
player matches the video signal of your
television (see NTSC/PAL setting).
• Check the disc for fingerprints.
™ Clean with a soft cloth, wiping from
centre to edge.
™ Sometimes a small amount of picture
distortion may appear, this is not
malfunction.
No return to start-up screen when disc
is removed.
• Check to see if the programme requires
another disc to be loaded.
™ Reload a disc.
™ Reset by switching the player off, then
on again.
Player does not respond to all
operating commands during playback.
• Operations are not permitted by the
disc.
™ Refer to the instruction of the disc.
No audio at digital output.
• The digital connections are not properly
connected or connected wrongly
™ Check the digital connections.
• Incorrect digital output settings.
™ Check the settings menu to make sure
the digital output is set to ALL or PCM.
™ Check if the audio format of the
selected audio language matches the
receiver capabilities.
No picture on TV screen.
• The video cable is not connected.
™ Connect the cable between the system
and TV.
40
pg 001-41/D5-D1/21-Eng new
40
6/8/01, 11:33 AM
3139 115 20054
CD Player Operation
Radio Reception
"NO DISC" is displayed.
• The disc is inserted upside down.
™ Place disc with printed side up.
• Moisture condensation at the lens.
™ Wait until lens has adjusted to normal
room temperature.
• There is no disc in the CD tray.
™ Insert a disc.
• The disc is dirty, badly scratched or
warped.
™ Clean or replace the disc.
• The disc lens is dirty or dusty.
™ See section under Maintenance (page
40).
Poor radio reception.
• The signal is too weak.
™ Adjust the antenna.
™ Connect an external antenna for better
reception.
• The TV or VCR is too closed to the
stereo system.
™ Separate the stereo system from the TV
or VCR.
"DISC NOT FINALIZED" is
displayed.
• The CD-RW or CD-R disc is not properly
recorded for use with a standard CD
player.
™ Read the instruction booklet of your CDRewritable or CD-Recorder on how to
finalise a recording.
• The CD is badly scratched or dirty.
™ Replace or clean CD.
Cannot tune to radio station.
• Wrong tuning grid.
™ Switch to the correct tuning grid.
General
System does not react when any
button is pressed.
• Electrostatic discharge.
™ Press STANDBY ON to switch the
system off. Remove the AC power plug
from the wall outlet, then reconnect the
power plug and switch on the system
again.
No or poor sound.
• Volume is not turned up.
™ Adjust VOLUME.
• The headphones are connected.
™ Disconnect the headphones.
• Speakers are not connected or are
connected wrongly.
™ Check that the speakers are connected
correctly.
™ Make sure the stripped speaker wire is
clamped.
Reversed left and right sound.
• Speakers are connected wrongly.
™ Check the speaker connections and
location.
Lack of bass sound or apparently
imprecise physical location of musical
instruments.
• Speakers are connected wrongly.
™ Check the speaker connection for
proper phasing, coloured/black wires to
coloured/black terminals.
Remote control has no effect on the
system.
• Wrong source is selected.
™ Select the source (CD, TUNER, etc.)
before pressing the function button
(É, í, ë, etc.).
• The distance to the system is too large.
™ Reduce the distance.
• Batteries are inserted incorrectly.
™ Insert the batteries with their polarities
(+/– signs) as indicated.
• Batteries are exhausted.
™ Replace the batteries.
Timer is not working.
• Clock is not set.
™ Set the clock.
• Timer is not switched on.
™ Press TIMER to switch on the timer.
English
TROUBLESHOOTING
Clock setting is erased.
• There was a power failure.
™ Reset the clock.
System displays features
automatically; buttons flash
continuously.
• Demonstration mode is switched on.
™ Press and hold Ç (on the system) for
five seconds to switch off the
demonstration.
There is a howling sound at the
external source.
• You hear feedback when you are
listening in AUX mode
™ Press AUX to select CDR mode.
All lighted buttons are not lit.
• Display is switched on in DIM 3 mode.
™ Press DIM until DIM OFF display mode
is shown.
41
pg 001-41/D5-D1/21-Eng new
41
6/8/01, 11:33 AM
3139 115 20054