1
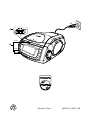
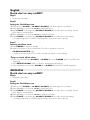
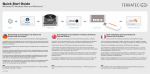
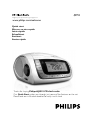
Register your product and get support at
www.philips.com/welcome
Quick start
Mise en service rapide
Inicio rápido
Schnellstart
Snelstart
Avvivo rápido
Thanks for buying Philips AJ3915 CD clock radio.
Our Quick Start guides you through just some of the features on the set.
Please read our instruction booklet to really rise & shine!
A
C
ALARM 1
ALARM 2
B
CLOCK
TUNING
Printed in China
AJ3915_12_QSG_V2.0
English
Quick start as easy as ABC!
Step A
• Plug to the wall outlet.
Step B
Setting the Clock/Alarm time
1. Press and hold CLOCK or ALARM 1/ ALARM 2 until clock digit for hour flashes.
2. Press repeatedly, or hold down ∞/ § to adjust the hours.
3. Press CLOCK or corresponding ALARM 1/ ALARM 2 to confirm the hour setting, and the
clock digits for minute flashes.
4. Press repeatedly, or hold down ∞ / § to adjust the minutes.
5. Press CLOCK or corresponding ALARM 1/ ALARM 2 to confirm the minute setting.
• Corresponding ALM1 or ALM2 is displayed. when alarm time is set to activate.
Step C
Selecting the Alarm mode
1. Press POWER to switch to standby.
2. Select your choice of alarm mode: either CD, radio, or buzzer by using the
CD•RADIO•BUZZER slider.
• At the set alarm time, the CD or radio or buzzer will switch on automatically.
3 ways to switch off the alarm
• Press once corresponding ALARM 1 or ALARM 2, or press POWER (ALM1 or ALM2 is still
displayed.).
• Press REPEAT ALARM (ALM1 or ALM2 is still displayed, yet flashing.).
• Press repeatedly corresponding ALARM 1 or ALARM 2 until ALM1 or ALM2 disappears.
ENGLISH
Quick start as easy as ABC!
Step A
• Plug to the wall outlet.
Step B
Setting the Clock/Alarm time
1. Press and hold CLOCK or ALARM 1/ ALARM 2 until clock digit for hour flashes.
2. Press repeatedly, or hold down ∞/ § to adjust the hours.
3. Press CLOCK or corresponding ALARM 1/ ALARM 2 to confirm the hour setting, and the
clock digits for minute flashes.
4. Press repeatedly, or hold down ∞ / § to adjust the minutes.
5. Press CLOCK or corresponding ALARM 1/ ALARM 2 to confirm the minute setting.
• Corresponding ALM1 or ALM2 is displayed. when alarm time is set to activate.