1
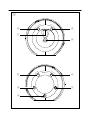
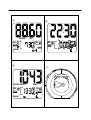
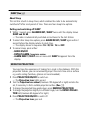
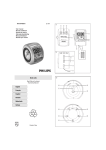
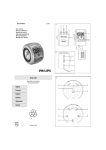
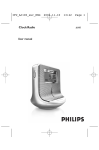
Clock Radio
Register your product and get support at
www.philips.com/welcome
User manual
Mode d’emploi
Manual del usuario
Benutzerhandbuch
Gebruiksaanwijzing
Manuale utente
AJ 3600
1
1
RADIO ON/OFF
2
BAND
3
ALARM RESET/SLEEP
5
REPEAT ALARM
BRIGHTNESS CONTROL
AL
4
AL
ON
OFF
PRESET 1
AJ3600 PROJECTION CLOCK RADIO
AL1
9
2
1
TUNING
2
VOLUME
DC 7.5V
3
4
AL 2
8
6
7
3
E
PR
OJ
EC
TIO
PRO
N
JE
CT
IO
N
O
3
N
RE
FF
VE
RS
/O
2
1
T
+
UR
HO
AL
AR
M
ON
SE
1
PRESET 1- 5
1
TA
2
LA
RM
3
5
4
SET
T I ME
6
TE +
8
T
4
C
MINU
9
SE
PR OJE
2
5
TE
TI
RO
A
7
4
5
RADIO
FM
AL
AL
AL
AL
ON
ON
ON
OFF
PRESET
5
6
E
PR
OJ
EC
TIO
PRO
N
Max.180
C
TE
A
RO
AL
AL
ON
PRESET
ON
2
PR OJE
ON
MW
TI
SLEEP RADIO
JE
CT
IO
N
O
N
FF
RE
RS
/O
VE
7
T
English
Congratulations on your purchase, and welcome to Philips! To fully benefit from
the support that Philips offers, register your product at www.philips.com/welcome.
SUPPLIED ACCESSORIES
– 1 X AC 7.5V adapter
TOP AND FRONT PANEL (See 1)
1 RADIO ON/OFF
– switches the radio on/off; displays radio frequency
– switches off sleep timer
2 BAND – select FM/ MW waveband
3 ALARM RESET / SLEEP
– stops active alarm for 24 hours
– activates the radio for sleep function
– displays/adjusts/switches off sleep timer
4 REPEAT ALARM / BRIGHTNESS CONTROL
– switches off the alarm for a 9 minute period
– changes the brightness of the display illumination
– stops SLEEP function
5 DISPLAY – shows clock/alarm times and status of the set
6 AL 1 (AL
) – switches on/off ALAM 1 radio mode
– displays ALAM 1 time
7 AL 2 (AL
) – switches on/off ALAM 2 buzzer mode
– displays ALAM 2 time
8 Battery compartment – for 4 batteries, type R6, UM3, AA
9 RESET – press if the set / display does not react to operation of any button
BACK PANEL (See 2)
1 TUNING +/- – tunes to radio stations
2 VOLUME – adjusts the sound level
3 DC 7.5V
– socket for AC/DC 7.5V adapter
4 Pigtail – improves FM reception
LEFT & RIGHT PANEL (See 3)
1
2
3
4
5
6
7
8
9
Projection lens
REVERSE PROJECTION – turns time/hour digits upside down(AC-powered only)
PROJECTION ON/OFF – switches the projection on/off
ROTATE PROJECTION – adjusts projection slightly to a different angle
SET ALARM 1 / PRESET 1 – sets ALARM 1 time
– stores, recalls and shows station 1
SET ALARM 2 / PRESET 2 – sets ALARM 2 time
– stores, recalls and shows station 2
MINUTE + / PRESET 3 – adjusts the minutes for clock and alarm times
– stores, recalls and shows station 3
SET TIME / PRESET 4 – sets the clock time
– stores, recalls and shows station 4
HOUR + / PRESET 5 – adjusts the hours for the clock and alarm times
– stores, recalls and shows station 5
POWER SUPPLY
Batteries (not included)
1 Open battery door and insert four batteries (preferably PHILIPS POWER LIFE o
alkaline), type R6, UM3 or AA as indicated in the compartment.
2 Remove the batteries from the set if they are exhausted or not be used for a
long time.
• When you replace batteries, the preset stations, alarm and clock time settings can be stored for up to 3 minutes. (see 'Self-Powered Back-Up').
Batteries contain chemical substances, so they should be disposed of
properly.
Mains adapter
1 Connect the mains adapter to the set's DC 7.5V socket and to the power
socket.
™
indicates the set is now adapter operated.
• Make sure your adapter is properly connected to save battery energy!
2 Always disconnect the mains adapter if you are not using the set.
™
indicator goes out.
Helpful hints: To avoid damage to the set, use only the adapter supplied!
The type plate is located on the bottom of the set inside the battery compartment.
SELF-POWERED BACK-UP
The self-powered back-up conveniently allows your preset stations, alarm and clock
time settings to be stored for up to 3 minutes when there is a power interruption e.g.
AC power failure or when changing batteries.The complete clock radio and backlight
illumination will be switched off.
If power supply returns after 3 minutes and the display shows:
• clock time blinking - indicates you need to re-adjust the clock time.
BATTERY LOW MODE
indicates batteries low. Replace with fresh batteries to ensure all the features
on your set will function properly.
BASIC FEATURES
Reset
Should your set receive external interference e.g. static electricity from carpets, thunderstorms, etc. RESET allows you to clear all previous settings and start up again.
• Use a ballpoint pen to press the RESET hole found on the bottom of the set.
Illumination brightness
Press REPEAT ALARM / BRIGHTNESS CONTROL once or more.
• The brightness of the display can be adjusted:
Bright ➟ Medium ➟ Low ➟ Bright (when AC-powered)
Low ➟ Bright ➟ Low ➟ Bright (when battery-powered)
Helpful hints:
– When battery-powered, the display illumination is default low to help save energy. Any other use of the BRIGHTNESS CONTROL for a brighter display adjustment
will therefore be effectively limited.
SETTING THE CLOCK
The time is displayed using the 24-hour clock.
1. Check the radio is switched off.
2. Press SET TIME to enter the clock setting mode.
3. Hold down or press HOUR + or MINUTE + repeatedly to set and adjust the
hours and minutes respectively. Release HOUR + or MINUTE + when you
have reached the correct setting.
4. Press SET TIME to confirm.
RADIO
1 Press RADIO ON/OFF once to switch on the radio.
™ Display shows the radio frequency of the last selected waveband briefly
before returning to the clock time. Your preset station is also shown if you
are listening to a preset. (See 4)
2 Press BAND if you wish to change waveband.
3 Adjust the sound using VOLUME.
4 Press RADIO ON/OFF to switch off.
Helpful hints:
– In standby clock time, to view the current radio frequency,
• Press RADIO ON/OFF once or more;
• For preset stations, press the respective PRESET button (1-5) once or repeatedly.
TUNING TO RADIO STATONS
Automatic tuning
• Press TUNING +/- one second or more to tune to your station.
™The radio automatically tunes to a station of sufficient reception.
Manual tuning
• Press TUNING +/- briefly or repeatedly until you reach the desired frequency.
To improve reception:
For FM, extend and position the pigtail fully to obtain optimum reception.
For MW, the set is provided with a built-in aerial. Direct the aerial by adjusting the
position of your clock radio.
STORING AND USING PRESET STATIONS
You can store up to a total of 10 radio stations in the memory, 5 on each waveband.
1 Tune to your desired station (see TUNING TO RADIO STATIONS).
2 To store a preset, hold down briefly on a PRESET button 1-5 until you hear a double
beep.
™ Display shows the preset number of your station.
3 Repeat steps 1 and 2 to store your other stations.
• You can overwrite a preset station by storing another frequency in its place.
4 Press a.PRESET button 1-5 to listen to a preset station.
USING THE ALARM
GENERAL
Two different alarm times can be set. This can be useful when you need to be
woken up at a different time e.g. during the week and at the weekend:
• ALARM 1 - radio mode
• ALARM 2 - buzzer mode. The gentle wake buzzer alarm increases its beep tone frequency within seconds.
SETTING THE ALARM TIME AND MODE (See 5)
1. Check the radio is switched off.
2. Press AL 1 or AL2 to on.
or AL
icon.
™ Display: ON appears under the respective AL
3. Press and hold SET ALARM 1 or SET ALARM 2 until alarm time digits flash.
4. Hold down or press HOUR + or MINUTE + repeatedly to set and adjust the
hours and minutes respectively. Release HOUR + or MINUTE + when you
have reached the correct setting.
5. After both the hours and minutes are set, press SET ALARM 1 or SET ALARM
2 to confirm the setting.
Helpful hints:
– If you have selected AL 1 (AL
), make sure you have properly tuned to a
station before turning off the set.
– If you set and activate the same time for both alarms, only the AL 2 (AL
) will
be activate at the set time.
– When both AL 1 (AL
) and AL 2 (AL
) are turned on, by default the display
shows the alarm time nearest to activation.
– To check the alarm time setting for AL 1 or AL 2, press AL 1 or AL 2 button.
– It is not possible to adjust the alarm time during an alarm call or the repeat alarm
mode.
SWITCHING OFF THE ALARM
There are three ways of switching off the alarm. Unless you cancel the alarm
completely, the 24-hour ALARM RESET will be automatically selected after 59
minutes from the time your alarm first goes off.
24 HOUR ALARM RESET
If you want the alarm mode to be stopped immediately but also wish to retain
the same alarm setting for the following day:
• Press ALARM RESET / SLEEP.
™ You will hear a beep tone confirming 24 hour reset activation.
REPEAT ALARM
This repeats your alarm call at 9 minute intervals.
• During the alarm call, press REPEAT ALARM / BRIGHTNESS CONTROL..
™ Display shows (AL
) or (AL
) flashing during a repeat alarm.
• Repeat if desired (up to a maximum of 6 times).
CANCELING THE ALARM COMPLETELY
• Press AL 1 or AL 2 button once or more until the OFF appears under the
respective (AL
) or (AL
) icon.
SLEEP (See 6)
About Sleep
This set has a built-in sleep timer, which enables the radio to be automatically
switched off after a set period of time. There are four sleep time options.
Setting and switching off SLEEP
1 Within 1 second, press ALARM RESET / SLEEP twice until the display shows
SLEEP and SL: 60.
™ The radio is automatically switched on and tunes to the last station.
2 To select other sleep time options, press ALARM RESET / SLEEP again within 1
second before the display returns to clock time.
™ The display shows in sequence: SL : 30, SL : 15 and OFF.
3 To cancel sleep, press either:
– RADIO ON/OFF
– REPEAT ALARM / BRIGHTNESS CONTROL.
– ALARM RESET / SLEEP once or more until SLEEP disappears from the
display.
USING THE PROJECTION
1
2
3
4.
5.
You may have the experience of looking for a clock in the darkness. With this
projection feature, you can conveniently project the clock time onto a surface
e.g. walls ceiling (furniture, glasses not recommended).
Press PROJECTION ON/OFF to switch on.
™ The Projection lens lights up red.
Turn the Projection lens wheel (maximum 180 degree left or right) and also the
set, if necessary, to find a suitable projection surface. (See 7)
To change the projected time upside down, press REVERSE PROJECTION.
To change the projection slightly to a different angle, turn the ROTATE PROJECTION ball (maximum 60 degree left or right.).
Press PROJECTION ON/OFF to switch off.
™ The Projection lens goes out.
Helpful hints:
– When battery-powered, the projection lens lights up briefly to help save energy.
– For a longer projection time, please use the supplied 7.5V AC adapter to
operate the set.
MAINTENANCE & SAFETY
• If you do not intend to use set for a long time, remove the batteries.
• Do not expose the set to humidity, rain, sand or excessive heat caused by
heating equipment or direct sunlight.
• To clean your set, use a soft damp cloth or chamois leather. Do not use cleaning products, which contain benzene, thinner, etc. as these may harm the
housing.
ENVIROMENTAL INFORMATION
We have reduced the packaging to its minimum using only paper and cardboard.
Your set consists of materials which can be recycled if disassembled by a
specialized company. Please observe local regulations on the disposal of
packing materials and old equipment.
TROUBLESHOOTING
If a fault occurs, first check the points listed below before taking the set for repair.
If you are unable to remedy a problem by following these hints, consult your dealer or
service centre.
WARNING: Under no circumstances should you try to repair the set yourself, as this
will invalidate the guarantee. Do not open the set as there is a risk of
electric shock!
No sound
– Volume not adjusted
• Adjust the volume
No display backlight / display malfunction/ radio and alarm do not
function
– Set is in Power Low mode
• Connect AC/DC adapter or insert fresh batteries
Display error / no reaction to any controls
– Electrostatic discharge
• Press the RESET hole on the bottom of the set with a ball-pen. Or disconnect
set from AC/DC adaptor and batteries for 5 minutes, then re-plug.
Continuous crackling and hiss noise during MW reception
– Interference from other electrical equipment e.g. TVs, computers, fluorescent
lamps
• Move the clock radio away from electrical equipment
Intermittent crackling sound during FM reception
– Weak signal
• Extend and position the pigtail aerial
The alarm does not function
– Alarm time/ mode not set
• See SETTING THE ALARM
– Volume too low for radio
• Increase the volume
) not tuned to a radio station
– AL 1 (AL
• Check if the set is tuned to a radio station before you set AL1 and when you
switch off the radio.
Blurry projection
– Distance/ angle between the projection surface too large
• Reduce the distance/ angle.
This product complies with the radio interference requirements of the
European Union.
The typeplate and production number are located inside the battery
compartment.
ENVIRONMENTAL INFORMATION
We have reduced packaging to the minimum for easy separation into two
materials: paper and cardboard.
Your set consists of materials which can be recycled if disassembled by a specia
ized company. Please observe local regulations on the disposal of packing materi
als and old equipment.
Disposal of your old product
Your product is designed and manufactured with high quality materials and components, which can be recycled and reused.
When this crossed-out wheeled bin symbol is attached to a product it means the product is covered by the European Directive
2002/96/EC.
Please inform yourself about the local separate collection system for electrical
and electronic products.
Please act according to your local rules and do not dispose of your old products with
your normal household waste. The correct disposal of your old product will help prevent potential negative consequences for the environment and human health.
Notes for battery disposal
Your product contains batteries covered by the European
Directive 2006/66/EC, which cannot be disposed with normal
household waste. Please inform yourself about the local rules on
separate collection of batteries because correct disposal helps to
prevent negative consequences for the environmental and human
health.
Clock radio
Meet Philips at the Internet
http://www.philips.com
English
Français
Español
Deutsch
Nederlands
Italiano
Printed in China
AJ3600_12_UM_V2.0