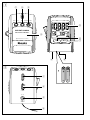
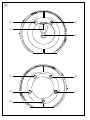
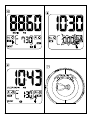
1
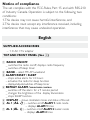
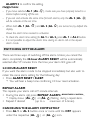
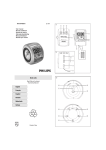
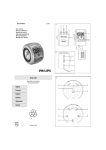
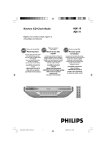
Clock Radio
Thank you for choosing Philips.
Need help fast?
AJ 3600
Philips vous remercie de
votre confiance.
Gracias por escoger Philips
Besoin d'une aide
rapide?
Necesita ayuda
inmediata?
Read your Quick Start Guide and/or
User Manual first for quick tips
that make using your Philips product
more enjoyable.
If you have read your instructions
and still need assistance,
you may access our online help at
Le Guide rapide de début et Manuel de
l'utilisateur regorgent d'astuces destinées à
simplifier l'utilisation de votre produit Philips.
Toutefois, si vous ne parvenez pas à résoudre
votre probléme, vous pouvez accéder à
notre aide en ligne à l'adresse
www.philips.com/welcome
www.philips.com/welcome
Lea primero la Guía rápida del comienzo
o el Manual del usuario, en donde encontrará
consejos que le ayudarán a disfrutar
plenamente de su producto Philips.
Si después de leerlo aún necesita ayuda,
consulte nuestro servicio de
asistencia en línea en
www.philips.com/welcome
User manual
1
1
2
RADIO ON/OFF
BAND
3
ALARM RESET/SLEEP
5
REPEAT ALARM
BRIGHTNESS CONTROL
AL
4
AL
ON
OFF
PRESET 1
AJ3600 PROJECTION CLOCK RADIO
AL1
9
2
1
TUNING
2
VOLUME
DC 7.5V
3
4
AL 2
8
6
7
3
E
PR
OJ
EC
TIO
PRO
N
JE
CT
IO
N
O
3
N
RE
FF
VE
RS
/O
2
1
T
+
UR
HO
AL
AR
M
ON
SE
1
PRESET 1- 5
1
TA
2
LA
RM
3
5
4
SET
T I ME
6
TE +
8
T
4
C
MI NU
9
SE
PR OJE
2
5
TE
TI
RO
A
7
Return your Product Registration Card or register online at
www.philips.com/welcome today to get the very most from your purchase.
Registering your model with PHILIPS makes you eligible for all of the valuable benefits listed below, so
don't miss out. Complete and return your Product Registration Card at once, or register online at
www.philips.com/welcome to ensure:
*Proof of Purchase
Returning the enclosed card
guarantees that your date of
purchase will be on file, so no
additional paperwork will be
required from you to obtain
warrranty service.
*Product Safety
Notification
*Additional Benefits
Registering your product guarantees that you'll receive all of
the privileges to which you're
entitled, including special
money-saving offers.
By registering your product,
you'll receive notification directly from the manufacturer
- in the rare case of a product
recall or safety defect.
Know these
safetysymbols
Congratulations on your purchase,
and welcome to the “family!”
Dear PHILIPS product owner:
Thank you for your confidence in PHILIPS.
You’ve selected one of the best-built, bestbacked products available today.We’ll do
everything in our power to keep you happy
with your purchase for many years to come.
As a member of the PHILIPS “family,” you’re
entitled to protection by one of the most
comprehensive warranties and outstanding
service networks in the industry.What’s
more, your purchase guarantees you’ll
receive all the information and special offers
for which you qualify, plus easy access to
accessories from our convenient home
shopping network.
Most importantly, you can count on our
uncompromising commitment to your total
satisfaction.
All of this is our way of saying welcome and thanks for investing in a PHILIPS product.
P.S. To get the most from your PHILIPS
purchase, be sure to complete and
return your Product Registration Card
at once, or register online at:
www.philips.com/welcome
CAU T IO N
RISK OF ELECTRIC SHOCK
DO NOT OPEN
CAUTION: TO REDUCE THE RISK OF ELECTRIC SHOCK, DO NOT
REMOVE COVER (OR BACK). NO USER-SERVICEABLE PARTS
INSIDE. REFER SERVICING TO QUALIFIED SERVICE PERSONNEL.
This “bolt of lightning” indicates uninsulated material within your unit may
cause an electrical shock. For the safety of
everyone in your household, please do not
remove product covering.
The “exclamation point” calls attention
to features for which you should read
the enclosed literature closely to prevent
operating and maintenance problems.
WARNING: To reduce the risk of fire or
electric shock, this apparatus should not be
exposed to rain or moisture and objects
filled with liquids, such as vases, should not
be placed on this apparatus.
CAUTION: To prevent electric shock, match
wide blade of plug to wide slot, fully insert.
ATTENTION: Pour éviter les choc électriques, introduire la lame la plus large de la
fiche dans la borne correspondante de la
prise et pousser jusqu’au fond.
For Customer Use
Enter below the Serial No. which is located
on the rear of the cabinet. Retain this
information for future reference.
Model No. __________________________
Serial No. __________________________
Visit our World Wide Web Site at http://www.philips.com/welcome
Notice of compliance
The set complies with the FCC-Rules, Part 15 and with RSS-210
of Industry Canada. Operation is subject to the following two
conditions:
1.This device may not cause harmful interference, and
2.This device must accept any interference received, including
interference that may cause undesired operation.
English
SUPPLIED ACCESSORIES
– 1 X AC 7.5V adapter
TOP AND FRONT PANEL (See 1)
1 RADIO ON/OFF
– switches the radio on/off; displays radio frequency
– switches off sleep timer
2 BAND – select FM/ AM waveband
3 ALARM RESET / SLEEP
– stops active alarm for 24 hours
– activates the radio for sleep function
– displays/adjusts/switches off sleep timer
4 REPEAT ALARM / BRIGHTNESS CONTROL
– switches off the alarm for a 9 minute period
– changes the brightness of the display illumination
– stops SLEEP function
5 DISPLAY – shows clock/alarm times and status of the set
) – switches on/off ALAM 1 radio mode
6 AL 1 (AL
– displays ALAM 1 time
) – switches on/off ALAM 2 buzzer mode
7 AL 2 (AL
– displays ALAM 2 time
8 Battery compartment – for 4 batteries, type R6, UM3, AA
9 RESET – press if the set / display does not react to operation of any button
BACK PANEL (See 2)
1
2
3
4
TUNING +/- – tunes to radio stations
VOLUME – adjusts the sound level
DC 7.5V
– socket for AC/DC 7.5V adapter
Pigtail – improves FM reception
LEFT & RIGHT PANEL (See 3)
1 Projection lens
2 REVERSE PROJECTION – turns time/hour digits upside down
(AC-powered only)
3 PROJECTION ON/OFF – switches the projection on/off
4 ROTATE PROJECTION – adjusts projection slightly to a different angle
5 SET ALARM 1 / PRESET 1 – sets ALARM 1 time
– stores, recalls and shows station 1
6 SET ALARM 2 / PRESET 2 – sets ALARM 2 time
– stores, recalls and shows station 2
7 MINUTE + / PRESET 3 – adjusts the minutes for clock and alarm times
stores,
recalls and shows station 3
–
8 SET TIME / PRESET 4 – sets the clock time
– stores, recalls and shows station 4
9 HOUR + / PRESET 5 – adjusts the hours for the clock and alarm times
– stores, recalls and shows station 5
POWER SUPPLY
Batteries (not included)
1 Open battery door and insert four batteries (preferably PHILIPS POWER
LIFE or alkaline), type R6, UM3 or AA as indicated in the compartment.
2 Remove the batteries from the set if they are exhausted or not be
used for a long time.
• When you replace batteries, the preset stations, alarm and clock time
settings can be stored for up to 3 minutes. (see 'Self-Powered Back-Up').
Batteries contain chemical substances, so they should be disposed
of properly.
Mains adapter
1 Connect the mains adapter to the set's DC 7.5V socket and to the
power socket.
indicates the set is now adapter operated.
™
• Make sure your adapter is properly connected to save battery energy!
2 Always disconnect the mains adapter if you are not using the set.
indicator goes out.
™
Helpful hints: To avoid damage to the set, use only the adapter supplied!
The type plate is located on the bottom of the set inside the battery compartment.
SELF-POWERED BACK-UP
The self-powered back-up conveniently allows your preset stations, alarm and
clock time settings to be stored for up to 3 minutes when there is a power
interruption e.g. AC power failure or when changing batteries.The complete
clock radio and backlight illumination will be switched off.
If power supply returns after 3 minutes and the display shows:
• clock time blinking - indicates you need to re-adjust the clock time.
BATTERY LOW MODE
indicates batteries low. Replace with fresh batteries to ensure all the features on your set will function properly.
BASIC FEATURES
Reset
Should your set receive external interference e.g. static electricity from carpets,
thunderstorms, etc. RESET allows you to clear all previous settings and start up
again.
• Use a ballpoint pen to press the RESET hole found on the bottom of the set.
Illumination brightness
Press REPEAT ALARM / BRIGHTNESS CONTROL once or more.
• The brightness of the display can be adjusted:
Bright ¬ Medium ¬ Low ¬ Bright (when AC-powered)
Low ¬ Bright ¬ Low ¬ Bright (when battery-powered)
Helpful hints:
– When battery-powered, the display illumination is default low to help save energy. Any other use of the BRIGHTNESS CONTROL for a brighter display
adjustment will therefore be effectively limited.
SETTING THE CLOCK
The time is displayed using the 12-hour clock.
1. Check the radio is switched off.
2. Press SET TIME to enter the clock setting mode.
3. Hold down or press HOUR + or MINUTE + repeatedly to set and
adjust the hours and minutes respectively. Release HOUR + or
MINUTE + when you have reached the correct setting.
4. Press SET TIME to confirm.
RADIO
1 Press RADIO ON/OFF once to switch on the radio.
2 Press BAND if you wish to change waveband.
3 Adjust the sound using VOLUME.
4 Press RADIO ON/OFF to switch off.
Helpful hints:
– In standby clock time, to view the current radio frequency,
• Press RADIO ON/OFF once or more;
• For preset stations, press the respective PRESET button (1-5) once or repeatedly.
TUNING TO RADIO STATONS
Automatic tuning
• Press TUNING +/- one second or more to tune to your station.
™The radio automatically tunes to a station of sufficient reception.
Manual tuning
• Press TUNING +/- briefly or repeatedly until you reach the desired
frequency
To improve reception:
For FM, extend and position the pigtail fully to obtain optimum reception.
For AM, the set is provided with a built-in aerial. Direct the aerial by adjusting
the position of your clock radio.
STORING AND USING PRESET STATIONS
You can store up to a total of 10 radio stations in the memory, 5 on each
waveband.
1 Tune to your desired station (see TUNING TO RADIO STATIONS).
2 To store a preset, hold down briefly on a PRESET button 1-5 until you hear a
double beep.
™ Display shows the preset number of your station.
3 Repeat steps 1 and 2 to store your other stations.
• You can overwrite a preset station by storing another frequency in its place.
4 Press a.PRESET button 1-5 to listen to a preset station.
USING THE ALARM
GENERAL
Two different alarm times can be set. This can be useful when you need to
be woken up at a different time e.g. during the week and at the weekend:
• ALARM 1 - radio mode
• ALARM 2 - buzzer mode. The gentle wake buzzer alarm increases its beep
tone frequency within seconds.
SETTING THE ALARM TIME AND MODE (See 5)
1. Check the radio is switched off.
2. Press AL 1 or AL2 to on.
or AL
icon.
™ Display: ON appears under the respective AL
3. Press and hold SET ALARM 1 or SET ALARM 2 until alarm time
digits flash.
4. Hold down or press HOUR + or MINUTE + repeatedly to set and
adjust the hours and minutes respectively. Release HOUR + or
MINUTE + when you have reached the correct setting.
5. After both the hours and minutes are set, press SET ALARM 1 or SET
ALARM 2 to confirm the setting.
Helpful hints:
– If you have selected AL 1 (AL
), make sure you have properly tuned to a
station before turning off the set.
– If you set and activate the same time for both alarms, only the AL 2 (AL
will be activate at the set time.
– When both AL 1 (AL
display
) and AL 2 (AL
)
) are turned on, by default the
shows the alarm time nearest to activation.
– To check the alarm time setting for AL 1 or AL 2, press AL 1 or AL 2 button.
– It is not possible to adjust the alarm time during an alarm call or the repeat
alarm mode.
SWITCHING OFF THE ALARM
There are three ways of switching off the alarm. Unless you cancel the
alarm completely, the 24-hour ALARM RESET will be automatically
selected after 59 minutes from the time your alarm first goes off.
24 HOUR ALARM RESET
If you want the alarm mode to be stopped immediately but also wish to
retain the same alarm setting for the following day:
• Press ALARM RESET / SLEEP.
™ You will hear a beep tone confirming 24 hour reset activation.
REPEAT ALARM
This repeats your alarm call at 9 minute intervals.
• During the alarm call, press REPEAT ALARM / BRIGHTNESS CONTROL..
) or (AL
) flashing during a repeat alarm.
™ Display shows (AL
• Repeat if desired
(up to a
maximum of 6 times).
CANCELING THE ALARM COMPLETELY
• Press AL 1 or AL 2 button once or more until the OFF appears
) or (AL
) icon.
under the respective (AL
SLEEP (See 6)
About Sleep
This set has a built-in sleep timer, which enables the radio to be automatically switched off after a set period of time. There are four sleep time
options.
Setting and switching off SLEEP
1 Within 1 second, press ALARM RESET / SLEEP twice until the display
shows SLEEP and SL: 60.
™ The radio is automatically switched on and tunes to the last station.
2 To select other sleep time options, press ALARM RESET / SLEEP again
within 1 second before the display returns to clock time.
™ The display shows in sequence: SL : 30, SL : 15 and OFF.
3 To cancel sleep, press either:
– RADIO ON/OFF
– REPEAT ALARM / BRIGHTNESS CONTROL.
– ALARM RESET / SLEEP once or more until SLEEP disappears
from the display.
USING THE PROJECTION
1
2
3
4.
5.
You may have the experience of looking for a clock in the darkness.
With this projection feature, you can conveniently project the clock time
onto a surface e.g. walls ceiling (furniture, glasses not recommended).
Press PROJECTION ON/OFF to switch on.
™ The Projection lens lights up red.
Turn the Projection lens wheel (maximum 180 degree left or right) and
also the set, if necessary, to find a suitable projection surface. (See 7)
To change the projected time upside down, press REVERSE
PROJECTION.
To change the projection slightly to a different angle, turn the ROTATE
PROJECTION ball (maximum 60 degree left or right.).
Press PROJECTION ON/OFF to switch off.
™ The Projection lens goes out.
Helpful hints:
– When battery-powered, the projection lens lights up briefly to help save energy.
– For a longer projection time, please use the supplied 7.5V AC adapter to
operate the set.
MAINTENANCE & SAFETY
• If you do not intend to use set for a long time, remove the batteries.
• Do not expose the set to humidity, rain, sand or excessive heat caused
by heating equipment or direct sunlight.
• To clean your set, use a soft damp cloth or chamois leather. Do not use
cleaning products, which contain benzene, thinner, etc. as these may
harm the housing.
ENVIROMENTAL INFORMATION
We have reduced the packaging to its minimum using only paper and cardboard.
Your set consists of materials which can be recycled if disassembled by a
specialized company. Please observe local regulations on the disposal of packing materials and old equipment.
TROUBLESHOOTING
If a fault occurs, first check the points listed below before taking the set for
repair.
If you are unable to remedy a problem by following these hints, consult your
dealer or service centre.
WARNING: Under no circumstances should you try to repair the set yourself, as
this will invalidate the guarantee. Do not open the set as there is a
risk of electric shock!
No sound
– Volume not adjusted
• Adjust the volume
No display backlight / display malfunction/ radio and alarm do
not function
– Set is in Power Low mode
• Connect AC/DC adapter or insert fresh batteries
Display error / no reaction to any controls
– Electrostatic discharge
• Press the RESET hole on the bottom of the set with a ball-pen. Or disconnect set from AC/DC adaptor and batteries for 5 minutes, then re-plug.
Continuous crackling and hiss noise during AM reception
– Interference from other electrical equipment e.g. TVs, computers, fluorescent lamps
• Move the clock radio away from electrical equipment
Intermittent crackling sound during FM reception
– Weak signal
• Extend and position the pigtail aerial
The alarm does not function
– Alarm time/ mode not set
• See SETTING THE ALARM
– Volume too low for radio
• Increase the volume
– AL 1 (AL
) not tuned to a radio station
• Check if the set is tuned to a radio station before you set AL1 and when
you switch off the radio.
Blurry projection
– Distance/ angle between the projection surface too large
• Reduce the distance/ angle.
The typeplate and production number are located inside the
battery compartment.
Clock radio
Meet Philips at the Internet
http://www.philips.com
English
Printed in China
JACKHY-0915