1
Operating Instructions
Back-End Client (Back-End Application)
Model No.
AG-JJLBE20P
Streaming from the Back-End Client and Convert Copy are not available at present. Upgrading is scheduled for the future.
In this manual, each explanation for streaming from the Back-End Client and convert copy is enclosed in a colored frame, like
.
•Microsoft and the Microsoft logo, Windows are registered trademarks or trademarks of Microsoft
Corporation in the United States and other countries.
ENGLISH
1009K0 -M
VQT2D95
Contents
Overview.............................................. 3
Playback............................................................. 36
Skip playback..................................................... 36
Fast rewind, fast forward, and slow playback..... 37
Quick replay....................................................... 38
Turning playback sound On or Off...................... 39
Creating classify information.............................. 39
Creating a snapshot picture............................... 40
Adding Bookmarks............................................. 40
Displaying Information........................................ 40
Displaying Property................................................ 43
Meta-information................................................ 43
Case file............................................................. 44
Evidence rules.................................................... 46
Verifying Videos...................................................... 47
Deleting Videos...................................................... 48
Moving Videos........................................................ 49
Moving Videos to Archive storage...................... 49
Moving archived videos...................................... 50
Deleting an archived video................................. 50
Copying Videos...................................................... 51
DVD Burn........................................................... 51
Convert Copy..................................................... 53
Export................................................................. 54
Importing................................................................ 55
Importing files..................................................... 55
Importing automatically...................................... 57
Streaming............................................................... 58
Starting up the streaming player........................ 58
Description of the Streaming player screen....... 59
Streaming operations......................................... 61
Setting audio and video...................................... 63
Adjusting a camera............................................. 64
Adjusting picture quality..................................... 66
Reporting................................................................ 67
Creating a report................................................ 67
Setting the search conditions............................. 68
Functions.............................................................. 3
Operating Environment............................................ 4
Installing/Uninstalling......................... 5
Installing................................................................... 5
Installing the Crystal Reports Runtime module.... 5
Installing the Back-End Client application............ 5
Remote updating.................................................. 5
Uninstalling............................................................... 6
Procedures for Windows XP................................ 6
Procedures for Windows Vista............................. 6
Description of the Screen Displays.... 7
Main Screen............................................................. 7
Operation section................................................. 7
Search Operation section..................................... 8
Search Result Display section.............................. 9
File Information section........................................ 9
Video Operation section..................................... 10
Advanced Search Screen........................................11
Import Screen......................................................... 12
Streaming Screen................................................... 13
Report Screen........................................................ 14
Player Screen......................................................... 15
Output Screen........................................................ 20
DVD Burn screen............................................... 20
Convert Copy screen.......................................... 20
Export screen..................................................... 21
Startup and Termination................... 22
Starting up.............................................................. 22
Terminating............................................................. 23
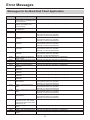
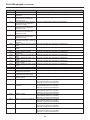
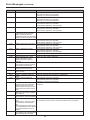
Error Messages................................. 71
Search................................................ 24
Messages for the Back-End Client Application....... 71
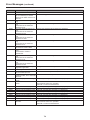
Messages common to the Back-End Administrator
Application.............................................................. 84
Sub-messages................................................... 84
Searching on the Main Screen............................... 24
Saved search..................................................... 25
Quick search...................................................... 25
Combination search........................................... 28
Searching on the Advanced Search Screen........... 29
Searching for videos........................................... 30
Entering search conditions................................. 32
Creating a saved search.................................... 33
Editing a saved search....................................... 33
Deleting a saved search..................................... 34
Software License Agreement........... 88
For obtaining the software, contact your supplier.
■ Display in this manual
Display on the screen may differ from the actual
product.
Operations......................................... 35
Streaming from the Back-End Client and Convert
Copy are not available at present. Upgrading is
scheduled for the future.
Playback Operation................................................ 35
Switching screens.............................................. 35
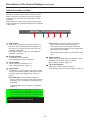
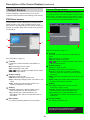
Overview
Creating an operation log report
AG-JJLBE20P Back-End Client application is a
Windows application to operate videos registered in the
Back-End Server.
The operation log for the Back-End Client application
can be created.
Functions
The Back-End Client application (for an officer) can
search for videos registered in the Back-End Server
with various search conditions. The videos found can
be played and also exported to external media. You can
also view pictures captured by the camera connected
to a Memory Card Recorder.
Searching for videos
Searching for videos registered in the Back-End
Server is enabled by setting various conditions such as
bookmark, classify tag, recording date, case file, meta
information, etc. Complex searching by combining
various conditions is also enabled. A combination of
search conditions can be registered as a saved search,
and videos can be searched for using the saved
search.
Playing back videos found
Videos found with the Back-End Server can be played
back. Various playback modes such as Fast Forward,
Rewind, Slow Playback, Quick Playback, etc. are
available. A bookmark or snapshot can be added to a
playback video.
Viewing a live video
Streaming for viewing pictures captured by the camera
connected to a Memory Card Video Recorder is
enabled. Camera selection, and setting and controlling
of video and audio can be remotely controlled.
Registering videos stored on external
media
Videos stored on external media can be registered in
the Back-End Server. The registered videos can be
searched for and played back.
Copying videos
Videos registered in the Back-End Server can be
copied to external media. Copying in the following three
formats is enabled:
• Converting to WMV format
• Burning a DVD in the DVD-video format
• Export in the proprietary format
Streaming from the Back-End Client and Convert
Copy are not available at present. Upgrading is
scheduled for the future.
Overview (continued)
Operating Environment
A PC that meets the following operating environment is
required for use of this application:
CPU: Intel Core Duo 1.66 GHz or more
(recommended)
RAM: 512 MB or more (for Windows Vista
Business, 1GB or more) (recommended)
Display: 1024 x 768 dot or more
LAN: 1000BASE-T/100BASE-TX
OS: Windows XP Professional Service Pack 3 or
later, Windows Vista Business Service pack 2 or
later
Add on: .Net Framework 3.5 Service Pack 1
Windows Installer3.1
Adobe Reader 8 or 9
Notes
• When live videos from the recorder is being displayed
(streaming) or a stored video file is being played using
this application, frames may be dropped or sound may
be broken up, depending on the PC status.
• If security software is running together with this
application, the operation of this application may
slow down or the connection with the recorder may
be released. Such phenomena may be improved
by changing the settings of Firewall of the security
software.
• While copying data to a DVD using this application,
never do the following operations:
-Turning off the power of the PC and peripheral
devices.
-Running another application.
-Starting the utility for system maintenance.
-Connecting or disconnecting peripheral devices.
-Moving the PC
-Imparting vibration or shock to the PC
-For a notebook PC, avoid supplying power with a
battery (For supplying power with a battery, be sure to
fully charge the battery.)
-Changing the power setting of PC
Streaming from the Back-End Client is not
available at present. Upgrading is scheduled for
the future.
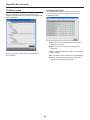
Installing/Uninstalling
Installing
Installing the Back-End Client
application
1. Start the Internet Explorer.
To install the Back-End Client application, the Crystal
Reports Runtime module and Back-End Server
application must be installed. For installation of the
Back-End Server, refer to the Operating Instructions for
the Service Watch.
2. Access to http:// (IP address of the Back-End Server):12430/Client.exe.
The Update module is downloaded, and executed.
3. Enter the IP address of the Back-End
Server, and click on [Update].
Installing the Crystal Reports
Runtime module
The License Agreement screen appears.
4. Select "I Agree".
Click on CRRedist2008_x86.msi.
The Crystal Reports Runtime module is installed.
The Installation Complete screen appears.
5. Click on [Close].
The login dialog box appears.
6. Enter the Server IP address, User,
Password, and click on [Login].
A shortcut icon is placed on the desk top.
Remote updating
The Back-End Client application can be remotely
updated when the latest version of the Back-End Client
application is registered in the Back-End Server.
When the Back-End Client application receives
the update module from the Back-End Server, it is
automatically updated upon being restarted.
Notes
• If the Interactive services dialog detection dialog box is
displayed, select "Show me the message."
• If a dialog box prompting you to select Try Again, Continue, or Exit Installation is displayed, select Continue.
• If a message "You must restart your system for the
configuration changes made to Arbitrator 360˚ -BackEnd Client to take effect. Click Yes to restart now or No
if you plan to manually restart later." is displayed, click
on [Yes]. Your PC will restart. If the PC does not restart,
recording on a DVD cannot be executed correctly.
Installing/Uninstalling (continued)
Uninstalling
To uninstall the Back-End Client application, follow the
procedures below.
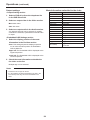
Procedures for Windows XP
1. Click on the [Start] button.
2. Select Control Panel.
3. Double-click on Add or Remove Programs.
The Currently installed programs window opens.
4. Select the program to be uninstalled.
5. Click on the [Remove] button.
A confirmation message appears.
6. Click on the [Yes] button.
Uninstalling of the selected program starts.
Procedures for Windows Vista
1. Click on the [Start] button.
2. Select Control Panel.
3. Double-click on Programs and Features.
The Uninstall or change a program window opens.
4. Select the program to be uninstalled.
5. Click on Uninstall.
The User Account Control window opens.
6. Click on the [Continue] button.
The Uninstall window opens.
7. Click on the [Uninstall] button.
Uninstalling of the selected program starts.
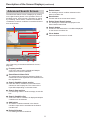
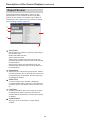
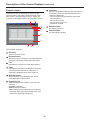
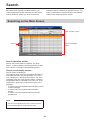
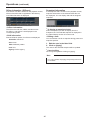
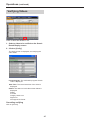
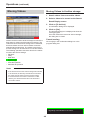
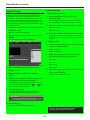
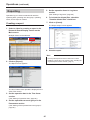
Description of the Screen Displays
Main Screen
The Main screen contains the operation, search
operation, search result display, and video operation
sections.
Operation section
Search Operation
section
Search Result
Display section
File Information
section
Video Operation
section
Operation section
When the button is clicked on, the screen for the
corresponding function will open. If the logged-in user
does not have the right of the operation, an error
message will appear.
①
②
③
④
Main button
⑤
⑥
Report button
Display the Main screen.
Display the Report screen.
(See "Report Screen," page 14 and "Creating a
Reporting," page 67.)
Adv Search button
Display the Advanced Search screen.
(See "Advanced Search Screen," page 11,
"Searching on the Advanced Search Screen," page
29.)
Help button
When this button is clicked, the mouse pointer will
be turned to "→+?". Clicking on a button or input
field with this pointer will display the description of
the clicked button/input field.
Import button
Display the Import screen.
(See "Import Screen," page 12 and "Importing,"
page 55.)
Note
Streaming button
If you use Acrobat Version 9 or 8, the description may
not be displayed correctly when you click on a button or
input field.
Streaming
from
the Back-End
Display the
Streaming
screen.Client is not
available
at present.
Upgrading
for
(See "Streaming
Screen,"
pageis13scheduled
and "Streaming,"
the future.
page 57.)
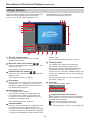
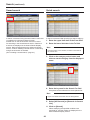
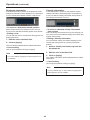
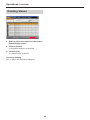
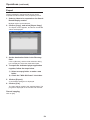
Description of the Screen Displays (continued)
Search Operation section
Searching for videos stored in the Back-End Server
by specifying various searching conditions is enabled.
The height of the section is adjustable by dragging the
border between the search operation and search result
display sections.
(See "Searching on the Main Screen," page 24.)
①
③
②
④
⑧⑨
Saved Search section
⑤
⑥ ⑦
⑩
All Records
A list of the saved search names is displayed. At
the top of the list, the save search named "Default
Saved Search" is shown, and others are listed
in ascending order below. Double-clicking on the
search name starts a search, and the search results
are displayed in the Search Result Display section.
Right-clicking enables displaying the Advanced
Search screen, deleting the saved search and
executing a new search.
For searching videos from all data saved in the
Back-End Server.
Records in Current List
For searching videos from the search result list of
the previous search.
Clear button
Clicking on this button clears the keyword entered
in the Search For field, sets the category setting to
Search All, and clears the search results.
Quick Search section
Searching by specifying a search category is
performed.
Date section
Enter the period for searching by setting the upper
and lower limit of dates. It is also possible to set
only an upper or lower limit.
Search For
Enter the keyword for searching. The keyword can
be selected from the dropdown list.
Clear History
Clicking on this button clears the history of
keywords entered in the Search For field.
Search button
Clicking on the button starts a search with the set
conditions.
Category select button
Clicking on the button shows the menu for search
categories.
• Search All
• Classify Tag
• Classify Note
• Bookmark Note
• Case File
• Officer
• Filename
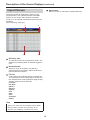
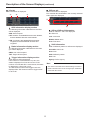
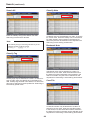
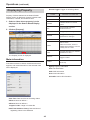
Description of the Screen Displays (continued)
Search Result Display section
Search results for videos are listed.
(See "Search," page 24.)
①
② ③ ④ ⑤ ⑥ ⑦ ⑧
Thumbnail
⑨
⑩
⑪
⑫
Duration
A thumbnail of a video is displayed. The thumbnail
is decided by the following priority level.
(1) Show the image at the top of the classify tag.
(2) Show the image at the location of the recording
trigger.
(3) Show the image at the top frame of the video.
When a classify tag is added, the thumbnail will be
updated. If the logged-in officer has no right to play
the video, the inhibit mark is displayed to the left of
the thumbnail.
If the file is a separated file, a joint icon is displayed
to the left.
The duration of the video is shown as "hh:mm:ss".
Officer1
The full name of Officer 1 who recorded the video
is displayed.
Officer2
The full name of Officer 2 who recorded the video
is displayed.
Agency
The Agency information is displayed.
Unit
The Unit information is displayed.
Filename
The filename is displayed.
Shift
The Shift information is displayed.
Classify
A list of the classify tags is displayed. When
multiple classify tags are attached to the video, as
many classify tags are shown as possible.
Area
The Area information is displayed.
VehicleID
Start Time
The Vehicle ID information is displayed.
The starting date and time of recording of the video
is shown as "yyyy/mm/dd hh:mm:ss".
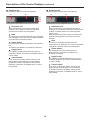
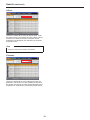
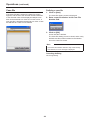
File Information section
①
②
Number of files
③
④
Main
The number of AV files currently selected is
displayed. Files other than AV files are not counted.
Total playback time of a main video of AV files
currently selected is displayed. If Video-Main is not
selected on the DVD Burn screen, "Main: 00:00:00"
is displayed.
Total
Total playback time of Main and Sub videos is
displayed.
Sub
Total playback time of a sub video of AV files
currently selected is displayed. If Video-Sub is not
selected on the DVD Burn screen, "Sub: 00:00:00"
is displayed.
Description of the Screen Displays (continued)
Video Operation section
Operations for videos listed in the search result display
section are enabled. The number of videos found is
shown on the left. The buttons for which the loggedin user does not have the right of operation are not
displayed.
Right-clicking on a video in the search result display
section enables the operations assigned to the buttons
in this section.
①
②
Play button
③
④
⑤
⑥
Export Copy: The Export screen for exporting
video to a removable media is displayed.
The exported video can be played under the
environment that the Back-End Client application
(for Officer) is not installed.
A video can be played. Click on the button, and
the player to play the specified video appears. If
the user has no right to play the video, the error
message is displayed.
(See "Player Screen," page 15, and "Playback
Operation," page 35.)
(See "Export screen" page 21 and "Export," page
54.)
Property button
Delete button
The property screen appears.
(See "Displaying Property," page 43.)
Videos can be deleted. Both the information on the
database and the video files are deleted.
(See "Deleting Videos," page 48.)
Verify button
Check if videos are falsified or not.
(See "Verifying Videos," page 47.)
To Archive button
Videos are moved to archive storage.
(See "Moving Videos to Archive storage," page 49.)
Copy button
The screen for copying videos is displayed. Three
copying formats are available. Select one of them
from the popup menu displayed by clicking on
[Copy].
Burn DVD-Video: The DVD Burn screen for
burning videos to a DVD in DVD-Video format is
displayed. The burned DVD can be played on a
DVD player.
(See "DVD Burn screen," page 20, "DVD Burn,"
page 51.)
Convert Copy: The Convert Copy screen for
converting videos to WMV format and copying to
a removable media is displayed. The converted
video can be played on a Windows Media Player.
(See "Convert Copy screen," page 20, and
Convert
Copy
is notpage
available
at present.
"Convert
Copy,"
52.) (colored
letters on the
Upgrading
is scheduled
for the Copy
future.is not available
black background)
Convert
at present. Upgrading is scheduled for the future.
10
Description of the Screen Displays (continued)
Advanced Search Screen
Delete button
For deleting a search condition selected on the
Search Condition list.
The Advanced Search screen is displayed by clicking
on the [Adv Search] button in the operation section of
the Main screen. On this screen, searching for videos
by combining various search conditions is enabled. A
combination of search conditions is named and saved
as a saved search.
Save button
Creates and saves a new saved search.
Delete Saved Search button
For deleting the saved search displayed in the
Saved Search Name field.
①
Search button
A search is executed with the conditions displayed
on the Search Condition list.
②
Close button
③
Advanced Search screen is closed.
④
⑤
⑥
⑦
⑧
⑨
⑩
⑪
⑫
(See "Searching on the Advanced Search Screen,"
page 29.)
Property section
A list of the search items is displayed. Multiple
search items cannot be selected.
Saved Search Name field
The saved search names are displayed. Select a
saved search name registered to the database from
the dropdown list.
Search Condition Input section
Enter the search conditions for the search item
selected on the Property list. The content of the
input differs depending on the search item.
Search from archive
For searching videos in archive storage, check this
box.
Search Condition list
A list of the search conditions is displayed. Multiple
conditions can be selected.
Add button
The search conditions entered in the Search
Condition Input section are added to the Search
Condition list.
Delete All button
For deleting all search conditions.
11
Description of the Screen Displays (continued)
Import Screen
Start button
When you click on this button, importing will start.
The Import screen is displayed by clicking on the
[Import] button in the operation section of the Main
screen. On this screen, files stored in removable
media or on an external hard disk are imported to the
database.
(See "Importing," page 55.)
①
③
②
④
Directory path
The directory of files to be imported is shown. The
default is the desktop folder of Windows logged-in
user.
Browse button
When you click on the button, the directory
selection dialog box appears. Select the directory
that includes the video file.
File list
A list of files in the selected directory is displayed.
The information below is displayed on the list, and
the checked items will be registered. Right-clicking
enables "Select All" and "Clear All".
Filename
Rec Date
Officer1
Officer2
Agency
Unit
Shift
Area
VehicleID
Status
Note
Agency, Unit, Shift, Area, and VehicleID are the default
setting for Field1 to Field5. The field name can be
changed upon installation of the Back-End Server.
12
Description of the Screen Displays (continued)
Streaming Screen
The Streaming screen is displayed by clicking on the
[Streaming] button in the operation section of the Main
screen. On this screen, the Front-End or Memory
Card Video Recorder to play streaming video can be
selected.
(See "Streaming," page 58.)
①
② ③
File list
The Front-End or Memory Card Video Recorders
recently connected to the Back-End Server are
listed. The items shown below are displayed.
Officer1
Officer2
Agency
Unit
Shift
Area
VehicleID
Streaming button
When you click on this button, streaming play
starts.
Refresh button
For updating the file list.
Streaming from the Back-End Client is not
available at present. Upgrading is scheduled for
the future.
13
Description of the Screen Displays (continued)
Report Screen
The Report screen is displayed by clicking on the
[Report] button in the operation section of the Main
screen. On this screen, an operation log of videos is
searched for, and a report on the log found is created.
(See "Creating a report," page 67.)
①
②
④
③
⑤
Time frame
Set the period for creating a report by searching for
the operation logs.
From: Start date and time
To: End date and time
When only the upper limit of the date is set, the
operation logs before the upper limit of the date will
be searched for.
When only the lower limit of the date is set, the
operation logs after the lower limit of the date will
be searched for.
Parameters
Specify the user names and group names. Select it
from the dropdown list. Up to three user names and
group names can be specified. No user and group
is specified as default.
Video Files
The list of videos to be reported is displayed.
If "Contain deleted files" check box is checked, the
operation logs for the deleted videos are searched
for.
Log items
The list of operation items to be output as a report
is displayed. Operation log whose check box is
checked will be searched for. All items are checked
as default.
Create button
When you click on this button, a report will be
created.
14
Description of the Screen Displays (continued)
Player Screen
The Play screen is displayed by clicking on the [PLAY]
button in the video operation section of the Main
screen. On this screen, videos registered in the
Back-End Server can be played back.
(See "Playback Operation," page 35.)
①
②③④
⑤
⑥
⑦
⑧
⑨
⑩
⑪
⑫
⑬
Record start/end time
/
(See "Creating a snapshot picture," page 40.)
Classify button
)
For creating a new classify information item.
If this button is clicked during playback, the
playback pauses and a classify information item
is created The Classify tab is displayed in the
Property section. This button is disabled during Fast
Forward or Fast Rewind mode, or if any classify tag
is registered.
Selects a video displayed on a player screen, main
video or sub video.
(See "Switching screens," page 35.)
QVGA/VGA switch button (
/
⑮
Rewind mode.
The record start and end time of the currently
displayed file is shown.
Main/Sub video switch button (
⑭
)
Selects the video size displayed on a player screen,
QVGA or VGA.
(See "Classify tab," page 19, and "Creating classify
information," page 39.)
(See "Switching screens," page 35.)
Help button
Audio tab
When this button is clicked, the mouse pointer will
be turned to "→+?". Clicking on a button or input
field with this pointer will display the description of
the clicked button/input field.
This is a panel for audio control.
ⓐ
Bookmark button
For creating a new bookmark.
If you click on this button, the playback pauses
and a bookmark is created. The Bookmark tab
is displayed. This button is disabled during Fast
Forward or Fast Rewind mode.
Audio mute buttons/indications
Select whether the playback sound of the selected
audio channel is On or OFF. The current setting is
indicated above the button.
: Audio mute Off (Playback sound On)
: Audio mute On (Playback sound Off)
(See "Adding Bookmarks," page 40.)
Snapshot button
(See "Turning playback sound On or Off," page 39.)
When you click on this button, the snapshot picture
is created and stored in the BMP format. The
playback location for a snapshot picture is recorded
as meta information. The Snapshot tab is displayed.
This button is disabled during Fast Forward or Fast
15
Description of the Screen Displays (continued)
Video Display Section
(Frame forward) button
/
If this button is clicked during pause, an image one
frame after the current frame will be displayed.
button
(Skip back/Frame rewind)
If the button is clicked during playback, playback of
the current file will start from the beginning.
If this button is clicked during pause, an image one
frame before the current frame will be displayed.
ⓐ
button
ⓑ
(Fast forward/Slow playback)
If this button is clicked during playback, fast forward
playback will start.
If this button is clicked during pause, slow playback
will start.
Each time this button is clicked, fast rewind or slow
reverse playback speed changes.
At the end of the file, playback pauses.
ⓒ
Video display section
Video is displayed.
(See "Switching screens," page 35.)
/
(Playback/Pause) button/
indication
Date and time indication
Each click on this button will toggle playback and
pause modes.
At the end of the file, playback pauses.
The current playback position is displayed.
Seek bar
Indicates the playback position.
Sliding the bar will change a playback location.
Clicking on the left side of the switch will move the
playback location backward by 1/20 of the content
length, and clicking on the right side will move the
playback location forward by 1/20 of the content
length.
The locations of the classify information and
bookmark are displayed on the bar.
/
(Fast rewind/Slow reverse
playback) button
If this button is clicked during playback, fast rewind
playback will start.
If this button is clicked during pause, slow reverse
playback will start.
Each time this button is clicked, fast rewind or slow
reverse playback speed changes.
At the beginning of the file, playback pauses.
Playback section
These buttons control the playback of videos
registered in the Back-End Server.
(See "Playback Operation," page 35.)
ⓐ
ⓑ
ⓒ
ⓓ
ⓔ
ⓕ
/
(Quick replay) button
Playback from a location 7 seconds before the
button is clicked starts. If this button is clicked
within 7 seconds from the beginning of a file,
playback starts from the beginning of the file.
16
Description of the Screen Displays (continued)
Info tab
Officers tab
Meta information is displayed.
ⓐ
ⓑ
Officer information is displayed.
The meta file data embedded in the currently selected
video signal are displayed.
ⓒ
ⓐ
ⓑ
GPS information display section
The following information obtained from the GPS
will be displayed.
Officer1/Officer2 information
Data for Officers 1 and 2 are displayed.
SPD: Vehicle speed
ID: Officer ID
LAT: Latitude. 00.000000N denotes north latitude,
and 00.000000S denotes south latitude.
Last: Last name
Middle: Middle name
LON: Longitude. 000.000000W denotes west
longitude, and 000.000000E denotes east
longitude.
First: First name
Shift information
Radar information display section
Data of shiftwork pattern for officers are displayed.
The following information obtained from the radar
gun will be displayed.
VehicleID: Vehicle ID
OWN: Own vehicle speed
Area: Area
TGT: Target vehicle speed
Shift: Shiftwork pattern
Unit: Unit
Trigger information display section
Input status to GPI is displayed.
If the number of connected GPI is up to 8, the
status is displayed in 4 lines and 2 rows. If the
number of connected GPI is more than 8, the status
is displayed in 4 lines and 4 rows.
The GPI channel number and trigger name are
displayed like "GPI channel number: trigger name"
in each cell.
Agency: Police agency
Note
The name of each field is the default setting for Field1 to
Field5. The field name can be changed upon installation
of the Back-End Server.
17
Description of the Screen Displays (continued)
Snapshot tab
Bookmark tab
The snapshots and their notes are displayed.
ⓐ
The bookmarks and their notes are displayed.
ⓐ
ⓑ
ⓑ
ⓒ
ⓓ
ⓔ
ⓒ
ⓓ
ⓔ
Bookmark List
Snapshot List
A list of bookmarks in the selected video file is
displayed. If a bookmark is selected, the bookmark
position is located and the unit enters playback
pause mode.
When the playback position reaches a bookmark
position during playback, the bookmark will be
selected.
A list of snapshots in the selected video file is
displayed. If a snapshot is selected, playback
pauses at the location of the snapshot.
Note
The note for the snapshot selected in the Snapshot
List is displayed. The note can be edited if playback
is paused at the snapshot location.
Note
Delete button
The note for the bookmark selected in the
Bookmark List is displayed. The note can be edited
if playback is paused at the bookmark location.
For deleting the snapshot selected in the Snapshot
List.
This button is disabled if no snapshot is selected.
Delete button
Apply button
For deleting the bookmark selected in the
Bookmark List. This button is disabled if no
bookmark is selected.
For updating snapshot data when the note of a
snapshot is edited. This button is disabled when no
note is edited.
Apply button
Cancel button
For updating bookmark data when the note of a
bookmark is edited. This button is disabled when
no note is edited.
If you click on this button before clicking on the
[Apply] button while editing a note, that editing
is canceled, and the note before editing will be
displayed. This button is disabled while no note is
being edited.
Cancel button
If you click on this button before clicking on the
[Apply] button while editing a note, that editing
is canceled, and the note before editing will be
displayed. This button is disabled while no note is
being edited.
18
Description of the Screen Displays (continued)
Classify tab
The classify information is displayed.
ⓐ
ⓑ
ⓓ
ⓔ
ⓕ
ⓒ
Classify List
A list of classify information in the selected video
file is displayed. If a classify information item is
selected, that position is located and the unit enters
playback pause mode.
Classify Tag
The classify information tag selected in the Classify
List is displayed.
Note
The classify information note selected in the
Classify List is displayed.
A classify information note can be edited if playback
is paused at the classify information position.
Delete button
For deleting the classify information selected in the
Classify List. This button is disabled if no classify is
selected.
Apply button
For updating a classify information item when
its classify tag or note are edited. This button is
disabled when neither Classify Tag nor note is
edited.
Cancel button
If you click on this button before clicking on the
[Apply] button while editing a classify tag or note,
that editing is canceled and the status before
editing will be restored. This button is disabled if no
classify tag or note has been edited.
19
Description of the Screen Displays (continued)
Output Screen
Convert Copy screen
The Convert Copy screen is displayed by clicking on
the [COPY] button in the video operation section of the
Main screen, and select [Convert Copy WMV]. Videos
are converted to WMV format and output to removable
media to be played with Windows Media Player.
Videos registered in the Back-End Server can be
copied to external media in the following three formats.
DVD Burn screen
The DVD Burn screen is displayed by clicking on the
[COPY] button in the video operation section of the
Main screen, and select [Burn DVD-Video]. Videos are
burned on a DVD in DVD-Video format to be played on
a DVD player.
③
①
①
②
③
②
④
(See "Convert Copy," page 53.)
Preview
Previews the meta-information embedded in a
video.
Main: Previewing a main video
Sub: Previewing a sub video
[ ], [ ] When converting multiple videos, select
a video to be previewed.
④
(See "DVD Burn," page 51.)
Preview
Previews the meta-information embedded in a
video.
Main: Previewing a main video
Sub: Previewing a sub video
[ ], [ ] When converting multiple videos, select
a video to be previewed.
Output setting
Select the output of video.
Directory: Showing the output directory
Ref: When the button is pressed, the directory
selection dialog box appears and the directory
can be set.
Video: Selecting to display either main video or sub
video
Audio: Setting the output audio channels. An
arbitrary combination is enabled.
Output setting
Select the output of video.
DVD Drive: Showing the output drive.
Video: Selecting to display either main video or sub
video
Audio: Setting the output audio channels. An
arbitrary combination is enabled.
Setting
Font size: Selecting the font size for metainformation, large or small
Position: Selecting the display position of the
meta-information from the dropdown list
Tag: Selecting the meta-information to be
embedded in the videos. Checked items will be
embedded.
Setting
Position: Selecting the display position of the
meta-information from the dropdown list
Tag: Selecting the meta-information to be
embedded in the videos. Checked items will be
embedded.
Convert button
Burn button
For starting converting data.
For starting outputting data for burning a DVD.
Convert Copy is not available at present.
Upgrading is scheduled for the future.
20
Description of the Screen Displays (continued)
Export screen
Comment
If an error is generated during export, the filename
for which the error was generated and the error
content are displayed.
• Communication with the Memory Card Video
Recorder failed.
• File cannot be found.
• No free space on the PC
• Verification is failed.
The Export screen is displayed by clicking on the
[COPY] button in the video operation section of the
Main screen, and select [Export Copy]. Videos are
exported to removable media in the proprietary format.
①
②
③
④
⑤
Export button
For starting exporting.
Cancel button
For interrupting exporting.
⑥
⑦
⑧ ⑨
(See "Export," page 54.)
Directory
Shows the output folder.
Browse button
When the button is clicked on, the folder selection
dialog box will appear. Select the output folder.
File
Indicates the progress of current file exporting.
Total
Indicates the progress of all files to be exported.
An estimate time required for completion of
exporting is displayed at the right of the bar.
With AV Viewer
When checked, the dedicated player will be
exported together with the data.
Export file list
Shows the files and the status of the files to be
exported.
Filename: Filename
Status: Displaying status
Time: Displaying the elapsed time from starting
exporting. When exporting is finished, the time
required for exporting is displayed.
21
Startup and Termination
Starting up
1. Turn on the PC.
2. Double-click the Back-End Client
application on the desktop.
The Login screen is displayed.
3. Enter the IP address or Host name of the
Back-End Server in Back-End Server field.
If you have logged in before, you can select it from
the dropdown list.
4. Enter the User ID.
If you have logged in before, you can select the
User ID from the dropdown list.
5. Enter the password.
6. Click on [Login].
The Main screen is displayed.
Canceling login
Click on [Exit].
22
Startup and Termination (continued)
Terminating
Click on the close button at the upper right on the Main
screen. The application is terminated, and the screen
closes.
Note
While importing automatically, the error message
appears, and the application cannot be terminated.
23
Search
Back-End Client application enables searching for
videos registered in the Back-End Server with various
search conditions. Searching can be executed by
setting the search conditions on the Main screen, or by
using a combination of meta-information embedded in
videos on the Advanced Search screen.
Searching on the Main Screen
Search operation section
Search result display
Joint icon
section
Search operation section
Selects and sets the search conditions. For Quick
Search, a search category can be specified by clicking
on the button on the right of the [SEARCH] button.
Search result display section
Search results are displayed.
The video file which has been recorded on the Memory
Card Video Recorder may be separated, and a joint
icon is displayed on the left of Thumbnail. If one of the
separated video files is met with the search conditions,
all separated files are indicated by the joint icon. In the
cases below, upper half or lower half of a joint icon is
displayed.
• In case a part of the separated files has been moved
to archive storage.
• In case a part of the separated files has been
deleted.
• In case a part of the separated file has not been
uploaded yet.
Note
The joint icon is displayed only for the video recorded on
the AG-CPD20P Memory Card Video Recorder.
24
Search (continued)
Saved search
Quick search
A search is executed using the saved search name that
is created on the Advanced Search screen.
Double-click on the saved search name to be used
for searching in the Saved Search section. Results of
a search are displayed in the Search Result Display
section. Right-clicking displays the Advanced Search
screen, on which deleting a saved search or searching
using a saved search is enabled.
(See "Creating a saved search," page 33.)
A search is executed after specifying a search category.
1. Enter the upper limit date in the From field.
2. Enter the lower limit date in the To field.
Note
If the check box is not checked, a search is executed to
the current time.
3. Click on the category select button and
select a search category from the displayed
menu.
4. Enter the keyword in the Search For field.
A keyword can be selected from the dropdown list.
Note
Upper- and lower-case letters are not distinguished.
5. Select [All Records] or [Records in Current
List].
6. Click on [Search].
Videos satisfying the specified conditions are
searched for, and the results are displayed in the
Search Results Display section.
25
Search (continued)
Search All
Classify Note
Enter an arbitrary string in the Search For field.
Searching is executed for all data.
A Classify note may be attached to a video. To search
for such a video, enter the classify note in the Search
For field. Classify notes entered in the Search For
field in the past can be selected on the dropdown list.
Searching is executed by partial match.
Note
If an arbitrary string for searching includes any of the
following symbols, it will be ignored.
!#$%()=–˜ˆ|{[@]}*:+;?/.
Bookmark Note
Classify Tag
A Bookmark note may be attached to a video. To
search for such a video, enter the bookmark note in
the Search For field. Bookmark notes entered in the
Search For field in the past can be selected on the
dropdown list. Searching is executed by partial match.
Classify tags may be attached to a video. To search for
such a video, enter the classify tag in the Search For
field. Classify tags entered in the Search For field in the
past can be selected on the dropdown list. Searching is
executed by partial match.
Case File
A Case file number may be attached to a video. To
search for such a video, enter the case file number
in the Search For field. Case file numbers entered in
the Search For field in the past can be selected on the
dropdown list. Searching is executed by partial match.
26
Search (continued)
Officer
Videos are searched for using an officer name. Enter
the officer name in the Search For field. Officer names
entered in the Search For field in the past can be
selected on the dropdown list. Searching is executed
by partial match.
Note
A search is executed for Officer1 and Officer2.
Filename
Videos are searched for using a filename. Enter the
filename in the Search For field. Filenames entered in
the Search For field in the past can be selected on the
dropdown list. Searching is executed by partial match.
27
Search (continued)
Combination search
A search using a combination of search conditions in
the Search Operation section is enabled.
1. Search for videos by specifying a category.
(See "Quick Search," page 25.)
2. Select [Records in Current List].
3. Specify another category.
4. Click on [Search].
Videos in the category additionally specified are
searched for, and the results are displayed in the
Search Results Display section.
Repeat steps 2 to 4, as required.
Note
To start a new search, select [All Records].
28
Search (continued)
Searching on the Advanced Search Screen
When you click on [Adv Search] on the Main screen,
the Advanced Search screen appears.
On this screen, videos are searched for using the metainformation embedded in the videos. Various conditions
can be combined for searching videos. A combination
of search conditions is stored as the saved search
which enables a search with various conditions easily
on the Main screen. On this screen, defining of saved
search, editing of a predefined saved search, and
deleting a predefined saved search are also enabled.
Either the archive videos or non-archive videos can be
searched for.
When the Back-End Client application is installed, a
saved search named "Default Saved Search" is set.
Upon starting the application, a video searched with the
Default Saved Search is displayed on the Main screen.
Saved Search Name
Search items
Search condition input section
Search Condition list
Operation buttons
29
Search (continued)
Searching for videos
Deleting a search condition
1. Select a search condition to be deleted in
the Search Condition list.
Multiple conditions can be selected.
2. Click on [Delete].
A confirmation dialog box is displayed.
3. Click on [Yes].
The selected search condition is deleted.
To cancel deleting
Click on [No] in the confirmation dialog box.
Deleting all search conditions
1. Click on [Delete All].
A confirmation dialog box is displayed.
2. Click on [Yes].
All search conditions on the Search Condition list
are deleted.
To cancel deleting
Click on [No] in the confirmation dialog box.
1. Select an item used for searching in
Property.
(See "Property list," page 31.)
2. Enter the search condition in the Search
Condition Input section.
(See "Entering search conditions," page 32.)
3. Click on [Add].
Search condition is added to the Search Condition
list.
Repeat Steps 1 to 3 to register all search conditions
required.
4. For searching for videos in the archive
storage, check the "Search from archive"
check box.
5. Click on [Search].
Results of a search are displayed in the Search
Result Display section on the Main screen.
30
Search (continued)
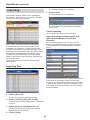
Property list
Items selectable in the Property section on the Advanced Search screen are as shown below. These can be used
for a search.
Property
Input value
Range
None*1
Characters
50 characters
Record Start Date
Date
Date range
Record Start Time
Time
0:00 to 23:59
Officer1
Characters
50 characters
Officer2
Characters
50 characters
Bookmark Note
Characters
3000 characters
Agency
Characters
50 characters
Unit
Characters
50 characters
Shift
Characters
50 characters
Area
Characters
50 characters
Vehicle ID
Characters
50 characters
Classify Tag
Characters
99 characters
Classify Note
Characters
500 characters
Case File Number
Characters
50 characters
Trigger
Characters
15 characters
Speed*2
Numeric
0 to 232-1
Group
Characters
50 characters
Time Frame*3
Numeric
4 digits
*1 If "None" is selected, a search is performed with the same conditions as "Search All".
If a keyword includes any of the following symbols, it will be ignored.
!#$%()=–˜ˆ|{[@]}*:+;?/.
*2 For Speed, set both the upper and lower limits for TGT (Target vehicle speed) or either the upper or lower limit.
*3 For Time Frame, set both the upper and lower limits for days after recording or either the upper or lower limit.
31
Search (continued)
Entering search conditions
Entering Time
Enter the conditions for each search item in the Search
Condition Input section. Conditions to be entered differ
depending on the search item.
(See "Property list," page 31.)
Enter the upper and lower limit in the Time boxes.
Select it from the dropdown list. Only an upper or lower
limit can be specified.
Entering characters
1. Enter characters in the Keyword field.
2. To search by the whole words match, check
the "Match whole words" check box.
If not checked, searching by the partial match is
defined.
3. To specify the case, check the "Case
sensitive" check box.
If not checked, the upper case and lower case
characters are not distinguished.
Entering numeric
Enter the upper and lower limit in the "Value" boxes.
Only an upper or lower limit can be specified.
Entering Date
Enter the upper and lower limit in the Date boxes.
Select it from the dropdown list. Only an upper or lower
limit can be specified.
32
Search (continued)
Creating a saved search
To cancel creating
Click on [Cancel] on the Save as screen.
Select search items in Property, and set search
conditions for each item, which makes a group of
search conditions. Name the group (saved search
name), and register it in the database. When searching,
only selecting a saved search name registered in the
database enables a search using multiple search
conditions.
Editing a saved search
1. Select a saved search name to be edited on
the Saved Search Name dropdown list.
Search conditions of the selected saved search are
displayed in the Search Condition list.
2. Edit the search conditions.
3. Click on [Save].
The Save as screen is displayed.
4. Click on [OK].
Saved search data in the database are updated.
To cancel editing
Click on [Cancel] on the Save as screen.
1. Select a saved search name from the Saved
Search Name dropdown list.
Search conditions of the selected saved search are
displayed in the Search Condition list.
2. Select an item to set the search conditions
from the Search Condition list.
3. Set the search conditions.
(See "Entering search conditions," page 32.)
4. Click on [Save].
The Save as screen is displayed.
5. Enter the new saved search name in the
New Saved Search Name field.
6. Click on [OK].
A new saved search is added to the database.
33
Search (continued)
Deleting a saved search
1. Select a saved search name to be deleted
from the Saved Search Name dropdown
list.
2. Click on [Delete Saved Search].
A confirmation dialog box is displayed.
3. Click on [Yes].
The selected saved search is deleted from the
database.
To cancel deleting
Click on [No] in the confirmation dialog box.
34
Operations
Switching the QVGA and VGA sizes
Playing back the videos found, verifying them, or
exporting them to external media is enabled.
Select the display size of videos, QVGA or VGA, using
the
Playback Operation
/
(QVGA/VGA switch) button.
VGA display
In the Search Result Display section of the Main
screen, click on the [PLAY] button, and the playback
screen appears.
QVGA display
Switching screens
Video display section
Switching the Main video and Sub video
With the VGA size screen, select the displayed video,
either the main or sub video, using the
Sub video switch) button.
Videos displayed on the display section is switched.
35
/
(Main/
Operations (continued)
Playback
Click on [
Skip playback
You can skip to various playback locations.
].
Playback starts.
Frame forward playback
To pause playback
Click on [
Click on [
] during pause.
An image one frame after the current frame will be
displayed.
].
Playback pauses.
Playback restarts if you click on the button again.
36
Operations (continued)
Fast rewind, fast forward, and slow
playback
Skip back/Frame rewind playback
Click on [
] or [
] button during playback.
If the button is clicked during playback
If the button is clicked during playback, playback of the
current file will start from the beginning.
If the button is clicked during fast forward or
fast rewind
Playback will start from the beginning of the current file.
You can skip to various playback locations.
If the button is clicked during pause
Fast forward playback and slow playback
An image one frame before the current frame will be
displayed.
Click on [
] or [
].
If the button is clicked during playback
Fast forward playback starts. Each time this button is
clicked, fast forward playback speed changes among
x2, x4, and x20.
At the end of the file, playback pauses.
If the button is clicked during pause
Slow playback starts. Each time this button is clicked,
slow playback speed changes between 1/2 and 1/4.
At the end of the file, playback pauses.
Notes
• If [
] is clicked during fast forward, normal playback
starts. The indication for the fast forward button
becomes [x2].
• If [
] is clicked during slow playback, playback
pauses. The indication for the slow playback button
becomes [1/2].
37
Operations (continued)
Quick replay
Fast rewind playback and slow reverse
playback
Click on [
] or [
].
If the button is clicked during playback
Fast rewind playback starts. Each time this button is
clicked, fast rewind playback speed changes among
x2, x4, and x20.
At the beginning of the file, playback pauses.
Click on [
].
Playback from a location 7 seconds before the button is
clicked starts. If this button is clicked within 7 seconds
from the beginning of a file, playback starts from the
beginning of the file.
If the button is clicked during pause
Slow reverse playback starts. Each time this button is
clicked, slow reverse playback speed changes between
1/2 and 1/4.
At the beginning of the file, playback pauses.
Notes
• If [ ] is clicked during fast rewind, normal playback
starts. The indication for the fast rewind button
becomes [x2].
• If [ ]is clicked during slow reverse playback, playback
pauses. The indication for the slow reverse playback
button becomes [1/2].
38
Operations (continued)
Turning playback sound On or Off
Creating classify information
1. Click on the Audio tab to open.
Click on [Classify] during playback.
2. Click on an audio channel button you wish
to set.
Playback pauses, and classify information is created.
The Classify tab in the Property section is displayed.
(See "Classify tab," page 19.)
Each time the button is clicked, On and Off
are switched alternately. The current setting is
displayed on the upper part of the button.
Notes
: Playback sound On
• Classify information cannot be created during fast
forward or fast rewind.
• The [Classify] button is not available if no classify tag
has been registered.
: Playback sound Off
39
Operations (continued)
Creating a snapshot picture
playback resumes.
Notes
• Bookmarks can be added with a minimum interval of 2
seconds.
• A bookmark cannot be added during fast forward or fast
rewind.
• You can edit bookmarks.
(See "Bookmark information," page 42.)
Displaying Information
Meta Information (Info)
If the Info tab is clicked on the playback screen, meta
information will be displayed.
Click on [
].
A snapshot picture at the current time will be stored in
the preset location.
You can edit snapshots.
(See "Snapshot information," page 41.)
●GPS
Information
In the GPS information section, the current location
and vehicle speed data obtained from the GPS are
displayed.
SPD: Vehicle speed
Adding Bookmarks
LAT: Latitude
LON: Longitude
●Radar
Information
In the Radar information section, the speeds of your
vehicle and target vehicle that are measured by the
radar gun are displayed.
OWN: Speed of your vehicle
TGT: Speed of the target vehicle
●Trigger
Information
In the Trigger information section, the GPI input status
is displayed.
A bookmark can be added to a file whose playback,
pause, or slow playback is in progress.
Click on [Bookmark] at a location you wish to
add a bookmark.
During pause, a bookmark is added to the currently
paused position.
During playback or slow playback, it stops. A bookmark
is added to that position, then playback or slow
40
Operations (continued)
Officer information (Officers)
Snapshot information
If the Officer Info tab is clicked on the playback screen,
officer information that is registered in the Memory
Card Video Recorder is displayed.
● Officer
If the Snapshot tab is clicked on the playback screen,
snapshot information of the selected video file will
be displayed. You can display and edit an assigned
snapshot.
information
● To
The officer IDs and first, middle, and last names
for Officer 1 and Officer 2 are displayed in the
corresponding fields.
● Shift
display a snapshot picture
Select a snapshot you wish to display from the
Snapshot List. The selected snapshot is displayed in
the Video Display Section in Pause mode.
information
● Editing
Data of shiftwork pattern for officers are displayed.
a note
You can edit the note for a snapshot during pause at a
snapshot position.
VehicleID: Vehicle ID
Area: Area
1. Edit the note in the Note field.
Shift: Shiftwork pattern
2. Click on [Apply].
Unit: Unit
The note for the selected snapshot will be updated.
Agency: Police agency
● Cancel
editing
Click on [Cancel] before clicking on [Apply].
Note
If no note is edited, the [Apply] and [Cancel] buttons are
not available.
41
Operations (continued)
Bookmark information
Classify information
If the Bookmark tab is clicked on the playback screen,
bookmark information will be displayed. It is possible to
move to a desired bookmark position or edit a note.
● To
If the Classify tab is clicked on the playback screen,
classify information will be displayed. It is possible to
move to a desired classify information item position or
edit classify information or a note.
move to a desired bookmark position
● To
move to a desired classify information
item position
Select a bookmark on the Bookmark List. The unit
moves to the selected bookmark position then pauses.
● Editing
Select a classify information item from the Classify List.
The unit moves to the selected classify information item
position then pauses.
a note
You can edit the note for a bookmark during pause at a
bookmark position.
● Editing
1. Edit the note in the Note field.
2. Click on [Apply].
The note will be updated with the edited information.
● Cancel
a classify information
You can edit the classify information displayed in the
Classify tab during pause at a classify information
position.
1. Select a classify information tag from the
dropdown list.
editing
Click on [Cancel] before clicking on [Apply].
2. Edit the note in the Note field.
Note
3. Click on [Apply].
If no note is edited, the [Apply] and [Cancel] buttons are
not available.
The classify information will be updated with the edited
information.
● Cancel
editing
Click on [Cancel] before clicking on [Apply].
Note
If none of Classify Tag, or note is edited, the [Apply] and
[Cancel] buttons are not available.
42
Operations (continued)
Displaying Property
Record Trigger: Trigger of recording videos
Content
The factor of a record start
Property of videos selected in the Search Result
Display section is displayed. Property includes metainformation, case file, and evidence rules.
REC
The REC button of a recorder
CAM
The REC button of a camera
1. Select a video whose property is to be
displayed in the Search Result Display
section.
CPREC
The REC button of a control
panel
PC
A record start command
received from PC
G1-G16
A trigger by a GPIO signal
RADAR
A trigger detection by a received
speed from a radar gun
ACC
Power on record
TEST
Record check
After record check, since it is
deleted automatically, it does not
usually exist on a card.
GPS
A trigger detection by a received
speed from a GPS
GPIOFF
Intermittent record after a level
trigger on GPIO
TIMER
Intermittent record after a record
timer stop
2. Click on [Property].
The Property screen is displayed.
Meta-information
If the Advanced tab is clicked, the Advanced screen
appears, and meta-information of the selected video
will be displayed.
Agency: Agency information
Unit: Unit information
Shift: Shift information
Area: Area information
VehicleID: Vehicle ID information
Start Time: Date and time of recording videos
Officer1: Name of Officer 1
Officer2: Name of Officer 2
Length of video: Length of a video file
Date/Time Added to Library: Date and time of
registering videos in the database
43
Operations (continued)
Case file
Defining a case file
1. Click on [New].
If the Case File tab is clicked, the Case File screen
appears, and the list of the case file numbers attached
to the selected video will be displayed. Multiple case
files can be attached to a video file. On this screen, a
new case file is defined and attached to a video. A case
file attached to a video can be deleted.
The Case File Setting screen is displayed.
2. Enter a case file number in the Case File
Number field.
3. Click on [OK].
A new case file is defined.
The Case File Setting screen is closed, and a newly
defined case file number is added to the Number
list on the Case File screen.
Note
If the Case File Number defined in Step 2 has already
been defined, an error message is displayed.
Canceling defining
Click on [Cancel].
44
Operations (continued)
Attaching a case file to a video
Deleting a case file
1. Click on [Add].
1. Select a case file number to be deleted on
the list.
The Case File Setting screen is displayed.
2. Select a case file number.
2. Click on [Delete].
A confirmation dialog box is displayed.
3. Click on [Yes].
The selected case file number is deleted.
Canceling deleting
Click on [No] on the confirmation screen.
3. Click on [OK].
The case file is attached to the video, and
registered in the database.
The attached case file number is added to the
Number list on the Case File screen.
Canceling attaching
Click on [Cancel].
45
Operations (continued)
Evidence rules
Displaying the right
Click on [Evaluate] and the rights for the file given
to the specified user will be displayed on the Rules
Evaluation screen.
When the Rules tab is clicked, the Rules screen
appears, and the evidence rules for the selected video
will be displayed.
User: The user name is displayed. Default is the
logged-in user name.
Rights: The list of the rights given to the file is
displayed.
Total: If marked, the specified user has the access
right to the file.
(Refer to Operating Instructions for the Back-End
Administrator.)
Own: The rights of the specified user are displayed.
Group: If marked, the corresponding right of the
specified user belongs to the group.
46
Operations (continued)
Verifying Videos
Check if videos are falsified or not.
1. Select a video to be verified on the Search
Result Display screen.
2. Click on [Verify].
The Verify screen is displayed, and verifying the
video starts.
Processing bar: The verification progress of each
video is displayed.
Start Time: The record start time of the video is
displayed.
Status: The status of each video shown below is
displayed.
Ready
Success
Integrity check error
Right error
Not support file format
Canceling verifying
Click on [Cancel].
47
Operations (continued)
Deleting Videos
1. Select a video to be deleted on the Search
Result Display screen.
2. Click on [Delete].
A confirmation dialog box is displayed.
3. Click on [Yes].
The selected video is deleted.
Canceling deleting
Click on [No] in the confirmation dialog box.
48
Operations (continued)
Moving Videos
Moving Videos to Archive storage
1. Search videos from non-archive videos.
2. Select a video to be moved on the Search
Result Display screen.
3. Click on [To Archive].
A confirmation dialog box is displayed.
4. Click on [Yes].
The progress dialog box is displayed to show the
moving progress.
Once the videos have moved to archive storage,
the dialog box is closed.
Cancel moving
Videos can be moved to archive storage to reduce the
disk space for videos and the search processing. The
videos moved to the archive storage can be searched,
but those videos and non-archive videos cannot be
searched at the same time. The videos moved to the
archive storage can be returned to non-archive videos.
The following operation cannot be done for the videos
moved to the archive storage.
• Playback
• Verify
• DVD Burn
• Convert copy
• Export copy
• Case file operation
• Attached file operation
Click on [No] in the confirmation dialog box or the
progress dialog box.
Notes
• If the videos moved to the archive storage are intended
to be returned, the directory and file structure must be
the same as those when moved to archive storage.
• If archived videos are moved to other drive or other
directory, the archived videos will not be returned to
non-archive videos.
Convert Copy is not available at present.
Upgrading is scheduled for the future.
49
Operations (continued)
Moving archived videos
Deleting an archived video
1. Search videos from archived videos.
1. Search videos from archived videos.
2. Select a video to be moved on the Search
Result Display screen.
2. Select a video to be deleted on the Search
Result Display screen.
3. Click on [From Archive].
3. Click on [Delete].
A confirmation dialog box is displayed.
A confirmation dialog box is displayed.
4. Click on [Yes].
4. Click on [Yes].
The progress dialog box is displayed to show the
moving progress.
Once the videos have been moved from the archive
storage, the dialog box is closed.
The selected archived video is deleted.
Cancel deleting
Click on [No] in the confirmation dialog box.
Cancel moving
Click on [No] in the confirmation dialog box or the
progress dialog box.
50
Operations (continued)
Copying Videos
6. Click on [Burn].
The confirmation dialog box is displayed.
The searched videos can be copied to external media.
DVD Burn, Convert Copy, and Export copy are enabled.
DVD Burn
7. Click on [Yes].
The progress dialog box is displayed. Once the
copying is finished, the dialog box is closed.
Videos stored in the Memory Card Video Recorder can
be downloaded to a PC, and are burned on a DVD-R/
RW in DVD-Video format. Meta information can be
embedded in the videos. Either main video or sub video
can be output to a DVD file. The audio can be output
by arbitrary combination of four channels. The selected
channels are synthesized, and are output as monaural.
It is also possible to output only video or audio.
Cancel copying
Click on [Cancel] in the progress dialog box.
While creating an image, copying can be canceled.
1. Select an output video on the Search Result
Display screen.
Note
Multiple videos can be selected.
When writing to a DVD starts, copying cannot be
canceled.
2. Click on [Copy], and select [Burn DVD-Video].
The DVD Burn screen is displayed.
Copying to a rewritable disc
If videos are to be copied to a rewritable disc, the
confirmation dialog box shown below is displayed.
Click on [Yes] to overwrite. Copying starts.
To cancel copying, click on [No].
3. Make settings for output in the Output
Settings section.
Verifying the disc
4. Make settings for Embedded OSD in the
Embedded OSD Settings section.
5. Confirm the meta-information attached to
the videos in the Preview section.
Select either a main or sub video. If multiple videos
are to be copied, click on [
] or [
] to select a
video to be previewed.
To verify the DVD disc, click on [OK].
Convert Copy is not available at present.
Upgrading is scheduled for the future.
51
Operations (continued)
Output settings
● Output
Meta-information embedded to the video
Tag
Setting section
1. Select a DVD drive from the dropdown list
in the DVD Drive field.
2. Select an output video in the Video section.
Main: Main video
Sub: Sub video
3. Select an output audio in the Audio section.
Any desired channels can be selected. If multiple
channels are selected, synthesized monaural audio
is output.
● Embedded
OSD Settings section
1. Select the display position of the metainformation in the Position section.
Characters
Field2
Characters
Field3
Characters
Field4
Characters
Field5(Vehicle ID)
Characters
Officer1 ID
Characters
Officer1
Characters
Officer2 ID
Characters
Officer2
Characters
GPS-LAT
xx.xxxxxN
GPS-LNG
xxx.xxxxxW
GPS-SPD
3 digits. Unit is KPH or MPH.
Radar-OWN
3 digits. Unit is KPH or MPH.
Radar-TGT
3 digits. Unit is KPH or MPH.
Trigger
Trigger Name, Max 15 characters
yyyy-mm-ss hh:mm:ss
Local Time
Time Stamp
Auto: This setting adjusts the displayed position
not to make the same position as Embedded
OSD by Meta file.
Upper left: The Embedded OSD is displayed at the
upper-left position.
Lower left: The Embedded OSD is displayed at the
lower-left position.
2. Check the meta-information embedded to
the video on the list.
Multiple tags can be selected.
Notes
• A maximum of 13 tags can be set.
• If a Time Stamp has been embedded in the video, the
Time Stamp of the tag cannot be embedded in the
OSD.
52
Indication format
Field1
Operations (continued)
Convert Copy
Output settings
● Output
Videos are converted to Windows Media Video format
(called WMV), and output to external media. Either
main video or Sub video can be output to a WMV file.
The audio can be output by arbitrary combination of
four channels. The selected channels are synthesized,
and are output as monaural. It is also possible to output
only video or audio.
Setting section
1. Set the destination directory in the
Directory field.
Click on [Ref], and the directory selection dialog
box is displayed. Select the destination directory.
2. Select an output video in the Video section.
1. Select an output video on the Search Result
Display screen.
Main: Main video
Sub: Sub video
Multiple videos can be selected.
3. Select an output audio in the Audio section.
2. Click on [Copy], and select [Convert Copy
WMV].
Any desired channels can be selected. If multiple
channels are selected, synthesized monaural audio
is output.
The Convert Copy screen is displayed.
● Setting
section
1. Select the font size for the meta-information
in the Font size section.
Large: Large size
Small: Small size
2. Select the display position of the metainformation in the Position section.
Left-Upper
Left-Lower
Right-Upper
Right-Lower
3. Make settings for output in the Output
setting section.
3. Check the meta-information attached to the
video on the Tag list.
4. Make settings for OSD in the Setting
section.
Multiple videos can be selected.
5. Confirm the meta-information attached to
the videos in the Preview section.
Select either a main video or Sub video. If multiple
videos are to be copied, click on [
] or [
] to
select a video to be previewed.
6. Click on [Convert].
The progress dialog box is displayed. Once the
copying is finished, the dialog box is closed.
Cancel copying
Click on [Cancel] in the progress dialog box.
Convert Copy is not available at present.
Upgrading is scheduled for the future.
53
Operations (continued)
Export
Videos registered in the Back-End Server can be
exported to external media in the proprietary format.
1. Select a video to be exported on the Search
Result Display section.
Multiple videos can be selected.
2. Click on [Copy], and select [Export Copy].
The Export screen appears, and the list of selected
videos are displayed.
3. Set the destination folder in the Directory
field.
Click on [Browse], and the folder selection dialog
box is displayed. Select the destination folder.
4. To export the dedicated player application
together, follow the steps below.
1) S
elect an empty folder or make a new
folder.
2) Check the "With AV Viewer" check box.
5. Click on [Export].
A confirmation dialog box is displayed.
6. Click on [Yes].
The video will be copied to the specified folder. The
progress is displayed on the File bar and Total bar.
Cancel copying
Click on [No].
54
Operations (continued)
Importing
A confirmation dialog box is displayed.
5. Click on [Yes].
The progress dialog box is displayed.
Files stored in external media can be registered to
the database. When you click on [Import] on the Main
screen, the Import screen appears.
Once the videos have been imported, the dialog
box is closed.
Cancel importing
Click on [Cancel] in the progress dialog box.
Importing videos recorded on the unit
other than the Memory Card Video
Recorder
When videos recorded on the unit other than the
Memory Card Video Recorder, the Meta-Information
screen appears when the [Start] button is clicked in
Step 4.
When a video has been recorded on the Memory
Card Video Recorder, its meta-information is also
registered to the database. If a video has not been
recorded on the Memory Card Video Recorder, metainformation can be attached to the video. When videos
are registered to the database, the storage location,
retention period and permission will be determined
based on the evidence rules defined by the Back-End
Administrator setup.
(Refer to Operating Instructions for the Back-End
Administrator.)
Importing files
Enter the information then click on [OK]. Repeat this as
many times as the number of files to be imported.
For the second and following files, the previous setting
is displayed as default. If "Save these settings for the
next import" check box is checked, the same setting is
applied to all files.
1. Click on [Browse].
The directory selection dialog box appears.
2. Select a directory, then click on [OK].
The list of files in the specified directory is displayed
in the list.
3. Select a file to be imported on the list.
Check the check box for the file to be selected.
Multiple files can be selected.
4. Click on [Start].
55
Operations (continued)
Usable function
Usable function of the imported videos depends whether they have been recorded on the Memory Card Video
Recorder or not.
Function
Videos recorded by the Memory
Card Video Recorder
Search
Play
○
It can be played back using the
dedicated player.
Videos not recorded by the Memory
Card Video Recorder
○
It can be displayed with the
application associated with the
explorer.
Delete
○
○
Verify
○
×
Display property
○
○
Case file operation
○
○
Edit meta-information
×
×
Bookmark operation
○
×
Snapshot operation
○
×
Classify operation
○
×
Archive operation
○
○
Report
○
○
Export copy
○
○
Convert copy
○
×
DVD burn
○
×
Convert Copy is not available at present.
Upgrading is scheduled for the future.
56
Operations (continued)
Importing automatically
Videos recorded to a P2 card or SDHC Memory Card
on the Memory Card Video Recorder can be registered
to the Back-End Server automatically.
1. Insert a P2 card or SDHC Memory Card to
PC.
The progress dialog box is displayed.
Upon completion of importing, a completion dialog
box is displayed.
2. Remove the P2 card or SDHC Memory Card
from the PC.
Cancel importing
Click on [Cancel] in the progress dialog box.
Notes
• Import operation is executed in background so that
other operation can be done while importing.
• After videos and its associated files are imported, those
files are deleted from the P2 card or SDHC Memory
Card.
57
Operations (continued)
Streaming
Starting up the streaming player
1. Select the Memory Card Video Recorder or
Front-End on the list.
Streaming videos via the Front-End or Memory Card
Video Recorder is enabled.
2. Click on [Streaming].
The streaming player starts. The streaming player
can start with the right-clicking menu.
Click on [Streaming] on the Main screen, and the
Streaming screen appears. The Front-End and Memory
Card Video Recorder recently connected to the
Back-End Server will be displayed.
Multiple streaming players can be activated.
Ending the streaming player
The streaming player is terminated with either of the
following two methods:
• Click on the Close button upper right on the screen.
• Close the Back-End Client application.
On the list, the following items will be displayed:
Officer1: Name of Officer 1
Officer2: Name of Officer 2
Agency: Information of Agency
Unit: Information of Unit
Shift: Information of Shift
Area: Information of Area
Vehicle ID: Information of Vehicle ID
Updating the Streaming screen
Click on [Refresh]. The list will be updated. The list can
be updated by right-clicking.
Streaming from the Back-End Client is not
available at present. Upgrading is scheduled for
the future.
58
Operations (continued)
Description of the Streaming player
screen
① ② ③
④
A/V tab
This is a panel for audio and video control.
⑤
ⓐ
ⓑ
ⓒ
⑥
⑦
⑧
⑫
Audio setting buttons/indications
Switch whether the selected audio channel is to
be played or not. The current setting is indicated
above the button.
: Played
⑨
⑩
: Not played
(See "Selecting playback audio channels,"
page 63.)
⑪
Mixed
?????
Video Image Enhance button
IR button/indications
Switches IR mode of the camera. Each time this
button is clicked, On, Off, and Auto is cyclically
selected. The current setting is indicated above the
button.
For adjusting the brightness of a dark video image.
Click on the [◄] or [►] button to change the setting.
The current setting is indicated at the center.
Off: No video image enhancing
Low: Low video image enhancing
High: High video image enhancing
(See "Compensating Image Brightness," page 64.)
(Backlight compensation) button/
indication
Turns the backlight compensation On or Off. The
current setting is indicated above the button.
Auto Zoom button/indication
Controls the automatic zooming function of the
camera. Zoom-in, pause, and zoom-out operation
will be automatically performed.
Full/Simple Operation mode switch
Switches the display mode between Full Operation
mode and Simple Operation mode.
Video select buttons
Selects one of six cameras connected to the
Memory Card Video Recorder for playing.
Streaming from the Back-End Client is not
available at present. Upgrading is scheduled for
the future.
59
Operations (continued)
Camera tab
Quality tab
This is a panel for operating the color camera. The
Camera tab cannot be selected if no color camera
is connected to the Memory Card Video Recorder.
ⓐ
ⓑ
ⓐ
ⓒ
ⓑ
Mode
Select the mode of a video.
Setting values: 768 kbps, 384 kbps, 192 kbps,
512 kbps, 256 kbps, 128 kbps
ⓒ
Resolution
Zoom buttons
Display the frame rate of video. The setting is
made on the Front-End application. The value in
parentheses are resolutions over RTP.
For adjusting zooming.
W: For zooming out
T: For zooming in
(See "Zooming," page 64.)
Setting values: 320×240 (352×240),
160×120 (176×112)
Focus buttons
Frame Rate
For adjusting focus.
Select the frame rate of a video.
Near: For focusing on a object nearby
Setting values: 30, 15, 10, 5, 2, 1 (frames/
seconds)
Auto: For automatic focusing
Far: For focusing on a distant object
(See "Focusing," page 65.)
Meta Info tab
(See "Info tab," page 17.)
AE buttons/indication
Officer Info tab
For adjusting the exposure. The current setting
value is indicated at the center.
(See "Officers tab," page 17.)
Status tab
-: Each click on this button decreases the exposure
value by 1. The value can be decreased to -2.
+: Each click on this button increases the exposure
value by 1. The value can be decreased up to 2.
(See "Adjusting Image Brightness," page 65.)
ⓐ
Status indication
Error is displayed.
Video Display Section
Streaming video is displayed.
Streaming from the Back-End Client is not
available at present. Upgrading is scheduled for
the future.
60
Operations (continued)
Streaming operations
Switching the displayed screen
Selecting a camera
Full/Simple Operation mode switch button is pressed,
Full Operation and Simple Operation screen switched.
Simple Operation screen
Select a camera displayed on the screen from among
six cameras connected to the Memory Card Video
Recorder by pressing one of the [1] - [6] buttons.
Streaming from the Back-End Client is not
available at present. Upgrading is scheduled for
the future.
61
Operations (continued)
Making a dark image easier to view
Making a backlit image easier to view
Click on [IR].
Click on [ ].
A dark video image becomes easier to view with
infrared imaging.
Each time this button is clicked, Auto, On, and Off are
switched. The current setting is displayed on the upper
part of the button.
Normally, set it to Auto.
The darker part of a backlit image becomes easier to
view.
Each time this button is clicked, On and Off are
switched alternately. The current setting is displayed on
the upper part of the button.
Normally, set it to Off.
Auto: Automatically changes IR mode depending
on ambient brightness.
On: Sets IR mode to On.
Off: Sets IR mode to Off.
Note
You can make a video image further brighter with image
enhancing. (See "Compensating Image Brightness,"
page 64.)
Streaming from the Back-End Client is not
available at present. Upgrading is scheduled for
the future.
62
Operations (continued)
Setting audio and video
Auto-zooming
Click on the A/V tab to display the A/V screen.
Selecting playback audio channels
Playback of each audio channel can be turned on or off
with the [1], [2], [3], and [4] buttons on the A/V tab.
Click on [Auto Zoom].
The camera zooms into the target magnification,
stops for a while, then zooms out to the preset end
magnification. If the camera is at a zoom position with a
larger magnification than the target magnification when
this button is clicked, the camera zooms out to the
target magnification first.
Click on an audio channel button you wish to play.
The setting is displayed on the upper part of the button.
: The audio channel signal is played.
: The audio channel signal is not played.
Streaming from the Back-End Client is not
available at present. Upgrading is scheduled for
the future.
63
Operations (continued)
Adjusting a camera
Compensating Image Brightness
Click on the Camera tab to display the Camera screen.
Zooming
You can adjust the brightness of dark video parts in the
main video.
Click on [Video Image Enhance ◄/►].
Off: No video image enhancing
Low: Low video image enhancing
High: High video image enhancing
Adjust using the [Zoom] buttons.
●
To zoom out
Hold the [W] button pressed.
Release the button when the zoomed image of your
preference is displayed.
●
To zoom in
Hold the [T] button pressed.
Release the button when the zoomed image of your
preference is displayed.
Streaming from the Back-End Client is not
available at present. Upgrading is scheduled for
the future.
64
Operations (continued)
Focusing
Adjusting Image Brightness
Adjust using the [Focus] buttons.
Adjust using the [AE -/+] buttons.
Normally, leave it set to "0."
● Automatic
adjustment
●
Click on [Auto].
Click on [+].
With the automatic focus function, focusing is
performed automatically.
●
To make an image brighter
●
Manual adjustment
To make image darker
Click on [-].
If the target is out of focus with the automatic focus
function, use manual focusing.
To focus on a distant object
Hold the [Far] button pressed until the target is in focus.
To focus on a object nearby
Hold the [Near] button pressed until the target is in
focus.
Streaming from the Back-End Client is not
available at present. Upgrading is scheduled for
the future.
65
Operations (continued)
Adjusting picture quality
Click on the Quality tab to display the Quality screen.
Setting the Mode
Click on Mode [+]/[-].
The setting value is indicated at the center.
Setting the resolution
Click on Resolution [+]/[-].
The setting value is indicated at the center.
Setting the frame rate
Click on Frame Rate [+]/[-].
The setting value is indicated at the center.
Streaming from the Back-End Client is not
available at present. Upgrading is scheduled for
the future.
66
Operations (continued)
Reporting
5. Set the operation items in Log Items
section.
(See "Setting of log items," page 68.)
Operation log of a video is searched for with the
operating date, operating user and group, operating
items, and its report is created.
6 To include the deleted files, check the
"Contain deleted files" check box.
7. Click on [Create].
Creating a report
The Report output screen appears.
1. Select a video for creating a report in the
Research Result Display section on the
Main screen.
Multiple videos can be selected.
8. Print the report.
Note
If the Crystal Reports Runtime module has not been
installed, a report will not be created. (See "Installing the
Crystal Reports Runtime module," page 5.)
2. Click on [Report].
The Report screen appears.
The list of videos to be reported is displayed in the
Video Files section.
3. Set the operation date in the Time frame
section.
(See "Setting of operation date," page 68.)
4. Set the operated users and groups in the
Parameters section.
(See "Setting of the operated users and groups,"
page 68.)
67
Operations (continued)
Setting the search conditions
Setting of log items
Select the operation items for reporting in the Log Items
section. Operation log whose check box is checked is
searched for. All items are checked as the default.
Right-clicking enables the operations below.
• Expand all tree
• Close all tree
• Check all
• Uncheck all
Operation items shown in the table can be set.
Setting of operation date
Set the operation period of operation log for searching
in the Time frame section. If only the upper limit is set,
operation log before the upper limit of the date will be
searched for. If only the lower limit is set, operation log
after the lower limit of the date will be searched for.
Setting of the operated users and groups
Up to three user names and group names can set in
the Parameters section. Select it from the dropdown
list.
Items
File
Subitems
Register files to the database.
Delete files manually.
Delete files automatically to expire the retention period of files.
Move files to a long term archive.
Restore files from a long term archive.
Add bookmarks in a .AV video.
Delete bookmarks from a .AV video.
Edit bookmarks of a .AV video.
Add classify to a .AV video.
Delete classify from a .AV video.
Edit classify information related a .AV video.
Add snapshot to a .AV video.
Delete snapshot from a .AV video.
Edit snapshot related a .AV video.
Export files.
Convert .AV videos and copy it.
Burn .AV videos to DVD.
Verify .AV videos.
Play a .AV video.
See a file except .AV video.
Associate case files with a file.
Delete case files associated a file.
System settings
Change drive settings.
Change network settings.
Change schedule settings.
Change password settings.
Convert Copy is not available at present.
Upgrading is scheduled for the future.
68
Operations (continued)
Items
Group settings
Subitems
Create groups.
Delete groups.
Change group information.
Add users to a group.
Delete users from a group.
Export groups.
Import groups.
User settings
Create users.
Delete users.
Change user information.
Export users information.
Import users information.
Evidence Rules settings
Create evidence rules.
Delete evidence rules.
Change evidence rules.
Evaluate evidence rules.
Classify settings
Register classify tags.
Delete registered classify tags.
Case File settings
Create case files.
Delete case files.
69
Operations (continued)
Items
Remote Update
Subitems
Create VPU groups.
Delete VPU groups.
Change VPU group information.
Register VPUs to a VPU group.
Delete VPUs from a VPU group.
Register a FE application.
Delete a registered FE application.
Register a VPU firmware.
Delete a registered VPU firmware.
Create VPU settings.
Delete VPU settings.
Change VPU settings.
Associate VPU settings with VPU or VPU group.
Register a BEC application.
Delete a registered BEC application.
Update the FE application.
Update the VPU firmware.
Update the BEC application.
Update the VPU setting.
Report
Output system report.
Other
Login.
Logout.
70
Error Messages
Messages for the Back-End Client Application
No.
Message
9000
The configuration file is not
found. There is a possibility not to
function properly.
The configuration file is illegal.
There is a possibility not to
function properly.
A fatal error occurred. It will end
the application.
This application has already started.
Failed to process the history file.
9001
9010
9020
9030
10000
Failed to acquire the search
parameter.
10001
Failed to cancel the search
parameter.
10100
Failed to acquire the group
information.
10101
Failed to acquire the search
parameter.
11000
Failed to display the advanced
search screen.
Failed to display the search screen.
The unexpected error occurred.
Failed to unload properly.
Failed to acquire the display
parameter.
Failed to update the search
parameter.
Failed to acquire the display
parameter.
Failed to acquire the display
parameter.
Failed to edit the search
parameter.
Failed to acquire the Saved
Search Name.
11001
11002
11003
11004
11005
11006
11007
11008
11100
11101
11102
11103
11104
12000
12001
12002
12003
Measure
Reinstall. (Normally this message is not displayed.)
Reinstall. (Normally this message is not displayed.)
An error occurred. The program may have some problem.
This application has already been started.
Check that the network is connected.
Check that the server is in operation.
Reinstall or contact the administrator.
Check that the network is connected.
Check that the server is in operation.
Reinstall or contact the administrator.
Check that the network is connected.
Check that the server is in operation.
Reinstall or contact the administrator.
Check that the network is connected.
Check that the server is in operation.
Reinstall or contact the administrator.
Check that the network is connected.
Check that the server is in operation.
Reinstall or contact the administrator.
Reinstall. (Normally this message is not displayed.)
Reinstall. (Normally this message is not displayed.)
Reinstall. (Normally this message is not displayed.)
Reinstall. (Normally this message is not displayed.)
Reinstall. (Normally this message is not displayed.)
Reinstall. (Normally this message is not displayed.)
Reinstall. (Normally this message is not displayed.)
Reinstall. (Normally this message is not displayed.)
Reinstall. (Normally this message is not displayed.)
Check that the network is connected.
Check that the server is in operation.
Reinstall or contact the administrator.
Failed to save Saved Search
Check that the network is connected.
Name.
Check that the server is in operation.
Reinstall or contact the administrator.
Failed to delete the Saved Search Check that the network is connected.
Name.
Check that the server is in operation.
Reinstall or contact the administrator.
Failed to change the Saved
Check that the network is connected.
Search Name.
Check that the server is in operation.
Reinstall or contact the administrator.
The Saved Search cannot be
Delete the unnecessary Save Search, then create it again.
created any more. The number
of the Saved Search that can be
created up to 50
Failed to display the Search
Reinstall. (Normally this message is not displayed.)
screen.
Failed to start the Search.
Reinstall. (Normally this message is not displayed.)
Failed to start the Saved Search. Reinstall. (Normally this message is not displayed.)
Failed to control the Search
Reinstall. (Normally this message is not displayed.)
screen.
71
Error Messages (continued)
No.
Message
12004
12100
Failed to control the Saved Search.
Lower limit value cannot be over
upper limit.
Input character string is too long.
The number of the maximum
characters is 50 .
Input character string is too long.
The number of the maximum
characters is 3000.
Input character string is too long.
The number of the maximum
characters is 99.
Input character string is too long.
The number of the maximum
characters is 500.
Input character string is too long.
The number of the maximum
characters is 260.
Neither the single nor double
quotation marks ' and " cannot be
searched.
Failed to display the search result
screen.
Failed to control the search result
screen.
Failed to playback the video.
Failed to display the video
information.
Failed to display the verification of
video.
Failed to display the video copy
screen.
Failed to display the video
deletion screen.
Failed to display the video archive
screen.
Failed to display the video.
Failed to display the video.
Failed to get the video
management information.
Failed to delete the thumbnail file
of the temporary saved video.
Failed to create the parameter
used for search.
Failed to start the Search.
12110
12111
12112
12113
12114
12115
13000
13001
13002
13003
13004
13005
13006
13007
13008
13009
13010
13011
13012
13013
13014
Failed to start acquiring the
thumbnail.
13015
Failed to search.
13016
Failed to cancel.
13017
Failed to acquire the thumbnail.
13018
Failed to move to the archive.
13019
Failed to move from the archive.
Measure
Reinstall. (Normally this message is not displayed.)
Set the lower limit of the input field less than the upper limit.
Enter the character string within 50 characters.
Enter the character string within 3,000 characters.
Enter the character string within 99 characters.
Enter the character string within 500 characters.
Reenter the charater string within 260 characters.
Delete ' and " from the keyword for the search.
Reinstall. (Normally this message is not displayed.)
Reinstall. (Normally this message is not displayed.)
Reinstall. (Normally this message is not displayed.)
Reinstall. (Normally this message is not displayed.)
Reinstall. (Normally this message is not displayed.)
Reinstall. (Normally this message is not displayed.)
Reinstall. (Normally this message is not displayed.)
Reinstall. (Normally this message is not displayed.)
Reinstall. (Normally this message is not displayed.)
Reinstall. (Normally this message is not displayed.)
Reinstall. (Normally this message is not displayed.)
Terminate the application, and login again.
Reinstall. (Normally this message is not displayed.)
Check that the network is connected.
Check that the server is in operation.
Reinstall or contact the administrator.
Check that the network is connected.
Check that the server is in operation.
Reinstall or contact the administrator.
Check that the network is connected.
Check that the server is in operation.
Reinstall or contact the administrator.
Check that the network is connected.
Check that the server is in operation.
Reinstall or contact the administrator.
Check that the network is connected.
Check that the server is in operation.
Reinstall or contact the administrator.
Check that the network is connected.
Check that the server is in operation.
Reinstall or contact the administrator.
Check that the network is connected.
Check that the server is in operation.
Reinstall or contact the administrator.
72
Error Messages (continued)
No.
Message
Measure
13019
Failed to delete contents.
13020
Failed in the progress process.
13100
Failed to search.
13101
Failed to acquire the thumbnail.
13102
Cannot display since the number
of the search results exceeds
display restrictions. Please
change the search item. Maximum
number of search results are 1000
Failed to move to the archive.
Check that the network is connected.
Check that the server is in operation.
Terminate the application, and login again.
Failed to move from the archive. Check that the network is connected.
Check that the server is in operation.
Terminate the application, and login again.
Failed to delete the contents.
Check that the network is connected.
Check that the server is in operation.
Terminate the application, and login again.
No rights to move to the archive. Obtain the right for archive processing, and login again.
No rights to delete.
Obtain the right for deleting, and login again.
Cannot playback two or more
Select only one content, and play it.
contents selected at a time.
Please select one content to
playback.
Contents that can be verified are Select a AV file, and verify it.
not included in selected contents.
Only videos can be verified.
Cannot be deleted because other Search again for updating the displayed items.
users moved to the archive.
Failed to display the Advanced
Reinstall. (Normally this message is not displayed.)
search screen.
Failed to search.
Reinstall. (Normally this message is not displayed.)
Failed to control the Advanced
Reinstall. (Normally this message is not displayed.)
search.
Failed to edit the Advanced
Check that the network is connected.
search.
Check that the server is in operation.
Reinstall or contact the administrator.
The selected Saved Search is
Remove the Saved Search which causes an error, and specify the new
created by the other application.
conditions.
This Saved Search cannot be
edited and the result may not be
correct even if the search can be
done.
The search condition is not set up. Add search conditions to the Saved Search, and save it.
Please save the search condition
after adding it.
Default Saved Search "Default
The default Saved Search cannot be deleted.
Saved Search" cannot be deleted
The Saved Search name is not
Enter the Saved Search name and save it. If the existing Saved Search is to
input.
be overwritten, enter the name of the Saved Search to be overwritten.
Please input a new name, when
you create new Saved Search
item.
When changing the conditions of
the existing Saved Search, please
input a Saved Search name to
change.
The Saved Search name is not
Select a Saved Search name, and delete it.
input. Please push a delete button
after selecting items to delete.
13103
13104
13105
13106
13107
13108
13109
13110
14000
14001
14002
14003
14100
14200
14201
14202
14203
Check that the network is connected.
Check that the server is in operation.
Reinstall or contact the administrator.
Check that the network is connected.
Check that the server is in operation.
Reinstall or contact the administrator.
Check that the network is connected.
Check that the server is in operation.
Terminate the application, and login again.
Check that the network is connected.
Check that the server is in operation.
Terminate the application, and login again.
Search with more strict conditions.
73
Error Messages (continued)
No.
Message
14204
14205
The search condition is not input.
The search condition is not set
up. It is necessary to check a
check-box for either maximum or
minimum.
The input character string is too
long.
The input character string is too
long.
The number of the maximum
characters is 50.
The input character string is too
long.
The number of the maximum
characters is 103.
The input character string is too
long.
The number of the maximum
characters is 3000.
The input character string is too
long.
The number of the maximum
characters is 10.
The input numerical value is too large.
The maximum number is 9999.
The input numerical value is too
large.
The maximum number is
4294967295.
The input character string is too
long.
The number of the maximum
characters is 99.
The input character string is too
long.
The number of the maximum
characters is 500.
A lower limit cannot be set up
larger than upper limit.
Please input a numerical value.
Cannot make any more conditions.
Can be created up to 50
Neither the single nor double
quotation marks ' and " cannot be
searched.
Failed to display the streaming
screen.
Failed to start the recorder
search.
14206
14207
14208
14209
14210
14211
14212
14213
14214
14215
14216
14217
14218
20000
20001
20002
20003
20004
20005
20006
20007
20008
20099
20100
Failed to control the streaming screen.
Failed to control the streaming screen.
Failed to control the streaming screen.
Failed to control the streaming screen.
Failed to control the streaming screen.
Failed to control the streaming screen.
Failed to control the streaming screen.
Failed to control the streaming screen.
Failed to search the Front-End/
Recorder.
Measure
Enter the characters and numerics in keyword and conditions, then add.
Check either upper limit or lower limit, then add.
Reduce the number of characters, and add.
Reenter the character strings within 50 characters.
Reenter the character strings within 103 characters.
Reenter the character strings within 3000 characters.
Reenter the character strings within 10 characters.
Reenter the value within 9999.
Reenter the value within 4294967295.
Reenter the character strings within 99 characters.
Reenter the character strings within 500 characters.
Modify the lower limit of the input field less than the upper limit.
Enter the numerical value in the input box.
Delete an unnecessary conditions, then add.
Delete ' and " from the keyword for the search.
Reinstall. (Normally this message is not displayed.)
Check that the network is connected.
Check that the server is in operation.
Reinstall or contact the administrator.
Reinstall. (Normally this message is not displayed.)
Reinstall. (Normally this message is not displayed.)
Reinstall. (Normally this message is not displayed.)
Reinstall. (Normally this message is not displayed.)
Reinstall. (Normally this message is not displayed.)
Reinstall. (Normally this message is not displayed.)
Reinstall. (Normally this message is not displayed.)
Reinstall. (Normally this message is not displayed.)
Check that the network is connected.
Check that the server is in operation.
Reinstall or contact the administrator.
74
Error Messages (continued)
No.
Message
20101
Failed to display the streaming
screen.
20102
Failed to acquire the setting for
the streaming the video from the
application configuration file.
Failed to acquire the recorder IP
address. The selected recorder
cannot stream the video.
Failed to acquire the server IP
address for the streaming video.
Currently unable to stream the
video.
ActiveX used for the streaming
video is not registered.
Because the number of registered
Recorder/Front-End exceeded
2000, only 2000 is displayed from
the acquisition result.
Failed to control the Recorder/FrontEnd.
No rights to stream the video.
The streaming has already been
processed.
The time-out was generated while
starting to stream the video.
The error was occurred while
starting to stream the video.
The error occurred while starting
to stream the video.
Disconnected with Front-End or
Recorder.
Finish streaming.
20103
20104
20105
20106
20107
20108
20109
20110
20111
20112
20113
20114
20115
30000
Streaming can not be started
via the Front-End, because
the recorder has already been
streaming by connecting with the
recorder directly.
Cannot connect with streaming
server.
40002
Failed to display the verification
screen.
Failed to start verifying.
Failed to control the verification
screen.
Failed to verify it.
Failed to display the video
playback screen.
Failed to control the video
playback screen.
Failed to update the lock.
40003
Failed to release the lock.
40100
The video to playback is not
selected. Please play it again
after selecting the video.
30001
30002
30100
40000
40001
Measure
Check that the network is connected.
Check that the server is in operation.
Reinstall or contact the administrator.
Reinstall. (Normally this message is not displayed.)
Wait for a while, then play again. If not improved, contact an administrator.
Wait for a while, then play again. If not improved, contact an administrator.
Reinstall. (Normally this message is not displayed.)
Wait for a while, then play again. The problem may be solved.
Restart the streaming playback.
Obtain the right for streaming process, then login again.
Wait for a while, then play again.
Wait for a while, then play again.
Wait for a while, then play again.
Wait for a while, then play again.
Check that the equipment works normally.
Check that the network is connected.
Wait for a while, then play again.
Check that the equipment works normally.
Check that the network is connected.
Wait for a while, then play again.
Check that the equipment works normally.
Check that the network is connected.
Wait for a while, then play again.
Reinstall. (Normally this message is not displayed.)
Reinstall. (Normally this message is not displayed.)
Reinstall. (Normally this message is not displayed.)
Reinstall. (Normally this message is not displayed.)
Reinstall. (Normally this message is not displayed.)
Reinstall. (Normally this message is not displayed.)
Check that the network is connected.
Check that the server is in operation.
Reinstall or contact the administrator.
Check that the network is connected.
Check that the server is in operation.
Reinstall or contact the administrator.
Select only one content, and play it.
75
Error Messages (continued)
No.
Message
40101
The video cannot be played
because information on the server
cannot be acquired. Please
playback after login again.
Information to display the video
playback screen was not able to
be acquired.
Failed to make a temporary folder.
No AV Viewer exists.
No necessary module for the
playback exists.
No necessary module for the
playback exists.
Failed to delete a temporary folder.
Failed to acquire the necessary
detailed information for the video
playback.
40102
40103
40104
40105
40106
40107
40108
40109
Failed to acquire the necessary
file information for the video
playback.
40110
Failed to acquire the video
information file.
40111
Failed to acquire the bookmark
file.
40112
Failed to acquire the playback
rights.
40113
Failed to update the bookmark.
Edited information is invalid.
The video cannot be played due
to no rights to playback.
Two or more videos cannot be
played at a time.
The video cannot be played
because other users are in use.
Please try again after a while.
Failed to update the information
on DB.
40114
40115
40116
40117
40118
40119
40120
40121
89000
89001
89002
89003
89004
Acquiring process of the video
information was canceled.
Failed to update the information
on DB.
Failed to acquire the file.
AV Viewer has already started. It
is not possible to start both
Failed to initialize the resource
related.
Failed to initialize the necessary
data.
Failed to create the temporary
folder.
Cannot covert the video because
the selected video info can not be
acquired.
Interrupted the process due to an
internal error.
Measure
Check that the network is connected.
Check that the server is in operation.
Terminate the application, and login again.
Reinstall. (Normally this message is not displayed.)
Terminate the application, then login again.
Reinstall. (Normally this message is not displayed.)
Reinstall. (Normally this message is not displayed.)
Reinstall. (Normally this message is not displayed.)
Terminate the application, and login again.
Check that the network is connected.
Check that the server is in operation.
Terminate the application, and login again.
Check that the network is connected.
Check that the server is in operation.
Terminate the application, and login again. If the problem is not solved,
contact the administrator.
Check that the network is connected.
Check that the server is in operation.
Terminate the application, and login again. If the problem is not solved,
contact the administrator.
Check that the network is connected.
Check that the server is in operation.
Terminate the application, and login again. If the problem is not solved,
contact the administrator.
Check that the network is connected.
Check that the server is in operation.
Terminate the application, and login again.
Create a bookmark again on a player.
Obtain the right to play, and login again.
Select only one content, and play it.
Wait for a while, then play again.
Check that the network is connected.
Check that the server is in operation.
Terminate the application, and login again.
Play it again.
Reinstall. (Normally this message is not displayed.)
Check that the network is connected.
Check that the server is in operation.
Terminate the application, and login again. If the problem is not solved,
contact an administrator.
The AV Viewer is already open. It is not possible to start if open elsewhere.
Reinstall. (Normally this message is not displayed.)
Reinstall. (Normally this message is not displayed.)
Set the TEMP folder for OS in the drive formatted with NTFS.
Check that the network has no problem. If no problem is found, the database
may be corrupted. Reinstall the Back-End Server.
Check that the network has no problem. If no problem is found, the database
may be corrupted. Reinstall the Back-End Server.
76
Error Messages (continued)
No.
Message
89005
Interrupted the process due to an
error while creating the DVD.
Interrupted the process due to the
data with no operation rights.
The free space of the folder is
insufficient.
The free space of the output
folder is insufficient.
The output destination is read-only.
Change the DVD media and drive to be output.
The output of the video file ended.
Some video files were failed to be
converted.
It is a file system that is not supported.
Cannot specify the output
destination due to the long folder
path.
Cannot output to the folder due
to too many files or folders at the
output destination.
DVD converting ends.
Failed to acquire the video
information processing.
Failed to acquire the video.
No convertible file exists.
The file that can be output to DVD
has not been selected.
Information on the drive cannot
be acquired. There is a possibility
that the disc not supported has
been inserted in the drive.
The drive is not ready. Please
insert unused DVD-R/-R DL/+R/
+R DL or the DVD-RW/+RW disc
in the drive.
Other applications are using the
drive. Please exit the application
for which the drive is used.
The tray of the drive is open.
Please insert unused DVD-R/-R
DL/+R/+R DL or the DVD-RW/
+RW disc in the drive and close
the tray.
The disc not supported has been
inserted. Please insert unused
DVD-R/-R DL/+R/+R DL or the
DVD-RW/+RW disc.
The disc not supported has been
inserted. Please insert unused
DVD-R/-R DL/+R/+R DL or the
DVD-RW/+RW disc.
It is not possible to store it on this
disc. Please insert unused DVDR/-R DL/+R/+R DL or the DVDRW/+RW disc.
This disc is read-only. Please
insert it in the drive after releasing
read-only.
It is not possible to cancel
because the video is writing to the
disc.
Because the free space in the
work area is insufficient, it is not
possible to keep processing it.
The total playback time of the
selected video is too long to
output to the disc.
The capacity of the disc cannot be
acquired.
Check that the network has no problem. If no problem is found, the database
may be corrupted. Install the Back-End Server again.
Reinstall. (Normally this message is not displayed.)
Select an AV file to which you have the right for output.
Select an AV file to which you have the right for output.
89006
89100
89101
89102
89103
89104
89105
89106
89107
89108
89109
89110
89111
89112
89113
89114
89115
89116
89117
89118
89119
89120
89121
89122
Measure
Operate as a user having the right.
Increase the free capacity for the work.
Reduce the files to be output to DVD.
Change the DVD media and drive to be output.
Use the HDD formatted with NTFS.
Specify the destination path length shorter.
Insert an unused DVD-R/-R DL/+R/+R DL or DVD-RW/+RW disc in the
drive.
Insert an unused DVD-R/-R DL/+R/+R DL or DVD-RW/+RW disc in a drive.
If the problem is not solved, change the drive.
Insert an unused DVD-R/-R DL/+R/+R DL or DVD-RW/+RW disc in the
drive. If the problem is not solved, change the drive.
Terminate the application that uses the drive.
Insert an unused DVD-R/-R DL/+R/+R DL or DVD-RW/+RW disc in the
drive. If the problem is not solved, change the drive.
Insert an unused DVD-R/-R DL/+R/+R DL or DVD-RW/+RW disc in the
drive. If the problem is not solved, change the drive.
Insert an unused DVD-R/-R DL/+R/+R DL or DVD-RW/+RW disc in the
drive. If the problem is not solved, change the drive.
Insert an unused DVD-R/-R DL/+R/+R DL or DVD-RW/+RW disc in the
drive. If the problem is not solved, change the drive.
Insert an unused DVD-R/-R DL/+R/+R DL or DVD-RW/+RW disc in the
drive. If the problem is not solved, change the drive.
Wait until output ends.
Increase the free space for the work folder.
Select either Main screen or Sub screen. If a warning is still displayed,
reduce the number of AV files.
Insert an unused DVD-R/-R DL/+R/+R DL or DVD-RW/+RW disc in the
drive. If the problem is not solved, change the drive.
77
Error Messages (continued)
No.
Message
89123
The drive that can be output was
not found.
The video cannot be output to
DVD because the number of
video files are exceeding 49
pieces. The number of video files
is 49 pieces at maximum to output
to DVD.
The video information with no right
to playback cannot be acquired.
(The output to DVD is possible).
The video information with no
right to output to DVD cannot be
acquired.
An uncertain error occurred while
converting the video.
No contents that can be output to
DVD are included in the selected
contents. Video length must be
2 seconds or more to output to
DVD.
Failed to display the screen of
DVD-Video.
This function cannot be used
because it is in the drive of no
existence of a temporary folder
nor the format by the forms other
than NTFS.
The number of items that can be
displayed on the screen at a time
is 13.
Failed to initialize.
Failed to output the log.
Failed in processing the
confirmation message of the file
deletion.
Failed to output the report.
Failed to download.
89128
89129
89130
89131
89900
89901
89902
89903
90000
90001
90002
90003
90100
90101
90102
Insufficient capacity at export
destination.
Failed to export to the media.
90103
Failed to export.
90104
There is no rights to export the
Arbitrator video file.
There are no rights to export nonArbitrator of video file exports
other than the .AV file.
The error occurred while acquiring
the detailed information.
Failed to initialize the resource
related.
Failed to initialize the data.
Failed to make the temporary
folder.
Cannot convert videos because
the selected video information can
not be acquired.
Interrupted the process due to an
internal error.
Interrupted the process due to an
output error.
90105
90106
91000
91001
91002
91003
91004
91005
Measure
Connect a DVD drive.
Select either Main video or Sub video. If a warning is still generated, reduce
the number of AV files.
The user has no right to play videos so that video information cannot be
obtained. (The output to DVD is possible.)
The user has no right to output to the DVD so that video information cannot
be obtained.
An uncertain error has occurred while converting the video. (Normally this
message is not displayed.)
Select an AV file that can be output to DVD.
Reinstall. (Normally this message is not displayed.)
This function cannot be used because a temporary folder does not exist or is
placed on the drive formatted other than NTFS.
A maximum number of items displayed on the OSD is 13.
Reinstall. (Normally this message is not displayed.)
Reinstall. (Normally this message is not displayed.)
Reinstall. (Normally this message is not displayed.)
Reinstall. (Normally this message is not displayed.)
Check that the network is connected.
Check that the server is in operation.
Terminate the application, and login again. If the problem is not solved,
contact the administrator.
Delete an unnecessary filed on the drive to which a file is to be exported to
keep sufficient space, then execute it.
Check that the driver for a media is installed correctly.
Change the media.
Terminate the application, and login again. If the problem is not solved,
contact the administrator.
Obtain the right for exporting an AV file, and login again.
Obtain the right for exporting a file other than an AV file, and login again.
Reinstall. (Normally this message is not displayed.)
Reinstall. (Normally this message is not displayed.)
Reinstall. (Normally this message is not displayed.)
Reinstall. (Normally this message is not displayed.)
Reinstall. (Normally this message is not displayed.)
Reinstall. (Normally this message is not displayed.)
Reinstall. (Normally this message is not displayed.)
78
Error Messages (continued)
No.
Message
91006
Interrupted the process due to the
data with no operation rights.
The free space of the folder is
insufficient.
The free space of the output
folder is insufficient.
The output destination is readonly.
The output of the file ended.
Some files were failed to be
converted.
It is a file system that is not
supported.
Cannot specify the output
destination due to long folder
path.
Cannot output to the folder due
to too many files or folders at the
output destination.
Failed to acquire the video
information.
91100
91101
91102
91103
91104
91105
91106
91107
91108
91109
91110
91111
91112
91900
91901
91902
91903
92000
92001
92002
93000
93001
93002
Failed to convert to WMV. Please
confirm the issues such as the
output capacity, existing files,
network and rights of files.
There is no convertible file.
No files that can be converted to
WMV are selected.
Video information cannot be
acquired because there is no
reproducing authority. (Conversion
into WMV is possible).
Video information cannot be
acquired due to no right to
playback.
Videos that can be converted to
WMV are not included in selected
contents. WMV's being able to
output is only a video.
Failed to display the screen of
Convert Copy to WMV.
This function cannot be used
because it is in the drive of no
existence of a temporary folder
nor the format by the forms other
than NTFS.
The number of items that can be
displayed on the screen at a time
is 13.
Failed to initialize the resource
related.
Failed in the search result setting
process.
Failed to display the selected
data.
Failed to initialize the resource
related.
Failed in "Advanced" search
display process.
Failed in "Case File" display
process.
Measure
Obtain the right for processing the WMV output, and login again.
Delete unnecessary files in the drive for the work folder to keep sufficient
free space, and perform it again.
Delete unnecessary files in the destination drive to keep sufficient free
space, and perform it again.
Check that the destination drive is not set to read only.
Terminate the application, and login again. If the problem is not solved,
contact the administrator.
Check the file format of the destination drive.
Format the destination drive.
Shorten the destination pass, and make setting again.
Delete the unnecessary files in the destination folder, and output again.
Check that the network is connected.
Check that the server is in operation.
Terminate the application, and login again. If the problem is not solved,
contact the administrator.
Terminate the application, and login again. If the problem is not solved,
contact the administrator.
Select a convertible AV file, then perform the operation.
Select a convertible AV file, then perform the operation.
The user has no right to play videos so that video information cannot be
obtained. (The WNV output is possible.)
The user has no right of WMV output so that video information cannot be
obtained. (The output to DVD is possible.)
Select a convertible AV file, then perform the operation.
Reinstall. (Normally this message is not displayed.)
This function cannot be used because a temporary folder does not exist or is
placed on the drive formatted other than NTFS.
A maximum number of items displayed on the screen is 13.
Reinstall. (Normally this message is not displayed.)
Reinstall. (Normally this message is not displayed.)
Reinstall. (Normally this message is not displayed.)
Reinstall. (Normally this message is not displayed.)
Terminate the application, and login again.
Terminate the application, and login again.
79
Error Messages (continued)
No.
93003
93004
93005
93006
93007
93008
93009
93010
93011
93012
93013
93100
93101
93102
94000
94001
94002
94003
94100
94101
94102
95000
95001
95002
95003
95004
95005
95100
95101
Message
Measure
Failed in "Rules" display process. Terminate the application, and login again.
Failed to add.
Check that the network is connected.
Check that the server is in operation.
Terminate the application, and login again.
Failed to associate with the list.
Check that the network is connected.
Check that the server is in operation.
Terminate the application, and login again.
Failed to delete the association.
Check that the network is connected.
Check that the server is in operation.
Terminate the application, and login again.
Failed to acquire the case file list. Check that the network is connected.
Check that the server is in operation.
Terminate the application, and login again.
Failed to acquire the case file list Check that the network is connected.
for the contents.
Check that the server is in operation.
Terminate the application, and login again.
Failed to acquire the group list.
Check that the network is connected.
Check that the server is in operation.
Terminate the application, and login again.
Failed to acquire the list of free
Check that the network is connected.
fields.
Check that the server is in operation.
Terminate the application, and login again.
Failed to acquire the case file.
Check that the network is connected.
Check that the server is in operation.
Terminate the application, and login again.
Failed to control a screen.
Check that the network is connected.
Check that the server is in operation.
Terminate the application, and login again.
Failed to acquire the user list.
Check that the network is connected.
Check that the server is in operation.
Reinstall or contact the administrator if not improved.
Failed to associate the case file.
Check that the network is connected.
Check that the server is in operation.
Terminate the application, and login again. If the problem is not solved,
contact the administrator.
Failed to delete the case file
Check that the network is connected.
association.
Check that the server is in operation.
Terminate the application, and login again. If the problem is not solved,
contact the administrator.
No rights to operate.
Obtain the right for editing a case file or verifying the evidence rule, and login
again.
Failed to initialize the resource
Reinstall. (Normally this message is not displayed.)
related.
Failed in the registration process. Reinstall. (Normally this message is not displayed.)
Failed to search the case file.
Reinstall. (Normally this message is not displayed.)
Failed to control the screen.
Reinstall. (Normally this message is not displayed.)
Invalid character in the input
Enter the value without using the invalid characters.
value.
This number was able to be
Use another number for registration.
registered.
The input value has already been Use another number for registration.
registered.
Failed to initialize the resource
Reinstall. (Normally this message is not displayed.)
related.
Failed in the selection process.
Reinstall. (Normally this message is not displayed.)
Failed to create the key for an
Reinstall. (Normally this message is not displayed.)
internal dictionary.
Failed to extract the selected
Reinstall. (Normally this message is not displayed.)
lines.
Some exception occurred during Reinstall. (Normally this message is not displayed.)
the search process.
Failed to control the screen.
Reinstall. (Normally this message is not displayed.)
Not selected.
Select an item, then perform the operation.
Failed to register this number.
Register using another number.
80
Error Messages (continued)
No.
Message
95102
Failed in searching the case file.
96000
Failed to initialize the resource
related.
Failed to create the file list.
Failed to control the import
screen.
Failed to create the temporary
area.
Failed to delete the temporary
area.
Failed in the registration process.
Failed to create the list.
Failed to import.
96001
96002
96003
96004
96005
96006
96007
96008
96009
96010
96011
96012
96013
96014
96015
96016
96017
96018
96100
96101
96102
96103
96104
Failed to extract the selected
lines.
ActiveX is not loaded.
Failed while processing the
property information in the
Arbitrator video file.
Failed to initialize ActiveX.
"InCarVideoX3.ocx" might not be
registered in the registry.
Failed while checking the rights.
Measure
Check that the network is connected.
Check that the server is in operation.
Terminate the application, and login again. If the problem is not solved,
contact the administrator.
Reinstall. (Normally this message is not displayed.)
Terminate the application, and login again.
Reinstall. (Normally this message is not displayed.)
Terminate the application, and login again.
Terminate the application, and login again.
Terminate the application, and login again.
Terminate the application, and login again.
Check that the network is connected.
Check that the server is in operation.
Terminate the application, and login again. If the problem is not solved,
contact the administrator.
Terminate the application, and login again.
Reinstall. (Normally this message is not displayed.)
Check that the network is connected.
Check that the server is in operation.
Terminate the application, and login again. If the problem is not solved,
contact the administrator.
Reinstall. (Normally this message is not displayed.)
Check that the network is connected.
Check that the server is in operation.
Terminate the application, and login again. If the problem is not solved,
contact the administrator.
The error occurred while acquiring Terminate the application, and login again.
the file list.
The error occurred while sorting
Terminate the application, and login again.
the metafiles and the bookmark
files.
The error occurred when starting Reinstall. (Normally this message is not displayed.)
the import processing.
The error occurred while
Check that the network is connected.
processing the import.
Check that the server is in operation.
Terminate the application, and login again. If the problem is not solved,
contact the administrator.
The error occurred while
Terminate the application, and login again.
processing the progress bar
setting.
The error occurred while creating Terminate the application, and login again.
the file list.
No object file in the specified
Select the directory where the file to be imported exists, then perform the
directory.
operations.
No rights to register the Arbitrator Obtain the right for importing videos, and login again.
video files.
No rights to register non-Arbitrator Obtain the right for importing files other than videos, and login again.
video files.
Cannot display since the number Too many files are saved in the directory, Delete the unnecessary files, and
of files exceeded display
perform the operation.
restrictions. Maximum number is
10000.
Interrupted the process due to the Check that the network is connected.
database registration failure.
Check that the server is in operation.
Terminate the application, and login again. If the problem is not solved,
contact the administrator.
81
Error Messages (continued)
No.
96105
96106
96107
96108
96109
97000
97001
97002
97003
97004
97005
97006
97007
97008
97020
97021
97022
97023
97024
50000
50001
50002
50100
Message
Measure
Interrupted the process due to the Check that the network is connected.
communication error.
Check that the server is in operation.
Terminate the application, and login again. If the problem is not solved,
contact the administrator.
Interrupted the process due to the Check that the network is connected.
integrity check error.
Check that the server is in operation.
Terminate the application, and login again. If the problem is not solved,
contact the administrator.
Interrupted the process due to
Check that the network is connected.
the error that was not able to
Check that the server is in operation.
distinguish in SDK.
Terminate the application, and login again. If the problem is not solved,
contact the administrator.
The server is in process.
Check that the network is connected.
Please execute again after a
Check that the server is in operation.
while.
Terminate the application, and login again. If the problem is not solved,
contact the administrator.
No rights to import.
Obtain the right for importing, and login again.
Failed to initialize the resource
Reinstall. (Normally this message is not displayed.)
related.
Failed to search the user.
Check that the network is connected.
Check that the server is in operation.
Terminate the application, and login again.
Failed to search the user details. Check that the network is connected.
Check that the server is in operation.
Terminate the application, and login again.
Failed to extract the selected
Reinstall. (Normally this message is not displayed.)
lines.
Some exceptions occurred during Check that the network is connected.
the search process.
Check that the server is in operation.
Terminate the application, and login again.
Some exceptions occurred while Check that the network is connected.
displaying the right list.
Check that the server is in operation.
Terminate the application, and login again.
Some exceptions occurred during Check that the network is connected.
the detailed search process.
Check that the server is in operation.
Terminate the application, and login again.
Some exceptions occurred
Check that the network is connected.
while acquiring the User Group
Check that the server is in operation.
information.
Terminate the application, and login again.
Failed to control the screen.
Reinstall. (Normally this message is not displayed.)
Failed to search the user details. Check that the network is connected.
Check that the server is in operation.
Terminate the application, and login again.
Some exceptions occurred during Check that the network is connected.
the search process.
Check that the server is in operation.
Terminate the application, and login again.
Some exceptions occurred while Check that the network is connected.
displaying the rights list process. Check that the server is in operation.
Terminate the application, and login again.
Some exceptions occurred during Check that the network is connected.
the detailed search process.
Check that the server is in operation.
Terminate the application, and login again.
Some exceptions occurred
Check that the network is connected.
while acquiring the User Group
Check that the server is in operation.
information.
Terminate the application, and login again.
Failed to display the report
Reinstall. (Normally this message is not displayed.)
screen.
Failed to start creating the report. Reinstall. (Normally this message is not displayed.)
Failed to control the report screen. Reinstall. (Normally this message is not displayed.)
The value in lower limit value
Set the lower limit value lower than the upper limit value in the input field.
cannot be larger than the one in
upper limit.
82
Error Messages (continued)
No.
Message
Measure
50101
Failed to acquire the user
information. The report that
specifies the user name cannot
be created.
Check that the network is connected.
Check that the server is in operation.
Terminate the application, and login again.
50102
Failed to acquire the group
information. The report that
specifies the group name cannot
be created.
Failed to acquire the user/group
information. The report that
specifies the user/group name
cannot be created.
No check on the Log item boxes.
Please check the boxes to create
a report.
User/Group don't exist. Please
select from the combo box again.
No rights to create a report.
Failed to search logs.
Check that the network is connected.
Check that the server is in operation.
Terminate the application, and login again.
50103
50104
50105
50106
50107
97000
—
Failed to initialize the resource
related.
Failed to collect the data.
Failed to collect the officer
information.
Case File Number input doesn't
exist in the list.
There is an invalid character in
the input value.
There are files that was not
properly registered.
Database registration error.
—
Network error.
—
—
Integrity check error.
Failed in deleting the file or the
folder completing registration.
Cannot connect to the Back-End
Server.
Auto import was stopped.
97001
97002
97100
97100
—
—
—
Already started. Prohibit multiple
starts.
Check that the network is connected.
Check that the server is in operation.
Terminate the application, and login again.
Check the one or more items on the tree, the perform the operation.
Select the user name and group name from the dropdown list, and perform
it.
Obtain the right for processing the report creation, and login again.
Check that the network is connected.
Check that the server is in operation.
Terminate the application, and login again.
Terminate the application, and login again.
Terminate the application, and login again.
Terminate the application, and login again.
Terminate the application, and login again.
Input without using invalid characters.
Perform registration again.
Terminate the application, and login again.
Check that the network is connected.
Check that the server is in operation.
Terminate the application, and login again.
Check that the network is connected.
Check that the server is in operation.
Terminate the application, and login again.
Terminate the application, and login again.
Terminate the application, and login again.
Check that the network is connected.
Check that the server is in operation.
Terminate the application, and login again.
Terminate the activated application, and restart.
83
Error Messages (continued)
Messages common to the Back-End Administrator Application
No.
1000
1010
1020
1030
1060
1070
1080
1090
1100
1130
1140
2010
2020
2030
2040
Message
Measure
Failed to update due to illegal
data. Please confirm the input
information.
No Back-End Server input.
No User ID input.
No password setting. Set the
password.
Failed to login.
Reinstall.
Failed to get the login user
information.
Failed to get the password
information
Failed to login.
Failed to update due to illegal
data. Please confirm the input
information.
No Correct Password.
Failed to set the password
information.
Invalid password length. Change
password.
Invalid password. Not included
the capital and small letters in the
password. Change the password.
Invalid password. Not include the
number in the password. Change
the password.
Invalid and expired password.
Change password.
Check the entered information again, then perform operations.
Enter the server, then perform operations.
Enter the user id, then perform operations.
Enter the password, then perform operations.
Check the entered information again, then perform operations.
End the application, and login again.
Check the entered information again, then perform operations.
End the application, and login again.
Check the entered information again, then perform operations.
Check the entered information again, then perform operations.
Check the entered information again, then perform operations.
Check the entered information again, then perform operations.
Check the entered information again, then perform operations.
Change the password following the screen displayed.
Sub-messages
The messages shown below are displayed together with the messages with code number 1000 and higher, like
1000-1.
No.
0
1
2
3
4
5
6
7
8
9
10
11
12
13
14
15
16
17
18
101
102
Message
DB access error.
No user found.
No user rights
Failed to add the user.
Failed to delete the user.
Failed to update the user information.
Wrong user id
Wrong password
Failed to add the user rights.
Number of users were exceeded.
No update time for the user
Failed to register the search information.
The same search name has already existed.
No search information
Failed to change the search information.
Failed to delete the search information.
Illegal group information.
Reached to the maximum capacity of the User Contents Search.
No User Contents Search
No video exists
No right to access the video
84
Error Messages (continued)
No.
103
104
105
106
107
108
109
110
111
112
113
114
115
116
117
118
119
120
121
122
123
124
125
126
127
128
129
130
131
132
133
134
135
136
137
138
139
140
141
142
143
144
145
146
147
148
149
150
151
152
153
154
155
156
157
158
159
160
161
162
Message
Failed to add the video.
No registered drive found
Failed to register the attached file
The video has existed.
Failed to add the bookmark.
Failed to register the file information.
The file information has existed.
Failed to register the officer.
Failed to register the event
GPIO has existed.
Failed to register GPIO
Reached to the maximum capacity of officer information.
Failed to delete the video.
Failed to modify the attached file.
No attached file exists.
Failed to modify the bookmark.
No bookmark exists
Failed to modify the video information.
Failed to modify the file information.
No file information exists.
Failed to modify the officer information
No Officer information exists.
Failed to modify the event information.
No event information exists.
Failed to modify the GPIO information.
No GPIO information exists.
Failed to transfer the file.
Failed to create the file path on the server, or no path exists.
The file has existed.
Failed to create the file on the server.
No file exists.
Failed to modify the right.
Failed to delete the actual data.
The registration number of attached file is exceeded.
Invalid video
Locked.
No lock by your own.
Failed to add the drive.
Failed to add the case file.
Failed to set to link the contents.
Failed to modify the drive.
Failed to modify the case file.
Failed to do multiple operation.
No rights to modify the evidence rule.
Failed to add the evidence rule.
Failed to search the evidence rule.
Illegal contents information
Failed to delete the evidence rule.
Failed to update the contents information by the evidence rule.
Locked the contents.
Failed to unlock the contents.
This status of the contents can not move(restore) archive
An error occurred when adding the information
An error occurred when adding the information
An error occurred when adding the information
An error occurred when deleting the information
An error occurred when deleting the information
An error occurred when deleting the preset information
An error occurred when changing the information
An error occurred when changing the information
85
Error Messages (continued)
No.
163
201
202
203
204
205
206
207
301
302
303
304
305
306
307
308
309
501
502
503
504
505
506
507
508
509
510
511
512
513
514
515
516
517
518
519
520
601
602
603
604
701
702
703
704
705
706
707
708
709
710
711
712
713
714
715
716
717
718
719
Message
An error occurred when changing the information
No case file exists.
No right to operate the case file.
The registration number of case file reached to the maximum.
Failed to add the case file.
Failed to modify the case file.
Failed to delete the case file. The case file has been assigned to the video.
Failed to delete the case file.
No group exists.
No right to operate the group.
Failed to add the group.
Failed to delete the group.
Failed to add the rights.
Failed to modify the group information.
Failed to add the group.
The registration number of group is exceeded.
Failed to update the group information.
No setting information exists.
No rights to set up
Failed to add the drive setting.
Failed to add the drive log setting.
The drive setting has been registered.
Failed to delete the drive setting.
Failed to valid the drive setting.
Failed to modify the drive setting.
Failed to register the server network setting.
Failed to register the schedule setting.
Failed to modify the Server network setting.
Failed to modify the schedule setting.
Number of the drive setting items is exceeded.
Failed to search the logical drive.
Failed to set up the password.
Failed to set up the system configuration.
Failed to delete the drive due to the assigned drive by the evidence rule.
Failed to search the drive.
Failed to add the IP address.
This database is used by else BES
No logs exist.
No rights exist.
Failed to add the log.
Failed to delete the log
No machine setting information exist.
No rights exist.
Failed to register the machine information.
Failed to register the machine group information.
Failed to register the software.
Failed to register the released software.
Failed to register the installation.
Failed to modify the machine information.
Failed to modify the machine group.
Failed to modify the software.
Failed to modify the released software.
Failed to modify the installation.
Released software has existed.
No software information exists.
No machine setting group exists.
No released software exists.
The officer has existed.
The software has existed.
The install information has existed.
86
Error Messages (continued)
No.
720
721
722
723
724
725
726
727
728
729
801
802
900
901
902
903
904
905
906
907
908
909
910
911
1000
2601
2627
3000
3001
3002
3003
5000
5001
5002
6000
6001
6002
6003
6004
6005
6006
6007
6008
—
Message
No update module exists
No update module path exists in DB.
Failed to locate the update module
The install information has existed.
Failed to delete the machine.
Failed to delete the machine group.
Failed to delete the machine software.
Failed to delete the machine release file.
Failed to delete the machine release software.
Failed to delete the installed machine.
No free field exists.
Failed to set the free field.
No Classify exists.
No right to operate Classify
Failed to add Classify.
The registration number of Classify reached to the maximum.
Failed to delete Classify.
Failed to modify Classify.
Failed to add Classify patterns.
Failed to delete Classify patterns.
Failed to modify Classify patterns.
No Classify patterns exist.
Failed to modify Classify due to linking to the machine.
Failed to modify Classify due to linking to the group.
A limit is exaggerated
This item already existed in DB
This item already existed in DB
Failed to connect.
Time out
Stopped the process.
Failed to transfer
Illegal query
Exceptional error on DB Server.
Illegal connection to DB
No support
Unknown error on Server.
Illegal parameter
Invalid request
No file was found.
Invalid file path
Illegal file
Failed to get the PC information on network.
No rights to get the network path.
Unknown Server Error
87
Software License Agreement
This product is licensed under the AVC Patent Portfolio
License for the personal and noncommercial use of a
consumer, and no license is granted or shall be implied
for any use other than the personal uses detailed
below.
THE SOFTWARE IS PROVIDED "AS IS", WITHOUT
WARRANTY OF ANY KIND, EXPRESS OR
IMPLIED, INCLUDING BUT NOT LIMITED TO
THE WARRANTIES OF MERCHANTABILITY,
FITNESS FOR A PARTICULAR PURPOSE AND
NONINFRINGEMENT. IN NO EVENT SHALL THE
AUTHORS OR COPYRIGHT HOLDERS BE LIABLE
FOR ANY CLAIM, DAMAGES OR OTHER LIABILITY,
WHETHER IN AN ACTION OF CONTRACT, TORT
OR OTHERWISE, ARISING FROM, OUT OF OR IN
CONNECTION WITH THE SOFTWARE OR THE USE
OR OTHER DEALINGS IN THE SOFTWARE.
- To encode video in compliance with the AVC standard
(“AVC Video”)
- To decode AVC Video that was encoded by a consumer
engaged in a personal and noncommercial activity
- To decode AVC Video that was obtained from a video
provider licensed to provide AVC Video
Additional information may be obtained from MPEG LA,
LLC (http://www.mpegla.com).
- Separate license contracts must be obtained from
MPEG LA where SD Memory Cards containing
information recorded with this product are to be
distributed to end users for commercial purposes.
"End user" refers to persons or organizations handling
such contents for personal use.
This product is licensed under the MPEG-4 Visual
patent portfolio license for the personal and
noncommercial use of a consumer for (i) encoding
video in compliance with the MPEG-4 Visual Standard
(“MPEG-4 Video”) and/or (ii) decoding MPEG-4
Video that was encoded by a consumer engaged in
a personal and non-commercial activity and/or was
obtained from a video provider licensed by MPEG LA to
provide MPEG-4 Video. No license is granted or shall
be implied for any other use. Additional information
including that relating to promotional, internal and
commercial uses and licensing may be obtained from
MPEG LA, LLC.
See http://www.mpegla.com/
Portions utilize Microsoft Windows Media Technologies.
Copyright (c)2006 Microsoft Corporation. All Rights
Reserved.
Included with this product is software licensed under
the MIT License.
Copyright (c) 1998, 1999, 2000 Thai Open Source
Software Center Ltd
and Clark Cooper
Copyright (c) 2001, 2002, 2003, 2004, 2005, 2006
Expat maintainers.
Permission is hereby granted, free of charge, to
any person obtaining a copy of this software and
associated documentation files (the "Software"), to
deal in the Software without restriction, including
without limitation the rights to use, copy, modify, merge,
publish, distribute, sublicense, and/or sell copies of the
Software, and to permit persons to whom the Software
is furnished to do so, subject to the following conditions:
The above copyright notice and this permission notice
shall be included in all copies or substantial portions of
the Software.
88
Panasonic Computer Solutions Company
50 Meadowlands Parkway, Panazip 2F-5,
Secaucus, NJ 07094
©
2009
P