1
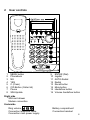
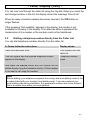
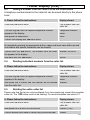
Speakerphone with SIM Card Reader TP68
User guide
1 General Information ................................ 4
2 User controls ........................................... 6
3 Setting up ................................................. 7
3.1
3.2
3.3
3.4
3.5
3.6
3.7
3.8
3.9
3.10
3.11
3.12
3.13
3.14
General Information................................................................................... 7
Check contents of pack ............................................................................. 7
Connecting the handset............................................................................. 7
Insert batteries........................................................................................... 7
Connect Mains Power Supply.................................................................... 8
Connecting the telephone cable ................................................................ 8
Fitting the desk support ............................................................................. 8
Wall mounting............................................................................................ 8
Modem Connection ................................................................................... 9
Recall setup............................................................................................... 9
Setting the Time / Date.............................................................................. 9
Entering your local area code .................................................................. 10
Access Number for International Numbers .............................................. 11
Outside Line Code on a PBX (business users only) ................................ 12
4 Operation................................................ 13
4.1
4.2
4.3
4.4
4.5
4.6
4.7
4.8
4.9
Making a call using the handset or handsfree feature ............................. 13
Dialling from the Phone Book .................................................................. 14
Receiving Calls........................................................................................ 14
Selecting different telephone network providers ...................................... 14
Muting...................................................................................................... 15
Adjustable Ringer Volume ....................................................................... 15
Redial ...................................................................................................... 16
Automatic Redial ..................................................................................... 16
Storing numbers in the Phone Book ........................................................ 17
4.9.1
Changing stored telephone numbers or names ........................ 18
4.9.2
Deleting a number in the phone book........................................ 19
4.10 Use of your mobile phones SIM card....................................................... 19
4.10.1 Synchronising the phone book in your GSM mobile phone
with the internal phone book (Update)....................................... 19
4.10.2 Copying the phone book from GSM mobile phones to the
internal phone book and vice versa........................................... 20
5 Caller Number Display (CID)................. 22
5.1
5.2
5.3
5.4
Viewing the Caller List ............................................................................. 22
Dialling a telephone number directly from the Caller List......................... 23
Saving a number from the Caller List to the Phone Book ........................ 24
Deleting individual numbers from the caller list........................................ 24
2
5.5
Deleting the entire caller list .....................................................................24
6 The Recall Button .................................25
6.1
6.2
6.3
Recall button on a PBX ............................................................................25
Recall button for network services............................................................25
Storing Telephone numbers on a PBX .....................................................25
7 Other Settings ........................................26
7.1
7.2
7.3
Adjusting Display Contrast .......................................................................26
Set Clock Display Format .........................................................................26
Entering Access Numbers for different Telephone Network Providers.....27
8 Important information............................28
8.1
8.2
8.3
8.4
8.5
Troubleshooting........................................................................................28
Hearing aid compatible.............................................................................28
Cleaning and care ....................................................................................28
Temperature and ambient conditions .......................................................28
Warranty...................................................................................................29
3
- General Information 1
General Information
Quick connection information
To enjoy the many benefits this phone has to offer we recommend that you
carefully read this user guide to fully understand how to get the best from this
product.
Before installing or changing the battery, make sure that the telephone is not
connected to the telephone network.
First install the batteries supplied, connect the curly cord to the phone and the
handset. Connect the line cord to the bottom of the phone and then to the wall
socket using the plug supplied. Lift the handset and check for dial tone.
CAUTION
●
●
●
●
●
●
Avoid exposure of this telephone to moisture or liquid.
To prevent electric shock, do not open the handset or base cabinet.
There is a slight chance that the telephone could be damaged by an
electrical storm. It is recommended that users unplug the phone from the
mains supply and telephone socket during a storm.
Follow the local regulations regarding the disposal of your packing
materials, exhausted batteries and used phone. Wherever possible,
recycle those materials.
Clean with a dry, soft, lint-free cloth. Never use cleaning agents, particularly
aggressive solvents.
Do not use your telephone during an electrical storm thunderstorm as it is
possible to get an electric shock. Refer to information contained in Telstra
White pages directory.
CAUTION
Use only the mains adaptor supplied with this telephone. Incorrect adaptor
polarity or voltage can seriously damage the unit.
Adaptor Model No.: 9vDC150
Input: 240 VAC 50 Hz
4
- General Information Output: 9 VDC 150 mA
Notes for operation in New Zealand
The grant of a Telepermit for any item of terminal equipment indicates only that
Telecom has accepted that the item complies with the minimum conditions for
connection to its network. It indicates no endorsement of the product by
Telecom, nor does it provide any sort of warranty. Above all, it provides no
assurance that any item will work correctly in all respects with another item of
Telepermitted equipment of a different make or model, nor does it imply that
any product is compatible with all of Telecom’s network services. This device
may be subject to ringing or bell tinkle when certain other devices are
connected to the same line. If this occurs, the problem should not be referred to
the Telecom Faults service. This equipment shall not be set to make automatic
calls to the Telecom “111” Emergency Service. This equipment may not provide
for the effective hand-over of a call to another device connected to the same
line.
REN (RN for New Zealand)
The REN (Ringer Equivalence Number) or (RN) is of significance only if you
wish to connect more than 1 telephone to your telephone line. A standard
telephone line has a maximum REN capacity of 3 (RN of 5). It is possible to
connect 3(5) devices with a REN of 1 (RN of 1) with no degradation to the
product’s performance. Exceeding this limit may cause the volume of the ringer
in any phone to decrease or not ring at all.
Caller ID
Customers using non Telecom toll services should not use the dial back feature
for local calls as this will incur a charge only the 7 digit number should be dialled.
Some of the CID services listed may not be available in New Zealand.
Customers Using Another Company’s Toll Service
Some customers use another company’s toll service and have their line setup
so that their chosen carries access code is automatically inserted by the
Telecom exchange. If you use such a service, your local calls will also be
passed to the other carrier and should you dial automatically from the caller
display memory a toll charge may be incurred.
If you recognize the telephone number on the list as a local non-cellular
number, then manually dial the 7-digit telephone number without the area code
digit. This will avoid the incurring of a toll charge for a local number
5
2
User controls
1
2
3
4
5
6
7
8
MENU button
Phonebook
NO
YES
C (Clear)
CID Button (Caller list)
Pause
SIM-Update
9
10
11
12
13
14
15
16
ENTER (Dial)
Jogdial
AUTO-Redial
Redial
Recall button
Mute button
Handsfree button
Volume handsfree button
Right side
SIM-card drawer
Modem connection
Underside
Ring volume
Connection telephone cable
Connection main power supply
Battery compartment
Connection handset
6
- Setting up 3
Setting up
3.1
General Information
NOTE! Before setting up, it is essential that you read the General Information
at the beginning of this operating manual.
3.2
Check contents of pack
The following items are supplied:
one telephone
one user guide
one curly cord
one power supply
one telephone line cord
one handset
one desk stand
four batteries Type AAA 1.5V
3.3
Connecting the handset
After unpacking your telephone, you must first connect the telephone handset to
the base unit. First take the short end of the curly cord and plug it into the
socket on the handset. Turn the telephone base over and plug the long end into
the socket marked with a handset
symbol located on the right hand side.
Feed the cable through the cable channel.
3.4
Insert batteries
Fit the batteries (supplied) before connecting your telephone to the telephone
network. The battery is required for the display, handsfree and other functions
of the telephone.
1.
2.
3.
4.
5.
Make sure that the telephone is not connected to the telephone network.
Locate the battery compartment on the underside of your telephone.
Open the battery compartment with a pen tip or a pointed object.
Insert the batteries, ensuring that the polarity is correct.
Close the battery compartment.
The battery must be changed when the display shows
.
Do not use rechargeable batteries, as these could possibly lead to a short
circuit. When replacing the battery use only AAA 1.5V alkaline batteries. Do not
throw batteries into fire or immerse in water. Do not dispose of old or faulty
batteries with the normal household waste.
7
- Setting up 3.5
Connect Mains Power Supply
In order to enjoy maximum performance and convenience, you must use the
mains power supply provided. The batteries should always be installed, even
when using the mains power supply, to protect against power cuts. Connect the
main power supply to the power socket and the jack marked DC 9V on the
underside of the telephone.
Note: In the event of power cut the batteries will maintain full operation for a few
days.
3.6
Connecting the telephone cable
Connect the telephone cable supplied to the telephone wall socket and to the socket
marked with a
symbol on the base of the phone. Then feed the cable out of the
telephone housing either upwards or downwards through the cable guide. Clip the
cable firmly in the cable channel.
3.7
Fitting the desk support
If you intend to use your telephone on a desk, then the desk support supplied must be
fitted. To do this, turn the telephone over. Now insert the two upper hooks into the
openings provided and push the desk support firmly home.
If you ever need to remove the support, press gently on the middle clips on the upper
edge and then pull the desk support off.
In the handset rest there is a small hanging device, which is used when the telephone
is wall mounted. This hanging device is not required when the telephone is used on a
desk, as it impedes lifting of the handset. Using a small screwdriver, turn this hanging
device until the screw is completely flush and its upper end does not protrude at all.
3.8
Wall mounting
Your telephone is also suitable for wall mounting. Use two screws for fixing. Drill two
holes horizontally side by side, 70mm apart, and leave the screws protruding from the
wall by 5mm. Now place the telephone over the screws and push it slightly downwards.
There is a small hanging device in the handset rest to prevent the handset from falling
when it is placed on the rest with the telephone mounted on the wall. Using a small
screwdriver, turn this hanging device until a small hook appears at the upper end.
If you are using the telephone fitted to the wall, you can hang the handset on the
telephone without hanging up. You will find a small hook for this purpose at the upper
end of the handset rest.
8
- Setting up 3.9
Modem Connection
The telephone has a “MODEM” socket for connection of a modem or fax
machine on the right side of the unit. Please note that this connection uses the
same telephone line as the telephone itself. The connected device cannot be
used at the same time as the telephone.
3.10
Recall setup
You can use the Recall button on your telephone when using your network
operator’s services such as call waiting etc. A subscription may apply for these
services, contact your network operator more information. If this is not working
correctly check the setting of the Recall timing inside the Settings Menu. Refer
to chapter 6 for viewing and changing the Recall setting. In Australia it should
be set at 100ms and for New Zealand it should be set at 600ms for use on a
normal telephone line.
3.11
Setting the Time / Date
If you want to reset the current time and date or change a value already entered,
proceed as follows:
th
Note: All entries must be made as two digits. If you want to enter the date 8 of
October, press the numbers 08 for the day and 10 for the month.
PLEASE FOLLOW THE INSTRUCTIONS:
Press the MENU button.
Turn the Jog dial until the “Settings” message appears in
the display.
Now press the YES button twice.
Now enter the current day, the month, the hour and the
minutes one after the other using the keypad.
Display shows:
Add entry
Settings
Date and time. The first
figure of the date
flashes.
If you want to set the
th
24 October and the
time 15.05, enter the
numbers “24 10 15 05”
using the keypad.
The date and time are saved by pressing the YES
button.
To exit programming mode, press the NO button twice.
9
- Setting up 3.12
Entering your local area code
Telephone numbers must always be stored in mobile phones with the dialling
code. If these numbers are then transferred to your telephone via the SIM card,
the dialling code can of course be omitted when making local calls. For this
purpose the telephone must know your local dialling code.
A. Please follow the instructions:
Display shows:
Press the MENU button once.
Add entry
Turn the Jog dial as far as the “Settings” message
Settings
Confirm with YES.
Clock
Turn the Jog dial until the “City code” message appears in
the display.
City code
Confirm with YES.
Note: A local dialling code already entered will not be
shown in the display.
Number:
Now enter your own local dialling code without the zero.
e.g. 2
Confirm with YES.
Stored =>
City code
To exit programming mode, press the NO button twice.
10
- Setting up 3.13
Access Number for International Numbers
For international numbers, the TP68 automatically replaces the “+” sign with the
IDD access number used in your country. Program this code by following the
instructions below.
A. Please follow the instructions:
Display shows:
Press the MENU button once.
Add entry
Turn the Jog dial as far as the “Settings” message
Settings
Confirm with YES.
Clock
Turn the Jog dial until the “IDD Prefix” message appears
in the display.
IDD Prefix
Confirm with YES.
Note: The IDD dialling code already entered will not be
shown in the display.
Number:
Now enter your own IDD dialling code 0011 when used in
Australia or 00 when used in New Zealand
e.g. 0011
Confirm with YES.
Stored =>
PBX Prefix
To exit programming mode, press the NO button twice.
11
- Setting up 3.14
Outside Line Code on a PBX (business users only)
If you have connected your telephone to a PBX, you may need to dial a
particular number (e.g. “9” or “0”) in order to get dial tone for an outside line. If
you have transferred the telephone numbers from your SIM card to your
telephone, these telephone numbers will be automatically prefixed by the
outside line code when dialling. To enable this you must program the outside
line code necessary for your PBX.
A. Please follow the instructions:
Display shows:
Press the MENU button once.
Add entry
Turn the Jog dial until the “Settings” message appears in
the display
Settings
Confirm with YES.
Clock
Turn the Jog dial until the “PBX prefix” message appears
in the display.
PBX prefix
Confirm with YES.
Note: codes already entered will not be shown in the
display.
Number:
e.g. “0”
Now enter your own outside line code.
Confirm with YES.
To exit programming mode, press the NO button twice.
Stored – PBX prefix
Note: If you want to delete an outside line code already stored, do not enter
a number when programming and confirm the blank display.
12
- Operation 4
Operation
4.1
Making a call using the handset or handsfree feature
You have three ways of making a call:
A. Please follow the instructions:
Display shows:
Lift the handset.
Now dial
number.
the
"ON LINE"
required
telephone
The number dialled; after 10 seconds
the duration of the call.
If you want to change from the handset to the handsfree feature, press the
button and replace the handset.
B. Please follow the instructions:
Display shows:
Dial the required telephone number.
With this method of entry, you can first
check the telephone number and
change it if necessary. Use the Jog dial
and the C button to do this..
Number to be dialled.
Press the ENTER button.
"ON LINE" and the number dialled; after
10 seconds the duration of the call.
After the number has been dialled, the telephone switches immediately
to the handsfree facility. To end the call, press the
button.
By lifting the handset, the call can be continued via the handset.
C. Please follow the instructions:
Display shows:
Press the
"ON LINE"
button.
Dial the required number.
The number dialled; after 10 seconds
the duration of the call.
If the other party answers their voice will be heard over the in-built loudspeaker.
The volume can be adjusted using the two buttons VOL
+“ and
- on
your telephone. If you want to change from the handsfree facility to the handset,
simply lift the handset.
13
- Operation 4.2
Dialling from the Phone Book
A. Please follow the instructions:
Press the
button.
Display shows:
Name:
Press the buttons with the appropriate
letters to select the number
alphabetically and/or search for the right
number using the Jog dial.
Stored phone number with name.
Press the ENTER button to call the
selected number.
"ON LINE“ and the number dialled.
When the other party answers, you can speak using the handsfree facility or by lifting
the handset. If the other party does not answer, hang up by using the
button.
Note: Chapter 4.9 explains how to store telephone numbers in the phone book.
4.3
Receiving Calls
As soon as you receive a call, the caller’s number appears in the display.
Further information on caller display is given in Chapter 5 “Caller number
Display” (CID).
The call can now be accepted using the handset or the handsfree facility. Lift
the handset or use the handsfree facility by pressing the handsfree button
To end the call, replace the handset or press the handsfree button
.
4.4
Selecting different telephone network providers
With your telephone you can make calling by way of the private telephone
network providers considerably easier. You can store 3 different Call-By-Call
numbers to these private telephone network providers in your telephone. When
making calls using the phone book you can then choose which provider you
wish to use to make the call. You will find out how to enter the Call-By-Call
numbers in Chapter 7.4.
14
.
- Operation A. Please follow the instructions:
Display shows:
Press the ENTER button.
Call-by-call Nr:
Now press one of the previously
entered access numbers by pressing
the numbers 1, 2 or 3.
Selected call-by-call number.
Confirm the selection with YES.
Now press the buttons with the
appropriate letters to select the number
from the phone book and/or search for
the right number using the Jog dial.
Stored phone number with name.
Press the ENTER button to call the
selected number.
"ON LINE“ and the selected access
number and telephone number.
4.5
Muting
When on a call you can talk to someone in the same room without the caller
hearing you. The loudspeaker remains switched on and you can continue to
hear the other party. You can use the mute button during a call both with the
handset and with the handsfree facility.
To mute the microphone, press the MUTE button once during the call.
The red indicator light in the button will turn on.
To switch the microphone on again, press the MUTE button once more.
The indicator light will go out and you will be able to continue your call
as normal.
4.6
Adjustable Ringer Volume
You can use the “RING” slide switch underneath the telephone to select the
settings
(soft) or
(loud) to adapt the ringer volume to your requirements.
If you ever do not want to be disturbed, use the
(off) position.
15
- Operation 4.7
Redial
If a connection that you have dialled is engaged or you were unable to get
through to anybody, simply replace the receiver. The last number dialled will be
saved in the telephone automatically. The last three numbers dialled remain
stored in the telephone. To call one of the last three numbers dialled, proceed
as follows:
Select one of the last three numbers by repeatedly pressing the
button.
Press the ENTER button. After the number has been dialled, the telephone switches
immediately to the handsfree facility. By lifting the handset, the call can be continued
via the handset.
You can also delete a particular number from the redial memory. Select the
required telephone number with the handset on the hook by using the
button and press the C button.
4.8
Automatic Redial
The automatic redial is a useful aid to make telephoning easier for you. If a
number is engaged, the number will be repeated automatically up to ten times.
Attempt to call to the required party.
If the line is engaged, press the AUTObutton. The display shows ”Pls Hang
Up”. Replace the handset on cradle. The display shows “Auto redial”. The LED next to
the handsfree button flashes.
If you made the call using the handsfree facility, the call is ended automatically.
Now, after about 30 seconds your telephone will try to call the number again. The
handsfree facility is switched on and the number is dialled. If the number is still
engaged, the handsfree facility automatically switches itself off again after a short time
and your telephone waits for a further 30 seconds before another attempt is made.
If the call is answered, you can press
button to carry out the call using the
handsfree facility. By lifting the handset, the call can be continued via the handset.
Note: By lifting and replacing the handset once, the automatic redial is automatically
cancelled.
16
- Operation 4.9
Storing numbers in the Phone Book
Using your telephone, you can store 150 telephone numbers, each with 20
digits, in the phone book. In addition, a name can be stored with each telephone
number, each name having 16 letters.
A. Please follow the instructions:
Press the MENU button.
Display shows:
" Add entry "
Confirm with the YES button.
Name:
Before saving the telephone number, first enter the name. The numbers are also
inscribed with letters for entering the name. By repeatedly pressing the appropriate
button, upper and lower case letters as well as numbers and special characters
can be entered.
Example: You wish to enter the name “Peter”.
Press: 1 x button 7, 5 x button 3, 4 x button 8, 5 x button 3, 7 x button 7
To enter a space, turn the Jog dial to the right. To enter the same letter twice,
press the appropriate letter and then turn the Jog dial to the right before entering
the second letter. To correct a mistake, move the cursor to the required position by
turning the Jog dial and change the entry. You can delete the selected letter
(cursor flashes) with the C button. The special characters (. , ? ! - &) can be
entered using the "1" and "*" buttons.
Confirm with the YES button.
Number:
Enter the complete telephone number. You can delete
numbers again using the C button (cursor flashes).
In order to be able to use numbers later in your mobile
phone, always enter the country code (+61 for Australia &
+64 for New Zealand) and the local dialling code without
Number dialled
e.g. 1234 56789
the zero. To get the “+“ sign, press and hold the
button
for one second. To delete the “+” sign, press the
button again for one second.
Confirm with the YES button.
Stored
After a few seconds, the display shows “Add entry”
Add entry
To enter more numbers, press the YES button and start
again by entering the name
Name:
Exit the menu with the NO button.
17
- Operation The phone will automatically prevent your own local dial code being dialled
along with the number. For more information, see Chapter 3.12. If you have
also entered the numbers with your own country code, this will be recognised by
the telephone and the country code will not be dialled. With international calls,
your telephone automatically replaces the “+” sign with the IDD code you have
programmed in to the phone. For more information, see Chapter 3.13
4.9.1
Changing stored telephone numbers or names
Stored telephone numbers can be changed at any time. Please proceed as
follows:
A. Please follow the instructions:
Display shows:
Press the
Name:
button once.
Press the appropriate initial letter on the keypad or use
the Jog dial to select the telephone numbers.
Telephone number
with name.
Confirm with the YES button.
Edit
Confirm with the YES button.
Selected name
Now enter the new name. By repeatedly pressing the C
button, you can delete the name letter by letter.
Alternatively, use the Jog dial to make changes within the
name.
Confirm with the YES button.
Telephone number.
Now enter the new number. By repeatedly pressing the C
button, you can delete the individual digits. Alternatively,
use the Jog dial to make changes within the number.
The changes are saved by pressing the YES button
Stored – Name:
Now select another number for changing if required or exit
the menu with the NO button.
18
- Operation 4.9.2
Deleting a number in the phone book
A. Please follow the instructions:
Display shows:
Press the
Name:
button once.
Press the appropriate initial letter on the keypad or use
the Jog dial to select the telephone number.
Telephone number
with name.
Confirm with the YES button.
Edit
Now turn the Jog dial once to the right.
Erase
Confirm with the YES button.
Confirm (Y/N)
Now press YES to delete the entry or cancel
the process with NO.
“Erased” with yes
Erase with no
Exit the menu with the NO button.
4.10
Use of your mobile phones SIM card
With your telephone you can copy the telephone numbers stored in the phone
book of your GSM mobile phone into the phone book of your telephone. You
can keep both phone books the same level using the "Synchronisation" function.
The telephone book contains 150 memory locations.
WARNING! When you want to transfer the telephone numbers in your mobile
phone to the telephone for the first time or vice versa, please always use
synchronisation (item 4.10,1) so that the numbers already stored both in the
mobile phone and in the telephone are not lost. If you should ever change your
SIM card at a later date (e.g. change of provider), do not use synchronisation
the first time but copy the data as described under item 4.10.2 instead. After
this you can use synchronisation again for realignment.
Please handle the SIM card carefully and do not touch the contact surfaces.
Always place the card in the drawer with the contact surfaces uppermost. The
card is slightly bevelled at the bottom right so that it cannot be inserted
incorrectly.
4.10.1
Synchronising the phone book in your GSM mobile phone with the
internal phone book (Update)
Please use synchronisation function to keep both phone books the same at all
times. Numbers, which in the meantime have been stored either in the mobile
phone or in the telephone are thus copied from the mobile phone to the
telephone and vice versa.
19
- Operation A. Please follow the instructions:
Display shows:
Press the UPDATE button.
Insert card
Now open the compartment for the SIM card and insert
the card into the drawer.
Insert card
Now slide the drawer back into the telephone and press
the YES button.
Wait ... => Pin:_
Enter your mobile phone’s four-digit PIN code.
Synchronisation is now started immediately by pressing
YES. After synchronisation the display shows “done” and
you can remove the SIM card.
Pin: ****
Wait .... => done
rejected => Pin:_
If the PIN code was not entered correctly, you can enter
the PIN code again after a few seconds.
WARNING! Please note there are only three attempts
available. After this, your SIM card must be revalidated
with the “master PIN” (PUK). Refer to your GSM manual.
Note: If the message “Remove Card” appears in the display, remove the card from the
telephone and confirm with YES.
4.10.2
Copying the phone book from GSM mobile phones to the internal phone
book and vice versa
You will not normally need this function if you use synchronisation regularly.
Bear in mind that copying deletes the current phone book in the target device.
Copying should therefore only be used when you want to transfer the entire
phone book to the SIM card or vice versa. Two functions “Card to Phone” and
“Phone to Card” are available.
Example 1 for “Phone to Card”. You have a new mobile phone with a new SIM
card and want to transfer the entire phone book from your telephone to the SIM
card.
Example 2 for “Card to Phone”. You have not yet entered any telephone
numbers into your telephone’s phone book and want to transfer the entire
phone book from the SIM card to the telephone.
20
- Operation A. Please follow the instructions:
Press the MENU button.
Display shows:
Turn the Jog dial until the message “SIM Card Access”
appears in the display.
SIM Card Access
Confirm with YES.
Insert card
Now open the compartment for the SIM card and insert
the card into the holder.
Insert card
Now slide the cardholder back into the telephone and
press the YES button.
Wait ... => Pin:_
Enter your mobile phone’s four-digit PIN code.
Pin: ****
Confirm the PIN code with YES. If the PIN code was not
entered correctly, you can enter the PIN code again after
a few seconds.
WARNING! Please note that there are only three attempts
available. After this, the SIM card must be revalidated with
the “master PIN” (PUK).
Copy all
Press YES once more.
Now choose whether you want to copy the telephone
numbers from the telephone to the SIM card or from the
SIM card to the telephone by using the Jog dial.
Card to phone
Add entry
Card to phone
or
Phone to Card
Card to phone => Telephone numbers on the card are
copied to the telephone
Phone an Card => Telephone numbers in the telephone
are copied to the SIM card
Warning: No synchronisation takes place. Any existing
data is deleted when copying.
Confirm with the YES button.
Start copying with YES or cancel the function with NO.
Warning: When copying from the telephone to the SIM
card, an additional safety query is incorporated. Confirm
the message “Overwrite?” with YES.
Confirm (Y/N)?
The completion of the copying process is confirmed in the
display.
Done and then Copy all
Press NO and remove the SIM card.
Remove card
After removing, confirm with YES.
SIM Card Access
with yes: Wait
with no: Remove card
Wait…
Exit programming with the NO button.
21
- Caller Display (CID) 5
Caller Number Display (CID)
If you subscribe to your telephone network operators Caller ID service, numbers
of the incoming calls will be displayed on the display and stored in the call log. (
If you have stored this telephone number with a name in your phone book, the
name is also shown in addition to the number. All calls are saved in a caller list
with date and time so that you will not miss any calls. Up to 99 numbers are
saved in the caller list. When the list is full, the oldest number is always deleted
from the list.
If calls are registered during you will see in the display.
TOTAL: 34
NEW:05
This indication in the display shows that there is a total of 34 calls in the caller
list. There are 5 new calls in the caller list that have not yet been checked. In
addition, when there are new calls, the CID button flashes.
Warning! Caller display is an optional service (charges may apply) from your telephone
network operator. Please ask your telephone provider for further information. If this
service is not available, incoming callers numbers will not be shown in the display.
5.1
Viewing the Caller List
Press the CID button. The first storage location in the caller list appears in the display.
This is at the same time the last call received.
Name
Number
#001 --/-- --:--
NEW RPT
If the number is stored in the phone book, the appropriate name appears in the
first line. The telephone number can then be seen in the second line.
The first figure in the bottom row “#001” shows the storage location in the caller
list. After this comes the date and time of storing. If the symbol “NEW” appears,
then the call has not yet been checked in the list. The symbol “RPT” (Repeat)
tells you that this number has already called several times. The time and date of
the latest call is always displayed.
22
- Caller Display (CID) You can now look through the caller list using the Jog dial. When you reach the
last storage location in the list, the display shows the message “End of list”.
When all newly recorded numbers have been checked, the CID button no
longer flashes.
If the message “Not available” appears in the display, the number is not
available for showing in the display. The caller has either suppressed the
transmission of his number or the number could not be transferred.
5.2
Dialling a telephone number directly from the Caller List
You can dial telephone numbers directly from the caller list.
A. Please follow the instructions:
Display shows:
Press the CID button once.
First number from the
caller list
Turn the Jog dial until the required telephone number
appears in the display.
Telephone number /
name
Now press the ENTER button and the number will be
dialled directly using the handsfree facility. Lift the handset
if you want to call using the handset.
Note!
Before dialling, your telephone compares the country and local dialling codes of the
number dialled with your location (local dialling code). If you have entered your
local dialling code during installation, the appropriate numbers will not be dialled if
this is a number from within your local network.
23
- Caller Display (CID) 5.3
Saving a number from the Caller List to the Phone Book
A telephone number stored in the caller list can be saved directly to the phone
book.
A. Please follow the instructions:
Display shows:
Press the CID button once.
First number from the
caller list
Turn the Jog dial until the required telephone number
appears in the display.
Telephone number /
name
Now press the YES button.
Store
Confirm the display with YES once more.
_
Now enter the name. The numbers are inscribed with letters for entering the name.
By repeatedly pressing the appropriate button, upper and lower case letters as well
as numbers and special characters can be entered.
Confirm with the YES button. The number from the caller
list appears in the display.
Number: XXXXXX
Now save with the YES button.
Stored
5.4
Deleting individual numbers from the caller list
A. Please follow the instructions:
Display shows:
Press the CID button once.
First number from the
caller list
Turn the Jog dial until the required telephone number
appears in the display.
Telephone number /
name
Now press the C button and the number will be deleted
from the caller list.
Erased
5.5
Deleting the entire caller list
Please note that the list can only be deleted if you have previously viewed the complete
caller list. The CID button must not be flashing. For more information see section 5.1.
A. Please follow the instructions:
Display shows:
Press the CID button once.
First number from the
caller list
Now press the C button for one second.
Confirm (Y/N)?
Confirm deletion with YES or cancel the process with NO.
Erased
24
- R Signal Button 6
The Recall Button
You can use the Recall button on your telephone on a PBX and when using
your network operators services such as call waiting etc.
6.1
Recall button on a PBX
If you have connected your telephone to a PBX, you can use all the facilities
such as call transfer, automatic recall, etc. The RECALL button provides
access to these facilities. The recall time is selectable, (100ms or 600ms).
6.2
Recall button for network services
Your telephone supports your network operators services (eg. call waiting,
three-way conference, etc.).
Setting the Recall time
A. Please follow the instructions:
Display shows:
Press the MENU button once.
Add Entry
Turn the Jog dial until the “Settings” message appears in
the display
Settings
Confirm with YES.
Clock
Turn the Jog dial until the “Flash time” message appears
in the display.
Flash time
Confirm with YES.
Current flash time
Use the Jog dial to set the required flash time. 100ms for
Australia, 600ms for New Zealand
100 - 300- 600 ms
Confirm with YES.
Flash time
Press the NO button twice to exit programming
6.3
Storing Telephone numbers on a PBX
The pause function between the code for the outside line (usually 0 or 9) and
the dialling tone described in this chapter is only necessary on older private
exchanges.
With some private exchanges, there is a short pause between the code for the
outside line (usually 0 or 9) and the dialling tone. This pause can be entered
when dialling manually and when dialling from the phone book so that the
following numbers are not dialled too quickly.
25
7
Other Settings
Note: The DIAGNOSTICS item on the menu is intended for test purposes and should
only be used by a trained specialist.
7.1
Adjusting Display Contrast
To adjust the display to suit the local lighting conditions, please proceed as
follows:
A. Please follow the instructions:
Display shows:
Press the MENU button once.
Add Entry
Turn the Jog dial as far as the “settings” message.
Settings
Confirm with YES.
Clock
Turn the Jog dial as far as the “Contrast” message.
Contrast
Confirm with YES. (a digit 1-4 will be displayed)
1 to 4
Now select the desired contrast between 1 (light) and 4
(dark) using the Jog dial.
1 to 4
Confirm with YES.
Contrast
Press the NO button twice to exit programming
7.2
Set Clock Display Format
The clock can be set to 24-hour format (standard) or 12-hour format (AM/PM).
A. Please follow the instructions:
Display shows:
Press the MENU button once.
Add Entry
Turn the Jog dial as far as the “Settings” message.
Settings
Confirm with YES.
Clock
Turn the Jog dial as far as the “time format” message.
Time format
Confirm with YES.
Current setting
Now select the required format using the Jog dial
24 Hour - AM/PM
Confirm with YES.
Time format
Press the NO button twice to exit programming
26
7.3
Entering Access Numbers for different Telephone Network
Providers
With your telephone you can make calling by way of the private telephone
network providers considerably easier. You can store 3 different access
numbers to these private telephone network providers in your telephone. When
making calls using the phone book you can then choose which provider you
wish to use to make the call. You can find out how to call up the access
numbers before dialling in Chapter 4.4.
A. Please follow the instructions:
Display shows:
Press the MENU button once.
Add Entry
Turn the Jog dial until the “Settings” message appears in
the display
Settings
Confirm with YES.
Clock
Turn the Jog dial until the “Call-by-Call Nr.” message
appears in the display.
Call-by-Call Nr.
Confirm with YES.
Code 1:
Select one of the three memory locations “Code 1”, “Code
2” or “Code 3” using the Jog dial.
Code x:
Confirm with YES.
Number:
Now enter the required access number
e.g. 01013
Confirm with YES.
Stored=>
Call-by-Call Nr.
Now press YES to start further programming or press the
NO button twice to exit programming.
27
8
8.1
Important information
Troubleshooting
If you feel this product is not working correctly please consult the user guide and
ensure that you are using the product in accordance with the instructions.
Remove all extra telephone equipment and connect only this telephone directly to the
telephone socket.
If the fault is still present, connect another telephone (if available) to the telephone
socket. The results will show you whether the fault lies with this unit or with the
telephone line. If the product is working correctly the fault is on the telephone line.
Please contact your network operator for assistance
In the case of technical problems with this product please consult our website for
further information or send us an email for a prompt response to your enquiry.
8.2
Hearing aid compatible
The telephone has a special circuit working on the basis of induction for
transmitting speech to hearing aids. Please set your hearing aid to “T”.
8.3
Cleaning and care
The surface of the case can be cleaned with a dry, soft, lint-free cloth. Never use
cleaning agents, particularly aggressive solvents. Apart from occasional cleaning of the
case, no other care is necessary. The rubber feet of the base station are not resistant
to all cleaning agents. The telephone feet do not normally leave any marks on the
surface. However, on account of the multitude of varnishes and surface finishes used,
surface marks caused by the feet of the unit cannot be ruled out. The manufacturer
can therefore not be held responsible for possible damage to furniture or the like.
8.4
Temperature and ambient conditions
The telephone is designed for use in protected rooms with a temperature range
of 10 °C to 30 °C. The telephone must not be installed in damp rooms such as a
bathroom or laundry room. Avoid proximity to sources of heat such as radiators
and do not expose the unit to direct sunlight.
28
8.5
Warranty
This product is covered by a 12 month warranty against defective workmanship or
parts, effective from the date of purchase.
NOTE: The warranty does not extend to damage caused by misuse, negligence,
excessive voltage, faults on the telephone line or lightning. This guarantee in no
way affects your statutory rights. Full details of the warranty are contained in the
enclosed warranty card.
In the unlikely event of a fault during this period, please contact us for
assistance. If the product is then found to be faulty you will be asked to
return it directly to us with a copy of the purchase receipt.
Australia
New Zealand
Oricom International Pty Ltd
ABN 46 086 116 369
PO Box 5681
South Windsor, NSW 2756
Atlas Gentech (NZ) Limited
Private Bag 14927,
Panmure,
Auckland
Customer support
Email: [email protected]
Web: www.oricom.com.au
Fax: (02) 4572 0939
Ph: 1300 889 785
Customer support
Email: [email protected]
Web: www.atlasgentech.co.nz
Fax: (09) 574 2722
Ph: 0900 50 025 (Toll Call)
29