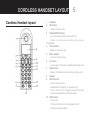
1
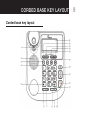
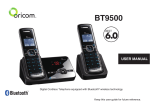
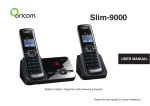
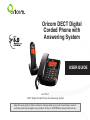
Oricom DECT Digital Corded Phone with Answering System USER GUIDE eco7100-1 DECT Digital Corded Phone with Answering System Keep this user guide for future reference. Always retain your proof of purchase in case of warranty service and register your product on line at: AUSTRALIA: www.oricom.com.au TABLE OF CONTENTS SAFETY INFORMATION 1 Getting Started 3 CORDLESS HANDSET LAYOUT 5 Cordless Handset LCD display 7 Corded base key layout 9 CORDED BASE LCD LAYOUT 11 CORDLESS HANDSET OPERATIONS 15 Using your phonebook 17 Using the call log 20 Using the redial list 21 SET CLOCK & ALARM 23 Advanced use of your telephone 25 USING THE INTERCOM/ MAKE CONFERENCE CALL 27 ANSWERING SYsTEM 28 CORDED BASE OPERATIONS 31 Answering system on the base 36 Customer Support 37 WARRANTY38 SAFETY INFORMATION IMPORTANT • Avoid exposure of this telephone to moisture or liquid. • T o prevent electric shock, do not open the handset or base cabinet. • A void metallic contact (e.g. metal clips, keys) between the battery contacts and charging conductors. • T here is a slight chance that the telephone could be damaged by an electrical storm. It is recommended that users unplug the phone from the mains supply and telephone socket during a storm. • Do not use the handset in an explosive hazard area such as where there is gas leaking. • Follow the local regulations regarding the disposal of your packing materials, exhausted batteries and used phone. Wherever possible, recycle those materials. • This phone should not be used near intensive care medical equipment. Persons with pacemakers should consult their Doctor or cardiologist before using this phone. 1 • Clean with a dry, soft, lint-free cloth. Never use cleaning agents, particularly aggressive solvents. • B ecause the phone works by sending radio signals between base station and handset, wearers of hearing aids may experience interference in the form of a humming noise. • Your phone can interfere with electrical equipment such as answering machines, TV and radio sets, clock radios and computers if placed too close. It is recommended that you position the base unit at least one metre from such appliances. • This telephone complies with applicable safety requirements for exposure to radio waves (EMR). The mean power of this telephone does not exceed 20mW limit at which point testing is required. • Privacy of communications may not be ensured when using this telephone. • The earpiece of the handset may attract small metal objects such as staples and pins. Care should be taken when placing the handset near these items. • T his telephone is not designed for making emergency telephone calls when the mains power fails. Always have a corded phone available to be able to make and receive calls to emergency services if the mains power fails. 2 SAFETY INFORMATION • Do not use your telephone during an electrical storm or thunderstorm as it is possible to get an electric shock. Refer to information contained in White pages directory. •This phone is designed for connection to a PSTN telephone line or an analogue extension port of a PBX system. If you connect this device to a digital extension of a PBX, damage may result to the PBX. CAUTION ! Use only the mains adaptors supplied with this product. Incorrect adaptor polarity or voltage can seriously damage the unit. Adaptor for base unit and charger: Base Unit power supply – Input: 100-240VAC 50/60Hz Output: 6V 0.5A Ext Charger power supply – Input 100-240VAC 50Hz Output: 6V 150mA Getting Started Read first before getting started Location The base unit needs to be placed within 2 metres of the mains power socket and telephone socket so that the cables can reach. 3 Mains power connection IMPORTANT - The base unit and charger pod must be used with the power adaptors that supplied with this product as using other power adaptors might damage the product. Battery safety The base unit should not be placed too close to other electrical equipment for avoidi interference. ONLY use the rechargeable batteries supplied with this product. Avoid exposure of the phone to moisture or liquid. DO NOT use non-rechargeable batteries - which might explode or damage the product. Avoid exposure of the phone to hot, humid conditions or strong sunlight. Radio signals between handset and base unit To use your handset and base unit together, you must be able to maintain a radio link between them. Be aware that any large metal objects, like a refrigerator, a mirror, filing cabinet etc, between the handset and the base unit may block the radio signal. Other solid structures, like walls, may reduce the signal strength. Interference If the sound quality gets worse as you move around while on a call, this is probably caused by interference between the handset and the base unit, perhaps because you are too near to another phone or other electrical equipment. Move to a different position to clear the interference. If you do not move, it might cause a short break or your call may be cut off. Remove the batteries if you do not plan to use the product for several months at a time ! CAUTION RISK OF EXPLOSION IF BATTERY IS REPLACED BY AN INCORRECT TYPE. DISPOSE OF USED BATTERIES ACCORDING TO THE INSTRUCTIONS. If you have a Broadband line If you connect your telephone to a line with a broadband connection, you will need to insert a micro-filter between the telephone and the telephone line; otherwise you may get interference between the telephone and the broadband, which could cause problems. 4 Getting Started In a home with broadband, every telephone must have a micro-filter connected, not just the one at the telephone point that your modem is connected to. If you need more broadband micro-filters, contact your broadband supplier. Packing contents The following items should be contained in the pack: • • • • • • • • 1 base unit (with corded handset) 1 cordless handset 1 charging cradle with power supply 1 power supply 1 line cord 2 rechargeable batteries (Ni-MH 1.2V 400mAh) 1 user guide 1 color brochure Note: If any of these are missing, please contact your supplier with purchase receipt. Battery installation 1)Remove the battery compartment cover and insert the AAA rechargeable batteries into the handset in accordance with the polarity that is marked inside the battery compartment. 2)Replace the battery compartment cover, sliding it into place, pressing firmly to make sure it is closed. Charging the batteries Before the handset is used for the first time, place it into the charging station for at least 14hours. The charging status is indicated in the handset display. CORDLESS HANDSET LAYOUT Cordless Handset layout 5 1Earpiece 2 OK button - Select a menu entry 3 NAVIGATION button - Up to increase volume and view CID -D o w n t o d e c r e a s e v o l u m e a n d a c c e s s Phonebook 4 TALK button - Make or Accept a call 5 Menu button - Access to main menu 6 [*] button -Long press to activate or deactivate the key lock 7 Mute button - Mute or Unmute the microphone during a call 8Display 9 BACK button - Cancel a menu entry - Backspace the digit (s) or character (s) -P ress and hold to toggle between handset name and date/time in standby mode 10 END button - End a call - Press and hold to turn the handset on/off - Exit the menu/operation 6 CORDLESS HANDSET LAYOUT 11 Redial button - Enter redial list to view the last dialed number 12 R (Recall) button 13 [#] button - Insert a pause. - Long press to turn the ringer on/off 14 INT button - Make the intercom call - Make the conference call 15Microphone PACK CONTENTS CORDLESS HANDSET LCD DISPLAY 7 Cordless Handset LCD display 1 Display icons 4 Display during the MENU mode 2Displays during the MENU mode to confirm the selection Press BACK to return to the pervious menu level. 3Indicates more options available Use Up/Down key to scroll up/down Press BACK to delete the last entered digit or character 8 CORDLESS HANDSET LCD DISPLAY Icon Definition Icon Name Description Battery Level Indication Indicates the battery charge level Call Indicates that an external call is connected or held. Icon blinks when receiving an incoming call. Message Indicates you have a new Voice Mail message. Caller display Indicates you have new missed calls, or the call log is being viewed. Phonebook Displays when the phonebook is accessed. Alarm Displays when the alarm clock is activated. Ringer Off Displays when ringer volume is turned off. Signal Level Tam Indicates that the handset is registered and within range of the base station. Icon blinks when the handset is out of range or is searching for a base. Slowly Blinking to indicate new TAM message(s) Fast blinking to indicate TAM is full Icon is not displayed when TAM is off CORDED BASE KEY LAYOUT Corded base key layout 9 10 1 CORDED BASE KEY LAYOUT Hook lock -fix the corded handset on the corded base while the corded base is hung against the wall 2Speaker 3 BACK button - Press to return to Standy mode 4 OK/ CLOCK button - Press to confirm all settings - Long press to set date and time 5 Key lock / * button -Long press to activate or deactivate the key lock on corded base 6 INT/PAGE button -Press to page the registered cordless handset -Press to initiate the intercom call -Press to make conference call 7 MUTE/CANCEL/DELETE button 8 R (Recall) button 9Microphone 10 Redial button -Press to enter Redial list and make a calling by pressing SPEAKER button or pick up the corded handset 11 Ring Off/ Pause/ # button - Long press to turn the ringer on/off - Insert a pause 12 Speaker button - Press to make or answer a call - Press to switch to speakerphone during a call 13 Volume button -Press to adjust the corded base ringer level in standby mode -P ress to adjust the corded base speaker / receiver volume during a call 14 Phonebook button - Press to enter Phonebook 15 CID up/ down button - Press up/ down button to view the call list 16 Play/ Stop button - Press to play message or stop playback 17 Annoucement button 18 MEMO button 19 Answer On/ Off button - Press to turn the answering system on or off 20Display CORDED BASE LCD LAYOUT 11 12 CORDED BASE LCD LAYOUT Icons Definition Icon Name Description Mute Indicates the mic is turned off Call Indicates that an external call is connected or held. Icon blinks when receiving an incoming call. Message Indicates you have a new Voice Mail message. Caller display Indicates you have new missed calls, or the call log is being viewed. Phonebook Displays when the phonebook is accessed. Key lock Displays when the key clock is activated. Speaker Displays when the speaker is activated. Ringer Off Displays when ringer volume is turned off. TAM Slowly Blinking to indicate new TAM message(s) Fast blinking to indicate TAM is full Icon won’t be displayed when TAM is off CORDED BASE LCD LAYOUT #88 88:88AM 88M/88D OR 88:88PM 88D/88M 13 Recorded number in Phonebook or CID list Indicates the recorded number for Phonebook or CID entry Digits on the right Displays when there is more digit(s) available on the right for displaying Digits on the left Displays when there is more digit(s) available on the left for displaying Time/ Date 1 2 3 4 Displays for Caller ID date/time while viewing CID list Displays for the actual time AM/ PM states for the time format “D”indicates for Date, “M”indicates for Month 14 COREDE BASE LCD LAYOUT Menu Tree Main Menu PHONEBOOK PERSONAL SET CLOCK & ALARM ADVANCED SET ANSW MACHINE Sub-menu 1 NEW ENTRY LIST EDIT ENTRY DELETE DELETE ALL DIRECT MEM HANDSET NAME HANDSET TONE LANGUAGE AUTO HANG-UP DATE/ TIME SET FORMAT ALARM ALARM TONE CHANGE PIN REGISTRATION UNREGISTER RESET AUTO PREFIX RECALL TIME FIRST RING PLAY DELETE ALL ANSW. ON/OFF RECORD OGM ANSWER MODE SETTINGS CORDLESS HANDSET OPERATIONS Cordless Handset Operations Switching ON/ OFF Press and hold the END button for more than 2 seconds to switch on/off the handset in standby mode. You can switch the handset off to save battery charge. Note: The handset cannot be used for Emergency calls when switched off. Also, it won’t ring during an incoming call. You need to switch it back on to answer a call, which might take some time for the handset to re-establish a radio link with the base unit. 15 Note: You won’t be able to erase and correct the entered digits in direct dialing mode. You can also call from Call log/Redial list/Phonebook Call from call log Press Navigation Up button in standby mode and select the desired entry by using Up/down button Press TALK button to make a call Note: You need subscribe to Caller Line identification service to view the caller’s number or name in the call log. Make a call You can input with maximum 24 digits. Call from Redial list Pre-dialing - Dial the number and then press TALK button. Press Redial button in standby mode and select the desired entry by using up/down button Press TALK button to make a call Note: You can press BACK button to erase the digits if you made an error. Direct dialing - Press TALK button first and then dial the number Call from Phonebook Press Phonebook button in standby mode and select the desired entry by using up/down button Press TALK button to make a call Answer and End a call Answer – Press TALK button to answer a call when the phone rings End – Press END button to end a conversation 16 CORDLESS HANDSET OPERATIONS Volume control During a call, you can increase/ decrease the earpiece volume by pressing Navigation up/down button Mute The Mute function allows you to turn off the microphone during a call, so that the caller can’t hear you. But, it won’t affect you hearing from the caller side. Press the Mute button to activate/ deactivate mute function Note: “MUTE ON” will be displayed on the handset screen when mute is activated Paging This feature enables you to locate the misplaced cordless handset when it is in range and with power on. Press INT/PAGE button on the base unit, all the registered handsets will start to ring. Press TALK button on any one of the registered handsets or press INT/PAGE button on the corded base again to stop paging To lock/ unlock the keypad Press and hold the key for about 2 seconds to lock/ unlock the keypad in standby mode. Note: Incoming calls can still be answered even when the keypad is locked. Call waiting If you have subscribed to Call Waiting service, the earpiece will emit a beep tone to inform you that there is a second incoming call. The number or name of the second caller will also be displayed on your phone if you have subscribed to Caller Line Identification service (CLI). Please contact your network provider for more information on this service. Using your phonebook Using your Phonebook You can store up to 30 phonebook memories with a maximum of 24 digits for the phone number and 12 characters for name for each entry. The stored entries will be listed in alphabetic order. Add an entry into Phonebook 17 View a Phonebook entry 1.Press Phonebook (Navigation down) button in standby mode to access Phonebook directly 2.Press Navigation Up/Down button to select a entry, then press OK button to confirm and the stored number will be displayed Or you can view by another way: 1.Press MENU button in standby mode and select PHONEBOOK with navigation up/down button 1.Press MENU button and select PHONEBOOK by using Navigation Up/Down button, press OK button to confirm 2.Press OK button to access PHONEBOOK and select NEW ENTRY 2.Press Up/Down button to select LIST and then press OK button to confirm 3.Press OK button to confirm your selection and handset will display ENTER NAME 3.Press Up/Down button to select a entry, then press OK button to confirm and the stored number will be displayed 4.E nter the name by pressing the corresponding numeric button and press OK button to confirm 5.Enter the contact number and then press OK to confirm. A confirmation beep will be emitted. Note: You can erase the entered content by pressing BACK button if you make an error. You can’t save a new entry when the memory is full. In that case, you will have to delete some existing entries to make space for the new one.. Edit a Phonebook entry 1.Press MENU button and select PHONEBOOK by using Navigation Up/Down button, press OK button to confirm 2.Press Up/Down button to select EDIT ENTRY and then press OK button to confirm 3.Press Up/Down button to select a entry, then press OK button to confirm 4.The current stored name will be displayed, edit the name and press OK button to confirm 5.The current stored name will be displayed, edit the number and press OK button to confirm 18 Using your phonebook Note: You can erase the entered content by pressing BACK button if you make an error.. Delete a Phonebook entry Long press the corresponding key in standby mode will automatically dial the stored number. Add a direct memory 1.Press MENU button and select PHONEBOOK by using Navigation Up/Down button, press OK button to confirm 1.Press MENU button and select PHONEBOOK by using Navigation Up/Down button, press OK button to confirm 2.Press Up/Down button to select DIRECT MEM. and then press OK button to confirm 2.Press Up/Down button to select DELETE and then press OK button to confirm 3.Press Up/Down button to select KEY 1 or KEY 2, press OK button to confirm 3.Press Up/Down button to select a entry, then press OK button to confirm 4.handset will display NO NUMBER, press MENU button to display EDIT NUMBER 4.Handset will display DELETE?, press OK button to confirm and a confirmation beep will be emitted. 5.Press OK button to display ENTER NAME and press OK again to confirm, enter name and save by pressing OK button Delete all Phonebook entries 6.ENTER NUMBER will be displayed and press OK to confirm, enter the number and save by pressing OK button 1.Press MENU button and select PHONEBOOK by using Navigation Up/Down button, press OK button to confirm 2.Press Up/Down button to select DELETE ALL and then press OK button to confirm 3.Handset will display DELETE?, press OK button to confirm and a confirmation beep will be emitted. Edit a direct memory 1.Press MENU button and select PHONEBOOK by using Navigation Up/Down button, press OK button to confirm Direct memory 2.Press Up/Down button to select DIRECT MEM. and then press OK button to confirm You can store 2 direct access memories (Key 1 & 2) in the Phonebook. 3.Press Up/ Down button to select KEY 1 or KEY 2, press OK button to confirm Using your phonebook 4.The current stored name will be displayed, press MENU button to display EDIT NUMBER 5.Press OK button to confirm, edit the name and press OK to confirm 6.The current stored number will be displayed, edit the number and press OK to confirm Delete a direct memory 1.Press MENU button and select PHONEBOOK by using Navigation Up/Down button, press OK button to confirm 2.Press Up/Down button to select DIRECT MEM. and then press OK button to confirm 3.Press Up/Down button to select KEY 1 or KEY 2, press OK button to confirm and the current stored name will be displayed 4.Press MENU button and select DELETE by using Up/Down button 5.Press OK button to confirm, DELETE? will be displayed and then press OK to confirm. A confirmation beep will be emitted. 19 20 USING THE CALL LOG Using the call log Delete a call log entry Caller ID enables you to see the your callers’ phone number on the handset display before you answer and also in your Call Log afterwards, but you have to subscribe to the Caller ID service first. Check with your telephone network service provider for more details if you need this service. 2.Press MENU button and select DELETE by using Up/Down button, press OK to confirm The last 20 external calls can be stored in the call log. View the Call Log 1.Press Call Log (Navigation Up button) in standby mode and press Up/Down button to browse the call list. 2.Press OK button to display more details of the call, including date and time. Save an entry into Phonebook from Call Log 1.Press Call Log (Navigation Up button) in standby mode and press Up/Down button to select an entry 2.Press MENU button and select SAVE NUMBER by using Up/Down button, press OK to confirm 3.Enter the name and press OK to confirm 1.Press Call Log (Navigation Up button) in standby mode and press Up/Down button to select an entry 3.H andset will display DELETE?, press OK to confirm and a confirmation beep will be emitted Delete all call log entries 1.Press Call Log (Navigation Up button) in standby mode 2.Press MENU button and select DELETE ALL by using Up/Down button, press OK to confirm 3.Handset will display DELETE?, press OK button to confirm and a confirmation beep will be emitted USING THE REDIAL LIST 21 Using the Redial list Delete all redial entries The last 5 dialed numbers will be stored in the Redial list. 2.Press MENU button and select DELETE ALL by using Up/Down button, press OK button to confirm View the Redial list 3.Handset will display DELETE?, press OK button to confirm and a confirmation beep will be emitted Press Redial button in standby mode and browse the redial list by using Up/Down button Save an entry into Phonebook from Redial list 1.Press Redial button in standby mode 2.Press Up/Down button to select an entry and press MENU button 3.Press Up/Down button to select SAVE NUMBER and press OK button to confirm 4.Enter the name and press OK button to confirm, SAVED will be displayed on the handset with a confirmation beep emitted Delete a redial entry 1.Press Redial button in standby mode 2.Press Up/Down button to select an entry and press MENU button 3.Press Up/Down button to select DELETE and press OK button to confirm 4.Handset will display DELETE?, press OK button to confirm and a confirmation beep will be emitted 1.Press Redial button in standby mode Change your handset name 1.Press MENU button in standby mode 2.Press Up/Down button to select PERSONAL SET and press OK button to confirm 3.Press Up/Down button to select HANDSET NAME and then press OK button to confirm 4.The current handset name will be display, press BACK button to erase the content 5.Enter the new name and press OK button to confirm Change your handset tone Set the ring volume There are 5 options for ringer volume: OFF, LEVEL 1, LEVEL 2, LEVEL 3, LEVEL 4. 1.Press MENU button in standby mode 2.Press Up/Down button to select PERSONAL SET and press OK button to confirm 3.Press Up/Down button to select HANDSET TONE and press OK button to confirm 22 USING THE REDIAL LIST 4.Press Up/Down button to select RING VOLUME and press OK button to confirm 5.Press Up/Down button to select ON or OFF and then press OK button to confirm 5.Press Up/Down button to select your desired volume and then press OK button to confirm Change the display language Set the ring melody 2.Press Up/Down button to select PERSONAL SET and press OK button to confirm There are 10 melodies available on your handset. 1.Press MENU button in standby mode 2.Press Up/Down button to select PERSONAL SET and press OK button to confirm 3.Press Up/Down button to select HANDSET TONE and press OK button to confirm 4.Press Up/Down button to select RING TONES and press OK button to confirm 5.Press Up/Down button to select your desired melody and then press OK button to confirm Activate/deactivate key tone The handset can be programmed to emit a tone with each key press. You can choose to activate or deactivate this feature. 1.Press MENU button in standby mode 2.Press Up/Down button to select PERSONAL SET and press OK button to confirm 3.Press Up/Down button to select HANDSET TONE and press OK button to confirm 4.Press Up/Down button to select KEY BEEP and press OK button to confirm 1.Press MENU button in standby mode 3.Press Up/Down button to select LANGUAGE and press OK button to confirm 4.Press Up/Down button to select your desired language and then press OK button to confirm Activate/deactivate auto hang-up This feature enables you to automatically end a call by simply placing the handset back to the charging cradle. 1.Press MENU button in standby mode 2.Press Up/Down button to select PERSONAL SET and press OK button to confirm 3.Press Up/Down button to select AUTO HANG-UP and press OK button to confirm 4.Press Up/Down button to select ON or OFF and then press OK button to confirm Set Clock & Alarm 23 Set Clock & Alarm Set date format Set Date and time 2.Press Up/Down button to select CLOCK & ALARM and press OK button to confirm 1.Press MENU button in standby mode 2.Press Up/Down button to select CLOCK & ALARM and press OK button to confirm 3.Press Up/Down button to select DATE/TIME and press OK button to confirm 4.Enter the current year, month and date and then press OK button to confirm 5.Enter the current hour and minute, press Up/Down button to select AM or PM and then press OK button to confirm Date/ time format You can set the date/time format into your preferred format. Set time format 1.Press MENU button in standby mode 2.Press Up/Down button to select CLOCK & ALARM and press OK button to confirm 3.Press Up/Down button to select SET FORMAT and press OK button to confirm 4.Press Up/Down button to select TIME FORMAT and press OK button to confirm 5.Press Up/Down button to select 12 HOURS or 24 HOURS and then press OK button to confirm 1.Press MENU button in standby mode 3.Press Up/Down button to select SET FORMAT and press OK button to confirm 4.Press Up/Down button to select DATE FORMAT and press OK button to confirm 5.Press Up/Down button to select DD/MM or MM/DD and then press OK button to confirm Set Alarm When the alarm is set, the alarm clock icon will be displayed on the handset screen. The alarm can be set to sound once or daily. 1.Press MENU button in standby mode 2.Press Up/Down button to select CLOCK & ALARM and press OK button to confirm 3.Press Up/Down button to select ALARM and press OK button to confirm 4.Press Up/Down button to select ON ONCE, ON DAILY or OFF and then press OK button to confirm If you select ON ONCE or ON DAILY, enter the alarm time in HH-MM format and press Up/Down button to select AM or PM (when the time is in 12 hours format), then press OK button to confirm. 24 Set Clock & Alarm Set the Alarm tone There are 3 alarm melodies available. 1.Press MENU button in standby mode 2.Press Up/Down button to select CLOCK & ALARM and press OK button to confirm 3.Press Up/Down button to select ALARM TONE and press OK button to confirm 4.Press Up/Down button to select your desired melody and then press OK button to confirm Advanced use of your telephone 25 Advanced use of your telephone 2.Press MENU button on the handset in standby mode Change PIN 3.Press Up/Down button to select ADVANCED SET and press OK button to confirm The master PIN is used for registering/ unregistering the handsets and accessing the answering machine remotely. 4.Press Up/Down button to select REGISTRATION and press OK button to confirm 1.Press MENU button in standby mode 5.Enter the PIN code and press OK button to confirm. WAITING will be displayed on the handset. A confirmation beep will be emitted to indicate a successful registration and the handset will return to standby mode with its handset number displayed. 2.Press Up/Down button to select ADVANCED SET and press OK button to confirm Un-register your handset The default PIN is 0000. The maximum length is 8 digits. If you forget your PIN code, you can reset the handset to resume it back to the default 0000. 3.Press Up/Down button to select CHANGE PIN and press OK button to confirm 4.Enter the current PIN code and press OK button to confirm 5.Enter the new PIN and then press OK button to confirm Register your handset 1.Press MENU button on the handset in standby mode 2.Press Up/ Down button to select ADVANCED SET and press OK button to confirm 3.Press Up/Down button to select UNREGISTER and press OK button to confirm 4.Enter the PIN code and press OK button to confirm When you purchase a telephone, all included handsets are pre-registered to the base. 5.Press Up/Down button to select the handset you want to un-register and then press OK button to confirm This telephone can support to register with maximum 4 cordless handsets. Reset your telephone 1.Press and hold INT/PAGE button on the corded base for about 5 seconds This feature allows you to reset your phone to its default settings. 26 Advanced use of your telephone After reset, all your personal settings including the entries in call log and redial list will be deleted. Recall time But, the entries in your Phonebook will remain unchanged and the recorded messages (answering machine model) will also remain unchanged. This feature allows you to choose the different Recall time to accommodate the setting of your telephone service provider for using customer calling service, such as Call waiting. 1.Press MENU button on the handset in standby mode 1.Press MENU button on the handset in standby mode 2.Press Up/Down button to select ADVANCED SET and press OK button to confirm 2.Press Up/Down button to select ADVANCED SET and press OK button to confirm 3.Press Up/Down button to select RESET and press OK button to confirm 3.Press Up/Down button to select RECALL TIME and press OK button to confirm 4.C ONFIRM? will be displayed on the handset, press OK button to confirm 4.Press Up/Down button to select SHORT, MEDIUM or LONG and press OK button to confirm Set Prefix Set First ring This feature allows you to define a prefix number (maximum with 10 digits) to be added to the beginning of any pre-dial number. The first ring of an incoming call will not be emitted when this feature is set to OFF. 1.Press MENU button on the handset in standby mode 2.Press Up/Down button to select ADVANCED SET and press OK button to confirm 3.Press Up/Down button to select AUTO PREFIX and press OK button to confirm 4.Press Up/Down button to select PREFIX and press OK button to confirm 5.Enter the number and then press OK button to confirm 1.Press MENU button on the handset in standby mode 2.Press Up/Down button to select ADVANCED SET and press OK button to confirm 3.Press Up/Down button to select FIRST RING and press OK button to confirm 4.Press Up/Down button to select ON or OFF and press OK button to confirm Using the intercom/ Make conference call Using the intercom/Make conference call Initiate an intercom call 1.Press INT button (or the INT/PAGE button on the base unit) in standby mode 2.Handset will display INT with the relevant handset numbers that are available for intercom. 3.Press the specific handset number you want to call, or press * to call handsets Note: if there is only one cordless handset registered on the corded base, press INT button on the handset will automatically call the corded base. "0" is presented for the corded base when there are more than one registered cordless handsets. Answer an incoming call during intercom hen there is an incoming call during intercom, W you will hear the alert tone and CALLING will be displayed on handset screen. Press TALK button to answer the incoming call and the intercom will be ended O r you can put the intercom on hold by pressing INT button, then press TALK button to answer the incoming call P ress END button to end the conversation with external call and the handset will return to the previous intercom 27 Transfer an external call to another handset 1.Press INT button to put the external call on hold (the caller won’t be able to hear you) 2.Handset will display INT with the relevant handset numbers that are available for intercom. 3.Press the specific handset number you want to call, or press * to call handsets 4.Press TALK button on the handset(s) that being called to accept the internal call, then press END button on the originating handset to transfer the external call Note: If there is no answer from the internal handset(s), you can press INT button to resume the external call. Establish a three-party conference call 1.Press INT button to put the external call on hold (the caller won’t be able to hear you) 2.Handset will display INT with the relevant handset numbers that are available for intercom, press the specific handset number you want to call 3.Press TALK button on the handset that being called to accept the internal call, then press and hold the INT button on the originating handset for about 2 seconds to establish the three-party conference. CONFERENCE will be displayed on the handset screen. 28 Answering system Answering system 4.Press Up/Down button to select RING DELAY and press OK button to confirm Turn On/ off the answering system 5.Press Up/Down button to select 2-7 rings or ECONOMY and then press OK to confirm 1.Press MENU button in standby mode 2.Press Up/Down button to select ANSW MACHINE and press OK button to confirm 3.Press Up/Down button to select ANSW. ON/OFF and press OK button to confirm 4.Press Up/Down button to select ON or OFF and press OK button to confirm Or you can simply press the ANSWER ON/OFF button on the base unit to turn it on or off Set the answering mode 1.Press MENU button in standby mode 2.Press Up/Down button to select ANSW MACHINE and press OK button to confirm Note: When ECONOMY mode is selected, the answering machine will answer calls & start to play the message after 5 rings if there is no new recorded message(s), or after 3 rings if there is at least one new recorded message. Listen to the recorded messages 1. Press MENU button in standby mode 2.Press Up/Down button to select ANSW MACHINE and press OK button to confirm 3.Press Up/Down button to select ANSWER MODE and press OK button to confirm 3.Press Up/Down button to select PLAY and press OK button to confirm. The recorded messages will be started to play, you can adjust the earpiece volume by pressing the Up/down button 4.Press Up/Down button to select ANSW.&RECORD or ANSWER ONLY and press OK button to confirm Or you can simply press the PLAY/STOP button on the base unit to play the recorded messages Set Ring delay Delete ALL messages 1.Press MENU button in standby mode 1.Press MENU button in standby mode 2.Press Up/Down button to select ANSW MACHINE and press OK button to confirm 2.Press Up/Down button to select ANSW MACHINE and press OK button to confirm 3.Press Up/Down button to select SETTING and press OK button to confirm 3.Press Up/Down button to select DELETE ALL and press OK button to confirm. Answering system 4.C ONFIRM? will be displayed on the handset, press OK button to confirm Or you can simply press and hold the Mute/C/Delete button on the base unit to delete all recorded messages. Record an outgoing message The pre-recorded outgoing message will be played to the caller when the answering system answers the call, unless you have recorded your own message. 1. Press MENU button in standby mode 2.Press Up/Down button to select ANSW MACHINE and press OK button to confirm 3.Press Up/Down button to select RECORD OGM and press OK button to confirm. 4.Press Up/Down button to select ANSW.&RECORD or ANSWER ONLY and press OK button to confirm 5.Press Up/Down button to select RECORD OGM and press OK button to confirm. 6.RECORDING. will be displayed on the handset screen and you can start to record the message (speak as you normally do during the call) 7.Press OK button to confirm to save the recorded message Delete your recorded OGM 1.Press MENU button in standby mode 2.Press Up/Down button to select ANSW MACHINE and press OK button to confirm 29 3.Press Up/Down button to select RECORD OGM and press OK button to confirm. 4.Press Up/Down button to select ANSW.&RECORD or ANSWER ONLY and press OK button to confirm 5.Press Up/Down button to select DELETE and press OK button to confirm. Play the current OGM The answering machine will play the pre-recorded outgoing message if you haven’t recorded your own message. 1.Press MENU button in standby mode 2.Press Up/Down button to select ANSW MACHINE and press OK button to confirm 3.Press Up/Down button to select RECORD OGM and press OK button to confirm. 4.Press Up/Down button to select ANSW.&RECORD or ANSWER ONLY and press OK button to confirm 5.Press Up/Down button to select PLAY and press OK button to confirm to listen Activate/deactivate Remote control access Once the remote control access is activated, you can check the messages of your answering system by calling from another phone when you are away from home. 30 Answering system If the answering system is turned off, you must change your master PIN from its default 0000, before you can use the remote access feature. 1.Press MENU button in standby mode 2.Press Up/Down button to select ANSW MACHINE and press OK button to confirm 3.Press Up/Down button to select SETTINGS and press OK button to confirm. 4.Press Up/Down button to select REMOTE ACC. and press OK button to confirm. 5.Press Up/Down button to select ACTIVATE or DEACTIVATE and press OK button to confirm. Access the answering system remotely Dial your home number from another phone, when the answering system answers your call and starts to play the OGM, press # key on the phone and enter the remote access code (which is same as your PIN code) The remote feature lets you perform the following functions by pressing the corresponding numeric key: • • • • • • • Review message 1 Play back messages 2 Stop message playback 8 Erase message 6 (during message playback) Skip message 3 Turn on answerer machine 7 Turn off answerer machine 9 Note: If the answering system is off, and the master PIN has been changed from its default 0000, it will answer the call after 10 rings. Corded Base Operations Corded Base Operations 31 Volume control Set Date and Time uring the call, you can adjust the handset receiver/ D base speaker volume by pressing Volume up/down button. Press and hold OK/CLK button, the LCD will be displayed: here are 5 ringer volume levels available: L1, L2, T L3, L4, L5. - - : - - AM - - D/ - - M In standby mode, you can adjust the base ringer volume by pressing Volume up/ down button. Select AM/PM Key in the time and date, you can erase the entered content by pressing Mute/C/Delete button if you made an error. Press OK/CLK button to save the setting. A confirmation beep will be emitted. Make a call Pre-dialling - Dial the number in standby mode and then pick up the corded handset or press Speaker button to make the call directly Note: You can press BACK button to erase the digits if you made an error. irect dialling - Pick up the corded handset or press D Speaker button, then dial the number you want to call Note: You won’t be able to erase and correct the entered digits in direct dialling mode. here are 6 ringer volume levels available: L0, L1, T L2, L3, L4, L5. ou can also turn off the base ringer by simply Y pressing and holding the # button in standby mode, the ring off icon will be displayed on the LCD. ress and hold # button again to turn on the base P ringer, the ringer level will be same as previous setting. Mute Function During the call, press the Mute/C/Delete button to activate/ deactivate mute function Note: The Mute icon will be displayed on the LCD when mute is activated, and the caller won't be able to hear you. 32 HandsetBase Corded ToneOperations Activate/deactivate Key Lock function In standby mode, press and hold * button to activate/ deactivate key lock. The key lock icon will be displayed on the LCD when this function is activated. Redial List on the corded base There are 5 entries can be stored in the redial list. View redial list Press Redial button in standby mode and browse the redial list by pressing CID up/down button Make a call from redial list 1.Press Redial button in standby mode and select an entry by pressing CID up/down button 2.P ick up the corded handset or press Speaker button to automatically dial the selected number. Add a redial entry into Phonebook Press Redial button in standby mode and select an entry by pressing CID up/down button. Press and hold Phonebook button, then press OK button to confirm to save the number into Phonebook. A confirmation tone will be emitted. Delete a redial entry Press Redial button in standby mode and select an entry by pressing CID up/down button Press Mute/cancel/delete button and the LCD will display Press OK/CLK button to confirm. A confirmation tone will be emitted and the base will return to standby mode. Delete all redial entries Press Redial button in standby mode Long press and hold Mute/C/delete button and the LCD will display Press OK/CLK button to confirm. A confirmation tone will be emitted and the base will return to standby mode. Phonebook on the corded base ou can store 30 phone numbers into Phonebook Y with maximum 24 digits for each number. View Phonebook entries P ress Phonebook button in standby mode and browse the entries by pressing CID up/down button he Phonebook icon will be displayed on the LCD, T and the corresponding record number will also be displayed at the top right corner (such as #01). Add an entry into Phonebook ong press and hold the Phonebook button till the L Phonebook icon is displayed on the LCD. ey in the number you want to add, press Mute/C/ K Delete button to erase the entered digit if you made an error. Corded Base Handset Operations Tone Press OK/CLK button to confirm. A confirmation tone will be emitted and the base will return to standby mode. Edit a Phonebook entry P ress Phonebook button in standby mode and select an entry by pressing CID up/down button ress and hold Phonebook button again till the P Phonebook icon is displayed on the LCD. P ress Mute/C/Delete button to erase the original number ey in the number and then press OK/CLK button to K confirm. confirmation tone will be emitted and the base will A return to standby mode. Delete a Phonebook entry P ress Phonebook button in standby mode and select an entry by pressing CID up/down button P ress Mute/C/Delete button and the LCD will be displayed: ress OK/CLK button to confirm. A confirmation tone P will be emitted and the base will return to standby mode. Delete all Phonebook entries Press Phonebook button in standby mode Long press and hold Mute/C/Delete button and the 33 LCD will be displayed: Press OK/CLK button to confirm. A confirmation tone will be emitted and the base will return to standby mode. Caller ID on the corded base his is a call log that shows the phone numbers of the T incoming calls. There are 20 records can be stored on the base with maximum 24 digits for each record. ach CID record will be displayed with the E corresponding time, date and phone number (but CID name won't be displayed.) View CID record Press CID up/down button to browse through the call log in standby mode he call log icon will be displayed on LCD, and the T corresponding record number will also be displayed at the top right corner (such as #01). Add a CID record into Phonebook Press CID up/down button in standby mode to select an entry ress and hold Phonebook button till the Phonebook P icon is displayed on the LCD Press Mute/C/Delete button to erase the digits if you want to edit the number, then press OK/CLK button to confirm. 34 Corded Base Operations confirmation tone will be emitted and the base will A return to Standby mode. Delete a CID record Press CID up/down button in standby mode to select an entry P ress Mute/C/Delete button and the LCD will be displayed: Press OK/CLK button to confirm. A confirmation tone will be emitted and the base will return to standby mode. Delete all CID records Press CID up/down button in standby mode Long press and hold Mute/C/Delete button and the LCD will be displayed: Press OK/CLK button to confirm. A confirmation tone will be emitted and the base will return to standby mode. Intercom Function he base can support a maximum of 4 registered T cordless handsets. Make an intercom from Base to Handset Press INT/PAGE button in standby mode to page all registered cordless handsets he paging tone will be emitted from the base and all T registered handsets will start to ring Press TALK button on any handsets to establish the intercom. Note: if you want to cancel the intercom before being answered by the registered handsets, simply press the INT/PAGE button again to stop paging. Answer an incoming call during intercom hen there is an incoming call during intercom, you W will hear the alert tone Press Speaker button to answer the incoming call and the intercom will be on hold You can press INT/PAGE button to switch between the intercom or external call Transfer an external call to Handset hen the corded base is connected with an external W line, press INT/PAGE button to page all registered cordless handsets. P ress Speaker button or put the corded handset back to the corded base to end the call. The external call is transferred and all registered cordless handsets will start to ring. P ress TALK button on any one of the registered handsets to accept the transferred call. Corded Base Operations Make a Conference call our phone can make a conference call between the Y corded base, 1 registered handset and 1 external line, or between 2 registered handsets and 1 external line. hen the corded base is connected with an external W line, press INT/PAGE button to page all registered cordless handsets. P ress TALK button on any one of the registered handsets to accept the intercom and the external line will be on hold. P ress and hold INT/PAGE button on the corded base for about 2 seconds to establish the 3-party conference. 35 36 Answering system on the base Answering system on the base Turn on/off the answering system Y ou can press ANS button to turn on/off the answering machine. Note: When it is set On, An On will be displayed on the LCD and answering machine icon will also be displayed. When it is Off, An Off will be displayed on the LCD. Listen to the recorded message Press Play/Stop button in standby mode to play the corded messages, press CID up/down button to skip to the next message or go back to listen to the previous one Delete a recorded message Press Play/Stop button in standby mode and select one recorded message by pressing CID up/down button Press Mute/C/Delete button to delete the selected message. confirmation tone will be emitted and the base will A return to standby mode. Delete all recorded messages Press Play/Stop button in standby mode P ress and hold Mute/C/Delete button for about 5 seconds to delete all the recorded messages. A confirmation tone will be emitted and the base will return to standby mode. Record your MEMO Press and hold MEMO button in standby mode and the LCD will display: You can start to record your message (speak as you normally do in the speaker mode) and press MEMO button again to save to the recorded message Play your MEMO Press Play/Stop button in standby mode to listen the recorded MEMO Press CID up/down button to go back to the previous message or skip to the next one You can adjust the volume by pressing Volume up/ down button Delete a MEMO Press Play/Stop button in standby mode and select a memo by pressing CID up/down button Press Mute/C/Delete button to delete the selected memo A confirmation tone will be emitted and the base will return to standby mode. Customer Support Customer Support If you have any problems setting up or using this product you will find useful tips and information in the Troubleshooting section of this user guide as well as “Frequently Asked Questions” on our website www.oricom.com.au. If you have further questions about using the product after reviewing the resources above or would like to purchase replacement parts or accessories please call our Customer Support Team. Our dedicated local support team are more likely to be able to help you than the retailer where you made your purchase. Important Please retain your purchase receipt and attach to the back page of this user guide as you will need to produce this if warranty service is required. Take a few moments to register your product online: www.oricom.com.au 37 38 WARRANTY How to make a claim under Warranty in Australia Oricom has a simple warranty process for you to follow: • Please call or email our Customer Support Team, contact details follow. • A Customer Support Team member will verify after troubleshooting with you if your product qualifies under warranty. If so, they will give you a Product Return Authorisation number. • We will then email or fax a Return Authorisation form and a Repair Notice (if necessary), together with instructions on how to return the goods for warranty service. Please note that if a Customer Support Team member advises that your product does not qualify for return, this warranty does not apply to your product. Products that are authorised to be returned to Oricom in Australia must include all of the following: • A completed Return Authorisation form • A copy of your Proof of Purchase (please keep your original copy) • The faulty product, including all accessories, Send the approved returns to: Oricom International Pty Ltd Locked Bag 658 South Windsor NSW 2756 Australia Please note that this warranty excludes expenses incurred by you in returning any faulty product to us. You must arrange and pay any expenses incurred (including postage, delivery, freight, transportation or insurance of the product) to return the faulty product to us, however, we will arrange delivery of the repaired or replaced faulty product to you. Important Information Repair Notice Please be aware that the repair of your goods may result in the loss of any user-generated data (such as stored telephone numbers, text messages and contact information). Please ensure that you have made a copy of any data saved on your goods before sending for repair. Please also be aware that goods presented for repair may be replaced by refurbished goods or parts of the same type rather than being repaired. WARRANTY Warranty Information (Australia) This Warranty is provided by Oricom International Pty Ltd ABN 46 086 116 369, Unit 1, 4 Sovereign Place, South Windsor NSW 2756, herein after referred to as “Oricom”. Oricom makes no other warranties or conditions, express or implied, including as to acceptable quality and fitness for a particular purpose, except as stated in this Warranty. Any implied warranties that may be imposed by law are limited in duration to the Warranty Period. Oricom warrants that the product is free from defects in materials or workmanship during the Warranty Period. This Warranty does not extend to any product from which the serial number has been removed or was purchased outside of Australia. This warranty in no way affects your statutory warranty rights under the Competition and Consumer Act 2010 or any other similar legislation. The Warranty Period will be 1 year from the date of purchase of the product evidenced by your dated sales receipt. You are required to provide proof of purchase as a condition of receiving warranty services. You are entitled to a replacement product or repair of the product according to the terms and conditions of this document if your product is found to be faulty within the Warranty Period. This Warranty extends 39 to the original purchaser only and is not transferable. Rechargeable battery cells and rechargeable battery packs (if supplied) with this product are covered under this warranty for a period of 90 days. Products distributed by Oricom are manufactured using new materials or new and used materials equivalent to new in performance and reliability. Spare parts may be new or equivalent to new. Spare parts are warranted to be free from defects in material or workmanship for thirty (30) days or for the remainder of the Warranty Period of the Oricom branded product in which they are installed, whichever is longer. During the Warranty Period, Oricom will where possible repair and if not replace the faulty product or part thereof. All component parts removed under this Warranty become the property of Oricom. In the unlikely event that your Oricom product has a recurring failure, Oricom may, subject to the Competition and Consumer Act 2010, at its discretion, elect to provide you with a replacement product of its choosing that is at least equivalent to your product in performance. Oricom does not warrant that the operation of the product will be uninterrupted or error free. Oricom is not responsible for damage that occurs as a result of your failure to follow the instructions that came with the product. These terms and conditions together with any specific terms and conditions contained in the user guide to the product purchased constitute the complete and exclusive agreement 40 WARRANTY between you and Oricom regarding the product. No change to the conditions of this Warranty is valid unless it is made in writing and signed by an authorised representative of Oricom. Oricom will not be in breach of a warranty expressly set out in this User Guide or under the Competition and Consumer Act 2010 and excludes any liability for damages or any other remedy arising under any other legislation or the common law if the damage occurs as a result of: 1.failure by you to adhere to the warnings and follow the instructions set out in this user guide for the proper installation and use of the product; 2.negligence on your part or misuse by you of the product; 3.an uncontrollable external cause which results in the product not functioning including but not limited to power failure, lightning or over voltage; and 4. m odification to the product or services carried out on the production by anyone other than Oricom or Oricom’s authorised service provider. Oricom will not be liable for any damages caused by the product or the failure of the product to perform, including any lost profits or savings or special, incidental or consequential damages. Oricom is not liable for any claim made by a third party or made by you on behalf of a third party. This limitation of liability applies whether damages are sought, or a claim made, under this Warranty or as a tort claim (including negligence and strict product liability), a contract claim or any other claim. However, this limitation of liability will not apply to claims for personal injury. Nothing in this Warranty excludes, restricts or modifies any condition, warranty, right or remedy which pursuant to the Competition and Consumer Act 2010 applies to this Warranty and which may not be so excluded, restricted or modified. For warranties that cannot be excluded, restricted or modified, Oricom limits the remedies available to those specified in the relevant legislation. Oricom products come with guarantees that cannot be excluded under the Australian Consumer Law. You are entitled to a replacement or refund for a major failure and compensation for any other reasonably foreseeable loss or damage. You are also entitled to have the goods repaired or replaced if the goods fail to be of acceptable quality and the failure does not amount to a major failure. Contact details for Oricom Support and Warranty Claims in Australia Oricom International Pty Ltd Locked Bag 658 South Windsor, NSW 2756 Australia Email: [email protected] Phone: 1300 889 785 (Monday to Friday 8am to 6pm AEST) Web: www.oricom.com.au Fax: (02) 4574 8898 Ref: 07092011