1
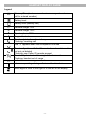
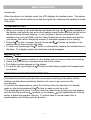
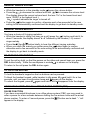
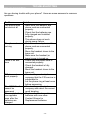
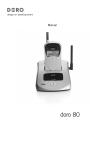
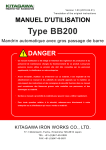
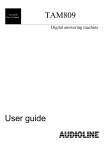
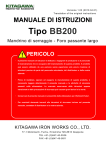
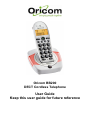
Oricom BB200
DECT Cordless Telephone
User Guide
Keep this user guide for future reference
CONTENTS
Getting Started…………………………………………………………………………. 3
Handset and base unit………………………………………………………………… 3
Handset Display Guide………………………………………………………………... 4
Safety Information……………………………………………………………………… 5
Installation…………………………………………………………………………….... 6
Power supply…………………………………………………………………………… 6
Fitting batteries…………………………………………………………………………. 6
Recharging your cordless phone……………………………………………………… 6
Replacing batteries…………………………………………………………………….. 6
Basic Operation………………………………………………………………………… 7
To answer a call………………………………………………………………………… 7
Making a call……………………………………………………………………………. 7
Using the Hands-free speakerphone………………………………………………… 7
Pre-dialling……………………………………………………………………………… 8
Last number redial……………………………………………………………………… 8
Call duration timer…………………………………………………………………….. 8
Adjusting the earpiece volume………………………………………………………... 8
To page the handset………………………………………………………………….. 8
Handset ringer volume………………………………………………………………… 9
Handset ringer melody………………………………………………………………… 9
To mute the mouthpiece……………………………………………………………… 9
To lock the keypad ……………………………………………………………………. 9
Using your cordless on a PBX…………………………………………………………10
Turning off the handset ringer…………………………………………………………10
Message waiting indication ……………………………………………………………10
Take 2 different calls at the same time ………………………………………………10
Phonebook Memories and Caller ID……………………………………………….. 11
To store a number in the phonebook………………………………………………. 11
To dial a number from the phonebook……………………………………………… 11
To delete a number from the phonebook…………………………………………... 11
Caller ID………………………………………………………………………………... 12
Check caller ID records……………………………………………………………… 12
To return a call………………………………………………………………………… 13
To delete a caller ID record………………………………………………………….. 13
To store a caller ID record…………………………………………………………… 13
Troubleshooting………………………………………………………………………. 14
Notes for Operation in New Zealand……………………………………………….. 15
Warranty………………………………………………………………………………. 16
-2-
GETTING STARTED
Unpacking your Oricom BB200
Retain all packing materials in a safe place, in case you later need to transport it or
return it for servicing.
In the box, you will find: - 1 cordless handset, 1 Base Unit , 2 AAA rechargeable
600mAh batteries, 1 AC adaptor, telephone line cord and adaptor plug, warranty card
and this user manual.
Handset and Base unit
1
2
3
4
5
6
7
1.
2.
3.
4.
5.
8
9
Memory button
Back and Recall button
Speakerphone button
Talk button
Caller ID and Forward button
10
11
6. Mute/Delete button
7. Ringer on/off button
8. Ringer volume button
9. Handset Locator button
10. Last Number Redial/Pause button
11. # and Keypad Lock button
-3-
HANDSET DISPLAY GUIDE
Legend
&
Memory/Store (to store a number in memory or to make a
call to a stored number)
Battery level
Battery level (Battery low)
%
%
X
Handset Ringer “ON”
Handset Ringer “OFF”
Speakerphone “ON”
Keypad locked
On steady: telephone line is busy.
Flashing: incoming call
The “X” appears when the microphone is muted
x
*
On steadily: all new Caller ID records have been listened to
but not yet deleted
Flashing: new Caller ID records present
On steadily: handset within range of the base unit
Flashing: handset out of range
Indicates new message received
Intercom operating: during calls to another handset
More digits to view to the right or to the left of the display
-4-
SAFETY INFORMATION
• Avoid exposure of this telephone to moisture or liquid.
• To prevent electric shock, do not open the handset or base cabinet.
• Avoid metallic contact (e.g. metal clips, keys) between the battery contacts and
charging conductors.
• Do not use the handset in an explosive hazard area such as where there is gas
leaking.
• There is a chance that the telephone could be damaged by an electrical storm. It is
recommended that users unplug the phone from the mains supply and telephone
socket during a storm.
• Follow the local regulations regarding the disposal of your packing materials,
exhausted batteries and used phone. Wherever possible, recycle those materials.
• We advise that this phone should not be used near intensive care medical
equipment or by persons with pacemakers.
• Clean with a dry, soft, lint-free cloth. Never use cleaning agents, particularly
aggressive solvents.
• Because the phone works by sending radio signals between base station and
handset, wearers of hearing aids may experience interference in the form of a
humming noise.
• Your phone can interfere with electrical equipment such as answering machines, TV
and radio sets, clock radios and computers if placed too close. It is recommended
that you position the base unit at least one metre from such appliances.
• This telephone complies with applicable safety requirements for exposure to radio
waves (EMR). The main power of this telephone does not exceed 20mW limit at
which point testing is required.
• The earpiece of the handset may attract small metal objects such as staples and
pins. Care should be taken when placing the handset near these items.
CAUTION
This telephone is not designed for making emergency telephone calls when the
mains power fails. Always have a corded phone available to be able to make
and receive calls to emergency services if the mains power fails.
Do not use your telephone during an electrical thunderstorm as it is possible to
get an electric shock. Refer to information contained in the White pages
directory.
CAUTION
Only use only the mains adaptor supplied with this phone. Incorrect adaptor
polarity or voltage can seriously damage the unit.
Adaptor
Model #: S060020D22
Approval #:Q031027
Input: 240 Vac / 50Hz
Output: 6VDC /200MA 1.2VA
-5-
INSTALLATION
POWER SUPPLY
IMPORTANT!
The mains power adaptor must be installed near the equipment and must be easily
accessible. Power must be turned on at all times for the phone to work
1. Connect the output plug of the mains adaptor to the adaptor socket on the back of
the base unit and the mains adaptor to the wall mains supply.
2. Connect the telephone lead to the phone cord socket on the back of the base unit
and to the wall phone socket.
FITTING BATTERIES
IMPORTANT: Only use the rechargeable batteries provided with this phone.
1. Place your handset with the keypad facing downwards.
2. Remove the battery compartment cover by pushing on the indent and sliding it in
your direction.
3. Insert the two batteries (AAA) into the battery compartment, observing the correct
polarity.
4. Slide the battery compartment cover gently back into place, it will click when it is in
the correct position.
IMPORTANT!
PLACE THE HANDSET IN THE BASE UNIT AND LEAVE FOR 15 HOURS TO
CHARGE THE BATTERIES FULLY BEFORE FIRST USE.
RECHARGING YOUR CORDLESS PHONE
When your handset battery becomes low the Low Battery symbol
display. To recharge it, just replace the handset on the base unit.
appears on the
Tip! It is good practice to put the handset on the base unit to charge when it is
not in use or every evening to ensure the handset is always fully charged
REPLACING BATTERIES
CAUTION
THERE IS A RISK OF EXPLOSION IF THE BATTERY IS REPLACED BY AN
INCORRECT TYPE. Never use non-rechargeable batteries; use only type
supplied with this telephone. Ni-MH batteries must be disposed of in
accordance with the applicable waste disposal regulations. When the handset
needs to be charged more frequently, even when batteries are correctly recharged, it is
time to replace the batteries: follow the instruction above “Fitting Batteries”.
-6-
BASIC OPERATION
Introduction
When the phone is in standby mode, the LCD displays the handset name. The battery
icon reflects the current battery level and the signal icon indicates the handset is linked
to the base.
TO ANSWER A CALL
• When you receive a call, both handset and base will ring, the
symbol appears on
the display, and both the red led on the handset locator button and the big red led on
the phone base will start flashing. If your cordless is directly connected to the
telephone line (not via PABX) and the Caller Details Service has been activated by
your server, the caller’s telephone number (if available) appears on the display.
will come up steadily on the
• Press the button to answer the call, the symbol
display and the base red led with flash.
button, or alternatively replace the handset back in
• To end a call, press again the
the base. The display symbol and the base red led disappear.
MAKING A CALL
• Press
button.
appears steadily on the display and the base red led starts flashing.
• The symbol
• Check that the dial tone is present then key in the number.
• The dialled number appears on the display.
button or alternatively replace the handset back
• To end the call, press again the
in the base.
USING THE HANDS-FREE SPEAKERPHONE
The Hands-free function provides the convenience of talking to the caller without
holding onto the phone and allows others in the room to be involved in the
conversation.
To activate the speakerphone, press the X button when the handset is in standby
mode or after having pressed the button to make or pick up a call.
The speakerphone is active if you can hear the callers voice coming from the speaker
and can see the X and the
symbols on the display
(hold repeatedly the Volume
button to adjust the speaker volume). To switch back to normal mode from a
speakerphone call, briefly press the X button.
-7-
PRE-DAILLING
Pre-dial allows you to enter a telephone number and verify it on the screen before you
place the call. The screen displays the last 12 digits dialled but you can enter up to 2
digits.
• In standby mode enter the phone number you wish to dial.
button and a dash “-“will appear in the display.
• To enter a pause, press the
• If you make a mistake, press DEL to erase one digit at a time. Or you can press
and hold the DEL button to clear the entire number and return the phone to standby.
• Press
to dial out the number.
• To end the call, press the button again, or replace the handset back in the base.
Note:If you have connected this phone to an office phone system (PBX) you may need
to enter a pause for a few seconds between dialling the line access code and the
actual phone number.
button and a dash “ - “will appear in the display.
To pause, press the
LAST NUMBER REDIAL
You can review and call back the last 3 numbers you have dialled as your cordless
stores them in the redial memory.
• In the standby mode press the
button to scroll through the last 3 numbers you
dialled.
• Select the number you want to redial and press , to dial the number.
CALL DURATION TIIMER
When you make or answer a call the display shows the call duration in time minutes
and seconds.
ADJUSTING THE EARPIECE VOLUME
During a call, to adjust the volume in the handset’s earpiece or speakerphone press
the volume button repeatedly
.
The display shows the current volume level: the more “0’s” the highest the volume (“0”
to “00000”).
TO PAGE THE HANDSET
This function is useful if you can’t find your handset.
• On the base unit press and release the
button. The handset rings with a special
tone.
• To stop the handset ringing, on the handset press any button or numbered key.
-8-
HANDSET RINGER VOLUME
• While the handset is in the standby mode
press the volume button.
• Press the
to decrease the volume level and
to increase the volume level.
The display shows the current volume level: the less “0’s” is the lowest level and
more “00000” is the highest level.);
the % symbol indicates the ringer is turned off.
• Press the
button again to confirm, otherwise wait a few seconds for the new
setting to be automatically confirmed and the display to get back to standby mode.
HANDSET RINGER MELODY
You have a choice of 9 ringing melodies.
• While the handset is idling (not busy on a call) press the
button and hold it for
about 3 seconds, the display shows “d--d” followed by the number (1-9) current
ringer melody.
• Press the
or
button briefly to hear the different ringing melodies.
button again to confirm,
• When you reach the melody you prefer press the
otherwise wait a few seconds for the new setting to be automatically confirmed and
the display to get back to standby mode.
TO MUTE THE MOUTHPIECE
To put the call on hold, so that the person on the other end cannot hear you, press the
DEL button briefly. While the mouthpiece is muted
x is shown on the display.
To return to the call press the DEL button again.
TO LOCK THE KEYPAD
To lock the handset’s keypad so that no buttons can be pressed.
To block the handset keypad, while handset is idle press #/ and hold it for a few
seconds; until you hear a confirmation beep and appears on the display.
To unlock the keypad, press #/ again and hold it until disappears from the display.
USING YOUR CORDLESS ON A OFFICE PHONE SYSTEM (PBX)
PAUSE FUNCTION
If you have connected this phone to an office phone system (PBX) you may need to
enter a pause for a few seconds between dialling the line access code and the actual
phone number. To enter a 3 second pause, press the
button and a dash “ - “will
appear in the display.
-9-
TURNING OFF THE HANDSET RINGER
• When the handset is in the standby mode press and hold for a few seconds the
* button, the symbol % will appear on the display.
• To turn the ringer back on, press and hold again the button * , the symbol % will
disappear from the display.
IMPORTANT: with this function active only the base will ring and the call symbol
will flash on the display.
MESSAGE WAITING INDICATION
You have to subscribe to a voice message service (eg Telstra Message Bank) from
your local service provider to use this feature. (Subscription and other charges may
apply).
When you receive a voice message the * icon will appear on the display. When you
retrieve your messages the message * will turn off. You can also turn it off by
pressing DEL for 2 seconds in the standby mode.
HOW TO TAKE 2 DIFFERENT CALLS AT THE SAME TIME
You can use the
(Recall) button to answer a second call while you are on the
phone. However this service will need to be turned on. For example to turn on
Telstra’s Call Waiting service:
1. Press wait for dial tone then Press *43#
2. You will hear a service tone then Press .
During a call, you will hear two loud beeps periodically to notify you of another
incoming call. If you wish to answer this call:1. When the handset receives a second call, the number of the caller appears on the
display.. Press
(Recall) when you hear dial tone Press 2 to put the current
call on hold and talk with the second caller.
2. Subsequent presses of
listen for dial tone then Press 2 will toggle you
between these 2 callers.
Caller information of this second call will be stored in the call log.
NOTE: If you have subscribed to your telephone network operators Call Waiting Caller
ID service, your phone will also display the number of the second incoming call for
around 10 seconds while you are talking on the phone or until you press a key on the
phone.
- 10 -
PHONEBOOK MEMORIES AND CALLER ID
MEMORIES
You can store up to 10 numbers in the phonebook memory. Each stored number can
be up to 25 digits.
TO STORE A NUMBER IN THE PHONEBOOK
Make sure the handset is in the standby mode.
button and hold it until the symbol &flashes on the display.
Press the
1. Key in the number you want to store (max 25 digits).
and
buttons to
2. If you need to correct a number whilst entering use the
move the cursor from a digit to another, and the DEL button to delete a wrong digit
to the left of the cursor.
button, again, (the telephone number moves to the right on the
3. Briefly press the
display and the cursor flashes on the left). Key in a memory location number (0 to 9).
4. The display goes back to standby mode.
To store another number, start again from step 1.
Tip: You can delete a record by simply storing a new number in the same
location.
TO DIAL A NUMBER FROM THE PHONEBOOK MEMORY
1. When the handset is idle press briefly the
button to enter the Phone Book.
2. Key in the memory location number, if the wrong number appears on the display,
key in another memory location number (0 to 9) to view the other stored records.
3. Press the button or the X button to call the desired number.
TO DELETE A NUMBER FROM THE PHONEBOOK MEMORY
1. Press the
button and hold it until the symbol & flashes on the display.
2. Briefly press the
button, again, a dash “-“will appear on the display.
3. Key in the memory location number (0 to 9).
4. You hear a confirmation tone and the display goes back to standby mode.
- 11 -
CALLER ID
If you subscribe to your network providers Caller ID service (charges may apply) your
phone automatically stores the numbers of the last 20 incoming calls.
When the phone rings and caller information is received, the display will show the last
14 digits of the callers number.
When in the standby mode and there are calls you haven’t answered, the symbol
flashes on the display.
When you review these calls the
symbol will remain constant on the display.
Refer to the following page to learn how to access the list.
TO CHECK CALLER ID RECORDS
With handset idle, press the Caller
on the display.
ID button, you’ll see the most recent record
Details of the telephone
number of the related
call to be viewed
Number of
received call
Day-Month of
Time
received call
of received call
Wait a few seconds for the display to automatically show you the telephone number
related to the call, otherwise press
the button again to check the caller’s number.
Details of the
date and time
of the related call
to be viewed.
Now, just press the
button to go back and view the date and time of the last call.
Press the Caller ID button again
repeatedly to view the next records (less recent
ones).
Press repeatedly the
button to view the phone number of the related call first, and
then the date and time of the following calls (more recent ones).
Once you’ve reached the beginning of the end of the list, scroll it again backwards.
- 12 -
TO RETURN A CALL
• In standby mode, press the Phone
button to enter the list.
• Use the
and
buttons to select the number you want to call back.
- To call back a number when the call details (date and time or telephone number)
are displayed, just press three or the Xbutton.
TO DELETE A CALLER ID RECORD
A simple operation allows you to delete a record from the list:
button to enter the list.
• In standby mode, press the
• Use the
and the
buttons to select the record you want to delete.
- When the record is shown on the display, press and hold the DEL button until the
display moves to the next Caller ID records.
If there are no more Caller ID records, the display shows
TO STORE A CALLER ID RECORD (10 MEMORIES AVAILABLE)
button to enter the list.
• In standby mode, press the
• Use the
and
buttons to select the number you want to store.
• When the number appears on the display, press and hold the
seconds) until the & symbol flashes on the display.
• Key in a memory location number (0 to 9).
• Press the button
briefly again, you’ll hear a beep to confirm.
- 13 -
button (for about 2
TROUBLESHOOTING
TROUBLESHOOTING
Are you having trouble with your phone? Here are some answers to common
questions.
Problems
The phone does
not work at all
Solutions
• Make sure that adaptor and
phone cord are connected
properly.
• Check that the batteries are
fully charged and installed
properly.
• This phone does not work
during power failure.
The phone does
• Make sure the adaptor and the
not ring
phone cord are connected
properly.
• Move the handset closer to the
base unit.
• Make sure the handset (or
base) ringer is turned on.
There is no dial
• Check that the phone cord is
tone
connected properly.
• Check the handset is fully
charged.
• Move the handset closer to the
base unit.
CID does not
• Check with your local phone
work properly
company that the CID service is
subscribed to.
• Let the phone ring at least once
before answering.
The CIDCW call
• Check with your local phone
cannot be
company and select the correct
answered
recall duration
The empty battery • Replace the Rechargeable
icon appears
batteries with new ones.
soon after the
Contact Oricom for
batteries are
Replacement batteries.
charged
- 14 -
Notes for operation in New Zealand
The grant of a Telepermit for any item of terminal equipment indicates only that
Telecom has accepted that the item complies with the minimum conditions for
connection to its network. It indicates no endorsement of the product by Telecom, nor
does it provide any sort of warranty. Above all, it provides no assurance that any item
will work correctly in all respects with another item of Telepermitted equipment of a
different make or model, nor does it imply that any product is compatible with all of
Telecom’s network services. This device may be subject to ringing or bell tinkle when
certain other devices are connected to the same line. If this occurs, the problem should
not be referred to the Telecom Faults service.
This equipment shall not be set to make automatic calls to the Telecom “111”
Emergency Service. This equipment may not provide for the effective hand-over of a
call to another device connected to the same line.
REN (RN for New Zealand)
The REN (Ringer Equivalence Number) or (RN) is of significance only if you wish to
connect more than 1 telephone to your telephone line. A standard telephone line has a
maximum REN capacity of 3 (RN of 5). It is possible to connect 3(5) devices with a
REN of 1 (RN of 1) with no degradation to the product’s performance. Exceeding this
limit may cause the volume of the ringer in any phone to decrease or not ring at all.
Caller ID
Customers using non Telecom toll services should not use the dial back feature for
local calls as this will incur a charge only the 7 digit number should be dialled. Some of
the CID services listed may not be available in New Zealand. This telephone is not
designed for making emergency telephone calls when the power fails. Make
alternative arrangements for access to emergency services.
- 15 -
WARRANTY
This product is covered by a 12 month warranty against defective workmanship or parts.
The warranty does not extend to damage caused by misuse, negligence, water ingress,
excessive voltage, telephone line faults or lightning. This guarantee in no way affects
your statutory rights. Full details of the warranty are contained in the enclosed warranty
card.
If you feel this product is not working correctly please consult the user guide and
ensure that you are using the product in accordance with the instructions. Remove all
extra telephone equipment and connect only this telephone directly to the telephone
socket.
If the fault is still present, connect another telephone (if available) to the telephone
socket. The results will show you whether the fault lies with this unit or with the
telephone line.
If the product is working correctly the fault is on the telephone line. Please contact your
network operator for assistance.
To order replacement batteries and in case of any technical issues you may have
with this product please consult our website for further information or send us an
email for a prompt response to your enquiry.
In the unlikely event of a fault developing, please contact us for assistance. If the
product is then found to be faulty you will be asked to return it directly to us with a
copy of the purchase receipt.
Australia
Oricom International Pty Ltd
Locked Bag 568
South Windsor, NSW 2756
New Zealand
Atlas Gentech (NZ) Limited
Private Bag 14927,
Panmure, Auckland
Customer support
Email: [email protected]
Web: www.oricom.com.au
Fax: (02) 4574 8898
Ph: 1300 889 785
Customer support
Email: [email protected]
Web: www.atlasgentech.co.nz
Fax: (09) 574 2722
Ph: 0900 50 025 (Toll Call)
- 16 -