1
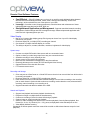
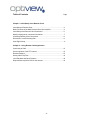
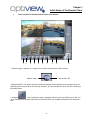
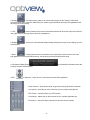
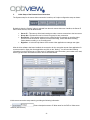
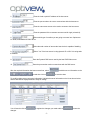
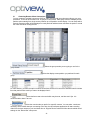
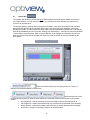
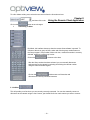
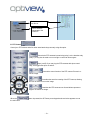
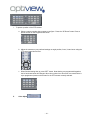
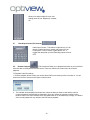
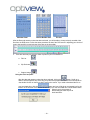
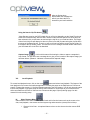
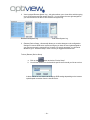
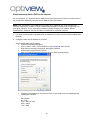
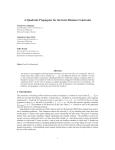
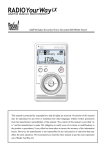
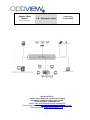
Remote Client
Manual
VR - Enterprise Series
Professional
PC-based DVR
Version 2.28.06/4.37
Optiview CCTV Inc.
2052 St. John’s Bluff Road, Jacksonville, FL 32246
Main Office Tel# 866.301.7680 or 904.727.7680
Technical Support: Tel# 904.855.1121
Website: http://www.discount-security-cameras.net/
Technical Support website: http://www.optiviewpro.com/downloads.htm
Tech Support Email: mailto:[email protected]
1
Remote Client Software Features:
•
•
•
Cost Efficient – Uses IP infrastructure, so there is no need for costly dedicated cables between
sites and servers and manage the data, videos, audio, and other files efficiently. Uses H.264
technology, which maximizes the use of the space on your HDD.
Leverage - Centralize control of setup parameters, scheduled alerts and maintenance of those
individual digital image devices like DVR, DVS, etc.
Straightforward Application and Management - Supports centralized network recording
management, flexible storage and HDD coverage and usage. Password-protected application with
multi-level user rights assignment per user.
Video Display
Max up to 16 preset video display groups. Each group can be set from 1up to 25 video display
channels on one screen.
Real time 25fps (PAL) or 30fps (NTSC) recording per channel
One channel or multiple channels display in a screen.
The ability to adjust hue, contrast, saturation, resolution, brightness of video display.
System setup:
Connect to multiple DVR and/or video servers with one connection button
Option to cluster your sites into groups for an easy one connection button
Schedule recording for every channel per site
Access control on the remote client software
Multi-level user authorization management on the client software
Remotely edit setup on the severs (PC-DVR and Digital Video Servers)
Optional Remote Voice chat with other sites
PTZ camera remote control
Recording and Storage:
Client may act as a Data Center or a Virtual DVR server wherein it can record video from all the sites it
is currently connected to.
Real time 25fps (PAL) or 30fps (NTSC) recording per channel
Each camera can have its own individual schedule settings to record video according to the recording
plan on each channel. Options include continuous recording, motion-detection event, alerts activation
recording, manual recording or no recording at all.
Support watermark and date/time added on the OSD.
Search and Playback:
Support local playback and remote playback simultaneously
Playback on single or multiple channels simultaneously
Continuous recording of video from sites while doing a playback
Capture image as .bmp format during playback
Search for video recording files with time bar. Real time playback, frame-by-frame playback, fastforward (2x, 3x, 4x, 5x), Rewind (1/2x - 1/5x), pause, and playback at the selected point in time.
Video display windows zooming
(Bandwidth or Internet speed connection must still be consider to affect these features except for local
playback)
-2-
Table of Contents
Page
Chapter I - Initial Setup of the Remote Client
Initial Setup of Remote Client ……………………………………………………….4
Basic Functions of the Main Remote Client User Interface………………………4
Initial Setup of the Remote Client Connection……………………………………..6
Modify existing server connection information……………………………………..7
Clustering Remote Client Connections……………………………………………..8
Record Set / Local Recording Plan………………………………………………....9
User Rights Setup…………………………………………………………………….11
Chapter II – Using Remote Client Application
Connecting to Sites…………………………………………………………………..13
Preset a position of the PTZ camera……………………………………………….14
Remote Playback ……………………………………………………………………16
Saving Video Clip Files………………………………………………………………16
Local Playback and Other Features ……………………………………………….18
Requirements to place a DVR on the Internet…………………………………….19
-3-
Chapter I
Initial Setup of the Remote Client
I.
Basic Functions of the Main Remote Client User Interface
1
2
3
4
5
6
7
6
8
9
1. Capture Image – captures the image on the currently selected camera while viewing.
Capture Image
Manual ON / OFF
2. Manual ON/OFF – By default, remote client will automatically record images from the remote host server
(depending how it was setup on record setup). However, you can manually turn ON or OFF the recording on
this switch button.
– This is actually the option to playback video from the host DVR server. In fact, you
3. Playback
will be searching the recorded video files from the host DVR server. Detailed information will be discussed
later.
-4-
- The main system setup for the remote client begins on this “Setting”. DVR server
4. Setting
connection information such as IP addresses, port number, login information and many other parameters will
be configured on this setting.
5. Lock
- Security feature of the remote client software which can be control using the multi-level
user rights setup to leverage security and user management.
6. Display
screen display.
- Select your own preferred display settings starting from single screen display up to 25
7. Menu
- Other features of the client software are on this option such as remote voice chat,
local playback, view remote DVR server log, view local log and the (Remote) Device setup.
8. Information Display Panel
currently selected camera/window.
9. Exit
- provides basic information about the
or Minimize – Select to exit or minimize the remote client application.
Group Connect – sites can be cluster by group for easy single button connection
List Connect – provides you a list of the sites you’re currently connected into.
PTZ Control – remotely control your PTZ camera
Color Adjust – adjust color of camera such as hue, contrast, brightness etc..
DO Control – control the alarm output device from the server remotely.
-5-
II.
Initial Setup of the Remote Client Connection
The System setup for the remote client connection is made up of 4 major configuration setup as shown:
By default, when the “Setting” option is selected from the main remote client user interface, the Server IP
menu comes out first, also as shown below.
•
•
•
•
Server IP – This sets up all the basic settings to make a remote connection to the host server.
Group Set – Remote sites can be cluster into group for easy connection.
Record Set – Each camera window can be configured how to respond on recording video
options from the host server. Options are normal recording, sensor-activated recording,
motion-detect recording, or no recording at all.
Right Set – It is the security feature of the remote client application to manage user rights.
After the client software has been installed, the next task to do is to setup the remote client application for
remote connection. Open the client application and click on the “Setting”. You will need the following
information from the DVR server or Video server: IP addresses, login information, port number to be used,
device type and other information as shown and enumerated below:
Server IP menu – Main System Setup
Initial remote connection setup starts by providing the following information:
1.
machine (host servers).
Enter a descriptive name or IP Alias name for the DVR or Video server
-6-
2.
Enter the local or public IP address of the host server.
3.
Enter the port number to be use to communicate with the host server.
4.
Enter the user name account to be used to connect to the host server.
5.
Enter the password of the username account used for login (at item# 9).
Select which type of machine you are going to connect into. Options are:
6.
PC DVR, Embedded and Video Server.
7.
Select the total number of camera the host device is capable of handling.
8.
IP address.
Select “Yes” if the host server is using dynamic IP or NO if it is using static
9.
Enter the Dynamic DNS server used by the host DVR/Video server.
10.
Enter the port number used to communicate with the DNS server.
After the required information has been entered into, select
list and then click on
to add the server information on the
to save the data.
To modify existing server connection information, highlight the server information on the list as shown below
and the data will be displayed below it ready for editing.
You will need to click on
changes.
to register the changes you made and then
-7-
to save the
III.
Clustering Remote Client Connections,
You can connect to multiple host servers (DVR or Video servers) and group them according to your own
preference. There can be a maximum of 16 groups of connections. Each group will have a display screen
partition option starting from single screen partition up to 25-partition screen display. You can setup which
host site camera number will be displayed on each particular window screen and have the option to record
the video feed while viewing the site.
1.
group of sites.
2.
group.
Select the group number you are going to use for the
Select the display screen partition you preferred for each
3.
For each window, you have the option to select whose host servers will it connect to and what camera number
from that particular site would you want to be displayed into it.
Select the frame rate to be used which may be auto, real-time and 1 fps. It is
4.
recommended to leave it at auto.
5.
Select the record mode you prefer for a specific camera. You can select “continuous
recording” which means that upon connecting to the site, the client software application will start recording
video from the host camera to your local hard drive or “By plan Record” which will follow the scheduled record
settings on the “Record Set” setup menu.
-8-
IV.
Record Set,
The operator will be able to choose how each of the remotely connected camera display will record on
your local hard drive. You can set the time when you want them to record and how you want them to
record or no recording at all.
The example below is showing that the camera on window# 1 is set not to record at the local hard drive
during Saturday and Sunday as indicated with the gray color bars. During the weekdays, that is from
Monday thru Friday, it is set to record only when there is a motion detected on camera from 12:00 AM thru
8:00 AM as indicated by the blue color bars. Starting from 8:00 AM thru – 5:00 PM, the camera at window#
1 will be doing normal recording. Again, from 5:00 PM thru 12:00 midnight as indicated by the red color
bars, the client software will be recording the video only when the sensor devices are activated by the
DVR system.
1.
Select the window number you are going to work on. There is a
maximum 25 windows available to choose from.
Select and click one of the
2.
recording options on how you want the client software to record the video from the camera on this window
number.
• Normal Record – means a continuous normal recording of video to the local hard drive.
• Sensor Record – means client software will only record on sensor-activated video recording.
• Motion Record – means client software will record only on motion-detected video recording.
• Not Record – simply no recording of video to the local hard drive.
-9-
3.
Select and click the day and time at your own preference. The 0 thru 23 represents the time of the day and the
far left column is for the days of the week. You will need first to click the recording option you prefer which is
on item# 2, and then select and click on this schedule table for the day and time you prefer. When you are
finished setting it up, click on the
button to save the configurations.
4.
This is convenient to use if all other windows will
have the same settings as what you are currently working on. Simply select “All Window” and then the “Copy”
to copy these settings to all the windows. You can also just select one particular window number that you want
to copy these settings into and then click copy. Again, just click “Save” when you are finished.
V. Right Set,
There is a multi-level user rights setup that you can assign to each specific user in order to control and
secure the Remote Client system settings on your application. It comes in two-part setup compose of
“User Setup” and “Rights Setup”. The default user account is the “admin” account, which has all the admin
rights to the application. For security purposes, even as you logged in as admin account remotely, you will
still not be able to go into the “Password Setup” menu when changing settings at the DVR server.
This option will enable or disable the use of the
security login to access the Remote Client Software. You will need to decide which one you prefer,
otherwise setting up all the user account passwords are useless if this option is disabled.
To add a new user account, you will need first to click on the
A.
1.
2.
button.
Basic user information needs to be provided on this section such as:
Click on this button to add a new user account.
Enter the user name of the new user account.
3.
Select that authority level you want to give this new user. The manager
level can access and edit user passwords and the operator level cannot.
- 10 -
4.
password.
B.
Enter the password for the new user account and re-enter it to confirm the
Specific user access rights will be configured on this section such as:
Check this user right if you want to give the user an access right to the remote
1.
connection setup of the remote client software. Otherwise, uncheck this option. The user account with this
“Local Setup” rights can access the following menus and make changes on its settings:
Note that a user with a “Local setup” access right still cannot go to the “Right Set” menu which is where the
user accounts are kept.
Check this user right if you want to give the user an access right to force a
2.
local manual recording of video. Otherwise, uncheck this option.
3.
This user right is a very important part of the security feature of the client application
software. If this access right is checked, you are giving the user an access right to make changes on how the
host DVR server is setup. Otherwise, uncheck this option to block a user from accessing the host DVR
settings.
4.
Basically, this option will allow the user to access the “Playback” menus and all the
other associated functionalities on playback such as play locally recorded video files, capture images, make
copies of the video files etc…
This option will allow user to make adjustment on the color display such as hue,
5.
brightness, contrast, etc…
6.
If this access right is checked, you are giving the user an access right to go to
Playback menus of the host DVR. A user having this user rights can play and make copies of the video files on
the host server. Otherwise, uncheck this option to block a user from accessing the host DVR video files.
7.
8.
9.
desktop.
Simply to view local log files on the local machine.
This will allow the user to view all the activities going on the host DVR system.
This will allow the user to minimize the remote client software and be at the PC
- 11 -
To edit or delete existing user, select the user account from the list as shown here
Chapter II
and then click on the Delete
user the
buttonRemote
Using
Client. Application
Click on the
button to save changes.
I.
Connecting To Sites
By default, this interface shows up when the remote client software is opened. To
connect to the site or group of sites, select and click the group number button on
the Group keypad. If the number is blue color icon, means that number is currently
selected, otherwise it will be gray in color.
Click on the
to connect to the sites.
After the Group number has been selected, you can manually disconnect
and reconnect to the camera by selecting and clicking the camera number
using the camera number keypad.
to disconnect to all host sites and
Click on the
disconnect all currently connected cameras.
II. List Sites
This will provide you a list where you are currently remotely connected. You can also manually connect or
disconnect to site camera using the List Connect, just double left click on each camera you want to connect.
- 12 -
Device Name of the
host Server
List of cameras
connected to the
Client PC
III. PTZ Control,
Control your PTZ camera and all its other associated relays remotely using this option.
Controls the PTZ cameras internal relay (relay1) or the decoder relay
(relay 1). It may also be used to turn on a light or control an access gate.
Wiper (on/off): If you are sing the PTZ cameras with wiper control
relay, this toggles the wiper on and off.
Controls the zoom function of the PTZ camera. Zooms in or
out the image.
Overrides the auto-focus setting of the PTZ camera, allowing
the user to further focus on the image.
Overrides the PTZ cameras auto iris and allows operator to
brighten or darken the image.
When the
the exit button.
button is pressed, the SP Dome preset keypad as shown below appears next to
- 13 -
1. To preset a position of the PTZ camera:
a. Select a camera number that you want to configure. Press the “SP Dome” button. Press a
preset number on this keypad shown below:
b. Adjust the camera on your preferred settings on angle position, focus, iris and zoom using the
PTZ control panel shown here:
c.
V.
When finished setting that up, press “SET” button. Note that the pre-programmed keypad on
the left as shown below will change to blue color number icon. Blue color icon means there is
a pre-programmed preset on this button for the PTZ camera currently selected.
Color Adjust
- 14 -
Allow you to adjust locally the color view
settings such as Hue, Brightness, Contrast,
etc.
VI.
Data Output Control (DO Control)
Data Output Control – This feature is optional only. It is for
the use of alarm devices or sensor relays tied up to the
DVR system. It can be a door or gate opener, etc... It
toggles the relays tied up to the Data Output ports to ON or
OFF.
VII.
Remote Playback,
- This function will allow you to playback and save on your local hard
drive the video recordings from the DVR server. There is a maximum 4 screen limit to do a remote
playback.
To Playback Video Recordings:
1. Click the playback button to have you choose which DVR server would you like to connect to. You will
select from the list of servers as the figure is shown below:
2. The calendar will be displayed as shown here; select the date you want to view and the camera
number keypad will automatically be displayed to have you choose the camera you want to view.
Number icons in blue color means there is a recorded video on it, otherwise they’re empty. The feature
of the remote playback is very similar to the DVR server playback.
- 15 -
Calendar Panel
Camera Number Pad
File List
After the Date and camera number has been selected, you will be able to view previously recorded video
files from the DVR server. Follow the same procedure as that of the DVR server in adjusting your choice of
view to the specific hour and minutes of the day on the time slider.
3. There are three ways to save the video clip files on your local hard drive.
a. File List
b. Clip file button
c. Capture Image
Using the File List option:
button. Scroll up or
After the date and camera number has been selected, click on the
down to find the specific time of the day you preferred to playback or save on the local hard drive.
Just double left click on the file to play it back on the screen. If you need to download the file on
your local hard drive, click the
button and you will be given a message box for the
location of the file after it has finished downloading it to your local hard drive just as shown below:
Shown here is the process of
downloading the video clip file to
local hard drive.
- 16 -
After the file has been
downloaded, this message box
will tell you where the file is
located on your local hard drive.
Using the Search Clip File button,
Video files are stored on the DVR’s hard drive on a file size depending on the Swap File size set
at the DVR’s camera setup. After the date, camera number and the specific time of the day has
been selected, click on this button to start saving the clip file on your local hard drive. The length
of time for this clip file will depend on where in point in time did you start saving the clip file within
the range of the Swap file size. There is no way to tell how long will the search clip file will be. So
the length of the clip usually varies. The best one to use in saving a selected remote video files to
your local hard drive is the File List download.
Capture Image
- click on this button while viewing the video to capture a snapshot in
.bmp format. You will then have a message box to give you the location of the capture image, just
as shown below: (RSearch - indicates a remote search captured image).
VIII.
Local Playback
button and select local playback. The feature of the
To access local playback menu, click on the menu
local playback on a remote client software application is exactly the same as the Playback on a DVR server
system. Please refer to page 11-16 of the Operation manual of the DVR system. You will only have the option
to do a local playback if you have setup the remote client software to record video to your local hard drive
while connected from the DVR or Video servers. Please see the pages 7(item5) through page 9 on this
manual for local recording setup.
IX.
Other Features Menu,
Other features of the client software can be found on this function button such as the remote voice
chat, local playback, view remote and local system log and access the (remote) Device Setup.
1. Remote Voice Chat – an optional feature to have a voice chat to the other remote DVR
server.
- 17 -
2. View Local and Remote System Log – this option allows you to view all the activities going
on to a DVR system and the remote client PC. You must have the user right assigned to
your user account to be able to view remote DVR system log.
Remote DVR System Log
Local Client System Log
3. (Remote) Device Setup – this actually allows you to make changes on the configuration
settings of a remote DVR server system as long as you have the user rights assigned to
your user account at the remote server. However, for security purposes, you will not be
allowed to go to “Password Setup” menu even as you logged in as admin user.
To do a (Remote) Device Setup:
button and select “Device Setup”.
a. Click on the
b. You will then select from the list which specific server would you like to work on.
It takes a while for it to connect to the remote DVR settings depending on the Internet
upload speed connection from the host DVR site.
- 18 -
Requirements to place a DVR on the Internet
On a local network, you should be able to readily access your DVR system remotely via web browser or
the remote client software by using the local IP address of the DVR system.
Note: This information is provided as a courtesy only. Optiview Inc. does not provide
technical support for routers, similar network devices and/or problems in configuring your
local area network. If you encounter problems, please contact your network device
manufacturer, Internet Service Provider or Microsoft for technical support.
1. It is highly recommended to use static public IP address if you need to have the DVR available online
(Internet).
2. Configure a static local IP address on your DVR.
Step to assign static local IP address:
• Close the DVR software program
• Click on “Start” – RUN – on the OPEN box, type in ncpa.cpl, then click OK.
• Right click on Local Area Connection, then select Properties
• Double-click Internet Protocol (TCP/IP)
• Enter your local IP information according to your LAN IP scheme settings
•
Configure port forwarding or any similar function on your local router and enable/open the
following port numbers:
Port number:
80 – Web
5100 – Remote client
5300 – Alarm
7100 – DNS
- 19 -