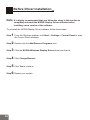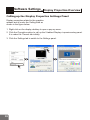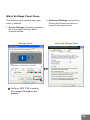
1
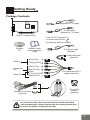
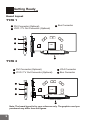
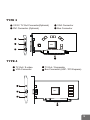
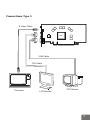
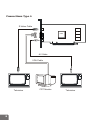
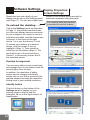
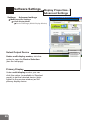
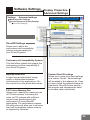
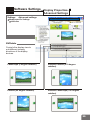
Cinematic Computing for Every User
NVIDIA PCI Express Series
NVIDIA
GeForce FX
User's Manual
Contents
Getting Ready
Driver Installation
Display Modes
Appendices
Contents
1
Getting Ready
1
2
4
5
Package Contents
Board Layout
Features
Connections
10 Before Driver Installation
11 Quick Driver Installation Windows XP/2000/ME/98
12 Software Settings
12 Display Properties - Overview
14 Display Properties - Screen Settings
15 Display Properties - Advanced
Settings
18 nView Display Mode
23 Direct3D Settings
24 OpenGL Settings
NVIDIA PCI Express Series User's Manual
Version B
Sep 2004
P/N: W0500895
Getting Ready
Package Contents
AV cable
(Optional for TV output)
GPU
S-video cable
(Optional for TV output)
NVIDIA Graphics Card
If the TV-OUT connector on
your card looks like this:
,
the following cable is included:
Software
CD
General Guide/
Quick Installation
Guide
S-video-AV cable
(Optional)
Power-split cable
(Optional)
White (S-IN)
Video In
Orange (AV-IN)
Red (Pr-Out)
Component
Out
Video Out
VIDEO
CARD
Blue (Pb-Out)
Green
(Y-Out / AV-Out)
Black (S-Out)
Standard VIVO cable
(Optional)
VIVO cable with HDTV
support (Optional)
DVI to VGA
adapter
(Optional)
Do not have the VIVO cable connected with the AV cable and S-video
cable simultaneously. Connect only the cable for currently desired input
source for the video to be displayed correctly.
1
Getting Ready
Board Layout
TYPE 1
Bus Connector
DVI Connector (Optional)
VIVO / TV Out Connector (Optional)
BIOS
GPU
TYPE 2
DVI Connector (Optional)
VIVO / TV Out Connector (Optional)
BIOS
VGA Connector
Bus Connector
GPU
Note: The board layout is for your reference only. The graphics card you
purchased may differ from the figures.
2
1
TYPE 3
VGA Connector
Bus Connector
VIVO / TV Out Connector(Optional)
DVI Connector (Optional)
BIOS
GPU
TYPE 4
TV Out / S-video
VGA Connector
TV Out / Composite
Bus Connector (AGP / PCI Express)
GPU
3
TYPE 5
TV Out
VGA Connector
Bus Connector (PCI Express)
GPU
Features
Powered by NVIDIA GeForce PCX / GeForce 6 GPU
Imagination
Graphics Beyond
CineFX Engine - Enables stunning, cinematic-quality special effects along with
advanced programmability
Intellisample Technology - Delivers higher image quality through anti-aliasing at
frame rates that rival aliased modes
nView Multi-display Technology - Empower user with maximum flexibility in
display options and control
PCI Express Support - PCI Express is a new Intel bus architecture that doubles
the bandwidth of the AGP 8X bus, delivering over 4GB per second in both
upstream and downstream data transfers.
Microsoft DirectX 9.0 and OpenGL 1.4 /1.5 Optimizations and Support
Video-in / Video-out function support (Optional)
4
Connections Type 1
S-Video Cable
DVI 2
BIOS
GPU
DVI 1
DVI Cable
DVI Cable
Television
LCD Monitor
LCD Monitor
Connecting the VGA cable to the
DVI connector through the DVI to
VGA adapter:
VGA cable
DVI to VGA
adapter
DVI connector
When the DVI to VGA adapter is used on DVI 2 to connect
to a monitor, the TV-out will not function.
5
Connections Type 2
DVI Cable
BIOS
GPU
VGA Cable
S-Video Cable
LCD Monitor
6
Television
CRT Monitor
Connections Type 3
S-Video Cable
BIOS
GPU
VGA Cable
DVI Cable
Television
LCD Monitor
CRT Monitor
7
Connections Type 4
S-Video Cable
GPU
AV Cable
VGA Cable
Television
8
CRT Monitor
Television
Connections Type 5
S-Video Cable
GPU
VGA Cable
Television
CRT Monitor
9
Before Driver Installation
Note: It is highly recommended that you follow the steps in this section to
completely uninstall the NVIDIA Display Driver software before
installing a new version of the software.
To uninstall the NVIDIA Display Driver software, follow these steps:
Step
1 From the Windows taskbar, click Start > Settings > Control Panel to open
the Control Panel windows.
Step
2 Double click the Add/Remove Programs item.
Step
3 Click the NVIDIA Windows Display Drivers item from the list.
Step
4 Click Change/Remove.
Step
5 Click Yes to continue.
Step
6 Restart your system.
10
Quick Driver Installation Windows XP/2000/
ME/98
WE HIGHLY RECOMMEND WINDOWS XP/2000/ME/98 USERS TO USE QUICK DRIVER INSTALLATION.
WINDOWS NT 4.0 USERS PLEASE INSTALL THE DRIVER MANUALLY.
Step
Step
1
Insert the software
pack CD into the
CD-ROM drive.
Step
2
The Autorun screen
will display on the
screen. Select Driver
Install by clicking on it.
Step
3
A dialog box tells you
it is ready to install
the driver. Click Next.
4
Windows is installing the
driver. A dialog box
appears showing the
progress.
GeForce PCX 5750
Step
5
If a warning message
appears, click
Continue Anyway.
Step
6
When it is finished, a
dialog box asks you if
you want to restart your
computer. Tick Yes and
click Finish.
11
Software Settings Display Properties-Overview
Calling up the Display Properties Settings Panel
Display properties related to the graphics
adapter are all under the Settings tab as
shown in the figure below.
1. Right-click on the display desktop to open a pop-up menu.
Method 2
2. Click the Properties option to call up the 5-tabbed Display Properties setup panel.
It is under the Themes tab initially.
3. Click the Settings tab to switch to the Settings panel.
1. Default Monitor on NVIDIA GeForce PCX 5750
12
What Settings Panel Does
The Settings panel contains two major
parts of settings:
2. Advanced Settings, accessed by
clicking the Advanced button as
shown in the figure below.
1 Screen Settings, including resolution
and color depth settings, with a
preview window.
Settings Panel
Advanced Settings Panel
Default Monitor and NVIDIA GeForce PCX 5750
GeForce PCX 5750
1. Default Monitor on NVIDIA GeForce PCX 5750
GeForce PCX 5750 is used as
the example throughout the
manual.
13
Software Settings Display PropertiesScreen Settings
Resolution and color depth of your
display can be set on the Settings panel
(see Page 11). You can also extend your
To extend the desktop
screen to the second device and set its
resolution separatly using this panel.
You need to have two monitors
connected to use this feature.
Call up the Settings panel as described
in Page 11, the preview window shows
you have two display devices connected
to your computer, the one(s) in use is in
solid blue and white, and the unused one
is blurred. In the figure to the right,
device 1 is in use, and device 2 is not.
To extend your desktop to a second
device, click the screen 2 Icon to
highlight it (Step 1). Then check the
check box on the bottom (Step 2). The
result will be as in the second figure.
Screen 1 is the primary screen; and 2,
the extended screen.
1
Step
2. Plug and Play Monitor on NVIDIA GeForce PCX 5750
Step
2
Desktop Arrangement
You can move either screen icons freely
and arrange them in any fashion (see the
second figure from the top).
In addition, the resolution of either
screen can be changed individually;
simply click on one of the screens in the
preview window and drag the resolution
sliding knob to your desired resolution.
Identify button
Click this button on the bottom of the
Settings panel to display on your
primary screen a big 1a, and the
extended, 1b, as in the figure below, for
identification.
2. Plug and Play Monitor on NVIDIA GeForce PCX 5750
2. Plug and Play Monitor on NVIDIA GeForce PCX 5750
14
38
Software Settings Display PropertiesAdvanced Settings
Settings ¾ Advanced settings
Monitor
Model-specific Settings
Default Monitor and NVIDIA GeForce PCX 5750
GeForce PCX 5750
p. 14
1
1 Monitor
Default Monitor and NVIDIA GeForce PCX 5750
GeForce PCX 5750
Refresh Rate
We recommend you set the
refresh rate to 85 Hz to reduce the
flickering of the screen. If 85Hz is
unavailable, use the default value.
21
15
Software Settings Display PropertiesAdvanced Settings
Settings ¾ Advanced settings
Default Monitor and NVIDIA GeForce PCX 5750 Prop...
Model-specific Settings
nView Display Mode
Performance and Quality Settings
Overlay Controls
Full Screen Video
GeForce PCX 5750
Desktop Utilities
NVRotate
2
4
GeForce PCX 5750
1
3
5
GeForce PCX 5750
6
1 nView Display Mode
p. 16
Default Monitor and NVIDIA GeForce PCX 5750
GeForce PCX 5750
p. 21
Default Monitor and NVIDIA GeForce PCX 5750
GeForce PCX 5750
Choose nView modes here.
2 Performance and Quality Settings
Includes Direct3D and OpenGL settings.
16
English
Software Settings Display PropertiesAdvanced Settings
3
Default Monitor and NVIDIA GeForce PCX 5750
Overlay Controls
These controls are used to adjust video quality
such as brightness, contrast, hue and saturation.
GeForce PCX 5750
4 Full Screen Video
Users can also select the default Full screen
device to be as Primary or Secondary Display.
5
NVRotate
p. 23
Default Monitor and NVIDIA GeForce PCX 5750
GeForce PCX 5750
Default Monitor and NVIDIA GeForce PCX 5750
GeForce PCX 5750
6 Desktop Management
Allow you to set up the Media Center
Taskbar Utility and Desktop manager.
17
Software Settings Display PropertiesAdvanced Settings
Settings ¾ Advanced settings
Default Monitor and NVIDIA GeForce PCX 5750
Model-specific Settings
nView Display Mode
nView Modes
Display
Detect Displays
Device Settings
GeForce PCX 5750
GeForce PCX 5750
3
1
Display
The drop-down list includes
all available display output
devices on your system
(see the figure below).
To set one of the devices as the
primary display, select that device
from the drop-down list and then
check Make this the primary display.
You can also disable auto-panning on
the secondary device by checking the
second check box.
Detect Display
Click this button to have the system
detect for any available display devices.
2
Device Settings
Click this button to open a popup menu
that includes settings for output devices.
See page 18 for details.
18
1
2
Software Settings Display PropertiesAdvanced Settings
3
nView Modes
The option checked here determines
how the video is displayed on the
screen(s) using the nView technology.
Four modes are available under
Windows XP/2000 systems.
Under Windows ME/98, only
Standard mode and Clone
mode are available.
Standard (DualView)
Allows only one screen to display the
output video.
Horizontal Span
Check to have the Windows desktop span
horizontally across on two screens.
Clone
Check to have the same images displayed
on the two screens.
Vertical Span
Check to have the Windows desktop
span vertically across on two screens.
What is nView?
nView is a multi-display technology
developed by NVIDIA, which is built into
the latest GeForce series video cards.
nView supports a wide variety of multidisplay modes, offering users maximum
flexibility. It also allows you to set
independent resolution, color depth, and
refresh rate on a per display basis.
nView is only available for
models with dual video
output ports.
19
Software Settings Display PropertiesAdvanced Settings
Settings ¾ Advanced settings
Model-specific Settings
nView Display Mode
Device Settings (Standard Mode)
1
Select Output Device
Click this option to select a device
from its submenu.
2 Color Correction
This dialogue box allows you to adjust
color using slider controls.
20
Default Monitor and NVIDIA GeForce PCX 5750 Prop
GeForce PCX 5750
3
Screen Adjustment
Click the arrow icons to adjust the
position of the screen on your monitor.
Click Display Timing to call up the
panel as the figure below.
Display Timing
General Timing Formula is a standard
used by most newer hardware.
Discrete Monitor Timings (DMT)
DMT is an older standard still in use on
some hardware. Check this option if
your hardware uses DMT.
Select TV Format
Click this button to bring the Select TV
Format menu and select a TV standard
used in your country from the list. The
system will then set the TV format
accordingly.
English
21
Software Settings Display PropertiesAdvanced Settings
Settings ¾ Advanced settings
Default Monitor and NVIDIA GeForce PCX 5750
Model-specific Settings
nView Display Mode
Device Settings (Multi-Display Modes)
GeForce PCX 5750
Select Output Device
Under multi-display modes, click this
option to open the Device Selection
(see the last page).
Primary Display
Under multi-display modes, you can
click this option (unavailable in Standard
mode) to set the selected device (highlighted in the preview window) as the
primary display device.
22
34
Software Settings Display PropertiesAdvanced Settings
Settings ¾ Advanced settings
Plug & Play Monitor &NVIDIA GeForce PCX 5750
Model-specific Settings
Performance and Quality Settings
Direct3D Settings
GeForce PCX 5750
GeForce PCX 5750
Direct3D Settings
Allows you to adjust the
performance and compatibility
options and mipmapping for
your Direct3D games.
Performance & Compatibility Options
This field offers options that change the
performance and the compatibility of
your Direct3D games.
Mipmap detail level
A lower bias provides better image
quality; a higher bias increases
performances of the applications. You
can choose from five preset bias values.
PCI Texture Memory Size
Allows you to specify the maximum size
of PCI texture heap. Increasing this
value on PCI systems with sufficient
memory may greatly improve the
performance of some Direct3D
applications. For performance reasons,
this utility does not allow you to set more
than half the available system memory
as reported by Windows.
Custom Direct3D settings
Allows you to save the current settings
as a custom "tweak". Saved settings
will be added to the adjacent list. Once
you have found the optimal settings for
a particular Direct3D before starting
the program and eliminates the need
to set each option individually.
23
Software Settings Display PropertiesAdvanced Settings
Settings ¾ Advanced settings
Plug & Play Monitor & NVIDIA GeForce PCX 5750
Model-specific Settings
Performance and Quality Settings
OpenGL settings
GeForce PCX 5750
GeForce PCX 5750
OpenGL Settings
Allows you to adjust the
performance and compatibility
options of your OpenGL
application.
Multi-Display Hardware
Acceleration
This option determines advanced
rendering options when using multiple
displays. The options include: SingleDisplay Mode, nView Clone/Span
Mode, and Multi-Device Compatiblity
Mode.
Custom OpenGL settings
A list of the custom settings you have
saved. Selecting an item from the list will
activate the setting. To apply the setting,
please choose the "OK" or "Apply" button.
Note that Multi-display hardware
acceleration options do not apply
when using nView Multiview mode in
Windows NT 4.0.
Vertical Sync
Select the type of vertical synchronization.
Default color depth for textures
This setting item allows you to select
the default Color depth for textures.
24
Buffer flipping mode
Turns on page flipping for full-screen
OpenGL applications which may improve
their performance. If this is disabled,
OpenGL will use a bit block transfer to
flip from the back buffer to the front buffer.
34
Software Settings Display PropertiesAdvanced Settings
Settings ¾ Advanced settings
Plug & Play Monitor & NVIDIA GeForce PCX 5750
Model-specific Settings
NVRotate
GeForce PCX 5750
GeForce PCX 5750
NVRotate
Controls the display view to
suit different viewing
directions of the display
devices.
Landscape (0 degree rotation)
.
Inverted Portrait (270 degree
rotation)
.
Portrait (90 degree rotation)
.
Inverted Landscape (180 degree
rotation)
.
25