1
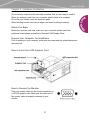
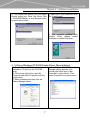
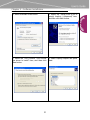
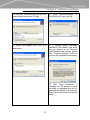
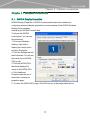
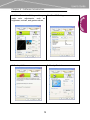
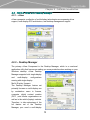
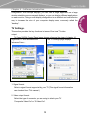
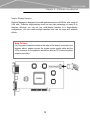
Copyright / Disclaimer
NVIDIA GeForce FX Series
User’s Guide
Copyright
Copyright 2003, all rights reserved. No part of this publication may be
reproduced, transmitted, transcribed, stored in a retrieval system, or translated
into any language or computer language, in any form or by any means,
electronic, mechanical, magnetic, optical, chemical, manual or otherwise,
without the prior written permission of this company,
Disclaimer
We makes no representations or warranties, either expressed or implied, with
respect to the contents hereof and specifically disclaims any warranties,
merchantability or fitness for any particular purpose. Any software described in
this manual is sold or licensed "as is". Should the programs prove defective
following their purchase, the buyer (and not this company, its distributor, or its
dealer) assumes the entire cost of all necessary servicing, repair, and any
incidental or consequential damages resulting from any defect in the software.
Further, this company reserves the right to revise this publication and to make
changes from time to time in the contents hereof without obligation to notify any
person of such revision or change.
All brands or product names mentioned in this manual are trademarks or
registered trademarks of their respective companies.
FCC Statement / Macrovision Statement
FCC Class B Radio Frequency Interference Statement
This equipment has been tested and found to comply with the limits for a Class
B digital device, pursuant to Part 15 of FCC Rules. These limits are designed
to provide reasonable protection against harmful interference in a residential
installation. This equipment generates, uses, and can radiate radio frequency
energy and, if not installed and used in accordance with the instructions, may
cause harmful interference to radio communications. However, there is no
guarantee that interference will not occur in a particular installation. If this
equipment does cause harmful interference to radio or television reception,
which can be determined by turning the equipment off and on, the user is
encouraged to try to correct the interference by one or more of the following
measure:
1.
Reorient or relocate the receiving antenna.
2.
Increase the separation between the equipment and receiver.
3.
Connect the equipment into an outlet on a circuit different from that to
which the receiver is connected.
4.
Consult the dealer or an experienced radio/television technician for help.
Notice 1:
The changes or modifications not expressly approved by the party responsible
for compliance could void the user's authority to operate the equipment.
Notice 2:
Shielded interface cables must be used in order to compiliy with the emission
limit.
Macrovision
This product incorporates copyright protection technology that is
protected by method claims of certain U.S. patents and other intellectual
property rights owned by Macrovision Corporation and other rights
owners. Use of this copyright protection technology must be authorized
by Macrovision Corporation, and is intended for home and other limited
viewing uses only unless otherwise authorized by Macrovision
Corporation. Reverse engineering or disassembly is prohibited
II
Table of Content
Table of Contents
Table of Contents ..............................................................................III
Chapter 1 – Introduction ...................................................................1
1.1 Specifications & Features.....................................................1
Chapter 2 – Hardware Installation ....................................................1
2.1 – Item Check .........................................................................1
2.2 – Installation Procedure .......................................................1
Chapter 3 – Software Installation .....................................................4
3.1 - Display Driver Manual Installation ..................................4
3.1.1 Setup Windows Me/98/95 Standard VGA Mode
(For First Time Installation) .................................................4
3.1.2 Setup Windows Me/98/95 Standard VGA Mode
(For Upgrading) ....................................................................5
3.1.3 Setup Windows Me/98/95 Display Driver (Manual
Setup) ....................................................................................6
3.1.4 Setup Windows XP/2000 Display Driver (Manual
Setup) ....................................................................................7
3.2 – Display Driver Automatic Installation ...........................10
3.3 – WDM Capture Driver Installation ...................................10
Chapter 4 – Software Introduction ................................................. 11
4.1 - NVIDIA Display Properties .............................................. 11
4.2 - NVIDIA nView and Desktop Manager ............................13
4.2.1 – nView ...............................................................................13
4.2.2 – Desktop Manager ............................................................13
III
Chapter 2 – hardware Installation
Chapter 1 – Introduction
1.1 Specifications & Features
The NVIDIA GeForce FX GPU ushers in a new era of graphics and gaming. With the
GeForce FX powering your graphics experiences, you can run applications and
games at higher resolutions and at speeds never before possible. Everything a
bleeding-edge gamer desires is packed inside this powerhouse of a processor,
including the latest high-speed DDR2 memory, an expansive AGP 8X pipeline and
unparalleled Intellisample
TM
technology driving scenes of unrivalled beauty at
unmatched speeds.
Power and performance, the two elements every gamer craves, are the heart and
soul of the GeForce FX. Powered by pure adrenaline and engineered with a passion
for perfection, the GeForce FX delivers cinematic effects beyond imagination. Its
TM
CineFX engine produces gaming effects on par with the hottest motion pictures.
Combined with the industry’s first true 128-bit studio-quality color processing
technology, 3D worlds and characters are more real than anything that’s come
before.
Chapter 2 – Hardware Installation
2.1 – Item Check
z
Graphics Card
z
User’s Guide
z
Drivers & Utilities CD
2.2 – Installation Procedure
z
Caution :
Static electricity can severely damage electronic parts, Take these precautions :
Before touching any electronic part, drain the static electricity from your body. You
can do this by touching the internal metal frame of your computer while it’s
unplugged.
1
Chapter 2 – Hardware Installation
Do not remove a card from the anti-static container until you are ready to install it.
When you remove a card from your computer, place it back in its container.
Do not let your clothes touch any electronic parts.
When handling a card, hold it by its edges, and avoid touching its circuitry.
Before You Begin
Before your process next step, make sure your computer system meets the
peripheral requirements and switch to Standard VGA Display Driver.
Prepare Your Computer for Installation
Prior to working on your computer, make sure the power and any related equipment
are turned off.
How to Insert Your AGP Graphics Card
How to Connect the Monitor
Plug your monitor cable into the monitor connector on
your AGP graphics card. Make sure the other end of
the monitor cable is properly connected to your
monitor.
2
Chapter 2 – hardware Installation
Installation Procedure
z
For the first time installation
1. Locate the AGP bus expansion slot, make sure this slot is unobstructed.
2. Remove the corresponding expansion slot cover from the computer chassis.
3. Ground yourself to an anti-static mat or other grounded source.
4. Position the card directly over the AGP slot and insert one end of the card down
into the slot.
5. Be sure the metal contacts on the bottom of the host adapter are securely
seated in the slot.
6. Connect your analog monitor’s 15-pin VGA connector to the card and fasten the
retaining screws (if any).
7. Connect other cables and devices if available.
Now you are ready to install the driver and utilities.
z
1.
2.
3.
4.
For Systems with existing VGA card.
Change your display driver to Standard VGA Display Driver.
Shut down your computer and unplug all electrical cards.
Replace the existing VGA card with the new graphics card.
Restart your computer and install the new display driver.
3
Chapter 3 – Software Installation
Chapter 3 – Software Installation
3.1 - Display Driver Manual Installation
z
Caution:
Before installing the display driver, make sure your Windows Me/98/95 is
installed in VGA Mode and works fine.
z
For Windows 95 user. To take advantage of all the AGP features, please use
Windows 95 OSR2.1 or later version.
The AGP driver is required for non-Intel chipset. Please use correct AGP drive to
install for different chipset.
z
3.1.1 Setup Windows Me/98/95 Standard VGA Mode (For First Time
Installation)
1. Start Windows Me/98/95.
2. Add New Hardware Wizard dialog box will
appear and detect as Standard PCI Graphic
Adapter ( VGA ).
3. Click Next to begin setup the VGA driver.
If the Windows ask you for your Windows
Me/98/95 CD, insert the CD, or change the
path to \Windows\System folder.
4
4. Windows will prompt you to
restart your Windows, Click Yes to
reboot.
5. After system reboot. You may
begin to setup NVIDIA VGA driver.
Chapter 3 – Software Installation
3.1.2 Setup Windows Me/98/95 Standard VGA Mode (For Upgrading)
1. Start Windows Me/98/95. Click mouse
right button on the desktop and select
Properties from the popup menu, or double
clock on the Display icon from the Control
Panel folder.
2. Select Setting->Advanced, then
select Adapter page, and click
Change button.
3. When Update Device Drivers Wizard
Dialog box appears on screen, select
Display a list of all drivers, so you can select
the driver you want.
4. Select Standard Display Type
from the manufacturers and select
Standard PCI Display
Adapter( VGA ) from the models,
then click OK button.
5. After complete installing Standard
VGA Driver. Click Close button and
restart Windows.
6. After System reboot. You may
begin to setup NVIDIA VGA Driver.
5
Chapter 3 – Software Installation
3.1.3 Setup Windows Me/98/95 Display Driver (Manual Setup)
1. Start Windows Me/98/95,
2. Click mouse right button on the desktop
and select Properties from the popup menu,
or double clock on the Display icon from the
Control Panel folder.
3. Select Setting->Advanced, then
select Adapter page, and click
Change button
4. When Update Device Drivers Wizard
dialog box appears on the screen, select
Specify the location of the driver to show all
VGA devices.
5. Select “Display a list of all the
driver in a specific location”, and
click Next button.
6
Chapter 3 – Software Installation
6. Click Have Disk button from the Select
Device dialog box, Enter the Driver Path
( \NVIDIA\WinMe9x ) or click Browse button
to select driver folder.
7 Select your VGA model and click
OK to start install.
8. After complete installing VGA
Display Driver, please restart
Windows to enable VGA driver.
3.1.4 Setup Windows XP/2000 Display Driver (Manual Setup)
1. Start Windows XP/2000 and insert the
Installation CD disk into the CD-ROM
drive.
2. Click mouse right button upon My
Computer and select Properties from the
popup menu.
3. Select Hardware and then click the
Device Manager button .
7
4. The Windows XP/2000 Device
Manager dialog appears, click
mouse right button upon Video
Controller in others device. Then
select Properties from popup menu.
Chapter 3 – Software Installation
5. Select Reinstall Driver button.
6. Select the “Install from a list or
specify location ( Advanced)” item,
and then click Next button.
7. Select the “Don’t Search, I will choose
the driver to install” item, and then click
Next button.
8. Select Display Adapter and press
Next.
8
Chapter 3 – Software Installation
9. Click Have Disk button so that you can
select display driver from CD disc.
10. Enter \NVIDIA\Win2000
\NVIDIA\WinXP, then click OK.
11. Select your graphic card, then click
Next button.
12. A warning dialog “Hardware
Installation” will shown if the driver
that you choose is not Microsoft
WHQL certified one, anyway, please
click “Continue Anyway” button to
continue the installation procedures.
or
13. After finish installation. A
message box will prompt you that
the driver is upgraded and will not
work until you restart your computer.
Then click Finish button to close this
dialog.
9
Chapter 3 – Software Installation
3.2 – Display Driver Automatic Installation
1. Start Windows XP/2000/NT/Me/98/95, and insert the installation CD disc into the
CD-ROM drive.
2. The display driver installation wizard will appear, Click on VGA Driver Installation
3. The Welcome dialog box will
appears, Click Next button to
continue.
4. Please read Software License
Agreement before begin installing
drivers, and click Yes to continue to
install.
5. After complete installing VGA
driver, Windows will ask you reboot
system to enable VGA display
driver.
6. After system reboot, VGA display
driver is setup OK, and ready to go.
3.3 – WDM Capture Driver Installation
1. Start Windows XP/2000/NT/Me/98/95, and insert the installation CD disc into the
CD-ROM drive.
2. The display driver installation
wizard will appear, Click on
WDM Capture Driver Installation
3. The Welcome dialog box will
appears, Click Next button to
continue.
4. Please read Software License
Agreement before begin
installing drivers, and click Yes to
continue to install.
5. After complete installing VGA
driver, Windows will ask you reboot system to enable WDM Capture Driver.
6. After system reboot, Please check your device manager page, to make sure there
were four NVIDIA WDM capture device inside.
10
Chapter 4 – Software Introduction
Chapter 4 – Software Introduction
4.1 - NVIDIA Display Properties
NVIDIA Display Properties is NVIDIA’s control panel-based user interface for
configuring advanced display properties of current release of the NVIDIA Windows
Display Driver software.
Accessing the NVIDIA Control Panel
To Access the NVIDIA
control panel, you can use
this procedure:
1. From your Windows
desktop, right click to
display the context menu
and click Properties.
2. Click the Settings tab and
then Advanced. You will see
the name of your NVIDIA
GPU on tab.
3. Click the NVIDIA GPU
tab which displays the
name of the NVIDIA GPU.
4. Click Additional
Properties and the any of
those tabs to access its
properties page:
5. To return the NVIDIA GPU page, click OK from any of the pages listed above.
11
Chapter 4 – Software Introduction
A. Color Correction Setting – lets you
make color adjustments, such as
brightness, contrast, and gamma values,
B.
C. Desktop Utilities –
D. Overlay Controls –
12
Direct3D Setting –
Chapter 4 – Software Introduction
4.2 - NVIDIA nView and Desktop Manager
4.2.1 – nView
nView represents a collection of multi-display technologies encompassing driver
support, multi-display GPU architecture, and desktop management support.
4.2.2 – Desktop Manager
The primary nView Component is the Desktop Manager, which is a user-level
application utility that focuses on making you more productive when working on your
Windows desktop. nView Desktop
Manager supports both single-display
and
multi-display
configurations
running with single-display
Multi-Display Support
The Desktop Manager feature set
primarily focuses on multi-display use
by
workstation
users
in
finance,
corporate, digital content creation
(DCC ) and similar organizations as
well as in the mobile (laptop) markets.
Therefore, to take advantage of the
full
feature
set
of
the
Desktop
Manager, your need a multi-display
13
Chapter 4 – Software Introduction
configuration. With multiple displays, you can view a single application as a large
window stretching across several displays, or you can display different applications
on each monitor, Using a multi-display configuration is an efficient and cost-effective
way to increase the size of your computer display area, commonly called the
“desktop”.
TV Settings.
This section provides the key functions in terms of fine tune TV video
output.
To Open NVIDIA Control Panel page, please reference the steps of chapter 4-1.
The TV Settings page displays
Right-click TV icon and select the
–
'advanced' item –
1. Signal format:
Select a signal format supported by your TV.(This signal format information
can checked from TV's maunal.)
2. Video output format:
Select the type of connector you are using to attach your TV.
'Composite Video-Out' or 'S-Video-Out'.
14
Chapter 4 – Software Introduction
Single-Display Support
Desktop Manager is designed for broad applications across NVIDIA’s wide range of
VGA card, Therefore single-display users can also take advantage of many of its
features, Although you can not use multi-display features in a single-display
configuration, you can create multiple desktops and use hot keys and windows
effects.
Note To User:
If 4-Pin power connector located at the edge of the board, as shown in the
diagram above, please connect the system power supply cable and the
4-Pin connector on the graphics card before boot on PC to assure system
operates smoothly.
15