1
Nikon
Autofocus Sp-ee(tligtlt
INSTRUCTION MANUAL
e===============CONTENTS================~
FOREWORO ... ... . ................. .... .
"" 3
NOMENCLATURE "" " .. ... " " .. " ..... ... .. .. . 4-6
BASIC OPERATION ... .............................. 7-12
Installing Batteries.. ...............
. .... . 7
Attaching Flash Unit to Camera Accessory Shoe ..... 8
Programmed TTL Auto Flash Shooting
(with Nikon F-501 I N2020, F-401 I N4004 or
F-301 / N2000)
......................... 9-10
Flash Shooting ... .. ...................... ......... 11-12
AUTO FOCUS FLASH PHOTOGRAPHY
(with Nikon F-501 / N2020 or F-401 / N4004) ... 13-15
SETTING CAMERA SHUTTER SPEED ................. 16
DETERMINING APERTURE .. .. .. .... ...
. ..... 17-32
TTL Mode
(for TTL Automatic Flash Exposure Control) ... 17-21
A1 or A2 Mode (for Non-TTL Automatic Flash
Exposure Control) .............................. 22-25
M Mode (for Manual Flash Exposure Control) .. 26-28
MD Mode (for Manual Flash Exposure Control
with Motor Drive Operation) ....
. .. 29-32
Guide Number .........
. 32
SETTING POWER SWITCH .. ........
. ..... 33
STBY (STANDBY) Position
... 33
ON Position
.... 33
OFF Position ....... .......
. .... ..... 33
READY-LIGHT INDICATIONS .
.. 34-35
2
Ready-Light Warning Functions ...... ........ . ...... 35
USING WIDE-FLASH ADAPTER .
. ... 36
SYNCHRO·SUNLIGHT FILL·IN FLASH
PHOTOGRAPHy .. ....
. .. 37-39
In TTL Mode
................. .. .. ,,""" 38
In A1 or A2 Mode "" ........ .. .. .. " ... " .. .. .. . ". 38
In M Mode ................. ............. ............ 39
DIFFUSING THE LIGHT .... ................... .. 40-42
Bounce Flash Photography Procedure ........ .... ... 41
USing A Diffuser ... ..
. . . ........... •..
.. 42
MULTIPLE FLASH EXPOSURES ... ....... ... .... 42
MULTIPLE FLASH PHOTOGRAPHy ... . ......... .. 43-46
TTL Multiple Flash Photography..
. .. 43-45
Manual Multiple Flash Photography .................. 46
AVOIDING "RED EyE" ........................... .... .. . 46
CLOSE·UP FLASH PHOTOGRAPHY IN TTL MODE ... . 47
TIPS ON SPEEDLIGHT CARE .. .
. .. 48-49
ABOUT BATTERIES .... .............. .... .......... .... 50
ACCESSORIES ........... .. .... .. ... ... 51-52
Sync Cords SC -11 and SC-15 ....
. ..... .. 51
TTL Remote Cord SC -17
. .. ....... . .... 51
TTL Multi-Flash Adapter AS-10 ... .
........ . 51
TTL Multi-Flash Sync Cords SC-18 and SC-19 . . 52
Flash Unit Couplers AS-4 and AS-7 ............... . 52
DC Unit SD-7
... ..... ... ....
. .... 52
SPECiFiCATiONS ....... ... ........................ 53-54
~==FOREWORDI====-.
Thank you for purchasing the Nikon Autofocus Speedlight S8-22. We hope the S8-22
will make photography a much bigger part
of your life. Get to know your S8-22, but
before using it, be sure to read both your
camera instruction manual and this manual. Nikon cannot be held responsible for
malfunctions resulting from use of the
S8-22 other than as specified in this man·
ual, or from use of the S8-22 with a camera
made by a manufacturer other than Nikon.
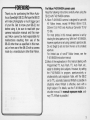
For Nikon F-401/N4004 camera users
Read the following instructions careful ly when using the
S8-22 with F-401 /N4004 camera.
1. Nikon F-401/N4004 camera is designed for use with
AF Nikkor lenses, except AF-Nikkor 80mm 112.8,
200 mm f/3.5 IF-ED and Autofocus Converter TC-161
TC-16A.
For most photos in this manual, aperture is set by
rotating the lens aperture ring . With the F-401/N4004,
however, aperture is set using camera's aperture dial.
Do not forget to set and lock the lens at its smallest
aperture.
For limited use of non-AF Nikkor lenses, see the
F-401/N4004 instructi.on manual.
2_ Most of the explanations in this manual dealing with
Programmed TTL Auto Flash, TTL Auto Flash , etc.,
apply to shooting dark subjects. However, by setting
the F-401/N4004 to program, aperture-priority or
shutter-priority auto exposure mode, with the S8-22
set to TTL, automatic balanced fill-flash is possible in
situations where fill-flash is effective, even with a
bright subject. For details, see the F-401/N4004 instruction manual. (In manual exposure mode, ordinary TTL fill-flash is possible.)
3
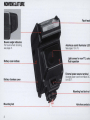
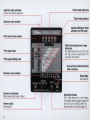
NOMENCLATURE
Flash head
Bounce angle indicators
For bounce flash shooting,
see page 41 .
Battery cover indices
Battery chamber cover
Autolocus assist illuminator LED
See pages 13 to 15.
Light sensor lor non·TTL auto
flash operation
External power source terminal
Accepts power cord from Nikon DC
Unit SD·7 .
Mounting loot lock nut
Mounting loot
4
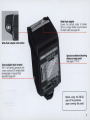
Hot· shoe contacts
Wide-flash adapter
Covers the picture · angle of lenses
28 mm or longer. Slides out and covers
the flash head (see page 36).
Aperture selection/shooting
distance range panel
See pages 17 to 31 .
Sync/multiple flash terminal
For (1) off-camera operation with
a sync cord and (2) multiple flash
photography in manual flash
operation (page 46).
Before using the SB-22,
peel off the protective
paper covering the panel.
5
Aperture index windows
Used in automatic operation .
Flash mode indicators
Flash mode selector
Aperture scale window
Aperture/distance index
windows for MD mode
Film speed scale window
Film speed index
Film speed setting knob
Flash shooting distance range
indicators
The patterned bar (fourth bar from
the top) shows programmed TTL
auto flash information.
Normal (35mm)/Wide (28mm)
index windows
Distance scale window
Ready·light
See page 34 .
Bounce set indicator
Blinks when flash head is tilted .
Power switch
See page 33.
6
Open·flash button
For (1) test firing in A 1 or A2 mode,
(2) multiple flash exposure (page 42)
and (3) to turn on SB·22 after it is
automatically turned off (page 33).
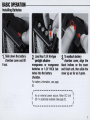
BASIC O P E R A T I O N - - - - - - - - - - - - - - Installing Batteries
1. Slide down the battery
chamber cover and lift
it out.
2
Load four 1.5 V AA·type
• penlight alkaline·
manganese or manganese
batteries or 1.2V NiCd bat·
teries into the battery
chamber.
3
To reattach battery
• chamber cover, align the
black indices on the cover
and flash unit, then slide the
cover up as far as it goes.
For battery information, see page
50.
(
I
\
~----------------,
As an external power sou rce, Nikon DC Unit \
SD-7 is optionally available. See page 52.
~----------------~
I
I
7
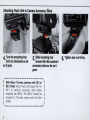
4
Turn the mounting foot
• lock nut clockwise as far
as it goes.
5
Slide mounting foot
• forward into the camera's
accessory shoe as far as it
goes.
I ~----------------,
With Nikon F3·series cameras with DE·2 or \
I
I
I
I
\
DE·3 finder: Attach Flash Unit Coupler AS-4 or
AS-7 to camera 's accessory shoe before
mounting the S8-22. The S8 -22 cannot be
mounted on F3-series camera with the other
finders .
~----------------8
I
I
I
I
I
6. Tighten lock nut firmly.
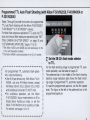
Programmed TTL Auto Flash Shooting (with Nikon F-501/N2020, F-401/N4004 or
F-301/N2000)
Steps 7 through 9 provide instructions for programmed
TTL auto flash shooting with the Nikon F-501 /N2020*,
F-401lN4004** or F-301/N 2000* camera.
For other flash exposure operations (TTL auto, non-TTL
auto and manual flash exposure operations) see "SETTING CAMERA SHUTTER SPEED " on page 16 and
" DETERMINING APERTURE," pages 17 to 32.
* The Nikon N2020 and N2000 are sold exclusively in the
U.S.A. and Canadian markets.
** The Nikon N4004 is sold exclusively in the U.S.A. market.
7. Set the 58-22's flash mode selector
to TTL.
~----------------,
For programmed TTL automatic flash opera"
,"
I
,
,
,
,
,
I
\
tion, note the following :
• Use AI -S type lenses only. With Nikon F-401 1
N4004, use only AF-Nikkor lenses, except
AF-Nikkor 80mm f/2.8, 200mm f/3.5 IF-ED
and Autofocus Converter TC-16 /TC-16A.
• For autofocus operation, set the Nikon
F-501/ N2020's focus mode selector to S for
Single Servo Autofocus mode, or set the
Nikon F-401 /N4004 to A for autofocus mode.
For details , see pages 13 to 15.
~----------------~
I
,
,
,
I
I
For the flash shooting range in programmed TTL automatic operation, see the table on page 20.
The patterned bar in the middle of the flash shooting
distance range indicators also shows the flash shooting range in programmed TTL automatic operation.
To read the programmed aperture, set the film speed
knob. The figure at the left of the patterned bar is the
programmed aperture.
I
I
I
9
With F·301/N2000
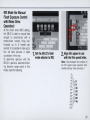
8
Set camera to a programmed exposure mode (P DUAL, P
• or P HI for F-501/N2020; P or P HI for F-301/N2000)_
With the Nikon F·401/N4004, set the camera to either program auto
(aperture dial to S, shutter speed dial to A) or shutter-priority auto (aper·
ture dial to S, shutter speed dial to desired speed) exposure mode.
10
9
Set lens to minimum
• aperture (largest
f-number)_
With AF Nikkor lenses, lock lens
aperture at minimum setting. (See
the lens instruction manual).
With the Nikon F·401/N4004, this
procedure is unnecessary because
the lens is always locked at the
smallest aperture.
Flash Shooting
10. Set power switch to 5TBY (standby
11. Make sure bounce angle is set at 0
0
•
position) to turn on 5B·22.
LED indicating selected flash mode immediately lights
up.
'.
I
•
I
I
\
~----------------~
If the flash head is tilted, '.
the bounce set indicator
blinks. For bounce flash
photograph , see page
41.
I
•
I
I
~----------------~
I
11
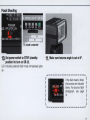
12. Lightly press shutter
13. Fully depress shutter
release button and viewfinder ready-light comes on
to indicate flash is ready to
fire.
release button to take
picture.
(
.-----------
•
•
I
I _
\ -
.....
For blinking ready· '.
light warnings, see
page 35.
I
.... _ _ _ _ _ _ _ _ _ fIIIIII"
12
I
I
I
I
Unless viewfinder ready·light blinks
after the shot, your flash exposure
will be perfect ; if it does blink, pic'
ture may be underexposedmove closer to subject.
I
"""'---------
.....
Do not fire flash toward or ,
near the eyes ; it may dam- I
age the retina.
I
I
I
\
....
_--------.",.I
14. Turn off the 58·22.
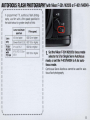
AUTOFOCUS FLASH PHOTOGRAPHY (with Nikon F-501/N2020 or F-401/N4004)I ~----------------,
\
In programmed TTL au tofocus flash photog·
raphy, use film wi th a film speed speci fied in
th e table below for greater depth of field :
Lens ma ximum
aperture
Lens
only
F-501 I
N2020
with
TC·16A
Film speed
1/2 .8 or laster
ISO 50 or higher
Slower than 1/2.8
ISO 100 or higher
1/1.4 or 1/1 .2
ISO 50 or higher
1/1 .8 , 1/2 , 1/2.5 or
fl2 .8
ISO 100 or higher
1
Set the Nikon F·501/N2020's focus mode
• selector to S for Single Servo Autofocus
mode, or set the F·401/N4004 to A for auto·
focus mode.
Continuous Servo Autofocus cannot be used for auto·
focus flash photography.
\
~----------------~
13
2. Set aperture.
With Nikon F·401/N4004, use camera 's aperture dial.
Don 't forget to lock lens at minimum position.
For other flash operations, set as follows :
Lens maximum
aperture
For programmed TTL operation, set to smallest lens
aperture (largest f·number) and lock the lens aperture.
(For details, see the lens instruction manual).
f/2 .8 or faster
f/2 .8 or larger f·number
(f/2 .8, f/4 , f/5 .6, etc.)
Slower than f/2.8
f/5 .6 or larger f-number
(t/5 .6, f/8 , f/11, etc.)
F·501l
N2020
f/1.4 or f/1 .2
f/2 or larger f-number
(f/2 , f/2.8, f/4, etc.)
with
TC-16A
f/1 .8, f/2, f/2.5 or f/2.8
f/4 or larger f-number
(f/4 , f/5 6, f/8 , etc.)
Lens
only
14
Aperture setting
,
0
"
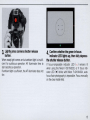
3. Lightly press camera shutter release
button.
When ready-light comes on but ambient light is insufficient for autofocus operation, AF illuminator fires to
start autofocus operation.
If ambient light is sufficient, the AF illuminator does not
fire .
"
4
Confirm whether the green in· focus
• indicator LED lights up, then fully depress
the shutter release button.
If focus-nat-possible indicator LED ( x ) remains lit
when using the Nikon F-501/N2020, or if focus indicator LED ( . ) blinks with Nikon F-401/N4004, autofocus flash photography is impossible. Focus manually
on the clear matte field.
15
SETTING CAMERA SHUTTER S P E E D - - - - - - - - Set came ra's shutter speed , referring to the table
below.
Nikon camera
s~~~~~Or!~~t.ifn
Camera setting
P DUAL IF·501/N2020 only). P. PHI
F·501/N2020·
F·301/N2000 ·
1/125 or slower A. 1/2000-1/2505Oc .
1/125-lsee. and 6
Aperture dial
A
S
A
1.4-32
1/100 or slower 1/2000 - 1/1255Oc. S
1/60-lsee.
S
1/2000 -1 1125s.c. 1.4 -32
1/60 - ls.c . and 6
1.4 -32
All shutler speed settings except
M250 and 6 in P. S and A mod.s
1/4000 -1/500see . in M mode
1/250 or slower
11250 - 1sec. in M mode
M250 and 6 in P. S. A and M
As shown in the table , automatic sync speed sett ing is
available wi th most Nikon came ras.
Running shutter
speed (sec.)
1/125
1/125
as set
Viewfinder sh utter speed indication
125 iiOhlS up
125 Ii hiS up and LED for proper non- flash shutter speed blink.s
LEO lor manually set shutter speed lights up and LED for proper non-flash shutter
speed blinks : no indication at B
Shutter dial
F· 401/N4004
FA
modes· ·
FE2
11250 orslower
FG
1/90 or slower
F3-series
1/80 or slower
Ivia AS ' 4 or AS'7
coupler)
FM2
11250 or slower
FG'20
1/90 or slower
1/100
-
as set
-
1/100
LCD shows 250
11250
asset
LCD shows M250
LCD shows manuaJty set shutter speed
as set
No indication
A.1/4000-1/500see.
11250
11250-6sec.
as set
u
M250 and 6
as set
p. A. 1/ 1000-1/125sec.
1/90
Two LEOs representing 1/90sec . liQht up
1/60- l sec
asset
LEO lor manually sel shutter speed lights up
M90 and 6u
as set
No indication
A
1160
LCD shows 60
1/2000 -1I125sec.
LCD shows MBO
1/60
1/60-6sec. X, 6andT
LCD shows manually set shutter speed , no indication at 8 or T
as set
1/250 lsec, and 8
as set
A. 110 . 111000-1I125sec.
1/90
1/60 - 1sec " M90 and 6
as set
auto flash operation Will be performed With the A/·S type lens and F·5011N2020 or F·301IN2000set at programmed
- In TTL mode, programmed TTL
auto exposure mode.
- -Improper for programmed TTL auto flash operation and TTL auto flash operation.
16
-
as set
1/250
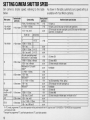
DETERMINING A P E R T U R E - - - - - - - - - - - - TTL Mode
(for TTL Automatic Flash Exposure Control)
TTL mode is for exclusive use with Nikon F-50 1/N2020, F-401 /N4004,
F-301/N2000, FA, FE2 and FG cameras only.
For TTL auto fl ash operation with the Nikon F-501/N2020, F-401 /N4004 or
F-301/N2000, be sure to set the camera to aperture priority auto or manual
exposure mode .
For correc t exposu re in TTL mode, use film with a film speed speci fied in
the table below:
Camera
Film speed
F·501/ N2020 and F·301/ N2000
ISO 25 10 1000
F-401/ N4004 , FA , FE2 and FG
ISO 2510 400
1. Set 58 ·22's mode selector
to TTL.
To determine aperture with the S8-22's aperture selection/shooting distance range panel for TTL auto flash operation , read the following:
(For programmed TTL auto flash operation, see pages 9 to 10.)
17
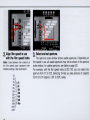
2.Align film speed in use
with the film speed index.
Note: Lines between the numbers on
the film speed scale represent intermediate settings. (See illustration)
32
:~~:25
8P~:50
125-........= 100
160-= 200
;~~/~ 400
500~: 800
1:;/;1: 1600
1
1250
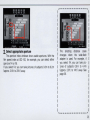
3. Select and set aperture.
The aperture scale window shows usable apertures. (Depending on
film speed in use, all usable apertures may not be shown in the aperture
scale window; for usable apertures, see table on page 20.)
For example, with the film speed index at ISO 100, you can select any
aperture from f/2 to 1/22. Selecting f/4 lets you take pictures of subjects
0.8 m to 6.2 m (approx. 2.6ft. to 30ft.) away.
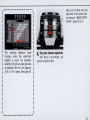
I
.",------------ ...\
The shooting distance scale
changes when the wide-flash
adapter is used. For example,
selecting fl4 lets you take pictures
of subjects 0.6m to 4.4m (approx.
2.0ft. to 14 ft.) away. See page 36.
Next, turn on flash unit and
take shot in the same manner shown in "BASIC OPER ATION ," steps 10 to 14.
4. Set your chosen aperture.
With Nikon F-401/N4004, use
camera 's aperture dial.
I
I
I
I
I
I
\
.....
_-----------"'"
19
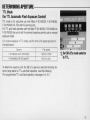
Usable apertures/shooting distance range in TTL mode
200
100
50
25
-
-
-
-
1000"
800"
400
2.8+ '/3
2.8
2
4+ '/3
4
2.8
2
5.6+'/3
5.6
4
2.8
2
8+ '/3
8
5.6
4
2.8
2
c.
11+ '/3
11
8
5.6
4
2.8
~
16+ '13
16
11
8
5.6
22+ '/3
22
16
11
-
-
22
-
-
-
-
0
Normal
With wide·ilash adapter
-
3.2 - 20 (10-66)
2.2-17 (72-56)
-
-
2.2-17 (7.2-56)
1.6- 12 (5.2 - 39)
-
-
1.6-12 (52-39)
1.1- 8.8 (3.6 - 29)
-
1.1-8.8 (36-29)
0.8-6.2 (2.6-20)
2
0.8 - 6.2 (2.6 -20)
0.6- 4.4 (20- 14)
4
2.8
0.6-4.4 (20-14)
0.6-3.1 (2.0- 10)
8
5.6
4
0.6-3. 1 (2.0- 10)
0.6-2.2 (20 - 72)
16
11
8
5.6
0.6 - 2.2 (20-7.2)
0.6 - 1.5 (20 - 5.0)
-
22
16
11
8
0.6 -1 .5 (20 - 50)
0.6-1. 1 (20-3.6)
-
-
22
16
11
0.6-1 .1 (20-36)
0.6- 0.7 (20-23)
"For Nikon F·5011N2020 and F·301lN2000 only.
Programmed TTL auto flash information.
c:=:J
20
=
Un it: m (It )
Shooting distance range
ISO film speed
Exposure compensation in TTL mode
With a dark subject (with low reflectivity) or one that is
light in tone (having high reflectivity), over- or underexposure may occur. To prevent this, compensate
exposure by rotating camera's exposure compensation
dial. With the FG, push the exposure compensation
button. (For details, see came ra instruction manual.)
The shooting distance range for TTL automatic flash
operation varies with the amount of exposure compensation . For compensated distance range, see table at
right , then reset film speed setting on the back of
S8-22.
For example, with ISO 100 film and camera's exposure
compensation dial set at +2, read 25 on the table and
reset the S8 -22 's film speed index to 25.
With an aperture of 1/4 , the flash shooting distance
range-which is 0.8m to 6.2m (2.6ft. to 20ft.) at ISO
100-shifts to 0.6m to 3.1 m (2. 0ft. to 10ft.) at ISO 25.
The Nikon F-401/N4004 has no exposure compensation dial, and compensates exposure with automatic
balanced fill-flash.
~nsat ion value
+2
+1
a
- 1
- 2
Film speed in use
25
50
/' /'
/ ' 25
25
50
100
50
100
200
100
25
50
100
200
400
200
50
100
200
400
800 '
800 '
/'
/'
400
100
200
400
800 ' /1000 '
200
400
800'
/
* For Nlkon F-SOIIN2020 and F-301IN2000 only.
~: Not possible ; make the necessary compensation in
the non- TTL automatic mode (see the following) or
shoot on manual.
21
A1 or A2 Mode (for Non-TTL Automatic
Flash Exposure Control)
Use the S8-22 on Al or A2 mode for automatic operation with Nikon Cameras other than Nikon F-5011
N2020, F-401/N4004*, F-301/N2000, FA, FE2 and FG.
The following procedure lets you select aperture with
the S8-22's aperture selection/shooting distance
range panel for non-TTL auto flash operation.
*Non-TTL automatic operation is not possible when Nikon
F-401IN4004 is set to either program or shutter-priority auto
exposure mode.
1. ~Iign film speed in use with film speed
Index_
Note: Lines between the numbers on the film speed scale
represent intermediate settings. (See illustration)
~~\
64~: 25
80~: 50
125,,: 100
160_: 200
250 / : 400
320
500---:/: 800
640 /.1: 1600
1000//
1250
1
22
I ~------------ ...\
I
I
I
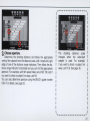
2. Select appropriate aperture
The aperture index windows show usable apertures. With the
film speed index at ISO 100, for example, you can select either
aperture f/4 or f/8 .
If you select fl4 , you can take pictures of subjects 0.8m to 6.2 m
(approx. 2.6ft. to 20ft.) away.
The shooting distance scale
changes when the wide-flash
adapter is used , For example, if
you select 1/4, you can take pictures 01 subjects 0.6m to 4.4m
(approx. 2.01t. to 14 It.) away. See
page 36,
I
I
I
I
I
I
I
I
.... _ _ _ _ _ _ _ _ _ _ _ _ tI>
I
23
Next turn on flash unit and take
shot in the same manner shown
in " BASIC OPERATION ," steps 10
to 14.
il
3. Set 58 ·22's mode selector 4. Set your chosen aperture.
to A1 or A2 according to
the selected aperture.
24
With Nikon F-401/N4004, use
camera 's aperture dial.
Shooting distance range in A 1 or A2 mode
Regardless of the film speed and the correspondi ng
flstop available at A1 or A2 , the auto shooting range is
as shown in the following table.
Auto shooting range
Selector mode
Normal
With wide-flash
adapter
A1
A2
O.6-3.1m
O.8-6.2 m
O.6-2.2m
O.6-4.4m
Exposure compensation in A 1 or A2 mode
With a dark background (one with low reflectivity) or
one that is light in tone (having high reflectivity), overor underexposure may occur. To prevent this , compensate exposure by stopping down or opening aperture.
With a dark background, stop down the aperture 1/2 to
one fu ll f/stop ; when the background is light in tone,
open the aperture 1/2 to one full f/stop.
With the Nikon F-401lN4004, set aperture using the
camera 's aperture dial.
25
M Mode (for Manual
Flash Exposure Control)
In M mode, the S8-22 fires at its
maximum light output regardless
of the flash-to-subject distance.
To determine aperture with the
S8-22's aperture selection/shooting distance range panel for
manual flash operation, read the
following .
1. Set the S8·22's flash
mode selector to M.
2
Align film speed in use
• with the film speed index.
Note: Lines between the numbers on
the film speed scale represent intermediate settings. (See illustration)
~~~:25
8O~: 50
125"-...: 100
160-:
200
250 ....-: 400
320""- 500/'/: 800
640~/k 1600
1000//
1250
26
I
3. Choose aperture.
Determine. the shooting distance and follow the appropriate
vertical line upward from the distance scale until it meets the right
edge of one of the distance range indicators. Then follow the distance range indicator horizontally and you can find the appropriate
aperture. For example, with film speed index set at ISO 100, and if
you want to shoot a subject 3m away, use f/8 .
You can also determine aperture using the S8-22's guide number
(GN) For details, see page 32.
..,------------ ...\
The shooting distance scale
changes when the wide-flash
adapter is used. For example,
if you want to shoot a subject 3m
away, use f/5 .6. See page 36.
.....
_------------
I
I
I
I
I
I
I
I
I
I
27
Next, turn on flash unit and take shot in the same
manner shown in " BASIC OPERATION ," steps 10 to 14.
4. Set your chosen aperture.
With Nikon F-401 / N4004 , use camera 's aperture dial .
28
MD Mode (for Manual
Flash Exposure Control
with Motor Drive
Operation)
At the motor drive (MO) setting,
the S8-22 is able to recycle fast
enough to synchronize with a
motor-driven camera firing continuously up to 6 frames per
second. It is possible to take up to
four full flash pictures in rapid
succession in this way.
To determine aperture with the
S8-22's aperture selection/shooting distance range panel in this
mode, read the following .
1. Set the 58·22'5 flash
mode selector to MD.
2
Align film speed in use
• with the film speed index.
Note: Lines between the numbers on
the film speed scale represent intermediate settings. (See illustration)
32
~~~: 25
80~: 50
125,,= 100
160-= 200
250 ./: 400
320"--- -
5000/:: 800
640/}= 1600
1O00!
1250
29
I
4f11A-------------.,
I
I
I
I
I
I
I
I
3. Choose aperture.
Determine the shooting distance and follow the appropriate
vertical line upward from the distance scale until it meets one of
the aperture/distance index windows for MD mode on the distance
range indicators. Then follow the distance range indicator hori·
zontally and you can find the appropriate aperture. For example,
with film speed index set at ISO 100, and if you want to shoot a
subject 3m away, use f/2 .8.
You can also determine aperture using the S8·22's guide number
(GN). For details, see page 32.
30
The shooting distance scale
changes when the wide-flash
adapter is used. For example, if
you want to shoot a subject 3 m
away, use f/2 . See page 36.
...._------------
Next, turn on flash unit and take shot in the same
manner shown in " BASIC OPERATION ," steps 10 to 14.
4. Set your chosen aperture.
With Nikon F·401/N4004, use camera's aper·
ture dial.
31
The maximum number of flashes for continuous
shooting are li sted below.
Batteries
AA-type alkaline-manganese
batteries inside 88-22
AA-type alkaline-manganese
batteries inside 88-22 plus C-type
alka line-manganese batteries inside
optional DC Unit 8D-7"
Maximum Frames
number of
per
flashes' second
4
61ps
10
61ps
40'"
4.2 1ps
• Don't begin the continuous sequence until the ready-light
has been lit for approx. 30 seconds (with fresh batteries
at 20°C [68 °FJ).
•• For detaits about the SD -7, see page 52.
••• More flashes possible, but never fire the flash more than
40 times. Before firing the flash again, let it rest for at
least 10 minutes.
Note: In M or TTL automatic modes, or A l1A2 modes (nonTTL automatic modes), do not fire the flash more than 10
frames without allowing the flash to rest at least 10 minutes.
Even for fewer flashes, be sure to allow the SB-22 a few
minutes to rest. Using the flash continuousty without cooling
causes malfunction.
32
Guide Number
In M or MD mode, without referring to the aperture selection/shooting distance range panel, you can determ ine the f/stop by using the following equation:
f/stop=
guide number
b"
flash-to- su lect distance
See the table for guide numbers at va rious film
speeds.
Guide number at various film speeds
Unit · m(lt)
With wide -flash
adapter
Normal
Mode
selector
0
!!1
1600
800
400
200
100
50
25
M (manual)
MD
M (manual)
MD
100 (328)
70 (230)
50 (164)
36 (1 18)
25 (82)
18 (59)
125 (41)
32 (105)
22 (72)
16 (52)
11 (36)
8 (26)
5.6 (18)
4 (13)
70 (230)
50 (164)
35 (115)
25 (82)
18 (59)
125(41)
9 (30)
22(72)
16 (52)
11 (36)
8 (26)
5.6( 18)
4 (13)
2.8 (9)
SETTING POWER S W I T C H - - - - - - - - - - - m 06
ft 2
1 1.5
3 4 5
POWER
UNCE OFF.... ST,BY
•
,.oN
3
7 10
FLA
I
GN(lSO lOa) 25(m)/82(ft)
•
STBY (STANDBY) Position
Use to conserve energy and shorten recycling time.
With other cameras:
Though the ON position is normally recommended for
turning on the flash unit, ST8Y can also be used.
With other Nikon cameras , even if the camera 's exposure meter stays on , the S8-22 automatically turns off
when not used for one or two minutes. To turn on
again , set power switch to ON or OFF position , then
reset to ST8Y. For convenience , you may also push
the open-flash button to turn on the S8-22.
ON Position
With cameras other than the Nikon F·501/N2020,
F·401lN4004, F·301/N2000, FA, FE2 and FG :
This position is normally used to turn on the S8-22.
With Nikon F·501/N2020, F·401/N4004, F·301l
N2000, FA, FE2 and FG:
Use the S8-22's ST8Y position to turn on the S8 -22.
In ST8Y position, when the camera 's meter turns off, in
one or two minutes the S8-22 turns off automatically.
To turn the S8 -22 on again, lightly press the camera 's
shutter release button.
Note: Wh en the Nikon FA or FE2 is connected to Nikon
Motor Drive MD -12 via a remote cord, the camera 's meter
stays on and the 58-22 remains on at STBY position.
With the Nikon FA, FE2, and FG:
To turn on the S8-22 when using mechanical shutter
settings (M250, M90 or 8), set power switch to ON.
OFF Position
When not using the flash unit, a/ways set the power
switch to OFF position.
33
READY-LIGHT INDICATIONS,- - - - - - - - - -- FA
F-501/N2020 .
F-301/N2000
When the flash unit is turned on , the S8 -22 's ready-light
lights up to indicate the flash is ready to fire .
To activate the viewfinder ready-light function when
using the Nikon FA, FE2, F-501 /N2020, F-401lN4004,
F-301/N2000, FG or FG-20, first turn on the camera 's
meter by lightly pressing the shutter release button.
34
With alkaline-manganese batteries, if the ready-light
takes more than 30sec. to light up, replace the batteries with a fresh set.
Ready-Ught Warning Functions
To prevent errors, the ready-light inside the camera's
viewfinder blinks in the cases listed below. When blinking occurs, check the S8-22's flash mode selector
setting, the camera 's shutter speed/mode selector setting or film speed setting and adjust as necessary.
1) When S8-22 is set at TTL with cameras other than
Nikon F-501/ N2020, F-401/N4004, F-301lN2000,
FA, FE2 or FG.
Reset S8 -22's flash mode selector to A1, A'2 or M.
2) When using the FA, FE2, or FG to perform TTL automatic flash photography with the camera 's shutter
speed .dial set at a mechanical setting (M250, M90
or 8). Reset shutter speed dial to another shutter
speed setting. For M250, M90 or 8 setting, reset
S8-22's flash mode selector to A1 , A2 or M.
3) When performing programmed TTL auto or TTL
auto flash operation with a camera film speed setting beyond the usable range . Use film within the
approp.riate range for TTL auto flash photography
(ISO 2~ to 400 with the F-40 1/N4004, FA, FE2 or
FG; ISO 25 to 1000 with the F-50 1/N2020 or F-301/
N2000). With the FA, ready-light also blinks when the
film speed setting on the camera is near ISO 12.
4) When shutter speed set on the FE or FM2 is faster
than the flash sync speed. Set the shutter speed to
the flash sync speed or slower one.
5) With the Nikon F-401/N4004, when the built-in flash
and S8-22 are OFF, and when the camera detects
flash is effective, the ready-light in the camera's
viewfinder blinks when the shutter release button is
lightly pressed.
With the S8-22 in TTL, A1 or A2 mode, if both viewfinder ready-light and S8 -22 ready-light blink after
taking pictures (to warn that lighting might have been
insufficient for correct exposure), confirm subject is
within the flash shooting distance range and,. if necessary, use a wide aperture or move closer to the subject.
With the Nikon F-401/N4004, for scenes where the
background is extremely bright, the ready-light may not
blink after the shot, even if flash is insufficient for correct exposure.
With weak batteries, ready-lights blink to indicate insufficient flash power, even if the subject is within the
shooting distance range ; replace batteries with a fresh
set.
35
USING WIDE-FLASH A D A P T E R - - - - - - - - - - -
The angle of illumination of the
S8-22 covers the picture angle of
a 35 mm lens. When the wide-flash
adapter stored in the flash head is
set, it increases the angle of coverage, allowing the S8-22 to be used
with a 28mm lens. When the wideflash adapter is used , the guide
number is reduced to 18 (ISO 100
and meters) or 9 (ISO 25 and
meters), and the shooting distance
range for automatic operation
changes. With the sliding movement of the wide-flash adapter, the
distance scale changes accordingly.
36
Tilt the flash head to the 90° position . Slide out the wide-flash
adapter to cover the flash head.
Turn the flash head to its original
position.
Tilt the flash head to the 90° position. Then, while pushing the
wide-flash adapter lock button,
slide the wide-flash adapter into
the pocket. Turn the flash head to
its original position.
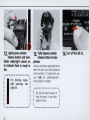
SYNCHRO-SUNLIGHT FILL-IN FLASH PHOTOGRAPHY----For backlit subjects, to fill in shadows and balance
lighting , use the 88-22 even in daytime.
r~----------------,
•\
In the following , use a slower shutter speed to
avoid a dark background.
'.
•
..----------
~----------------~....
Without flash:
The backlit subject
comes out too dark.
With flash :
Both the subject
and the background
come out properly
exposed.
I
I
8y sett ing the F-401!
,
N4004 to program,
aperture-priority or
shutter-priority auto
exposure mode, with
the 88 -22 set to TTL,
automatic balanced
fill-flash is possible in
situations where fill-flash
is effective, even with a
bright subject. For details,
see the F-401!N4004
instruction manual.
(In manual exposure
mode, ordinary TTL fillflash is possible.)
...._-------_ ..
37
In TTL Mode
In A1 or A2 Mode
1. Set the camera shutter speed manually to a flash
1. Determine correct aperture for the backlit subject
synchronization speed or slower speed.
2. Frame the background in the camera viewfinder,
turn on the camera's exposure meter to determine
aperture for a correct background exposure, then
set the aperture on the lens.
3. Set the flash mode selector to TTL, turn on the
S8·22 and take the shot.
With a strongly backlit subject (e.g., scene which includes the sun), it may be difficult to obtain desired
exposure balance. In this case , use the S8-22 in M
mode.
(according to method on page 23) by referring to the
S8-22's aperture selection/distance range panel ,
then set both the aperture index and the aperture on
the lens.
2. Frame the background in the camera viewfinder and
turn on camera meter to determine proper shutter
speed for the aperture set on the lens. The shutter
speed must be equal to or slower than the flash sync
speed-without a proper shutter speed you cannot
perform fill-in flash photography in A1 or A2 mode.
3. Set the shutter speed from step 2 on camera's
shutter speed dial.
4. Set the flash mode selector to A1 or A2 , turn on the
flash unit and take the shot.
With a strongly backlit subject, perform fill-in flash
photography in M mode.
Note: Do not use programmed TTL flash operation for fill-in
flash photography.
38
In M Mode
1. Manually set the camera shutter speed to a flash
synchronization speed or slower speed.
2. Frame the background in the camera's viewfinder,
then turn on the camera's exposure meter to read
proper aperture for correct background exposure,
and set the aperture on the lens.
3. Calculate the flash-to-subject distance using the
equation below and set the 88-22 at the calculated
distance.
.
guide number'
flash-to-subJect =
I/stop
t
II
I
I
I
I
I
I
I
,----------------,
To eliminate harsh shadows caused by ambient
daylight, decrease flash illumination by one or
two f/stops using one of the methods below.
1. Use an aperture one or two f/stops smaller
than that determined in step 2 in combination with a shutter speed slower by one or
two steps.
2. Use a flash-to-subject distance from 1.4 to
two times longer than that determined using
the equation in step 3.
\
I
I
I
I
-=-----
, For guide number, see page 32.
4. 8et the 88-22 's flash mode selector to M, turn on
the flash unit and take the shot.
I
I
I
I
I
I
~----------------,39
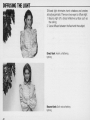
DIFFUSING THE L l G H T - - - - - - - - - - - - - Diffused light eliminates harsh shadows and c reates
attractive portraits, There are two ways to diffuse light:
1, Bounce light off a broad reflective surface such as
the cei ling ;
2, Use a diffuser between the flash and the subjec t.
Direct fla sh: Harsh, unflattering
lighting.
Bounce flash : Soft , natura l·looking
lighting,
40
Bounce Flash Photography Procedure
1. Select a ceiling to bounce the flash from. In color
photography, select a white or si lver cei ling-other·
wise, color photographs come out with an unnatural
colo r cast similar to that of the reflecting surface.
2. Ti lt the flash head tlpwards., towards the ceiling.
To avoid uneven illumination, tilt flash head back
60° or more.
3. Set flash mode selector to TTL for TTL auto fl ash
operation, A1 or A2 for non-TTL auto flash operation, then turn on the flash unit. The bounce indicator blinks.
4. Choose an aperture and perform a test firing. If the
ready-light blinks after test firing , indicating underexposure may occur at the aperture set on the lens,
use a wider aperture or reduce the bounce distance
and test fire the flash again.
5. Bracket you r exposu res. You are recommended to
take additional shots with the camera's exposure
compensation dial set in the + or - direction (not
possible with Nikon F-401/ N4004) for TTL auto flash
operation or with the lens opened up or stopped
down one or two f/stops for non-TTL auto flash
operation .
41
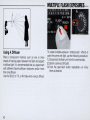
MULTIPLE FLASH EXPOSURES-
Using A Diffuser
Place a translucent material, such as one or more
sheets of tracing paper, between the flash and subject
to diffuse light. It is recommended that you experiment
with different flash-to-diffuser distances and/or more
than one diffuser.
Use the S8-22 on TTL or M mode when using a diffuser.
42
To create multiple-exposure " stroboscopic " effects or
paint the scene with light, use the following procedure :
1. Disconnect the flash unit from the camera body.
2. Set the camera at 8 (bulb).
3. Push the open-flash button repeatedly-as many
times as desired.
MULTIPLE FLASH PHOTOGRAPHY-----------
TTL Multiple Flash Photography
Use the Nikon 8peedlight 88-22, 88-20, 88-18, 8B-16B
or 88-15 connected to an F-501 / N2020, F-401/N4004,
F-30 1lN2000, FA, FE2 or FG camera as a master flash
unit ; and use either the 88-22, 8B-21B, 5B-20, 5B-18,
5B-17, 8B-16A, 8B-168 and/or 8B-15 as slave flash
unit(s). Up to five flash units can be used.
For TTL multiple flash photography, use the optional
TTL Multi-Flash 8ync Cord 8C-18 (1.5m) and lor 8C-19
(3m) to connect the flash units via the TTL multiple
flash terminal . Because the 8B-22, 8B-21 B, 8B-20,
88-18 and 88-15 are not provided with a TTL multiple
flash terminal, it is necessa ry to use TTL Remote Cord
5C-17 when using these flash units as a master flash
unit. To use the 8B -22, 5B-20, 5B-18 and/or 88-15 as
slave flash units, use the A5-10. When using the
5B-140, 8B-14 and/or 8B-11 for TTL multiple flash
photography, you should also use TTL Remote Cord
8C-23. With the Nikon F-401/N4004, programmed TTL
auto flash and TTL auto flash are not possible with the
8B-11/14/140 (even with the 8C-23) or 8B-21. They
cannot be used for TTL multi-fl ash either, even as a
slave flash unit.
8ee the system chart on the next page.
43
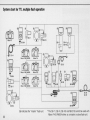
System chart for TTL multiple flash operation
rra
:~"'''I
5B-140
m
Nlkon F·5011N2020
" - - - - - - --1
MQJ~
Nlkon F-401fN4004
Nikon FE2
Nikon F·3011N2000
Nlkon FG
" - - - - - - --1
=E~----------------1-0Dm~,~«::»~~~,~, n~
....
SC-17
SC·18
SC-19
S8-21A
@ indicates the "master" flash unit.
44
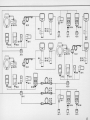
-The S8-11 , S8-14 , S8-140 and S8-218 cannot be used with
Nikon F-401/ N4004 either as a master or slave flash unit.
~~r
e.'7
58·11
58·141
58·140
L1
AS·l1
f-------~
""~,.,.
ctd se·,~
~~0iD----,-------~
~--------------~I --------------~~~~
" ~~~
IAS·'O
I
AS·l 0
I
I
~~Q
i
E1
AS-l1
~'
El 6A
AS·11
'.'6e
~
AS-l0
45
AVOIDING "RED EYE'-'- - -
Manual Multiple Flash Photography
Connect the S8 -22 and other flash units with the
optional Nikon Sync Cord SC-11 or SC-15 via the
S8-22 's multiple flash term inal.
For correct exposure in manual multiple flash operation, be sure all flash units are set at manual flash mode.
Caution
To avoid damaging the flash units or incorrect operation,
never mix Nikon Speedlight with flash units of other manufa cturers.
46
"Red eye " is a common phenomenon in flash photography where the center portions of a subject 's eyes
appear as bright red orbs in color photographs, or
white in black-and-white pictures.
To avoid " red eye;' take any or all of the following precautions :
• Ask the subject not to look directly into the lens when
the picture is taken.
• Using a sync cord or TTL Remote Cord SC-17, remove
the flash unit from the camera and hold it as far away
from the camera as possible.
- Increase the overall room illumination to reduce
opening of the subject 's pupil s.
CLOSE-UP FLASH PHOTOGRAPHY IN TTL MODE-----When used with the Nikon F-S01/N2020, F-401/N4004,
F-301/N2000, FA, FE2 or FG cameras, the optional TTL
Remote Cord SC -17 lets you perform flash shooting
with a subject closer than 0.6m.
1_ Use the SC-17 to connect the S8-22 and camera.
(See SC-17 instruction manuaL)
2_ Position the S8-22 and tilt the flash head down so
light from the flash head covers the subject.
3_Regardless of the lens in use, use the wide-flash
adapter.
4_ To determine aperture, use the following equation:
f/stop~
If you are using ISO 100 film for example, and the
flash-to-subject distance is O.Sm , divide 4 by 0.5 to
get f/8. That means you can use an aperture of f/8 or
smaller. Use as small an aperture as possible.
5_ Set the flash mode selector to TTL, turn on the
S8-22 and take the shot.
With very light- or dark-toned subjects, make exposure compensation with the camera's exposure compensation dial.
A
- -- - - - - - flash-to-subject distance
where A corresponds to the film in use according to
the table below :
47
TIPS ON SPEEDLIGHT C A R E - - - - - - - - - - - -
• To remove smudges, wipe with a
dry soft or silicon-treated cloth .
Never use thinner, benzine or
alcohol-they might damage
plastic parts.
48
• Never disassemble or repair the
flash unit ; if the S8-22 malfunctions, take it immediately to an
authorized Nikon dealer or service center.
• Keep the S8-22 away from places
where temperature is higher than
50°C, and do not store in damp
places. Use within the range of
-10°C-+50°C.
• Keep the S8-22 away from salt
water and out of the rain .
• When not using the S8-22, re move batteries to avoid damage
due to battery leakage. If leakage
occurs, take the S8-22 to your
nearest Nikon authorized service
facility.
• When the S8 -22 is not used, perform the following once a month :
1. Install batteries , turn on the
S8-22 and fire flash a few
times.
2. Wait until the ready-light comes
on .
3. Turn off the S8-22, and remove
the batteries.
49
ABOUT B A T T E R I E S - - - - - - - - - - - - - New batteries
NiCd batteries
Purchase the new (freshest) batteries possible.
In comparison with ' regular batteries, NiCd batteries
provide faster recycling time and better efficiency at
low temperatures.
Before charging NiCd batteries, thoroughly read instructions for batteries and battery charger.
Temperature
Battery life ratings are based on operation at 20°C
(68°F). At other temperatures, battery life is shortened.
For low temperature operation , keep spare batteries
and if possible, use NiCd batteries.
Continuous use
Batteries are drained much more quickly by continuous use than by intermittent use.
Storage
Store batteries in a cool, dry place below 20°C (68°F).
Battery brand
Do not mix battery brands or model numbers, or new
and old batteries.
Disposal
Do not dispose of batteries by burning, and never disassemble batteries.
50
'Batteries with a "+ " terminal that exceeds 6mm in diameter cannot be used.
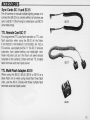
ACCESSORIES---------------Sync Cords SC -11 and SC-15
For off-camera or manual multiple lighting setups or to
connect the S8-22 to a camera without a hot shoe use
sync cord SC-11 (25 cm long) or coi led sync cord SC-15
(one meter long).
TTL Remote Cord SC-17
;:
)
For programmed TTL auto flash operation or TTL auto
flash operation when using the S8 -22 off the Nikon
F- 501/ N2020, F-401/N4004, F-30 1/ N2000, FA, FE2 or
FG camera , use coi led cord SC-17. The SC-17 ensures
automatic sync speed setting and ready-light viewfinder indication just as if the flash unit were directly
mounted on the camera. Comes with two TTL multiple
flash terminals and one tripod socket.
TTL Multi·Flash Adapter AS·10
When using the S8-22, S8-20, S8 -18 or S8-15 as a
slave flash unit or when using more than three fl ash
units, use the AS-10. Comes with three multiple fl ash
terminals and one tripod socket.
AS-10
51
TTL Multi·Flash Sync Cords SC-18 and
SC-19
Use the SC-18 or SC-19 to connect flash units in TTL
multiple flash operation. The SC-18 is approx. 1.5m
long ; the SC-19 is approx. 3m.
Flash Unit Couplers AS-4 and AS-7
To mount the S8-22 on a Nikon F3-series camera with
the OE-2 or OE-3 finder, use the AS-4 or AS-7. The AS-7
lets you change film without removing th e flash unit.
OC Unit SO·7
The Nikon DC Unit SO-7 is an optional external power
source. To use it, connect the SO-Ts power cord SC-16
to the S8-22's external power terminal. Even when
powered with the SO-7, the S8-22 still requires batteries inside the flash unit-do not remove the
batteries.
AS-4
SD-7
52
SPECIFICATIONS--------------All performance data are for normal· temperature operation
[20°C (68°F))
Electronic
construction
Guide number
Autom atic silicon·controlled
rectifier and series circuitry
25 (ISO 100 and meters);
18 (with wide·flash adapter)
41 (ISO 25 and feet) ;
30 (with wide·flash adapter)
Angle of coverage
Horizontal Vertical
Usable lens
Normal
60°
45°
35mm or longer
With wide· fl ash
adapter
70°
53°
28mm or longer
Bounce capability
Flash duration
Power source
Fl ash head can be tilted down
to - yo or up to 90°
Approx. 1/ 1700sec. (at M sett·
ing) or 118000 sec. (at MD
setting)
Four 1,5 V AA·type alkaline·
manganese, manganese or
NiCd batteries ; optional Battery
Pack SD·7 holding six C·type
batteries is available as an
external power sou rce
Power switch
Three positions are provided
-OFF, STBY (for standby)
and ON ; at STBY position with
the Nikon F·501/N2020, F·4011
N4004, F· 301/N2000, FA, FE2
or FG, SB·22 tums off auto·
matically when flash unit is not
used for one or two minutes
and turns on when camera
exposure meter is on
Number of flashes and recycling time at manual
full light output
Battery type
AA·type
alkaline·manganese
Number of flashes Recycling time
(approx.)
(approx. )'
200 times
4sec ,
AA-type manganese
55 times
8sec ,
AA-type NiCd
70 times
3sec,
C·type alkaline·
manganese inside
the opt ional SQ· 7*'
Up to 100 times
2sec,
Up to 300 times
3sec,
Up to 600 times
30sec ,
'For autofocus operation assisted by the AF illuminator,
less number of flashes available,
•• With four AA·type alkaline·manganese batteries installed
in the 58·22,
53
Flash exposure
control
TTL mode
Usable film speed
range in TTL mode
Usable aperture
range in TTL mode
Automatic mode
Five flash modes are provided :
TTL, A1, A2 , M and MD
Used only with Nikon F-5011
N2020, F-401/N4004, F-3011
N2000, FA, FE2 or FG ; for programmed TTL auto flash operation (with F-501/N2020, F-4011
N4004 or F-301/N2000) or TTL
auto flash operation; light is
measured through the lens
ISO 25 to 1000 with Nikon
F-501/N2020 and F-301lN2000
or ISO 25 to 400 with Nikon
F-401/ N4004, FA, FE2 and FG
f/2 to f/22 (at ISO 100)
For non-TTL au to flash operation; light is measured via
light sensor in front of the flash
unit
Usable apertures in automatic mode
54
Aperture
Shooting distance range
fl4 (at ISO 100)
A2 : 0.B-6.2m (2.6-20ft.)
fiB (at ISO 100)
A1 : 0.6-3.1 m (20-10fl.)
M mode
Full output at M setting;
approx. 1/10 power at MD
setting
AF assist LED
Automatically fires LED beam
toward the subject when performing autofocus with the
Nikon F-501/N2020 (Single
Servo) or F-401/N4004 camera
in insufficient light
Dimensions
Approx. 68 (W) x 105 (H) x
80 (D) mm
Weight
Approx. 250g
(without batteries)
Accessory provided Soft Case SS-22
Specifications and designs are subject to change without
notice.
No reproduction in any form of this manual,
in whole or in part (except for brief quotation in
critical articles or reviews), may be made without
written authorization from NIKON CORPORATION .
Nikon
NIKON CORPORATION
FUJ I BLDG., 2·3, MARUNOUCHI 3-CHOME, CHI YODA·KU,
TOKYO 100, JAP,t{N
,
PHONE: 81·3·214·5311 TELEX: J22601 (N IKON) FAX: 81·3·201·5856
Printed in Japan 8&078·C 1 0