1
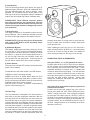
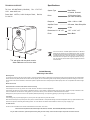
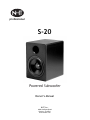
professional
S-20
Powered Subwoofer
Owner’s Manual
NHT, Inc.
6400 Goodyear Road
Benicia, CA 94510
www.nhthifi.com
IMPORTANT SAFETY INSTRUCTIONS
CAUTION
RISK OF ELECTRIC SHOCK
DO NOT OPEN
CAUTION: TO REDUCE RISK OF ELECTRICAL SHOCK, DO NOT REMOVE COVER (OR BACK). NO
USER SERVICEABLE PARTS INSIDE. REFER TO QUALIFIED SERVICE PERSONNEL.
The lightning flash with the arrowhead symbol, within an equilateral triangle, is intended to alert the user to the presence of uninsulated
“dangerous voltage” within the product’s enclosure that may be of sufficient magnitude to constitute a risk of electric shock to persons.
The exclamation point within an equilateral triangle is intended to alert the user to the presence of important operating and maintenance
(servicing) instructions in the literature accompanying the appliance.
WARNING: TO REDUCE THE RISK OF FIRE OR ELECTRIC SHOCK, DO NOT EXPOSE THIS APPLIANCE TO RAIN OR MOISTURE.
1. READ INSTRUCTIONS - All safety and operating instructions should be read before the appliance is operated.
2. RETAIN INSTRUCTIONS - Safety and operating instructions should be retained for future reference.
3. HEED WARNINGS - All warnings on the appliance and in operating instructions should be adhered to.
4. FOLLOW INSTRUCTIONS - All operating and use instructions should be followed.
5. WATER AND MOISTURE- The appliance should not be used near water - near bathtub, washbowl, kitchen sink, laundry tub; in a wet basement near a swimming pool, etc.
6. CARTS AND STANDS - Do not place this product on an unstable cart, stand, tripod, bracket, or table. The appliance should be used only with
a cart or stand that is recommended by the manufacturer.
7. VENTILATION - The appliance should be situated so that its location and position do not interfere with proper ventilation. The appliance should
not be situated on a bed, sofa, rug, or any surface that may obstruct cabinet openings.
8. HEAT - The appliance should be situated away from heat sources such as radiators, heat registers, stoves, or other devices (including amplifiers) that produce
heat.
9. POWER SOURCES - This product should be operated only from the type of power source indicated on the marking label. If you are not sure of the type power
supply in your home, consult your product dealer or local power company. For products intended to operate from battery power or other sources, refer to the operating instructions.
10. POWER CORD PROTECTION - Power supply cords should be routed so that they are not likely to be walked upon or pinched by items placed upon or against
them, paying attention to cords and plugs, convenience receptacles, and the point where they exit from the appliance.
11. POLARIZED PLUG - This appliance is equipped with a polarized line plug (a plug having one blade wider than the other). This plug will fit into the power outlet only one way. This is a safety feature. If you are unable to insert the plug fully into the outlet, try reversing the plug. If the plug still fails to fit, contact your electrician to replace your obsolete outlet. Do not attempt to defeat this safety feature.
12. LIGHTNING - For added protection for this product during a lightning storm, or when it is left unattended and unused for long periods of time, unplug it from
the wall outlet and disconnect the antenna or cable system. This will prevent damage to the product due to lightning and power line surges.
13. OVERLOADING - Do not overload wall outlets, extension cords, or integral convenience receptacles, as this can result in a risk of fire or electric shock.
14. CLEANING - Unplug this product from the wall outlet before cleaning. Do not use liquid cleaners or aerosol cleaners. Use a damp cloth for cleaning.
15. NON-USE PERIODS - This amplifier should be unplugged from the outlet when the appliance is left unused for a long period of time.
16. OBJECT AND LIQUID ENTRY - Never push objects of any kind into this product through openings, as they may touch dangerous voltage points or short-out
parts that could result in a fire or electric shock. Never spill liquid of any kind on this product.
17. DAMAGE REQUIRING SERVICE - The appliance should be serviced by qualified personnel when:
a. The power supply cord or plug has been damaged; or
b. Objects have fallen on or liquid has been spilled into the appliance; or
c. The appliance has been exposed to rain; or
d. The appliance does not appear to operate normally or exhibits a marked change in performance; or
e. The appliance has been dropped or the enclosure is damaged.
18. SERVICING - Do not attempt to service this product yourself, as opening or removing covers may expose you to dangerous voltage or other hazards. Refer all
servicing to qualified service personnel. For service warranty information call the NHT Hotline number: 1-800-NHT-9993.
19. REPLACEMENT PARTS - When replacement parts are required, be sure the service technician has used replacement parts specified by the manufacturer or
that have the same characteristics as the original part. Unauthorized substitution may result in fire, electric shock, or other hazards.
20. SAFETY CHECK - Upon completion of any service or repairs to this product, ask the service technician to perform safety checks to determine that the product
is in proper operating condition.
This symbol indicates that this product incorporates double insulation between
hazardous mains voltage and user accessible parts. When servicing use only
identical replacement parts.
CAUTION
TO PREVENT ELECTRIC SHOCK, DO NOT USE THIS (POLARIZED) PLUG WITH AN EXTENSION CORD,
RECEPTACLE OR OTHER OUTLET UNLESS THE BLADES CAN BE FULLY INSERTED TO PREVENT
BLADE EXPOSURE.
1
INTRODUCTION
Thank you for your purchase, and congratulations on
your selection of the NHT Pro S-20 powered subwoofer.
The S-20 will add dynamic bass response to any pair of
smaller, powered monitors, or can be used to reproduce
the .1 LFE channel for surround mixing. The S-20 was
designed to mate seamlessly with the NHT Pro M-00 and
M-20 monitor systems, and offers tremendous flexibility:
- Use multiple S-20’s to improve bass output if desired.
- Add an optional footswitch and you take the S-20 in and
out of the audio chain on the fly.
- Use as a ported or sealed design as NHT includes a
port plug with every S-20.
Investing some time learning about the S-20's features
and capabilities will reward you with the best possible
performance. Now would also be an excellent time to fill
out and send in your warranty registration card; or register online in the Support section at www.nhtpro.com.
This action will automatically extend both the parts and
labor warranty for an additional two years, for a total of
three years! If at any time, you require assistance, call
our customer service hotline at (800)-NHT-9993 (6489993).
increase power handling. Setting the Subwoofer Bypass
switch to BYPASS eliminates this circuit and sends all
frequencies in the signal to the satellite monitors.
4) Phase Switch: This switch sets the polarity of the
subwoofer at either the 0° position (normal phase) or the
180° position (reverse phase) to achieve the smoothest
possible bass response in your system.
USER CONTROLS / CONNECTORS
1) Sub Level Control:
The subwoofer level control matches the S-20 output
level to the satellite monitors. This control differs from
most as it doesn't turn the woofer all the way off, but
offers a 18dB range of adjustment. Fully clockwise, output is maximum (0 dB or unity). In the counter clockwise
position, the sub output is attenuated by 18dB.
This phase-reversing option is important because when
bass frequencies come from both the subwoofer and the
main speakers, peaks and dips in the frequency
response can occur at the listening position. In these
cases, reversing the subwoofer polarity can improve
blending and balance.
2) Input Sensitivity Control:
This control affects the level of all signals that go through
the S-20, both the subwoofer and satellite signals. Use
the +4dB position when you have a normal or high signal
level (most cases). Use the -10dB position when you
have a very low signal level (rarely). When setting up the
system, start with the control in the +4dB position. If the
system output is adequate, when your signal source has
it's volume or gain control at the maximum position, leave
the control in that position. If the system does not have
enough output, move the control to the -10dB position.
Following this procedure will give you the minimum system noise level.
To properly set the Subwoofer Phase:
• Play familiar music, reversing polarity settings. Listen
from your usual position.
• Avoid evaluating while standing above the subwoofer or
amplifier; sound at the listening position will be significantly different.
• The correct setting is the one in which the bass is the
loudest at the listening position.
3) High Pass (HP) Frequency Switch:
The High Pass Frequency switch determines the lowest
frequency passed on to the satellite monitors. There are
two settings: 80Hz and 110Hz. Selecting the proper
switch position (see the Initial Control Settings section
on Pg. 4) will help blend the overall system response and
5) Low Pass (LP) Frequency Control:
This control allows fine adjustment of the subwoofer
crossover point to match the point where the satellites
roll off at the low end of their response. This detented low
pass control has a range of 80Hz -110Hz.
2
6) Input Section:
The S-20 offers three stereo input options: two types of
balanced inputs (TRS and XLR) and unbalanced RCA.
The two balanced inputs are wired in parallel. Note:
Standard 1/4” connectors may be used in place of the
TRS type if the source equipment employs unbalanced
outputs, but this method may induce unwanted noise.
PLEASE NOTE: These different connector options
have been provided for your convenience. Use only
one connection for the left channel and only one connection for the right channel or damage may result to
your subwoofer.
7) Output Section:
The output connectors to the satellite monitors are balanced, TRS type. Two 12' cables are included to connect
the S-20 left and right outputs to the satellite monitors.
PLEASE NOTE: If you are using your S-20 subwoofer
with a pair of NHT M-00’s, set the sensitivity switch
on the M-00’s to +4.
probably sound best. In a larger room or where the subwoofer is farther from the walls or corners, bass reflex
mode will work best.
8) Subwoofer Bypass:
This feature, helpful when monitoring, allows you to turn
the S-20 “ON” or ”OFF” on the fly. Any standard “latching”
or two-position foot switch that has a 1/4”plug will control
this function. A press of the foot switch will place the S20 and its High Pass filter into BYPASS mode and
remove them from the signal chain. A second press of
the foot switch, causes the S-20 to resume operation.
When installing the port plug, put it in the port until it
stops, and then push it in another 1/4". It is not necessary
to use a lot of force. As long as there is no audible air
noise coming from the port, the plug is in far enough.
CONNECTING THE S-20 SUBWOOFER:
Using the S-20 as a .1 or LFE stand-alone device:
Connect either an RCA, XLR or TRS from your designated LFE channel or buss output assignment to either the
left or right input on the S-20 “INPUT SECTION”. If more
subwoofer sensitivity is required, use a “Y” adaptor and
connect to both left and right inputs. Turn the low pass
control to it’s maximum position. Be sure to utilize surround test tone signals to properly balance the woofer
level with the other monitor channels. Please read
through the Subwoofer Placement and User Controls
sections before you begin.
9) Power Section:
The main power ON and OFF switch is located above the
power cord receptacle.
Located above to the power switch is an LED Inticator:
GREEN: the S-20 is operating normally.
AMBER: the S-20 is in Standy Mode. When the S-20
doesn’t hear an incoming signal after a period of time it
will go into standy mode and will ‘wake up’ and come out
of standby mode when it hears a signal.
RED: the S-20 is in FAULT, consult the Troubleshooting
section of this manual (pg. 5)
Using the S-20 to augment the frequency response of
powered mini-monitors:
Connect the left and right outputs from your mixer or
source unit to either the XLR, TRS or RCA jacks on the
“INPUT” section of the S-20. Now connect the supplied
left and right TRS cables from the “OUTPUT” jacks on
the S-20 to your satellite monitors' input jacks. You may
also want to connect a foot switch (or any standard 1/4”,
2-position switch) into the BYPASS input on the rear of
the S-20. Using this feature is not necessary to the basic
operation of the S-20.
The Port Plug:
The S-20 subwoofer is designed to be used as either a
bass reflex or acoustic suspension subwoofer. With the
port plug removed, the subwoofer is a bass reflex system. With the plug in, the system is acoustic suspension.
In bass reflex mode, the subwoofer will have lower bass
extension and more output capability, but somewhat lessened transient response. In acoustic suspension mode,
the subwoofer will have less bass extension and output,
but better transient response. In a room with a lot of low
frequency standing waves or where the subwoofer must
be placed in a corner, acoustic suspension mode will
3
INITIAL CONTROL SETTINGS:
The S-20 subwoofer amplifier has a number of controls
which can help you determine optimal placement. A little
time spent experimenting with these options should yield
just the right solution for your installation.
Input Sensitivity Selection:
This switch affects the input sensitivity of all three sets
(XLR, TRS and RCA) of input jacks. When satellites
are connected to the S-20, the subwoofer takes over
as the master sensitivity control for the system.
TECH TIP: The bypass foot switch is very helpful when
setting up and tuning the S-20 to your room. When
switching the woofer in and out, no tonal difference
should be noticeable, just bass or no bass.
IMPORTANT: Set the satellite speakers you're using
to the +4 setting. Set the sensitivity on the S-20 to
the appropriate setting for your source equipment.
SYSTEM OPERATION
HP Frequency Selection:
If you are using NHTPro M-00 monitors as satellites, set
the HP FREQ to the 110Hz setting. If you use a different
brand of powered satellites try setting the switch to 110
Hz when the satellite woofer size is 5” or smaller and
80Hz if larger than 5”.
The S-20 used in conjunction with good satellite
monitors, like the M-00's, can play very loud with low
distortion. Although designed to handle a wide range of
listening levels, every speaker has its limits. Harsh
breakup is an indication your monitors or the subwoofer
have exceeded their output limits. Excessive boosting of
bass, treble or equalizer controls can worsen the
problem. If you hear continuous distortion or feel heat
emanating from the drivers, reduce the level immediately. Most speaker damage occurs from sustained high
volume levels, not from transient sounds or brief musical
peaks. Listening at high volume levels is potentially dangerous and can lead to permanent hearing loss,
especially when listening in the near-field. Protect your
ears and use common sense.
Subwoofer Level Setting:
The level you select will depend largely on placement.
We suggest you start with this control in the 12 o'clock
position. Move the control in a clockwise direction to
increase bass output and counterclockwise to decrease
it. Adjust the level so that the S-20 seamlessly integrates
with the satellites, ie. you can tell it's operating but can't
“hear” it as a separate entity.
Low Pass Frequency Setting:
Getting this setting right may take a little time. Using a
variety of demo material you are very familiar with, start
with the control in the 12 o'clock position. If the bass
sounds too “punchy”, turn the control counter clockwise
towards 80Hz. If the bass sounds thin, turn the control
clockwise towards 110Hz.
SYSTEM MAINTENANCE
Your S-20 subwoofer needs no regular maintenance.
The S-20 cabinet is finished with a durable, powder-coat
paint. Light dusting is usually sufficient, although the
cabinet can be cleaned with a non-abrasive, water
based, cleaner.
SUBWOOFER PLACEMENT:
WARNING: To avoid risk of electrical shock, do not
remove the amplifier from the rear of the cabinet.
Refer all repairs to a qualified authorized service center. Always disconnect the S-20 from the AC power
source prior to any maintenance.
Where you locate the S-20 subwoofer will have a profound effect on the system's performance. Unfortunately,
there are no hard and fast rules to find the best location.
If you have some flexibility, we encourage you to experiment. The following guidelines should help you in your
placement decisions:
TROUBLESHOOTING
Placement near walls and corners will reinforce low frequencies; conversely, placement out into open space will
add definition, but will reduce bass weight and extension.
If the S-20 fails to operate when the Power Switch is
turned on, thoroughly check the power cord, input and
output connections
Ideally, the subwoofer should be adjusted so that you
hear the additional bass extension, but cannot localize
the subwoofer itself. The subwoofer should be placed
somewhere in the same plane as the left and right monitors. Listen as you go, using a wide variety of program
material. Jazz recordings with acoustic bass and piano
are particularly helpful in determining location, sub level
and crossover settings. Transparency and integration
are the goals.
If the S-20 turns on but the LED indicator fails to illuminate, mis-wiring or a power surge may have caused the
amplifier to become damaged.
If the S-20 turns on but its status LED appears AMBER,
the unit has gone into FAULT (protect mode), which
could be caused by incorrect wiring, short circuits, or
excessive volume. Turn off the Power Switch on the subwoofer for two or more seconds to reset. If this doesn’t
help, contact NHT customer service.
4
TECHNICAL SUPPORT:
Toll free: 800-NHT-9993 (648-9993).
1252. www.nhthifi.com.
Specifications:
Fax: 1-707-747-
Postal Mail: NHTPro, 6400 Goodyear Road., Benicia,
CA 94510
System Type
Bass Reflex
or Sealed, Powered
Driver
10” Aluminum Cone
(Not Video Shielded)
Response
32Hz - 110Hz +/- 3dB
Amplifier Power
200 watts, Class D Amplifier
Weight
35 lbs.
Dimensions H” x W” x D”
17.5” x 12.2” x 15”
Finish
Matte Black
**
Per the EC directive of WEEE (Waste Electrical and Electronic
Equipment) this product may not be disposed of as waste. It must be
recycled through an approved recycling method. This recycling service shall be provided, at no cost to the consumer, by the distributor or
retail outlet where the product was originally purchased. For recycling, the consumer should contact the place of original purchase for
more information.
**16” with grille and rear panel controls.
Allow additional room for wire dress.
Limited Warranty
Valid Only in the U.S.A.
Warranty Period
For a period of 5 years for parts and 5 years for labor (1 year parts and 90 days labor for electronics) from the date this product is first purchased from an authorized NHT
dealer, Now Hear This (NHT) warrants that if it fails to function properly due to a manufacturing defect, despite its being installed and operated according to these instructions and used under normal conditions, it will be either replaced or repaired with new or rebuilt parts (both at NHT's option) with a unit of comparable value without charge
to you.
What's Not Covered
Altered, defaced or removed serial numbers void this warranty.
This warranty does not cover any product used in trade, business, industrial or commercial applications.
This warranty also does not cover the cabinet or appearance factors, or costs, defects or damage resulting from misuse, abuse, accident, improper maintenance, alterations or modifications not authorized in writing by NHT, or parts or labor from any source other than an authorized NHT service location.
Damage due to power exposure in excess of the speaker's published power ratings; ie, overpowering, lightning or power surges, are also not covered.
Your Rights
This warranty gives you specific legal rights, and you may have other rights which vary from state to state.
NHT limits this warranty to the purchase price of the product, excludes incidental or consequential damages, and limits its obligations under any implied warranties under
state laws to a period not exceeding their warranty periods. As some states do not allow the above limitations, however, they may not apply to you.
To Obtain Service
To find the name and address of the nearest authorized NHT service location, call or write:
Customer Service Department, NHT, 6400 Goodyear Rd., Benicia, CA 94510, 1-800-NHT-9993 (648-9993), www.nhthifi.com
For your future convenience, please keep this warranty with your sales receipt, and record date and place of purchase for further reference.
5