1
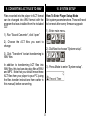
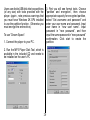
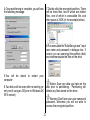
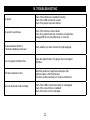
MA828 | Digital MP3 Player
Instruction Manual
Thank You
2 or more separate drives and encrypt these
partitions to keep others from accessing
your files and information.
Thank you for purchasing our Digital Mp3
Player. This uniquely designed device
combines an MP3 Player, voice recorder;
FM radio and removable Flash Memory drive
all in one unit. You can move and store files
between computers and enjoy your MP3
music collection anytime and anywhere.
Record/Replay
Record your voice with the built-in microphone
and save in WAV or ACT formats. Playback
your recording at any time.
Seven Preset Equalizer
Built-In equalizer can be set to Natural,
Rock, Pop, Classical, Soft, Jazz or Heavy
Bass.
1. Feature Summary
Firmware Upgradable
Check our website often for the latest driver,
firmware and software updates:
www.nextar.com
Multiple Playback Modes
Can be set to Normal cycle single song
Cycle Single Song, Play Directory, Cycle
Directories, Cycle All, Shuffle or Browse
Remove able Disk
Use this unit as a removable drive, storing
files, music or anything you want (drivers
required for operating systems prior to
Windows 2000)
Shutdown Timer
Sleep mode and power-save mode to extend
battery life
Full Graphical Menus
Graphical menus with corresponding text
display.
“Dream-space” Disk Mode
With the utility included on the software CD,
you can partition the memory of this unit into
USB Connection
Quick connection to USB port.
4. Basic Functions
Start up/Shutdown
Start up or shutdown player by pressing and
holding the “PLAY” button.
Built-in FM Radio
Listen to FM stations and set your favorite
stations by using Auto Preset or Manual
Preset. The player can save 40 (20 for AM,
20 for FM) local stations.
Entering Menu Modes
Menus: Main menu (entered by momentarily
holding Mode key when not playing), Play
submenu (entered by pressing Mode key
while playing), and Stop submenu (entered
by pressing Mode key when not playing).
2. Introduction
Thank you for purchasing our MP3 player.
Before using the unit please read this
manual carefully to obtain the best possible
performance from your player. Keep this
manual for future reference
Browsing Tracks
Browse forward (to the next track) by
sliding Mode key clockwise, and backward
(previous song) by sliding Mode key counterclockwise.
3. Getting To Know The Player
Using the Different Function Modes
Enter the different modes from the main
menu by sliding Mode key clockwise or
counter-clockwise then pressing Mode key:
Display screen
Main menu:
Enter USB mode*, display shows:
*must be connected to PC
Select Music mode, display shows:
Adjusting Volume
Decrease volume by pressing VOL Increase volume by pressing VOL+.
Key Lock (HOLD) Function
Move the HOLD switch to the position
showing the lock.
When Hold is ON, all controls are locked
out. If you press any controls, you will see
on the display:
Select Record mode, display shows:
Select Play mode, display shows:
When Hold is ON, USB mode will be
displayed as:
Select System setup, display shows:
5. Button/Control Functions
Music mode and Voice mode
Key
Play
Mode
Next
Last
Vol+
Vol-
Action
Stop state
Play state
Play submenu
Stop Submenu
Press and hold
Shutdown
Shutdown
Shutdown
Shutdown
Press and release
Play
Stop
Exit menu
Exit menu
Press and hold
Enter main menu
Enter main menu
Enter main menu
Enter main menu
Press and release
Confirm this
Enter/stop submenu Enter/play submenu option or enter
the next level
Dial
Next song
Hold
Browser forward
continuously
Dial
Last song
Hold
Browser backward
continuously
Increase volume
by one step
Increase volume
continuously
Decrease volume
by one step
Decrease volume
continuously
Press and release
Hold
Press and release
Hold
Next song
and play it
Confirm this
option or enter
the next level
Move submenu
Move submenu
Fast forward
continuously
Fast forward
continuously
Move submenu
Move submenu
Skip backward
Fast backward
continuously
Fast backward
continuously
Increase volume
by one step
Increase volume
continuously
Decrease volume
by one step
Decrease volume
continuously
X
X
X
X
X
X
X
X
Skip forward
Last song
and play it
Record mode
Key
Play
Mode
Action
Stop state
Record state
Press and hold
Shutdown
Stop record
Press and release
Start to record
Pause record
Press and hold
Enter main menu
X
Press and release
Enter record submenu
X
6. Playing Music
To delete files in (stop submenu) mode:
Files can be deleted under their respective
modes.
Adding and deleting files
To add and delete music file on your MP3
player, simply connect the unit to the USB
port of your PC or Notebook computer,
From the “My Computer” explorer, click the
“Removable Disk” drive (which is what the
MP3 player looks like to your computer) and
then copy/cut, paste and delete any file from
you PC to the MP3 player.
1). At Stop Interface (no Stop Interface
exists in FM Mode).
2). Press MODE to enter Stop Submenu.
Before you disconnect the player, please
follow these steps or it may result in lost
files:
1). Double click the “Safely Remove
Hardware icon” in the dialog box (this icon
should be in the lower left bottom of your
screen, near the clock, and looks like a
green arrow).
3). Press NEXT/LAST to select “Delete” or
“Delete All”.
4). Press MODE to enter Delete Interface.
2). Click stop and the next dialog box will tell
you that you can safely remove your hardware
now.
5). Press NEXT to switch between “No” and
“Yes”.
3). Click “OK”, then you can unplug the unit
safely.
6). Press MODE to confirm and deletion
starts.
To play music.
4). Choose music
Last: choose last song
Next: choose next song
“Delete all” will delete all files in the current
mode under the current directory.
(For example, only music files will be deleted
if you choose Delete All under the music
mode).
5). Control volume
VOL+: increases volume
VOL-: decreases volume
Attention: All keys have no effect if HOLD
button is in the locked position; If “Power
Off/Power Save” mode is set, Player will
shut down automatically at sestet time.
Attention: you must remove the player
from your PC if you delete files on PC, or
you will receive a “the files are not deleted”
warning.
Equalizer Mode
1). While playing music.
Getting Started
1). Connect earphone to earphone jack on
unit
2). Please make sure keyboard is unlocked.
2). Enter play submenu by pressing MODE.
3). Start up player and enter “Music mode”
By holding PLAY momentarily; press PLAY
again
3). Dial Next to choose “Equalizer”.
4). Enter “Equalizer” by pressing MODE.
Name of song: Jay-Sky.mp3 / Name of lyric
file: Jay-Sky.lrc
How to know whether a song has lyrics:
If there is a lyric file matching the song, the
icon on the upper left corner of music mode
should change to “ “ .
5). Dial Next to choose, press Mode to
select.
How to display the lyrics:
1). Find lyric match with song:
2). Press and hold Mode to enter lyric
interface.
6). Instruction for all kinds of sound effect
(EQ):
3). Display lyrics.
Displaying Synchronized Lyrics (Karaoke
function)
This player supports “LRC” files. (Search
online for “LRC lyrics” – these files play
lyrics along with music simultaneously.)
4). Return to music mode by pressing
Mode.
How to use lyric files:
Keep the names of lyric file and song the
same. Such as:
5). Cycle lyrics manually: Move lyrics forward
or backward by pressing VOL+ or VOL.
7. Voice Recorder
5). Other operations use steps 1 through 3.
Note: Voice recording requires significant
battery power. Check you batteries before
recording.
6). Voice recordings are saved in the current
directory; set in “stop record/submenu/
directories of main disk”
You can save ninety-nine recorded files in
each directory.
If “The space is full” displays, there is no
more space for new files; delete other files
to free up space.
Record mode
1). Enter main menu.
If “The directory is full” displays, there
are 99 record files in the current directory;
delete files or switch to another directory.
Choose Record Type
1). From the main recording interface:
2). Dial Next to choose record mode.
3). Press Mode to enter record mode.
2). Press Mode to enter record submenu.
4). Press Play to start recording.
8. Playing recorded files
3). Dial Next, choose the submenu “record
type”:
1). Enter main menu.
4). Press Mode to enter the option:
2). Dial Next to choose “Voice mode”.
3). Press Mode to enter Voice mode.
5). Dial Next to choose record type.
6). Press Mode to confirm your choice.
7). Press Play to start recording (VOR can
pause recording).
4). Press Play to start playing.
5). Choose recorded file:
Last: choose last record file
Next: choose next record file
8). Record type:
32K/WMA: High-quality, WAV format
8K/ACT: Long recordings ACT format
32K/VOR: High-quality, sound control, WAV
8K/VOR: Long records, sound control, ACT
6). Control volume:
VOL+: increase volume
VOL-: decrease volume
10
9. Converting ACT Files to WAV
10. System Setup
Files recorded into the player in ACT format
can be changed into WAV format with the
program that was installed from the included
CD:
How To Enter Player Setup Mode
Set system parameters here. These will need
to be reset after every firmware upgrade
1). Enter main menu.
1). Run “Sound Converter”, click “open”
2). Choose the ACT files you want to
change
2). Dial Next to choose “System setup”.
3). Click “Transform” to start transforming to
WAV files
In addition to transforming ACT files into
WAV files, this tool can also play files of WAV
and MP3. Note that you should move these
ACT files from your player to your PC (using
the files transfer instructions from earlier in
this manual) before converting.
3). Press Mode to enter “System setup”.
11
Overview Of Settings
Record time
Set save time and date
for recorded files
Backlight
Set the amount of time the
backlight remains on
Languages
Sets different language
Power Off
Sets the automatic shut off timer
(set minutes until shutdown)
Replay mode
Sets the playback parameters
Contrast
Sets the contrast of
display screen
Online mode
Sets Dream Space
mode parameters
Memory Info
View the EMS memory
and service condition
Firmware version
Display the firmware revision
Firmware Upgrade
Exclusive use for
upgrading firmware
Exit
Exit the current interface
11. Detailed operating
instruction
Set “Record time”
1). Interface for system setup.
2). Press Mode to enter the record time
interface.
3). Press VOL+/- to select number to
change:
4). Dial Next/Last to increase/decrease
number:
5). Exit by pressing Mode after change.
12
Set Backlight time
1). Interface for setting system.
Set Language
See “Backlight time” - operations are the
same.
Set Power off
See “Backlight time”- operations are the
same
2). Dial Next to choose “Backlight”.
Power-save mode shuts it down automatically
if no buttons are pressed during the set time
and the unit is not playing
3). Press Mode to enter interface.
“0” denotes that this function has been
disabled;
“Sleep mode” shuts the unit down
automatically no key is pressed during the
set time - whether player is stopped or
playing. The sleep mode is only active once
after it is set. Once the player is restarted it
must be reset.
4). Dial Next/Last to adjust time.
5). To exit press Mode after change.
Set Replay Mode
Press Mode to enter interface, Dial to
choose:
“Manual mode” denotes that you set a pause
manually;
13
Firmware Upgrade
Enter this interface
firmware.
“AUTO mode” denotes that it will pause
automatically in replay.
Adjust Contrast
See “Backlight time”- operations are the
same.
to
upgrade
your
Advanced Tip: Exit menus rapidly by
pressing Play after setting options. This
function works on any menu.
Online Mode
Operating systems prior to Windows 2000
Service Pack 4 cannot support two drive
partitions. To display chosen partition after
connecting to your PC, you need to choose
which disk you want to use between “single
normal disk” and “single cryptographic disk”
after setting up partitions using the “Dream
Space” utility.
12. USB Removable Disk Operation
This player supports standard USB
functions, for systems running Windows98
(with the included driver), Windows 2000
and newer (drivers not required), MacOS X
10.3 or Linux Red Hat 8.0 or newer.
This player can be supplied power via USB,
and can be played without batteries. From
the main menu, choose the work mode you
want and enter it. (To enter the main menu
from Standby, press Mode.)
Memory Info
The number denotes the remaining capacity
of disk - the percentage denotes the amount
of space used.
Firmware Version
Identifies the current edition of the player
firmware
To connect to a PC, connect unit and PC
with supplied USB cable. The player has
three display modes:
14
1). Standby State
2). Dial Next to choose “system setup”.
2). Downloading/uploading state
3). Press Mode to enter “system Setup”.
4). Dial Next to choose “firmware upgrade”.
New folder
This player supports up to ninety-nine onelevel folders created by the user.
5). Press
upgrade”.
13. Upgrading The Player
Upgrade this player or service the system
firmware with the software tool that was
installed on your PC from the installation
CD.
Mode
to
enter
“firmware
6). Connect player to PC.
1). Enter main menu.
7). Run the upgrade tool “MP3 Player
Update” on the computer, clicks the button
called “Choose new edition of firmware file”.
15
14. Miscellaneous Settings
8). Choose new firmware from the CD, or
select the firmware file previously downloaded
form the Nextar homepage 9). Click the “begin
upgrade” button to start the upgrade.
Choosing Different Directories (stop
submenu)
In order to play and manage sorted
files, users can put files into directories
(directories need to be created beforehand).
This player supports ninety-nine one-level
subdirectories.
10). Follow all prompts on the unit display.
Once the upgrade is complete and successful
the following is displayed on player:
1). Directories can be made under record,
stop and play modes.
Upgrades for firmware are for
improvement and optimization of the
performance of the player. Normal operation
can be affected if you do not regularly
upgrade your firmware.
2). Press Mode to enter “Stop submenu”.
Upgrading the firmware could cause
the player to function incorrectly if not done
properly. Please read the instructions before
you begin. This operation is meant for people
who have some computer experience.
3). Press Mode again to enter choose
directories interface.
Do not upgrade/install firmware not
intended for this unit. Do not use this unit’s
firmware upgrade for other units.
16
4). Dial Next or Last to choose directories.
To select a chosen directory press Mode.
1). Playing music.
Attention: Directories within a mode are
independent of the other modes’ directories.
They may be given the same name and
same settings as directories in other modes,
but they will not affect other the other
directories under other modes.
2). Press Mode to enter submenu.
3). Dial Next to choose “Tempo rate”.
Play Mode (play submenu)
You can choose different play modes while
playing music or record files.
4). Dial Next to choose “Tempo rate”.
5). Dial Next to speed up, Last to slow.
Play Speed (Play submenu)
You can choose different play speeds while
playing music (MP3 and recorded files only)
The actual pitch of the music or recording
should not change:
Attention: The speed setting will apply to all
songs until changed.
17
Replay Mode (Play submenu)
Enter by pressing “REC/A-B” directly or from
submenu.
5). Dial Next to confirm starting point A.
A-B replay
1). Play music or record.
6). Dial Next to confirm starting point B
Repeat play between A-B, exit Reread after
setting times; Set point A again (see “Replay
times” below for play time)
Under Replay mode, set “Tempo Rate”
directly by pressing VOL+ or VOL-.
2). Press Mode shortly to enter submenu.
Follow Read Function (play mode does
not have this function)
1). Replaying between A-B.
3). Dial Next to choose “Replay mode”.
2). Dial Next to enter Follow-read mode.
4). Press Mode to enter “Replay mode”:
18
3). It begins to record the voice of user when
Replay icon changes to follow-read icon
, length is the same as the time of the
A-B replay.
Dial Last to go back to “Follow-read
function”.
Replay Time (Play submenu)
The replay time determines how many times
the unit should replay A-B before exiting.
4). Play original voice if the time ends and
the icon changes to
, dial next to enter
this function at this time.
Replay Separation (Play submenu)
Replay separation determines the number
of seconds between repeat plays.
Return to “A-B replay” by dialing Last
under this mode.
Contrast Function (play mode does not
have this function)
1). The reread icon displays as
, after
entering this function. It plays original
sound.
15. Dream Space Partition &
Encryption Functions
Some users may have the need to hide
information on their unit from unauthorized
access. This is often the case when the unit
is shared by multiple users.
2). Icon changes to
after playing original
sound. Now it plays the follow- read sound
of user.
By allowing users to create separate
partitions on their unit, and then encrypt
those partitions, Nextar has solved this
problem.
3). Plays original sound again after playing
follow-read sound of user, repeats until
Mode is pressed to exit.
19
Users can divide USB disk into two partitions
(of any size) with tools provided with the
player. (again , note previous warnings that
you must have Windows 2K SP4 installed
to use the partition function. Otherwise you
must encrypt the entire drive).
3. First you will see format tools. Choose
“partition and encryption”, then choose
appropriate capacity for encrypted partition,
select “Set username and password” and
enter your user name and password. Input
user name in “new user name”. Input
password in “new password”, and then
input the same password in “new password”
confirmation. Click start to create the
partition.
To use “Dream Space”:
1. Connect the player to your PC.
2. Run the MP3 Player Disk Tool, which is
available in the included CD and needs to
be installed on the user’s PC
20
4.Once partitioning is complete, you will see
the following message:
7.Double click the encrypted partition. There
will be three files, two of which are hidden
files, one of which is executable file, and
disk space is 300K (in the example below).
8.Run executable file “RdiskDecrypt.exe”, input
user name and password in dialogue box. If
correct, you can unencrypt the partition (disk)
and view/manipulate the files on the drive
5.You will
computer
be
asked
to
restart
your
Notice: Save any data you have on the
disk prior to partitioning. Partitioning will
delete any files stored on the drive.
6.Two disks will be seen after re-starting (or
only one if using an OS prior to Windows 2K
SP4 version)
Warning: Don’t lose your user name and
password, otherwise you will not able to
access the encrypted partition.
21
16. Troubleshooting
No power
Check if the batteries are installed correctly;
Check if the USB connection is solid;
Check if the player has been started.
No sound in earphones
Check if the volume is turned down;
Check for a problem with the connection of earphones;
Damaged MP3s can play differently, or not at all.
Unusual situation with the
instructions displayed onscreen
Check whether you have chosen the right language.
Can not played the Music files
Check the digital format. This player does not support
DRM files.
FM radio reception is bad
Adjust the positions of earphone and player (the
earphone cable is the FM antenna)
Shut down nearby electronics to reduce interference.
Can not download music normally
Check if the USB is connected solidly or is damaged;
Check if the correct driver is installed;
Check if the drive is full or damaged.
22
17. Technical Specifications
Connection to PC
EMS memory
Power supply
Record
MP3, WMA, WMV, ASF
Music format
Temperature
Multi-language show
Supported operating systems
USB 2.0 full-speed
Flash storage: 64MB - 1GB
One AAA No.7 alkaline battery
The longest play time:
10H
Sampling rate
8KHz
Record format
WAV (32K bps), ACT (8K bps)
Record time
35H (ACT, 128M Flash)
Highest output
(L) 10mW+ (R) 10mW (32Ohm)
of earphones
MP3 bits rate
8K bps – 320K bps
WMA, WMV,
5K bps – 384K bps
ASF bits rate
Frequency response
20Hz to 20KHz
SNR
85dB
MP1, MP2, MP3, WMA, WMV, ASF, WAV
-5 - 40
Simple Chinese, English, Trad Chinese, Japanese, Korean,
French, Italian, German, Spanish, Swedish, Portugal,
Danmark, Dutch, Thailand, Russia, Czech, Poland
Windows98/SE/ME/2000/XP/2003, Mac OS 10, Linux 2.4.2
Attention: Specifications or design is subject to change without prior notice.
23