1
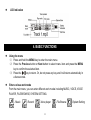
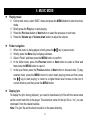
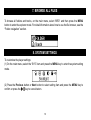
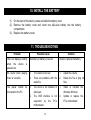
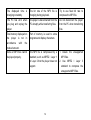
0 TABLE OF CONTENT 1. FEATURE SUMMARY..........................................................................................................................................................................2 2. INTRODUCTION..................................................................................................................................................................................3 3. GETTING TO KNOW THE PLAYER....................................................................................................................................................3 Appearance and Controls......................................................................................................................................................................3 LCD Indication.......................................................................................................................................................................................4 4. BASIC FUNCTIONS.............................................................................................................................................................................4 Using the Menus...................................................................................................................................................................................4 Enter Various Functional Modes...........................................................................................................................................................4 Basic Operations… … … … … … … … … … … ......… … … … … … … … … … … … … … … … … … … … … … ......................................................5 5. MUSIC MODE.......................................................................................................................................................................................6 Playing Music........................................................................................................................................................................................6 Folder Navigation..................................................................................................................................................................................6 Display Lyric..........................................................................................................................................................................................6 A-B Repeat............................................................................................................................................................................................7 Set Play Mode.......................................................................................................................................................................................7 Set EQ Mode.........................................................................................................................................................................................8 Set SRS and WOW Sound Effect.........................................................................................................................................................8 Delete Track..........................................................................................................................................................................................8 6. VOICE RECORDING............................................................................................................................................................................9 Record...................................................................................................................................................................................................9 Play Recordings....................................................................................................................................................................................9 7. BROWSE ALL FILES..........................................................................................................................................................................10 8. SYSTEM SETTINGS..........................................................................................................................................................................10 9. DOWNLOAD AUDIO FILES...............................................................................................................................................................12 Connect to the PC and download audio files......................................................................................................................................12 Remove the Player safely from the PC...............................................................................................................................................12 10. INSTALL THE BATTERY..................................................................................................................................................................13 11. TROUBLESHOOTING......................................................................................................................................................................13 12. SPECIFICATIONS............................................................................................................................................................................15 13. LISTENING CAUTIONS … … … … … … … … … … … … … … … … … … … … … … … … … … … ..… … ........................................................16 14. PRECAUTIONS................................................................................................................................................................................17 FCC CAUTION.......................................................................................................................................................................................18 FCC COMPLIANCE................................................................................................................................................................................18 1 THANK YOU Thank you for purchasing our digital MP3 player. This uniquely designed device combines an MP3 player, voice recorder and removable flash memory drive all in one unit. You can transfer files between this player and your computer, and enjoy your MP3 music collection anytime and anywhere. 1. FEATURE SUMMARY High-speed USB2.0 interface Multiple audio format support: MP1, MP2, MP3, WMA, WAV Folder navigation function Driverless removable drive functionality Voice Recording 7 preset equalizer settings: Normal, Rock, Pop, Classic, Soft, Jazz and Bass Easy-to-read LCD display Multiple play modes: Normal, repeat one, repeat all, folder, repeat folder, Random and intro SRS WOW sound effect setting Auto power off Power off timer Easy-to-understand graphical menus Lyric sync function (Karaoke mode) 2 2. INTRODUCTION Thank you for purchasing our MP3 player. Before using the unit, please read this manual carefully, to obtain the best possible performance from your player. Keep this manual for future reference. 3. GETTING TO KNOW THE PLAYER Appearance and Controls A. B. C. D. E. F. G. H. I. 3 Volume down Volume up Previous Next LCD display Play/Pause button Earphone jack MENU button USB connector LCD Indication 4. BASIC FUNCTIONS Using the menu (1) Press and hold the MENU key to enter the main menu. (2) Press the Previous button or Next button to select menu item and press the MENU key to confirm the selected item. (3) Press the key to return. Or, do not press any key and it will return automatically in a few seconds. Enter various work mode From the main menu, you can enter different work modes including MUSIC, VOICE, VOICE PLAYER, FILE BROWSE, SYSTEM SETTING. - Music - Record -Voice player 4 -File Browse -System Setting Basic Operations Function Power On/Off Play/Pause Adjust Volume Previous/Next Fast Forward Rewind Lock/unlock buttons Operation Press and hold the key until you see prompt on the display. Press the key to play or pause. Press the Volume up or Volume down button to increase or decrease volume. Press the Previous button or Next button to play the previous or next track. Press and hold the Next key to fast forwards. Press and hold Previous button to fast backwards. (1) On the main menu, select“SYS”and then press the MENU button to confirm. (2) Press to select“KeyHoldTime”and then press the MENU button to confirm. (3) Press to set an idle time after which the buttons are locked automatically. To unlock buttons, press and hold the MENU button. 5 5. MUSIC MODE Playing music (1) On the main menu, select “MSC”menu and press the MENU button to enter the music mode. (2) Briefly press the Play key to start playing. (3) Press the Previous button or Next button to select the previous or next track. (4) Press the Volume up or Volume down button to adjust the volume. Folder navigation (1) When the music is being played, shortly press the key to pause music. (2) Shortly press the Menu key to display submenu. (3) Select “Folder”and then press the MENU button to confirm. (4) In the folder mode, press the Previous button or Next button to select a folder and then press the MENU button to open it. (5) In the open folder, press the Previous button or Next button to browse tracks. To play selected track, press the MENU button to enter music playing mode and then press the key to start playing; to return to a higher folder level, browse to the root of current directory and then press the MENU button. Display lyric To display the lyric during playback, you need to download a lyric file with the same name as the current track title to the player. The extension name for the lyric file is “.lrc”; you can download it from the related website. Note: The lyric file and the track should be in the same directory. 6 A-B Repeat To repeat specified section of the current track, (1) When the music is being played, shortly press the MENU button to display submenus. (2) Select “Replay”and then press the MENU button to enter A-B repeat mode. At the same time, the start point of the section is selected. (3) At your desired end point, press the Next button to confirm end point of the repeat. The section between the start point and the end point begins to be played repeatedly. (4) To stop A-B repeat, press the MENU button. Set Play Mode You can switch between the following play modes: Normal -Play all tracks in order and stop after playing all Repeat One - Keep repeating the current track Folder –Play all tracks in current folder Repeat folder –Repeat all tracks in current folder. Repeat All - Play all tracks in order and repeat Random - Play all tracks randomly Intro- Play the first 10 seconds of each track To select play mode: (1) When the music is being played, shortly press the MENU button to display submenu. (2) Select "Play Mode" and then press the MENU key to show the provided options. (3) Press the Previous button or Next button to select the desired repeat mode, and press the MENU key to confirm or press the key to cancel and return. 7 Set EQ mode You can play the tracks in different sound effect. The device provides 7 preset EQ modes: Natural, Rock, Pop, Classic, Soft, Jazz, and Bass. To set the EQ mode: (1) When the music is being played, shortly press the MENU button to display submenu. (2) Select "Equalizer" and then press the MENU key to show the provided options. (3) Press the Previous button or Next button to select the desired mode, and press the MENU key to confirm or press the key to cancel and return. Set SRS and WOW sound effect The device provides the vivid sound effect SRS and WOW to enhance your music enjoyment. These steps can guide you to enable SRS and WOW setting: (1) When the music is being played, shortly press the MENU button to display submenu. (2) Select "SRS WOW mode" and then press the MENU key to show the provided options. (3) Press the Previous button or Next button to select the desired option, and press the MENU key to confirm or press the key to cancel and return. Delete Track You can delete one single track following these steps: (1) Pause the music playing first and then shortly press the MENU button to display submenu. (2) Select "Delete file" to delete one single track or “Delete All”to delete all tracks. Press the MENU key to continue. (3) Press the Previous button or Next button to select “Yes”or “No”, and then press the MENU key to confirm or press the key to cancel and return. 8 6. VOICE RECORDING Record (1) Press and hold the MENU button to display the main menu. (2) Select “REC”menu and then press the MENU button to enter voice recording mode. (3) Press the button to start recording. (4) During recording, you can press the button to pause or resume recording. (5) Press and hold the MENU button to stop and save the recording. CAUTION: DO NOT REMOVE THE BATTERY DURING RECORDING. THAT WILL CAUSE CURRENT RECORDING UNSAVED AND LOST. Play recordings (1) On the main menu, select the “RPL”item to enter the voice playing mode. (2) Select the file that you want to play and press the key to play it. For detail information about playing, refer to the “Basic operations”and “Music Mode” section. Alternatively, you can enter the navigation mode, open the VOICE folder and select the voice file that you want play. 9 7. BROWSE ALL FILES To browse all folders and tracks, on the main menu, select “BRO”and then press the MENU button to enter the explorer mode. For detail information about how to use the file browser, see the “Folder navigation”section. 8. SYSTEM SETTINGS To customize the player settings: (1) On the main menu, select the “SYS”item and press the MENU key to enter the system setting mode. (2) Press the Previous button or Next button to select setting item and press the MENU key to confirm or press the key to cancel/return. 10 Item Backlight Language Power Set Contrast KeyHoldTime About Firmware version Firmware Upgrade Exit Description Set the duration of the backlight after you press any key. Select the language in which the on-screen text is displayed. Off time –Set the length of time after which the player is turned off automatically when there is no activity Sleep time - Set the continuous playback time before the player is turned off automatically. Set contrast between background and foreground of the screen. Set an idle time after which the buttons are locked automatically. Display total capacity and used space of the internal memory Display software version number. Upgrade the firmware Exit the system setting mode 11 9. DOWNLOAD AUDIO FILES Connect to the PC and download audio files This player is plug & play for WIN2000/XP/ME/Vista OS. You don’ t need to install the driver. But for Windows98/SE, you are required to install a driver before connection. To connect it with PC for transferring files: (1) Plug the attached USB cable to the PC, and connect the other end to the player. (2) When the “ ” icon appear at the right bottom of the PC screen, it means the connection is successful. (3) When you open “My Computer”, you will see a removable disk which represents the player. Now you can use the removable disk as a normal local disk drive, copying audio files from or to the removable disk. Removing the player safely from the PC For Windows2000/XP/Vista: (1) Left click the icon at the right hand corner of the taskbar. (2) Click the pop-up mini-window with message of “Stop the USB Mass Storage Device – Driver (X)”. (3) When you are prompted to remove the device, pull on the player. For Win98, please make sure the data transfer is completed before unplugging the MP3 player. 12 10. INSTALL THE BATTERY (1) (2) (3) On the back of the device, press and slide the battery cover. Remove the battery cover and insert one AAA-size battery into the battery compartment. Replace the battery cover. 11. TROUBLESHOOTING Problem Possible Cause Solution The LCD displays nothing when the device is powered on. No battery or battery is too low. Install or replace the battery. No sound when playing music or voice file. 1. 2. The volume is too low. There are problems with the audio file. 1. 2. Adjust the volume. Delete the file or play other files. The player cannot connected to the PC. 1. The driver is not installed or destroyed. The USB interface is not supported by the PC’ s motherboard. 1. Install or reinstall the Windows 98 driver. Update or replace the PC’ s motherboard. be 2. 13 2. The displayed time changing constantly. is The bit rate of the MP3 file is changing during playback. Try to use fixed bit rate to compress the MP3 file. The PC has error when you plug and unplug the player. The player is disconnected from the PC abruptly while transferring files. Do not disconnect the player from the PC when transferring files. Total memory displayed on the player is not in accordance with the marked amount. Part of memory is used to store programs and display characters. Some of MP3 files cannot be played properly. The MP3 file is compressed by a standard, such as MPEG I Layer 1 or Layer 2 that the player does not support. 14 1. Delete the unsupported MP3 files. 2. Use MPEG I Layer 3 standard to compress the unsupported MP3 files. 12. SPECIFICATIONS Item Music format Bit rate Frequency range Signal/noise ratio Channel separation Frequency response Output power to earphones EQ modes Display Type of ports Memory media Memory capacity Output current Power off current Parameter MP3, WMA 8kbps ~ 320kbps 20HZ ~ 20kHz >= 86 dB >=40dB <=3dB (20HZ ~ 20kHz) L 4mW, R 4mW Natural, Rock, Pop, Classic, Soft, Jazz, Bass 132 X 32 pixel (black and white color) 2.0-compatible with USB 1.1 FLASH 128MB ~4GB <=80mA <=500uA Remark: Specifications and appearance are subject to change and improvement without further notice. 15 13. LISTENING CAUTIONS Do not play your earphones or headphones at a high volume. Hearing experts advise against continuous extended play. If you experience a ringing in your ears, reduce volume or discontinue use. Do not use while operating a motorized vehicle. It may create a traffic hazard and is illegal in many areas. You should use extreme caution or temporarily discontinue use in potentially hazardous situations. Even if your headphones or earphones are the open-air type designed to let you hear outside sounds, don’ t turn up the volume so high that you can’ t hear what’ s around you. Sound can be deceiving. Over time your hearing “comfort level”adapts to higher volumes of sound. So what sounds “normal”can actually be loud and harmful to your hearing. Guard against this by setting your equipment at a safe level BEFORE your hearing adapts. To establish a safe level: a. Start your volume control at a low setting. b. Slowly increase the sound until you can hear it comfortably and clearly, and without distortion. Once you have established a comfortable sound level, leave it there. 16 14. PRECAUTIONS 1). When not using the player for an extended period of time, remove the batteries to avoid damage due to leakage. 2). Do not use the player in extremely hot, cold, dusty or damp environments. 3). Make sure the keys are unlocked before using the player (otherwise controls will not function). 4). Avoid dropping or striking the unit .This may cause external and internal physical damage to the player. 5). Replace battery with new one if: a) The battery level icon displays (An empty battery) b) The player powers off automatically and off again when restarted. c) No response when pressing keys with keys unlocked and battery installed 6).To prevent damage from static shock, never use the player in very dry conditions. 7). When player is being formatted or transferring a file, do not interrupt the connection. Otherwise, data may be corrupt of lost. 8). When the player is used as a portable HD, please use only per instructions. Otherwise, permanent data loss could occur. 17 FCC Caution: this equipment has been tested and found to comply with the limits for Class B digital device, pursuant to part 15 of the FCC Rules. These limits are designed to provide reasonable protection against harmful interference in a residential installation. This equipment generates, uses and can radiate radio frequency energy and, if not installed and used in accordance with the instructions, may cause harmful interference to radio communications. However, there is no guarantee that interference will not occur in a particular installation. If this equipment does cause harmful interference to radio or television reception, which can be determined by turning the equipment off and on, the user is encouraged to try to correct the interference by one or more of the following measures: ·Reorient or relocate the receiving antenna. ·Increase the separation between the equipment and receiver. ·Connect the equipment into an outlet on a circuit different from that to Which the receiver is connected. ·Consult the dealer or an experienced radio/TV technician for help. FCC Compliance: ·To assure continued compliance, follow the attached installation instructions. ·Use only the provided shield interface cables when connecting to computer. Any unauthorized changes or modifications to this equipment would void the user's authority to operate this device. This device complies with part 15 subpart B of the FCC Rules. Operation is subjected to the following conditions:(1)This device may not cause harmful interference, and(2)This device must accept any interference received, including interference that may cause undesired operation. This product may receive radio interference caused by mobile telephones or other products during operation. If such interference is apparent, please increase separation between the product and the mobile telephone or other product. Industry Canada Requirement: This Class B apparatus complies with Canadian ICES-003. Cet appareil numérique de la classe B est conforme ála norme NMB-003 du Canada Other names of systems and products mentioned in these instructions are usually the registered 18 trademarks or trademarks of the manufacturers who developed the system or product concerned. The and marks are not used to identify registered trademarks and trademarks in these instructions. TM This manual was correct and complete at the time of printing. However, specifications and updates can occur at any time without prior notice. No part of this manual may be copied, republished, reproduced, transmitted, or distributed in any way without prior written consent of Nextar, Inc. Any unauthorized distribution of this manual is expressly forbidden. NextarTM is a trademark of Nextar (Hong Kong) Limited. Nextar may find it necessary to modify, amend or otherwise change or update this manual. We reserve the right to do this at any time, without any prior notice. All specifications and features are subject to change without notice. All screen shots shown are simulated and may not represent the actual screen on production units sold to consumers. For instruction manuals, updated drivers or other information, be sure to visit our website at: www. Nextar.com Or write to us at: Nextar 1661 Fairplex Dr. LaVerne, CA USA 91750 Copyright 19 2007