1
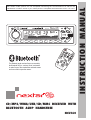
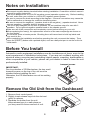
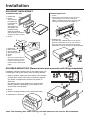
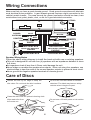
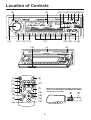
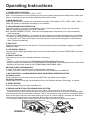
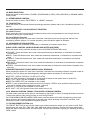
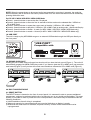
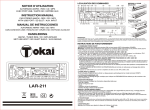
NCU160
CD/MP3
USB/SD/MMC/WMA
RESET
MIC
AMS
FLAT
POP
PHONE
CLSC ROCK
TRK MUTE INTR
RDM RPT
LOUD
BND
MP3 INPUT
DIS
VOL
PUSH SEL
ST
LO/DX
TK
LUD
PAU
1
INT
2
RPT
3
MUTE/PAIRING
RDM
4
5
6
MOD
OF
F
RD
S
ST
TA
L
PT
TA
LU
D
LO
PA
U
1
K
C
MO
DE
IN
RD
M
Y
2
4
BA
ND
RE
MO
TE
SE
T
6
PA
The Bluetooth word mark and logos are owned by
the Bluetooth SIG, Inc. and any use of such marks
is under license. Other trademarks and trade names
are those of their respective owners.
RP
3
MU
AS
PS
EJ
T
5
IR
IN
TE
G
L
CO
NT
RO
L
CD/MP3/WMA/USB/SD/MMC RECEIVER WITH
BLUETOOTH A2DP HANDSFREE
NCU160
INSTRUCTION MANUAL
Attention!! This car radio unit is compatible with the latest profile Bluetooth. It is inevitably possible
that certain mobile phones are not compatible concerning the communications as well as the
identification numbers. Check if your mobile phone is compatible with Bluetooth version 1.2 or 2.0.
Contents
Notes on Installation..............................................................2
Before You Install...................................................................2
Remove the Old Unit from the Dashbord...............................2
Installation..............................................................................3
Wiring Connections................................................................4
Care of Discs..........................................................................4
Location of Controls...............................................................5
Operating Instructions.........................................................6-8
Precautions............................................................................9
Instruction to play MP3/WMA Songs......................................9
Pairing the Unit with Mobile Phone via
Bluetooth Wireless Technology............................................10
Receive Call.........................................................................10
Handsfree Operation............................................................10
Simple Troubleshooting Guide..............................................11
Specifications........................................................................11
Notes on Installation
Disconnect negative battery terminal before starting installation. Consult the vehicle's owner's
manual for proper instruction.
The unit is designed for a 12Volt DC negative ground operation system only. Before Installing
the unit, make sure your vehicle is a 12Volt DC negative ground system.
Be sure to connect the leads according to the diagram. Incorrect connections may cause the
unit to malfunction or damage the vehicle's electrical system.
Be sure to connect the negative (-) speaker leads to the negative (-) speaker terminal. Never
connect negative (-) speaker leads to chassis ground.
The unit is only designed for use with 4 speakers. Do not combine output for use with 2
speakers. Do not ground negative speaker leads to the chassis ground.
Make sure all of the connections are completely correct before turning on your unit.
When replacing the fuse(s), the replacement must be of the same amperage as shown on
the fuse holder.
Do not block vents or heater panels. Blocking them will cause heat to build up inside and
may result in fire.
After completing the installation and before operating the unit, reconnect the battery. Then
press the (RESET) button with a pointed object, such as a ball-point pen to set the unit to its
initial status.
Before You Install
Automotive audio equipment installations can be troublesome at times, even to the
most experienced of installation technicians. If you are not confident working with
electrical wiring, removing and reinstalling interior panels, carpeting, dashboards or
other components of your vehicle, please call your dealer in order to have the unit
professionally installed.
transport screws
IMPORTANT :
Due to protection of CD Mechanism, the two small
transport screws on the top of the unit must be
released before installing the unit.
Otherwise, the CD Mechanism can not be working
properly.
Remove the Old Unit from the Dashboard
1. Remove front control panel.
2. Slightly insert release keys into the slot and
gently to release.
3. Separate the holder from the unit.
Keep release keys in a safe place as
you may need for future removal of unit.
RELEASE KEY
RELEASE KEY
2
Installation
DIN FRONT DASH MOUNT
Removing the unit
Installation the unit
1. Frame
2. Insert fingers into the groove in the front of
frame and pull out to remove the frame,
(When re-attaching the frame, point the side
with a groove downwards and attach it.)
1. Dashboard.
2. Holder
After inserting
the holder into
the dashboard,
select the
appropriate tab
according to the
thickness of the
dashboard material
and bend them inwards to
secure the holder in place.
3. Screw
3. Release keys
Insert the keys supplied with the unit into the
grooves at both sides of the unit as shown in
figure until they click. Pulling the keys make
it possible to remove the unit from the dashboard.
6
1. Dashboard.
2. Plain washer
3. Spring washer
4. Self-Tapping screw
5. Screw
6. Strap
Be sure to use the strap to
secure the back of the unit
in place. The strap can be
bent by hand to the desired
angle.
DIN REAR-MOUNT ISO (Remove facia and surround until fitting completed)
Installation using the screw holes on the sides of the unit.
Fastening the unit to the factory radio mounting bracket.
1
1. Select a position where the screw holes of the bracket
and the screw holes of the main unit become allgned
(are fitted), and tighten the screws at 2 places on
each side.
Use either truss screws (5X6mm) or flush surface
screws (4X6mm), depending on the shape of the
screw holes in the bracket.
3
2
2. Screw
4
3. Radio mounting bracket (not provided with radio)
4. Dashboard or Console
2
3
Note: The mounting box, outer trim ring, and half-sleeve are not used for ISO installation.
3
Wiring Connections
Make sure that you have a good chassis ground. Good ground connections will eliminate
most electrical noise problems. A good chassis ground requires a tight connection to the
vehicle's metal chassis. The area around the ground connection should be clean, bare
metal without rust, paint, plastic, dust, or dirt for a good electrical connection.
ANTENNA
RCA
LINE OUT
POWER
ANTENNA
IGNITION
BLUE
BLACK
FUSE 1A RED
FUSE 8A YELLOW
FRONT LEFT SPEAKER
GROUND
MEMORY
FRONT RIGHT SPEAKER
WHITE
GRAY
GRAY/BLACK
WHITE/BLACK
REAR LEFT SPEAKER
REAR RIGHT SPEAKER
GREEN
PURPLE
GREEN/BLACK
PURPLE/BLACK
Speaker Wiring Notes
Follow the above wiring diagram to install the head unit with new or existing speakers.
This unit is designed for use with four (4) speakers with an impedance between 4 ohms
to 8 ohms.
An impedance load of less than 4 Ohms could damage the unit.
Never bridge or combine the speaker wire outputs. When not using four speakers, use
electrical tape to tape the ends of the unused speaker outputs to prevent a short circuit.
Never ground the negative speaker terminals to chassis ground.
Care of Discs
Do not use CDs with labels or stickers
attached. The label may leave a sticky
residue when it begins to peel.
Handle the disc by its edge to keep the
disc clean. Do not touch the disc’s surface.
Clean the discs with an optional cleaning cloth.
Wipe each disc from
the center out.
4
Do not use a CD with paste or ink residue
on it.
Location of Controls
(9)
(2) (15) (21)(1)(3) (20)(18)
(5)
NCU160
CD/MP3
USB/SD/MMC/WMA
RESET
MIC
AMS
FLAT
POP
CLSC ROCK
PHONE
TRK MUTE INTR
LOUD
RDM RPT
BND
MP3 INPUT
DIS
VOL
PUSH SEL
LO/DX
(14)
PAU
1
LUD
TK
ST
INT
2
(11) (12) (13)
(1)
(11)
(17)
(12)
(13)
EJ
OFF
RDS
ST
TALK
PAU
INT
(4)
1
2
3
5
6
(3)
(15)
6
MOD
(10) (16) (7) (6)
(8)
(8)
(17)
PTY
TA
LUD
BAND
MUTE
LOC
(10)
(2)
5
RPT
RDM
4
4
3
(19)
MUTE/PAIRING
RDM
RPT
(7)
*Remove the transparency plastic thin plate (D)
before use and replace the CR2025(3V) lithium
battery (E) if necessary.
PA I R I N G
(14)
MODE
SEL
AS
PS
REMOTE CONTROL
E
(16)
(14)
(14)
5
D
Operating Instructions
1. POWER ON/OFF CONTROL
Press the button to turn the power “ON” or “OFF”.
Note : The unit can be turn on by pressing any keys on the panel (except panel release button & disc eject
button). It will help the user who cannot find the power button in dark.
2. BAND SELECTOR
Each time this button is pressed, the radio band is changed. The indication “FM1”, “FM2”, “FM3”, “AM1” or
“AM2” will appear on the display according to your selection.
3. PRE-SCAN/AUTO-STORE BUTTON
This button allows you to enjoy “Preset Memory Scan” function by pushing it shortly, and “Auto-Store
Memory” function by pushing it more than 2 seconds.
lPS (PRESET MEMORY SCAN) - It calls the memorized station frequencies (from 1-6) automatically
every 5 seconds.
lAS (AUTO-STORE MEMORY) - It searches all station frequencies upward and memorize automatically
6 stations by catching the frequency which has scan-stop level, the memorized station is shown on LCD
as “Channel 1 to 6”. After memorizing, auto-store memory function will be changed to “Preset Memory
Scan” function automatically.
4. DISC SLOT
Holding the disc and insert into the disc slot. The disc mechanism will automatically engage into CD/MP3/
WMA play mode.
5. LCD DIGITAL DISPLAY
The unit utilizes a digital type display which shows numerical indication of station FREQUENCY and other
FUNCTIONS.
6. DISPLAY BUTTON
This button serves to show available information as following:
- Time
- Track No. / Playing Time (during CD/MP3/WMA/USB-DRIV/MEM-CARD mode)
- Directory Name / File Name (during CD/MP3/WMA/USB-DRIV/MEM-CARD mode and the file must contain
directories or files name written by the CD/MP3/WMA/USB/SD/MMC writer)
SETTING CLOCK TIME MANUALLY
1. Press “DIS” button and hold it until the display flash and release.
2. Rotate “VOL/SEL” button clockwise to set HOUR and anti-clockwise to set MINUTE.
7. MUTE CONTROL / PAIRING MOBILE PHONE HANDFREE OPERATION BUTTON
For Mute Function
Press the button to mute volume control and “MUTE ON” will appear on the display.
For Pairing Function
Please refer to the “Pairing the Unit with Mobile Phone via Bluetooth Wireless Technology” for details.
8. EJECT BUTTON
Press the button to eject the disc inside disc slot.
9. OPEN/CLOSE BUTTON / DETACHING PANEL BUTTON
* Press this button to show the disc slot in the main panel. Then, press once to close the disc slot.
* To detach the front panel, press this button so that the panel slide down from vertical to horizontal position.
Use thumb hold near the preset button between 3 and 4, and use other finger to hold the corrugated release
button at the back of the front panel while pulling (see Figure A). After the panel is released, the slide down
metal frame will automatically move backward until it locks to the original position.
* To re-attach the panel, put the front panel to the slide down metal frame by clipping it into place.
FIGURE A
6
10. MODE SELECTION
Press this button to select Radio (TUNER), CD/MP3/WMA (S-CDP), USB (USB-DRIV) or SD/MMC (MEMCARD) mode.
11. STEREO/MONO CONTROL
Press this button to select “FM STEREO” or “MONO” reception.
12. TALK BUTTON
Press this button for Bluetooth wireless technology operation (please refer to the “Handsfree Operation” for
details).
13. LOUD CONTROL / LOCAL-DISTANT SELECTOR
For Loud Function
Briefly press this button to activate the loudness circuitry which compensates for loss of high and low
frequencies during low volume levels.
For Local-Distant Function
When pressing the button for more than 2 seconds, it activates to prevent strong local stations from
overlapping weaker stations. For normal operation, press this button again for distance.
14. VOLUME/SELECTION CONTROL
Rotate the button anti-clockwise to decrease, or clockwise to increase volume level.
AUDIO LEVEL CONTROL (WHEN PUSHING ONE AFTER ANOTHER)
Press this button shortly one after another to show VOL/BAS/TRE/BAL/FAD control.
lVOLUME - Press this button once, then rotate anti-clockwise to decrease, or clockwise to increase
volume level.
lBASS - Press this button once, then rotate anti-clockwise to decrease, or clockwise to increase bass
level.
lTREBLE - Press this button once, then rotate anti-clockwise to decrease, or clockwise to increase
treble level.
lBALANCE - Press this button once, then rotate anti-clockwise or clockwise to level balance of speaker
right and left.
lFADER - Press this button once, then rotate anti-clockwise or clockwise to level fader of speaker front
and rear.
AUDIO/SETTING SELECT (HOLD MORE THAN 2 SECONDS)
When pressing the button for more than 2 seconds, it activates as unit setting selection in cyclical mode as
following. The unit setting can be changed by rotating the button clockwise or anti-clockwise.
lDSP OFF / POP M / ROCK M / CLASS M / FLAT M
lESP 12 / ESP 45 (setting 12 seconds or 45 seconds of electronic anti-shock time for audio CD)
lMULT OFF / MULT ON (not available for this model)
lBEEP ON / BEEP OFF (not available for this model)
lSEEK 1 (tune up/down buttons performs fast tune function) / SEEK 2 (tune up/down buttons performs
auto tuning function when pressed more than 1 second)
lCOLOR 1 / COLOR 2 (not available for this model)
lVOL LAST / VOL ADJ (preset volume level when unit turn on)
15/16. MANUAL UP/DOWN TUNING / TRACK SEEK UP/DOWN CONTROL
On radio mode, press the button will tune one frequency step higher or lower. Pressing the button more than
1 second can performs fast tuning function or auto tuning function.
On CD/MP3/WMA/USB-DRIV/MEM-CARD mode, press this button will locate the beginning of the track
being played or will locate the beginning of the next track. When pressing more than 2 seconds, it will
move fast forward or fast backward to a specific position.
17. STATION PRESET BUTTON (1-6)
The PRESET BUTTONS on the unit are used to store station frequencies which you may wish to recall. Each
preset button can store FM1, FM2, FM3, AM1, AM2 band station frequency. Pressing the button momentarily
recalls the station frequency which was memorized. There are 6 preset buttons, giving you capability of storing
18FM / 12AM.
7
NOTE: When the preset button to be memorized is kept pressed for more than 2 seconds, the receiving
station frequency will be stored in the button pressed. After this, the memorized station can be recalled by
pressing the button once.
On CD / MP3 / WMA / USB-DRIV / MEM-CARD Mode
lPreset 1- press this button to pause the disc / file played.
lPreset 2- press this button to scan the first 10 seconds of all the tracks on the selected disc / USB drive /
SD or MMC Card.
lPreset 3- press this button to repeat the current track of the disc / USB drive / SD or MMC Card.
lPreset 4- press this button to play disc / USB drive / SD or MMC Card at random order - disc/file shuffle play.
lPreset 5- press this button to search -10 track (for MP3 / WMA / USB-DRIV / MEM-CARD Mode only).
lPreset 6- press this button to search +10 track (for MP3 / WMA / USB-DRIV / MEM-CARD Mode only).
18. USB PORT
The unit is ready to play MP3/WMA songs on an external USB device through the USB port directly on
the front panel.
*USB PORT*
Compatible with
19. SD/MMC CARD SLOT
Holding the SD or MMC card and insert into the slot until you hear the lock sound (Figure 1). The unit will
automatically engage into MEM-CARD play mode. If you want to eject the SD or MMC card, just press the
card inward (Figure 2) until you hear the unlock sound and then release the SD or MMC card (Figure 3).
20. BUILT-IN MICROPHONE
21. RESET BUTTON
The RESET button is located on the front of control panel. It is recessed in order to prevent accidental
engagement, and can be activated with the tip of a ball-point pen or any similar pointed object. This reset
circuitry is provided in order to protect the unit's microprocessor, and should only be activated under the
following conditions :
a) Initial installation after all wiring is completed.
b) Abnormal operation is encountered such as numerical indication on display is erratic.
c) Whenever the reset button is activated, all preset memory content will be erased and must be
reprogrammed.
8
Precautions
This unit will only play the following discs.
Type of disc
Label on the disc
CD, MP3, WMA
Recorded material
Size of disc
Audio only
12 cm
Instruction to play MP3/WMA Songs
IMPORTANT NOTES
l The MP3/WMA file recording media acceptable to this unit are CD-R, CD-RW, USB flash memory, SD or MMC
memory card.
l The MP3/WMA formats acceptable are limited.
l Do not attempt to play a media containing non-MP3/WMA files or non-MP3/WMA files with MP3/WMA extension.
Otherwise, the CD Mechanism/USB Drive/MEM-CARD Drive will not be working properly. If “ERROR” is shown,
it is suggested to reset the radio by presssing the reset button.
PLAY ON MP3/WMA SONG
l Insert the media with MP3/WMA song in the disc slot / insert the USB flash memory / insert SD/MMC card.
The unit will start playing and checks all the files and folder on the media.
l If MP3/WMA files and directories are recognized, the media will start playing.
l The MP3/WMA files and directories are accessed according to the order written by the CD / flash memory /
SD or MMC card writer.
TRACK SEARCH
l Press “AMS” button once and “TRK SCH” will be shown on the display.
l Press “VOL/SEL” control to enter track search mode and “TRK 0001” will appear on the display for you to enter
track number.
l Rotate “VOL/SEL” control clockwise or anti-clockwise to shift number 0 – 9 in loop rotation.
l Press “VOL/SEL” control shortly to select the first digit.
l Repeat the same procedure to enter the other digits if required.
l After the track number is selected, press “VOL/SEL” control more than 2 seconds to start playing the selected track.
l If track number is not entered within 10 seconds, the unit will continue playing the current file.
FILES SEARCH
l Press “AMS” button twice and “FILE SCH” will be shown on the display.
l Press “VOL/SEL” control to enter file search mode.
l Rotate “VOL/SEL” control clockwise or anti-clockwise to view the directories.
l After the selected directory is selected, rotate “VOL/SEL” control either clockwise or anti-clockwise to view the files.
l Press “VOL/SEL” control to play the selected file.
l If directories or files name is not entered within 10 seconds, the unit will continue playing the current file.
CHARACTER SEARCH
l Press “AMS” button 3 times and “CHAR SCH” will be shown on the display.
l Press “VOL/SEL” control to enter into character search mode and “A” will appear on the display for you to enter
first character.
l Enter whole name of files (maximum 8 characters) by rotating “VOL/SEL” control clockwise or anti-clockwise to
shift “A-Z”, “0-9” & “*” (space) in loop rotation.
l Press “VOL/SEL” control shortly to select the first character.
l Repeat the same procedure to enter the other characters if required.
l After the whole name of file is entered, press “VOL/SEL” control more than 2 seconds to start playing the selected
track.
Remark :
1) The media must contain directories or files name written by the CD / USB flash memory / SD or MMC card writer
in order to use in searching.
2) If only partial letters are entered for searching either in directories or files name, you may not get it correctly.
9
Pairing the Unit with Mobile Phone via Bluetooth Wireless Technology
Attention!! This car radio unit is compatible with the latest profile Bluetooth. It is inevitably possible that
certain mobile telephones are not compatible concerning the communications as well as the identification
numbers.
Ensure that your mobile phone is compatible with Bluetooth 1.2 or 2.0
l Press “MUTE” button about 5 seconds until “PAIRING” show on display.
l Turn ON connection via Bluetooth wireless technology from the mobile phone Menu, then search new
paired device.
l Select “BHF101K” and entering password “0000” to start pairing. Once pairng is completed, “PHONE”
indicator will show on display and it is ready to start mobile phone handsfree operation.
l If pairing cannot be completed in 2 minutes, press “MUTE” button once more to start “PAIRING” again
and re-start the procedure again from above until “PHONE” indicator is appeared on display.
Receive Call
l When you receive a call from mobile phone, the LCD display will show the incoming telephone number (if
this service available from telecom carrier) and the unit volume will mute.
l If you accept a call, press “TK” button to start conversation.
l The incoming call can be heard directly from car radio speaker. The driver can start to talk by through the
built-in microphone on the panel. (See Figure B)
Built-in microphone
FIGURE B
Handsfree Operation
l Outgoing Call – Dial the number on the phone and hear voice from car speakers.
l answering Call – Press “TK” button once to accept incoming call.
l Hang Up – Press “TK” button once to end communication.
l Last Number Redial – Shortly press “TK” button twice to dialing the last outgoing number.
l Reject Call – When there is incoming call, press “TK” button more than 2 seconds to reject the call.
l Transfer Call to Phone – When using handfree for talking, press “TK” button more than 2 seconds to
transfer listening of call from car speakers to phone.
10
Simple Troubleshooting Guide
PROBLEM
CAUSE/SOLUTION
No Power
Check wiring connections.
Check and make sure the fuse is not
blown.
Replace with the proper rating / size
fuse.
Some errors occur in the LCD or
nothing functions when buttons
are pressed.
Press the RESET Button (21).
Unable to receive stations
Check and make sure the antenna
is connected properly.
Poor radio reception
Check and make sure the antenna
is the correct length. Make sure the
antenna is not broken. If the antenna
is broken, replace it. The antenna is
poorly grounded. Check and make sure
the antenna is grounded at mounting
location.
CD’s cannot be loaded
A CD is already loaded in the player.
Eject CD.
Songs keep skipping
The CD is dirty or damaged.
File information shows in LCD but
will not play.
Your file may be corrupt.
Specifications
GENERAL CHARACTERISTICS
Power supply ............................................................................................ 12V DC
Power consumption .................................................................................. 8A max.
Max. output power .................................................................................... 45 W x 4
Frame size ................................................................................................ 178 wide x 50 high x 185 deep (mm)
CD PLAYER
System ...................................................................................................... CD audio system
Compatible disc type ................................................................................ Compact discs (CD)
Bandwidth ................................................................................................. 30 Hz to 18 kHz
Signal-to-noise ratio .................................................................................. Higher than 50 dB
Number of channels .................................................................................. 2 channels (stereo)
FM TUNER
Frequency range ....................................................................................... 87.5 MHz - 107.9 MHz
Usable sensitivity ...................................................................................... Less than 20 dB
Intermediate frequency ............................................................................. 10.7 MHz
AM TUNER
Frequency range ....................................................................................... 530 KHz - 1,710 KHz
Usable sensitivity ...................................................................................... Less than 44 dB
Intermediate frequency ............................................................................. 450 KHz
LINE OUTPUT
Output level ............................................................................................... 700 mV for 15% THD in FM
Impedance ................................................................................................ 600 ohms
Subject to change without further notice.
11
P/N: 570-MDB902-01


![[PDF:3.6MB]](http://vs1.manualzilla.com/store/data/005700359_1-411bc916f99a59f282120c6ff0bb3aea-150x150.png)
![[PDF:4.7MB]](http://vs1.manualzilla.com/store/data/005853887_1-c5fd0ffcec21d199ddeaa4c471851be4-150x150.png)