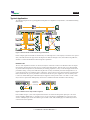
1
User Guide "Smart Filtering" Appliance A 2 B A B 1 www.netoptics.com IDS Analyzer 1 Analyzer 2 Forensic RMON 1 RMON 2 Doc. PUBDIRU Rev. 2, 9/08 *** Confidential - DO NOT Distribute *** PLEASE READ THESE LEGAL NOTICES CAREFULLY. By using a Net Optics Director device you agree to the terms and conditions of usage set forth by Net Optics, Inc. No licenses, express or implied, are granted with respect to any of the technology described in this manual. Net Optics retains all intellectual property rights associated with the technology described in this manual. This manual is intended to assist with installing Net Optics products into your network. Trademarks and Copyrights © 2008 by Net Optics, Inc. Net Optics is a registered trademark of Net Optics, Inc. Director is a trademark of Net Optics, Inc. Additional company and product names may be trademarks or registered trademarks of the individual companies and are respectfully acknowledged. Additional Information Net Optics, Inc. reserves the right to make changes in specifications and other information contained in this document without prior notice. Every effort has been made to ensure that the information in this document is accurate. Director Contents Chapter 1 Introduction............................................................................................... 1 Key Features. . . . . . . . . . . . . . . . . . . . . . . . . . . . . . . . . . . . . . . . . . . . . . . . . . . . . . . . . . . . . . . . . . . . . . . . . . . . . 2 About this Guide. . . . . . . . . . . . . . . . . . . . . . . . . . . . . . . . . . . . . . . . . . . . . . . . . . . . . . . . . . . . . . . . . . . . . . . . . . 3 Director Architecture . . . . . . . . . . . . . . . . . . . . . . . . . . . . . . . . . . . . . . . . . . . . . . . . . . . . . . . . . . . . . . . . . . . . . . 4 USB port. . . . . . . . . . . . . . . . . . . . . . . . . . . . . . . . . . . . . . . . . . . . . . . . . . . . . . . . . . . . . . . . . . . . . . . . . . . . . . . . 5 Director Management. . . . . . . . . . . . . . . . . . . . . . . . . . . . . . . . . . . . . . . . . . . . . . . . . . . . . . . . . . . . . . . . . . . . . . 5 Typical Application. . . . . . . . . . . . . . . . . . . . . . . . . . . . . . . . . . . . . . . . . . . . . . . . . . . . . . . . . . . . . . . . . . . . . . . . 6 In-line Monitoring of 10 Gigabit Links . . . . . . . . . . . . . . . . . . . . . . . . . . . . . . . . . . . . . . . . . . . . . . . . . . . . . . . . 8 Director Front Panel. . . . . . . . . . . . . . . . . . . . . . . . . . . . . . . . . . . . . . . . . . . . . . . . . . . . . . . . . . . . . . . . . . . . . . . 9 Director Rear Panel. . . . . . . . . . . . . . . . . . . . . . . . . . . . . . . . . . . . . . . . . . . . . . . . . . . . . . . . . . . . . . . . . . . . . . . 10 Chapter 2 Installing Director.................................................................................... 11 Plan the Installation. . . . . . . . . . . . . . . . . . . . . . . . . . . . . . . . . . . . . . . . . . . . . . . . . . . . . . . . . . . . . . . . . . . . . . . 12 Unpack and Inspect the Director device. . . . . . . . . . . . . . . . . . . . . . . . . . . . . . . . . . . . . . . . . . . . . . . . . . . . . . . 12 Install Director Network Modules . . . . . . . . . . . . . . . . . . . . . . . . . . . . . . . . . . . . . . . . . . . . . . . . . . . . . . . . . . . 13 Install SFP and XFP Monitor port Modules. . . . . . . . . . . . . . . . . . . . . . . . . . . . . . . . . . . . . . . . . . . . . . . . . . . . 13 Rack Mount the Director device. . . . . . . . . . . . . . . . . . . . . . . . . . . . . . . . . . . . . . . . . . . . . . . . . . . . . . . . . . . . . 13 Connect Power to Director. . . . . . . . . . . . . . . . . . . . . . . . . . . . . . . . . . . . . . . . . . . . . . . . . . . . . . . . . . . . . . . . . 14 Connect the local CLI Interface. . . . . . . . . . . . . . . . . . . . . . . . . . . . . . . . . . . . . . . . . . . . . . . . . . . . . . . . . . . . . 14 Connect the remote CLI Interface. . . . . . . . . . . . . . . . . . . . . . . . . . . . . . . . . . . . . . . . . . . . . . . . . . . . . . . . . . . . 15 Log into the CLI. . . . . . . . . . . . . . . . . . . . . . . . . . . . . . . . . . . . . . . . . . . . . . . . . . . . . . . . . . . . . . . . . . . . . . . . . 16 Configure Director using the CLI. . . . . . . . . . . . . . . . . . . . . . . . . . . . . . . . . . . . . . . . . . . . . . . . . . . . . . . . . . . . 17 Using the CLI Command History Buffer. . . . . . . . . . . . . . . . . . . . . . . . . . . . . . . . . . . . . . . . . . . . . . . . . . . . . . 21 Connect Span Ports to Director. . . . . . . . . . . . . . . . . . . . . . . . . . . . . . . . . . . . . . . . . . . . . . . . . . . . . . . . . . . . . . 22 Connect Director With In-line Network Links. . . . . . . . . . . . . . . . . . . . . . . . . . . . . . . . . . . . . . . . . . . . . . . . . . 23 Connect Monitoring Tools to Director. . . . . . . . . . . . . . . . . . . . . . . . . . . . . . . . . . . . . . . . . . . . . . . . . . . . . . . . 24 Configure a Matrix Switch connection in Director. . . . . . . . . . . . . . . . . . . . . . . . . . . . . . . . . . . . . . . . . . . . . . . 24 Check the Installation. . . . . . . . . . . . . . . . . . . . . . . . . . . . . . . . . . . . . . . . . . . . . . . . . . . . . . . . . . . . . . . . . . . . . 24 Chapter 3 Configuring Filters Using the CLI............................................................ 25 Syntax. . . . . . . . . . . . . . . . . . . . . . . . . . . . . . . . . . . . . . . . . . . . . . . . . . . . . . . . . . . . . . . . . . . . . . . . . . . . . . . . . 25 Copy Traffic From Any Network Port to Any Monitor Port. . . . . . . . . . . . . . . . . . . . . . . . . . . . . . . . . . . . . . . . 26 Aggregate Traffic From Any Set of Network Ports to Any Monitor Port. . . . . . . . . . . . . . . . . . . . . . . . . . . . . . 26 Regenerate Traffic to Any Set of Monitor Ports. . . . . . . . . . . . . . . . . . . . . . . . . . . . . . . . . . . . . . . . . . . . . . . . . 27 Create Filters. . . . . . . . . . . . . . . . . . . . . . . . . . . . . . . . . . . . . . . . . . . . . . . . . . . . . . . . . . . . . . . . . . . . . . . . . . . . 28 *** Confidential - DO NOT Distribute *** Director Create Complex Filters. . . . . . . . . . . . . . . . . . . . . . . . . . . . . . . . . . . . . . . . . . . . . . . . . . . . . . . . . . . . . . . . . . . . 29 View filters . . . . . . . . . . . . . . . . . . . . . . . . . . . . . . . . . . . . . . . . . . . . . . . . . . . . . . . . . . . . . . . . . . . . . . . . . . . . . 30 Work with configurable 10 Gigabit ports. . . . . . . . . . . . . . . . . . . . . . . . . . . . . . . . . . . . . . . . . . . . . . . . . . . . . . 31 Understand filter interactions. . . . . . . . . . . . . . . . . . . . . . . . . . . . . . . . . . . . . . . . . . . . . . . . . . . . . . . . . . . . . . . 33 Understand pending and active filters. . . . . . . . . . . . . . . . . . . . . . . . . . . . . . . . . . . . . . . . . . . . . . . . . . . . . . . . . 36 Chapter 4 Daisy-chaining Multiple Director Chassis............................................... 39 Appendix A Director Specifications............................................................................ 40 Appendix B Command Line Interface......................................................................... 42 Filter parameters. . . . . . . . . . . . . . . . . . . . . . . . . . . . . . . . . . . . . . . . . . . . . . . . . . . . . . . . . . . . . . . . . . . . . . . . . 48 Appendix C Protocol Numbers.................................................................................... 49 Limitations on Warranty and Liability..................................................... 52 *** Confidential - DO NOT Distribute *** Director Chapter 1 Introduction Net Optics Director is a key component for building a comprehensive, consolidated monitoring infrastructure for both network management and security. It extends the range of visibility for data monitoring across converged data and digital voice networks, while eliminating monitoring port contention and minimizing the number of tools needed to optimally manage the network. A single Director device enables you to tap into multiple network links, and direct their traffic to multiple monitoring ports. It includes aggregation and regeneration functions, so the link-to-monitor-port mapping can be one-to-one, one-to-many, many-to-one, or many-to-many. In addition, it provides filtering: Each Monitor port can be programmed to receive only traffic meeting user-defined filter criteria based on protocol, source and destination addresses, and network utilization. This filtering capability enables specific types of traffic such as voice over IP (VoIP) to be directed to particular monitoring tools. Matrix switching, aggregation, and regeneration Each Director chassis supports up to 12 in-line network links or 26 Span ports. For monitoring, up to 12 ports are provided. Network and Span ports can be aggregated and regenerated to output ports in almost any combination. Modular design Director is modular to provide configuration flexibility. • Director Network Modules (DNMs) support SX (multi-mode) and LX (single-mode) fiber links and 10/100/1000 Copper links. • Each DNM provides either 6 in-line network links or 12 Span ports. • The Director Chassis includes two DNM slots; they can be populated with the same or different DNM types. • Ten 1-Gigabit Monitor ports are SFP-based, accepting any mix of Copper, SX, and LX interface modules. • Four 10-Gigabit ports are XFP-based, accepting SR, LR, and ER interface modules. Flexible 10 Gigabit support Two 10 Gigabit ports on the front of the unit can be configured as Network, Span, or Monitor ports. They can be configured for the same or different functions. Traffic from multiple 1-Gigabit Network or Span ports can be aggregated to a 10-Gigabit Monitor port. Conversely, traffic from a 10 Gigabit Network or Span port can be dis-aggregated to multiple 1 Gigabit Monitor ports through appropriate filtering. For example, traffic from different IP address ranges could be directed to separate Monitor ports. Expandable An additional two 10 Gigabit ports on the rear of the unit enable daisy-chaining up to ten Director chassis to expand the number of available ports, for a total of 380 ports in a fully expanded system (when available). Monitor port-based filtering Director avoids the confusion of pre-filtering versus post-filtering by strictly tying filtering to the Monitor ports. Each Monitor port can be configured to have traffic from any number of Network or Span ports directed to it, and each Monitor port applies up to 30 protocol-, address-, and utilization-based filters to the traffic. 1 *** Confidential - DO NOT Distribute *** Director Key Features Ease of Use • • • • • • • • • • Tap, aggregation, regeneration, matrix switch, and filter functions in a single device 19-inch rack frame, 1U high Front-mounted connectors for quick and easy installation LED indicators show Power, Link, and Activity status Modular design for configuration flexibility RMON statistics, including network utilization thresholds and filtering; data can be used to assemble XML-based end-user reports, or it may be exported to a third party reporting tool such as a protocol analyzer Text-based command-line interface (CLI) available through RS-232 serial port CLI also available remotely over secure SSH connection Field-upgradeable software Compatible with all major manufacturers’ monitoring devices, including protocol analyzers, probes, and intrusion detection and prevention systems Monitor port Filtering • • • • • • • • • 1,000 filter elements per a chassis Exclusive (drop matched packets) and inclusive (pass matched packets) filters Filters based on IP protocol, IP addresses, layer 4 ports, MAC addresses, and VLANs Source and destination MAC addresses Source and destination IP addresses, or ranges of addresses Source and destination ports VLAN Network port utilization Protocols: all IP protocols such as ICMP, TCP, UDP, and RDP Passive, Secure Technology • • • • • • • Passive access at up to 10 Gbps In-line links do not interfere with the data stream or introduce a point of failure Optimized and tested for 10, 100, and 1000Mbps copper and 1 and 10 Gpbs fiber networks Redundant power to maximize uptime In-line links default to open under a complete power-fail condition, ensuring network availability FCC, CE, VCCI, C-Tick, and WEEE certified Fully RoHS compliant Unsurpassed Support • Net Optics offers technical support throughout the lifetime of your purchase. Our technical support team is available from 8:00 to 17:00 Pacific Time, Monday through Friday at +1 (408) 737-7777 and via e-mail at [email protected]. FAQs are also available on Net Optics Web site at www.netoptics.com. 2 *** Confidential - DO NOT Distribute *** Director About this Guide Please read this entire guide before installing Director. This guide applies to the following part numbers: Chassis Part Number Description DIR-3400 Director Main Chassis with 10 SFP monitor ports DIR-____ Director Main Chassis with 10 SFP monitor ports, -48VDC power DIR-7400 Director Main Chassis with 10 SFP monitor ports, 2 XFP 10GbE ports, 2 XFP uplink ports DIR-____ Director Main Chassis with 10 SFP monitor ports, 2 XFP 10GbE ports, 2 XFP uplink ports, -48VDC power DNM Part Number Description DNM-100 6-Port 10/100/1000 Copper In-Line Module DNM-110 12-Port 10/100/1000 Copper Span Module DNM-200 6-Port Gigabit SX Fiber 62.5μm In-Line Module DNM-210 12-Port Gigabit SX Fiber 62.5μm Span Module DNM-220 6-Port Gigabit SX Fiber 50μm In-Line Module DNM-230 12-Port Gigabit SX Fiber 50μm Span Module DNM-300 6-Port Gigabit LX Fiber In-Line Module DNM-310 12-Port Gigabit LX Fiber Span Module DNM-320 6-Port Gigabit ZX Fiber In-Line Module DNM-330 12-Port Gigabit ZX Fiber Span Module 3 *** Confidential - DO NOT Distribute *** Director Director Architecture The following diagram shows a schematic view of the architecture of the Director device shown as a Matrix Switch with filtering. The black dots indicate aggregating Matrix Switch connections between Network Ports and Monitor Ports. DNM with 6 in-line network ports n1.1 n1.2 n1.3 n1.4 n1.5 n1.6 n1.7 n1.7 n1.9 n1.10 n1.11 n1.12 n2.1 n2.2 n2.3 n2.4 DNM with 12 Span or out-of-band network ports n2.5 n2.6 n2.7 n2.8 n2.9 n2.10 n2.11 n2.12 t.1 Two configurable 10GbE XFP ports t.2 Filters t.1 t.2 m.1 m.2 m.3 m.4 m.5 m.6 m.7 m.8 m.9 m.10 Key: Network or Span port Monitor Port Aggregating switch conection Dim Alternate configurations for 10 GbE XFP ports 10 SFP monitor ports Figure 1: Director internal architecture Director can be viewed as a matrix switch with up to 26 inputs, or Network ports, and 12 outputs, or Monitor ports. Any number of inputs can be directed to each of the outputs; Director aggregates the traffic from those Network ports and sends them to the Monitor ports. For example, the diagram shows: • Traffic from the first in-line Network link (n1.1-n1.2) is being directed to the first SFP Monitor port (m.1) • Traffic from two in-line Network links (n1.3-n1.4 and n1.7-n1.8) plus three Span Network ports (n2.3, n2.7, and n2.11) is being aggregated and directed to the second SFP Monitor port (m.2) • Traffic from one in-line Network link (n1.11-n1.12) is being regenerated to two SFP Monitor ports (m.9 and m.10) The traffic from the in-line Network links to the Monitor ports may include the traffic being received at the oddnumbered Network port (at the left side of the diagram), at the even-numbered Network port (at the right side of the diagram), or both; the diagram doesn't include this level of detail. In addition, filters (shown at the bottom of the diagram) are configured independently for each Monitor port, one or more filters per port, and applied on the aggregated traffic for that port. For example, the second SFP Monitor port could have two filters, where one filter selects the TCP traffic from the two in-line Network links and the second filter selects the UDP traffic from the three Span Network ports. 4 *** Confidential - DO NOT Distribute *** Director The inputs are divided into three groups: two DNMs plus the 10GbE ports. In-line DNM models support 6 in-line links, while Span DNM models support 12 Span ports. The diagram shows one in-line and one Span DNM. Both in‑line and Span DNMs are available with either Copper or SX Fiber interfaces. Different DNM types can be mixed in the same chassis, for example, one in-line Copper DNM and one Span Fiber DNM. The modules are hot-pluggable for easy serviceability. One or both DNM slots can be populated. The DNM slots are numbered 1 for the slot on the left and 2 for the slot on the right. If only one slot is populated, it should be slot 1. The two configurable 10-Gigabit XFP ports are shown in the first two columns and last two rows of the diagram. The two dark black rows indicate that both ports are configured as Span inputs. The two dimmed columns indicate that the ports can alternately be configured as Monitor ports. The two ports may be configured as: • Both Span • Both Monitor • One Span and one Monitor USB port A USB port located on the back is reserved for future functionality. Director Management Director can be configured and managed using a command-line interface (CLI) that will be familiar to most network administrators. The CLI runs locally over an RS-232 serial port or remotely over a secure SSH connection. Net Optics GUI-based Compass management tools, which will be available soon, include: • Web Manager—A Web-browser based tool to manage a single Director (at a time) from anywhere in the world • System Manager—An SNMP platform-based tool to mange all the Director and other Net Optics iTap-enabled devices on your network 5 *** Confidential - DO NOT Distribute *** Director Typical Application The following diagram shows a typical application using Director to implement a comprehensive, consolidated monitoring infrastructure. A 2 B A B 1 www.netoptics.com IDS Analyzer 1 Analyzer 2 Forensic RMON 1 RMON 2 Figure 2: Director-centric network monitoring infrastructure In this example, eight network links are monitored by six monitoring devices. The company's external access is protected by a firewall, shown in the upper left of the diagram. The link runs through a router, then in-line through Director, and then to a switch that distributes traffic throughout a department. Network Links The rest of the department's switches are shown, but only the connections to Director are illustrated. The four department switches shown in the lower right are cross-connected for fault tolerance. All four of the cross-connected links are passed in-line through Director (as indicated by the slanting purple lines) so they can be thoroughly monitored for performance tuning, security, and trouble-shooting. Because so many critical links pass in-line through Director, it's good to know that they are completely passive connections—Director does not slow down or interfere with the in-line traffic, and the links stay open to pass traffic even if both of the Director power supplies are removed. (When power is removed, 10/100/1000 Copper in-line links may be dropped for a short period of time—less than 1 second—while relays switch to open the link. Subsequently, the network re-establishes the links and traffic resumes flowing.) Purple line indicates an in-line Tap Figure 3: Detail of in-line Taps shown in Figure 2 In the middle of Figure 2, three other departmental switches are monitored through their Span ports. One of the switches handles 10GbE traffic, so its Span port goes to one of the Director 10GbE XFP ports. One of the other switches' 1GbE Span ports carries three distinct types of traffic–e-mail, VoIP, and Web pages–as indicated by the three colored circles on the Span link. 6 *** Confidential - DO NOT Distribute *** Director In this installation, Director has ten additional Span ports and one in-line link that are available for expansion, when more links need to be monitored. Monitoring Tools Still referring to Figure 2, six monitoring tools are connected to Director. They include protocol and performance analyzers, RMON probes, and an intrusion detection system (IDS). Any of the monitoring tools can be used to observe any of the connected network links, and the connections can be switched easily, using the Director CLI, without ever moving a cable or touching the tools. A set of possible data flows is indicated by the colored circles on the links in the diagram. One of the network monitoring tools is capable of handling more than 1 Gbps, so it is attached to a 10 Gigabit XFP port. Through this port, the tool can be sent aggregated traffic up to 10 Gbps. For example, the colored circles in the diagram indicate that traffic from four links is being aggregated and sent to this port. Four streams of traffic are also being aggregated to the red monitoring tool on the upper left. Since this is a 1 Gbps Monitor port, aggregated data up to 1 Gbps can be sent to the red tool. If the aggregated traffic exceeds 1 Gbps, packets will be dropped. To avoid dropping packets, filters should be configured to reduce the aggregated traffic load to 1 Gbps or less. The two green RMON monitoring tools at the bottom are the same type of tool. Two identical tools provide the capability of monitoring a greater amount of data than a single tool can handle. Another reason to use identical monitoring tools is to provide redundancy in case one of the tools fails. In addition, Director can be configured to send different types of traffic to each tool, for example, all the TCP traffic to one tool, and the UDP traffic to the other. 7 *** Confidential - DO NOT Distribute *** Director In-line Monitoring of 10 Gigabit Links To create an in-line link on a 10 Gigabit network segment, use and external iBypass Switch or network Tap. These two methods are explained in the following sections. iBypass Switch Method One method for creating a fail-safe, passive in-line 10 Gigabit network connection with Director is to use an external iBypass Switch, as shown in the following diagram. iBypass Switch 10 Gbps full duplex ON OFF Router Director A Switch B A 2 B 1 www.netoptics.com Purple arrows show traffic flow in one direction Monitoring tools Figure 4: iBypass Switch method for 10 Gigabit in-line network connection In this case, traffic flows from the router, into the iBypass Switch, down to the Director, through Director, back up to the iBypass Switch, and finally to the switch. It also travels in the opposite direction. If power is removed from Director or from the iBypass Switch, the iBypass Switch fails open, creating a passive connection that keeps traffic flowing between the router and the switch. External Network Tap method Another method for creating a fail-safe, passive in-line 10 Gigabit network connection with Director is to use an external network Tap, as shown in the following diagram. LC Fiber Tap 10 Gbps Router 10 Gbps Switch Director A B www.netoptics.com Monitoring tools Figure 5: External Tap method for 10 Gigabit in-line network connection In this case, traffic flows from the router, through the external Tap, to the switch. The Tap is totally passive, with no power needed for its operation. Optical splitters send a portion of the link light to the Director for monitoring. The Tap produces two half-duplex data streams, so both of Director's 10 Gigabit ports are used to monitor full-duplex traffic. A 10 GigaBit Port Aggregator can be used instead of a Tap to send the full-duplex link traffic to a single Director 10 Gigabit port, assuming the aggregated full-duplex traffic is 10 Gbps or less. 8 *** Confidential - DO NOT Distribute *** Director Director Front Panel The features of the Director front panel are shown in the following diagram. 10 SFP Monitor Ports 1 Director ™ 2 3 4 2 XFP Configurable 10GbE Ports DNM with 10/100/1000 Copper Network Ports (6 In-line or 12 Span Ports) DNM with SX Fiber Network Ports (6 In-line or 12 Span Ports) 5 A 2 B In-Line 10/100/1000 10 LINK 100 ACT 1000 In-Line GigaBit A B A B A B A 1 www.netoptics.com B 6 Power LEDs 7 8 9 1 10 2 3 4 5 6 7 8 9 10 11 12 2 Director Network Module (DNM) Slots Monitor Ports Network Ports Figure 6: Director Front Panel Monitor Port LEDs Each Monitor port has two light-emitting diode (LED) indicators. The Link LED is illuminated when a link is established. The Activity LED blinks when traffic is passing through the port. They are located in the middle between the two rows of SFPs. DNM / Network Port LEDs Each 10/100/1000 Network or Span port has two LEDs. The Link LED is illuminated when a link is established. The Activity LED blinks when traffic is passing through the port. The Link LED also indicates the link speed: amber for 10Mbps, yellow for 100Mbps, and green for a 1000Mbps (1 Gbps). They are integrated in the RJ-45 connectors, Link on the left and Activity on the right. Each 1-Gigabit Fiber Network or Span port has a single LED. It illuminates solid when a link is established, and it flashes when traffic is passing through the port. These Link LEDs are located below the LC fiber connectors. 10 Gigabit Port LEDs Each configurable 10-Gigabit port has a single LED. It illuminates solid when a link is established, and it flashes when traffic is passing through the port. These Link LEDs are located to the left of the XFP fiber connectors. Power LEDs Two LED indicators for power, one for each of the redundant power supplies. 9 *** Confidential - DO NOT Distribute *** Director Director Rear Panel The features of the Director rear panel are shown in the following diagram. Management Port USB Port RS232 Management Port 2 XFP Daisy-chain 10GbE Ports INPUT Power Supply Module OUTPUT SERIAL NUMBER RS-232 Port Power Supply Module SR, LR, or ER Fiber XFP Modules XXXXXX Redundant Hot-swappable Power Supplies Figure 7: Director Rear Panel Major features of the rear panel include: • USB Port—Reserved for future functionality • RS-232 Port—DB9 serial port for the CLI • Management Port—A 10/100/1000 network port for the remote management interfaces and software updates; the CLI runs over an SSH connection through this port; Compass management tools, when available, will connect through this port • XFP Daisy-chain 10GbE Ports—Accepts SR, LR, and ER XFP transceiver modules for daisy-chaining up to 10 chassis • Power Supply Modules—Universal-input (100-240VAC, 0.5Amp, 47-63Hz), hot-swappable power supplies with integrated cooling fans; each supply can power the unit independently; dual supplies provide redundancy to maximize uptime; -48VDC models are also available 10 *** Confidential - DO NOT Distribute *** Director Chapter 2 Installing Director This chapter describes how to install and connect Director devices. The procedure for installing Director follows these basic steps: 1. Plan the installation 2. Unpack and inspect the Director device 3. Install the DNM modules 4. Install the SFP and XFP modules 5. Rack mount the Director device 6. Connect power to Director 7. Connect the command line interface (CLI) RS-232 DB9 port or the Management port 8. Log into the CLI 9. Configure Director parameters using the CLI 10.Connect Director to the network with Span ports and in-line links 11.Connect the monitoring tools to Director 12.Configure a Matrix Switch connection in Director 13.Check the installation This chapter pertains to installing a single Director. Chapter 4 addresses daisy-chaining up to 10 Director chassis into a single logical system. 11 *** Confidential - DO NOT Distribute *** Director Plan the Installation Before you begin the installation of your Director device, determine the following: • • • • • • Name that will identify the Director device IP address of the Director device, or a range of IP addresses if you are deploying multiple Director devices Net Mask for Director IP address of the remote management console, if deployed over a WAN; this address is used for SNMP traps Gateway to the remote management console, if deployed over a WAN Port assignments and filters for the Network and Monitor port connections Make sure you have a suitable location to install the Director device. For power redundancy, use two independent power sources. Unpack and Inspect the Director device Carefully unpack the Director device, power supplies, and all cables that are provided. Director is delivered with the following: • • • • • • • (1) Director device (2) Power cords Director Quick Install Guide (one sheet) (1) CD containing the Director User Guide (this document) Network and monitor cables RS-232 DB9 cable for use with the CLI Extended Warranty if purchased Check the packing slip against parts received. If any component is missing or damaged, contact Net Optics Customer Service immediately at +1 (408) 737-7777. (Note: XFP modules are ordered and shipped separately.) 12 *** Confidential - DO NOT Distribute *** Director Install Director Network Modules If the Director Network Modules (DNMs) are not already installed when you receive the unit, install them by sliding them into the DNM slots in the front panel. (If there is a plate covering the DNM slot, remove it by unscrewing two thumb‑screws, and then install the DNM module.) The DNM circuit boards ride in the rails provided in the slots. Push in the DNM firmly until you feel the connectors mate and the bezel is flush with the front panel, but do not force them. If you encounter resistance, withdraw the module and try again, making sure to align the circuit board in the rails and slide the module straight in. When the DNM is fully seated, fasten it to the front panel with the two captured thumbscrews. If you are only using a single DNM, it should be installed in the left slot (Slot 1). A 2 1 Slot 1 B A B Slot 2 www.netoptics.com Figure 8: Installing Director Network Modules Install SFP and XFP Monitor port Modules SFP and XFP modules are shipped separately. Install them as desired in the SFP and XFP slots in the front on the chassis, and the two XFP slots in the rear. For each module, remove the temporary plug from the SFP or XFP slot and insert the module until it clicks into place. The photograph on the cover of this Guide shows properly installed SFP and XFP modules. Rack Mount the Director device Director is designed for rack mounting in a 19-inch rack panel. The panel occupies one rack unit. To rack mount the Director device, simply slide it into the desired rack location and secure it using the four supplied screws. 13 *** Confidential - DO NOT Distribute *** Director Connect Power to Director For power fault protection, Director is equipped with redundant power connections. If one power source becomes unavailable due to an interruption in AC power or failure of the power brick, the other power source keeps Director operating normally. If both power sources become unavailable, Director passively keeps all in-line network links open, passing all traffic between the network ports. (When power is not available, no data is seen at the Monitor ports.) Management Port RS232 INPUT OUTPUT Model: Dual Gig Copper Port Agg Tap, -48V P/N: PAD-GCU-48V SERIAL NUMBER XXXXXX Figure 9: Connecting redundant power supplies Supply power to Director using the power cords that were included with the unit. If you plan to use redundant power, make sure that you connect the power supplies to two separate, independent power sources for maximum protection. One or both Front Panel Power LEDs are illuminated, depending on whether you used one power supply or two. Connect the local CLI Interface All configuration options, filters, and status can be accessed using the Director Command Line Interface (CLI). You can run the CLI locally over the RS-232 serial port or remotely over the Management port. If you choose to run the CLI locally, connect a DB9 cable from the RS-232 port on the back of the Director chassis to your computer; the computer needs to have terminal emulation software such as HyperTerminal to access the Director CLI. To connect the CLI for local use over the RS-232 serial port: 1. Connect a PC with terminal emulation software, such as HyperTerminal, to Director using the RS-232 DB9 cable supplied with Director. Management Port RS232 INPUT OUTPUT Model: Dual Gig Copper Port Agg Tap, -48V P/N: PAD-GCU-48V SERIAL NUMBER XXXXXX To computer with terminal emulation software Figure 10: Connecting RS-232 Cable to Director 14 *** Confidential - DO NOT Distribute *** Director 2. Launch terminal emulation software and set communication parameters to: 115200 baud 8 data bits No parity 1 stop bit No flow control The Net Optics CLI banner and login prompt are displayed in the Terminal Emulation software. ********************************************************** * Net Optics Command Line Interface (CLI) * * * * Copyright (c) 2008 by Net Optics, Inc. * * * * Restricted Rights Legend * * * * Use, duplication, or disclosure by the Government is * * subject to restrictions as set forth in subparagraph * * (c) of the Commercial Computer Software - Restricted * * Rights clause at FAR sec. 52.227-19 and subparagraph * * (c)(1)(ii) of the Rights in Technical Data and Computer* * Software clause at DFARS sec. 252.227-7013. * * * * Net Optics, Inc. * * 5303 Betsy Ross Drive * * Santa Clara, California 95054 USA * * +1-408-737-7777 * * * ********************************************************** Login user: Figure 11: CLI sign-on banner Connect the remote CLI Interface If you choose to run the CLI remotely, connect a network cable from a switch to the Management port on the back of the Director chassis. Use any computer with an SSH client to access the CLI over the network. Tip!_ ___________________________________________________________________________________________________ PuTTY is a freeware SSH client for Windows that can be downloaded from many sites on the Internet. ________________________________________________________________________________________________________ To connect the CLI for remote use over the Management port: 1. Connect the Director Management port to a network switch using a network cable. 2. Open Direct (the default IP address is 10.60.4.180 and the SSH port is 22) from an SSH client on the network. Director displays the shell login prompt. login as: Figure 12: Shell login prompt 3. Enter customer to log into the shell. The shell asks for the password. login as: shellusername [email protected]'s password: Figure 13: Shell login 15 *** Confidential - DO NOT Distribute *** Director 4. Enter netoptics as the password. For security, the password is not displayed as you type it. The Director CLI runs and the CLI sign-on banner and login prompt are displayed. login as: customer [email protected]'s password: Last login: Thu Sep 4 09:40:31 2008 from 10.30.1.62 ********************************************************** * Net Optics Command Line Interface (CLI) * * * * Copyright (c) 2008 by Net Optics, Inc. * * * * Restricted Rights Legend * * * * Use, duplication, or disclosure by the Government is * * subject to restrictions as set forth in subparagraph * * (c) of the Commercial Computer Software - Restricted * * Rights clause at FAR sec. 52.227-19 and subparagraph * * (c)(1)(ii) of the Rights in Technical Data and Computer* * Software clause at DFARS sec. 252.227-7013. * * * * Net Optics, Inc. * * 5303 Betsy Ross Drive * * Santa Clara, California 95054 USA * * +1-408-737-7777 * * * ********************************************************** login user: Figure 14: Shell login as customer (password "netoptics" is not displayed) Log into the CLI Each Director maintains a list of accounts for users authorized for access to that particular Director. The default account for new systems is User Name admin and Password netoptics. To log into the CLI: 1. Enter the user name. (The default user name is admin.) The Enter Password prompt is displayed. 2. Enter the password. (The default password is netoptics.) For security, the password is not displayed as you type it. The CLI prompt is displayed. login user: admin password: Net Optics> Figure 15: Logging into the CLI 16 *** Confidential - DO NOT Distribute *** Director Configure Director using the CLI You should be logged into the Director CLI. The factory-set default values for Director are: • Username: admin • Password: netoptics • • • • IP Address: 10.60.4.180 (address for remote CLI, and for Compass manager software, when available) Netmask: 255.0.0.0 (associated with IP Address) Manager IP Address: 192.168.1.2 (address for SNMP traps) Gateway IP Address: 10.0.0.1 (associated with Manager IP Address) • Display: ON • Management Port: ON The following default parameters apply to all ports (when available): • Enable: ON • Threshold: 50% • Link Fault Detection: ON (applies to 10/100/1000 in-line Network ports only) A complete list of CLI commands can be viewed by typing Help at the CLI prompt. It is also provided in Appendix B. You will now use the CLI to: • • • • • • • Change the login User Name and Password Assign a new IP Address, Netmask, and Gateway IP Addresses Assign new remote manager IP Address Change port modes Set the date and time Save and load Director configurations Try out the CLI Help command Your CLI screen should be displaying the "Net Optics:" prompt as shown here: Net Optics> If you do not see the "Net Optics>" prompt, try typing Help followed by the Enter key. If the prompt is still not displayed, repeat the instructions in the preceding section Connect the local CLI Interface or Connect the remote CLI Interface and log in again. Change Director User Name and Password It is strongly recommended that you change the User Name and Password from the defaults to provide security against unauthorized access. To change the user name and password: 1. Enter user mod name=<new username> pw=<new password>. The user name and password are changed. 2. Record the new user name and password in a secure location. 17 *** Confidential - DO NOT Distribute *** Director Assign a New Director IP Address, Netmask, and Gateway IP Address If you are using the local RS-232 serial interface to access the CLI, then you need to configure the IP Address that Compass management software, when available, will use to communicate with Director. If Director must communicate through a Gateway to reach the network, then set the Gateway IP Address for that Gateway. If you are running the CLI remotely, you can change the IP Address, but when you do, you will lose your SSH connection since it is talking to the old IP Address. In that case, initiate a new SSH session to the new IP address and you can continue using the CLI remotely. To assign a new IP Address, Netmask, and Gateway IP Address to Director: 1. Enter sysip show. The current IP Address, Netmask, and Gateway IP Address are displayed. 2. Enter sysip set ipaddr=<new ip address> netmask=<new netmask> gw=<new gateway>. The IP Address, Netmask, and Gateway IP Address are made pending. 3. Enter sysip show. Verify that the displayed IP Address, Netmask, and Gateway IP Address are the desired values. 4. Enter sysip commit to activate the new IP Address, Netmask, and Gateway IP Address. Example:sysip set ipaddr=10.60.4.180 netmask=255.0.0.0 gw=10.0.0.1 sysip commit Tip!_ ___________________________________________________________________________________________________ The sysip command accepts one, two, or three parameters, so you only need to include the ones you want to change. For example, to change the IP Address but leave the Netmask and Gateway IP Address the same, enter sysip set ipaddr=<new ip address>. ________________________________________________________________________________________________________ Assign a New Manager IP Address Configure the Manager IP Address to the IP Address of the remote management server, for example an IBM Tivoli or HP OpenView server. To assign a new Manager IP address to Director: TBA Change Port Modes To change the port mode: 1. Enter port set ports=<portlist> autoneg=< on | off> speed=< 10 | 100 | 1000 > duplex=< full | half> to set the mode of a 10/100/1000 Copper port. Example: Enter port set ports=n1.5 autoneg=off speed=100 to set Network Port 5 in DNM 1 to 100Mbps fixed speed. Duplex mode is left in its default state of full duplex. 2. Repeat Step 1 as desired for ports n1.2 to n1.12, n2.1 to n2.12, m.1 to m.12, and t.1 to t.2; this procedure only affects 10/100/1000 Copper ports. 18 *** Confidential - DO NOT Distribute *** Director Tip!_ ___________________________________________________________________________________________________ You can change the modes of multiple ports in a single command by specifying the ports in the portlist. Use a comma to separate items in the list, and use a dash (-) to indicate a range. For example, this portlist includes the first three ports in DNM 1 and the first port in DNM 2: ports=n1.1-n1.3,n2.1 ________________________________________________________________________________________________________ Set the Current Date and Time Director maintains a time-of-day clock which is used to record the time of traffic peak utilization events. Time is based on the 24-hour clock. The clock must be initialized using the CLI or another management tool. To change the current date and time: 1. Enter time hh:mm:ss where hh is hour, mm is minutes, and ss is seconds. 2. Enter date mm/dd/yyyy where mm is month, dd is day of the month, and yyyy is year. Example:time 12:20:00 date 06/24/2008 Save and Load Director Configurations The entire configuration of Director, including port configurations and filters, can be saved to and loaded from files stored on Director's internal disk drive. When working with these files from within the CLI, specify only a filename (up to 32 characters long) without an extension. The current configuration is automatically kept in a file named defaultcfg. This file is automatically loaded at power up or when the system is reset, so your configuration is persistent. However, you may wish to save copies of various configurations that you use for different purposes. For example, each person that uses the device can maintain a separate configuration. To save the Director configuration: • Enter save <filename> where <filename> is the name for this configuration. The configuration is saved. To load a Director configuration: • Enter load <filename> where <filename> is the name of a saved configuration. The configuration is loaded. To view a list of all saved Director configurations: • Enter list. A list of Director configurations is displayed. To view a saved Director configuration: • Enter show <filename> where <filename> is the name of a saved configuration. The configuration is displayed. 19 *** Confidential - DO NOT Distribute *** Director Using the CLI Help Command To view CLI help information: 1. Enter Help at the "Net Optics:" prompt. The list of help topics is displayed. Net Optics> help ![#] commit date del filter help history image list load logout module passwd ping port restart save show stats sysip time upgrade user quit or exit - !number or up/down key for previous command save local config to hardware set system date delete file 'name' - set for filter command - view cli usage - display command history list - switch image - list xml file - load file 'name' - logout from cm server - show installed modules in the system - change password for ssh user's account - ping 'ipaddr' - set port command - restart the whole system - save file 'name' - show all files 'name' - show/clear ports statistics - show and set system network IP address - set system time - upgrade image file - manage user account - exit current cli session Net Optics> Figure 16: Director CLI Help command 2. To view the syntax for changing Director filter parameters, enter help filter. 3. Repeat with the command of interest to view the syntax for all commands available from the CLI. For a complete description of all of the CLI commands, see Appendix B. 20 *** Confidential - DO NOT Distribute *** Director Using the CLI Command History Buffer You can save a lot of typing by using the command history buffer maintained by the CLI. The up- and down-arrow keys scroll forward and backward through the history buffer. To execute a command again, simply scroll to that command and press enter. Alternately, you can scroll to a command and then edit it inline before executing it. You can see a history of all the buffered commands by entering the history command. Any command in the history buffer can be accessed directly by entering ![#] where [#] is the number of the command in the buffer. Operation of the command history buffer is illustrated in the following example. Net Optics> show show name - show all files 'name' Net Optics> list current config file: lannie_090208 Net Optics> help ping ping ipaddr - ping 'ipaddr' Net Optics> sysip show Network Interface Info: Ipaddr: 10.60.4.180 NetMask: 255.0.0.0 Gateway: Net Optics> history 1: show 2: list 3: help ping 4: sysip show Net Optics> !3 Net Optics> help ping ping ipaddr - ping 'ipaddr' Net Optics> 10.0.0.1 Figure 17: CLI command history buffer 21 *** Confidential - DO NOT Distribute *** 1 6 Director Connect Span Ports to Director To connect Director to the network using Span ports, be sure that at least one of your DNMs is a Span model. Use ports in that DNM to connect to the network. Span port numbering is shown in the following diagram. It is the same for Span DNMs and in-line DNMs. Port # n1.1 2 3 4 A 7 8 9 .2 .3 .4 .5 .6 Port # n2.1 .2 .3 .4 .5 .6 5 Span 10/100/1000 B 10 LINK 100 ACT 1000 Span GigaBit 1 10 Port # n1.7 .8 .9 .10 .11 .12 2 3 4 Port # n2.7 .8 5 6 .9 7 8 9 .10 10 11 12 .11 .12 Port numbers in purple Figure 18: Port numbering for Span DNM models Note:___________________________________________________________________________________________________ DNM 1 is on the left and DNM 2 is on the right. In the CLI, the Network ports are designated using the letter N followed by the DNM number, a dot, and then the port number. For example, the Network port on the upper left is n1.1 and the Network port on the lower right is n2.12. ________________________________________________________________________________________________________ To connect a Span port: 1. Plug the appropriate cable into a Director Span port. 2. Plug the other end of the cable into the span port of the switch. The Link LED for the port illuminates after a short delay to indicate that a link has been established. If the Span traffic bandwidth is greater than about 300 Mbps, the two Link LEDs blink. Repeat for all desired Span port connections. 1 Director ™ 2 3 4 5 A 2 B Spn 10/100/1000 10 LINK 100 ACT 1000 Span GigaBit A 1 www.netoptics.com B 6 7 8 9 1 10 2 3 Figure 19: Span port connections 22 *** Confidential - DO NOT Distribute *** 4 5 6 7 8 9 10 11 12 1 6 Director Connect Director With In-line Network Links To connect Director to the network using an in-line installation, be sure that at least one of your DNMs is an in-line model. Tap port-pairs for each link are located side by side, with three links across the top row and three links across the bottom row. This is true for both Fiber and 10/100/1000 DNMs. Link # 1 Port # n1.1 2 3 4 8 9 .3 3 .4 .5 Link # 7 8 Port # n2.1 .2 .6 9 .3 .4 .5 A B A .6 5 A 7 2 .2 B In-Line 10/100/1000 10 LINK 100 ACT 1000 In-Line GigaBit A 1 10 Port # n1.7 .8 Link # .9 4 .10 .11 5 .12 6 B 2 3 Port # n2.7 .8 Link # 10 4 5 6 .9 7 .10 8 9 B 10 11 12 .11 .12 11 12 Port numbers in purple In-line link numbers in green Figure 20: Port and link numbering for in-line DNM models To connect an in-line network link: 1. Plug the appropriate cable into an odd-numbered Network port (Port Nm.o). 2. Plug the other end of the cable into the source switch or router. The Link LED for the port illuminates after a short delay to indicate that a link has been established. 3. Plug another cable into the connector immediately to the right of Port Nm.o. It will be numbered 1 higher, or Port Nm.(o+1). 4. Plug the other end of the cable into the destination switch or router. The Link LED for the port illuminates after a short delay to indicate that a link has been established. If present, traffic passes between the source and destination switches or routers. If the traffic bandwidth is greater than about 300 Mbps, the two Link LEDs blink. Repeat for all desired in-line network connections. 23 *** Confidential - DO NOT Distribute *** Director 1 Director ™ 2 3 4 5 A 2 www.netoptics.com B In-Line 10/100/1000 10 LINK 100 ACT 1000 In-Line GigaBit A B A B A B A B 1 6 7 8 9 1 10 2 3 4 5 6 7 8 9 10 11 12 Figure 21: In-line Network connections Connect Monitoring Tools to Director To connect a monitoring tool to Director, simply plug the appropriate cable into the desired 1 Gigabit or 10 Gigabit Monitor port and plug the other end into the monitoring tool. The Link LED for the port should illuminate after a short delay to indicate that a link has been established. Repeat for all desired monitoring tool connections. Note:___________________________________________________________________________________________________ In the CLI, the Monitor ports are designated using the letter M followed by a dot, and then the port number. For example, the Monitor port on the upper left is m.1 and the Monitor port on the lower right is m.10. ________________________________________________________________________________________________________ Configure a Matrix Switch connection in Director In order to monitor a network link, Director must be configured to copy the traffic from a Network or Span port to a Monitor port. A simple connection is described in this section, operating Director as a Matrix Switch. For more complex switching and filtering, see Chapter 3. To monitor Network Port 1 (in DNM 1) on Monitor Port 2: 1. Enter filter add in_ports=n1.1 action=redir redir_ports=m.2. The switch connection is pending. 2. Enter filter commit. The switch connection is activated. 3. Verify that traffic present on Network Port 1 is visible on Monitor Port 2. Check the Installation You have connected Director to the network, monitoring tools, and power. It should now be functioning correctly. Check the status of the following: • • • • Check that at least one power LED is illuminated. Check the link status LEDs located on the front panel to verify that the links are connected. Verify that traffic is flowing through in-line connections to attached network devices. Verify that traffic present on Network port 1 is visible on Monitor Port 2. 24 *** Confidential - DO NOT Distribute *** Director Chapter 3 Configuring Filters Using the CLI This chapter describes how to use the CLI to determine which monitoring tools are connected to which Network ports. It also explains how to create filters to limit the amount of traffic copied to Monitor ports, so the monitoring tools receive only the traffic that is of interest to them. In this chapter, you will learn to: • • • • • • • • Copy traffic from any Network port to any Monitor port Aggregate traffic from any set of Network ports to any Monitor port Regenerate traffic from any aggregated set of Network ports to any set of Monitor ports Create filters Create complex filters View filters Work with configurable 10 Gigabit ports Understand filter interactions For a complete listing of filter commands in the CLI, see Appendix B. Syntax In the CLI, Director ports are specified by alpha-numeric names as follows: • n1.1, n1.2, n1.3 .. n1.12 – Network ports in the first DNM (the slot on the left); for in-line DNM models, port n1.1, n1.2 are an in-line link pair; so are n1.3, n1.4, and so on. • n2.1, n2.2, n2.3 .. n2.12 – Network ports in the second DNM (the slot on the right); for in-line DNM models, port n2.1, n2.2 are an in-line link pair; so are n2.3, n2.4, and so on. • m.1, m.2, m.3 .. m.10 – Monitor ports • t.1, t.2 – Configurable 10 Gigabit ports (on the front panel) Most commands accept lists of ports. In port lists, port names are separated by commas and a dash (-) designates a range. Do not include any space characters in the list (do not put a space after the comma). For example, n1.1,n1.2,n1.3,n1.4,n1.5-n1.10 is a list that includes Network Ports 1 through 10 on DNM 1. 25 *** Confidential - DO NOT Distribute *** Director When you define a filter, you specify and action to be taken when the filter conditions are met. The action can be either drop or redir (meaning redirect). If the action is drop, then packets which meet the filter criteria are dropped, that is, they are not copied to any Monitor port. If the action is redir, then packets which meet the filter criteria are copied to all Monitor ports listed in the redir_ports=<portlist> parameter. Copy Traffic From Any Network Port to Any Monitor Port Director can be used like a Matrix Switch to direct traffic from any Network port to any Monitor port. To create a simple switch connection, use a filter add command without specifying any filters. The filter add command creates pending filters (including switch settings); they are not activated until a filter commit command is executed. Any number of filter add commands may be issued prior to executing the filter commit command. Other CLI commands may be executed between the filter add commands as well. To monitor Network Port 1 on Monitor Port 2, and Network Port 3 on Monitor Port 1: 1. Enter filter add in_ports=n1.1 action=redir redir_ports=m.2. The switch connection is pending. 2. Enter filter add in_ports=n1.3 action=redir redir_ports=m.1. The switch connection is pending. 3. Enter filter commit. The switch connection is activated. Network Port 1 Monitor Port 2 Network Port 3 Monitor Port 1 filter add in_ports=n1.1 action=redir redir_ports=m.2 filter add in_ports=n1.3 action=redir redir_ports=m.1 Figure 22: Matrix switch connections Aggregate Traffic From Any Set of Network Ports to Any Monitor Port Director can be used like a Port Aggregator or a Link Aggregator, copying traffic from multiple Network ports to any Monitor port. The filter add command is again used to do this. The only difference from using the command to connect a single Network port to a single Monitor port is that a list of Network ports is specified. To copy aggregated traffic from Network Port 1 and Network Port 2 to Monitor Port 3: 1. Enter filter add in_ports=n1.1,n1.2 action=redir redir_ports=m.3. The aggregation connection is pending. 2. Enter filter commit. The aggregation connection activated. Note that in this example, Network Port 1 and Network Port 2 may be Span ports, or they can be a paired in-line network link. The Network port list in the filter add command always applies to the traffic received at the port, not the traffic transmitted out the port. Therefore, if Network Port 1 and Network Port 2 are an in-line link, then Director has been configured to act as a Port Aggregator, combining the traffic from both directions on the in-line link and copying it to the Monitor port. 26 *** Confidential - DO NOT Distribute *** Director Network Port 1 + Monitor Port 3 Network Port 2 filter add in_ports=n1.1,n1.2 action=redir redir_ports=m.3 Figure 23: Traffic aggregation Regenerate Traffic to Any Set of Monitor Ports Director can be used like a Regeneration Tap, copying traffic from a Network port (or aggregated group of Network ports) to multiple Monitor ports. The filter add command is used to do this. The only difference from using the command to connect a single or multiple Network ports to a single Monitor port is that a list of Monitor ports is specified. To regenerate traffic from Network Port 1 to Monitor Ports 3, 4, and 5: 1. Enter filter add in_ports=n1.1 action=redir redir_ports=m.3-m.5. The regeneration connection is pending. 2. Enter filter commit. The regeneration connection is activated. Monitor Port 3 Network Port 1 Monitor Port 4 Monitor Port 5 filter add in_ports=n1.1 action=redir redir_ports=m.3-m.5 Figure 24: Traffic regeneration To aggregate traffic from Network Port 10 and Network Port 11 and regenerate the resulting stream to Monitor Ports 9 and 10: 1. Enter filter add in_ports=n1.10,n1.11 action=redir redir_ports=m.9,m.10. The aggregation/regeneration connection is pending. 2. Enter filter commit. The aggregation/regeneration connection is activated. Network Port 10 + Network Port 11 Monitor Port 9 Monitor Port 10 filter add in_ports=n1.10,n1.11 action=redir redir_ports=m.9,m.10 Figure 25: Combined aggregation and regeneration 27 *** Confidential - DO NOT Distribute *** Director Create Filters Filters process a traffic stream by selecting packets based on criteria in the packet header. A filter is defined using a filter add command, which also specifies the Network ports and Monitor ports the filters apply to. The filter add command specifies the following behavior: • Traffic is aggregated from all the listed Network ports • Then the filter parameters are applied • Packets which match all of the specified filter parameters are copied to all of the listed Monitor ports, assuming the action=redir. • If the action=drop, the matching packets are not copied to any Monitor port; this mechanism is used to create exclusive filters. To send Monitor Port 1 all traffic received at Network Port 5 from IP addresses 192.168.10.0 to 192.168.10.15: 1. Enter filter add in_ports=n1.5 ip_src=192.168.10.0 ip_src_mask= 240 action=redir redir_ports=m.1. A filter has been defined to select all IPv4 packets from Network Port 5 with a source IP addresses of 192.168.10.0 and the lowest four address bits masked out (ignored); packets matching the filter are copied to Monitor Port 1. 2. Enter filter commit. The filter is activated. Network Port 5 Source IP = 192.168.10.0 – 192.168.10.15 Monitor Port 1 filter add in_ports=n1.5 ip_src=192.168.10.0 ip_src_mask= 240 action=redir redir_ports=m.1 Figure 26: Simple IP address filter To create a filter that selects IPv4 packets by protocol: 1. Enter filter add in_ports=n1.3 ip4_prot=3 action=redir redir_ports=m.6,m.8. A filter has been defined to select all IPv4 packets that use the TCP protocol received at Network Port 3 and copy them to Monitor Port 6 and Monitor Port 8. (Protocols are designated by an industry-standard numbering system. See Appendix C for details.) 2. Enter filter commit. The filter is activated. Network Port 3 Protocol = TCP Monitor Port 6 Monitor Port 8 filter add in_ports=n1.3 ip4_prot=3 action=redir redir_ports=m.6,m.8 Figure 27: Simple IPv4 protocol filter (with regeneration) Available filter parameters are listed in Appendix B and include: • ip_src • ip_src_mask IP source address IP destination address mask 28 *** Confidential - DO NOT Distribute *** Director • • • • • • ip_dst ip_dst_mask ip_proto l4_src_port l4_dst_port vlan IP destination address IP source address mask IP protocol Layer 4 source port Layer 4 destination port VLAN number Create Complex Filters Multiple filter parameters can be specified in a single filter add command. Packets must satisfy all of the filter parameters to be selected; in other words, the filter parameters have a logical AND connection. To select all TCP traffic arriving from IP address 192.186.10.0: 1. Enter filter add in_ports=n1.5 ip_src=192.186.10.0 ip_proto=6 action=redir redir_ports=m.1. A filter has been defined to select all IPv4 TCP packets from Network Port 5 with a source IP address of 192.186.10.0; packets matching the filter are copied to Monitor Port 1. 2. Enter filter commit. The filter is activated. Network Port 5 Source IP = 192.186.10.0 Protocol = TCP Monitor Port 1 filter add in_ports=n1.5 ip_src=192.186.10.0 ip_proto=6 action=redir redir_ports=m.1 Figure 28: Logical AND filter connection A logical OR connection can be made between filters by specifying multiple filters with the same Network and Monitor port lists. To select all packets which are either TCP or UDP protocol: 1. Enter filter add in_ports=n1.5 ip_proto=6 action=redir redir_ports=m.1. A filter has been defined to select all IPv4 TCP packets from Network Port 5 and copy them to Monitor Port 1. 2. Enter filter add in_ports=n1.5 ip_proto=17 action=redir redir_ports=m.1. Another filter has been defined to select all IPv4 UDP packets from Network Port 5 and copy them to Monitor Port 1. 3. Enter filter commit. The filters are activated. 29 *** Confidential - DO NOT Distribute *** Director Protocol = TCP Network Port 5 + Monitor Port 1 Protocol = UDP filter add in_ports=n1.5 ip_proto=6 action=redir redir_ports=m.1 filter add in_ports=n1.5 ip_proto=17 action=redir redir_ports=m.1 Figure 29: Logical OR filter connection View filters To view a list of all pending filters, enter filter list. To view the active filters, enter filter running. Net Optics> filter list 001 ip_src=00000000/ffffffff,ip_dst=00000000/ffffffff,ip_proto=0000 l4_src_port=0080,l4_dst_port=0000,vlan=0000,action=3 in_ports=01 redir_ports=13 002 ip_src=0a010101/ffffffff,ip_dst=00000000/ffffffff,ip_proto=0000 l4_src_port=0000,l4_dst_port=0000,vlan=0000,action=1 in_ports=00 05 003 ip_src=00000000/ffffffff,ip_dst=00000000/ffffffff,ip_proto=0000 l4_src_port=0000,l4_dst_port=0025,vlan=0000,action=3 in_ports=00 redir_ports=12 Net Optics> Figure 30: Filter list command Tip!_ ___________________________________________________________________________________________________ The ID numbers shown at the left of each filter in the filter list are the IDs that apply for filter del id=<id> and filter inc id=<id> commands, because all three commands act on the pending filter lsit. Do not use the IDs in a filter running list as the reference for filter del or filter ins commands. ________________________________________________________________________________________________________ 30 *** Confidential - DO NOT Distribute *** Director Work with configurable 10 Gigabit ports The two configurable 10 Gigabit XFP ports on the front panel are designated t.1 (on the left) and t.2 (on the right). They can be used in network port lists and monitor port lists. The 10 Gigabit ports are configured for Network or Monitor as required by the filter add commands you enter. Some examples follow. If separate filter add commands require different configurations for the same XFP port, the port is configured as required for the command that was entered last. To use both XFP ports as Network ports: 1. Enter filter add in_ports=t.1 ip_proto=6 action=redir redir_ports=m.1. A filter has been defined to select all IPv4 TCP packets from 10 Gigabit Port 1 and copy them to Monitor Port 1. 2. Enter filter add in_ports=t.1 ip_proto=17 action=redir redir_ports=m.2. A filter has been defined to select all IPv4 UDP packets from 10 Gigabit Port 1 and copy them to Monitor Port 2. 3. Enter filter add in_ports=t.2 action=redir redir_ports=m.3. A filter has been defined to copy all traffic from10 Gigabit Port 2 to Monitor Port 3. 4. Enter filter commit. The filters are activated. Protocol = TCP Monitor Port 1 Protocol = UDP Monitor Port 2 XFP Port 1 XFP Port 2 Monitor Port 3 filter add t.1 ip_proto=6 action=redir redir_ports=m.1 filter add t.1 ip_proto=17 action=redir redir_ports=m.2 filter add t.2 action=redir redir_ports=m.3 Figure 31: Configurable 10 Gigabit XFP ports used as Network ports To use both XFP ports as Monitor ports: 1. Enter filter add in_ports=n1.1-n1.4 action=redir redir_ports=t.1. A filter has been defined to aggregate the traffic from the first four 1 Gigabit Network Ports and copy the aggregated traffic to 10 Gigabit Port 1. 2. Enter filter add in_ports=n1.11 action=redir redir_ports=t.2. A filter (switch) has been defined to copy all the traffic from 1 Gigabit Network Port 11 to 10 Gigabit Port 2. 3. Enter filter commit. The filters are activated. 31 *** Confidential - DO NOT Distribute *** Director Network Port 1 Network Port 2 Network Port 3 + XFP Port 1 Network Port 4 Network Port 11 XFP Port 2 filter add in_ports=n1.1-n1.4 action=redir redir_ports=t.1 filter add in_ports=n1.11 action=redir redir_ports=t.2 Figure 32: Configurable 10 Gigabit XFP ports used as Monitor ports (with aggregation) To use one XFP port as a Span port and the other XFP port as a Monitor port: 1. Enter filter add in_ports=t.1 ip_proto=6 action=redir redir_ports=m.1. A filter has been defined to select all IPv4 TCP packets from 10 Gigabit Port 1 and copy them to Monitor Port 1. 10 Gigabit XFP Port 1 is configured as a Span port. 2. Enter filter add in_ports=n1.11 action=redir redir_ports=t.2. A filter has been defined to copy all the traffic from 1 Gigabit Network Port 11 to 10 Gigabit Port 2. 10 Gigabit XFP Port 2 is configured as a Monitor port. 3. Enter filter commit. The filters are activated. XFP Port 1 Network Port 11 Protocol = TCP Monitor Port 1 XFP Port 2 filter add in_ports=t.1 ip_proto=6 action=redir redir_ports=m.1 filter add in_ports=n1.11 action=redir redir_ports=t.2 Figure 33: Configurable 10 Gigabit XFP ports used one Span port and one Monitor port 32 *** Confidential - DO NOT Distribute *** Director Understand filter interactions It is important to understand that Director uses Content Addressable Memory (CAM) technology to implement filters. As each filter is defined, it is stored in the next available entry in the CAM. Each packet header is compared in the CAM, and the CAM returns the index of the first filter that the packet header matched. That filter, and only that filter, controls which monitoring ports receive a copy of the packet. Other filters are not executed for that packet. Therefore, filters are not completely independent; one filter can affect the operation of another. Let's walk through an example of a filter interaction that may be unexpected. First, we will set up a filter for an IP address: filter add in_ports=n1.5 ip_src=192.186.10.0 action=redir redir_ports=m.1 filter commit CAM Network Port 5 Source IP = 192.168.10.0 – 192.168.10.15 Address Monitor Port 1 1 Filter n1.5 ip_src=192.186.10.0 m.1 filter add in_ports=n1.5 ip_src=192.168.10.0 ip_src_mask= 240 action=redir redir_ports=m.1 Figure 34: A simple IP address filter, shown with CAM All traffic from Network Port 5 that comes from IP address 192.186.10.0 matches the first CAM entry and therefore is copied to Monitor Port 1. Next, suppose we want another monitoring tool to see all the TCP traffic from Network Port 5, so we set up this filter: filter add in_ports=n1.5 ip_proto=6 action=redir redir_ports=m.2 filter commit CAM Source IP = 192.186.10.0 Address Monitor Port 1 Filter interactions are not shown! Network Port 5 Protocol = TCP Filter 1 n1.5 ip_src=192.186.10.0 m.1 2 n1.5 ip_proto=TCP m.1 Monitor Port 2 filter add in_ports=n1.5 ip_src=192.186.10.0 action=redir redir_ports=m.1 filter add in_ports=n1.5 ip_proto=6 action=redir redir_ports=m.2 Figure 35: Incorrect flow diagram of two filters; filter interaction in CAM is neglected 33 *** Confidential - DO NOT Distribute *** Director Have we achieved our goal of sending all the TCP traffic to Monitor Port 2? Not quite. What happens when an TCP packet arrives from 192.186.10.0? It matches the filter at CAM address 1, so it is copied to Monitor Port 1. But that is all that happens; it does not go to Monitor Port 2. The flow is correctly shown in the following diagram. CAM Network Port 5 Source IP = 192.186.10.0 Address match Monitor Port 1 no match Protocol = TCP Filter 1 n1.5 ip_src=192.186.10.0 m.1 2 n1.5 ip_proto=TCP m.2 Monitor Port 2 filter add in_ports=n1.5 ip_src=192.186.10.0 action=redir redir_ports=m.1 filter add in_ports=n1.5 ip_proto=6 action=redir redir_ports=m.2 Figure 36: Correct flow diagram for two interacting filters To achieve the desired result of sending all TCP traffic to Monitor Port 2, clear the existing filters (filter discard command) and create three new filters by entering: filter add in_ports=n1.5 ip_src=192.186.10.0 ip_proto=6 action=redir redir_ports=m.1,m.2 filter add in_ports=n1.5 ip_src=192.186.10.0 action=redir redir_ports=m.1 filter add in_ports=n1.5 ip_proto=6 action=redir redir_ports=m.2 filter commit The flow diagram now looks as follows. CAM Network Port 5 Source IP = 192.186.10.0 & Protocol= TCP + Monitor Port 1 + Address Source IP = 192.186.10.0 n1.5 ip_src=192.186.10.0 ip_proto=TCP m.1,m.2 2 n1.5 ip_src=192.186.10.0 3 n1.5 ip_proto=TCP m.2 Monitor Port 2 no match Filter 1 match no match Protocol = TCP filter add in_ports=n1.5 ip_src=192.186.10.0 ip_proto=6 action=redir redir_ports=m.1,m.2 filter add in_ports=n1.5 ip_src=192.186.10.0 action=redir redir_ports=m.1 filter add in_ports=n1.5 ip_proto=6 action=redir redir_ports=m.2 Figure 37: Correct way to send all TCP traffic to Monitor Port 2 Now, packets that match both the IP address and protocol conditions will be copied to both Monitor ports, while packets that match only one of the conditions will be directed to the desired Monitor port. 34 *** Confidential - DO NOT Distribute *** Director Note:___________________________________________________________________________________________________ Instead of filter add, you can use a filter ins command to define filters. The only difference is that filter ins allows you to specify the filter's ID, which is its position in the pending filter list. (Use filter list so see the IDs of all pending filters.) When you use a filter ins command, the first parameter must be id=<id> where <id> is a decimal number in the range 1 to 999. For example: filter ins id=2 in_ports=n1.1 out_ports=m.1 defines a filter that sends all the traffic from Network Port 1 to Monitor Port 1 and places this filter in the second location in the pending filter list. ________________________________________________________________________________________________________ Tip!_ ___________________________________________________________________________________________________ The filter del command can be used to delete a filter from the pending filter list. The syntax is a filter del id=<id> where <id> is a decimal number in the range 1 to 999 corresponding to the position in the pending filter list. Use the filter list command so see the IDs of all pending filters. ________________________________________________________________________________________________________ Exclusive filters Filters can be specified using action=drop in order to create exclusive filters. (An exclusive filter excludes packets rather an including them.) For example, suppose you would like to monitor all traffic on a link except for the UDP traffic. To specify this filter, use the following commands. Note that the drop filter must come first so it is earlier in the CAM. filter add in_ports=n1.1 ip_proto=17 action=drop filter add in_ports=n1.1 action=redir redir_ports=m.1 filter commit CAM Network Port 1 Protocol = UDP match Address (drop) no match All Filter 1 n1.1 ip_proto=UDP action=drop 2 n1.1 m.1 Monitor Port 1 filter add in_ports=n1.1 ip_proto=17 action=drop filter add in_ports=n1.1 action=redir redir_ports=m.1 Figure 38: Creating an exclusive filter Tip!_ ___________________________________________________________________________________________________ If you only define switch connections, with no filtering, the CAM is not involved and the switches do not interact. ________________________________________________________________________________________________________ Tip!_ ___________________________________________________________________________________________________ Filters that use exclusive sets of Network ports (each Network port is included in only a single filter) do not interact. For example, filter add in_ports=n1.1-n1.5 <filter_parameter_list> <monitor_port_list> does not interact with filter add in_ports=n1.6-n1.10 <filter_parameter_list> <monitor_port_list> ________________________________________________________________________________________________________ 35 *** Confidential - DO NOT Distribute *** Director Understand pending and active filters To understand the actions of filter commands such as filter commit, filter discard, and filter delete, it is helpful to visualize the pending filter list and the CAM that holds the active filters. The previous section explained how the active filters are stored in a CAM, which can be thought of as list of active filters. These filters, which are actively running in the device, may be referred to as active, running, or committed. Pending filters, that is, filters that have been defined using filter add and filter ins commands but not yet committed, are kept in a pending filter list that shadows the CAM. These filters may be referred to as pending or uncommitted. The following table shows which filter commands affect the pending filter list and which affect the CAM. Commands apply to Pending filter list CAM filter add filter del filter discard filter ins filter list filter sync commit filter clear filter commit filter running As can be seen from the table, most of the time you work with the contents of the pending filter list. When you have the filters set up the way you want them in the pending filter list, a commit or filter commit command transfers the contents of the pending filter list to the CAM, activating that filter set-up. A common workflow for changing the Director filter configuration might be as follows. To change the Director filter configuration: CAM Pending filter list Address Filter Address Filter 1 n1.1 ip_proto=UDP action=drop 2 n1.1 m.1 Figure 39: Starting state 1. Enter filter running to view the currently active filters in the CAM. Net Optics> filter running 001 ip_src=00000000/ffffffff,ip_dst=00000000/ffffffff,ip_proto=0017 l4_src_port=0000,l4_dst_port=0000,vlan=0000,action=1 in_ports=00 002 ip_src=00000000/ffffffff,ip_dst=00000000/ffffffff,ip_proto=0000 l4_src_port=0000,l4_dst_port=0000,vlan=0000,action=3 in_ports=00 redir_ports=12 Net Optics> Figure 40: Filter running command 2. Enter filter sync. The contents of the CAM are copied to the pending filter list. 36 *** Confidential - DO NOT Distribute *** Director CAM Pending filter list Address Filter Address Filter 1 n1.1 ip_proto=UDP action=drop 1 n1.1 ip_proto=UDP action=drop 2 n1.1 m.1 2 n1.1 m.1 Figure 41: After filter sync 3. Use filter add, filter ins, and filter del commands to change filters as desired. CAM Pending filter list Address Filter Address Filter 1 n1.1 ip_proto=TCP action=drop 1 n1.1 ip_proto=UDP action=drop 2 n1.1 m.1 2 n1.1 m.1 3 n1.2 m.2 Figure 42: Filter 1 has been changed and filter 3 has been added 4. Enter filter list to view the pending filter list. Net Optics> filter list 001 ip_src=00000000/ffffffff,ip_dst=00000000/ffffffff,ip_proto=0006 l4_src_port=0000,l4_dst_port=0000,vlan=0000,action=1 in_ports=00 002 ip_src=00000000/ffffffff,ip_dst=00000000/ffffffff,ip_proto=0000 l4_src_port=0000,l4_dst_port=0000,vlan=0000,action=3 in_ports=00 redir_ports=12 003 ip_src=00000000/ffffffff,ip_dst=00000000/ffffffff,ip_proto=0000 l4_src_port=0000,l4_dst_port=0000,vlan=0000,action=3 in_ports=01 redir_ports=13 Net Optics> Figure 43: Filter list command 6. Repeat steps 3 and 4 until the pending filter list is consistent with the desired filter configuration. 7. Enter filter commit. The contents of the pending filter list are copied to the CAM, activating the new filter configuration. CAM Pending filter list Address Filter Address Filter 1 n1.1 ip_proto=TCP action=drop 1 n1.1 ip_proto=TCP action=drop 2 n1.1 m.1 2 n1.1 m.1 3 n1.2 m.2 3 n1.2 m.2 Figure 44: After filter commit 37 *** Confidential - DO NOT Distribute *** Director Be aware of these similar pairs of commands: • filter discard clears the pending filter list, while filter clear clears the CAM • filter list shows the pending filter list, while filter running shows the CAM • filter commit copies the pending filter list to the CAM, while filter sync copies the CAM to the pending filter list CAM Pending filter list Address Filter filter commit 1 2 Address Filter 1 2 filter sync filter discard to clear filter list to view contents filter clear to clear filter running to view contents Figure 45: Pairs of similar filter commands User interactions When multiple users are logged into Director at the same time, each user has a separate pending filter list in which to create filter configurations. However, there is only one CAM, so any time a user executes a commit or filter commit command, the CAM takes on the filter configuration from that user's pending filter list, and those become the active filters on Director. For this reason, it is a good idea to use a filter sync to get the current contents of the CAM before adding or modifying filters; that way, the filters that you don't touch remain unaffected after you commit. Filter capacity The capacity of Director's filtering function is roughly 1,000 filter elements per chassis, where a filter element is a port list or a filter parameter. For example, filter add in_ports=n1.1-n1.7 ip_proto=6 vlan=100 action=redir redir_ports=m.1-m.5,m.10 has four filter elements: 1.in_ports=n1.1-n1.7 2.ip_proto=6 3.vlan=100 4.redir_ports=m.1-m.5,m.10 Counting filter elements is only a rough gauge of filter utilization, and is not recommended. Instead, examine the pending filter list or CAM contents with filter list and filter running commands. The CAM has 512 locations, so the number of filter entries or filter IDs is an indication of how much filtering capacity has been utilized. For example, if the highest filter ID is 256, then half of the filter capacity is utilized. The actual capacity may exceed 1,000 filter elements because one CAM location can contain multiple filter elements. However, be aware that IPv6 addresses (when available) require additional CAM space and therefore fill the CAM more quickly than IPv4 addresses. 38 *** Confidential - DO NOT Distribute *** Director Chapter 4 Daisy-chaining Multiple Director Chassis This chapter describes how to expand the capacity of Director by daisy-chaining multiple Director chassis. The complete set of chassis becomes a single logical system with up to 380 total ports. By using long-reach ER links, chassis can be physically separated by as much as 25 miles (40 kilometers), enabling monitoring of entire campuses or multiple campuses with a single Director system. Daisy-chaining chassis is not supported in the initial release of Director. This chapter will be expanded when daisy‑chain functionality becomes available. 39 *** Confidential - DO NOT Distribute *** Director Appendix A Director Specifications Specifications, chassis Mechanical Dimensions: 1.6” high x 15.65” deep x 17” wide Mounting: Surface or 19” rack mount (1U) Weight: TBA Connectors Network Port Slots: (2) Director Network Module (DNM) Monitor Ports: (10) SFP Configurable 10Gigabit Ports: (2) XFP Daisy-chain (uplink) 10Gigabit Ports: (2) XFP Management Port: (1) RJ45 10/100 Copper Network Configuration (CLI) Port: (1) RS-232 DB9 USB Port: (1) Supports thumb drives for software loading Power: (2) AC universal Electrical Interface Power: 100-240VAC, 2A, 47-63Hz (Japan: 100‑125VAC, ~120 VA, 50-60Hz), -48VDC available Indicators (All ports) Link LEDs (with speed indication on Copper ports), (All ports) Activity LEDs (1) Alarm LED (2) Power LEDs Performance Hardware throughput: 74Gbps TapFlow Smart filtering: More than 1,000 filter elements per chassis; filter by IP source address , IP destination address, MAC source address, MAC destination address, source port, destination port, protocol, network port or port group, VLAN, utilization threshold RMON statistics for each network and monitor port: Current utilization, peak utilization, peak time, total packets, total bytes, CRC errors, collision packets, oversize packets, undersize packets Alarms: Programmable utilization threshold alarm for each network and monitor port Internal disk drive: 2.5-inch, SATA, 30 Gigabyte, 5400 RPM Software Net Optics Web Manager—compatible with all major Web browsers Net Optics System Manager—compatible with Windows XP, Windows 2000, and Windows 98 SNMP v3 support 40 *** Confidential - DO NOT Distribute *** Director Specifications, DNM Copper Interface (12) RJ45 Network Ports 10/100/1000Mbps (6) In-line links or (12) Span ports depending on model 22-24 AWG unshielded twisted pair cable, CAT5e or better recommended Fiber Optic Interface (12) Gigabit SX, LX, or ZX Network Ports, LC type (6) In-line links or (12) Span ports depending on model Fiber Types: Corning Multimode 62.5/125μm Corning Multimode 50/125μm Corning Singlemode 8.5/125μm Transceiver: SX GigaBit 850nm, VCSEL, supports 62.5/125μm SX GigaBit 850nm, VCSEL, supports 50/125μm LX GigaBit 1310nm, laser, supports 8.5/125μm ZX GigaBit 1550nm, laser, supports 8.5/125μm Safety: Class 1, eye-safe, laser emitter type; conforms to the applicable requirements per US 21 CFR (J) and EN 60825-1; also UL 1950 applications Environmental Operating Temperature: 0˚C to 55˚C Storage Temperature: -10˚C to 70˚C Relative Humidity: 10% min, 95% max, non-condensing Certifications FCC, CE, FCC, VCCI, C-Tick, and WEEE certified Fully RoHS compliant Available Models Models, Main Chassis DIR-3400 Director Main Chassis with 10 SFP monitor ports DIR-____ Director Main Chassis with 10 SFP monitor ports, -48VDC power DIR-7400 Director Main Chassis with 10 SFP monitor ports, 2 XFP 10GbE ports, 2 XFP uplink ports DIR-____ Director Main Chassis with 10 SFP monitor ports, 2 XFP 10GbE ports, 2 XFP uplink ports, -48VDC power DNMs DNM-100 6-Port 10/100/1000 Copper In-Line Module DNM-110 12-Port 10/100/1000 Copper Span Module DNM-200 DNM-210 DNM-220 DNM-230 6-Port Gigabit SX Fiber 62.5μm In-Line Module 12-Port Gigabit SX Fiber 62.5μm Span Module 6-Port Gigabit SX Fiber 50μm In-Line Module 12-Port Gigabit SX Fiber 50μm Span Module DNM-300 DNM-310 DNM-320 DNM-330 6-Port Gigabit LX Fiber In-Line Module 12-Port Gigabit LX Fiber Span Module 6-Port Gigabit ZX Fiber In-Line Module 12-Port Gigabit ZX Fiber Span Module 41 *** Confidential - DO NOT Distribute *** Director Appendix B Command Line Interface Tip!_ ___________________________________________________________________________________________________ The command line interface (CLI) is not case sensitive. ________________________________________________________________________________________________________ Port numbering: • Network ports are numbered Ns.p where • s is the DNM module (1 or 2; 1 is on the left, 2 is on the right) • p is the port number within the DNM (1 through 12) • for example, n2.1 and n2.12 are the lowest and highest port numbers in the second DNM Monitor ports are numbered m.1 through m.10 • Configurable 10 Gigabit ports are numbered t.1 and t.2 • a portlist is a list of ports separated by commas; dashes may be used to specify ranges; for example, n1.1,n1.2,n1.3 and n1.1-n1.3 mean the same thing; NOTE: Do not include any space characters in the list (do not put a space after the comma) A string is a string of characters up to 32 characters in length, not case sensitive; valid characters are A-Z, a-z, 1-9, -, _ Parameters marked with an asterisk (*) are required, and must be the first parameter in the parameter list for the command. Other parameters are optional and may be included in any order. Command ! Sub-Command Parameters Example and description [#] (a number) !3 Executes a command from the CLI command history buffer (see history command) commit commit Activates pending changes previously defined using filter commands; same as a filter commit command date <date> date 06/24/2008 Parameters: <date> is mm/dd/yyyy Sets the system calendar date; if <date> is omitted, the current date is displayed del <filename>* del my_configuration-1 Parameters: <filename> is the name of the file to delete; a string; do not include an extension Deletes a previously saved Director configuration file (see save command) exit exit Exits the CLI shell (same as logout and quit) 42 *** Confidential - DO NOT Distribute *** Director Command Sub-Command Parameters filter add ipv6=< y | n > filter add ipv6=n in_ports=n1.1-n1.3 ip_ in_ports=<network_portlist>* src=10.1.1.1 action=drop <qual>=<value> Parameters: action=< redir | drop > ipv6=y for IPv6 addressing; ipv6=n for IPv4 adredir_ports=<monitor_portlist> dressing (defaults to IPv4 if parameter is omitted) <network_portlist> — traffic from the network Notes: ports specified in this portlist is aggregated before being sent to the filter The command may include <qual> and <value> are filter qualifiers and values any number of <qual>, up as listed in the table that follows this table to the limit of Director's filter Specify redir or drop as the filter action — resources (approximately if redir, packets matching all of the <qual> are 1,000 <qual> per chassis) copied to all of the Monitor ports specified in the The action=< redir | drop > portlist <monitor_portlist> parameter is required if drop, packets matching all of the <qual> are dropped If action=redir, then redir_ports=<monitor_portlist> Defines a filter, including the Network and Monitor ports involved in the filter; filter is pending (inactive) parameter is required until activated by a filter commit or commit command Note: If the filter command does not include any <qual>, it defines aggregation, regeneration, and matrix switching functions without filtering clear filter clear Clears all active filters commit filter commit Activates pending filters previously defined using filter add and filter ins commands del Example and description ipv6=< y | n > id=<id>* filter del id=3 Parameters: ipv6=y for IPv6 addressing; ipv6=n for IPv4 addressing (defaults to IPv4 if parameter is omitted) <id> is a decimal number from 1 to 999 that identifies which filter is to be deleted Deletes a pending filter discard ins filter discard Clears all pending filters ipv6=< y | n > filter ins id=myfilter-1 in_ports=n1.1-n1.3 ip_ id=<id>* src=10.1.1.1 action=drop in_ports=<network_portlist> Parameters: <qual>=<value> ipv6=y for IPv6 addressing; ipv6=n for IPv4 adaction=< redir | drop > dressing (defaults to IPv4 if parameter is omitted) redir_ports=<monitor_portlist> <id> is a decimal number from 1 to 999 that specifies the priority of this filter (the address for the filter in the filter CAM) The rest of the filters parameters are as defined for the filter add command Defines and prioritizes a filter 43 *** Confidential - DO NOT Distribute *** Director Command Sub-Command filter list (continued) running Parameters Example and description ipv6=< y | n > filter list Parameters: ipv6=y for IPv6 addressing; ipv6=n for IPv4 addressing (defaults to IPv4 if parameter is omitted) Displays all pending filters (with filter IDs) ipv6=< y | n > filter running Parameters: ipv6=y for IPv6 addressing; ipv6=n for IPv4 addressing (defaults to IPv4 if parameter is omitted) Displays all active filters sync help filter sync Loads the pending filter list with a copy of the currently active filters <command> help filter Parameter: <command> is any CLI command Displays information about the specified CLI command; if <command> is omitted, displays a list of all CLI commands history history Displays a numbered list of previously executed CLI commands; any command can be executed directly by entering the command number preceded by an exclaimation point; up- and down-arrow keys can be used to scroll through the command history buffeer (see ! command) image <1|2> image 2 Parameter: Valid values are 1 and 2 Chooses which system image to boot from; if <n> is omitted, the current system image information is displayed (see upgrade command) list list Shows a list of filenames of saved Director device configurations (see save command) load <filename>* load my_configuration-1 Parameters: <filename> is the name of the file to load; a string; do not include an extension Loads a previously saved Director configuration (see save command) logout module logout Exits the CLI shell (same as exit and quit) show module show Lists information about Director hardware modules including system serial number, DNM types, and XFPs 44 *** Confidential - DO NOT Distribute *** Director Command Sub-Command Parameters Example and description passwd passwd Interactively changes the password of the SSH user account ping port set <address>* ping 10.1.1.4 Parameters: <address> is an IP address Pings the specified IP address to check for connectivity ports=<portlist>* autoneg=< on | off > duplex=< full | half > speed=< 10 | 100 | 1000 > port set n1.1-n1.3 autoneg=on duplex=full Parameters: <portllist> is a portlist For other parameters, select a value from the listed choices For 10/100/100 Copper interface Network and Monitor ports, enables or disables autonegotiation; selects the duplex mode; and sets the fixed speed (10Mbps, 100Mbps, or 1000Mbps) if autonegotiation is off show port show Displays the current port status and settings quit quit Exits the CLI shell (same as exit and logout) restart restart Reboots the Director device; also called warm boot; similar to power-cycling the device; does not change the configuration parameters or filters save save my_configuration-1 Parameters: <filename> is the name of the file where the configuration is saved; a string; do not include an extension Saves the Director device configuration to a file; saved information includes port set-up and filters show stats <filename>* show my_configuration-1 Parameters: <filename> is the name of the file to display; a string; do not include an extension Displays the contents of the specified saved configuration file (see save command) clear ports=all|<[portlist> stats clear ports=all Clears RMON statistics for the designated ports show ports=all|<[portlist> stats show ports=m.2,n1.4 Displays RMON statistics for the designated ports 45 *** Confidential - DO NOT Distribute *** Director Command Sub-Command sysip commit set Parameters Example and description sysip commit Activates pending changes defined with sysip set ipaddr=<address> netmask=<netmask> gw=<gateway> sysip ipaddr=192.168.1.2 netmask=255.255.0.0> Parameters: <address> is the IP address (default: 192.168.1.2) <netmask> is the netmask (default: 255.0.0.0) <gateway> is the gateway IP address (default: 192.168.1.1) Sets the Director IP address, netmask, and gateway IP address; requires a sysip commit command to activate the new settings show sysip show Displays the current Director IP address information time <time> time 13:02:00 Parameters: <time> is hh:mm:ss Sets the system time-of-day; if <time> is omitted, the current time is displayed upgrade srvip=<svrip> user=<username> pw=<passwd> filename=<filename> upgrade srvip=168.192.20.2 user=bob pw=bobpw filename=image021108 2 Parameter: <svrip> is the IP address of the server that the new image file is on <username> is the user name needed for FTP access to the server <passwd> is the password needed for FTP access to the server <filename> is the name of the image file Replaces the current system boot image with the image in the specified file (see image command); all parameters must be included and they must be in the order shown 46 *** Confidential - DO NOT Distribute *** Director Command Sub-Command user show This command is only available at root level add Parameters Example and description user show Lists all the currently defined user accoounts This command is only available at root level name=<username>* pw=<password> priv=<level> Notes: All three parameters are required, and they must be in the order shown user add name=bob pw=bob-pw priv=3 Parameters: <username> is the username, a string <password> is the password, a string <level> is 1, 2, or 3 (other values not applicable); 1=root; 2=admin; 3=user Creates a new user account This command is only available at root level del name=<username> user del name=bill Parameters: <username> is the user name of the account you wish to delete Deletes a user account This command is only available at root level mod name=<username> pw=<password> priv=<level> user mod name=bill pw=billpw Parameters: <username> is the user name of the account you want to change, a string <password> is the new password for the account to, a string <level> is 1, 2, or 3 (other values not applicable); 1=root; 2=admin; 3=user Modifies a user account This command is only available at root level 47 *** Confidential - DO NOT Distribute *** Director Filter parameters Switches and filters are defined using the filter add and filter ins commands. The filter add command syntax is: filter add in_ports=<portlist> <filter_parameter_list> action=<redir|drop> redir_ports=<portlist> The <filter_parameter_list> is a sequence of zero or more of the filter qualifiers as listed in the following table. If the <filter_parameter_list> is empty, the filter add command specifies an aggregation of the traffic received on all of the in_ports. If the action=redir, the aggregated traffic stream is regenerated to all of the redir_ports. If the <filter_parameter_list> contains filters, aggregation and regeneration take place as described in the previous paragraph. However, the filters are applied to the aggregated traffic stream before it is copied to the Monitor ports. If multiple filter qualifiers are specified, a packet must satisfy all of the filter qualifiers in order to be copied to the Monitor ports. In other words, the filter qualifiers are combined with a logical AND condition. A logical OR condition can be created by using multiple filter add commands with identical port lists. The filter add and filter ins commands define filters but do not activate them. A subsequent filter commit or commit command must be executed to the filters. This mechanism enables an interrelated group of filters to be activated simultaneously. It also allows you to double-check your filter definitions before you activate them. It is important to note that packets are filtered using a Content Addressable Memory or CAM. Each filter is a CAM entry, and the CAM is filled in the order that the filter add commands are received. Filter ins commands create filters in specific locations in the CAM. When a packet is processed, the first filter in the CAM that matches the packet is the only filter that is activated. Each packet can activate exactly zero or one filters. See Understand filter interactions near the end of Chapter 3 for examples. All supported filter qualifiers are shown in the following table. Director Filter Parameters <qual> <value> Example Description ip_src IPv4 address ip_src=168.10.4.1 IP source address ip_src_mask IPv4 address mask ip_src_mask=255.255.255.0 Mask for IP source address ip_dst ip_dst=1234:5678::9abc IP destination address ip_dst_mask IPv4 address mask IPv4 address ip_dst_mask=255.255.255.0 Mask for IP destination address ip_proto Number* ip_proto=6 Layer 4 IP protocol l4_src_port Port number l4_src_port=80 Layer 4 source port l4_dst_port Port number l4_dst_port=80 Layer 4 destination port vlan VLAN number vlan=128 VLAN * See Appendix C for a complete list of protocol numbers. Some common protocols include: Number Keyword Protocol 1 ICMP Internet Control Message Protocol 2 IGMP Internet Group Message Protocol 6 TCP Transmission Control Protocol 17 UDP User Datagram Protocol 89 OSPF Open Shortest Path First 132 SCTP Stream Control Transmission Protocol 48 *** Confidential - DO NOT Distribute *** Director Appendix C Protocol Numbers The official Assigned Internet Protocol Numbers list is maintained by the Internet Assigned Numbers Authority and can be found at http://www.iana.org/assignments/protocol-numbers. The list as of April 18, 2008 is reproduced in the following table (without references). Num Keyword Protocol Keyword Protocol 0 HOPOPT IPv6 Hop-by-Hop Option 1 ICMP Internet Control Message 30 NETBLT Bulk Data Transfer Protocol 31 MFE-NSP 2 IGMP Internet Group Management MFE Network Services Protocol 3 GGP Gateway-to-Gateway 32 MERITINP MERIT Internodal Protocol 4 IP IP in IP (encapsulation) 5 ST Stream 33 DCCP Datagram Congestion Control Protocol 6 TCP Transmission Control 7 34 3PC Third Party Connect Protocol CBT CBT 35 IDPR 8 EGP Exterior Gateway Protocol Inter-Domain Policy Routing Protocol 9 IGP any private interior gateway (used by Cisco for their IGRP) 36 XTP XTP 37 DDP Datagram Delivery Protocol 38 IDPRCMTP IDPR Control Message Transport Proto 39 TP++ TP++ Transport Protocol 40 IL IL Transport Protocol 41 IPv6 Ipv6 42 SDRP Source Demand Routing Protocol 43 IPv6Route Routing Header for IPv6 10 BBNRCCMON Num BBN RCC Monitoring 11 NVP-II Network Voice Protocol 12 PUP PUP 13 ARGUS ARGUS 14 EMCON EMCON 15 XNET Cross Net Debugger 16 CHAOS Chaos 44 IPv6-Frag Fragment Header for IPv6 17 UDP User Datagram 45 IDRP 18 MUX Multiplexing Inter-Domain Routing Protocol 19 DCNMEAS DCN Measurement Subsystems 46 RSVP Reservation Protocol 47 GRE 20 HMP Host Monitoring General Routing Encapsulation 21 PRM Packet Radio Measurement 48 DSR Dynamic Source Routing Protocol 49 BNA BNA 50 ESP Encap Security Payload 51 AH Authentication Header 52 I-NLSP Integrated Net Layer Security TUBA 22 XNS-IDP XEROX NS IDP 23 TRUNK-1 Trunk-1 24 TRUNK-2 Trunk-2 25 LEAF-1 Leaf-1 26 LEAF-2 Leaf-2 27 RDP Reliable Data Protocol 53 SWIPE IP with Encryption 28 IRTP Internet Reliable Transaction 54 NARP 29 ISO-TP4 ISO Transport Protocol Class 4 NBMA Address Resolution Protocol 49 *** Confidential - DO NOT Distribute *** Director Num Keyword Protocol Num Keyword Protocol 55 MOBILE IP Mobility 85 NSFNET-IGP 56 TLSP Transport Layer Security Protocol using Kryptonet key management NSFNETIGP 86 DGP Dissimilar Gateway Protocol 87 TCF TCF 88 EIGRP EIGRP 89 OSPFIGP OSPFIGP 90 SpriteRPC Sprite RPC Protocol 91 LARP Locus Address Resolution Protocol 92 MTP Multicast Transport Protocol 57 SKIP SKIP 58 IPv6ICMP ICMP for IPv6 59 IPv6NoNxt No Next Header for IPv6 60 IPv6-Opts Destination Options for IPv6 61 62 any host internal protocol CFTP 63 CFTP any local network 93 AX.25 AX.25 Frames 94 IPIP IP-within-IP Encapsulation Protocol 95 MICP Mobile Internetworking Control Pro. 96 SCC-SP Semaphore Communications Sec. Pro. 97 ETHERIP Ethernet-within-IP Encapsulation ENCAP Encapsulation Header 64 SATEXPAK SATNET and Backroom EXPAK 65 KRYPTOLAN Kryptolan 66 RVD MIT Remote Virtual Disk Protocol 67 IPPC Internet Pluribus Packet Core any distributed file system 98 69 SAT-MON SATNET Monitoring 99 68 70 VISA VISA Protocol 71 IPCV Internet Packet Core Utility 72 CPNX Computer Protocol Network Executive 73 CPHB Computer Protocol Heart Beat 74 WSN Wang Span Network 75 PVP Packet Video Protocol any private encryption scheme 100 GMTP GMTP 101 IFMP Ipsilon Flow Management Protocol 102 PNNI PNNI over IP 103 PIM Protocol Independent Multicast 104 ARIS ARIS 105 SCPS SCPS 106 QNX QNX 107 A/N Active Networks 108 IPComp IP Payload Compression Protocol 109 SNP Sitara Networks Protocol 110 CompaqPeer Compaq Peer Protocol 76 BR-SATMON Backroom SATNET Monitoring 77 SUN-ND SUN ND PROTOCOL-Temporary 78 WB-MON WIDEBAND Monitoring 79 WBEXPAK WIDEBAND EXPAK 80 ISO-IP ISO Internet Protocol 81 VMTP VMTP 111 IPX-in-IP IPX in IP 82 SECUREVMTP SECURE-VMTP 112 VRRP Virtual Router Redundancy Protocol 83 VINES VINES 113 PGM 84 TTP TTP PGM Reliable Transport Protocol 114 50 *** Confidential - DO NOT Distribute *** any 0-hop protocol Director Num Keyword Protocol Num Keyword 115 L2TP Layer Two Tunneling Protocol 134 116 DDX D-II Data Exchange (DDX) 117 IATP Interactive Agent Transfer Protocol RSVPE2EIGNORE 135 Mobility Header 136 UDPLite 137 MPLSin-IP Protocol 118 STP Schedule Transfer Protocol 119 SRP SpectraLink Radio Protocol 120 UTI UTI 121 SMP Simple Message Protocol 138 manet MANET Protocols 122 SM SM 139 HIP Host Identity Protocol 123 PTP Performance Transparency Protocol 124 ISIS over IPv4 140 to 252 125 FIRE 126 CRTP Combat Radio Transport Protocol 127 CRUDP Combat Radio User Datagram 128 SSCOPMCE 129 IPLT 130 SPS Secure Packet Shield 131 PIPE Private IP Encapsulation within IP 132 SCTP Stream Control Transmission Protocol 133 FC Fibre Channel Unassigned Use for experimentation and testing 253 254 255 51 *** Confidential - DO NOT Distribute *** Use for experimentation and testing Reserved Director Limitations on Warranty and Liability Net Optics offers a limited warranty for all its products. IN NO EVENT SHALL NET OPTICS, INC. BE LIABLE FOR ANY DAMAGES INCURRED BY THE USE OF THE PRODUCTS (INCLUDING BOTH HARDWARE AND SOFTWARE) DESCRIBED IN THIS MANUAL, OR BY ANY DEFECT OR INACCURACY IN THIS MANUAL ITSELF. THIS INCLUDES BUT IS NOT LIMITED TO LOST PROFITS, LOST SAVINGS, AND ANY INCIDENTAL OR CONSEQUENTIAL DAMAGES ARISING FROM THE USE OR INABILITY TO USE THIS PRODUCT, even if Net Optics has been advised of the possibility of such damages. Some states do not allow the exclusion or limitation of implied warranties or liability for incidental or consequential damages, so the above limitation or exclusion may not apply to you. Net Optics, Inc. warrants this Tap to be in good working order for a period of ONE YEAR from the date of purchase from Net Optics or an authorized Net Optics reseller. Should the unit fail anytime during the said ONE YEAR period, Net Optics will, at its discretion, repair or replace the product. This warranty is limited to defects in workmanship and materials and does not cover damage from accident, disaster, misuse, abuse or unauthorized modifications. If you have a problem and require service, please call the number listed at the end of this section and speak with our technical service personnel. They may provide you with an RMA number, which must accompany any returned product. Return the product in its original shipping container (or equivalent) insured and with proof of purchase. Additional Information Net Optics, Inc. reserves the right to make changes in specifications and other information contained in this document without prior notice. Every effort has been made to ensure that the information in this document is accurate. Net Optics is not responsible for typographical errors. THE WARRANTY AND REMEDIES SET FORTH ABOVE ARE EXCLUSIVE AND IN LIEU OF ALL OTHERS, EXPRESS OR IMPLIED. No Net Optics reseller, agent, or employee is authorized to make any modification, extension, or addition to this warranty. Net Optics is always open to any comments or suggestions you may have about its products and/or this manual. Send correspondence to Net Optics, Inc. 5303 Betsy Ross Drive Santa Clara, CA 95054 USA Telephone: +1 (408) 737-7777 Fax: +1 (408) 745-7719 Email: info@Net Optics.com / Internet: www.Net Optics.com All Rights Reserved. Printed in the U.S.A. No part of this publication may be reproduced, transmitted, transcribed, stored in a retrieval system, or translated into any language or computer language, in any form, by any means, without prior written consent of Net Optics, Inc., with the following exceptions: Any person is authorized to store documentation on a single computer for personal use only and that the documentation contains Net Optics’ copyright notice. 52 *** Confidential - DO NOT Distribute *** www.netoptics.com © 2008 by Net Optics, Inc. All Rights Reserved.