1
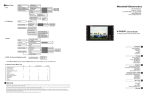
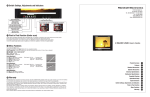
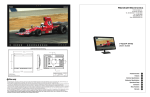
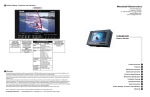
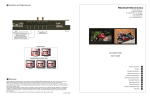
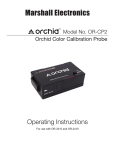
Marshall Electronics
Broadcast Multimedia Division
15” Rackmountable
LCD PANEL with
Audio
Marshall Electronics
El Segundo, California
www.LCDRacks.com
V-R151P
Table of Contents
6. Warranty
Marshall Electronics warranties to the first consumer, that this V-R151P rackmount monitor will,
under normal use, be free from defects in workmanship and materials, when received in its original
container, for a period of one year from the purchase date.
1. Installation ....................................................................................3
1) Before Installation ......................................................................3
2) Components ..............................................................................3
3) Operation ....................................................................................3
4) Tally ............................................................................................3
5) Mounting ....................................................................................3
6) Connections ................................................................................4,5
2. TV ..................................................................................................6
1) TV Mode Selection ..................................................................6
2) Value Default ............................................................................6
3) Channel ADD/REMOVE ..........................................................6
4) Air / CAble TV ..........................................................................6
5) Volume Adjust ..........................................................................6
6) Control Change ........................................................................6
This warranty is extended to the first consumer only and proof of purchase is necessary to honor the
warranty. If there is no proof of purchase provided with a warranty claim, Marshall Electronics
reserves the right, not to honor the warranty set forth above. Therefore, labor and parts may be
charged to you.
This warranty does not apply to product exterior and cosmetics. Misuse, abnormal service or handling, improper alterations or modifications in design or construction, voids this warranty.
No sales personnel of the seller, nor any other person is authorized to make any warranties other
than those described above, or to extend the duration of any warranties on behalf of Marshall
Electronics, beyond the time period described above.
Due to constant effort to improve products and product features, specifications may change without
notice.
3. Computer ......................................................................................7
1) Computer Mode Selection ........................................................7
2) Horizontal pan / Vertical Pan control ........................................7
3) Value Default ............................................................................7
4) Color Change ............................................................................7
5) Input Condition Control..............................................................7
4. Composite Video / S-VHS............................................................8
1) Composite Video / S-VHS Selection ........................................8
2) Value Default ............................................................................8
3) Video Mode ..............................................................................8
4) Volume Adjust ..........................................................................8
5) Color Change ..........................................................................8
5. Menu Tree ....................................................................................9
1) TV ..............................................................................................9
2) Computer ..................................................................................10
3) Video ........................................................................................10
4) OSD Control ..............................................................................10
5) System Control Menu Tree........................................................10
6. Warranty ........................................................................................11
Page 2
Page 11
INSTALLATION cont.
5. Menu Tree
1) TV
MONITOR
TV ON AIR
2) PC Monitor
CABLE TV
Page 4
Page 9
1. Installation
3) VIDEO
1) Before Installation
nBefore using your monitor, make sure to read this manual carefully. In case of any problems
with installation, contact Marshall Electronics.
nThe monitor should be handled with caution and not be exposed to impact or shock.
nThe display area is highly prone to scratches. Use cleaner suggested by the authorized
service center.
nDo not expose the monitor in high temperature or in high humidity.
nThere are no user serviceable parts inside your monitor. To avoid risk of electric shock, do not
open your monitor case!
2) Components
Rackmountable TFT LCD Monitor- 1 pc
DC Power Supply Adapter -1 pc
Power Cable 1- pc
Computer Cable 1 pc
4) OSD ( On Screen Display) control
Press Menu Select (System Setting)
use the UP, DOWN keys
3) Operation
Multiple Input Terminal
Select OSD U/D) or OSD L/R)
4) Tally
The V-R151P comes with a tally light installed at the top right-hand corner of the unit. The light
is operated by inserting a 2.5mm plug into the jack marked ‘TALLY’ on the rear of the unit. The
light will come on by closing the two contacts together. DO NOT GIVE POWER TO THIS
PLUG IT IS SELF-POWERED.
5) System Control Menu Tree
HORIZONTAL PAN
VERTICAL PAN
VALUE DEFAULT
CHANNEL ADD / REMOVE
TV=AIR CH
MODE
INPUT CONDITION
VOLUME ADJUSTMENT
BRIGHTNESS
CONTRAST
HUE
COLOR
PC
0
0
0
TV
COMPOSITE S-VHS
0
0
0
0
0
0
0
0
0
0
0
0
0
0
0
0
0
0
0
0
0
0
0
0
0
Page 10
5) Mounting
The V-R151P is designed to fit in a
EIA standard 19” rack. It requires 6
rack units of vertical space and is
secured with eight screws. It may be
necessary to center the unit up or
down so that it does not touch any
adjacent units when the unit is tilted
up or down.
Page 3
2. TV Mode
3. Computer
1) TV Mode Selection
Press
(INPUT) Using UP, DOWN keys
1) Computer Mode Selection
Press
(INPUT) using the UP, DOWN keys
(MONITOR) and than press select.
(TV)
2) Value Default
Press
(SYSTEM SETTING)
(VALUE
DEFAULT System control values will be initialized as this monitor is
originally manufactured.
3) Channel ADD / Remove
Press
(CHANNEL ADD/ REM) when you select a
channel which has already been added, (ADD/REMOVE) will turn into
(REMOVE) to remove the channel from your favorite channel list. To
add the channel,
(ADD) and press
.
4) Air/ Cable TV
Press
(AIR) or (CABLE)
(SYSTEM SETTING)
(TV)
5)Volume Adjust
Press
(VOLUME ADJUST) Use UP, DOWN keys
press
(If you press
before pressing
, volume
adjust will become invalid.)
6) Color Change
Press
(COLOR CHANGE)
one of 4 modes
to set you can control
sub-menu with UP, DOWN keys
press
sub-menu (4 color mode) will appear repeat the
above steps until you have settled color change press
when you press
, you will be asked whether (SAVE YES) or to
(SAVE NO)
one of the two options.
(If you press menu before selecting (SAVE YES,) color change will
become invalid.)
Page 6
press
2). Horizontal Pan / Vertical Pan Control
Press
(HORIZONTAL PAN ) or (VERTICAL PAN) control
(HORIZONTAL PAN) or (VERTICAL PAN) by pressing the UP, DOWN keys.
3) Value Default
Press
(SYSTEM SETTING) press
(VALUE
DEFAULT) press
(System control values will be initialized as this
monitor is manufactured.)
4) Color Change
Press
(COLOR CHANGE)
one of 4 modes to set
you can control selected sub-menu with the UP, DOWN keys press
sub-menu (4 color mode) will appear repeat the above steps
until you have settled color change press
when you press menu,
you will be asked whether (SAVE YES) or (SAVE NO)
one of the
two options.
Color Change sub-menu will be limited to Brightness/Contrast only.
(If you press menu before selecting (SAVE YES), color will become invalid.)
5) Input Condition Control
Press
(SYSTEM SETTING)
(INPUT
CONDITION)
one of the five modes to set.
Control the selected sub-menu with Select key
After tuning is settled, use
key to escape from menu tree
Page 7
INSTALLATION cont.
4. Composite Video / S-VHS
POWER SUPPLY
1) Composite Video / S-VHS Selection
By Remote Control
Press
or
on remote control directly.
By Menu key
Press
(INPUT) using the UP, DOWN keys
(S-VHS) and than press
press
(COMPOSITE) or
2) Value Default
Press
(MODE) press
(NTSC) or (PAL) depends on manufactured country Video Mode will not work on (TV) and (Monitor)
3) Volume Adjust
Press
(VOLUME ADJUST) use the UP, DOWN keys press
(If you press menu before pressing select, volume adjust will become invalid, )
CAMCORDER / Composite Video / DVD
4) Color Change
Press
(COLOR CHANGE)
one of 4 modes to set you can control
selected sub-menu with the UP, DOWN keys press
sub-menu (4 color mode will
appear repeat the above steps until you have settled color change press
when
you press
, you will be asked whether (SAVE YES) or (SAVE NO)
one of the
two options.
(If you press menu before selecting (SAVE, YES) color change will become invalid.)
S-VHS
Page 8
Page 5